Leaderboard
Popular Content
Showing content with the highest reputation on 02/17/21 in all areas
-
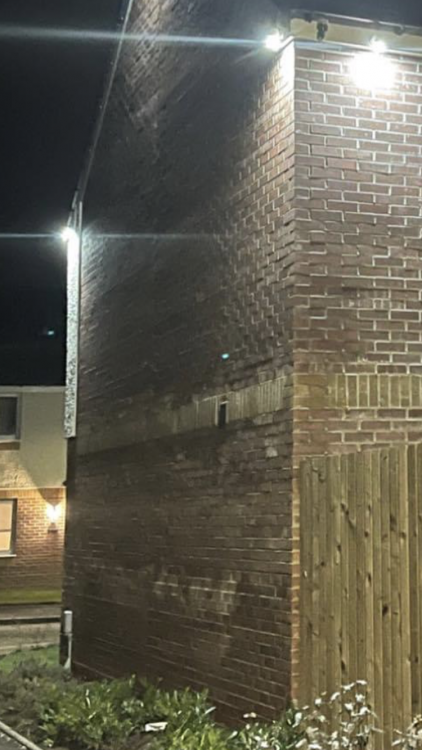
If you get on OK with them, ask what they think would be best. It needs something to stop the wall just getting soaked.2 points
-
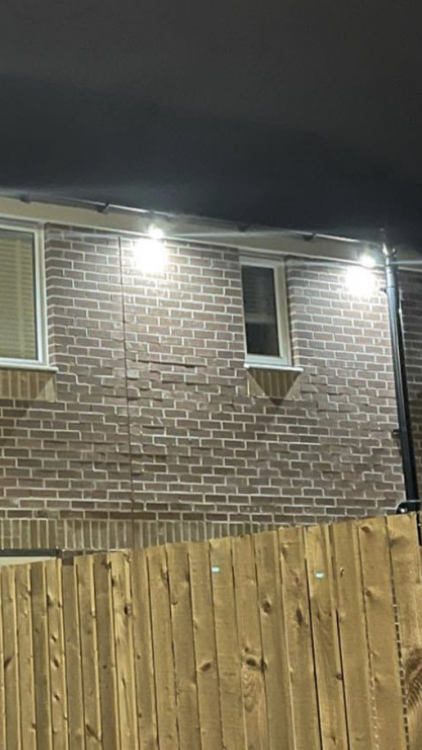
It is not your problem to fix it properly. I might just hide it all behind tall fence panels and let them worry about where the water goes and what rots until they are willing to sort it out properly.2 points
-
Calculating the heat losses between each room of the house, as well as any losses to the outside. From this the heat emitter sizes, and at what temperatures, they will operate best at, can be calculated. From this the heat source can be sized correctly. It is the same as going an external wall, floor, window, door and roof heat loss, except some rooms will have different temperatures i.e. living rooms and bedrooms. It may seem a bit of a faff, but it should help with setting a system up.2 points
-
My thoughts, ASHP is a viable source of heating and works, and solar PV gives you free electricity to reduce your bills. Both are good modern building ideas not "bling" I am far less convinced about rainwater harvesting. Perhaps that's because I live in a sparsely populated area with plenty of rainfall not renowned for water shortages or droughts. Perhaps if i was still in the SE where hosepipe bans were common when you got more than a week of sunshine, it might start to make sense to prop up the failing infrastructure a bit.2 points
-
Vertical battens, no counter batten required horizontal batten, counter batten required. The battens ideally should go through the osb and into the studs for extra support.2 points
-
1 point
-
Yeah, that’s a fanny trap, so will keep the smells out.1 point
-
I would build a fence totally independent of it, not touch it, fix to it otherwise they will blame you for any future water damage1 point
-
That is shocking, I can lay bricks better than that, and I’m not a bricky1 point
-
It looks like a cavity wall and that plastic has tears in it so the cavity will get wet!!!.1 point
-
Not very pretty is an understatement, I’m surprised they were able to build that.before you do anything to the wall you need to sort out the water issue. Maybe show your neighbor that photo let them see what you have to look at every day and see if you can come to some agreement. I’d probably try taking there copings off and make them wider bridging your wall with a bit of overhang,might keep water away. Regards. James1 point
-
Baton it and vertical timber clad to high enough to block it from view, and paint it your colour of choice! May be cheaper than render, and can't be blamed for any damp problems they may have.1 point
-
Absolutely honking having to look at that garbage when chilling out in your garden. I feel for you, as much as its their responsibility I suspect they don't care. So to get rid of that hideous wall some clever hiding needs to be done. Fence panel with trellis and some climbers going up it?1 point
-
Forget the blockwork, I would not want to live where you are jammed that close together with such tiny gardens, and where everyone feels the area is dodgy enough to have such search lights outside their house. Once you have lived in a detached house in the countryside with 1/3 acre garden, there is no going back.1 point
-
Wot a bodge, I was going to say fix a large facia board over that crap at the top but they have plastic sloping your way so “their” water will run down your wall!!!!1 point
-
The brick work makes me think of a new pub near me where brick work is like that to make it seem old. Reminds me of this recent story https://www.google.com/amp/s/www.thesun.co.uk/news/13846220/builder-sacked-after-sharing-video/amp/1 point
-
So, I've spoken to the LPA, Punter is correct, but it turns out we are fine, thankfully. Although I said we expect to take up to 5 years, we are planning on getting the barn water tight this year with first / second fix next year. It is only the internal decoration that is likely to take up to 5 years and the LPA said that's not a problem, the time is just for the building to be habitable and signed off. We only have to have bathroom / kitchen / bedroom / living area for that, the spare bedrooms 2nd bathroom etc. can take longer.1 point
-
1 point
-
1 point
-
We use water heavily in summer as we have a large kitchen garden and fish pond. We are putting together a collection of IBCs that will see us through (we hope) the hottest part of the summer. We regularly empty out some water from the pond to water the kitchen garden and are intending to replenish from the IBCs. It is a big pond with very large koi carp. We also have a problem with flooding at the front of the plot and the soak away is in the front paddock. Our thoughts are to reduce the water going into the soak away as much as possible so that the water coming off the drive can soak into the front paddock instead. We have also widened the ditch bordering the plot at the front to cope with excess rainwater. We have five IBCs set up in series collecting water from the house. This will be used to water the (yet to be created) flower beds in the front paddock. We will have two more in the front paddock collecting water from a shed. Two IBCs on one side of the “car port / shed / utility room” and one on the other (a symmetric roof). Five more IBCs in the kitchen garden. We know we will be pumping water from one place to another to get it where it is needed and create capacity in the collecting IBCs but putting it all together we are hopeful it will work for us. We do not intend to use any of the water collected for use in the house - it is all for the garden / pond.1 point
-
IBCs will quickly collapse if buried without a retaining structure which will cost you more than an underground tank. I did build an IBC DIY solution but happened to have a concrete retaining structure already built as part as our basement egress. As above, quite often you need some RWH to satisfy the regulatory water calc. I would not invest further in a parallel toilet flush capability as that will incur further cost (duplicate piping, plumbing labour etc) plus backup mains tanks etc. Use it for the garden with a cheap submersible pump and get the tank in the ground when your other groundworks are happening and there is plant on site.1 point
-
Our M+E chap said just say you are putting pressure limiters on the showers etc. Obvs don't fit them ? Simon1 point
-
I would remove the door and frame and use concrete blocks tied to the existing wall to fill the hole.1 point
-
My bathroom walls and ceiling are 12.5mm moisture resistant on 400mm centres. Will it fall down? ? The upstairs 4 rooms in the dormer are 9.5mm pb on walls AND ceiling. The proverbial plasterboard tent.1 point
-
The requirement in part g is self cert. Just a note from you saying that the dwelling meets that standard. Done.1 point
-
I also would've failed this if it wasn't for the RWH tank. the main thing for us for the RWH was (to quote @ProDave as I don't think I could've said it any better) "prop up the failing infrastructure a bit". basically to allow those who don't or can't get water in a drought period to get it from the mains as we won't have to (as much).1 point
-
1 point
-
If you don’t have a Ltd company there are things that a self builder has to pay VAT on, such as architect and structural engineer fees that a Ltd company can avoid. The reclaim scheme is supposed to put a self builder in the same position as a commercial builder but it really doesn’t. Plus if it’s not a self build, eg built to let out as in this case, you can’t reclaim VAT via the reclaim scheme so to avoid any VAT all work must be done by a VAT registered builder on a supply & fit basis.1 point
-
Seconding what @Mr Punter says, setting up a LTD company is really very simple, you can do it online during a coffee break. Structuring and running a company or companies successfully is an entirely different matter and something I'd recommend you always get advice on before taking the plunge, especially since your project involves your respective (multi-party) individual assets and their development. For example, you need someone to provide the grim but valuable advice about how to extract yourself should your friendship deteriorate and other such realities etc. I don't mean to sound negative but I've spent nearly 10years working with start up companies and entrepreneurs so learnt much about how things can shift from lucrative dream to unworkable dynamics, not to mention the challenges of setting up good financial structure and management.1 point
-
I recently replaced my temporary kitchen. My temp kitchen was installed to get a temp occupation certificate, to allow my builder to handover the house to me and for me to occupy then self fit the proper kitchen. As there were minimum cubic metre storage requirements I made sure I found units that were cheapest to achieve the min storage requirements. in the end i went with IKEA carcasses units without doors. I did find the IKEA legs expensive so used cheap ones from toolstation but I’ve got a funny feeling the IKEA leg proces have reduced to a sensible price. IKEA do cheap worktops too, if you are really trying to keep costs down you could always go without unit doors. Depending on what your priorities are - look or cost.1 point
-
The yachtsman in me views West Systems epoxy as a wonder glue. I have previously concluded that builders do not understand ropes, tarpaulins or epoxy glue ? Previously on this forum expert builders had told me my tarpaulin roof would not last 24 hours. Two months later it is coping well, must be due to all that practice I had tying down winter boat covers.1 point
-
1 point
-
No 1, before the installers leave, get them to show you: How to set the times that the heating and hot water are on and off How to set the hot water temperature How to set the heating water temperature How to set, turn on, off or adjust any anti legoinairs program be ready with a load of post it notes to mark the relavant sections in the user manual as they explain it to you.1 point
-
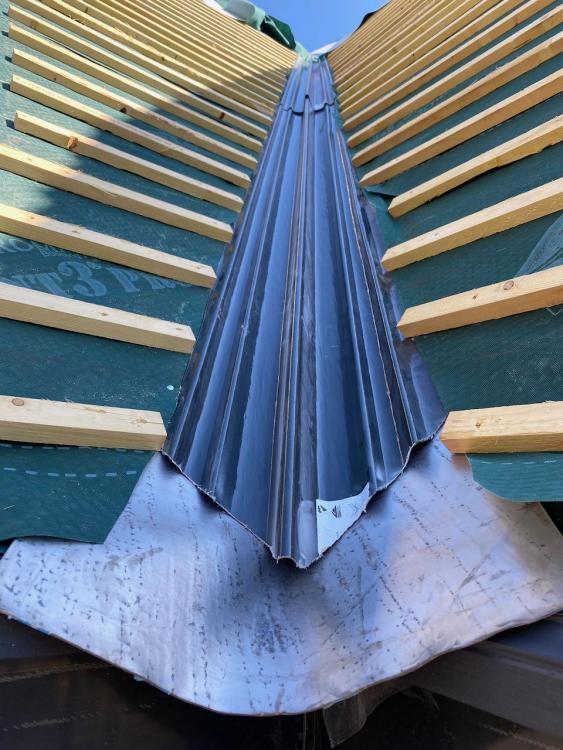
Are these mitres the overlaps on the ridge or the intersection junction of the ridge and hip ends? The following video shows a pro leadworker shaping and fitting roll top ridge flashing onto a bay window canopy. I like the way he shapes the sections on a portable moulding at ground level. The fixing straps are odd, the straps appear to be a copper/lead sandwich.1 point
-
Yes it was a faff, I used roofing membrane, no tape, tacked to the blockwork and render over. I sometimes wish I had bolted a wall plate (with slurry mix behind) to the external walls at joist ends and hung the joists from that, less faff and work and only needed on the walls at ends of joists, not internal or side walls . Resin threaded rod into block work will also make it airtight. Yet another method would be using built in joist hangers that hang on the blockwork if the blockwork joint is at the right level.1 point
-
Just dusted off my heat loss calculations and my old budget spreadsheet. I’ve got current ASHP and UVC prices, but am struggling to find current Sunamp UniQ12 prices (solar PV). Anyone got a current price of Sunamp ?1 point
-
How much will it cost to get your house connected to the grid? The quote I had was £24k, so spending anything less than that meant that the payback for solar was immediate. Also the panels plus mounts are £116 for about 2 sq.m. and slates were quoted at £40-60 per sq.m. so depending on the quality of the slate chosen installing solar panels cost no or little more. I'm installing rainwater harvesting for eco reasons and I agree that on straight cost terms it's not worth it. I also don't think my air to water heat pump cylinder, at just over £2k, can be cost justified over a standard cylinder which would be around a thousand or less, particularly since for over 6 months a year I won't be able to use half the solar energy that I could potentially produce so a standard immersion cylinder would be fine. But again it's a long term eco thing. Installing and air to air heat pump for heating and cooling, at around £1500, is for comfort so again there is no monetary payback from it. But what price do you put on being cool in the summer?1 point
-
I have to watch the costs of my build so there does have to be an economic aspect to everything. Things don't have to necessarily "pay for themselves" but they do need to have some intrinsic benefit over and above the eco aspect. Solar PV makes sense to me for instance because the house should self use most of the power and thus pay back in 3 years (no mains gas etc...). Installing the PV wasn't particularly expensive and allows other expenses to be saved from the build. E.g. I can trade 7000kWh per year of "free" electric against the cost of say fitting more efficient but expensive heating. Rainwater harvesting does indeed fail the cost benefit analysis if i were to buy a kit of parts, and I can see little way for it to displace any other build costs. I will still do it but the system will definitely be done on the cheap. Happy to share the maths behind my (somewhat crackpot) plans in a couple of days when I am less busy with windows and scaffolding.1 point
-
The ply orientation will not make any odds. You could use OSB if there is no ply about. Any glue will be OK or none if you don't have any. This is prob mostly a detail that get omitted but your drawing looks fine. Get on with it before someone felt and battens and you can't get to it.1 point
-
No, they are for the ridge. No We did this on my hip roof just using 4x2 across the corner, good detail but think epoxy glue etc may be overkill just annular ring shank nails into the wall plate ?1 point
-
No one is going to come in to spend maybe an hour on welding unless you are going to massively overpay them. I've been working with lead for 13 years and dressing/bossing is not something you will learn in a couple days/weeks. You need code 6 upwards for lead ridges. I highly suggest not using lead or getting a professional in for it.1 point
-
I’d be starting to think about getting a different roofer If the roof leaks he may tell you to get an umbrella ☔️1 point
-
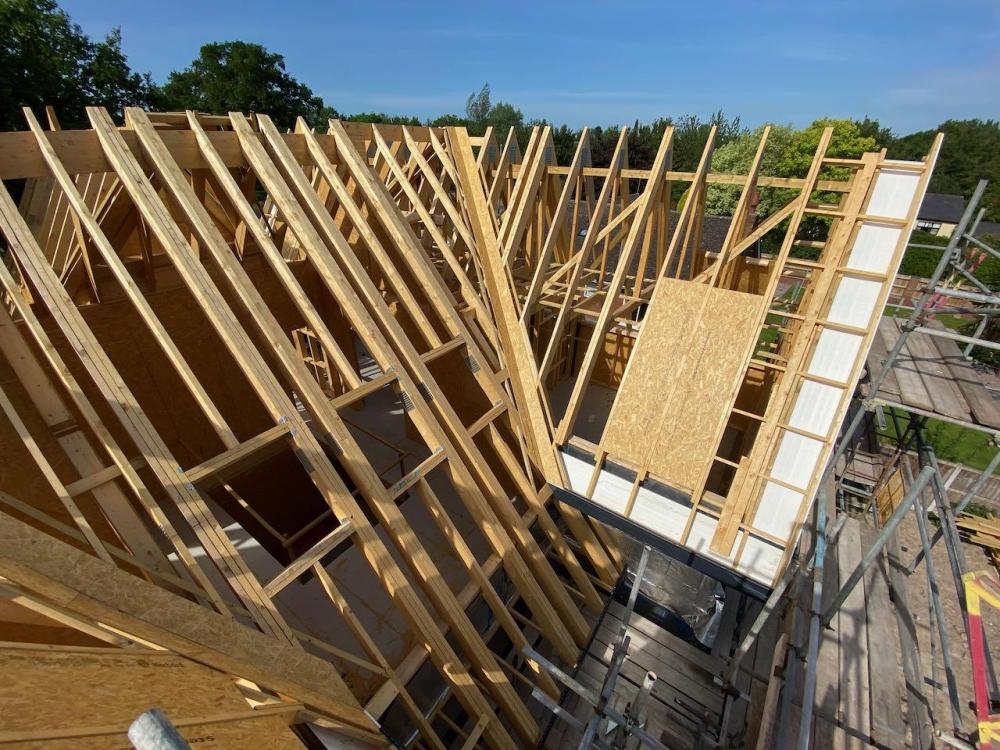
I have lots of valleys in my complicated roof and valley boards and noggins were always a requirement for everyone involved in the build. They weren't part of the scope of the timber frame contract but I paid the frame erectors directly for a couple of extra days to put them in. They also needed to put in noggins between the rafters so the roofer would have somewhere to fix the ends of the battens as they run into the valley. This is a photo from last year just before the roofer started. They used a ridged GRP valley trays, but still needed the valley boards. This is one of the valleys mid-way through felting and battening. I too can't really see how the trusses would provide any additional support for the valley or how you can go without valley noggins as otherwise the roofer won't have anywhere to secure the end of the battens (perhaps they just don't get fixed at the end?). Do you have a photo of the roof as it is without the valley boards?1 point
-
I am struggling to understand how reinforcement backing for the valley can be designed into the trusses. Did your roofer simply lay a grp valley across the tops of trusses 600mm apart? My roof has a valley but the design and the carpentry to create the valley is down to me and was outside the scope of the truss design. This remains an unresolved question for me hence my interest in your thread. (I am not an expert)1 point
-
Unless the UFH pipes are directly under the finished floor, in aluminium spreader plates or other such purpose made diffuser, this is not going to improve ever. Ive seen umpteen ‘builder executed’ UFH fack-ups, including UFH pipes just loose under the floors in the joist voids, boiler set at 80oC and TMV set to max flow temp etc. It’s really unbelievable that anyone thinks they can just throw this in ( especially when it is a heat pump install ) and it’ll work. This is a ‘floor up’ job by the sounds of it.1 point
-
@TheMitchells thanks for your kind words. Yes, please feel free to get in touch. We about 3/4 year living in the house and we are loving it. I'm tempted to re-open the blog up or start another as we are starting some garden projects soon. Favourites shots since the last entry! One from autumn And the winter1 point
-
I think you already answered this. 1/ for whatever reason, the evidence is that people regularly install poorly designed systems that under perform 2/ so we can deduce it's hard to design a system that is guaranteed to work well 3/ most lay persons (and self builders) lack the skills and experience to be sure they can design their own system. It's probably the only system they'd ever design so not worth formal training on how to DIY it 4/ there's a dire shortage of professional system designers with proven track record. RHI is explicitly designed to solve #4 (NOT to reduce cost of ownership, as people tend to think) which in theory is the way we (as a country) get out of this conundrum BUT it puts up the "up front" cost of ownership, which combined with the drawbacks listed above makes it extremely unattractive idea to the cautious customer1 point
-
Doesn't really work like that - there's a very long thread with lots of formulae and arguments about this subject. The wall should be considered as a single thermal element, where the concrete is in the profile, doesn't really matter. It's an order of magnitude cheaper to put a 40mm sheet of PIR on the inside vs a 100mm sheet of EWI grade EPS on the outside.1 point
-
our cavity was filled with 200mm of dritherm 32 (two 100mm batts), some we’re worried about not having an air gap behind the brickwork but it has a BBA certificate for full fill cavity work. The blockwork was parged with a slurry mix, then cement render then plaster finish. Around timber joists In the brick work the ends were wrapped in breathable membrane and pinned under the cement render, even between floors before the ceilings and floors were installed ( read up about the “Tony tray “as a variation but mine did not create a slip plane.) Cables in walls were sealed at back boxes with silicone. We had a warm roof, lined with 11mm OSB bubble glued together and sealed to the wall with expanding foam. The only leaks found during the airtest were a couple of windows not sealed to walls as well as I would have liked (can’t blame anyone I did this ?).1 point
-
you mean a mtere that you will then charge the new owenr for the water i would not buy a house with that agreement --you might change your mind and cut me off who knows how friendly you will be with the people in the farm by then . I am sorry but i am stopping replying to this thread you seem determined to make problems for your self in the future ,by being so penny pinching now the plot needs to be a separate title and defined boundaries to the farm ,with its own access and services --anything else is just asking for problems time passes and peole especially relatives can do funny things you have no RIGHT in law to a wayleave for services,its an agreement --so get it sorted out now1 point


