Leaderboard


Popular Content
Showing content with the highest reputation since 02/12/25 in all areas
-
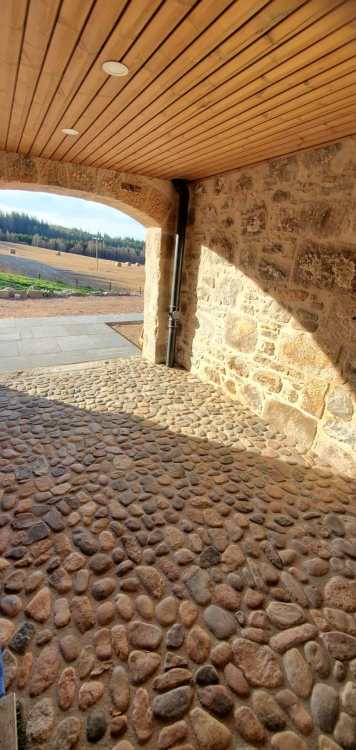
I'm so pleased with the way this turned out. It is a covered way through the whole width of the wing with the main glazed entrance behind the photographer. The floor is entirely of harvested glacier cobbles. These were formed when the glaciers had streams running beneath them, rolling stones along and forming these shapes. The cobbles are in bands in the sand , and were recovered when digging foundations and drains. They were carefully selected from a huge pile, one by one, for size and being flattish on one face. Most are rounder than these. The right hand wall and the arch are original, repointed in lime mortar. To the left, off camera, is an original timber clad stud wall, including a door, retained for heritage and interest, but there is a new wall behind it. There are pencil writings on the wood cladding, concerning numbers of sheep etc. Everything done by my daughter and SIL. 'except the straw bales' as they put it.
 28 points
 -
I should probably start a blog for this sort of thing, but I just wanted to let y'all know that we finally got planning permission - 4.5 years after buying the site, after one application with a committee hearing, and the latest application that took nine months to determine. Thanks to everyone on here for their help, advice, and nudges on expectation alignment!15 points
-
By way of background, I am the very aged IT geek that has done all of the SysAdmin since we first set up BuildHub about 9 years ago. I am no longer involved in Forum Management or politics; I just in keep the forum up and smoothly running, pro bono. i have also administered and run a number of community forums and wikis over the last few decades, mostly using open source forum packages such as phpBB and MediaWiki. However when the founding members set this forum up, we decided to use a commercial Forum package (there was a one-time purchase, plus an annual maintenance fee), because this customer funded business model offers us a better feature set and continuous through life improvement. We chose the forum app from the company now called Invision Community. This a PHP application that runs on a LAMP stack on a hosted Virtual Private Server (VPS). The VPS has grown in cores / RAM / storage over the years as the size of the forum and its user population have also grown. Three years ago, I moved the LAMP stack into a Docker Compose project, and the VPS runs this single dedicated Docker Project which is on open Github. If you want to know more then read the README at Github: TerryE/docker-buildhub which explains the setup. Our Hosting Provider is currently doing an infrastructure refresh so we have to migrate to a new VPS and at the same time I am retiring the use of Docker and switching to the open-source equivalent, podman. See this issue, if you want to know more: A Gemini Conversation about Migrating VPs and switching to podman. Warning: it's a bit long (17 pages) and technical, but it lays out the issues and context. This topic is just to keep interested members informed. Any technical discussion / comment is welcomed. I have opened a companion topic in Forum News and Site Issues: Rehosting the Forum Virtual Server to discuss the more general / policy aspect to allow this thread to focus on the nerdy stuff. 🙂 Can I ask you all to keep to the technical discussions here and use the companion topic for general / policy stuff. @TerryE is my user account but I also have the Godlike @Admin account to hide / delete off-topic posts if the mods don't move them to the general topic. 🤣😱7 points
-
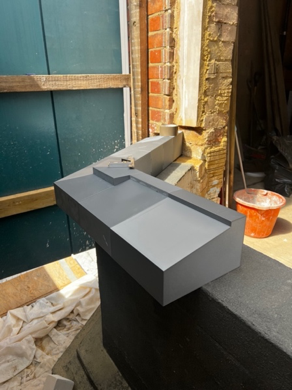
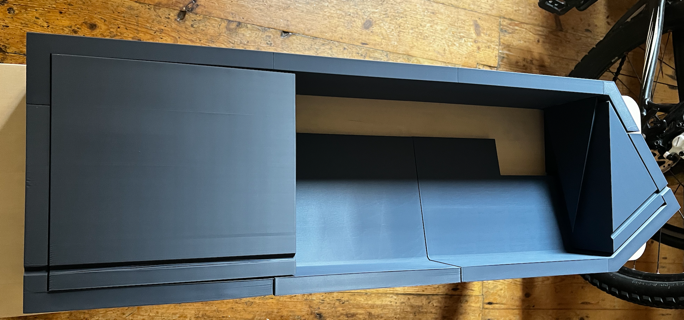
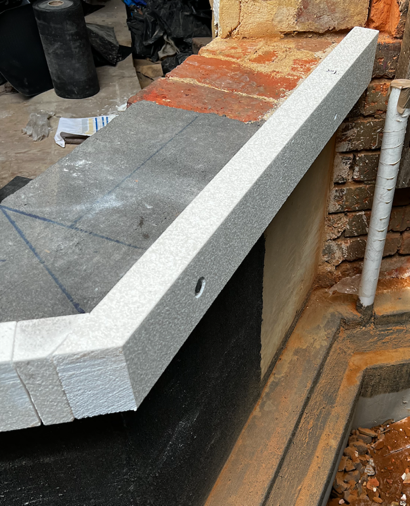
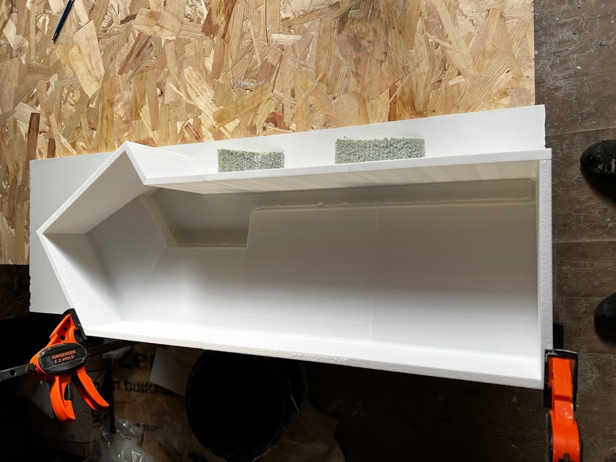
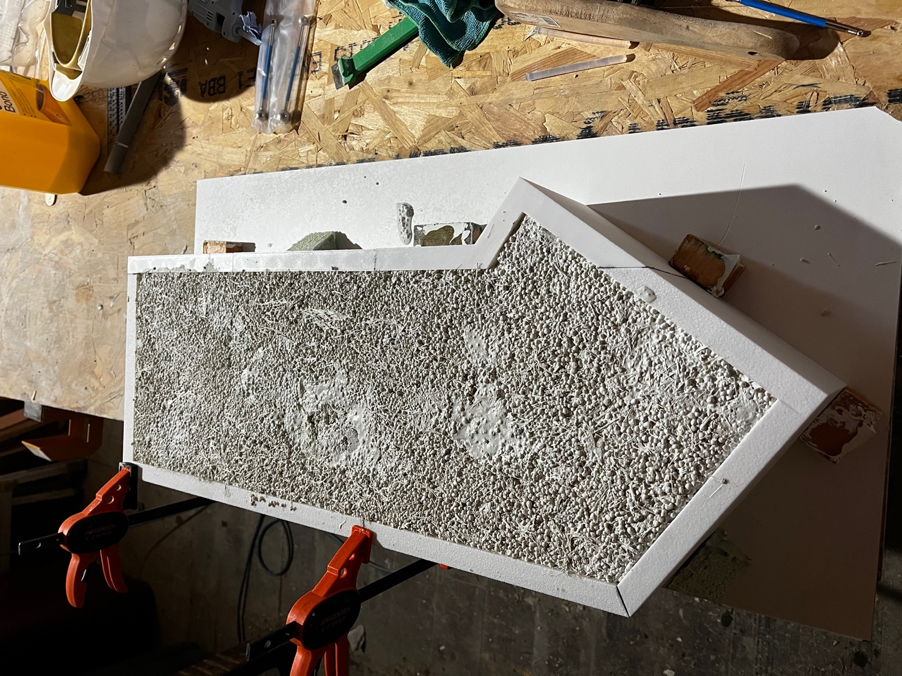
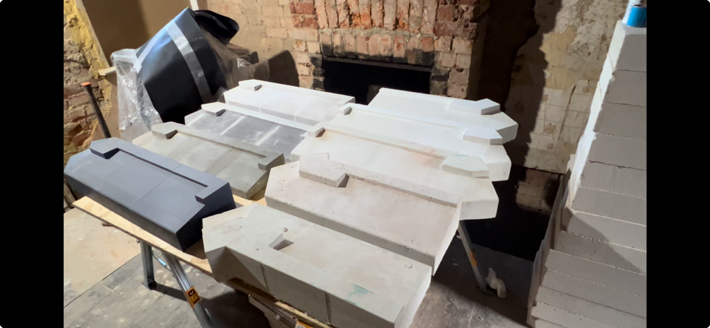
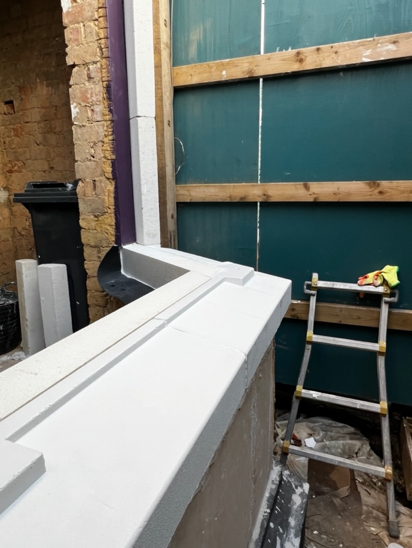
We’re rebuilding a Victorian bay window with a focus on thermal efficiency and restoring some period detail. To achieve this, we designed and cast our own bespoke window cills using GFRC, 3D printing, and innovative materials like glass bubbles to reduce weight and improve insulation. This post shares our design process, casting experiments, lessons learned, and the final results. Design I used SketchUp to produce the design for the side and centre cills. The bay has external wall insulation so the cill was designed deep to accommodate 10mm aerogel, 50mm PIR, render and the offset from wall. The 10mm aerogel was something I wanted to try out, and doesn’t add much compared to just using 60mm PIR. For some reason the grey versions of aerogel with a 0.015 thermal conductivity are not easy to find, so settled with the 0.019 grey blankets. We are targeting below 0.15 U value. The EWI gets us to 0.16 with additional internal insulation needed to be below target. The cills themselves are a thermal bridge 210mm deep then 100mm of structural insulation for a 0.34 U value, I haven’t yet decided on the further internal insulation to get below 0.15. I am trying new things out with this and will try VIPs. I have a budget for trying out new insulation. 3D printing The first concept of the design was printed out in a 3D model, including a wall return, stools for the jambs and mullion and underside drip. And later its mold to test the casting process. Structural insulation The plan was to install the cills on the exterior half of the wall, then given the deep cills a section of structural insulation was fixed into the wall to provide some support for the cill in case they were used as a step. Here this is fixed to the top of the wall and replaces the 50mm of PIR which otherwise would have been used. Casting Once the cill designs were done, I made a mold of the cills for casting with concrete and sand. The mold was 3d printed and via some experimentation manage to find a way to get a stone effect for the face coat. The idea of casting my own cills started while looking at GRFC concrete countertops, so my mix included glass fibres. The hope is that they prevent cracking, but the cills are already substantial so they probably don’t need them, but I kept with my original mix design. I don’t think the glass fibres added much to the process, except additional complication. If its reduces cracking then that’s helpful. Glass Bubbles I later tried an experiment using glass bubbles. Half the sand was substituted for glass bubbles to improve the thermal efficiency of the cills, (only a little) but its main advantage was in reducing the weight so it was possible to move the cills around with some ease. It also helped reduce deliveries of the sand. I was using a white sand which was an annoying bulky delivery. The glass bubbles tended to rise to the top of the mix, here the top is the bottom of the cill which was problematic for creating a flat surface. I later experimented with covering this to produce a flat surface but I manage to instead amend the mold design to be fill from its back. The advantage of this was that the slightly uneven surface was in an area where it didn’t matter and also the glass bubbles would be situated more evenly towards the back of the cills thus helping with the thermal efficiency of the cills on their internal side. Test casts I had about eight different cills cast before being totally happy with the design and the casting process. I experimented with using cast stone dust, but with a bad result (probably from my poor face coat application) so I moved away from a “bath stone” look to a white to be further finished. Completed Cills Once the cills were done, I was able to see how to progress upwards for the rest of the bay window. At the start we were happy to accept the bay would be a thermal bridge requiring lots of internal insulation. The benefit with this design is that much of the insulation is now external saving on the floor space. It took some time, which I have and I am happy with the result. Since I installed the jambs and mullions and making the header/lintels copying the original design in the area. Plus the cost is much reduced. The original plan was to spend 30k on the bay window build, as a standard build, that cost without windows relying upon insulation being done separately afterwards. Instead we have managed to spend 5k on tools and materials, including £500 for a 3d printer but lots of my time.

 7 points
 -
Good morning. Been quite some time. I doubt anybody will remember me, but I used to enjoy participating on the forum. Only reason I disappeared a couple of years ago was, wife got ill, and to be honest, I found myself getting depressed. I don't think I even realised the depression, until I came out the other side.....I have missed giving Pocster a hard time for his solweld skills though. I hope all of your projects are going well. I must say, I'm looking forward to being back. The skill and knowledge level on the site has always been fantastic. Together with the willingness to share that knowledge, and the pitfalls, and good times. The only thing that would be useful to me at the present time would be if anybody has any recommendations for a really good planning consultant in the Hertfordshire area. Anyway, I look forward to participating again in this excellent forum. Best of luck to all. Regards Jim7 points
-
Folks, We are on our self-build journey, we selected timber frame then short listed 4 suppliers and in the end chose MBC. They erect our medium complexity house in 8 working days - very impressive. I think MBC's strength is their experience which shows in the detail / thought in the design office and the efficiency of their erection teams. Our site is constrained so working out the order to deliver materials, how things are stacked, the order that things are lifted by the crane is complex. The team didn't seem to make any mistakes and just kept working, rain or shine. [To confirm I'm just a paying customer and have no other association with MBC]6 points
-
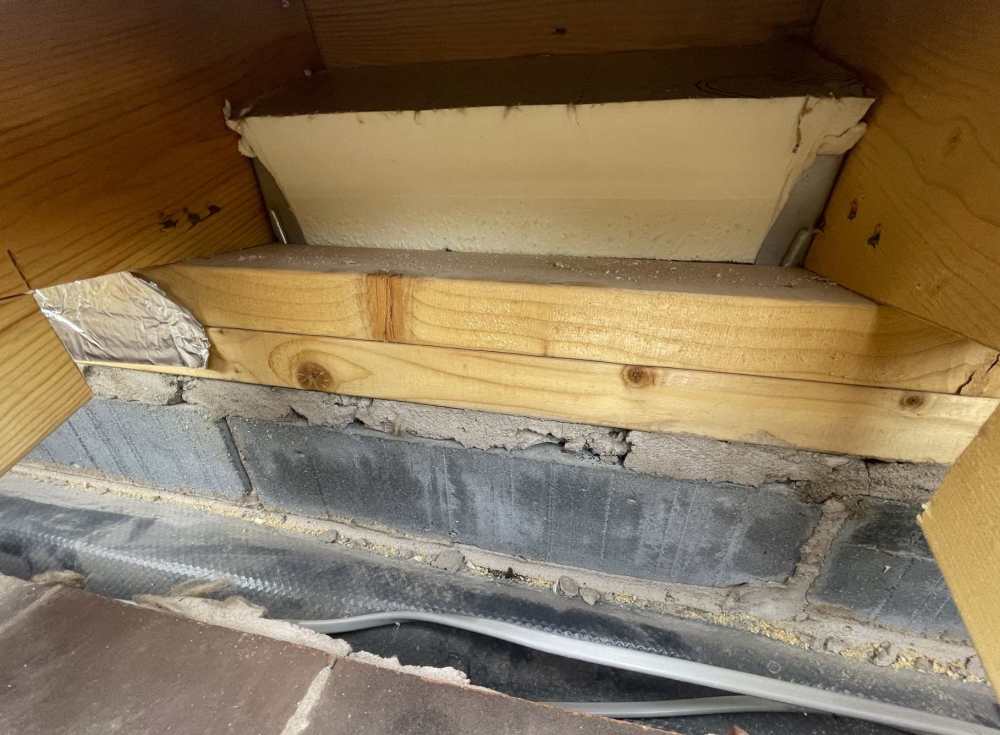
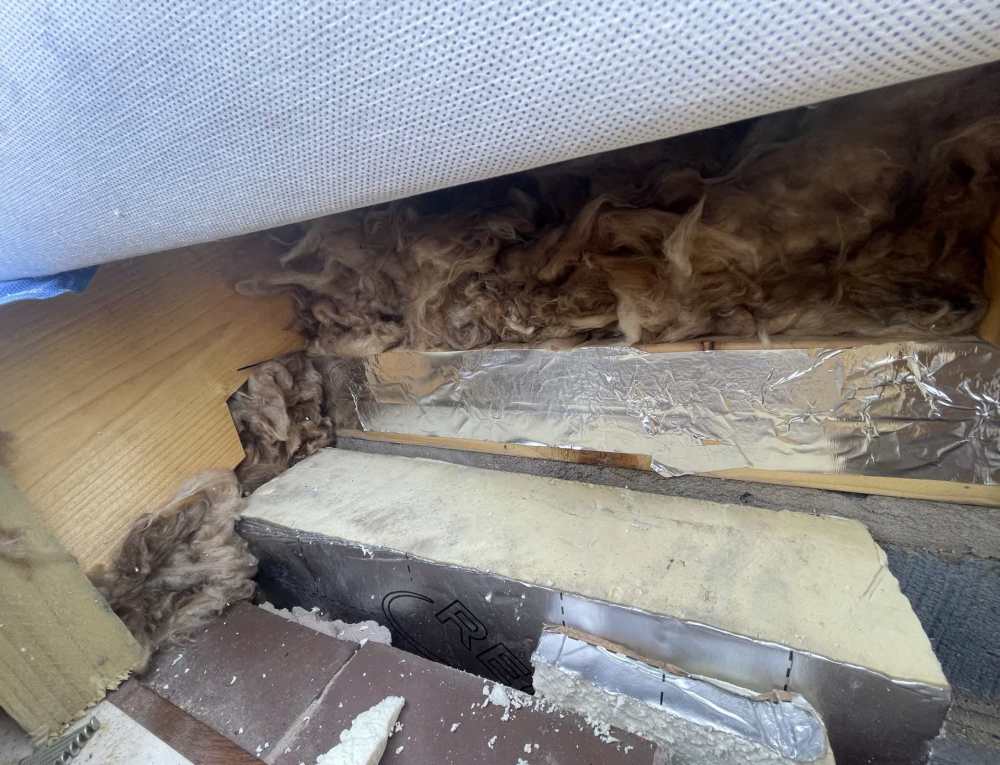
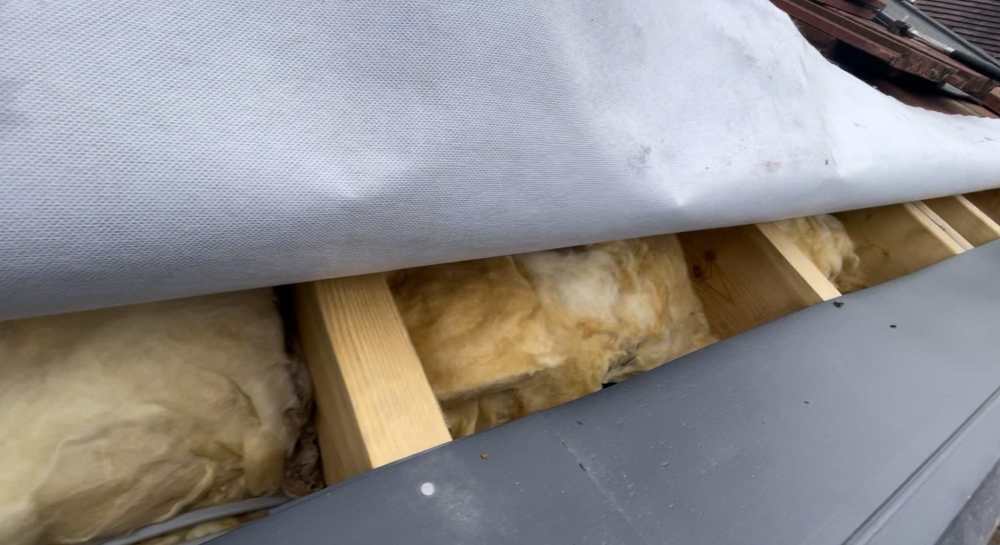
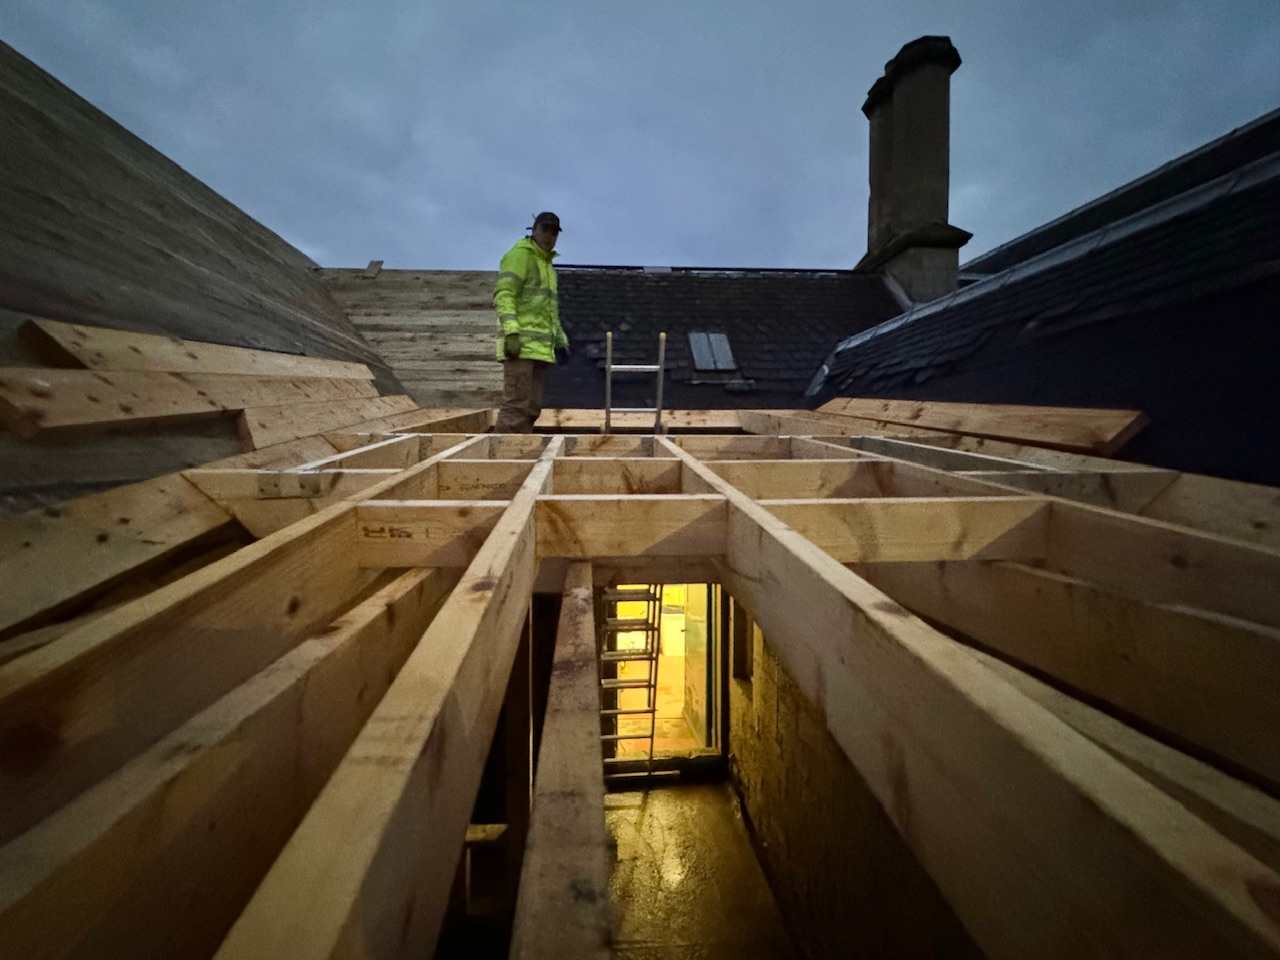
Brief update on this one just so the thread and any other troubled onlookers are aware. I've now gone through and inspected the eaves detail for everywhere I can for this extension. Found some horrifying things and insulated it the best I can. Those steps being:- :- Remove all poorly seated wool covering wall plates. :- Seal all gaps between ceiling PIR and wall plate with wool / foam/ tape. :- Reinstate PIR insulation where there was none :- Form Wedge to force wall PIR to be uptight against block :- Seal all gaps between Wall PIR and block with wool / foam / tape. :- Reseat wool covering wall plate and all sealed areas. I'm very pleased to report that this has made a huge difference. I have not had chance to put my thermal cam back on, but you can feel it in the room. It's actually retaining heat through the day now, heating on in the morning for a few hours and you could still feel the residual heat in there by midnight. Perhaps i'd got used to having essentially balls-all insulation in there so im hypersensitive, but very promising so far. and that's without any form of curtain / blinds etc. All the glazing (of which there's lots) is still entirely bare. Not to say im going to stop there, I will be still removing all the roof to fully seal it and add more insulation. But atleast now my horrifying suspicion that I may need to add interior insulation in an already finished room... has been quelled. I'd REALLY hoped I wouldn't have to do that and it looks now that i wont have to, so im very glad for that atleast. Id rather spend the time and money on further improving the roof, glazing and adding exterior wall insulation to the walls if I need to. Anyhow, some more images of fixes for future ref for anyone.
 6 points
 -
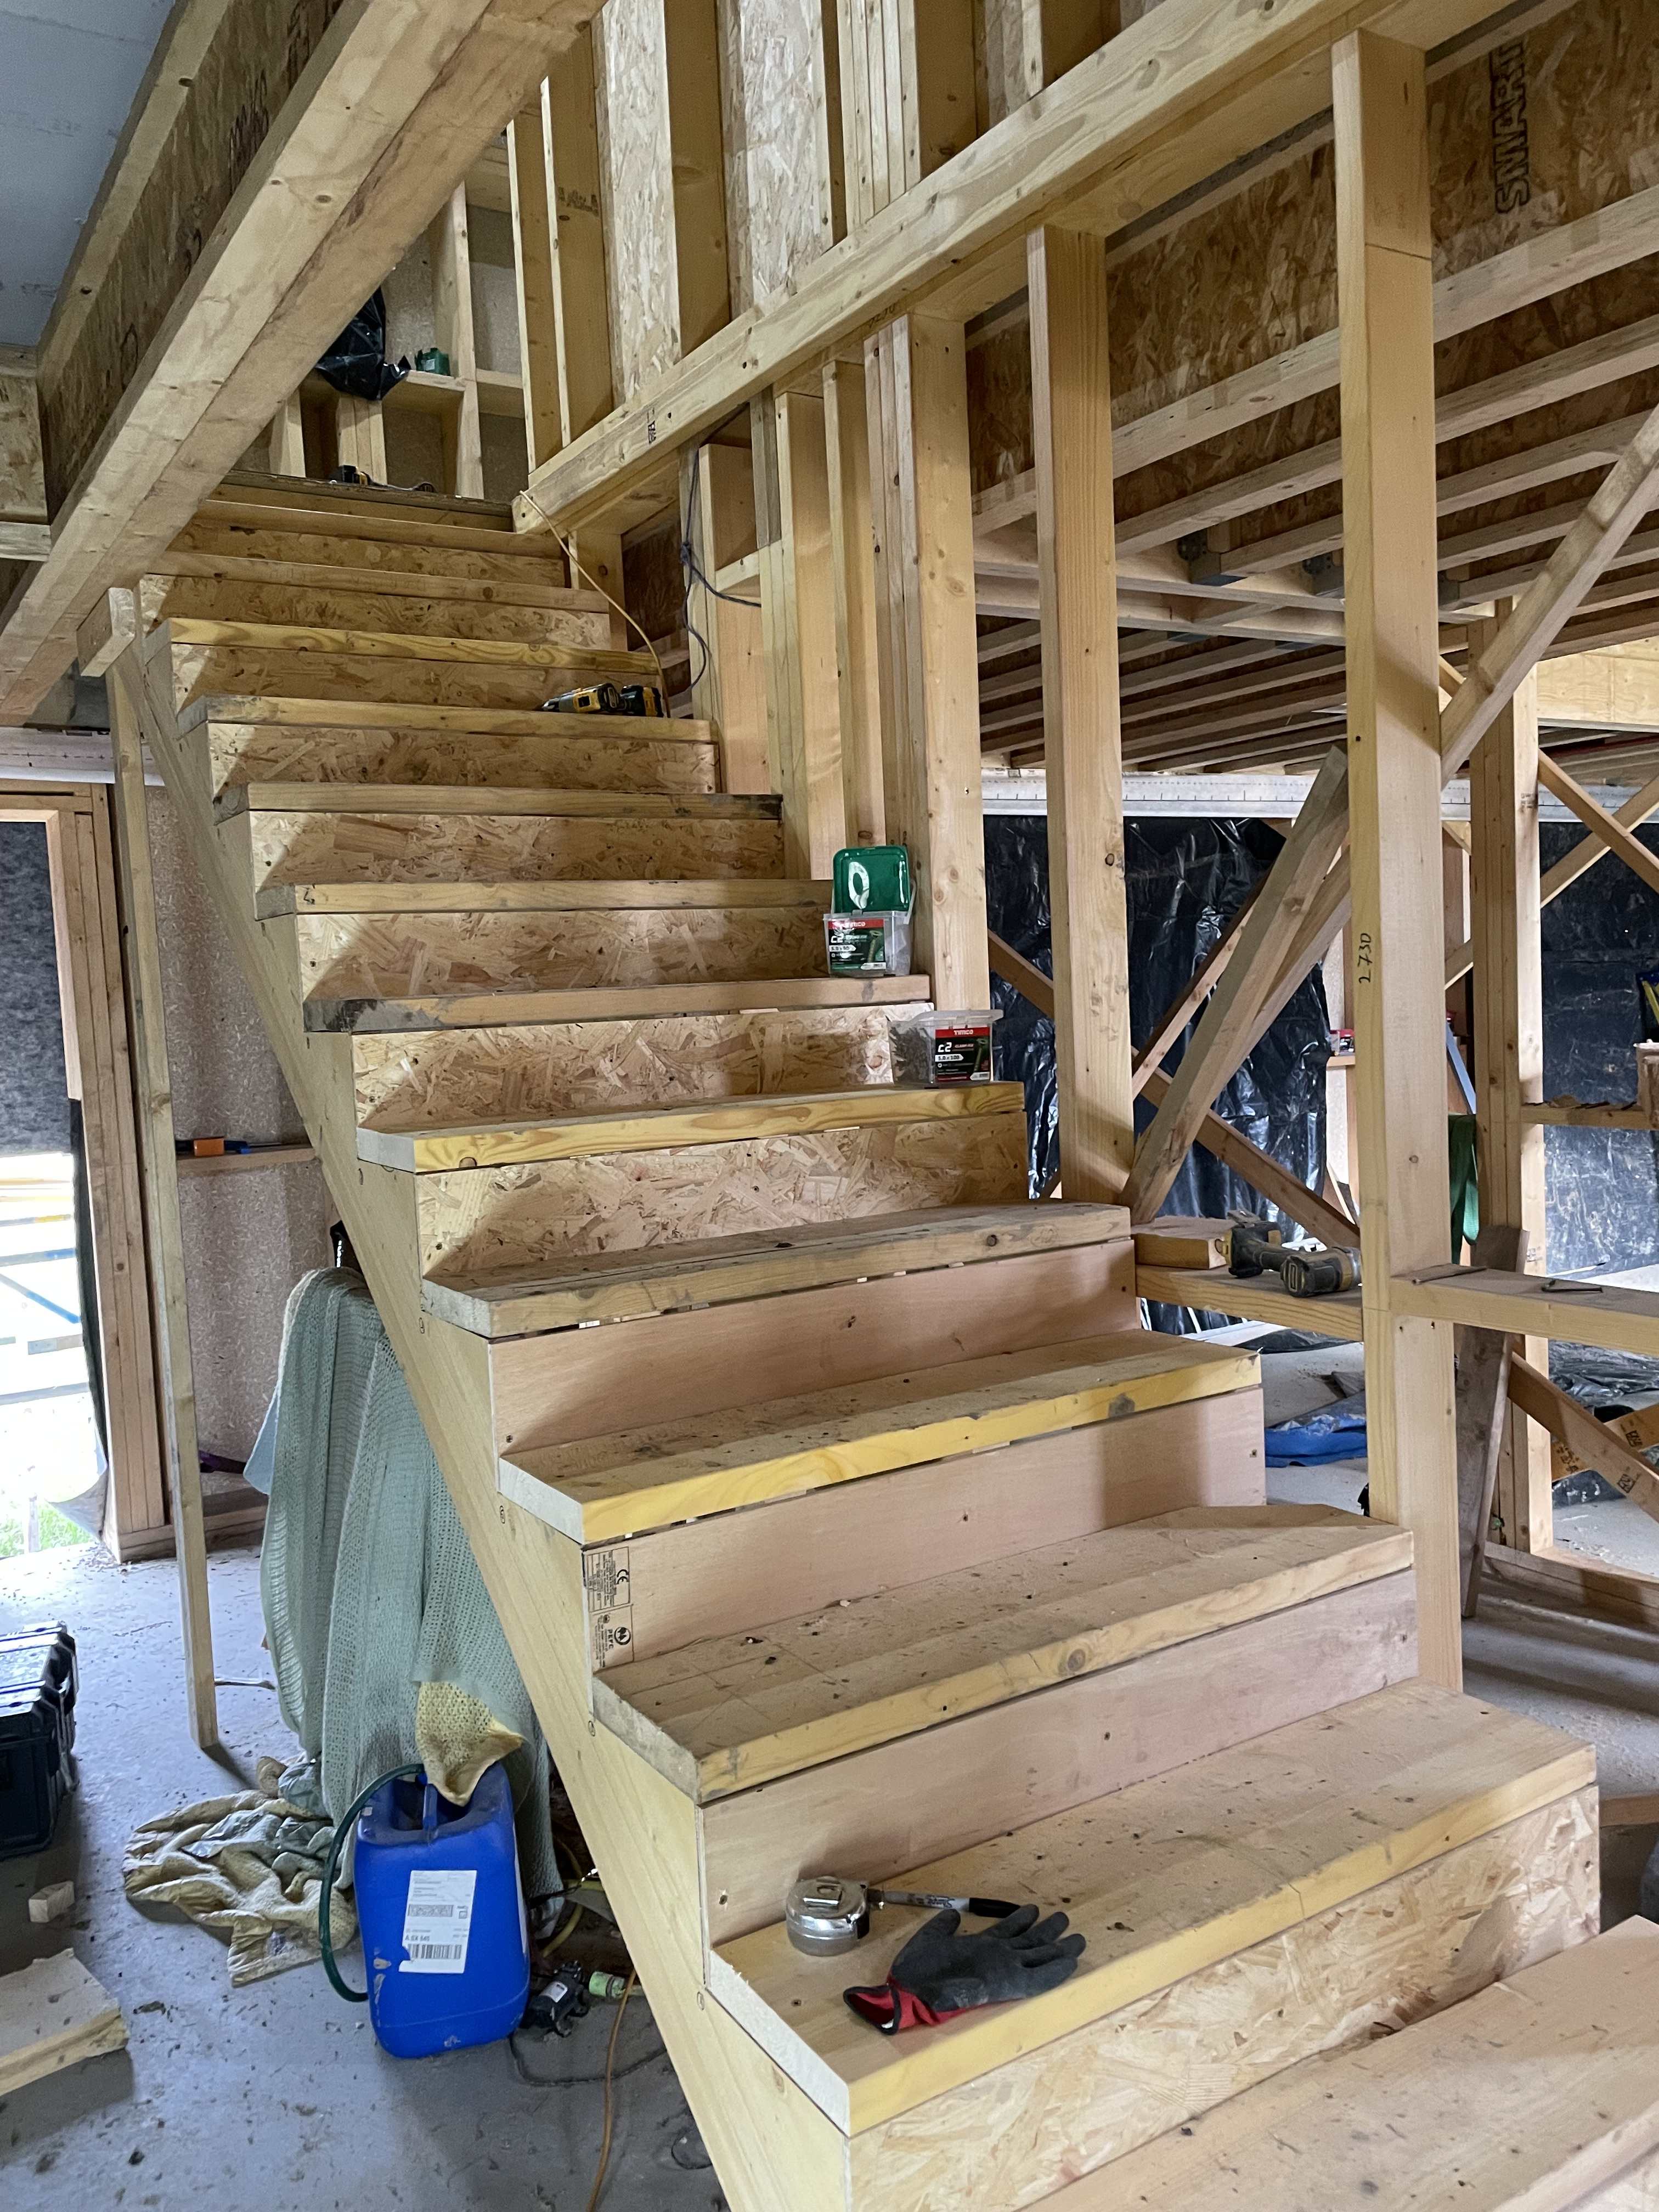
Built a rough staircase today. I needed a better way of getting materials upstairs. Next step is to take the windows upstairs ready for fitting.
 6 points
 -
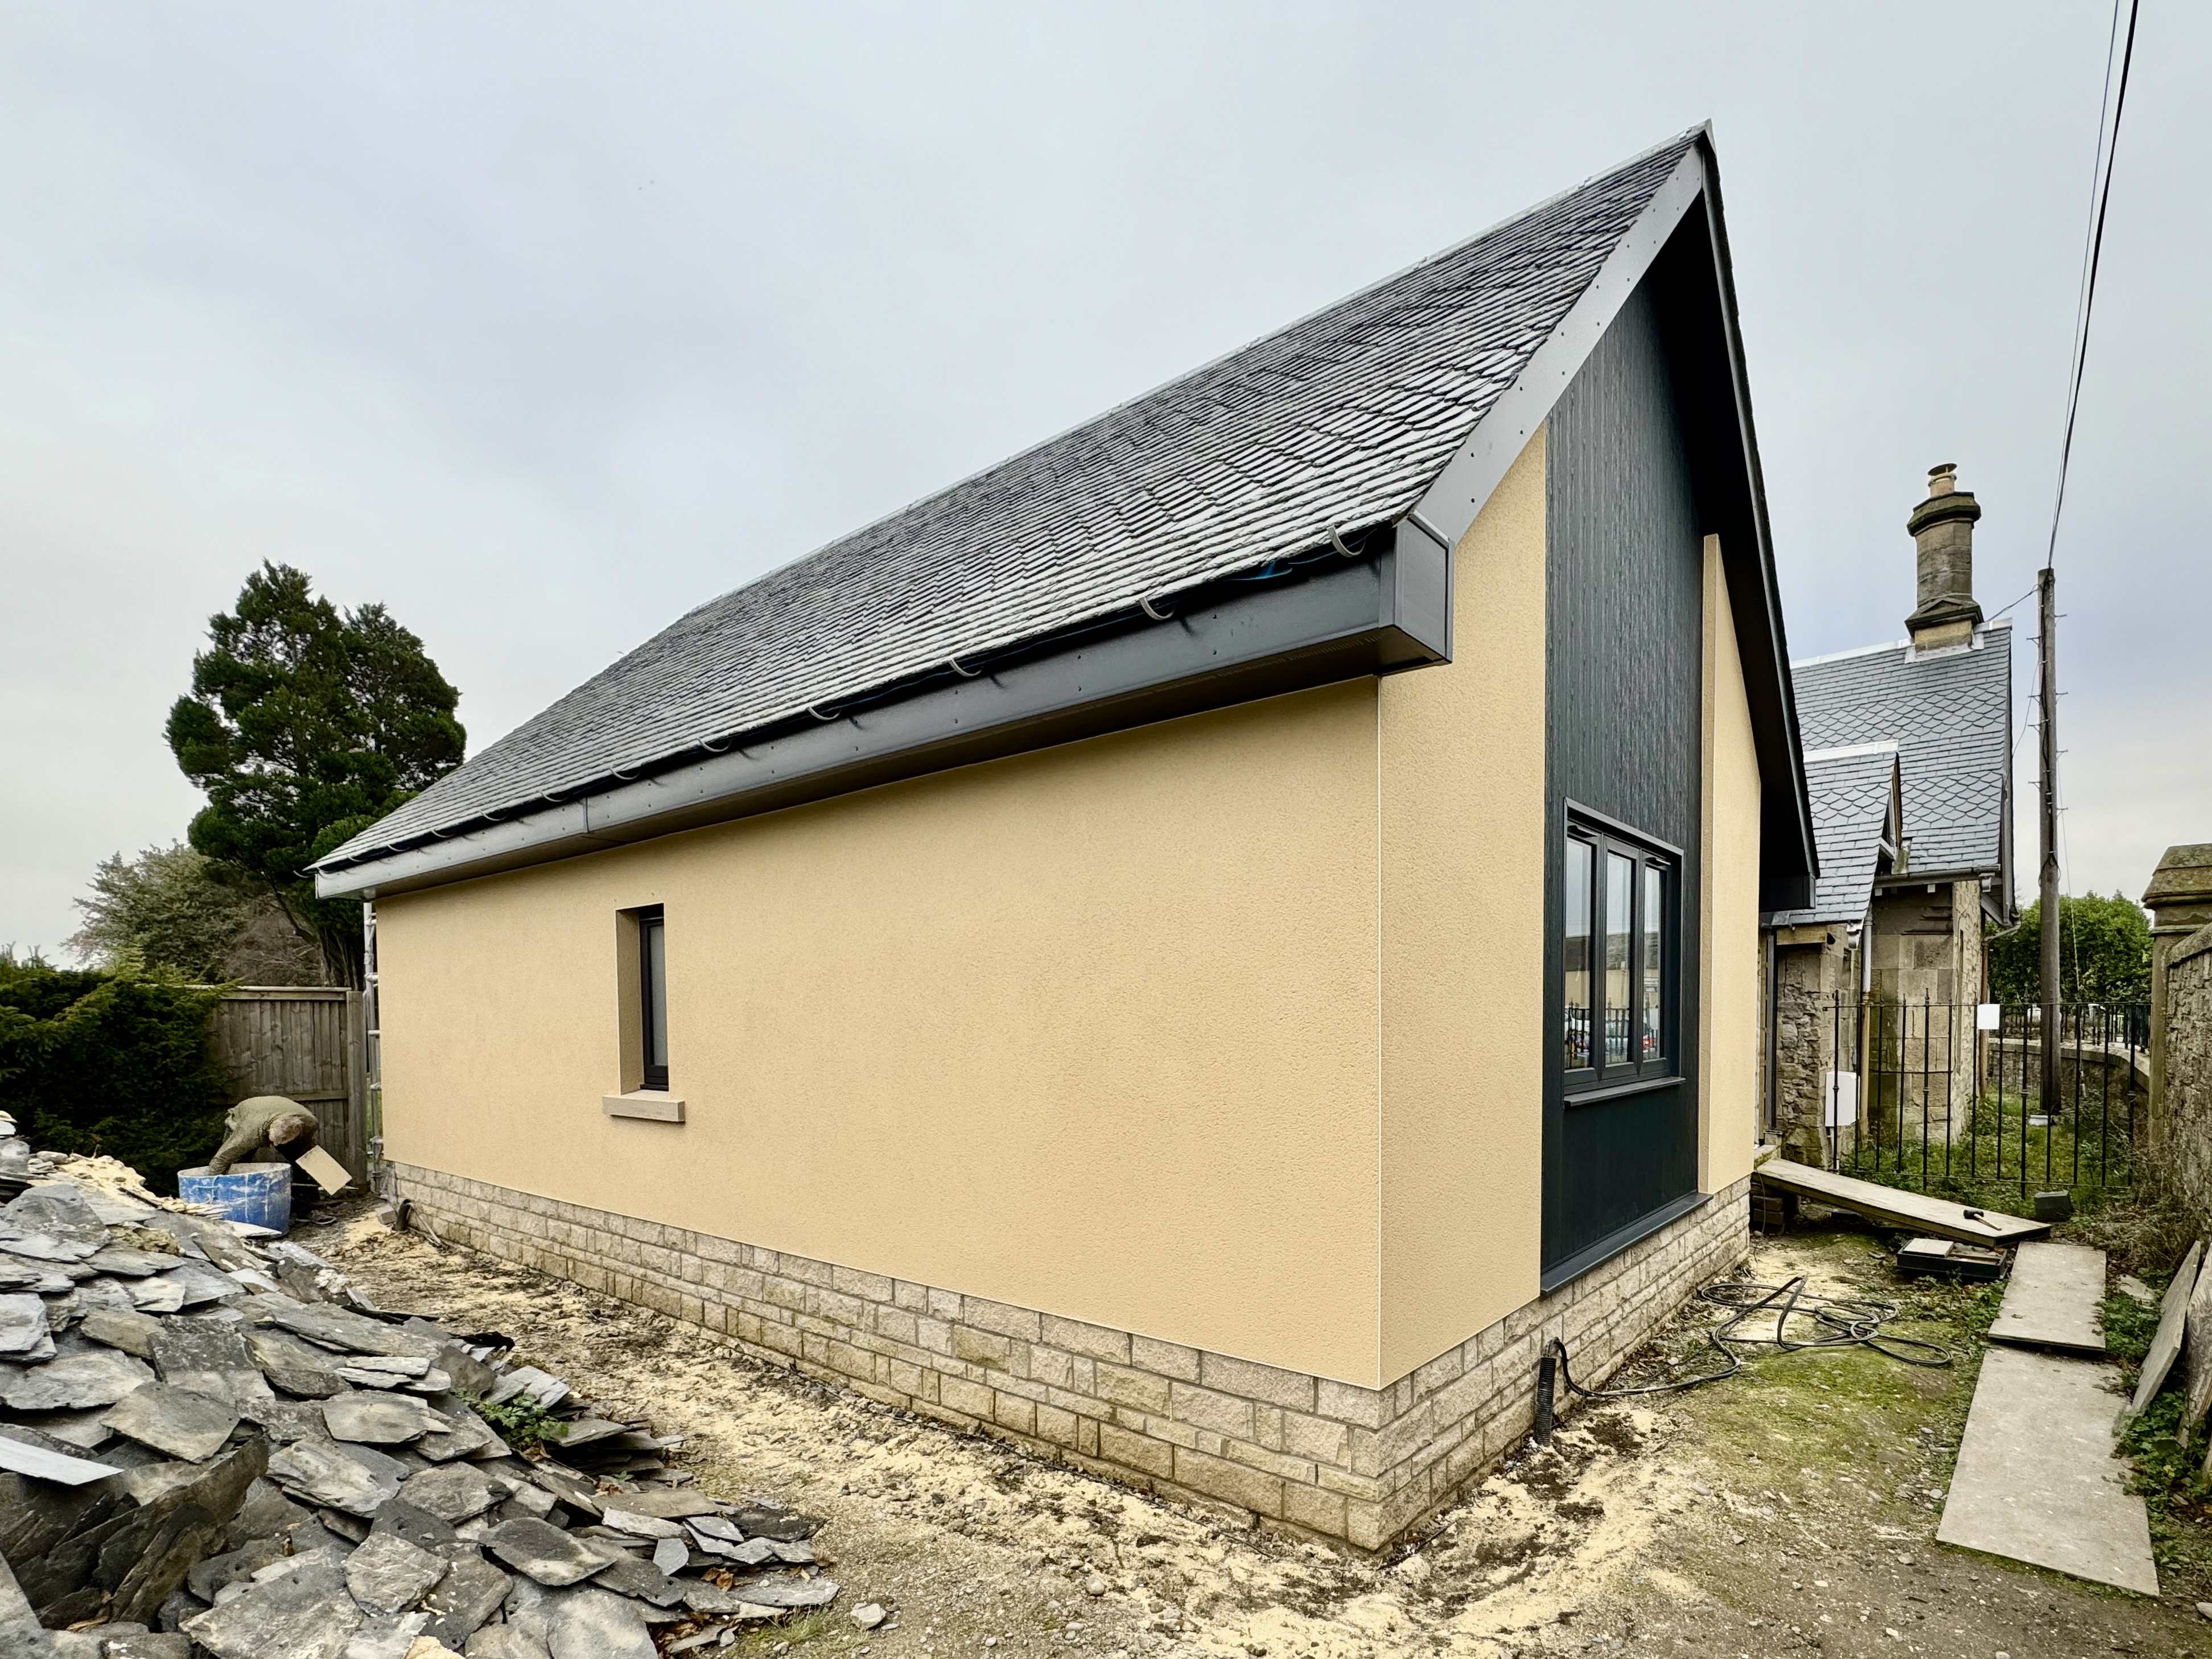
Hi all, as the title suggests we are in the Scotland currently completing a conversion/extension/renovation on an old cemetery lodge. My son and I have been doing the majority of the work with the assistance of a few trades where we are lacking in skill or speed. We are a non building background other than the usual DIY so it’s been a steep learning curve especially groundworks and structural work. It took a while the get the digger under control though I’m yet to master perfectly level trenches! The lodge is a cemetery gatehouse, more recently used as offices by the council as a base for their park keepers and groundsmen along with associated machinery which was stored in a 175m2 modern unit on site. We’ve added two en-suite bedrooms, a third bedroom bathroom and open plan living space. We also have planning permission to build a good sized detached 1 1/2 storey house on the site of the shed, which we may build in time. It wasn’t very well looked after with the usual council magnolia and Lino treatment to make it usable. We towards the tail end of the work now and are looking for another project to move on to. Planning takes a year or so up here once submitted, so we are actively looking now. The property certainly threw up a few challenges, not least the 2ft thick walls. Knocking through wasn’t easy and we also had to contend with poor previous work and rotten wood lintels. The roof turned into a labour of love with us working with a brilliant slater, sorting, holing and cutting all the bullets from welsh slate for him. The local planning department were totally unhelpful, with us initially treading on eggshells for fear of upsetting them to then telling them what we thought, giving them hard deadlines with consequences if they weren’t met. I use the term “totally unhelpful” but there are other words unsuitable for a public forum which are more accurate.


 5 points
 -
+1 I think I would just keep quiet about it unless enforcement bring it up. Ask forgiveness etc.5 points
-
Working as a chef, the easy way to make a kitchen much more efficient, is to make it smaller. I work in an area not much more the 1m2. Get rid of the clutter i.e. all those containers, gadgets, spice racks etc. Draws are often more useful than cupboards. Put lightweight things higher up. Clean up as you go along. And the big one. Learn how to cook. You really don't need much equipment, or ingredients. There are some dishes you will not create as well as a restaurant. Go to a restaurant for those meals, KISS at home.4 points
-
Hello Gaf. Firstly, nothing wrong with your drawing, it's quite informative, well done! Also the photos help back up and provide a bit of context and other info. I've written at some length here as concrete slab floors are heavy. Often in a timber frame the floor dead ( Permenant) loads are modestl and thus a bit more forgiving in terms of safety if something goes wrong. For all, if you are asking question and posting say photos it's of massive help if you can provide enough info so we can see the whole picture. Imagine you are looking at this for the first time! We need to see some panoramic photos and then close up detail. The more you make BH members guess the less targeted info and non specific advice / suggestions you'll get. @GafHope this helps a bit and lets you see how I look at stuff like this, given the info you have posted. I note you mention a certifier, I take it this is maybe a private BC or the like? Also note that "no SE has had eyes on the change." Now there are plenty experienced folk that understand a lot of this but some maybe don't fully grasp some of the nuances. The following is a kind of breakdown and what I can see from your info, what I am thinking initially in structural design terms and why I think this way based on what I see. I won't go into great detail but hope the following helps you identify some of the things you need to check. I look at your drawing and see there are two beams framing in at different levels, thus the loads on the masonry are additive. The beams appear to be simply supported.. individual beams. I can't see how much load is coming from above. The method of support to the beams is important (appear simply supported in this case) and how they are prevented from twisting.. and how they load the supports. Building foundations move about a bit and over time walls get out of plumb., this can reduce the bearing area of some floors for example. What I'm say is that you should not look at each individual element in isolation unless you have an overall idea of what you are designing. An oak framed building is much more forgiving than say a masonry building. The second photo is puzzling! I can see the hollo slabs seem to be loading the L shaped masonry column via a beam between the window and door? To go back a bit. One primary strategy as SE's deploy is to look at the whole building first in a qualitative manner and ask ourselves two questions. 1/ Can the design cope with the veritcal loads and equally important.. 2/ Can it resist the horizontal loads, wind and say heavy floors loading the walls off their centre of gravity.. called an eccentric load. 3/ We then work our way through the design, do further qualitative design, then detailed checks and go back and check everything again. In fairness to say a BC certifier they maybe don't have access or time to really lift the bonnet. But the bonnet must be lifted and any changes understood.. as if not this can be dangerous. Jumping quickly ahead to the element you are asking about. I had a quick intial scan at your info, could see some of the beam supports but I first focused on the masonry column. Is is stable? It looks like a cavity construction? Can it cope with the the possible ecentric loads from the beams and also the potential sideways loading from the glazing when the wind blows. For all, many masonry columns can carry lots of load until you introduce lateral wind load loads and /or eccentric loads from beams..suddenly they can lose 50% or more of their vertical load bearing capacity. @Gaf looks like you have some eccentric loads that you original SE never accounted for... as your builder has gone off and done their thing. Mind you that makes them the latest designer so probably have to carry the can for their design changes. I would want to first make sure that the masonry below the beams is stable as a failure here could be sudden and unpredictable. If you get you bit of local crushing at a beam ends or rotational deflection (torsional twisting) in the beams over the glass it may crack the glass say but no one tends trends to get hurt. But twisting of the beams is bad when you have say Hollow core slabs! Your builder may have significantly compromised the beam strength in terms of lateral buckling capacity. Placing the Hollo slabs with a full bearing on the top flange often allows you to treat the steel beam as being fully laterally restrained. Moving the Hollo beam rest postion to the bottom flange may have compromised the beam performance. I don't know enough about the loads from above but this is something I would want to know more about. The Hollow Core slabs. The bearing may be ok if the the beam flange is wide enough. Go and check if you have enough bearing.. and remember that the walls may be moving about on their founds. The steel beams must be checked again for lateral torsional buckling not least and the twisting effect needs a look at to see if it impacts on the padstone (missing) and the masonry column stability below. You builder is unlikely to be able to do this.. Now as the Hollow core slabs have been sat inside and on the bottom flange then they will introduce a twisting effect in the beam which will add local stress to the inside face of the masonry column.. which will tend to bend it outwards.. add the wind to that.. it needs checked. Lastly the padstones. Chances are you'll need them or maybe Engineering brick. But first I would want to make sure the Hollo slabs have adequate bearing and go from there. If I was you i would get an SE to check this and make sure it is all safe. It maybe will require some tweeks if it turns out all is not as it should be so doon't panic!4 points
-
Padstones are needed under all structural steel. All elements of structure need FR. Any changes made by a contractor need to be approved by your SE.4 points
-
Which is what we did. Here's the charging schema used by our architect - easy, simple, open. More detail here.
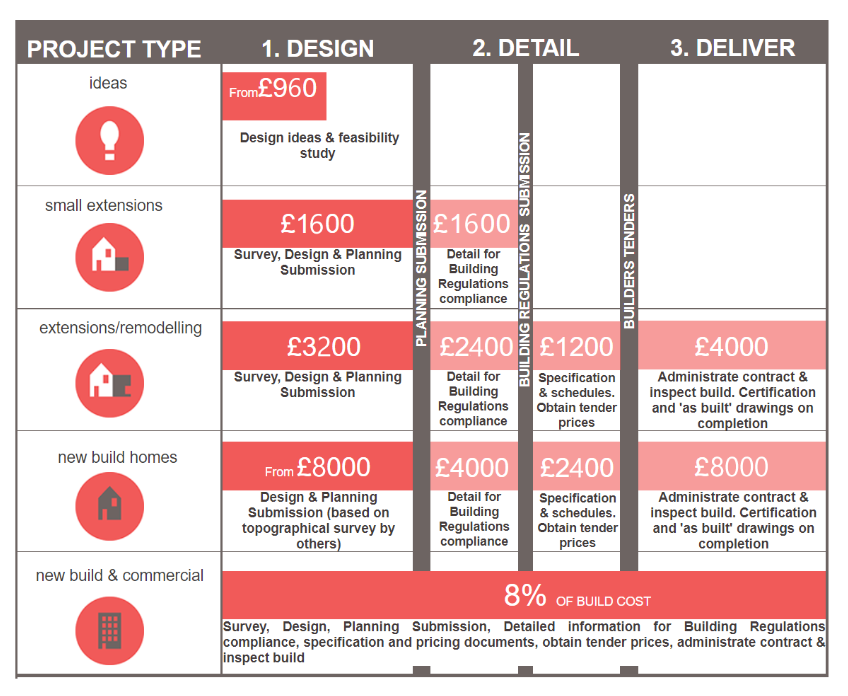 4 points
 -
Worst part was putting the floorboards back down, took a long time being extra careful, in hindsight doing it again i'd have ripped out the joists in the non kitchen end.
.thumb.jpg.8a40ce1cb8c9a889d42b2726d39e9347.jpg)
 4 points
 -
I did the Ecological Building systems approach in my 30’s semi detached, and it’s made the world of difference. No draughts anywhere, and a warm floor in winter. Highly recommend.
 4 points
 -
@flanagaj, it's a rite of passage. It's a hardening (cintering?) process. On hearing of our application - and subsequent success, our immediate neighbours Were gratuitously rude - in person - in public made ridiculous Trump-like baseless claims about our intention to build told lies about our intentions to anyone who would listen made false representation to the Planning Process at an open public meeting nailed a communal gate shut, denying us access to a communal pathway across his property ( photo here on BH somewhere) trolled me here on Buildhub Eight years later they have forgotten their behaviour. Speak civilly, wave occasionally, chat now and then. One neighbour came to apologise, and ask for help. That took guts, and I admire him for it ( posted here on BH about that discussion) They embarrassed themselves, and want to forget. To me behaviour such as theirs is a simple symptom of their lack of emotional intelligence. And thus need to be forgiven. But not forgotten.4 points
-
Hello! Thank you very much for your participation! It was actually deliberate. These are called "attention checks" and these checks help us determine the percentage of participants who are carefully reading the questions, which directly impacts how reliable our data is. If a large percentage selects differently, we know we need to be cautious about the overall results.4 points
-
They exist. The ones I used were sole traders, not employees in a bigger firm. They had been planning officers, knew the system, knew the planners. They made it easy for the planning officer.4 points
-
Weeks 18 to 23 So it’s been a while since the last update, but a couple of weeks ago the scaffolding came down and we can finally see our lovey slated roof and the solar. I am very happy with the roofers who worked so hard in the cold and the wind, as we are quite exposed. Anybody in the South West looking for a roofer I would be happy to recommend them. On the inside I have started with the insulation between the rafters. I am using Rockwool flexi slabs 140mm thick with an air gap above. On the outside I have put some insect mesh up already before the soffits are closed up, it’s attached to the ends of the rafters and will eventually be attached to the battens/cladding. As per previous blog the costs of parting with the builder and finding our own roofer and solar has proved to be good. Their respective quotes have been invoiced for the same amounts as the quotes, no extras or surprise costs. A saving of at least £12,000 against staying with the builder as his quote would have also incurred extras no doubt as he didn’t include Soffits on his build quote or roof quote, and he acknowledged they had not been included in any quote. Carried forward total £140,645 Scaffolding for roof £1440 Roofing. Felt and batten. Slate with Brazillian Graphite natural slate 500 x 250mm. Hook fix system to costal zone spec as per plan. Dry ridge system Con6 with Marley modern smooth grey ridge tiles. Two vent slates. Total supply and fix. £16786 Supply and fix softwood treated facia and bargeboards. Eave ventilation. Complete counter batten. £2111 Solar 15 x500W solar panels and GSE in roof trays. (Interior fit to be completed once windows are fitted) Supply and fit £4357 DPM for windows £316 1 Pallet of Rockwool 46m2 (Expect to order 2 more pallets to finish between rafters then PIR under rafters) £580 First electrical order (cable and back boxes, enough to make a start) £280 Windows all paid for £20869 A few incidentals from B&Q and Wickes etc Brings the total to date of £186,7574 points
-
There is your answer. the conduit is probably crushed by a stone somewhere and sadly useless. For anyone reading, only use a much larger smooth sided rigid conduit. 50mm absolute minimum.3 points
-
OK. One more turn at being reasonable. Respond to say their message has been received. That you believe you have dealt with all their issues but they have not responded to them. That If they have any new argument then you will be happy to receive it. Small claims judge is a proper judge. It is a small process but no less forbidding. The jusge will not look kindly on any new argument or evidence. It should all have been argued out already. They will look at each item in turn, not at the whole. Make sure you have easy- to-demonstrate proofs of every one of your points. The judge then adds up the sums and tells one of you to pay the other the difference, and who is to pay the court cost. The judge is perfectly happy to score 20 : nil. They don't get soft come item 20 unlike an adjudicator might. BUT if it gets remotely technical they will decide it needs expert reports and is not a small claims matter. Thus try to have a layman's argument plus a technical one. If any of your arguments are weak, compromise on them (only) pdq. Equally you must be ready to summarise your contra-costs. Don't put your papers up on here....they might be watching.3 points
-
Get a quote. One thing electrical technicians hate doing is verification and sign off of others work.3 points
-
The 'modern' kitchen design has been around since the late 50s/early 60s when exciting things like fridges started turning up. Is it time for us to re-think things? Looking around our present kitchen (and thinking about our new build kitchen design) I can't help thinking it's an ergonomic and design nightmare. Low cupboards 600mm deep that require you to get on hands and knees to empty stuff out so that you can reach the thing you want. High cupboards that you can't reach/see into and which require you to lean over the aforementioned lower cabinets, thus shortening your natural reach. Kettles/toasters/coffee makers/air fryers that have to either litter the work surface or hide in cupboards and be brought out each time you want to use them. And, perhaps the ultimate design failure, never a suitable place to put all those plastic Tupperware boxes and old Chinese takeaway containers and their lids that cascade out of the cupboard like an avalanche of plastic - regardless of how carefully you stack them. I don't have an immediate answer to all these issues but they annoy the hell out of me. Hopefully, someone with a more creative mind than mine can offer some suggestions...3 points
-
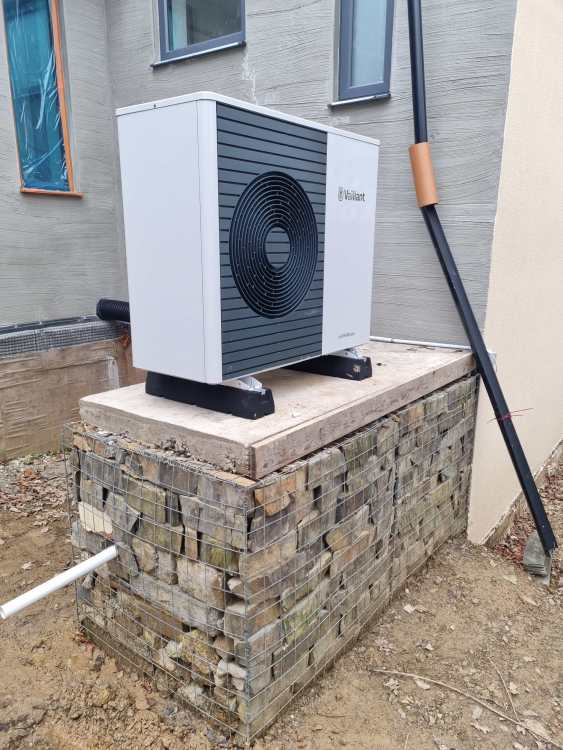
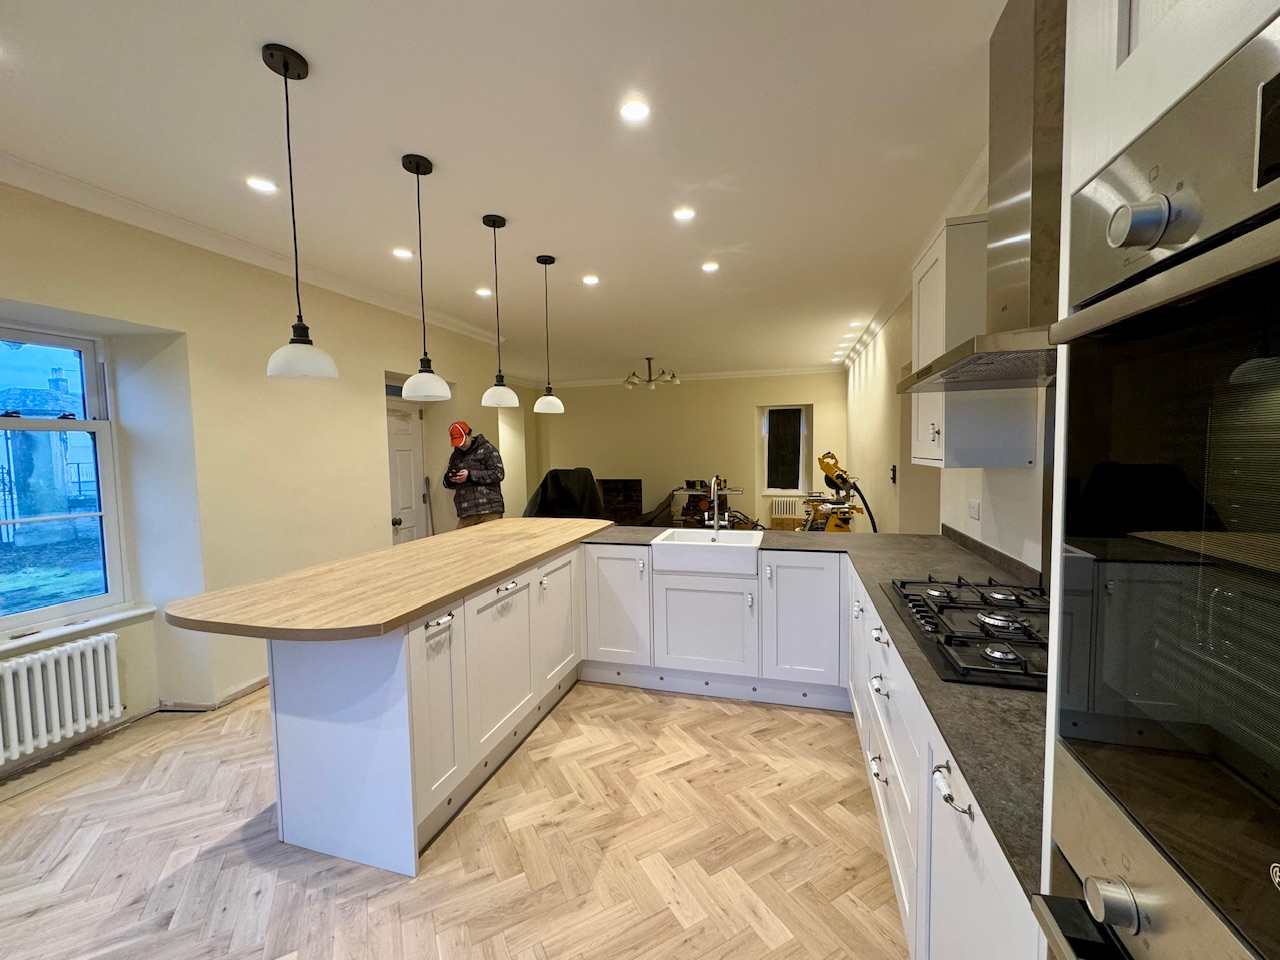
An update (after the fact) Plastering finished in the open plan area this coming week (by others) DONE (see above) Remainder of stone cladding arrives and work begins to get the most inaccessible (high) parts put up before the scaffold gets taken away - this means cladding two 7m x 2m wide walls. It arrived and I did get the stonework done on the high parts Plumbing pipework ready for ASHP installation DONE Gabion basket and pad for ASHP to be installed on DONE Mist coat and first coat on plaster (SWMBO is at the ready) DONE Begin fitting upstairs UFH (Not done) Front door being fitted (January) by others DONE Take 3-4 days off for Xmas DONE and appreciated ASHP installation (January) by others, that will allow for hot water and the downstairs UFH to be available ... DONE Fit a temporary bathroom ... DONE Fit out utility room as temp kitchen ...DONE Its been a comfortable month in the house (in fact we are staying an extra few days while it is cold overnight!). We fitted an over bath shower, and done a lot of other work since. and that'll be part of the next blog entry.

.thumb.jpg.2ae6d8f6692b57b216f5b9376804aa49.jpg)
 3 points
 -
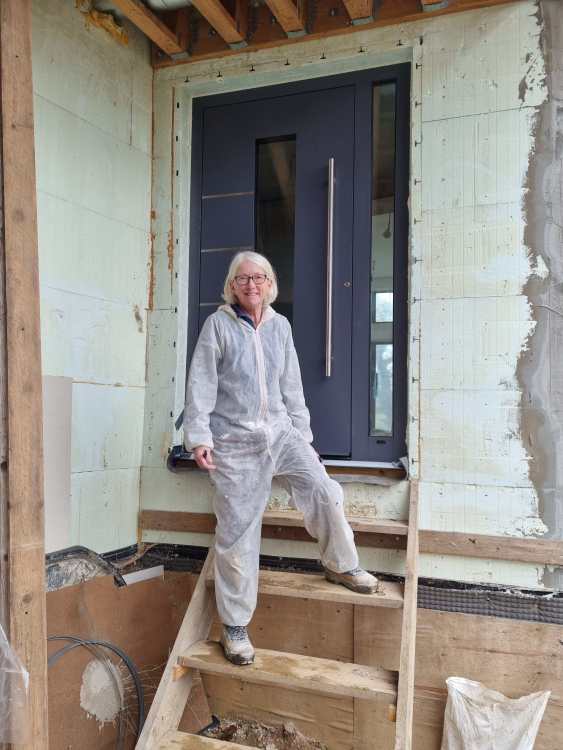
Hello Everyone, 66 year old avid DIYer here. Had a stab at most things over the years, mostly successful (but with the odd exception!), including framing, carpentry, floor-laying, electrics, plumbing, etc. Contemplating the purchase of a derelict croft house with some land a bit further north from where we live. It’s a wind and watertight empty shell / blank canvas in which I can see loads of potential, but needs a lot of work. Internal floor area is 36’ x 12’, enough for an open plan living/kitchen area, one bedroom and a shower room. The small scale of it appeals to me, as I’ve not done a full renovation before. I’ve been googling loads of questions, many of which kept bringing me to this forum, so I thought I might as well join the conversation. Thanks for having me.3 points
-
By thickness EPS gives 60% of the thermal insulation that PIR does, so to achieve the U Value that 300mm EPS provides, you need 180mm PIR. I said 200mm PIR as I'd personally be buying that in 2 x 100mm sheets. When I cost compared for bulk order, I could get 100mm EPS100 sheets for half the price of PIR sheets and I was comparing BBA Certified EPS100 (load bearing) with an equivalent, but not load bearing, PIR. Looking at what each are retailing for today it still seems to have the same price difference. At the time (2016), and apparently still the case today, EPS formwork are not priced publicly by the various suppliers, but are offered as part of an Engineering & Supply bundle. For me prices varied widely between the companies offering such bundles and if the bundles included installation the incremental cost for installation was far higher than you'd expect to pay with local resource. The price I ended up paying, after looking at all options available, was the equivalent to paying around 10% more for the same m³ that I could purchase directly in sheet form, once I'd allowed a reasonable Engineering fee, so felt it not unreasonable as it included the EPS300 formers. I can see the benefit of buying a full package: Engineering, supply and installation, especially if it also includes the house frame on top, as that totally de-risks that structural build, but, you have to expect that to come with a large premium attached, and you'll be paying that premium on everything, ie the insulation, steel, concrete, UFH and labour. The best "full bundle" price I could get, including installation, was over 100% more than the price I paid using a local ground works company, PM'd by me, to install the Engineered raft by AFT, who supplied me the insulation from Springvale EPS.3 points
-
I had a 5m tall almond tree growing right in the centre of the plot where my house is now situated. I got my groundworker to dig it up with his jcb, move it with a sling & replant it in a large hole elsewhere on the plot. It looked absolutely knackered - large vertical split on the trunk & many damaged branches. I gave it a severe pruning and next spring it flowered beautifully (similar to cherry blossom) & now 2 years later it looks remarkably healthy.3 points
-
Cut it down now otherwise they might put restrictions on it. If they ask say it was damaged in the last storm.3 points
-
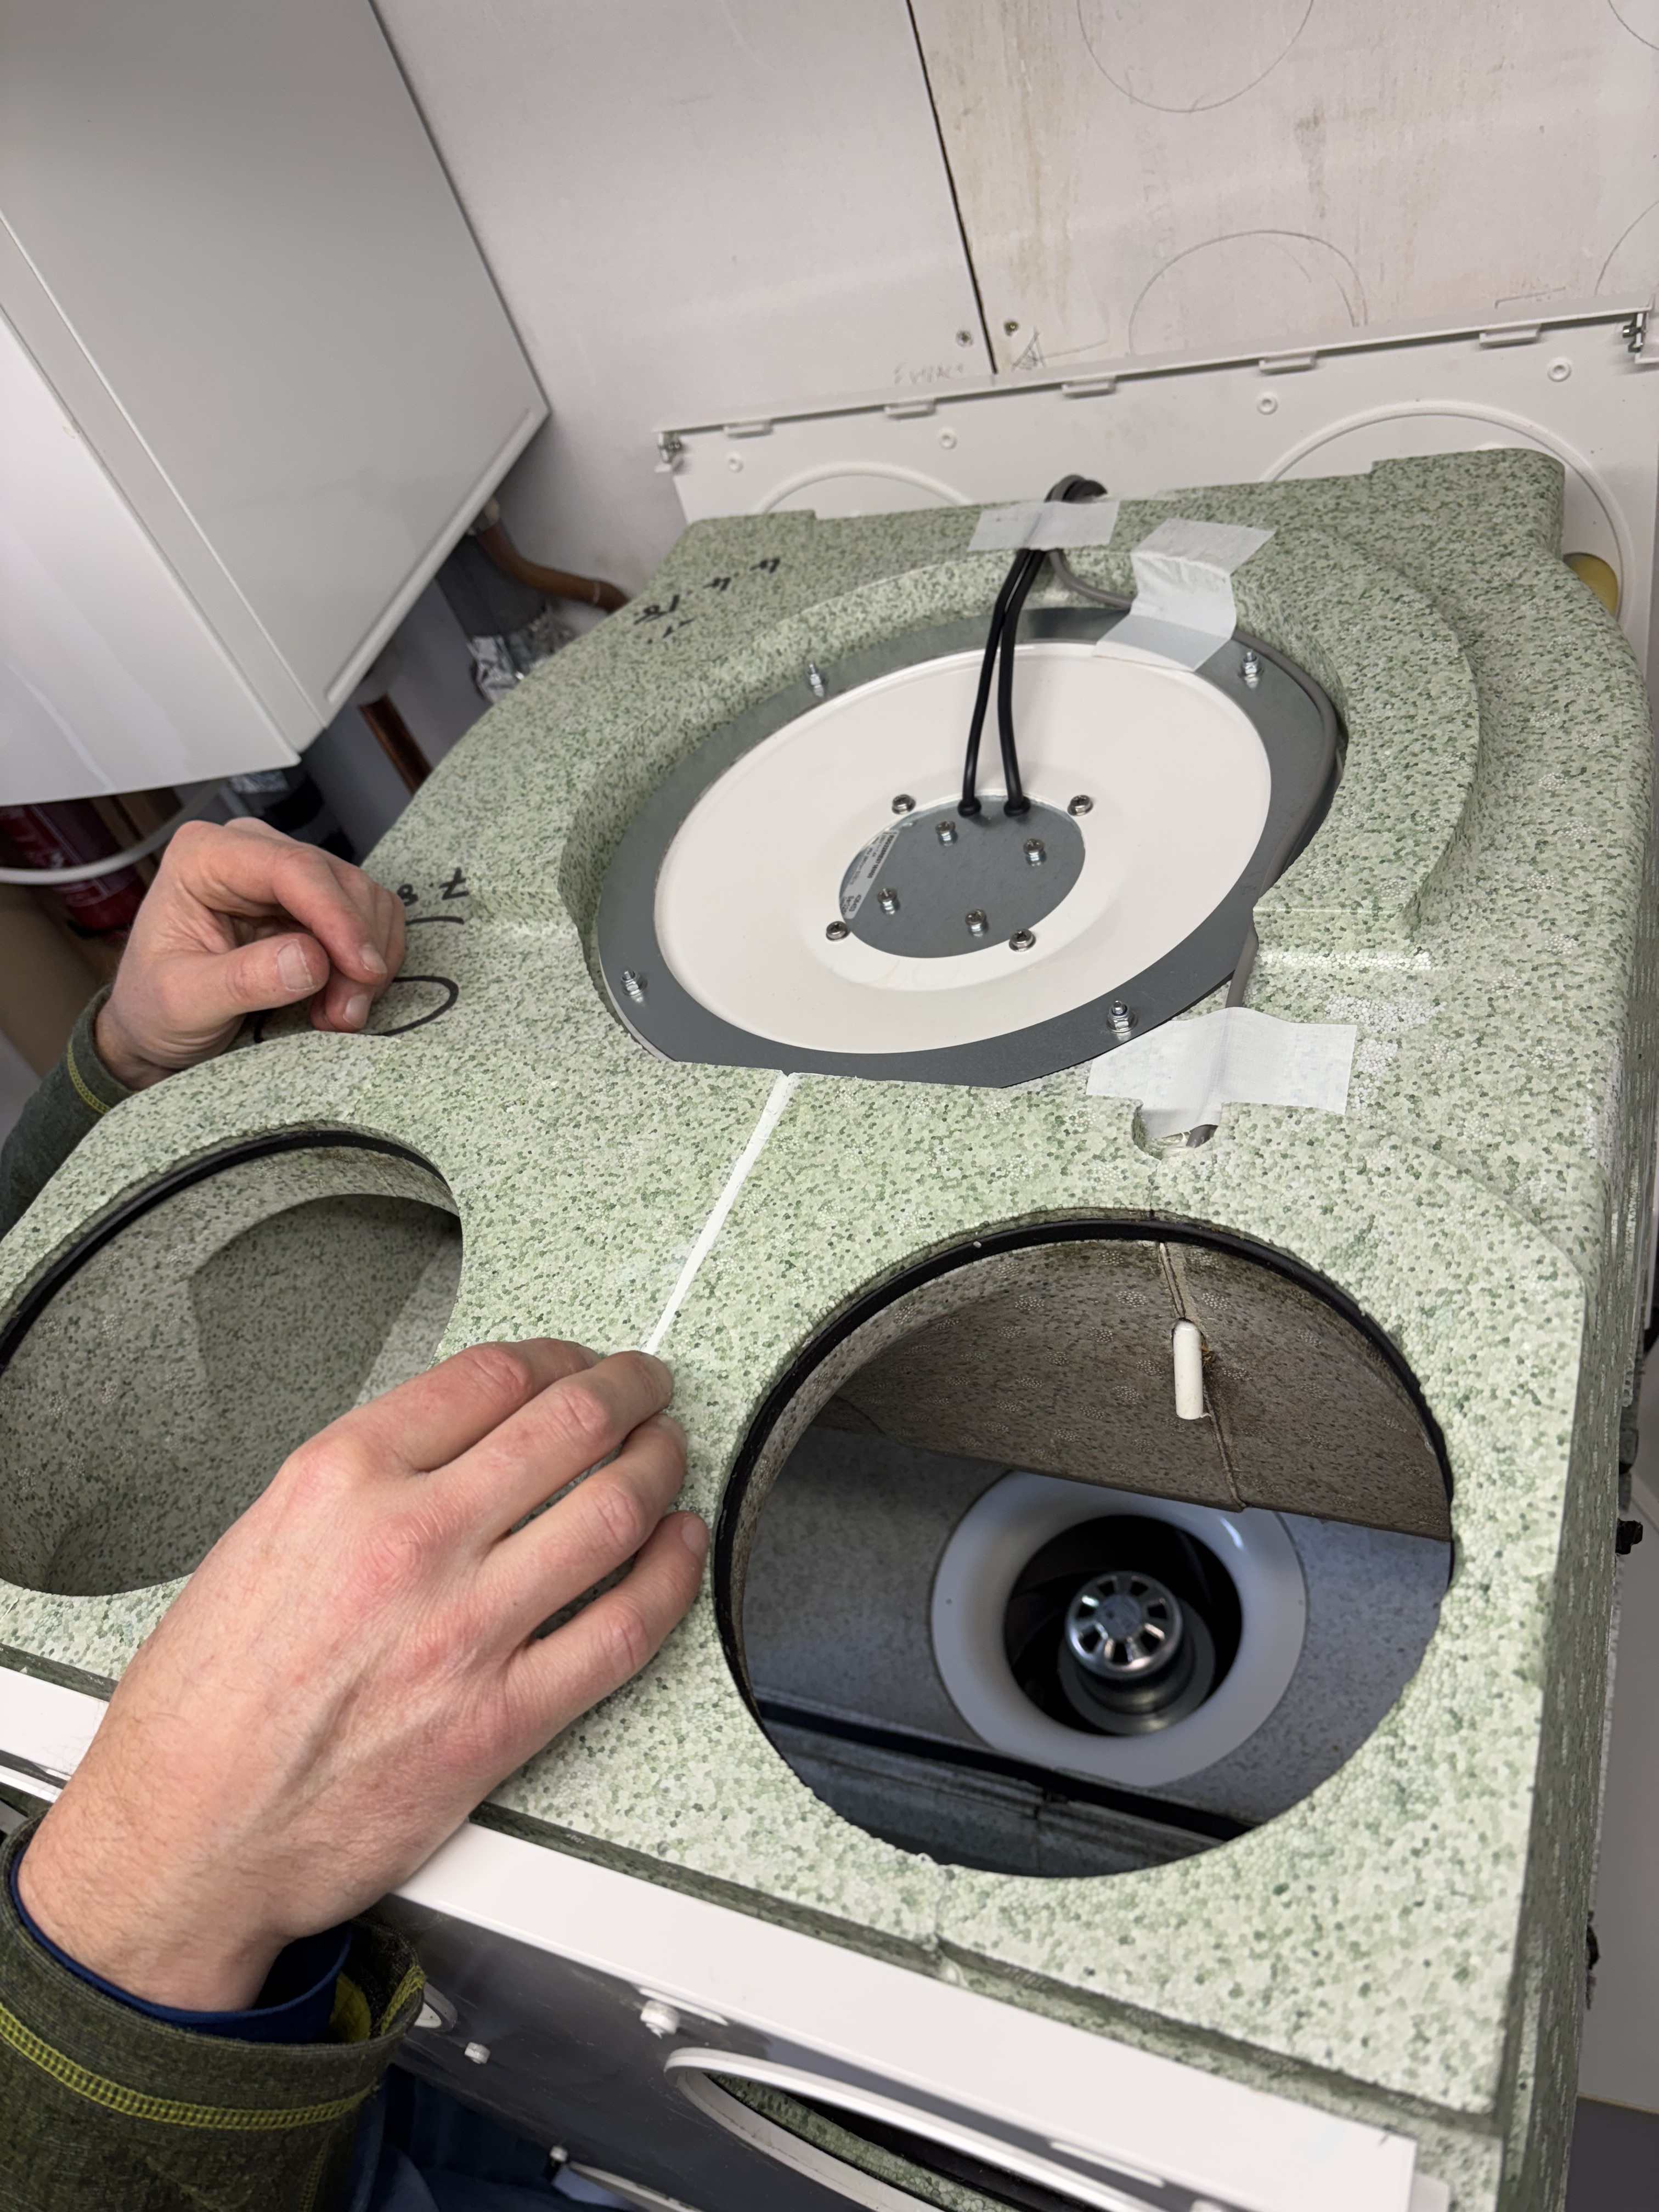
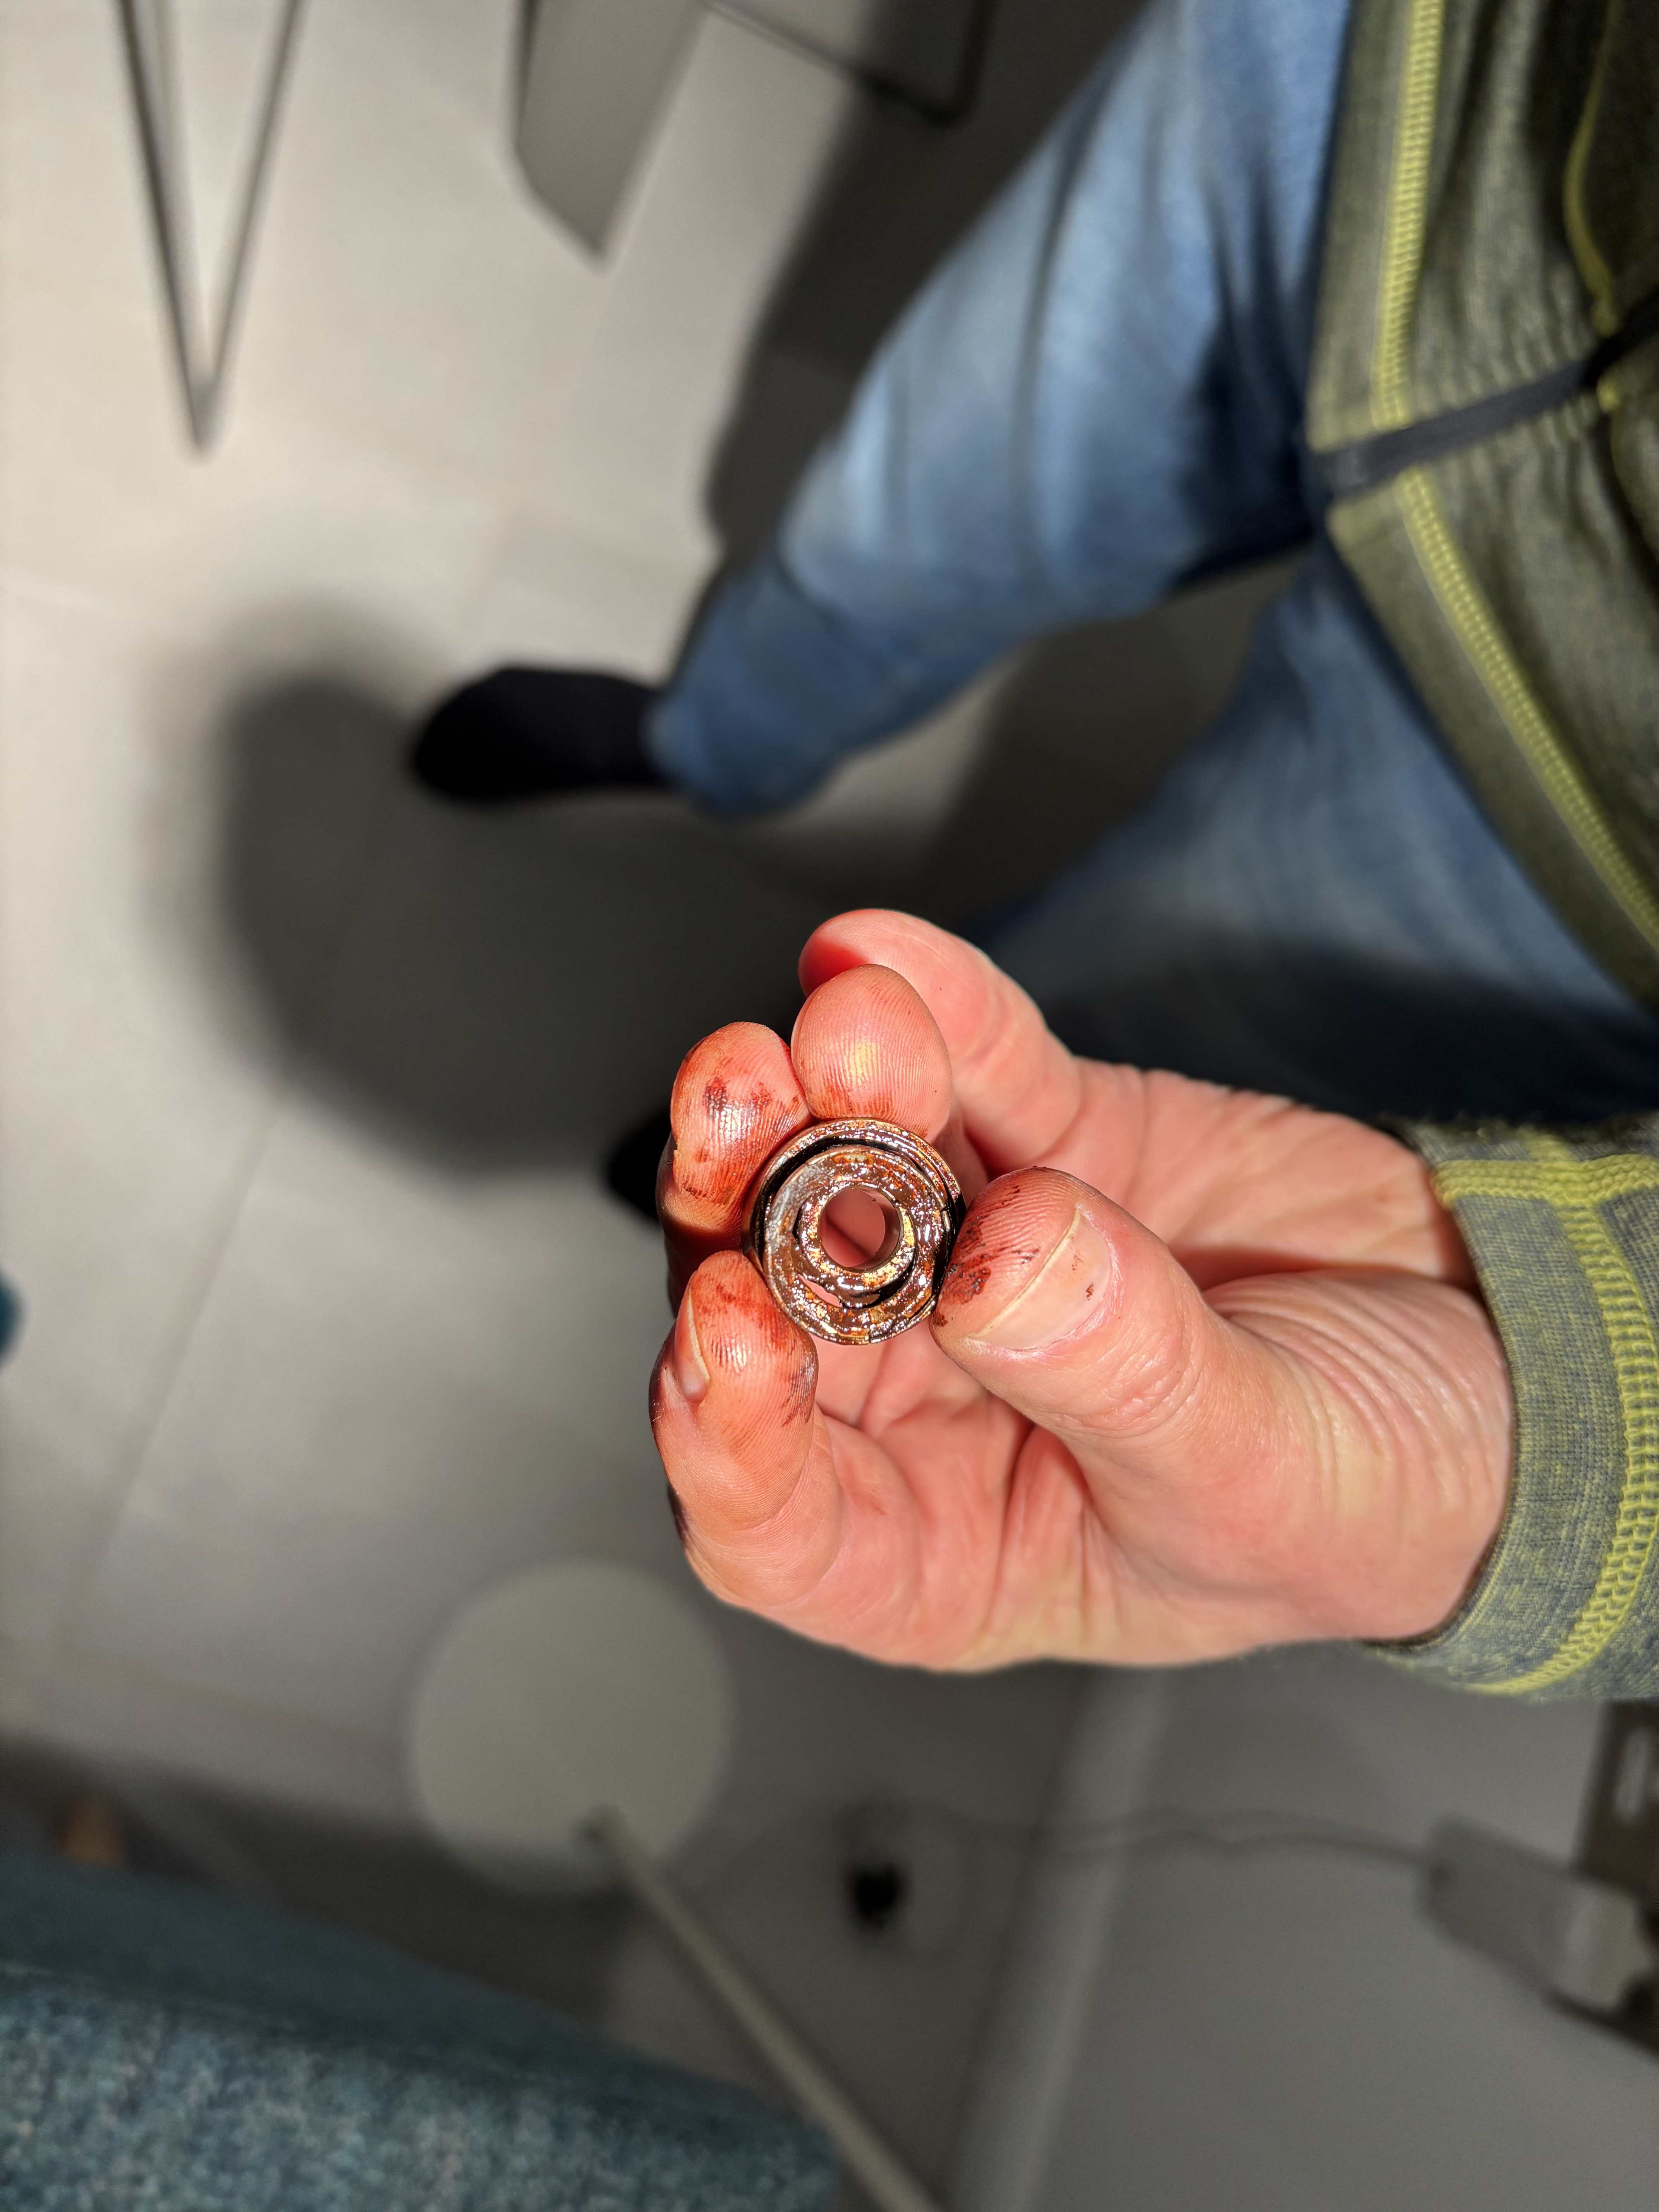
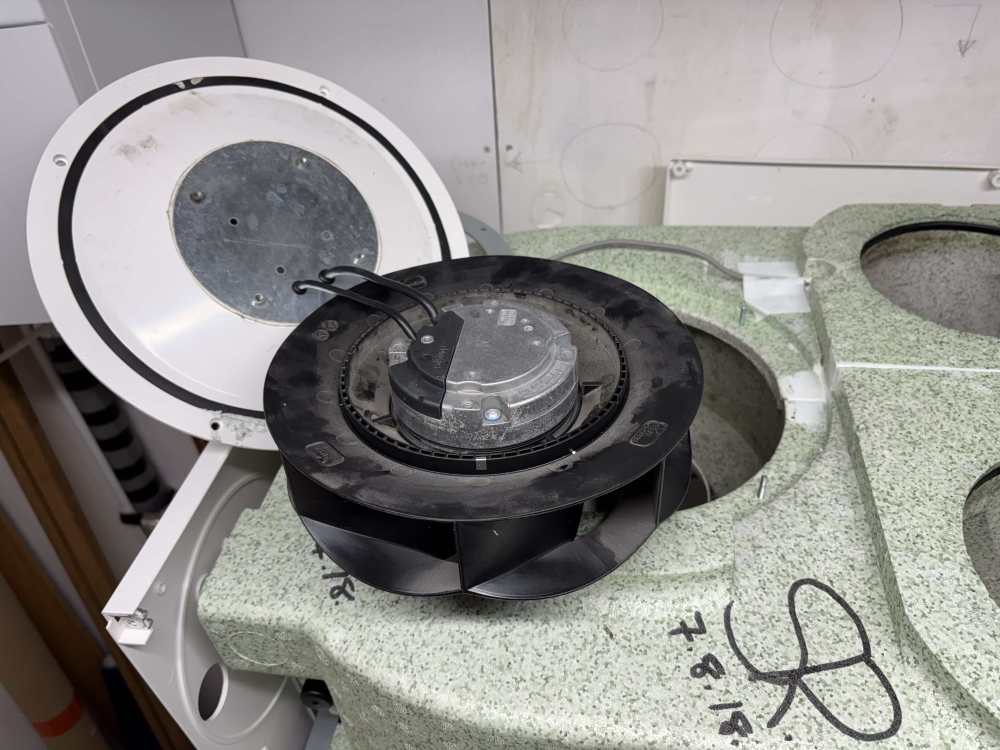
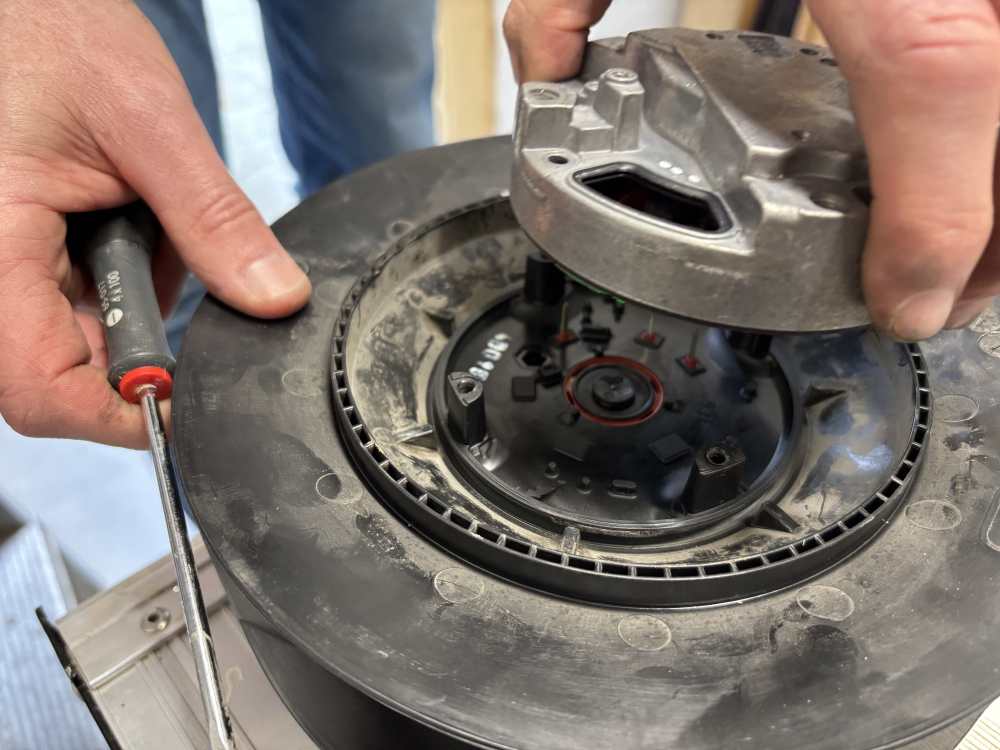
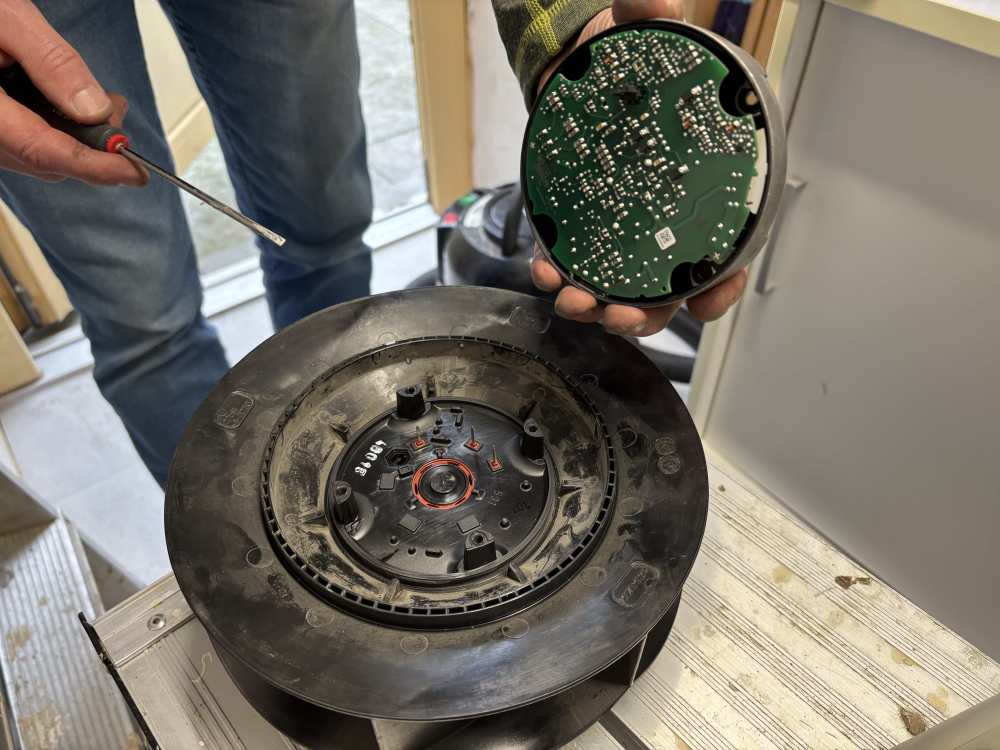
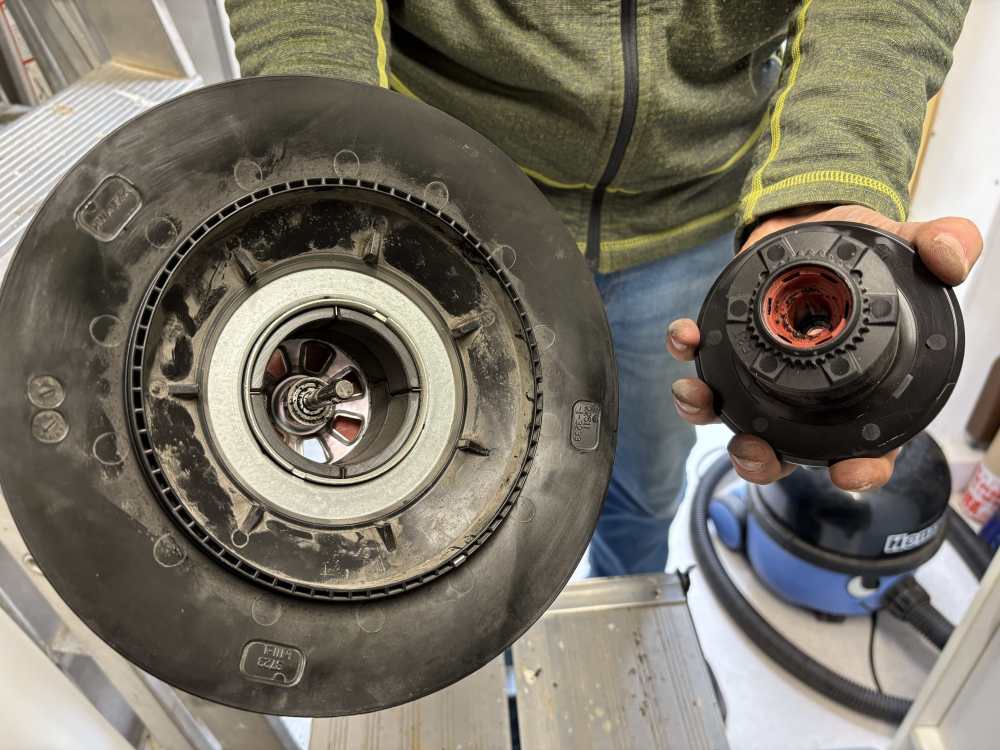
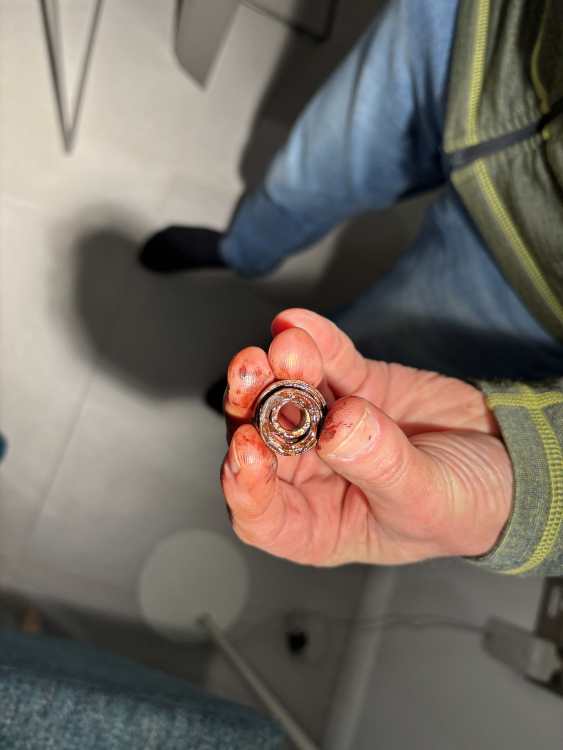
Following the 2 excellent posts by @DOIGAN and @Stones I’m posting this as our Vent Axia model (408451) is different again and it might help someone else to be able to order the bearings before starting to take apart the unit. We are half way through. Bearings now on order 608-2Z from Bearing King (thanks for the recommendation). We heard a noise (humming, but way louder than normal) and had a weird smell (like burning but not quite, though could be the failed fan in the network switch - both problems turned up on the same day). Thanks to googling “MVHR weird noise” this site came up! You can’t get to the fans without taking off the side panel. You can’t take off the side panel without taking it off the wall. And to do that you have to disconnect all the extract / intake ducts. The photos below start from once we got to this point. We identified which fan had the problem. When spinning them both one of them stopped a lot quicker. Was an effort just to get the fan housing out due to it being stuck in with lots of sealant. But here it is, finally out. Prised out with a flathead screwdriver. Then we removed the black rubber bit on the top. That took some prising out too once the screws were out. Then we pulled the section housing the circuit board off. Again, it didn’t come away easily. Then we popped the black button bit off The next bit was surprisingly hard as @Stones had said - the c-clip was really hard to remove. We used a couple of screwdrivers to force it open and a third to pop it up, and it bounced around the plant room fortunately landing at our feet. The first bearing took some effort to get out but it looks alright - we will still replace it as maybe the dirt around it is early signs that it’s done. Part number easily seen. 608-2Z Then the magnet holding this section in was so strong it took a fair force from the other end to get it out and see the other bearing. This bearing was so hard to remove. Others have said they just popped out. Not ours. But this might be why…. So we’ve done as much as we can today. Hopefully the bearings will get here soon so we can rebuild it all whilst we sort of remember how to… For interest, just out of 5 year warranty period, installed in 2018/2019 and powered up for the first time in November 2019. Huge thanks to previous posts without which we’d not have known where to start and would have been buying an expensive replacement fan or, worse still, paying a Vent Axia engineer to replace the fan. Hope this helps someone with this model as it does look a bit different inside. Will update when we put it back together again.


 3 points
 -
Update: Bearings arrived yesterday (3 day delivery - excellent service from Bearing King) and last night after work both fans were fitted with new bearings (2 in each). Unit put back together and now back on the wall, in full working order. Thanks again for great posts to help us DIY fix this. No hideous noises. Runs smoothly and quietly again.3 points
-
PIR avoid. Easy to do badly, difficult to do well. Would look at EPS beads, fully fills all voids, all gaps etc. make cavity as wide as practical. Minimum BR is pants3 points
-
Yes, you call the installers back and tell them that the workmanship is shocking. Those frames should be arrow straight, zero excuses.3 points
-
UK planners can be such tossers.3 points
-
Ahhhh, the relaxing calm of the sabbath. Ok folks, this has been decided to be genuine enough, and anyone who isn’t interested please just click on something else, simples. No more head shaking, please. The mods will decide what stays or goes and what is or isn’t spam. We’ve been doing this reasonably well for many years, and our regular members report improper content and it gets flushed as required, and this means that this forum is quite a nice place to hang around on. All good, chill out folks, go get a roast beef dinner, and……………..“breathe” The management.3 points
-
That must be one of the earliest cavity walls around.3 points
-
@Bramco @Big Jimbo WRS regs can be misinterpreted, but ultimately they do say any pipework through a wall has to be sleeved as noted above by @Nick Laslett However, much of this is now a moot point as the installation criteria laid out by the Heat Pump manufacturer specifies pipes do indeed have to be sleeved and insulated when going through walls At least that is good news...for me anyway ! As for the MCS, well what can I say! I recently spent a lot of time reading through their self promoting high standards material. I've concluded that almost any DIY person who can hold an hammer in one hand, and a lit ciggie in the other could install a heat pump to MCS Guidelines whilst reading a copy of the Beano. I was amazed that BC accept they have to leave standards in the hands of these kwangos as it's become so complicated and time consuming to enforce 'any' standard these days. There is a wide gap between bodging and satisfying regulations. If my example above is within any guidance then no wonder new builds from the large corporates are in such a state. I'm now on a long road seeking redress that I expect will take at least a year and involve various regulatory bodies. As I've already said, this is just one element from a catalogue of errors. Perhaps one day I can tell the full story. From your responses so far, I imagine jaws will hit the ground. Where I can, I will update this thread along the way.3 points
-
We bought some of these for insulating the loft. Was very impressed with them. interms of comfort and efficiency. Can work out cheaper than using a decent disposable mask. JSP Force8 Half-Mask with PressToCheckP3 Dust Filters,Size medium,Conforms and Complies with safety standards EN 140 / EN 143,Suitable for: Construction,DIY,Water based Paint Spraying (BHT0A3-0L5-N00) : Amazon.co.uk: DIY & Tools3 points
-
Something like this:3 points
-
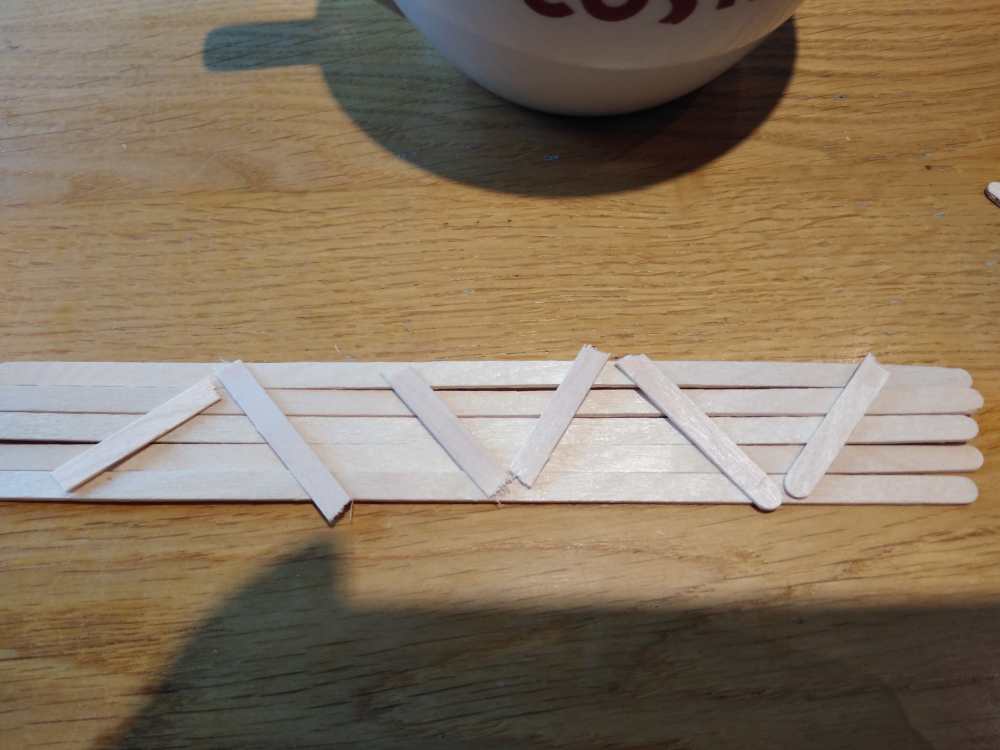
Have made a model of a lattice with Costa Coffee stiring sticks.
 3 points
 -
Electric boilers have always struck me as the most stupid idea. Why heat water with direct electricity in a big box and then pipe it to rooms via pipes into radiators? If you are going to heat with direct electric, just fit panel heaters. WHY the complication of an electric boiler? And most installs of an electric boiler just use a direct heated HW tank with an immersion heater, the boiler play no part. It would be just as absurd to use the boiler to pipe heat via an indirect coil to a hot water tank. The only electric boilers that make any sense are electric storage boilers and only if combined with something like an E10 tariff so you can heat the water at cheap rate and draw it at any time to heat the house. I suppose the only good point is having the pipes and radiators there, then there is a chance of relatively easily converting to an air source Heat Pump?3 points
-
Hello all. I'm renovating, or more precisely completly rebuilding, a 300 square metre house in mid devon. 2 years in, about a third of the way through. Also currently building a garage /workshop in the garden.3 points
-
Chances are you’ve got a plasterboard tent then especially with how much air flow you are getting through your sockets. it’s very hard to resolve this once it’s been fitted, you can try injecting flexible foam behind all around the perimeter at 100mm intervals, but it’s not easy to get a perfect seal. either wet plastering the walls or having a properly airtight service void is the only true way of resolving this, but it would mean removing all of the wall boards and starting again.3 points
-
My objective is to save you money. It's not often I start a new topic but here are some of my thoughts. Please excuse the spelling and grammer as I'm a bit dyslexic and off duty from my day job. Bit of narative first to let you know I know my stuff! Over say the last 10 years I've seen a lot of enthusiasm in the self build market for insulated rafts in one form or another. I got into this as an SE and developed the design calculations for the biggest supplier in the UK of cold formed steel industrial buildings, about 750 to 800 descent sized buildings a year. These are lightweight buildings with low floor loadings, like a house.. that sit on a big thick layer of squashy insulation. an insulated raft. I had a loads of fun at Capital Steel Buildings (CSB my employer), Gary Watson, their CEO, his directors in Australia not least put their money (a lot of 500k plus) and faith in me. Gary Watson the CEO who lives in Dalry, Scotland! So this is not some abstract concept for me! He lives just down the road pretty much, stuck his own money behind me and we sold a lot of buildings in the UK. Many thousands! I know a bit about this insulated raft malarky in terms of structural and geotech design! That said if anyone wants to engage with me on the theory then I would be delighted. It is a bit of a dark art, coupled with plastic and yield line theory design. I really push the boat on it but am always safe. Serviceablity needs discussed but I know the maths! For all the corners of a slab tend to be the bits that are hardest to get to work. For any curious SE's lurcking in the background. I took TR34 as a basis and then developed from first principles.. there is no "funny FE " software used! It's all verify able by excel! For all in some ways the design of insulated domestic rafts is very elegant and often cost efective. But get it slightly wrong and you are in trouble! But make no mistake we were doing this stuff in a hard and competetive commercial market probably before Kore rafts etc and Tanners design became more main stream in the self build market. For me I'm delighted that self builders are getting on board with insulated rafts and the whole passive house thing. Aside I wish I knew about this stuff when I did my self build, with hind sight I made some mistakes. Ok here is the rub. There are folk now jumping on the badwagon that I and others developed 15 years ago but they don't actually know what they are doing! Manufacturer's are creating insulated formers that come at a premium cost and claim they are at the cutting edge.. they are not often in terms of buildability! I know this as I as above developed lean desings. These folk are there to sell you insulation and their building system. *Kore etc are there to sell you insulation! *MBC et al are there to sell you timber frame! *You as self builders want to get an SE or Architect at the same price as a washing machine engineer. My advice is to look at simple stupid alterantives that you can get off the shelf! that can be a bit of PIR insulation cut up to avoid waste and perfom the same function. Example: someone pitched up the other day wanting to use a space frame. Someone said oh Kore do a thingy that can support the outer leaf. I think why as an SE can you not just specify a couple of braces in the frame so you don't need that complex outer "thingy" detail? Ask me if interested. Now folks I hope you have found my rant informative or just funny / daft. Design should be fun. The design process.. well if you don't like what I've written then you can rule it out.. Design is often about ruling stuff out and that lets you focus on the things that matter. To finish. As an SE I love, and it is a challenge to explain to a lay person how stuctures work. I have Man bag, in that is ruler. I pull that out to explain how buckling of a beam works. There is a soft rubber and my hard plastic measuring tape. I use these to show how the different layers of an insulated raft work.. the rubber is less stiff than the tape when you put one on top of the other..this lets folk see that the insultation is the critical design layer. The maths are complex but the Client immediately can grasp what we need to do, why and the raw cost implication.3 points
-
All stowed away in the built in cupboards. You have got to keep a neat shed !3 points
-
Welcome back. Glad to hear you came through the depression - can be a difficult time. Good luck with the new project/s whatever they might be3 points
-
My get out of jail card there, these days, is to line the door and window reveals with Marmox boards instead of plasterboard. Insulated plasterboard is quite a pig to work with when you have to cut around the metal fixings plates, especially when it's long thin lengths! Marmox is impervious to water / moisture ingress, insulates, and the grey coating will take a coat of plaster directly so no need to plasterboard over it. Downside is it will take less of a 'hit' from a point impact, vs plasterboard + skim, but if you have a good spread who has put 2 sets on then you should be fine with Marmox + skim + paint. You can easily router out the rear of the Marmox, nowhere near as messy as plasterboard, and it can be bonded on vs screws very successfully.3 points
-
Our kitchen supplier was a Bosch/Seimens agent so listed them in the quote and they matched well with the big sheds/on-line . My wife liked the look of the Bora hob in the showroom but it was too dear. Whilst sorting things out I found out the newer version was being fitted to the display in a few days so I asked about buying the display model, he did us a good deal on that and we bought the Fisher & Pykel fridge/freezer off display as well at a healthy discount. It pays not to be too precious over brands if there's a deal to be done!3 points
-
It's disappointing that circumstance meant not getting exactly what was planned but ask yourself - if conditions had led to building a couple of bricks wider, would you have offered them 8% more or just thought "it's only a few bricks"? It sounds like you agreed to the changes, I think you needed to re-negotiate and discuss the roof aesthetic at the time, not after the works were completed. I'd congratulate yourself on finding a company who've done good work, try to enjoy the results and not get hung up on trying to recoup what will be a very small sum at best for a lot of stress and effort3 points


.jpg.e490614dab59fa9a7f63830d11d04e85.jpg)


.jpg.7e1d9eeb741f5698d03555fb33a7c7bd.jpg)