Leaderboard


Popular Content
Showing content with the highest reputation since 03/12/24 in all areas
-
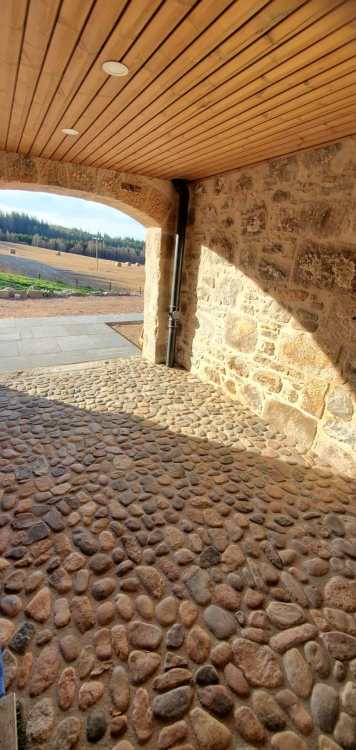
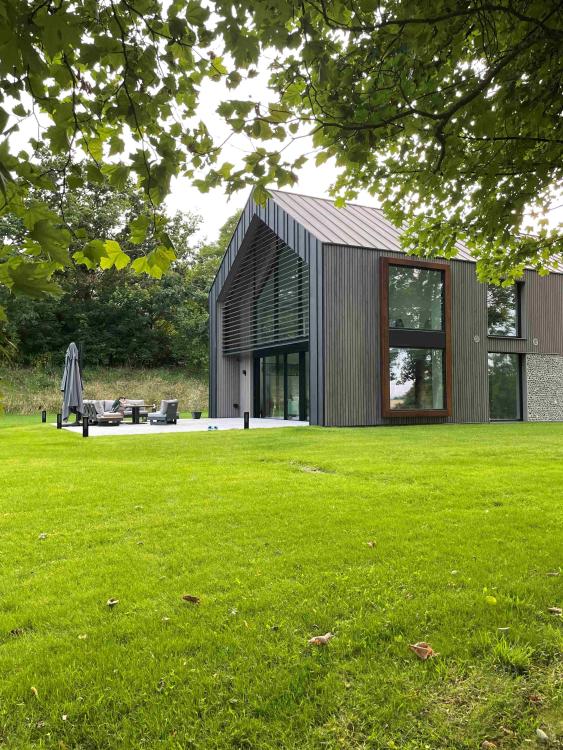
I'm so pleased with the way this turned out. It is a covered way through the whole width of the wing with the main glazed entrance behind the photographer. The floor is entirely of harvested glacier cobbles. These were formed when the glaciers had streams running beneath them, rolling stones along and forming these shapes. The cobbles are in bands in the sand , and were recovered when digging foundations and drains. They were carefully selected from a huge pile, one by one, for size and being flattish on one face. Most are rounder than these. The right hand wall and the arch are original, repointed in lime mortar. To the left, off camera, is an original timber clad stud wall, including a door, retained for heritage and interest, but there is a new wall behind it. There are pencil writings on the wood cladding, concerning numbers of sheep etc. Everything done by my daughter and SIL. 'except the straw bales' as they put it.
 28 points
 -
Hi All Well its been quite a journey ... House is finished (a year after moving in!!) with only the never ending snag list to sort ... Thanks for all those who have posted and replied to my many questions Bob (now an officially retired self builder !)

 26 points
 -
It’s been a long 12 yrs 🤣 I use to frequent ebuild ( I think that’s what it was called ) even before my build commenced . When that disappeared I did worry ! . But found the resurrection in buildhub . I knew I couldn’t do the build on my own . A non standard design with no help . I assumed ( incorrectly ) bco would be on my back with a self build and ‘help’ me … the opposite occurred . Everything in life I do on my own ( no rude jokes ) ; I can learn what I need to get the job done ( this does not make me an expert ! ) . Buildhub has been invaluable - I built a house via the internet . I think that’s (expletive deleted)ing amazing tbh ! So for all the noobs with no experience etc I do have advice ! You are either cash rich and time poor or the opposite. Cash rich you can pay others to accelerate your build . Time rich you do it yourself . As I am self employed and didn’t have the cash ( no (expletive deleted)er is going to give me a self build mortgage ) then time is my friend . Remove stress points . A self build mortgage will put you under massive pressure - to release the next payment . Don’t rent temporarily when you can buy . To partially fund our build we sold our house and bought a shitty flat . This took any rental issues off the table and equity appreciation allowed the crap flat to add to the finance of the build once sold . We then lived on site - a cash saving for sure at the expense of ‘normality ‘ . By not being tied to a loan nor tied to time I (expletive deleted)ed about for a decade and got it done . Stress existed - but it was rare . This is the way ! I still have a hundred bits to fanny around with . Remove pressure , remove stress . Appreciate everyone’s in a different situation . But don’t let the build destroy you . It’s a bitch and you are the master ( bit of bdsm there for my followers ) . Ask for help on the forum always . (expletive deleted) things up - so what ! . Waste 1000’s on a balls up - so what . Haven’t got a clue ? - so what . Plan a strategy!24 points
-
We had our first air tightness test today and achieved 0.25 ACH!! 🎉 Absolutely chuffed to bits with that. We have spent a lot of time taping every possible penetration, but I was still anxious in case we hadn’t quite been as scrupulous as needed.21 points
-
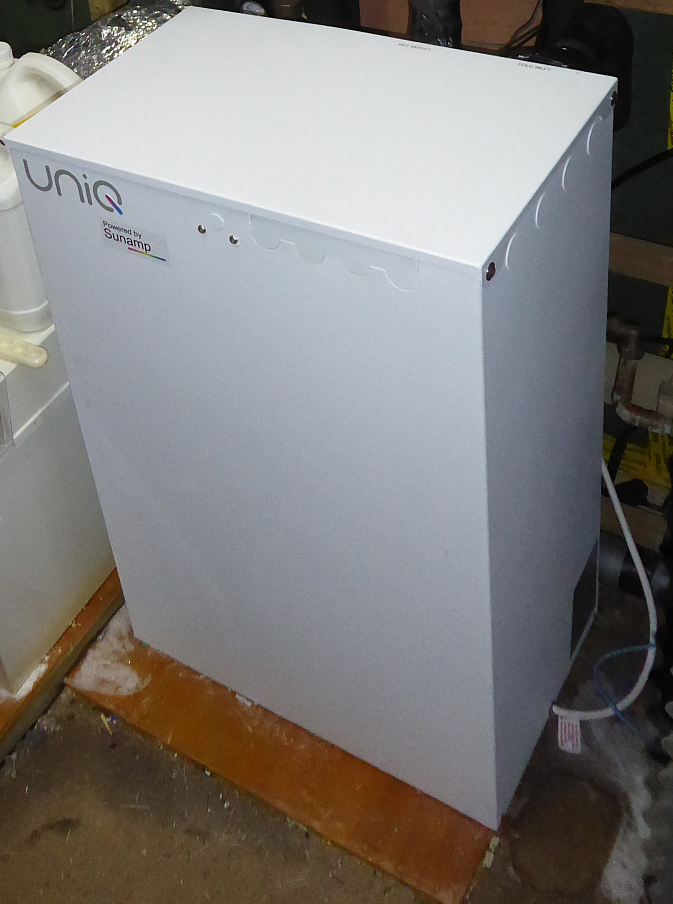
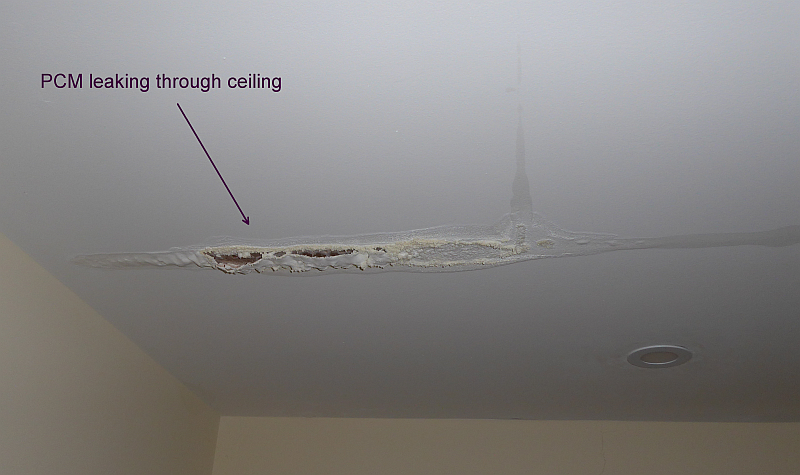
First of all, my apologies for being silent for so long. TBH, having finally settled here in our new home I needed a break from self-build. Not for any particular reason at all, just that I'd been living and breathing it for so many years that I needed some time out, a bit of breathing space if you like. Old age seems to do this, creep up on us almost unnoticed (and I'm now in my 70's). Also I was spending way too much time here, to the exclusion of other things I should have been doing. Anyway, thought I'd post here to hopefully shed some light on how things have gone with our Sunamp adventure, and give a bit of a gentle warning. Those who've been here, and on Ebuild before this place, may remember that we bought a Sunamp PV right back in the early days, before this place existed. We ran that for well over a year, with a few minor teething problems, but it was enough to convince me to swap it for a larger Sunamp UniQ eHW 9, which I did in September 2018. That also had a few teething problems, but Sunamp sorted them out quickly and without fuss. Since then I've been more than happy with the Sunamp. It's provided reliable hot water, mostly heated by excess solar generation, in fact far more hot water than we have ever needed as it turned out to be a bit over-sized. The first time we went away on holiday I turned everything off and was amazed to find that when we got home a week later there was still piping hot water available. I cannot complain at all about its performance, it has been significantly more efficient than a hot water cylinder, which was the reason for me being so enthusiastic about it back in 2016. Sadly, our Sunamp died on Saturday morning, and ejected its phase change material all over the floor, down through the ceiling in the kitchen below: A check upstairs in the services room confirmed that it's death had been spectacular, with PCM all over the floor and a long icicle of sodium acetate crystals down the back of the unit, from the burst casing inside: To it's credit, despite this it had delivered two showers that morning before we spotted the problem. Sadly this was to be its dying endeavour. I contacted Sunamp, not because of any warranty claim (there was no warranty anyway) but to ask them to put me in contact with a local installer for a replacement. I spent the weekend looking at the specs of the newer Thermino models and, given that the 9kWh (11kWh) UniQ was overkill for just two showers a day I decided its replacement would be the smaller Thermino ePlus 150, with the PV02 key to better match it for PV heating via the Eddi (when summer comes back). I found a couple of online suppliers, price, including VAT looked to be around £1,800 or so, plus delivery, which sort of seemed OK. I'm not up to getting the old unit downstairs and the new one up stairs, so I contacted a few local plumbers. All said they wouldn't touch this job. No idea why, it's a pretty straightforward swap, as the PRV, TMV etc is all there, just a matter of re-jigging two 22mm pipes. Seems the technology just scared them off, or, perhaps, it might have something to do with dealing with Sunamp? After a lot of delay, Sunamp customer services came back to me, asked for photos, then went silent. I got on to them again and they gave me contact details for a couple of installers. I contacted them, first one got back to me saying it would be around £6k to swap out our failed unit for a new one. I questioned this. He said it was about a day's work. Now, I'm all in favour of paying a fair rate for a job, but I know how long this job is going to take and I know the cost of all the materials. I am not going to pay a bloke £800 plus per hour, no matter how damned good he is! So, looks like I have to fall back to hiring a stair climber and doing it myself. PITA, as I'd have happily paid someone a few hundred quid to do this (over and above the cost of the bits) but I point blank refuse to stuff over £4k in someone's pocket for a job that is so straightforward, especially when there are installers advertising prices of around £4k to replace an existing hot water system and cylinder for a Sunamp, a job that is a heck of a lot more work. Sorry for the rant, thought it was worth posting here as a warning to others thinking of going down the Sunamp route. I can't fault the performance, but if the cost of repair and maintenance by a Sunamp approved company is so crazy then it may give some pause for thought. I've half a mind to bin the Sunamp and just get a high efficiency 150 litre cylinder installed. No idea what that might cost, but I doubt it would be over £6k. PS: Seems I have hundreds of PMs that have accrued in my time away. Sorry, but I doubt that I have a hope in hell of answering them all!
 19 points
 -
Update: Received the following just now- “Please accept our apologies in regards to not informing you when we issued the CIL Liability notice out at that time, as the originally email with the notices was sent out to your agent directly dated 04/10/2023 (attached). Due to the situation where development has commenced on site and you didn’t get notified, on this occasion we will allow discretion whereby you can submit the relevant forms, and we will grant the relief. Please do note that the full CIL charge plus the additional surcharges will not be imposed.” Thank goodness! These last 24 hours have been traumatic to say the least. But it appears that they do have some heart following my email to them detailing all the flaws in their process conducted. Thank you all for your input and advice. What an amazing platform we have here 😀18 points
-
Prompted by a private message today We have just finished the house With just I say just the drive and patios to do As with our previous build I’ll put the cost m2 Excluding the purchase of the plots But including fees surveys Architects etc etc While I’ve a trade background and plenty of contacts There’s lots of aspects of building a house that where as new to me as they would be to most of you I’m 63 and my wife is 60 and both work full time Monday to Thursday From our previous build to this we’ve tried to do as much of the work ourselves as we possibly could The figures are to encourage Not to discourage and show that you can build a house far superior and much better insulated for less money than your average Persimmon home we are at 420 m2 and have spent Just short of 350k We expect to pay 12k for gates and allowed 20 k for materials for the drive and patios Which the 39k vat refund should cover The seller wouldn’t split the two plots Or the field So we may have another build in us 😁17 points
-
I should probably start a blog for this sort of thing, but I just wanted to let y'all know that we finally got planning permission - 4.5 years after buying the site, after one application with a committee hearing, and the latest application that took nine months to determine. Thanks to everyone on here for their help, advice, and nudges on expectation alignment!15 points
-
Major news!!! Guess what? Sunamp have just emailed me to say that they are going to replace our unit as it is covered by the 10 year warranty on the core! They emailed me as I was typing the reply above.13 points
-
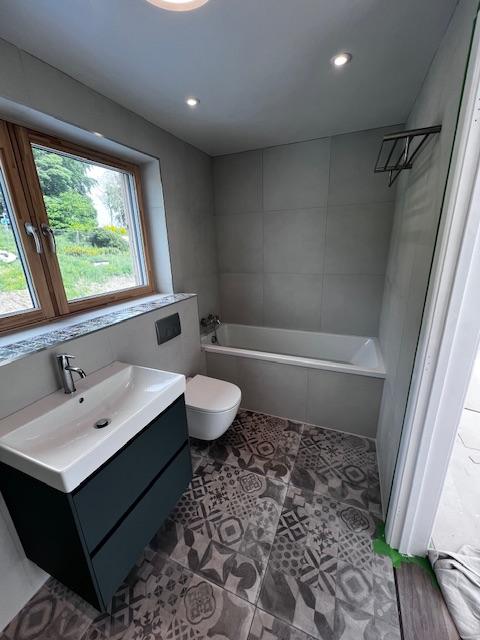
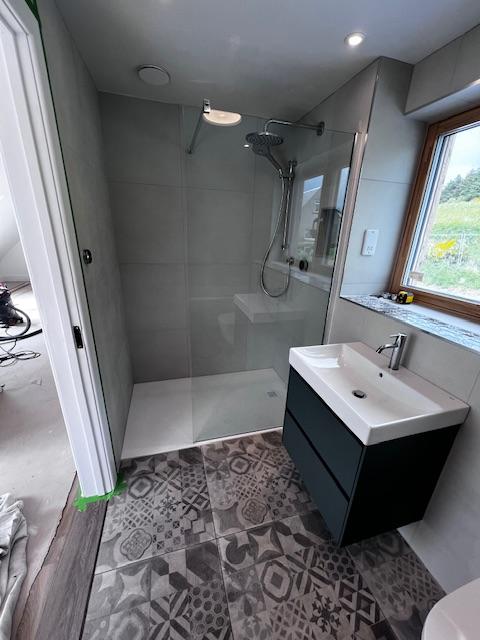
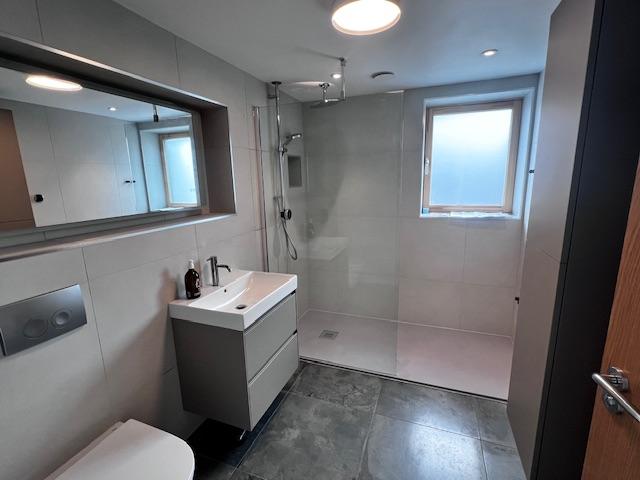
Just been reading through my last post from end of May, and thinking how on earth did it take me so long to get to this one 🤣 A lot of blood, sweat, tears and swearing later, and i've finally finished the bathroom, which has exceeded what I imagined i might be able to create, I still keep walking in and thinking, naaa this can't be my bathroom. So another room brought to a close 🙂 Those panels on the wall were actually meant for the living room, sound absorbing panels for the home cinema, but despite having ordered 'Natural' and them looking off white on the internet, they came with a blue tinge to them so wouldn't have gone. When i asked for a refund, they didn't want them back and just sent me the money, so I thought they'd be useful in the bathroom, and have massively dampened the echo in there. Aside from not plastering the sloped ceiling, everything else you see internally i've done myself, including the cabinets, which I really enjoy making, i took woodwork at GCSE but was at school at the time when IT was just getting going and consequently we were all pushed down that route. Walls are painted with F&B Ammonite, and the ceiling is F&B Wevet, mixed by Johnstones Trade Best success? Probably trusting myself to measure 4 times, cut once, and actually get it right for once...The solid oak top on the toilet/sink back, £130 alone that cost me, but it came out bang on! Total cost for everything was just a shade under £4k. Onto my new snug next which is actually well underway, but i'll post another entry when its all done and dusted in a month or two's time!12 points
-
Well it's the second day on week 4. The ground floor screeding is being done as I type this. To date all the walls are up (they come fully glazed, partially rendered and plasterboarded). The roof has been tiled and guttering fixed, the first fix electrics are done, the first fix plumbing is done (wastes and supplies for basins, wc's etc come ready installed in the panels), the underfloor heating is in and the MVHR ducting in place. In the service room is the cylinder, expansion vessel etc for the ASHP and the external unit is here wrapped, sitting on it's pallet. They started on the 8th April and expect to hand over at the end of May. We elected to use Dan Wood as a "half way house" - it's our original design (although with a nod to that sort of style). We didn't go extreme, much as we would like as I wanted a smooth planning experience, which we got. So, some of the standard Dan Wood bits we omitted. They can finish right up to carpets; handing over complete, save for the kitchen (too many choices apparently). We wanted a UK stair with closed risers so it could be carpeted. DW use bare wood, open riser and being aimed at the German market, the pitch is lower so the going messed up our internals too much. We also left out the doors (odd looking with the leaf rebated and closing against the face of the frame) and floor finishes save for the bathrooms. Those are now down to us. We had to provide the foundation (insulated raft for us) and drainage/service connections. However, it's been a dream not having to organise anything once they sign off the slab as ok. Men turn up at 7.00am sharp and work to between 5 and 6. Saturdays 8 till 1 ish. All materials are either brought with them or turn up on time. Electricians, plumbers, and scaffolders are woven into the work and are here at the correct point. The electrician was here until 11pm finishing off first fix because the next trade needed it done. Every single day it progresses. It probably isn't the cheapest way of doing it ( about £1730/m2 ex foundations) but the joy of not having any arguements with individual contractors makes up for it and there is no doubt the polish crew working on this house work damm hard and do a good job. You have to credit their attention to detail too. They obviously do this all the time as all the membranes are properly taped and sealed, the windows being inserted in the factory are done properly, etc etc. It's clear they have designed out issues over the years and have come up with solutions that work - hence the 20 year guarantee. We could buy the plot but needed to sell our house to fund the build. We are in a static caravan at present on site. Having reached retirement the certainty of getting the build done in a sensible timescale so we could get on with enjoying life was a big driver for this approach. Hopefully it'll be a family Christmas settled into a house this year instead of renting a cottage to escape the cold and damp of a 32ft static!11 points
-
Morning all. I don’t drop in here very often these days but just happened to browse on my way back from an extended trip to the USA. Lo and behold I see a post from @Jeremy Harris talking about Sunamp so thought I stick my head above the parapet and say hi. I’ve just looked at when I last posted here. It was June 2020! Where in hells name does time go? So here’s a quick summary of what I’ve been up to in that time (possibly not in chronological order): Fully retired (two years ago). Finished my build which is well documented here and there on this forum. Then sold it in 2021 and bought a “project” which I gutted (nothing left but 4 external walls, the roof and a worrying array of steel and acroprops). Then spent all lockdown rebuilding it. Finished the house but am still working on the landscaping. Spend vast amounts of time faffing about on my small holding (came with the house). Have I learnt anything? Yes, a fair bit: Stop buying houses on the national park, planning is a PIA (but the views are exceptional). When you retire you can’t work out how you ever had time to work! I can’t sit still. Wish I could (I’ve always known this really). Renovating an existing property is way more difficult than a new build. Building during lockdown was a complete nightmare. The window supplier/installer is more important than the window! Actually had a great experience with this renovation which is a world apart from the pain I experienced with EcoHaus SW and Internorm. Just stay WAY clear of “bleeding edge” technology. Exhibit A: SUNAMP (I might comment on the thread which started this resurrection off). Land is a time sync, the level of maintenance is mind blowing BUT it gives you an excuse to buy a digger, tractor and trailer. Plus a myriad of attachments Well that’s it for now. I can’t promise I’ll return to being a regular contributor. I simply spend much less time time in front of technology these days. I much prefer being outside. P.S. I think I’ve got one more build in me before I fully reach my target of eccentricity and too many animals.11 points
-
Appeal successful. I need to sit down for a while 😁11 points
-
Look what I got in the email !!! Bco can (expletive deleted) off planning can (expletive deleted) off most of all neighbors can (expletive deleted) right off “To fight is foolish , to win is super mofo “ Pocster 2024
 10 points
 -
Small progress. Just because my LPA were teeling me off, I submitted an application and then an appeal to have my PD rights reinstated. This is for a barn conversion completed in 2017 (not by me). My LPA seems to remove PD rights on all new houses. So, one small step forward. I'll post up a sanitised version of the appeal docs and decision notice when I get a few minutes.10 points
-
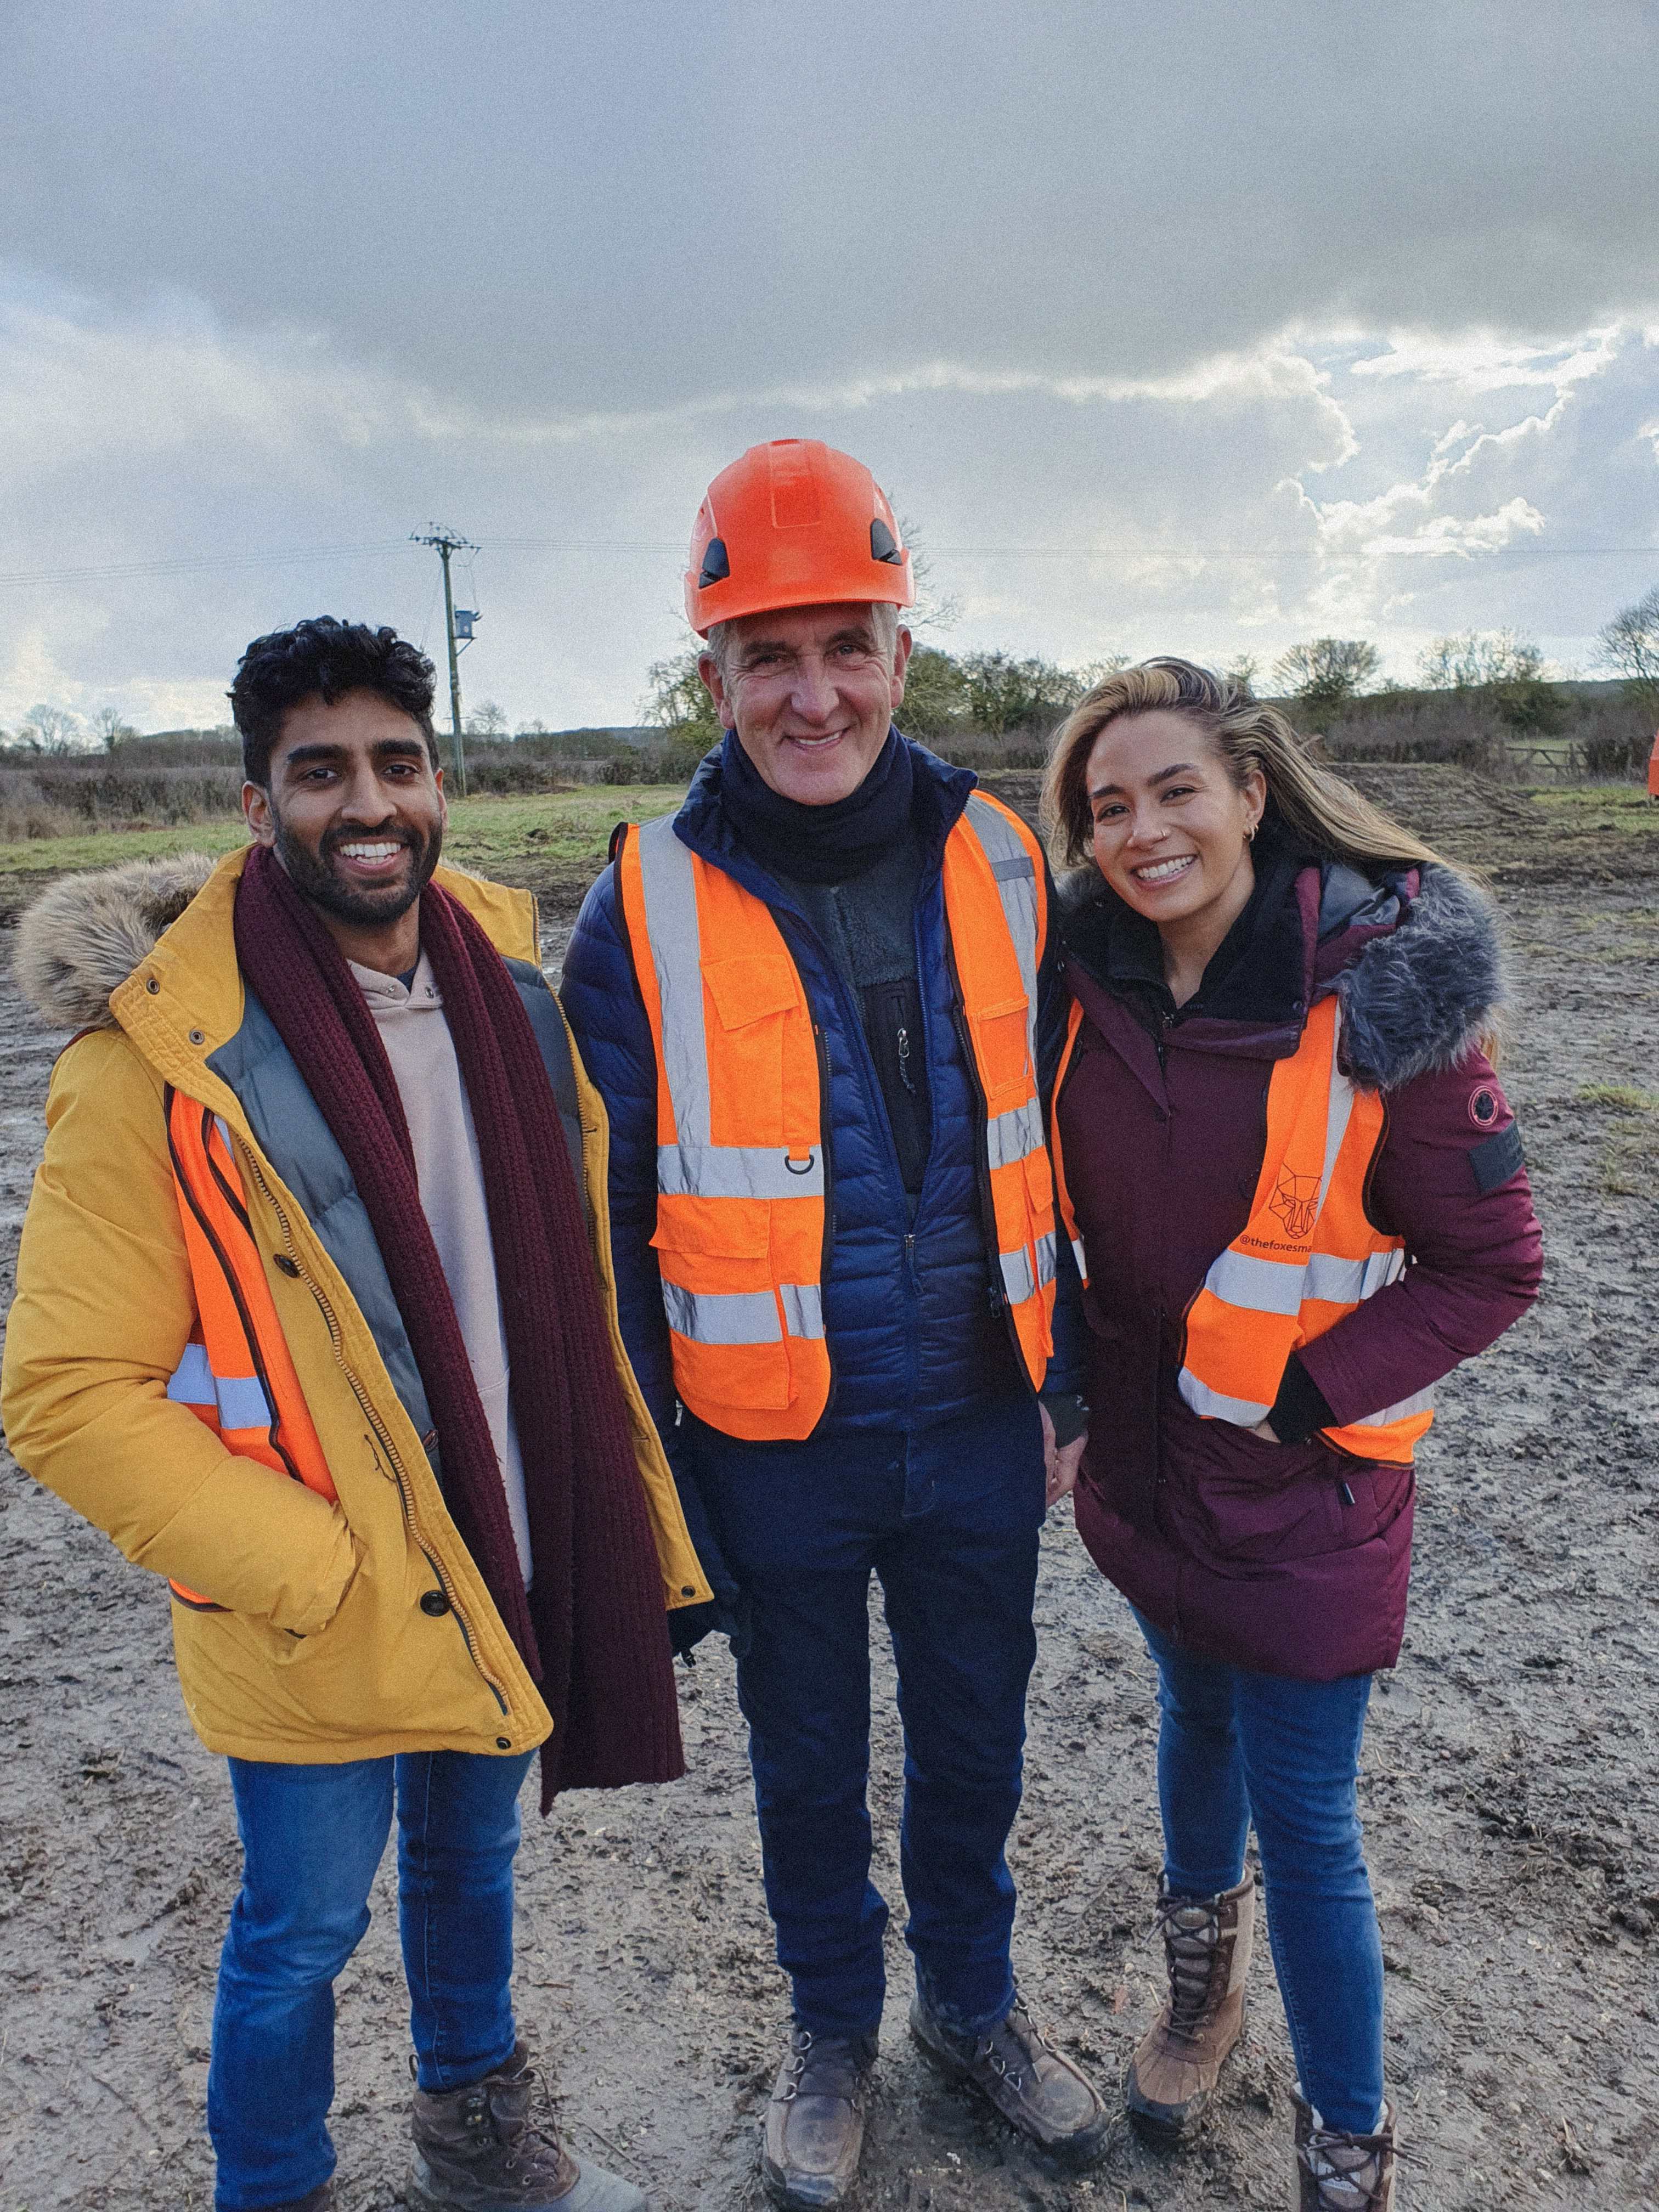
We've had to keep this a big secret. About 2 years ago, we were approached by Channel 4, asking us if we wanted to feature on Grand Designs. Like many of us on here, having watched the show a lot, and seeing how they typically go, we immediately said 'no' 😂 . After a fair bit of discussion, we came round to the idea, as we thought it would be a nice professionally produced story of our self-build, and so here we are. You can catch our full story and how it all went, on Wednesday 2nd October, Channel 4, 9pm. And for a sneak peak, you can see what we've been building on our Instagram: @thefoxesmaltings
 10 points
 -
After what seems like an age (but is not compared to others on here) we have at last are formal planning approval! We had quite journey, some of which is detailed here. We were told by our planning consultant just before Christmas that it would be approved by the 10th but of course until it actually states "Application Approved" on the portal then of course nothing is guaranteed. We were on site today cutting the overgrown boundary to the rear when I got the call to say that it had been approved. So, just a bit to do over the next year or so! Onwards and Upwards.9 points
-
Our certificate was emailed over today , feels like another milestone on the build, despite the fact this will be our second Xmas in the house officially we have(now) completed .9 points
-
it's been a long journey (although about a 1/3 of the time it took @Pocster) but we finally have our final certificate sign-off from BCO. we are over the moon to have passed that hurdle. There's still a long way to go but we are living in the house now and it is performing beyond our expectations and is a wonderful place to live. thank you to everyone on the forum for your help along the way. this place has been invaluable for us.9 points
-
To close off, planning permission was granted 2 days ago. A suitable drink was taken that evening 😁9 points
-
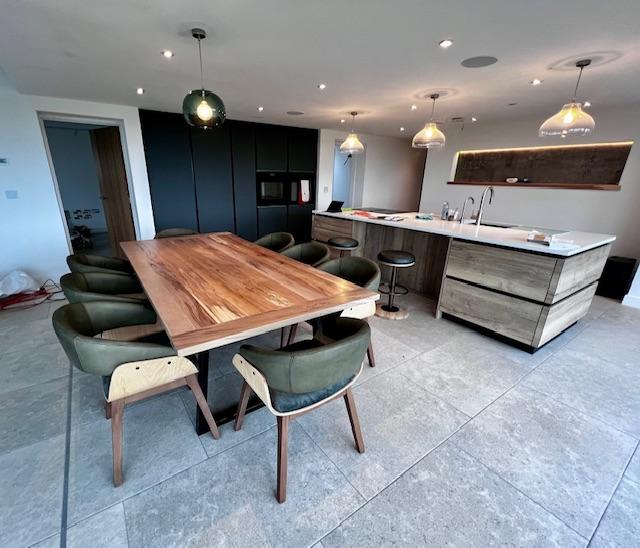
More or less done these two rooms now, which after finishing the bathroom were basically just flooring and decorating, making a bit of furniture and then moving some other furniture I already had which was always destined for the dining room. I’ve got planned some bench seating for the wall side of the dining table to make it more space efficient, but not any time soon. I think this will be the first time, certainly in the last 10 years, where I have no outstanding ‘filler that just needs sanding down and painting’ kind of jobs, everywhere has skirting board which is painted… the little things in life. Everytime I walk in the bungalow and see the French dresser, it just melts my heart, knowing that my late wife would have loved to see it where it is now, we did buy it while she was still alive as they were stopping making it and was perfect for the look we were going for, managed to bag the dining table off eBay from the same range for around £200 I think brand new, and the chairs were ones we had from ikea which I upholstered and painted white to match. I know the plug sockets need covering, managed to locate them just slightly too high! The bookcase is to be backlit with an LED strip light (awaiting Black Friday being the right bugger I am!) and then will be filled with all my books, photo to follow at some point. The hallway has also been redecorated and the floor sanded and reoiled - out of anywhere this small passageway has suffered the most during the works bringing everything in and out, so was nice to get it back to 100% again8 points
-
Winner winner chicken dinner ! Sent an appropriate email about poor service , lack of work required list after bco viewings etc etc etc Said once I get the G3 thing in then all passed and completion certificate issued . @ToughButterCup just checked the dictionary.. Legend = Pocster Pocster = ( see Legend ) .8 points
-
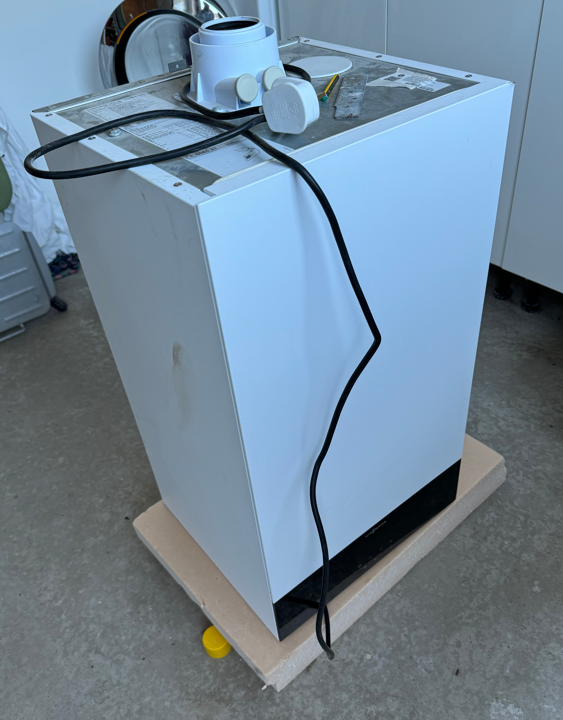
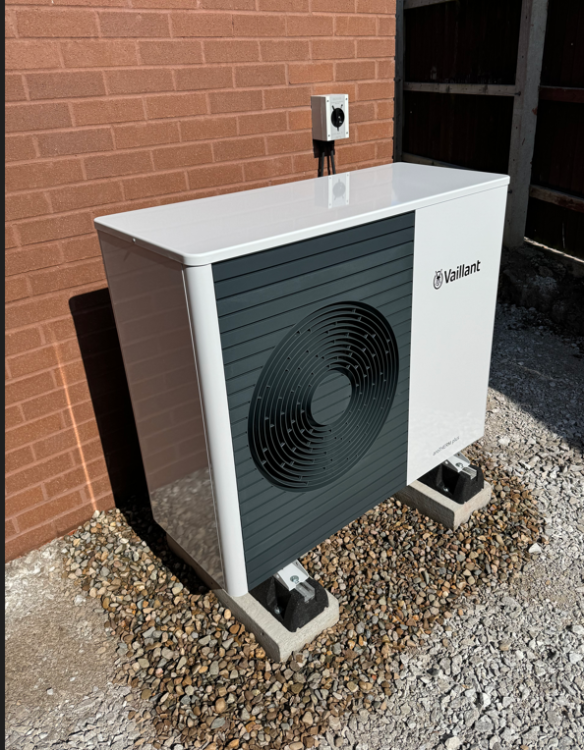
Chuffed to bits, finally finished my diy install of my nice shiny 7kW Arotherm. Have only used for dhw but working a treat once I realised that my esbe diverter valve was wired back to front and I was heating the ufh ! Just need to finish off wiring the OEM stuff. Old boiler out : New unit : Primary Pro and anti-freeze valves
 8 points
 -
last weekend i finished my last bit of plumbing in the house for what will be quite a while! i've still got a few things to do (e.g. dog shower, studio bathroom, basement toilet, outside tap) but they're not critical and can wait a year or two except maybe the outside tap. everything is working (and will hopefully stay that way 🤞). showers are gorgeous and no splashes on the toilet or toilet paper in the master shower in case people were worried. toilets and washing machine are being fed by the RWH tank which gives a great feeling and a lack of guilt when using the large flush option. i just wanted to say thank you to all the contributors on this thread. i couldn't have got it all done without your help and guidance. i think i definitely owe a few on here a few beers. i hope this thread is useful to others who are doing their own plumbing if they're able to read it all. my takeaways from doing my own plumbing? i've saved myself a small fortune but i now hate plumbing with a passion. 🤣8 points
-
After my horrid time earlier this year I am now going to post something more positive. As of yesterday, I was offered a job, not ideal (is any job ideal), rather than working from home I must go to the office which takes 40mins each way and hubby is disappointed that he will be left on his own all day. That said even with time out for funeral 250 miles away and wet, wet, wet we have progressed. Some pictures. hardcore & binding (take 2 after previous issues) now the expansion foam around the sides The heave protection next then taping next was the rebar here is the pour on top of the rebar - 200mm drying concrete slab with no hint of everything underneath, typical building, lots of expense and nothing to see. the first row of outside blocks added showing the cavity first blocks over DPC with all the rain we have created a bit of a swimming pool It was at this point that we purchased a puddle pump as hubby really didn't like having to kneel and build low in water going up with some windows & doors framed insulation going in joining the existing walls to the new part this is where some of the kitchen cabinets will be hung, so although internal we are using heavier blocks to take any necessary weight On the left hand side you can see part of the existing barn that will be staying. The roof is currently being held up with barrels and wood building from scaffolding is a real milestone, makes it seem like we are getting somewhere. To protect the insulation, we have the original insulation from the barn roof cut up to provide a 'roof' over the cavity. Having made the frames for the remaining to windows these need to be placed in situ for building around. This area will be our front hall and snug. Of course, the front door will only be used by visitors, but we will go through the hall internally to get into the snug. With all the cavities it is smaller than I hoped, but with all the insulation it will be much warmer than our single skin house. Hope you enjoy the pictures, next time I hope to be at lintel and wall plate level, but we would like the weather to improve. Thanks for reading Jill8 points
-
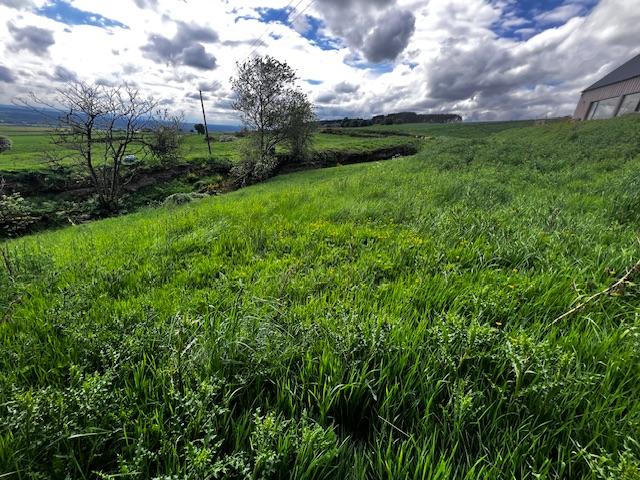
My initial plans were to have rainwater harvesting, build hub taught me no.. so with that scrapped I needed an alternative, soakaways are difficult due to bed rock levels. In addition to this we have lots of run off on the croft, and the track to the house floods. We have already installed a pond for the ducks and this has a large berm to the back and sides so that the runoff is held back and slowly soaks away, but this winter has proved it overflows regularly, that's around 3000L extra. So the plan was to install an overflow pipe from this pond to a new larger pond. The larger pond also acting as rainwater run off capture. The larger pond will have 2 levels, a pond and then an extra layer to act as a overflow that can evaporate and or be pumped to the rubble drain in drier times. I got a big carried away with the backhoe and ended up with around 10M x 8M and over a meter deep. The overflow capacity will be around 30k - 35k L. We had to peck out some of the rock to get depth, and at the front used "as dug" rock from the quarry to form a rough and rugged stone wall, quite in keeping in Caithness. Time will heal the scars and soften the edges with planting. Due to the two levels we came up with the idea of hiding the liner under some camo net, that we intend to plant up in time. Not sure how this will stand the test of time. From the house the rainwater enters a rock filter, an idea loosely based on a post from @ToughButterCup- thanks. From the rock filter we have created a little stream that the rainwater will flow down and into the pond. In addition to this we have a pump that will take the water via a home made skimmer from the pond and filter the water from the pond through the rock filter and stream constantly. This also has a diverter to pump the water past the house and into the field to reduce the overflow capacity in drier times. This is the rock filter, and some of the pipework yet to be buried. Getting to this stage ticked a box for building control as we now handle our run off. We got our completion certificate on the house this week, yeah. There are some things to finish, the second bedroom needs decorating and trim work. And a few small jobs here and there, but in general the house is decorated, and fully functioning. We started the build in earnest around May 23 I think, so quite pleased with the effort and timescale we achieved. It's was built by me and Mandy with the odd person helping with concrete pours. 3 months in summer were busy with the cabin rentals that saw Mandy spend 3-4 hrs a day turning them around for the endless NC500 travellers.😁 We're embarking on the VAT reclaim soon. To summarise the build: 89sqm True bungalow Floor 0.094U (300mm EPs 120mm concrete) Walls 0.139U ICF with 50mm EWI and 25mm PIR IWI Cold roof 0.1U 25MM PIR 400MM mineral wool. UPVC triple glazed windows and composite doors MVHR, 4kW PV in roof, 5kW ASHP, UFH. EPC A103, Airtightness 0.83 ACH.8 points
-
By way of background, I am the very aged IT geek that has done all of the SysAdmin since we first set up BuildHub about 9 years ago. I am no longer involved in Forum Management or politics; I just in keep the forum up and smoothly running, pro bono. i have also administered and run a number of community forums and wikis over the last few decades, mostly using open source forum packages such as phpBB and MediaWiki. However when the founding members set this forum up, we decided to use a commercial Forum package (there was a one-time purchase, plus an annual maintenance fee), because this customer funded business model offers us a better feature set and continuous through life improvement. We chose the forum app from the company now called Invision Community. This a PHP application that runs on a LAMP stack on a hosted Virtual Private Server (VPS). The VPS has grown in cores / RAM / storage over the years as the size of the forum and its user population have also grown. Three years ago, I moved the LAMP stack into a Docker Compose project, and the VPS runs this single dedicated Docker Project which is on open Github. If you want to know more then read the README at Github: TerryE/docker-buildhub which explains the setup. Our Hosting Provider is currently doing an infrastructure refresh so we have to migrate to a new VPS and at the same time I am retiring the use of Docker and switching to the open-source equivalent, podman. See this issue, if you want to know more: A Gemini Conversation about Migrating VPs and switching to podman. Warning: it's a bit long (17 pages) and technical, but it lays out the issues and context. This topic is just to keep interested members informed. Any technical discussion / comment is welcomed. I have opened a companion topic in Forum News and Site Issues: Rehosting the Forum Virtual Server to discuss the more general / policy aspect to allow this thread to focus on the nerdy stuff. 🙂 Can I ask you all to keep to the technical discussions here and use the companion topic for general / policy stuff. @TerryE is my user account but I also have the Godlike @Admin account to hide / delete off-topic posts if the mods don't move them to the general topic. 🤣😱7 points
-
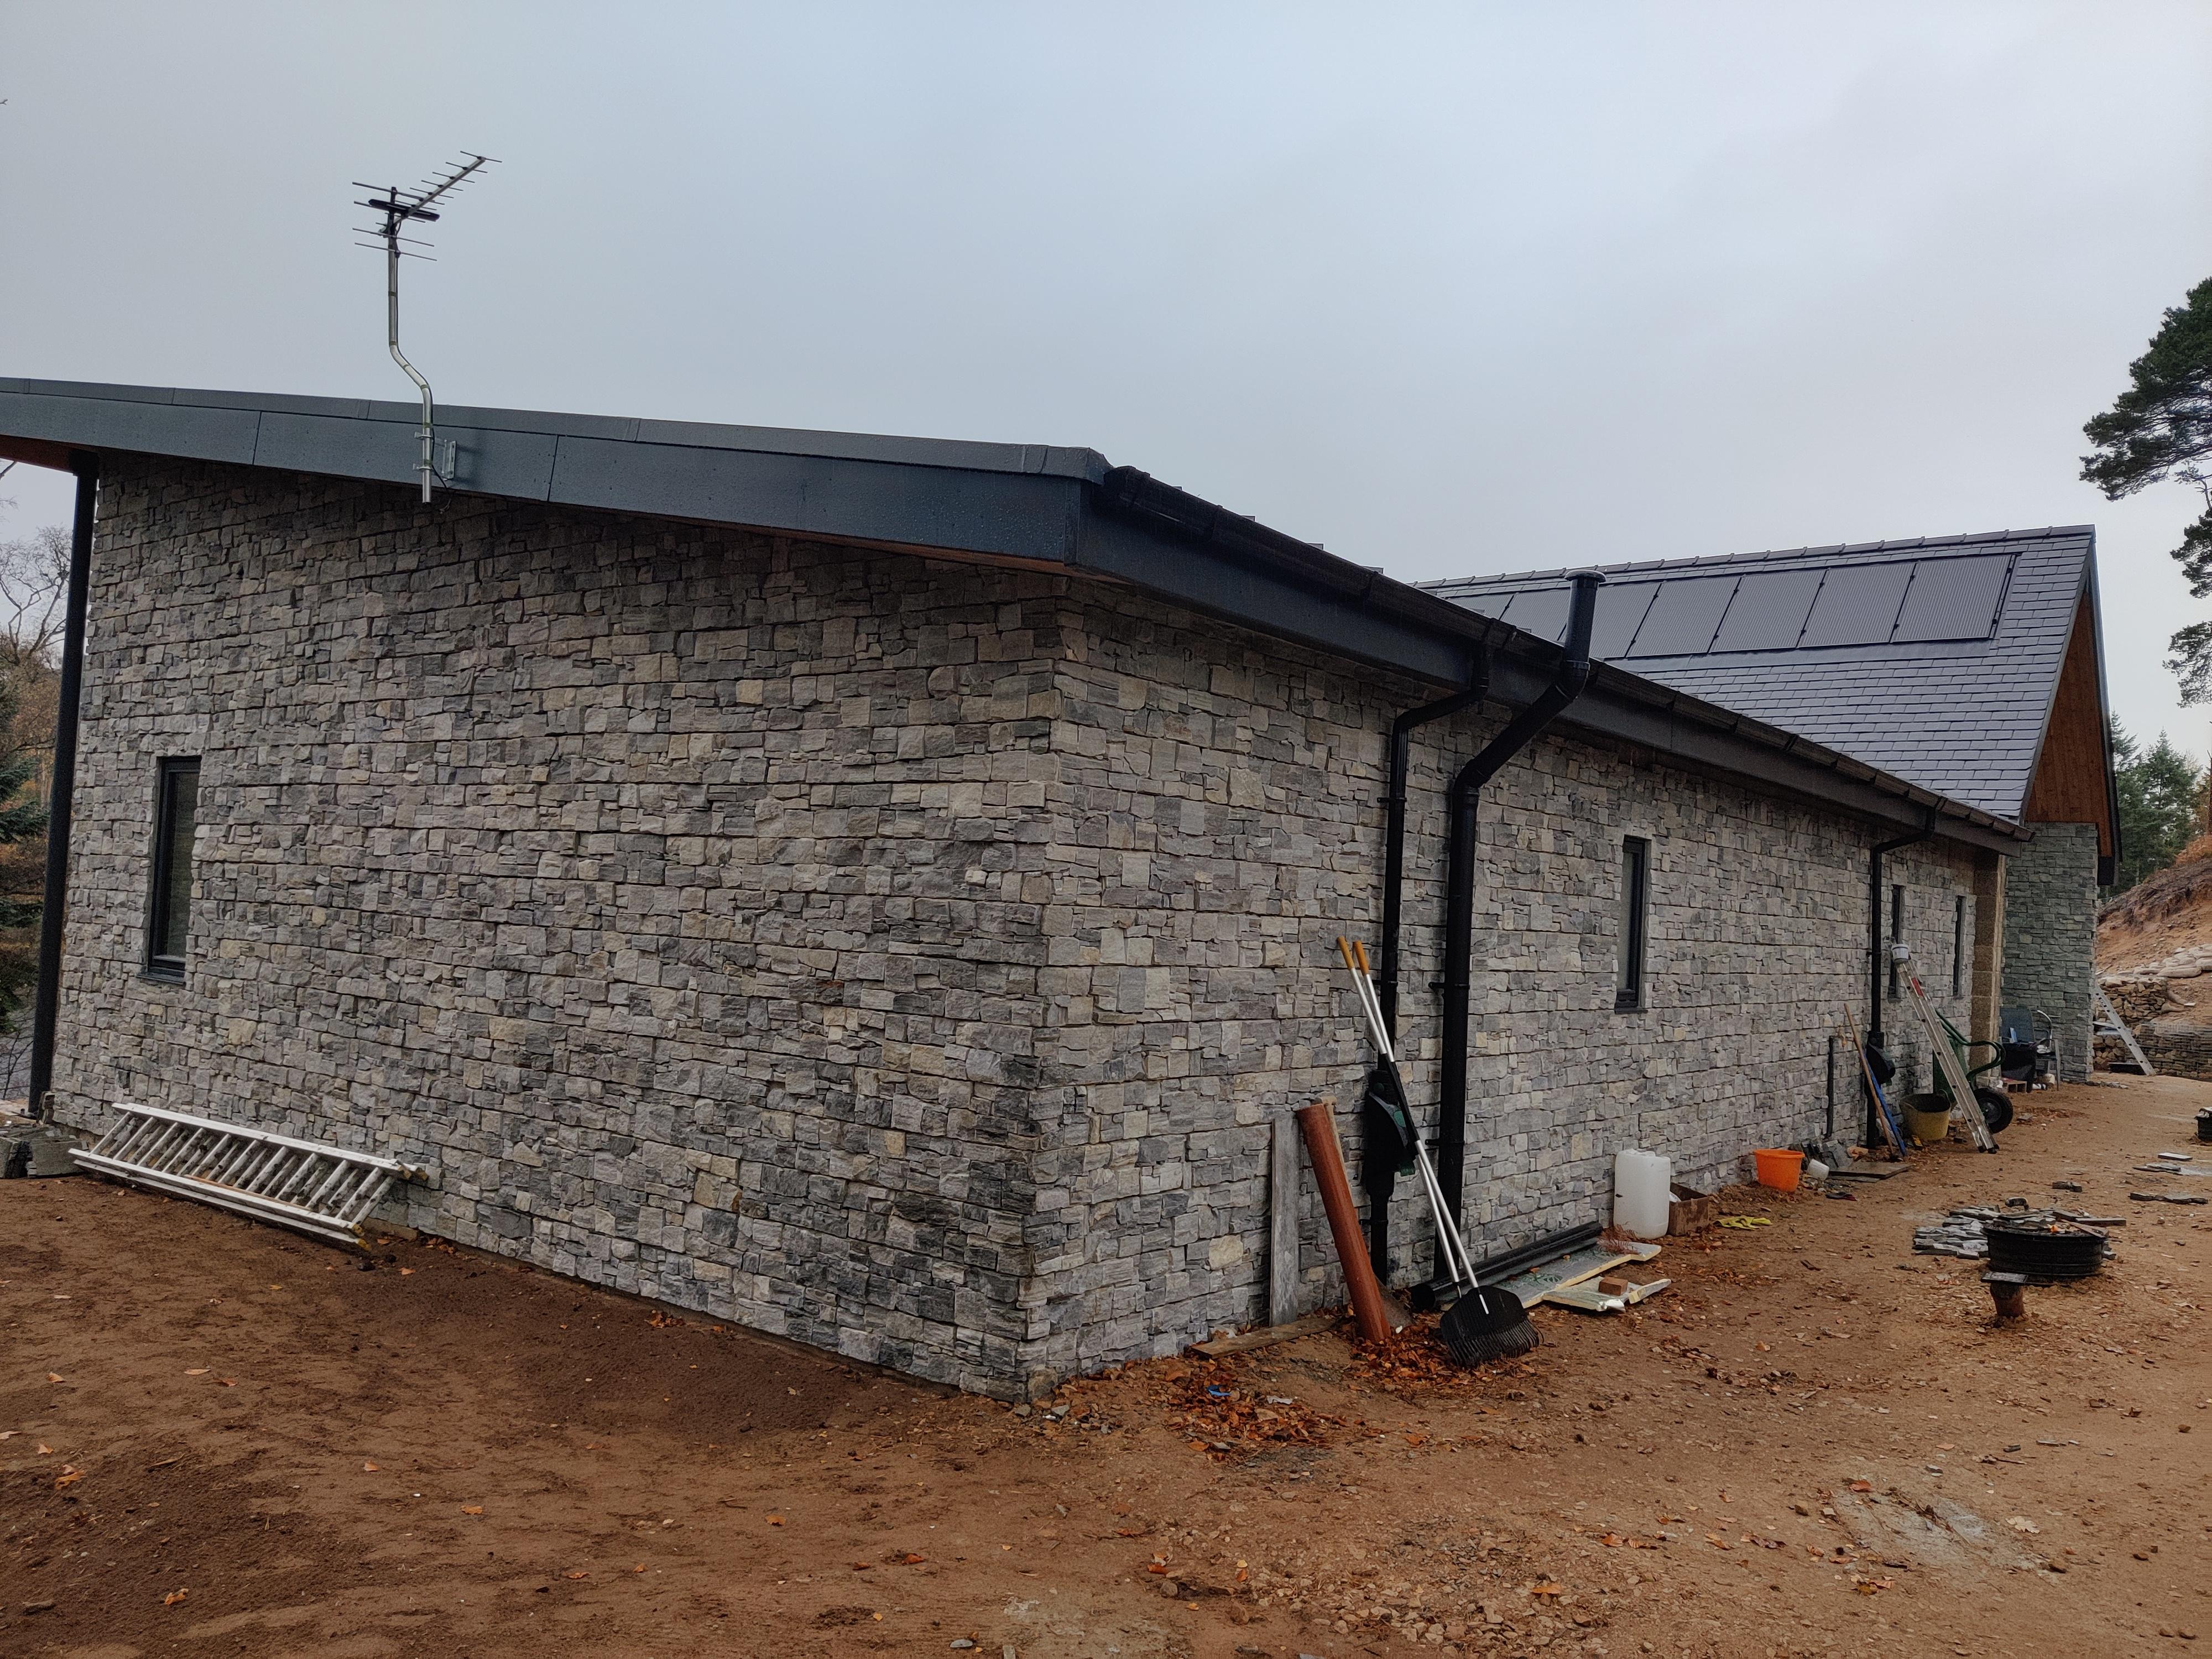
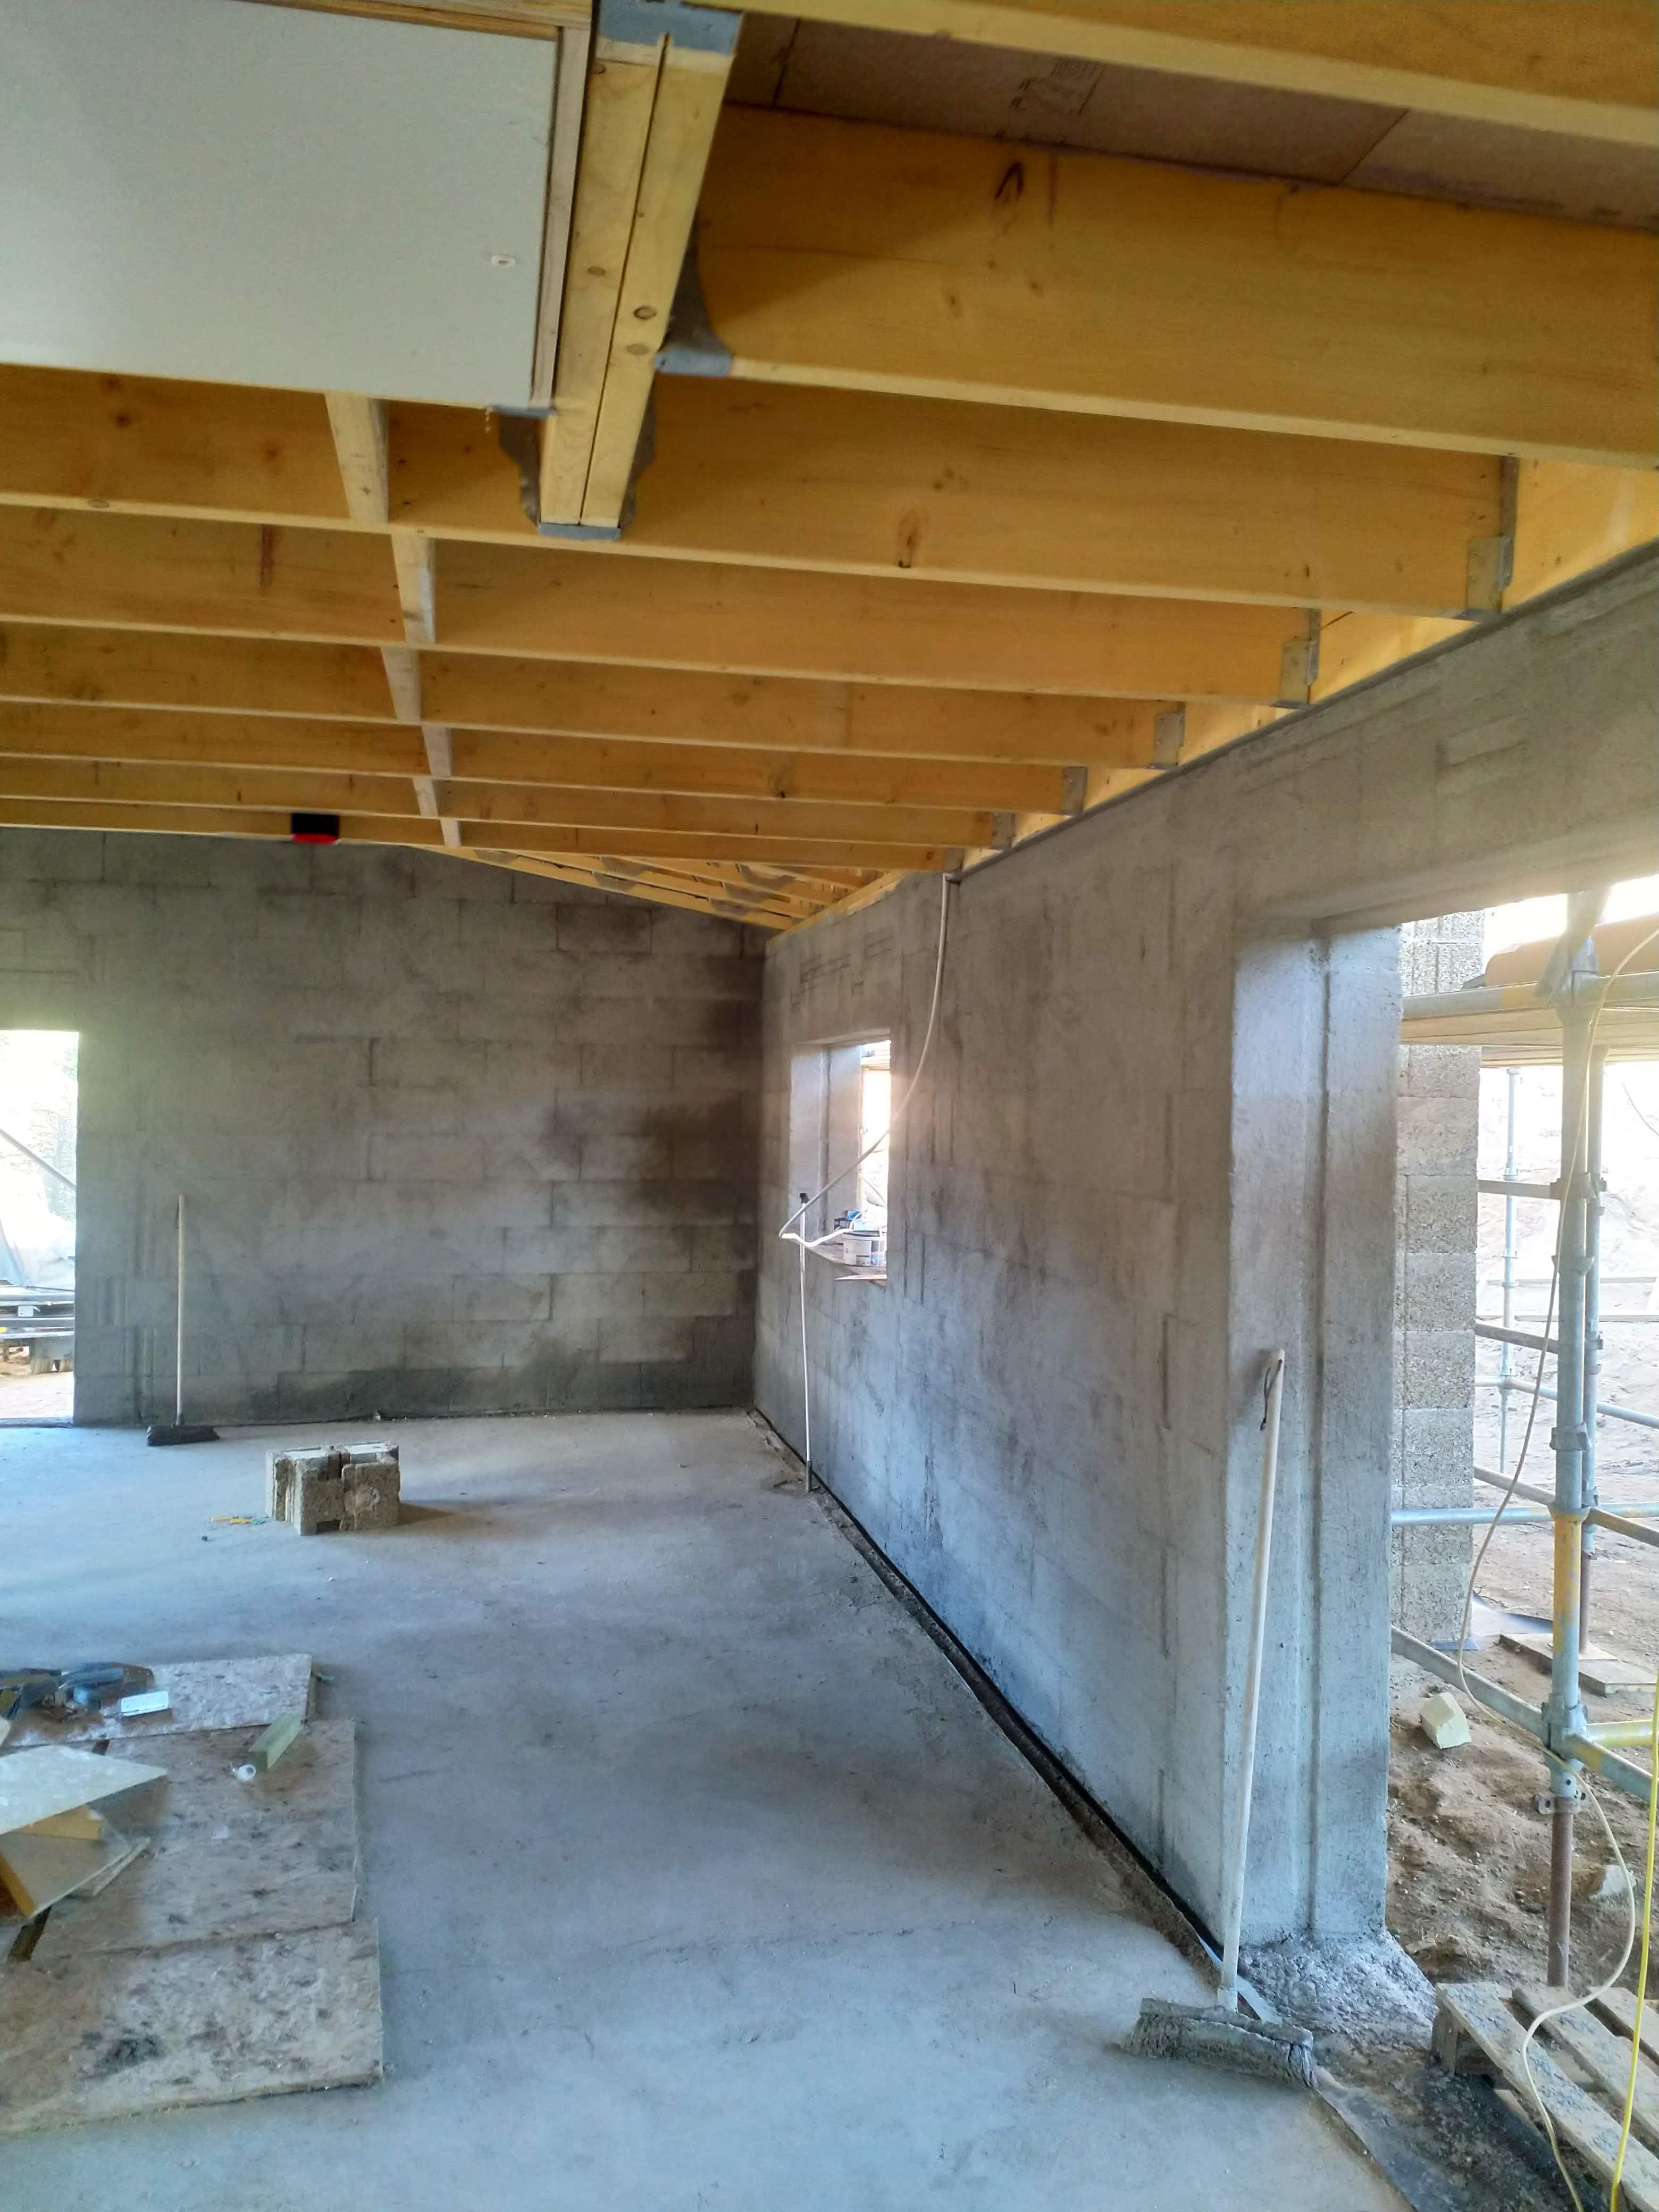
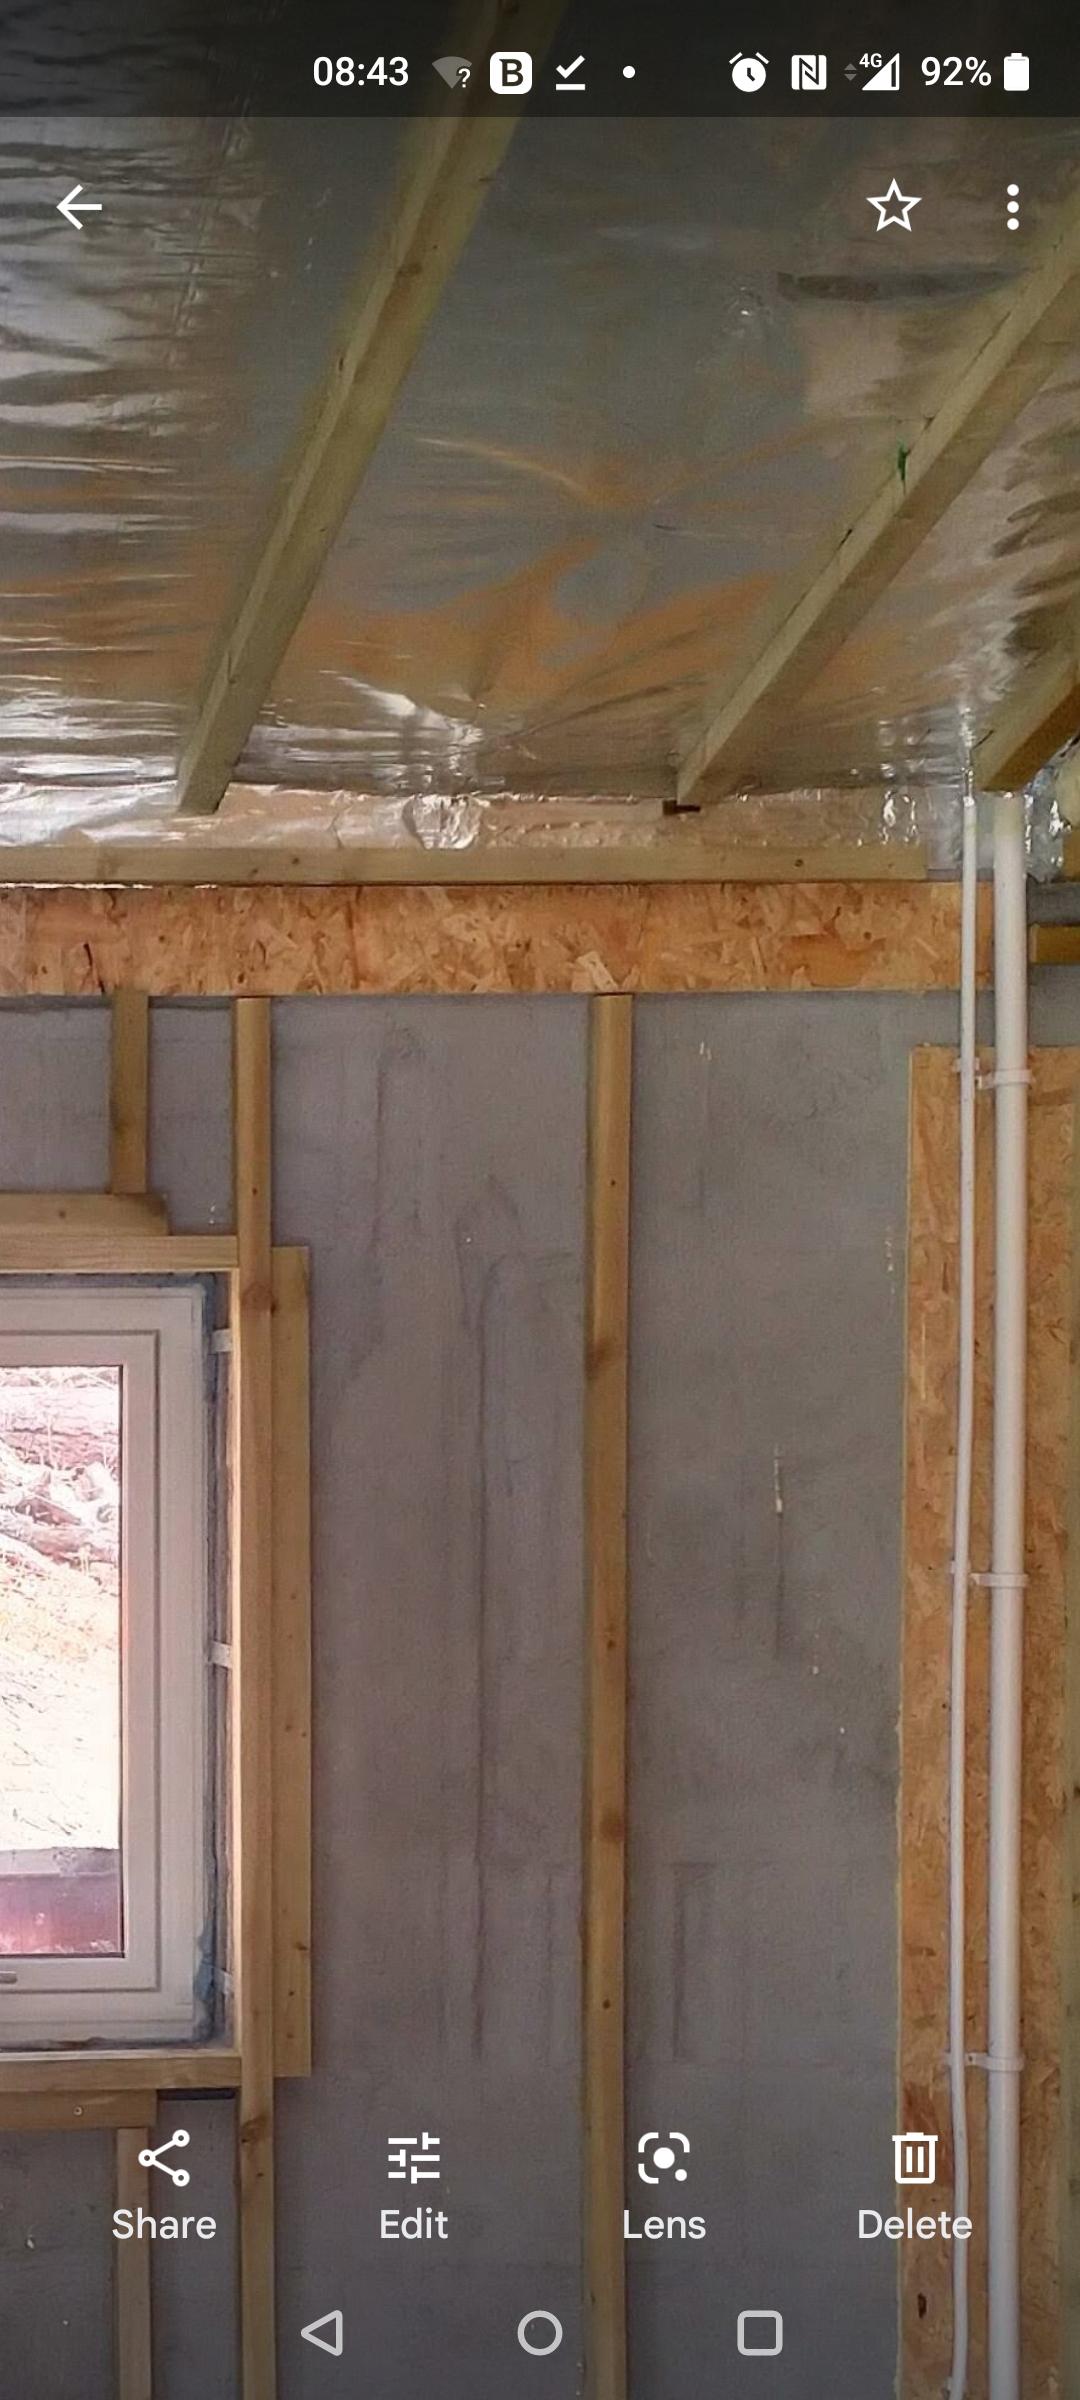
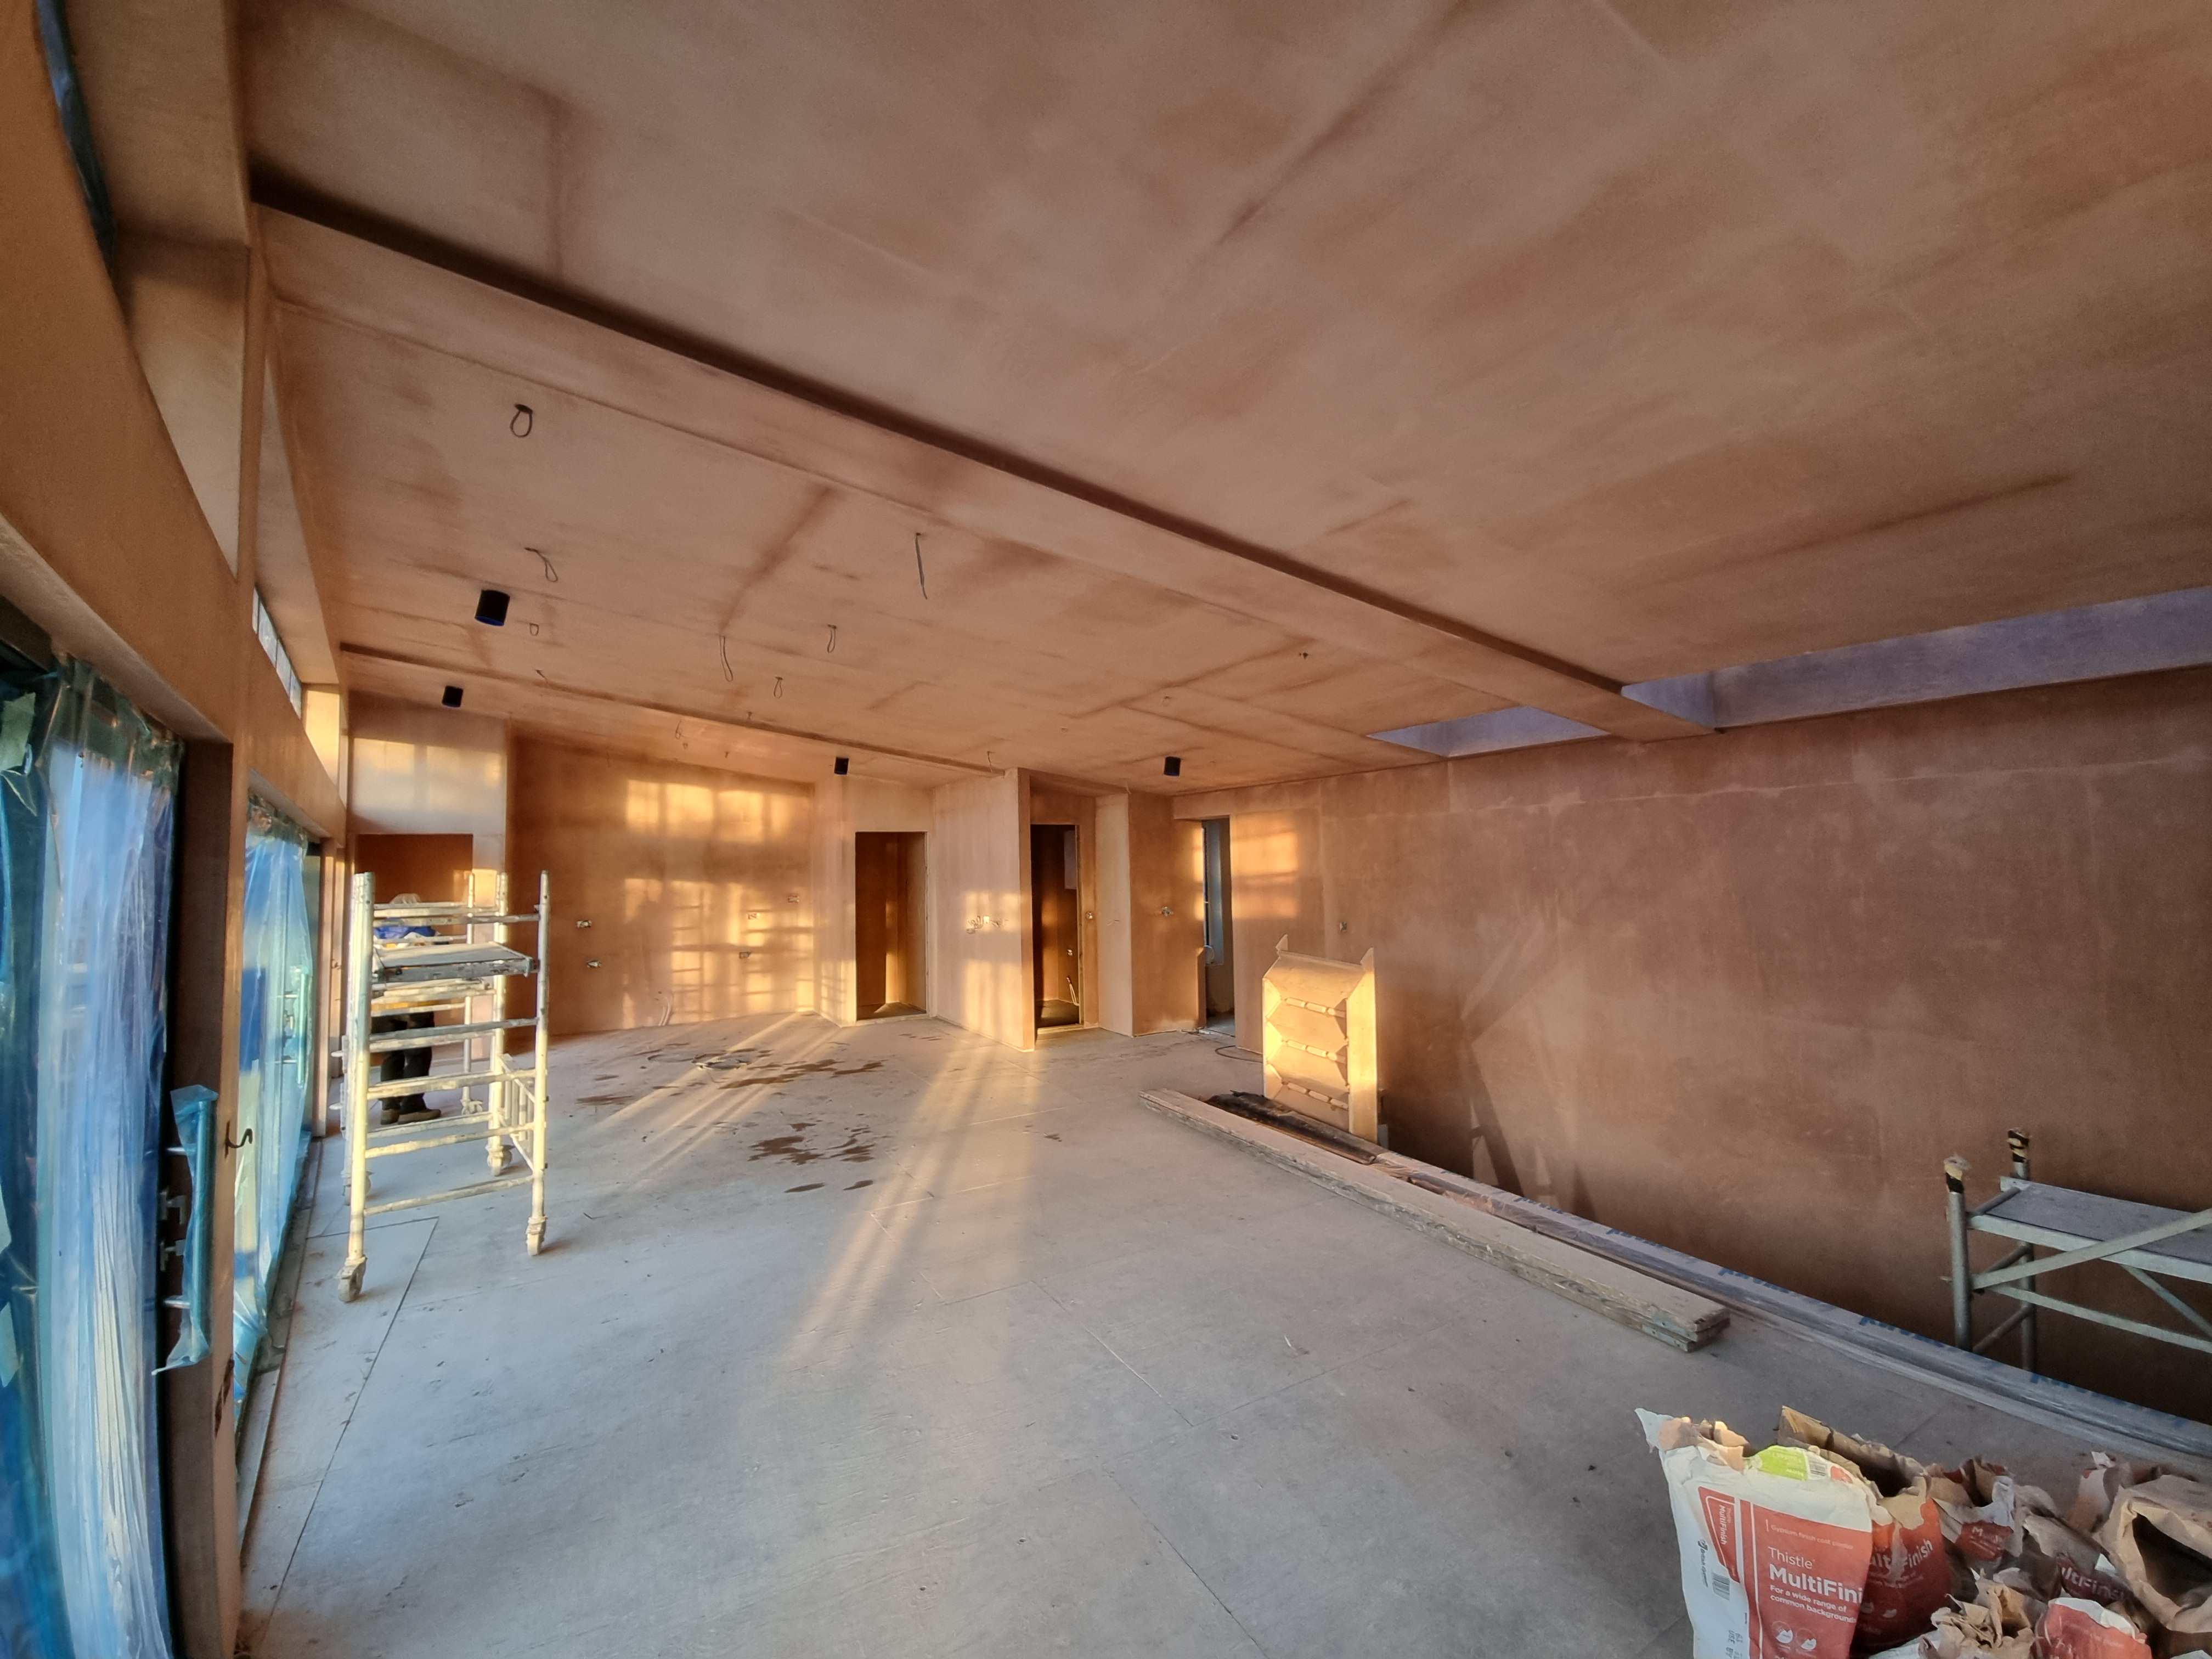
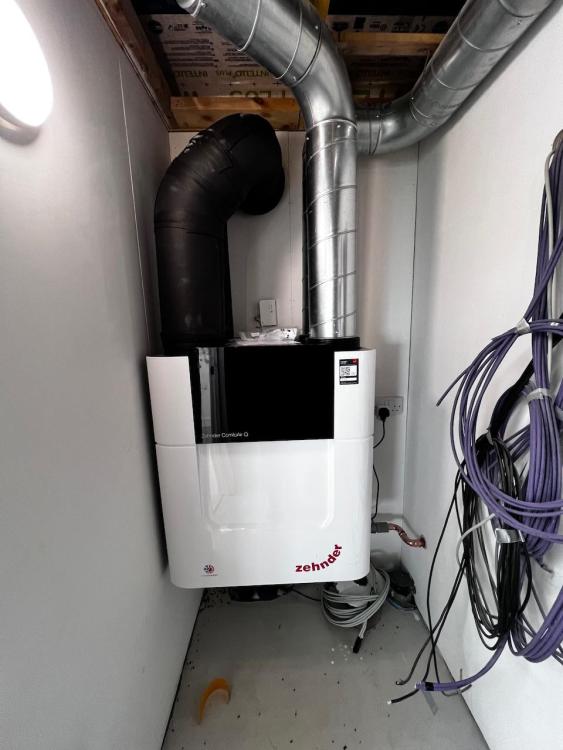
So a quick recap - back in December 2023, what may be my last ever employer decided to ask me to leave. I had mixed feelings about this. I took several weeks to think about next steps and actually get around to writing a father of the bride speech which I'd been putting off. After the wedding in March (a great day and a great speech!) I started to look more seriously for a new job, but being the wrong side of 60 now, the IT industry is not a good place to be looking especially when so many other people have been let go as well. Coming up to the end of May, we sat down and took some tough decisions; we bought a static van on a site about 3 miles from the plot, I stopped looking for a new job, SWMBO did an internal job transfer, we rented out our current house (instead of our original plan to sell up) to three newly qualified doctors (our niece and two others on their first F1 rotations in our local hospital so that worked out well), and we spent 6 weeks decluttering, and moved down SE Cornwall (Kernow) at the end of July. In the last blog entry I ended with a list: Finish ventilation system Finish insulating the GWW Finish backfilling Electrics Floors Walls ASHP and HWC Kitchen Bathrooms The remaining plumbing Outer wall coverings This is how it looks today Finish ventilation system Finish insulating the GWW (Great West Wall) Finish backfilling (on the back burner) Electrics (first fix) Floors (now on the back burner) Walls (En suite partition walls to be done) ASHP and HWC (being done in January) Kitchen (planned for January or February) Bathrooms (temporary loo and basin installed, cold water only, temp bathroom planned for January) The remaining plumbing Outer wall coverings (rendering done, stone cladding starting next week) What I missed off the list, and has taken most of our time: Sound insulation (R35 rockwool and resilient bars) Plasterboarding So a few photos are required I think: MVHR unit in place (since removed as plant room walls have been put in and waiting to be plastered inside) Ventilation distribution boxes and pipes fitted: Plaster board arrived (in May): My cold water manifold has pipes attached for the first time (one now being used for the temporary toilet and basin), no picture of it but just to the right is the hot water equivalent: We powered up the sewage treatment plant for the first time (nearly 4 years after it was first installed!): We started plasterboarding, first a large room into which we moved all our stuff that was in storage so saving a hefty wedge per month on storage fees, and then the much larger and more complex open living area: We took some time off in early October and went sailing for a week, and when we got back some kind fellows had installed some scaffold (first time on this build), and in the following few weeks we had the renderers in thanks to the Kernow weather gods: Meanwhile back inside, we finished plasterboarding the large living area, and during this last week the plastering started (kitchen area first!). We set off a couple of insect smoke bombs as we had a cluster fly infestation and wanted rid before plastering started 🙂 : Dare I add a what's next list 🙂 ? Well, here goes .... Plastering finished in the open plan area this coming week (by others) Remainder of stone cladding arrives and work begins to get the most inaccessible (high) parts put up before the scaffold gets taken away - this means cladding two 7m x 2m wide walls Plumbing pipework ready for ASHP installation Gabion basket and pad for ASHP to be installed on Mist coat and first coat on plaster (SWMBO is at the ready) Begin fitting upstairs UFH Front door being fitted (January) by others Take 3-4 days off for Xmas ASHP installation (January) by others, that will allow for hot water and the downstairs UFH to be available ... Fit a temporary bathroom ... Fit out utility room as temp kitchen ... ... and this is why - Move out of static van for the month of February (rules is rules!) and decamp to the house Well, I'll let you know how it all goes 🙂7 points
-
We’re rebuilding a Victorian bay window with a focus on thermal efficiency and restoring some period detail. To achieve this, we designed and cast our own bespoke window cills using GFRC, 3D printing, and innovative materials like glass bubbles to reduce weight and improve insulation. This post shares our design process, casting experiments, lessons learned, and the final results. Design I used SketchUp to produce the design for the side and centre cills. The bay has external wall insulation so the cill was designed deep to accommodate 10mm aerogel, 50mm PIR, render and the offset from wall. The 10mm aerogel was something I wanted to try out, and doesn’t add much compared to just using 60mm PIR. For some reason the grey versions of aerogel with a 0.015 thermal conductivity are not easy to find, so settled with the 0.019 grey blankets. We are targeting below 0.15 U value. The EWI gets us to 0.16 with additional internal insulation needed to be below target. The cills themselves are a thermal bridge 210mm deep then 100mm of structural insulation for a 0.34 U value, I haven’t yet decided on the further internal insulation to get below 0.15. I am trying new things out with this and will try VIPs. I have a budget for trying out new insulation. 3D printing The first concept of the design was printed out in a 3D model, including a wall return, stools for the jambs and mullion and underside drip. And later its mold to test the casting process. Structural insulation The plan was to install the cills on the exterior half of the wall, then given the deep cills a section of structural insulation was fixed into the wall to provide some support for the cill in case they were used as a step. Here this is fixed to the top of the wall and replaces the 50mm of PIR which otherwise would have been used. Casting Once the cill designs were done, I made a mold of the cills for casting with concrete and sand. The mold was 3d printed and via some experimentation manage to find a way to get a stone effect for the face coat. The idea of casting my own cills started while looking at GRFC concrete countertops, so my mix included glass fibres. The hope is that they prevent cracking, but the cills are already substantial so they probably don’t need them, but I kept with my original mix design. I don’t think the glass fibres added much to the process, except additional complication. If its reduces cracking then that’s helpful. Glass Bubbles I later tried an experiment using glass bubbles. Half the sand was substituted for glass bubbles to improve the thermal efficiency of the cills, (only a little) but its main advantage was in reducing the weight so it was possible to move the cills around with some ease. It also helped reduce deliveries of the sand. I was using a white sand which was an annoying bulky delivery. The glass bubbles tended to rise to the top of the mix, here the top is the bottom of the cill which was problematic for creating a flat surface. I later experimented with covering this to produce a flat surface but I manage to instead amend the mold design to be fill from its back. The advantage of this was that the slightly uneven surface was in an area where it didn’t matter and also the glass bubbles would be situated more evenly towards the back of the cills thus helping with the thermal efficiency of the cills on their internal side. Test casts I had about eight different cills cast before being totally happy with the design and the casting process. I experimented with using cast stone dust, but with a bad result (probably from my poor face coat application) so I moved away from a “bath stone” look to a white to be further finished. Completed Cills Once the cills were done, I was able to see how to progress upwards for the rest of the bay window. At the start we were happy to accept the bay would be a thermal bridge requiring lots of internal insulation. The benefit with this design is that much of the insulation is now external saving on the floor space. It took some time, which I have and I am happy with the result. Since I installed the jambs and mullions and making the header/lintels copying the original design in the area. Plus the cost is much reduced. The original plan was to spend 30k on the bay window build, as a standard build, that cost without windows relying upon insulation being done separately afterwards. Instead we have managed to spend 5k on tools and materials, including £500 for a 3d printer but lots of my time.

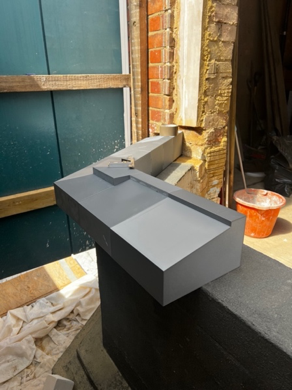
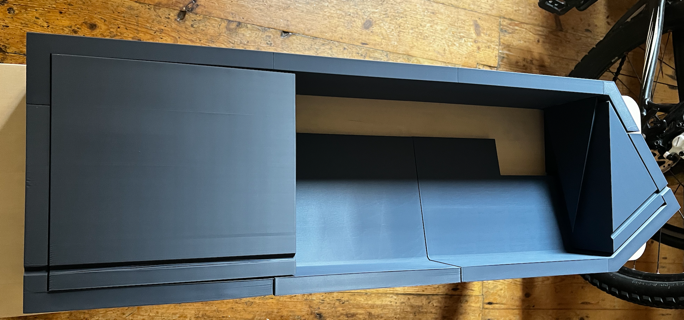
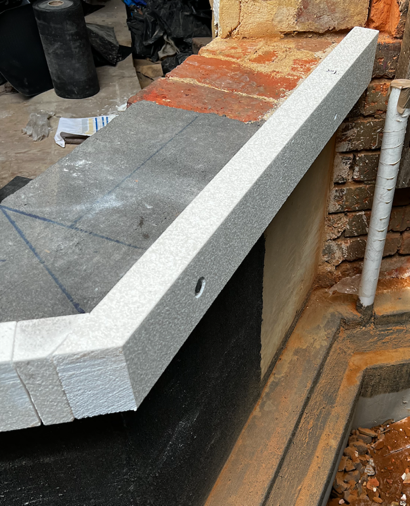
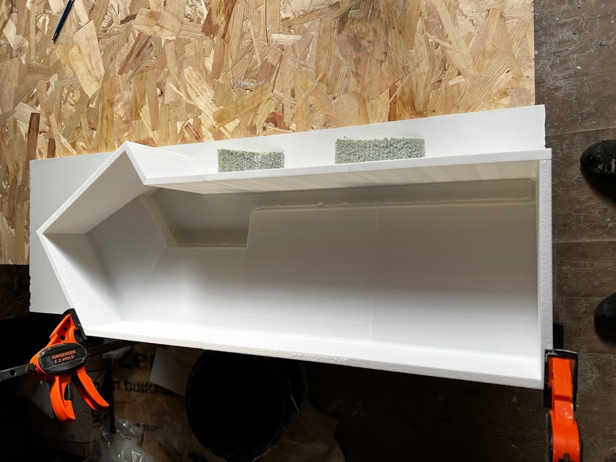
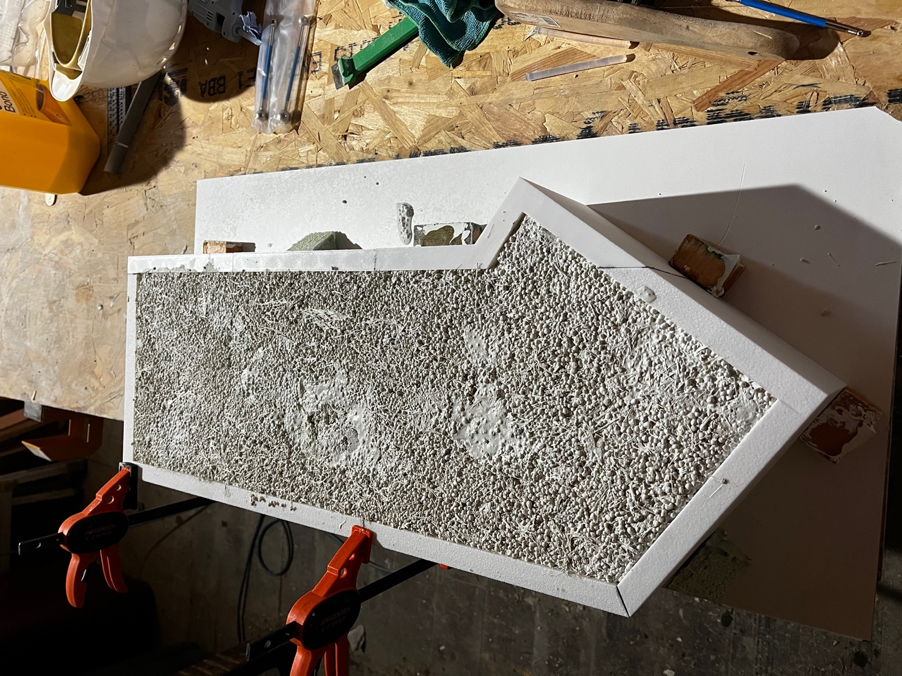
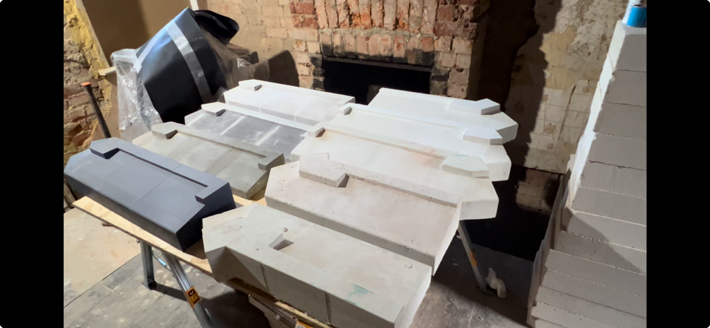
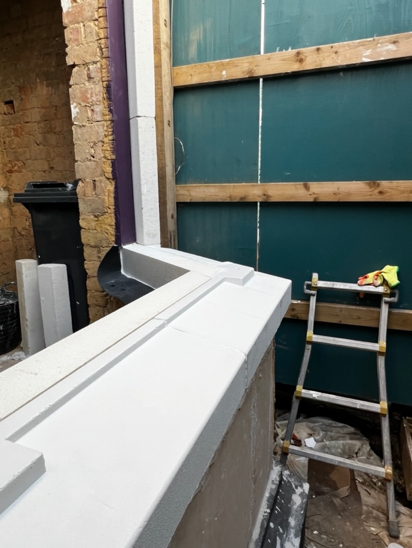 7 points
 -
Good morning. Been quite some time. I doubt anybody will remember me, but I used to enjoy participating on the forum. Only reason I disappeared a couple of years ago was, wife got ill, and to be honest, I found myself getting depressed. I don't think I even realised the depression, until I came out the other side.....I have missed giving Pocster a hard time for his solweld skills though. I hope all of your projects are going well. I must say, I'm looking forward to being back. The skill and knowledge level on the site has always been fantastic. Together with the willingness to share that knowledge, and the pitfalls, and good times. The only thing that would be useful to me at the present time would be if anybody has any recommendations for a really good planning consultant in the Hertfordshire area. Anyway, I look forward to participating again in this excellent forum. Best of luck to all. Regards Jim7 points
-
Weeks 18 to 23 So it’s been a while since the last update, but a couple of weeks ago the scaffolding came down and we can finally see our lovey slated roof and the solar. I am very happy with the roofers who worked so hard in the cold and the wind, as we are quite exposed. Anybody in the South West looking for a roofer I would be happy to recommend them. On the inside I have started with the insulation between the rafters. I am using Rockwool flexi slabs 140mm thick with an air gap above. On the outside I have put some insect mesh up already before the soffits are closed up, it’s attached to the ends of the rafters and will eventually be attached to the battens/cladding. As per previous blog the costs of parting with the builder and finding our own roofer and solar has proved to be good. Their respective quotes have been invoiced for the same amounts as the quotes, no extras or surprise costs. A saving of at least £12,000 against staying with the builder as his quote would have also incurred extras no doubt as he didn’t include Soffits on his build quote or roof quote, and he acknowledged they had not been included in any quote. Carried forward total £140,645 Scaffolding for roof £1440 Roofing. Felt and batten. Slate with Brazillian Graphite natural slate 500 x 250mm. Hook fix system to costal zone spec as per plan. Dry ridge system Con6 with Marley modern smooth grey ridge tiles. Two vent slates. Total supply and fix. £16786 Supply and fix softwood treated facia and bargeboards. Eave ventilation. Complete counter batten. £2111 Solar 15 x500W solar panels and GSE in roof trays. (Interior fit to be completed once windows are fitted) Supply and fit £4357 DPM for windows £316 1 Pallet of Rockwool 46m2 (Expect to order 2 more pallets to finish between rafters then PIR under rafters) £580 First electrical order (cable and back boxes, enough to make a start) £280 Windows all paid for £20869 A few incidentals from B&Q and Wickes etc Brings the total to date of £186,7577 points
-
I’m sorry but installing insulation takes time and I always charge for it. It is not something that should be included in the rates the same as feature bands, cutting up gables and cutting the bottom course of blocks where others have lost the ability to use a laser level correctly. I won’t take on projects with tongue and groove insulation because it’s not fit for purpose. Cutting and installing full fill insulation requires the following skills. 1) be able to use a tape measure 2) be able to use a long sharp knife and a cutting slot. 3) be able to think ahead 4) checking each junction as you go. 5) protecting work properly as brickwork progresses Gaps in insulation is my pet hate and the lads who work with me know it and have known it for years. I can guarantee that there isn’t a single gap in any of the cavity insulation on the 2 houses that I have just built for myself. Like I said it’s not rocket science but it does take time to get it bang on. Time should be paid for. Some of the bricklayers that have worked for some of this forums members were most likely used to working on a ‘rate per 1000 all in’ to include all the sundries. I stopped giving my time away for free 30 odd years ago. You pay peanuts you get monkeys. I do agree that there are plenty of poor bricklayers about but to tar them all with the same brush is pure stupidity.7 points
-
Item 1 on the latest list is complete 😁
 7 points
 -
I hate these types of threads.....there is absolutely zero standardised way of quantifying this question. There are far too many variables in how folks achieve a self build and what they include in their costs to enable a like for like comparison. @nod is an absolute outlier and every time this question is raised pipes up about how little he has spent per m2 with no context to how that was achieved. Is land included in your cost there, i expect not, how much have you spent on labour throughout vs how much have you done yourself? There is not much to be saved on materials...shopping around and economies of scale will help but the margains for material cost savings are small compared to the savings which can be made if you eliminate external labour costs and are able to do the work yourself. Labour costs are the killer and individual self build costs per m2 are primarily determined by how much work they can actually do themselves. But it comes at a cost of time.7 points
-
For starters, my list includes: + force the inspectorate and LPAs to publish full stats and don't let them play games e.g. taking 3 months to get to validation. Put the bottom 5% in 'special measures' without fail. + penalise LPAs financially if they're slow - return planning fees after 13 weeks, automatic approval after 20 weeks. + penalise LPAs if the pre-app advice they give is wrong. Allow recovery of resulting follow-on costs in the county courts (architects fees etc) due to erroneous pre-app advice. + force LPAs to accept paid-for meetings with applicants. + stop LPAs using generic terms without more detailed definition - amenity, environment etc. + allow applicants to nominate applications for planning committee review. + make single dwellings exempt from part O, SuDs, biodiversity, nitrate neutrality rules. + make LPAs suggest design amendments (in at least 3 rounds) instead of just blank refusal. + disallow LPA refusal using generic terms without evidence & substantiation. For instance if the LPA thinks the design is 'too big' they should justify why (e.g. floor areas of neighbours, average floor areas in LPA region) and propose a figure for an acceptable floor area. + for appeals, throw out the LPA statements of case (i.e. appeal automatically allowed) if the LPA doesn't follow the appeals procedural guide. + automatically award full costs (including applicant's time at a prescribed rate) if an appeal is allowed - right now, there are no repercussions for an LPA that wastes applicant's resources by going to appeal.7 points
-
6. Force development companies to start building on their "land banks" or compulsory purchase them and return them to other housebuilders / councils / small developers.7 points
-
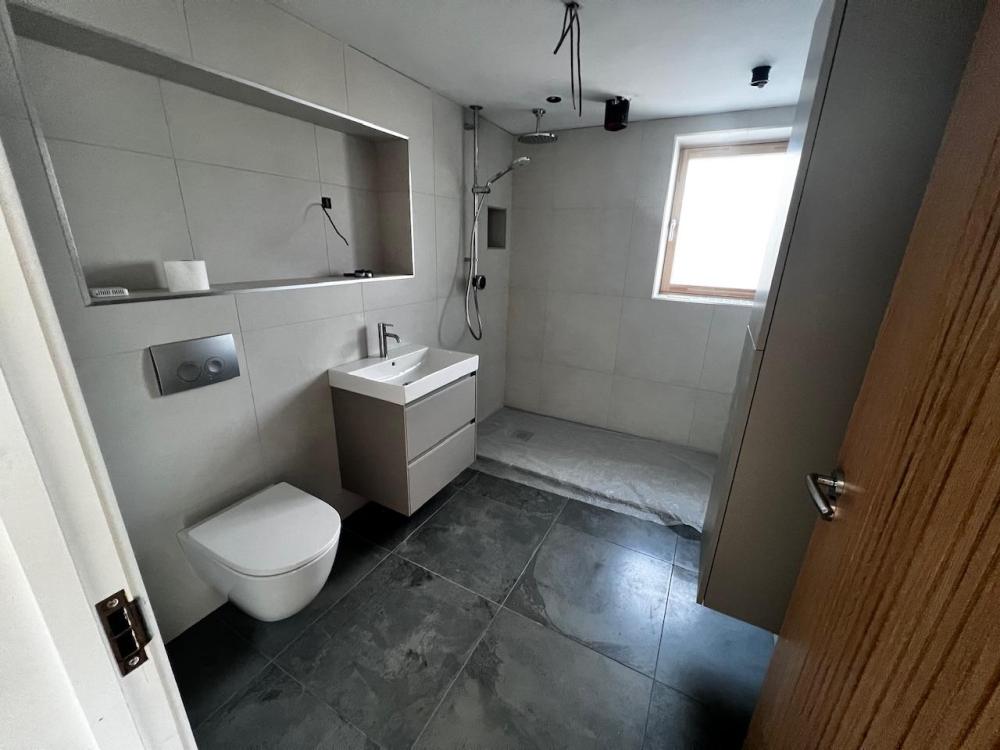
Well, technically, we can move in. I needed to get the downstairs bathroom finished which I’ve just done. Electrical/fire sign off was completed last week and I’ve got the certs. Stairs are finished. I’ve configured the Loxone system which is mostly working as we need. Still lots to do for final sign off but BC have said we are fine to move in now. We’ve also gained two orphaned lambs so that takes care of the grass cutting 😂 I also plumbed in the drinking water tap so it effectively is straight out the borehole through a pre-filter, into an accumulator, through another filter then UV then to the tap. Tastes lovely.

 7 points
 -
Thanks to the relatively mild weather this winter i decided to start chipping away at the bathroom project, which is being extended into part of the extension which was finished over a year ago. This gave me the opportunity to install the bath, sink and toilet in the new bit, at which time I’d totally disconnected the old bathroom allowing me to strip it out and that’s worked really well for my as I struggle to do more than 4hours in a single day so I could keep doing a bit and stopping when I’d had enough. didn’t fancy tackling the ceiling for plastering in the new bit so got a pro in to do this bit for me, all done in a couple of hours which was nice. and made the most of the space and got the painting done after putting a layer of 10mm marmox board down ready to accept the underfloor heating mat Next job was to start making a frame to hold the toilet frame and the sink and cabinet Decided on making my own cabinet rather than paying silly money for an MFC one, got pine furniture boards, a pocket hole jig and a new router and came out with this which I’m pretty happy with that all got painted and the sink installed, wall mounted tap and the wet room panels that I’m using both for this and for the walk in shower area all installed. got to work cutting the OSB backing and wet room panel for the toilet in prep for the final big push to disconnect the old and commission the new, that was a hard days work! And then bath and toilet all installed once the shower area is complete the bath will be disconnected again to lay the underfloor heating, self leveller and the flooring before being put back in place, and eventually building the wall and plastering it. Made a start on stripping the old bathroom out Next job is to patch up the loft insulation where the old spotlights were, new wiring in place for a single light fitting this time, airtight membrane adhered to the walls and then battens before reboarding it ready for plastering. Floor is coming up also to be replaced with 22mm chipboard to match new bit.7 points
-
Good luck with your project. I can safely say that having the exact opposite experience, e.g. discovering buildhub 3 years before my build actually started. Has made more of a difference than any other factor. I had no previous DIY or building experience. In no particular order here a few areas where BH was instrumental in shaping my house build journey. 1. Insulated slab foundation. 2. UFH in slab, not screed 3. Proper ASHP configuration. People like HeatGeek on YouTube are now advocating this stuff, but back on 2018-2019 BuildHub was already there. I have an insane quote from a Heating company in 2019 pricing my ASHP/UFH set-up @ £40,000+. I would be surprised if my ASHP/UFH install cost me more than £5000. 4. Going from resisting MVHR, to embracing it. The sooner you incorporate the MVHR ducting solution into the fabric of your build, the easier things will be. Every structural decision needs to accommodate how the ducts are going to route through the building. 5. Ducting requirements for ground works and in the slab. The insulated ASHP pipe is a particular pita to install. 6. Getting an electrical supply kiosk/water supply as soon as you own the land. All these services can be changed by you later in the build without involving the infrastructure companies. 7. Do your own heatloss calculation using Jeremy Harris’ spreadsheet. There is also a great MVHR calculation spreadsheet, but this might not be as robust. 8. Manifold approach for domestic plumbing. Also hot return, if applicable. 10mm pipe for certain outlets. I did all of the plumbing in my build, this was only possible because of the discussions here. The manifold photos are just eye candy to me now. I find the best way to search BH is with Google with “buildhub” at the beginning of the search string. For some reason the internal site search is not very effective. I find the best way to catalogue interesting threads is to use the “Follow” thread button, but without email alerts. You can then more easily find topics when you need to go back to them. The “Activity” drop down allows you to filter the site just showing threads you follow using “My Activity Stream”, “Content I follow”. Unless I am mistaken using the heart reputation button on individual posts, does not actually allow you to find them again, it does not function as a “like” button. Just found out this is not exactly true, see edit. *Edit. Thank you @joshwk, just playing about with my profile screen, if you click on the green reputation button, you can see all the posts you have hearted. You can do this on any users profile.7 points
-
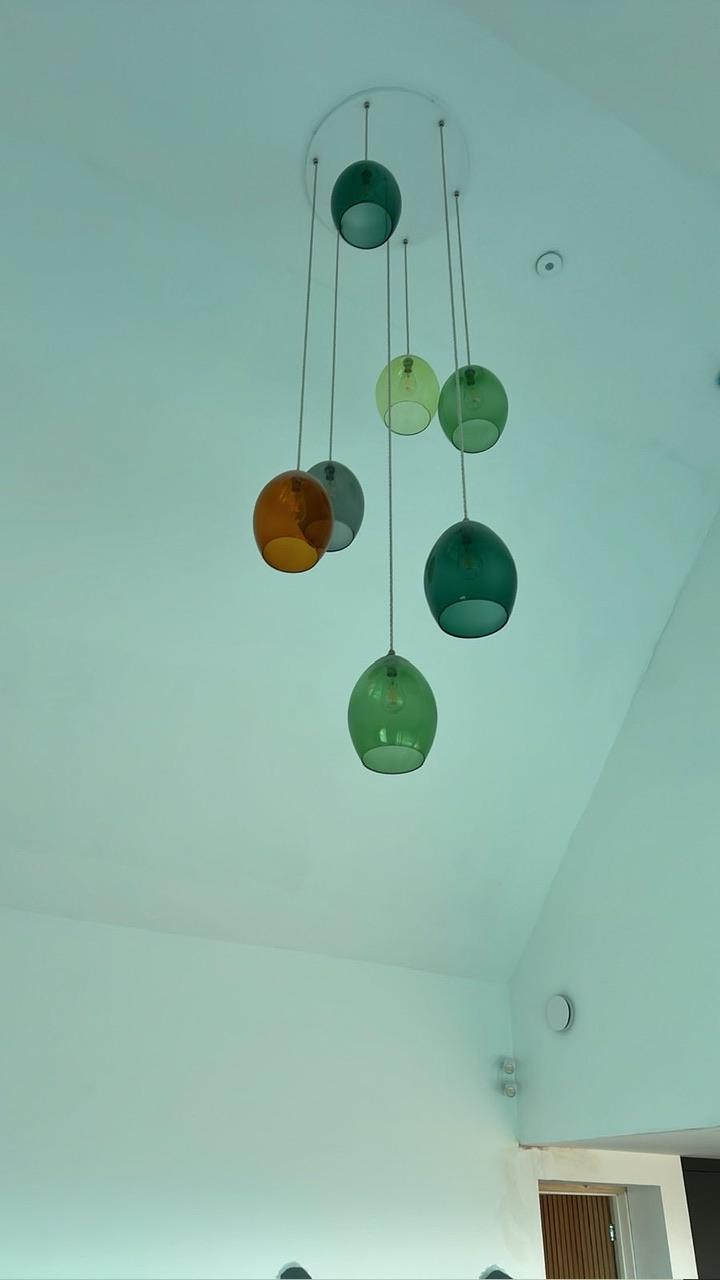
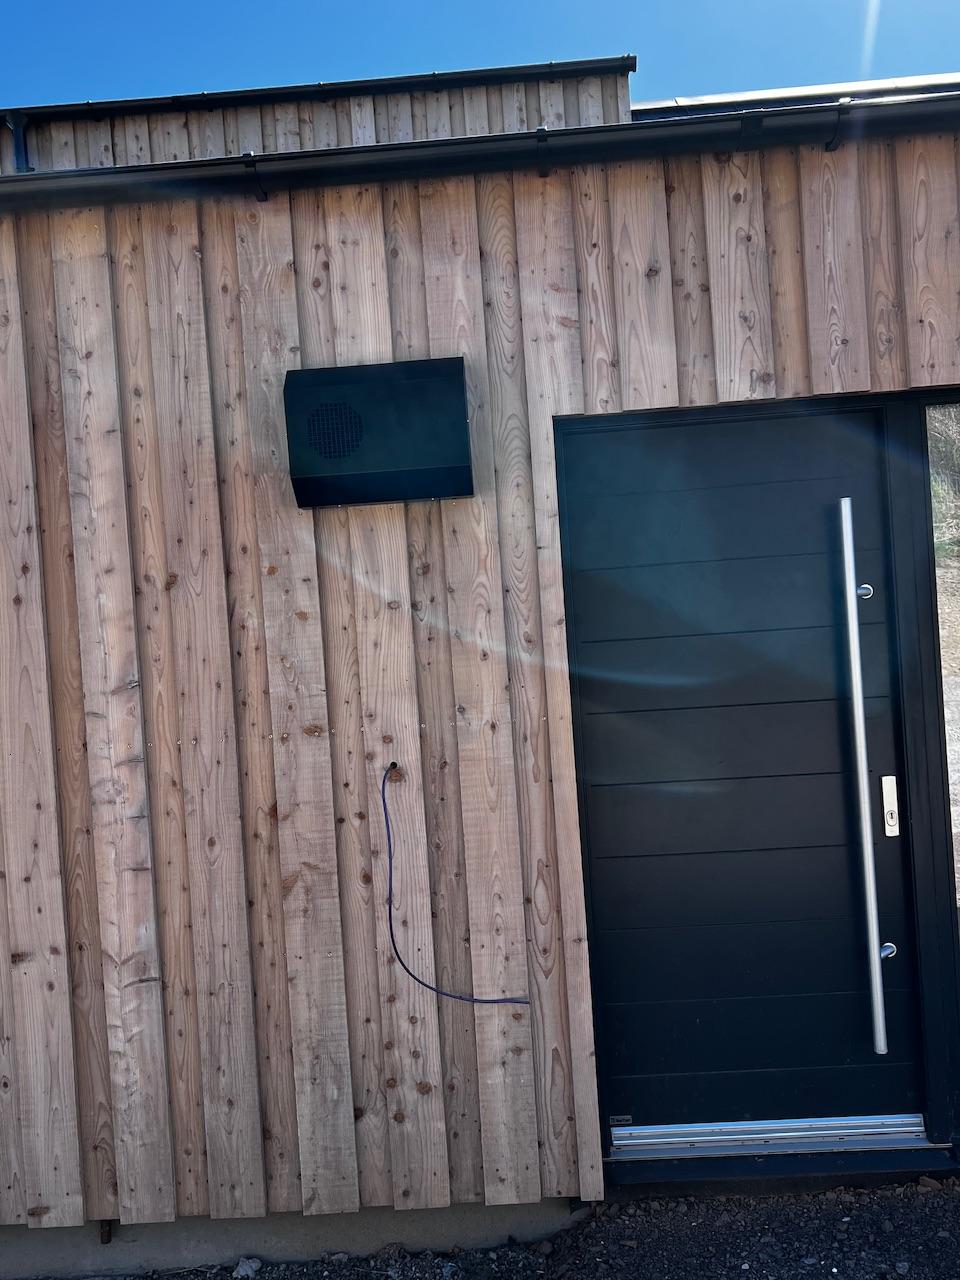
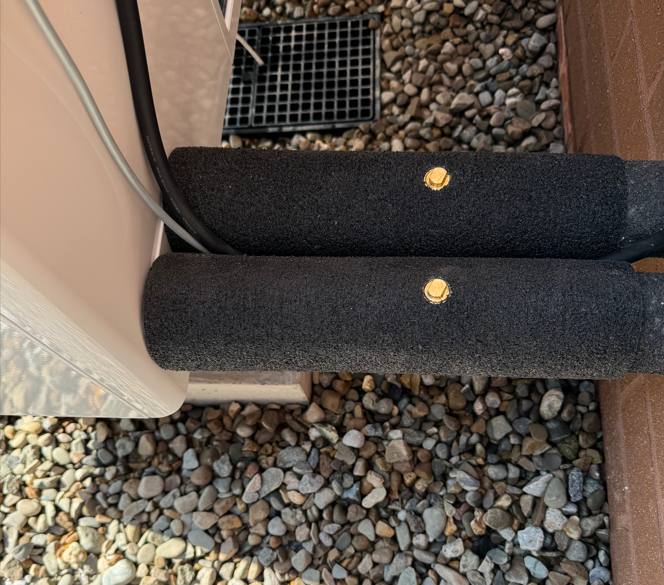
I installed the MVHR unit this week and got someone to commission it. It’s very quiet. You can hear a gentle hum from the kitchen terminal when standing underneath it but the others are silent. The external terminal isn’t as bad as I thought it was going to look but it’s still by the front door. I regret a bit not changing the whole floor plan of the porch/lean to bit of our house putting the plant room on an end elevation. In hindsight I ought to have combined it with the utility room with a wall separating them. The benefit of where it is that’s it’s right in the middle of the house though. The other small issue is the board on board cladding creates a void behind the terminal where the inside cladding board is which could allow rainwater to sit. I’ll need to add a block to fill it in. The board on board cladding has caused similar issues like this across a few areas of the house. Worth thinking about for anyone else considering board on board. Downstairs bathroom nearly finished. The Aqualisa shower was straightforward to fit but we pulled the speed fit hose out of the connection inside the rail which was a bugger to get back in. Bit concerned it came out so easily. I’m not massively impressed with the Aqualisa Optic Q shower control given the cost of it. It all feels a bit loose and plasticky. We have two and both the same. The rest of it is well made. The mixer and diverter are in the coomb upstairs making it really easy for future access as I made the coombs slightly wider and higher by removing the coomb completely on the opposite side of the roof. We gained a bit of floor space and it allowed me to widen this coomb by 150mm. I did this to make fitting the shower controls up here much easier. It would have been very tight otherwise. Doors and skirting fitted. Doors and hardware are by LPD. Unfortunately they don’t do smaller doors to fit the wardrobe. However Deanta do a very similar door (looks identical in the pictures) which can be custom made. Not cheap unfortunately and the lead time is 20 weeks. Also removed all the dust protection from our lights in the vaulted ceiling so it’s the first time we’ve seen them up properly.
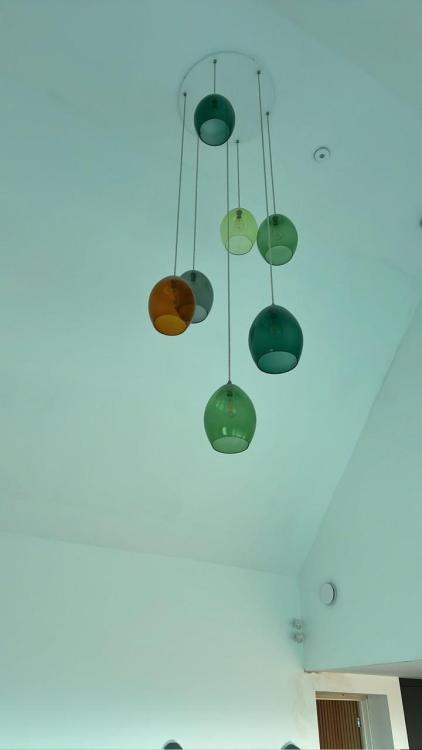

 7 points
 -
Hiya. I'm Scottish base and have family that live on one of the inner Hebrides and have lot's of experience dealing with BC on the Islands. Also I deal with Scottish Building Standards on a regular basis and have done so for the last 40 years. Some of the BC officers I know quite well, we have a chat on the phone about our careers and reminisce on how good the old times were. In other words they are folk just like us.. there is the odd exeption but that is life. In the round though BC officers actually do have your best interests at heart. It would be great to have a BC officer or two join BH! On the Islands there is a lot of politics. Some Island builders are really shite, cut corners in a big way, some are better / good. BC know who they are so maybe you are getting a heads up and not just seeing the wood for the trees about the work that has been done by others. Now you are doing a bit of work yourselves.. well how much and when did you start doing a lot yourselves? It is in your own interests to build your house right? There is always friction on the Islands... BC know this but are not corrupt at this level. There are loads of other Islanders and folk moving there that do DIY projects so you are not the first and last. @JWHIT "surely this is trespass" My advice.. get this right out your head now. If the BC officer can access your site then you have a Health and Safety issue and they can hammer you on that. The HSE law is quite clear on this all over the UK, if your site is accessible then you are on a hiding to nothing. Have a looked at your site security? Don't pursue this route as you will likely regret it. Too late for that, BC can hammer you much earlier. There is no argument in law for shoddy HSE by saying.. hey I'm insured. Insurance is for when you have tried to do your best and things still go wrong. If they can see bad things from outside the site boundary then surely.. you may be making a cock up? If you try and play hard ball with them then they will pull your trousers down and you won't get to pull them back up until they have run you ragged. Now you may feel that the BC officer has turned up with no appointment.. but they are allowed to do this under UK HSE law (not just Scottish law) .. part of their remit is pubic safety.. they can hammer you on this too! To lay it on a bit thicker they may start to ask if your project should fall under CDM regulations., just to give you the run around. In summary: 1/ Yes there is Island politics, don't worry too much about the main Island Contractor not getting the job. 2/ Phone the officer up and ask when they are next on the island and arrange to meet them in person. This is so imprortant. You are on an Island.. you must get to know folk.. the emails you get from BC only show a snap shot.. sometimes they write stuff that seems really daft / aggressive.. but they are pushed for time and under funded. Cut them some slack and cut yourself some slack too. Keep an open mind as while you see this as a personal opinion then they may be able to give you good advice? Also if you hit it off with them then later on when you apply for a completion certificate you'll probably find that part of the process much easier and not get hit with a load of things that don't conform. 3/ Build a rapport with the officer.. recognise that they may be trying to help you rather than hinder. You may have a young and inexperienced BC officer. Be very careful here not to bully as their boss will then give you the big stick! Listen to what they are saying.. put forward your ideas and have a bit of fun.. seriously they are just folk. To finish @Kelvin may be able to give you some advice about how you deal with BC when relocating to the north of the UK ( Scotland) 4/ Some of my family live on Tiree. Clocked this at the end! Well it does.. Some of the building regs are open to opinion / discussion / detailed design. BC officers often hold professional qualifications / have great experience. They are entitled to question. As before one big stick they do hold is the public safety issue (I do it too as an SE) . Lot's of folk on BH think that this is their house and they can do what they want. BC say and I.. that house has to last for 50 years at least and you may sell it to a family in a couple of years time. Our duty is not just to you but all the folk that come after. Just copied this right at the end. The above is misleading as if it is deemed to be a risk to public saftey then the LA can effect immediate access as what they do will call on the Fire service, the Police , gas board and me as an SE. You see.. who knows what building regs have been compromised? Is it just an extractor fan of a serious structural defect that could cause a gas leak? If push comes to shove and I'm acting for the local authority.. I'll find a legal way of getting into your property if I feel there is a safety issue. You are pissing in the the wind! If you have nothing to hide then you should be relaxed about all of this.7 points
-
The timber frame arrived this week from the factory. There was a large crane onsite all day yesterday. Got decent weather, no wind and only a bit wet in the morning. The lads have the walls fully up, 1st floor done and a ridge beam in place. They are starting cutting the roof today as that is built in situ. Really surprising walking around the rooms after looking at drawings for years! The window openings are a LOT bigger than I ever thought though, huge would be the description! Had a lodger arrive already - neighbours cat performing 1st inspection! Thanks to everyone on BuildHub for their support, advice and inspiration from their own experiences to help me get this project off the ground after SO long!!7 points
-
Back in ‘91 we self built the house we now live in. Block, render and pantiles. We were both working full time in those days and we did as much as we could, but that doesn’t include groundwork, blockwork, structural carpentry or plastering. Rural location, fields front and back, nice big garden. A third of a century later, at the end of September ‘23, we found ourselves in the back garden of a small, run down 1920s or 1930s timber framed bungalow. It’s in easy walking distance of the centre of a small market town, even closer is a lovely riverside walk, on a quiet-ish road, near a park, and the long, narrow, over run back garden in a quiet little oasis made of half a dozen other long back gardens. For us it’s the location to die for. Especially with our first floor bedroom overlooking the back garden. But the dark and sad and unmortgageable bungalow is not to our taste and crucially, it doesn’t have a first floor. Yet. On one side is another bungalow (a matching pair to ours) but fortunately on the other side is a two storey house (phew!). So we bought it, and put in a pre app during the buying process. The feedback came in (with some gentle, respectful encouragement) just before exchange and that feedback was generally very positive. Between exchange and completion we worked out what we wanted to live in and we met a couple of architects on site, one of which we were happy to work with so we engaged them. As soon as we completed in mid January we submitted our planning app, and we felled some trees and cleared lots of shrubs so we could start to see the garden. I quickly got to know the guys at the tip and I got much better at reversing Trevor the trailer. Our planning design is v close to the pre app design save changes hinted at by the planners, and in early May it was permitted without modification. Woo hoo. A few conditions (e.g. can’t start till September) but nothing too onerous. So, that means lots of time to research, plan, analyse and generally overthink just about everything! Now all we need to do is sell our house….6 points
-
Hello all. I know that a lot of folk talk about using D4 glue but this can lead to trouble. The designation D4 relates to the durability of the glue..durability is related to for simplicity the weather exposure.. you can buy D4 from say B & Q, Tool Station, Screwfix and loads of other places. Now I'm fine if you want to use "D4" that is bandied about on BH for sticking some non structural floor boards together. I'm not OK about you using this sole designation D4 (durability) in a stuctural application. A Tesco / Asda etc plastic bag is durable (probably deserves a D4 rating) for lying for years at the side of the road but it's not structurally strong! Glulam beams for example are bonded together with a structural glue that conforms to for example BS EN 301 which deals with glues that have structural stength AND the durability rating which is D1, 2, 3 & 4. Why would you not want to use a glue with both a structural and durability rating that the Glulam folk use? A structural glue requires both stength and durability. Structural glues tend to be resin based.. like old fashioned Araldite that your Mum and Dad used for fixing their glasses... Cascamite structural glue does the job and has both a structural and durability rating. Please folks can we stop recomending D4 when we are discussing bonding structural components.6 points
-
Over the last couple of months we have made steady progress. But, I've been very remiss in taking photos. Last time I posted we were busy building up the walls in phase 1. It's now ready for the lintels, which we waiting a month to be delivered. This one requires some blockwork changes as the overhang is over a block joint. This is the inside looking North looking down over the valley. This is the outside looking in, again some block changes needed. We used thermally broken IG lintels, which were on a 4 week lead time so to fill some of the time we have been prepping for phase 2. We realised we didn't have enough space for concrete lorries and storing the spoil so we moved the soil spoil heap further into the field. This doesn't look much, but it took 3 days and countless repeats of load dumper, move and tip, and repeat !!!! We've also moved into one of the horses winter fields, but we will return to a field when we've finished. Apart from putting block on block and repeat we've bought a few items at auction. We got some windows that are exactly the same model as we are ordering, maybe not the exact size, but we can make them fit. Of course the cill will be replaced. We also got a lovely sink for the utility room. For the first time in months we are dry on site, not sure how long it will last. At the moment I'm trying to order the posi-rafters for phase 1, but I need some input on a beam from the SE who is being very un-responsive. We've realised that we have a beam on our SE drawings which say 'B3' and no details. He initially responded saying it could be either an RSJ or a flitch beam, but that was 2 weeks ago. I was told last week that the rafters are also on 4 weeks lead time. Once we have those then we will be putting some of the barn roofing on as a temporary measure as we'll get the whole build roofed at the same time. I'm horrified at how little we seem to have done, but as I'm no longer working at home I think the work force (hubby) may be slacking 🙂 More soon, when I have some proper progress to show. Jill6 points
-
Yesterday we exchanged contracts on the purchase of a house in Lymington and on the same day we submitted a planning application to demolish the house and build a new house in its place. Probably Timber Frame, definitely to Passiv Haus standards (fabric first etc), 225 m^2, no fossil fuels but plenty of solar complemented by batteries. We have done this before with a TF house in 2009, a small development of brick and block houses in 2015/16, and an ICF house built into a hill in 2017. We hope for a simple, fast build with a high quality result. One thing we have learnt is to always be ahead of events and don't change your mind. Let's see6 points
-
I appreciate that I am most likely speaking to the converted regarding this topic, but we are currently renting a property on a large Persimmon built housing estate, and I honestly find it so depressing and cannot understand why anyone would choose to purchase one of these houses. Not only is the build quality shocking, but each house is orientated 180 degree relative to the house in the parallel road. Eg, you would never sit in your back garden, as you are overlooked by about 6 houses. You have to always be mindful when looking out your windows, for fear of staring directly at someone who is looking directly at your house. If nothing else, it will make us get on with our self-build, and make us appreciate that we are fortunate enough to be in a position to do a self-build.6 points
-
I see a few mentions of the expense of MVHR. I self installed a simple system complete for less then £1500 in a 260m2 house. It has no sensors just manual boost which we use occasionally, otherwise it stays on trickle rate 24/7, even when some doors and windows are open. Really happy with the air quality (which I monitor with sensors), best value for money in the whole project and a no brainer in a new house IMO.6 points
-
Just to add to this with a bit of experience of what I would do differently "next time". I had installed 50mm twin wall duct for the electric supply. After completing the raft that duct was extended by the groundworkers to the electric kiosk with the meter some 20 odd metres away. Only later did I consider the cable needs - 3 phase 25mm. Upon picking it up from the suppliers I could immediately sense a problem coming. A) it was heavy and B) it didn't bend well. This week I discovered drawing it through a 50mm duct was not practical - should have used 80mm at least. Also the bends in the duct made pulling the cable through a nightmare. Luckily, after a struggle we got it outside the raft (all of 3 metres) but had to dig down to it and cut it open to get past the first (of several) too tight bends. Finally have strained back trying to pull it the last 5 metres - can't even bend over at present! Resourceful wife asked two random men in a family of four passing by to help and they very kindly stepped in and pulled it the last bit while I sat on the floor in a lot of pain. So, 1) work out cable needs in advance. 2) use a bigger duct than you think you need 3) consider running the cable through the duct laid out in a straight line, then placing both duct and cable in place in one go so you know it will bend where you need it to! 4) just get someone else younger and fitter to do it!6 points