
Leaderboard


Popular Content
Showing content with the highest reputation on 01/12/22 in all areas
-
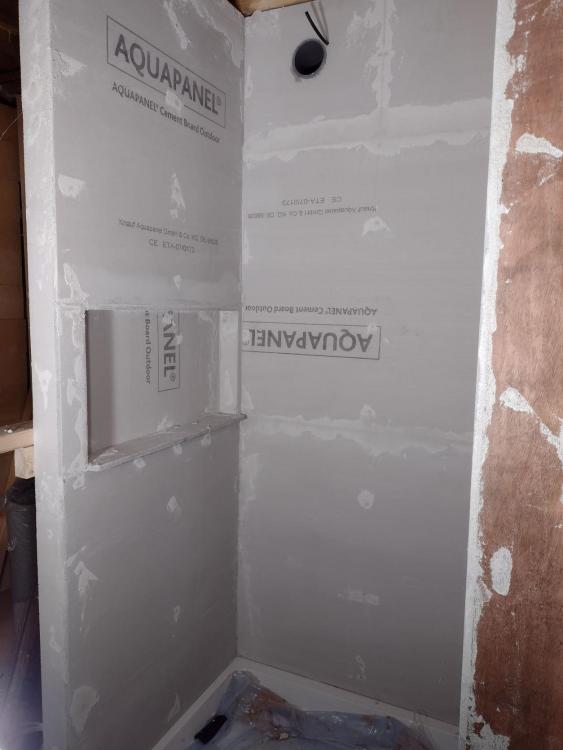
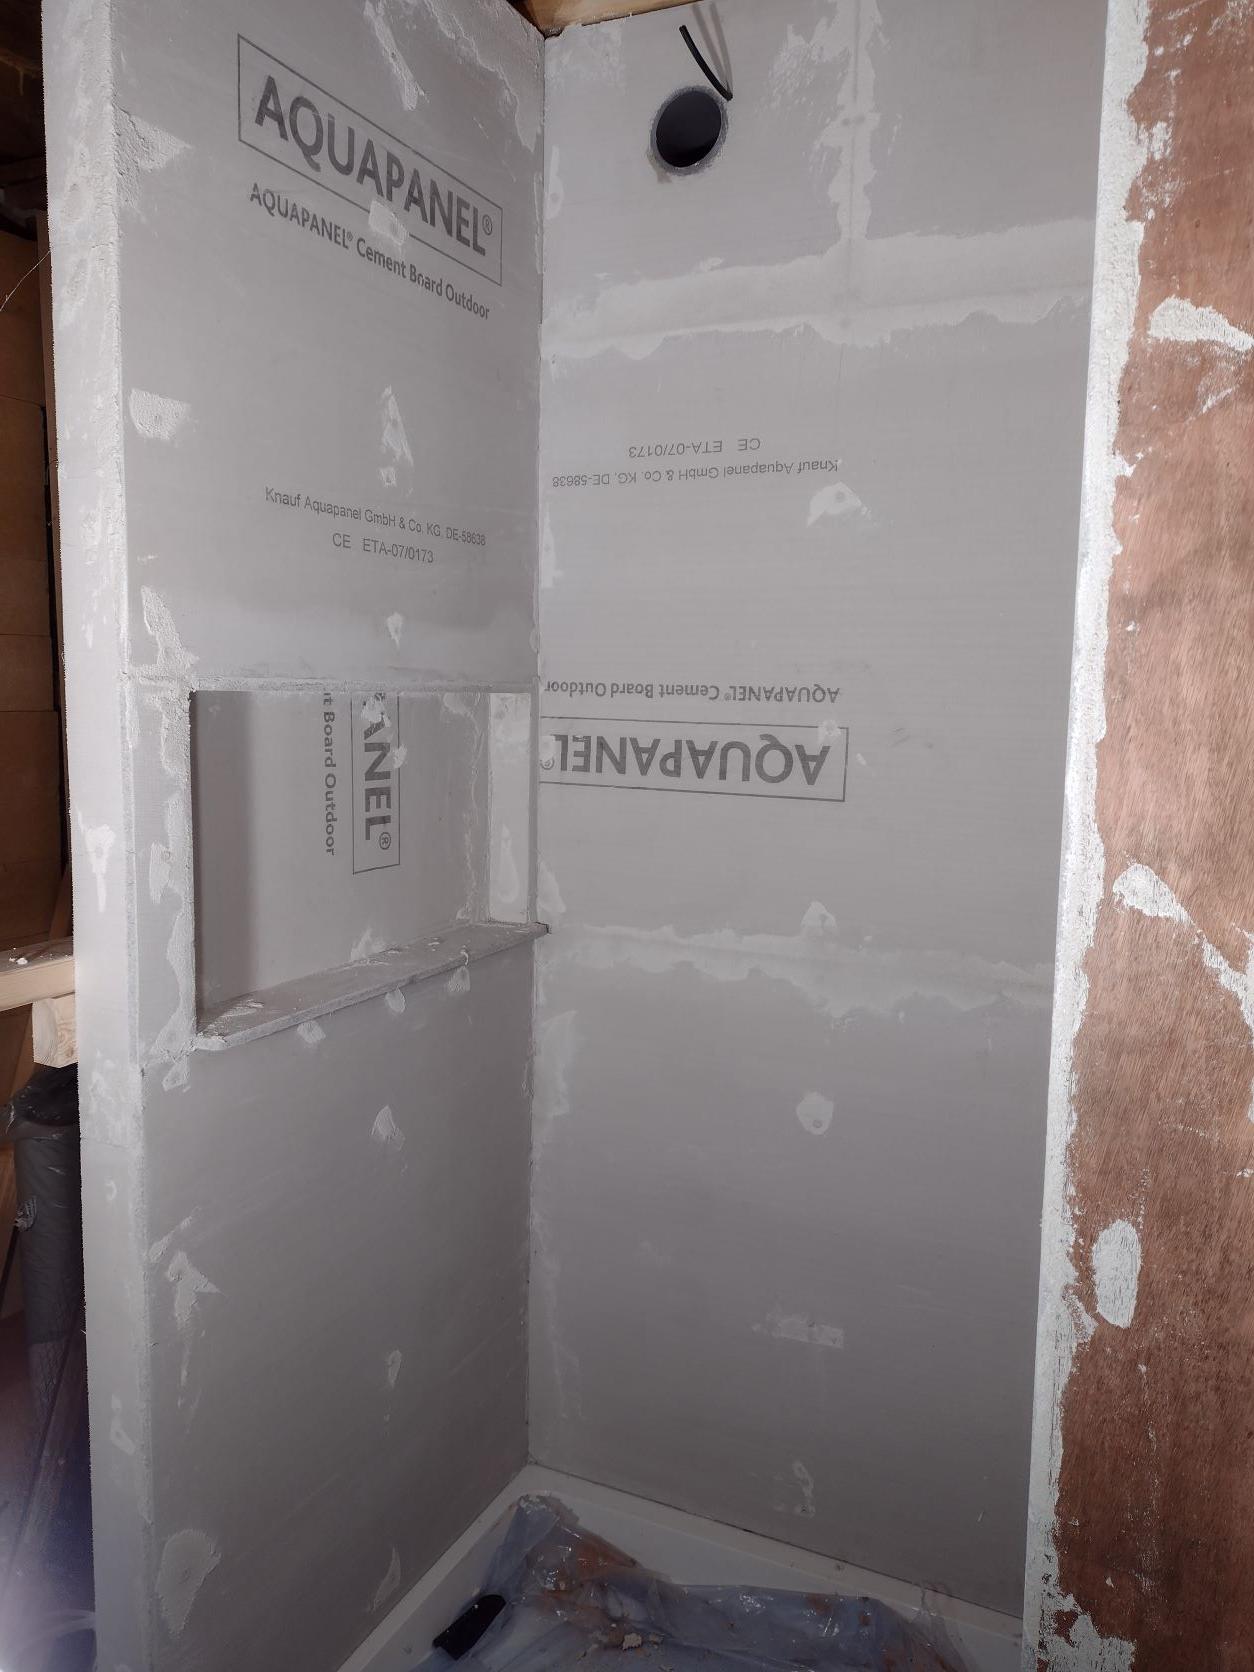
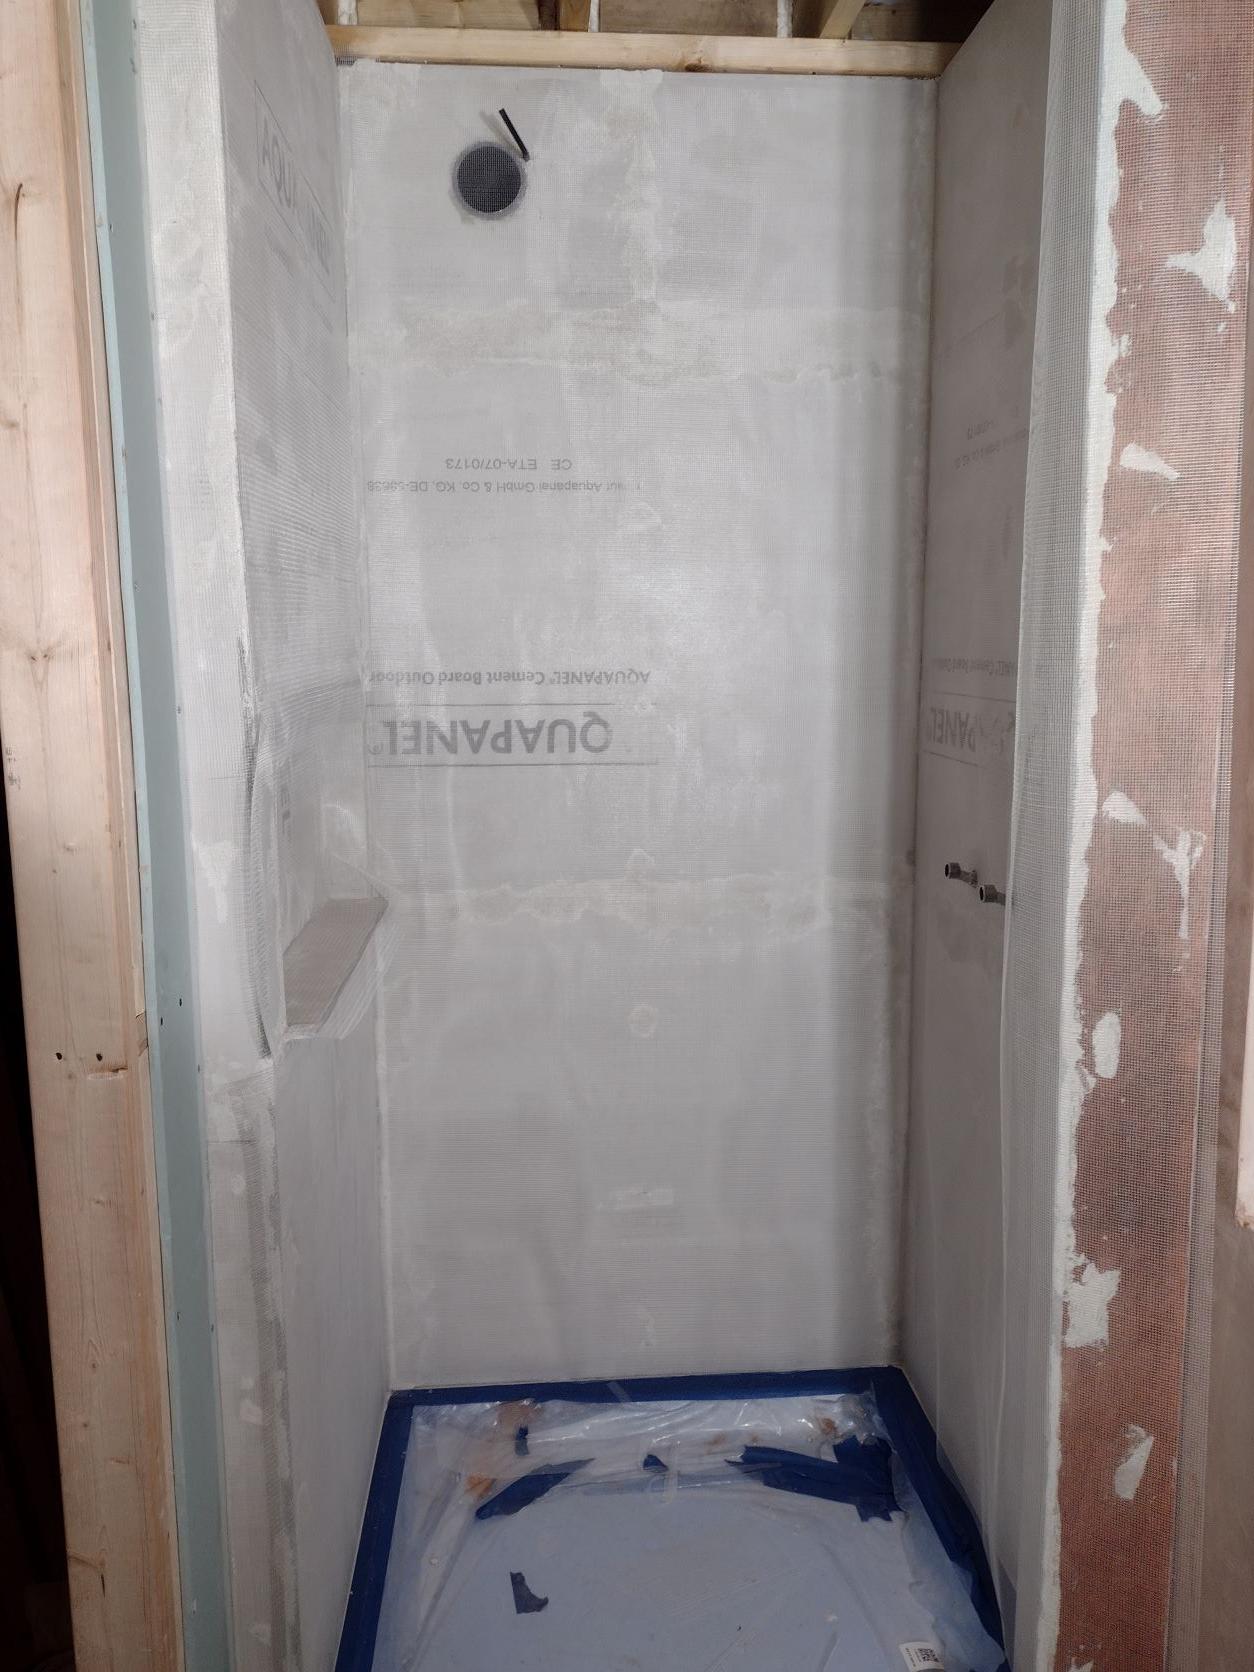
I've just started with microcementing a shower now. Decided to use an ensuite for the experiment so if it goes wrong, nobody's really going to notice Here are photos of 1st stage - boarded with Aquapanel Outdoor as the base because I had 3 panels knocking around, but you can use plaster and skim, plasterboard, and even plywood as the base. At this point I've just filled the countersunk screw wholes, joints and gaps with the microcement base coat. Nothing out of the ordinary just recording the steps for anyone interested. Tomorrow will be sanding it all down and then hopefully applying basecoat and mesh.

 3 points
 -
Hi Foggy, there's loads of really knowledgeable people on these forums. I think some are professional builders but most are DIY'ers that have gained lots of skills and understanding through experience. Good luck with your project!2 points
-
What about a ground array at the end of the garden? With optimisers on each panel to limit the effects of shading. PV with an immersion diverter, to use excess generated electric to make hot water. Battery storage expensive. Before any of the above look at insulation, draft and air leakage. That's the best money spent. Before you go to a heat pump, you need a house that can operate on low temperature heating, otherwise running costs will be high.2 points
-
Just updating this in case anyone is searching for advice on something similar in the future. In the end, I paid £336 for a survey for OpenReach to come out and work out how to solve the above issue. It was decided with the contractor (and agreed with the kit-builder) to raise the height of the phone line where it connected to the neighbour's house rather than move it. This meeting was in June, and the additional cost was £812, which I paid in June, the day after receiving the quote (as a side note, the contractors who eventually turned up to do the work pissed themselves when they found out how much we had had to pay for this). The work was eventually completed in late November, 5 months after I had paid, with no update from OpenReach during that time no matter how much I tried to contact them. They are absolutely bloody useless. I eventually had to go through their 'Jeopardy Management' team and threaten to charge back all the costs and remove the line myself to get them to do anything. In hindsight I should have done this a few months earlier.2 points
-
We are using DALI and very happy with the decision so far. Upstairs downlights are all on a one Loxone DALI extension, but by the time I add in low-level lighting, LED's and exterior lighting this would require 2-3 DALI extensions which as @joth rightly points out are expensive at around £450 each. It is only £7 per fitting, but the thing is, you need an address for all fittings (which you then group), whereas centralized dimmers can drive a whole circuit each. It does give you a lot of flexibikity though; for example there is one wall-washer in the breakfast area that shines on TV screen, which I can easily individually switch off depending on the lighting mood (or even if TV is on if I wanted to using smart plug). Before I go out and buy more than Loxone DALI extensions though I have one of these I got off of amazon which I plan to try to use https://www.amazon.co.uk/dp/B081TNRGMN/. This is good for 4 channels (256 devices) and needs a DALI power supply and Raspberry Pi and some minimal coding, but I'm pretty confident it'll work from my initial tests, it's just a simple ReST call out fro Loxone to Rapberry. Tunable white will be slightly more challenging, but no rush to get that working.2 points
-
Everything except 3 Dali dimmers still available to claim! I had a good go with KNX but the end decision was easy: programming it was a chore and always on an annoying learning curve, wheras Loxone was fun, and I wanted this to be a fun project. I could see with KNX I could make something that would work as well as conventional light switches, but once there I'd never want to touch it again and I'd rapidly lose memory of how to program it at all. ETS is a dog, and the whole ecosystem, is just stacked with compromises and paying over the odds for essentially 30+ year old technology. Loxone programming software is an absolute joy to use in comparison, and I get great fun making improvements to it. Maybe too much fun! This project is never going to be "finished" ? DALi was a tougher call, and often wish I had stuck to original plan and used it. I think the main downside was cost, especially as the Loxone Dali extensions are very limited and expensive. DMX was already familiar to me from theatre lighting, and is cheaper and more flexible. I have DMX driving SSRs for heating controls, blinds, towel rails, all sorts now. Modbus was simply not useful for inputs in Loxone, as it has a max polling rate once per 5s. For anything responding to human action that's useless. I successfully tested polling it from ESP2866 chip, and it also has TCP/IP support so I thought it might get used somewhere eventually but seems I never did! I do use modbus (from ESP) for energy monitors.2 points
-
In principle the half lap joint looks neetish.. what is less encouraging is the masonry below and it's bonding. Wall plates do an number of different things. One is to spread the load, another is to often act as a binder which ties the wall head over discontinuities in the masonry below. It may be ok but hard to say more without more detail / information.1 point
-
That’s nothing to worry about (unless it’s a hipped roof and the wall plate acts as a tie).1 point
-
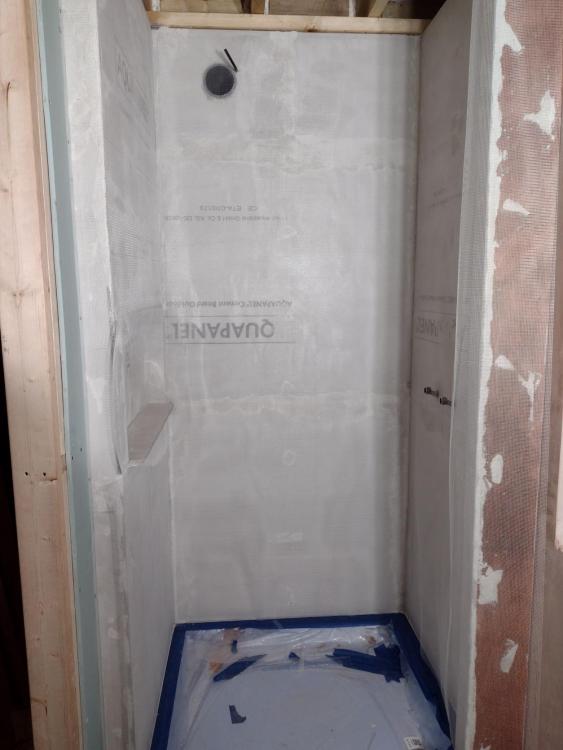
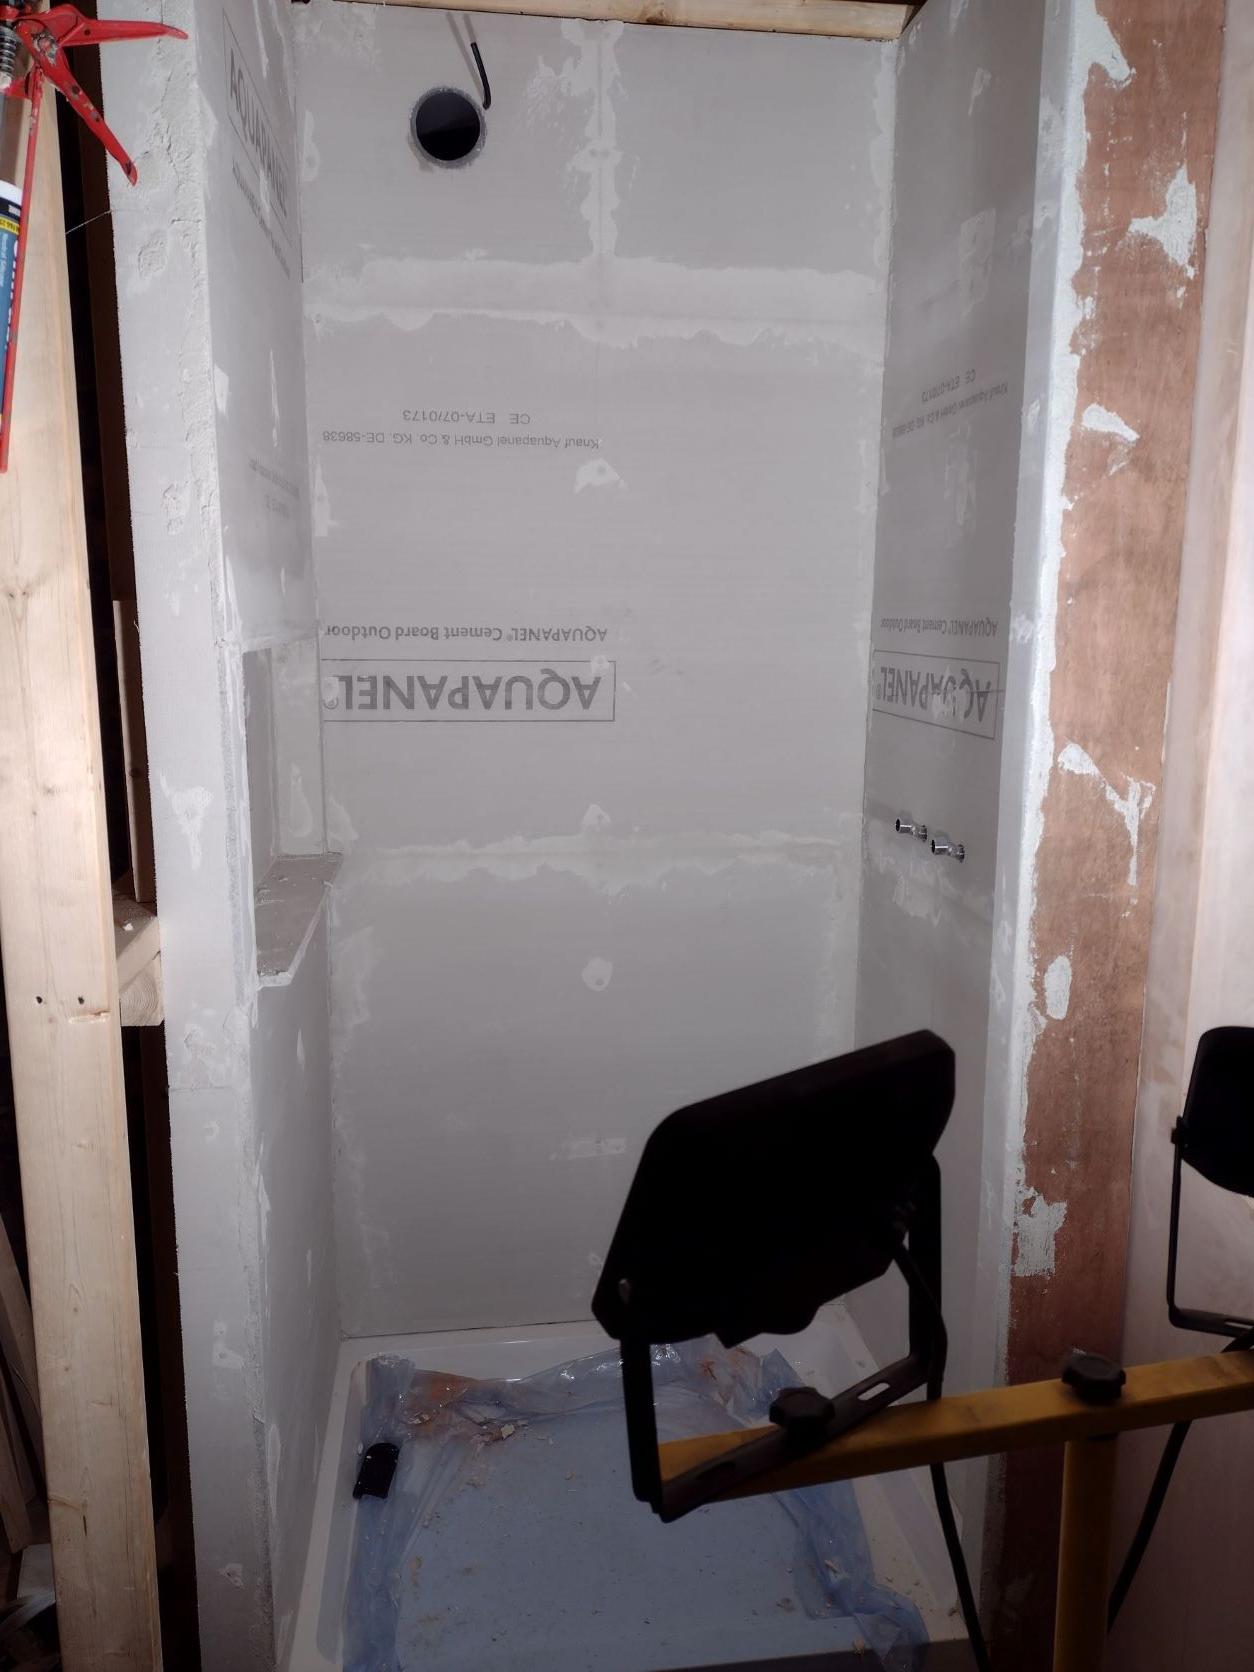
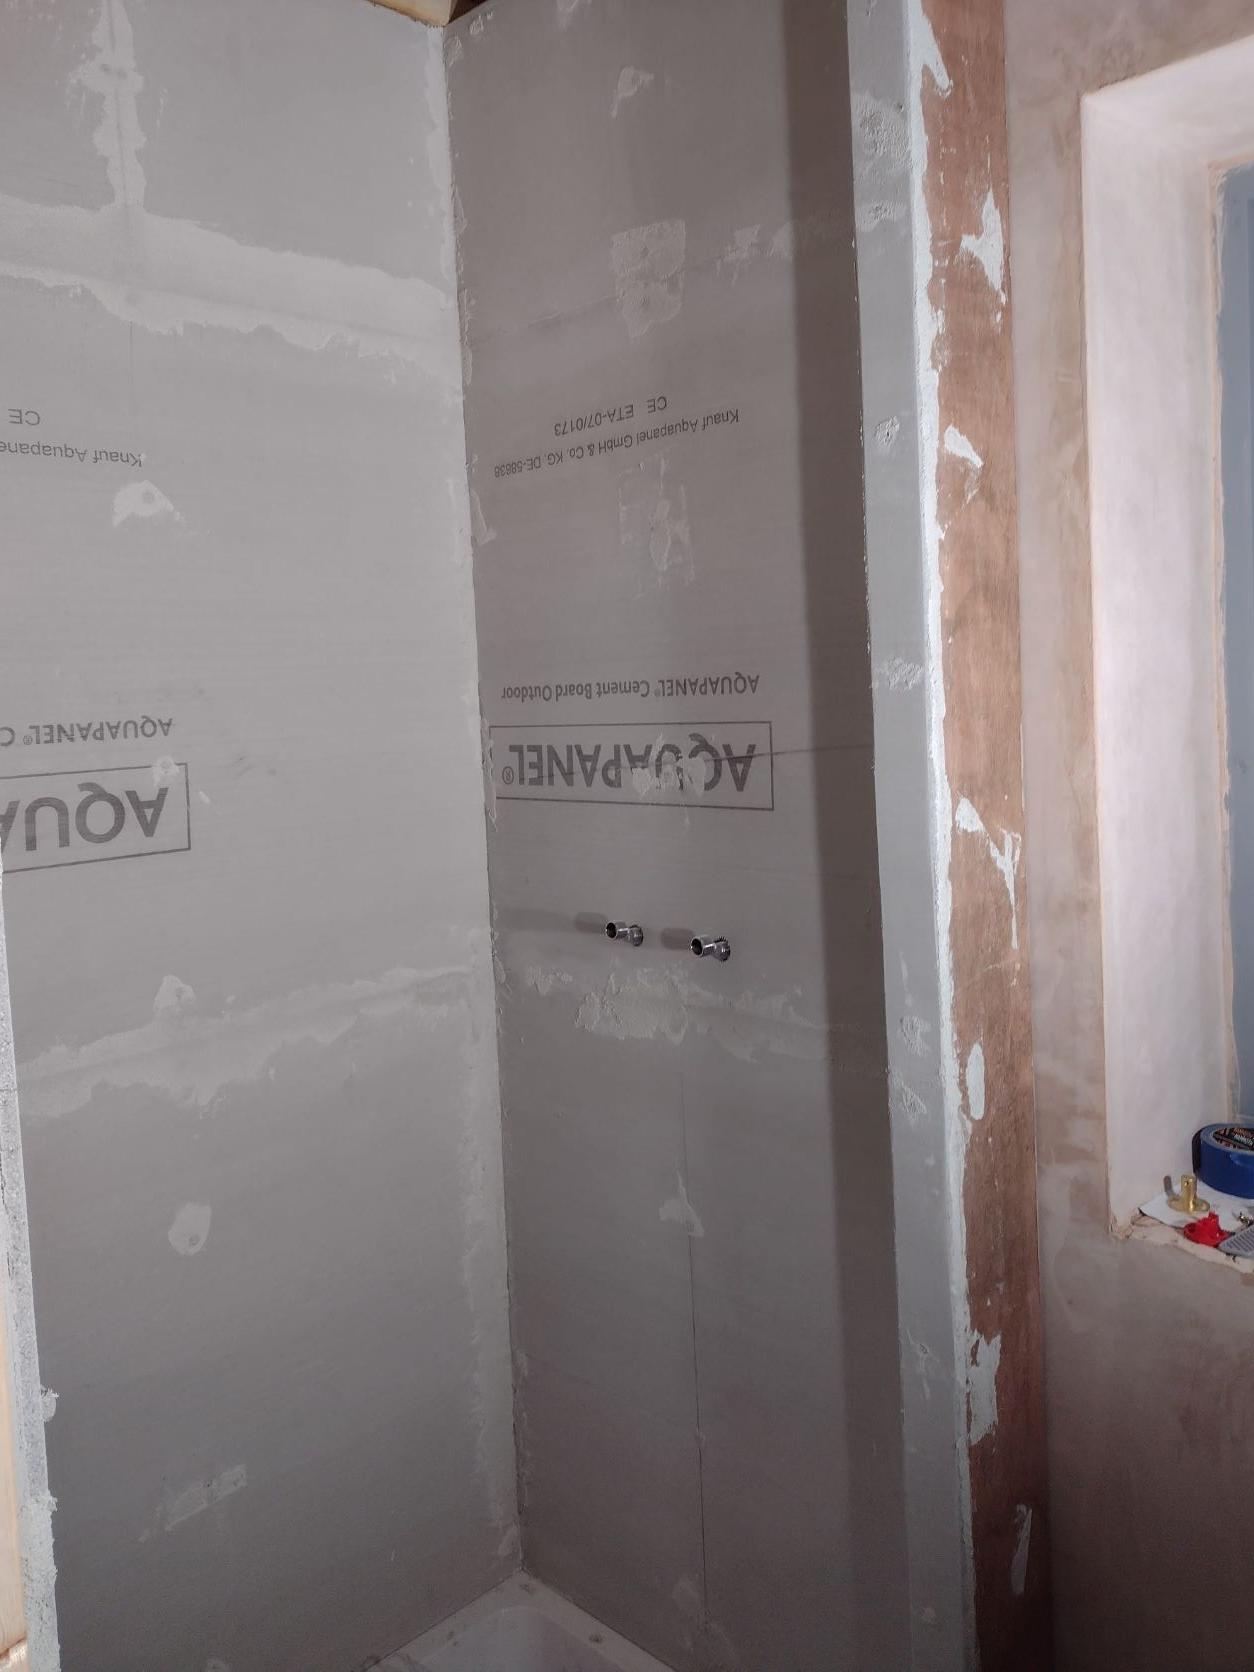
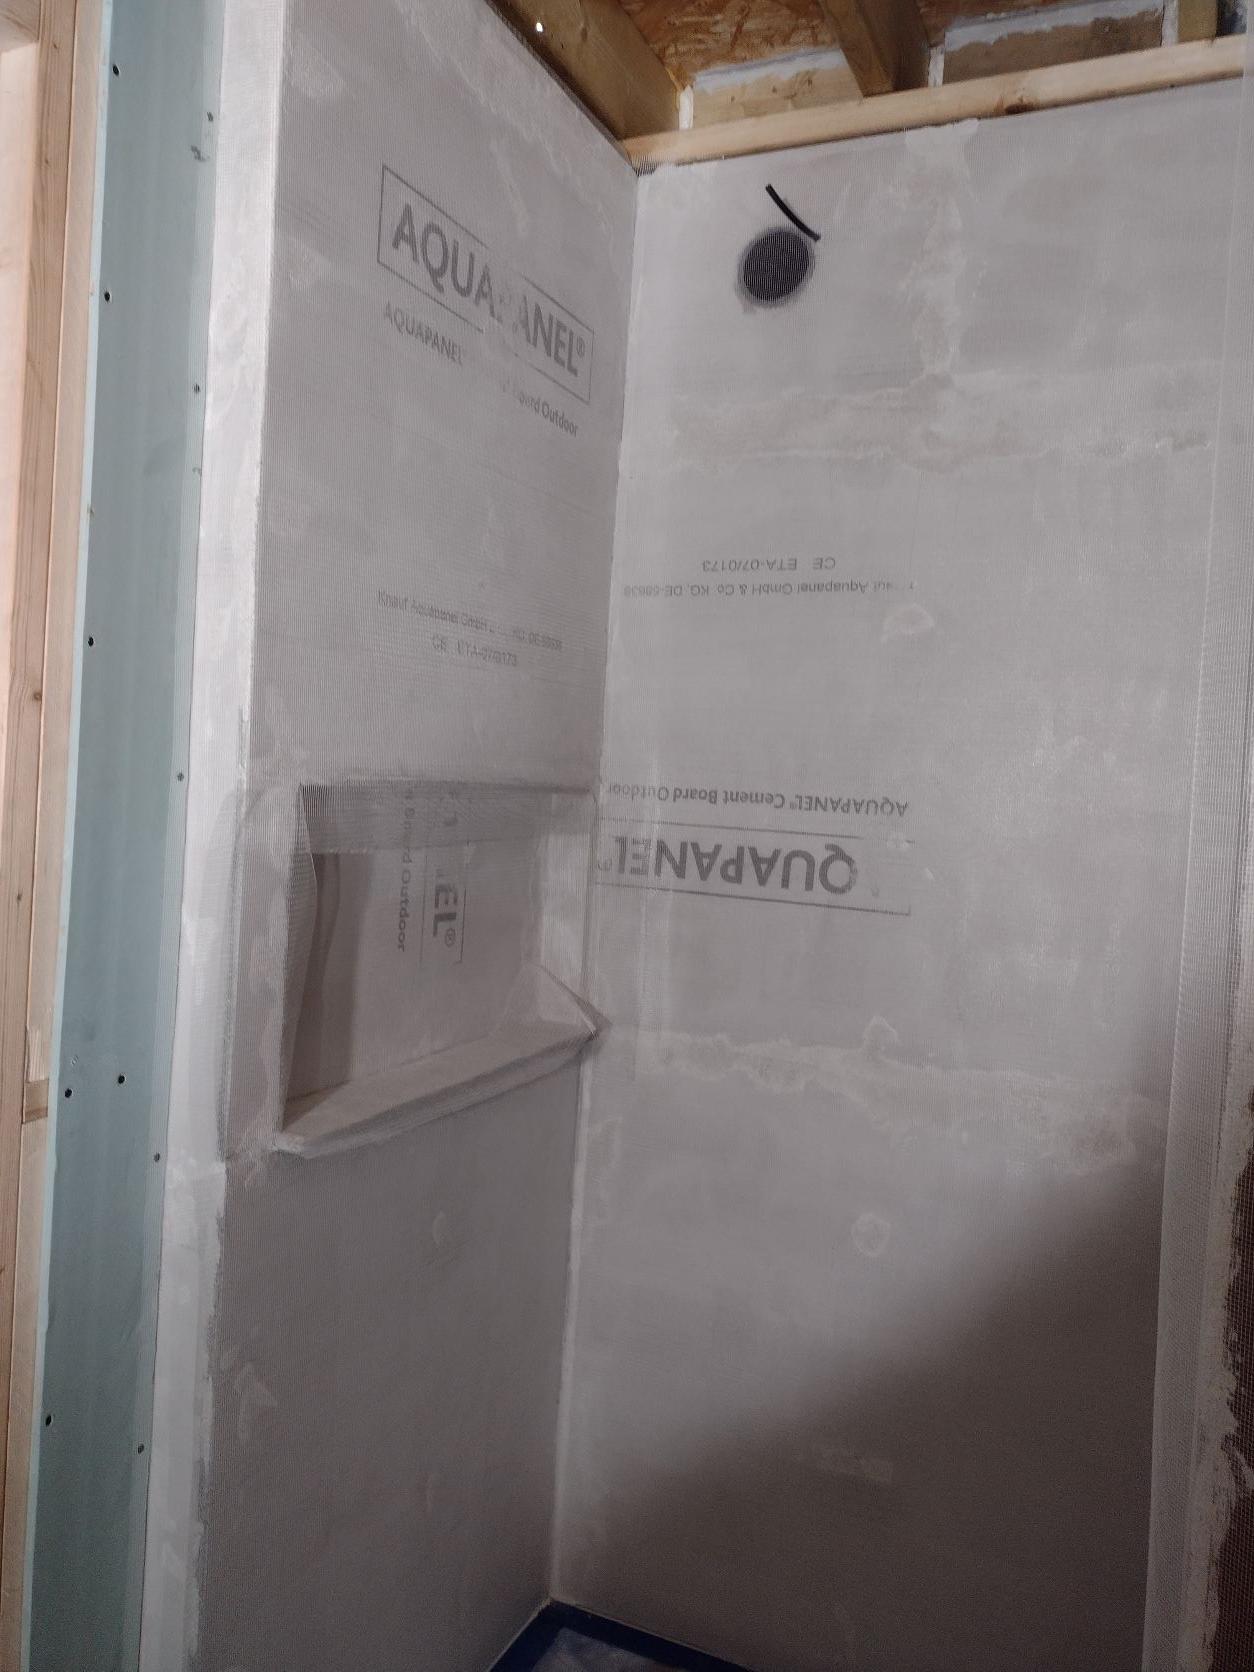
Day 2 of the ensuite now with step 2, 3 and 4 of microcement preparation. Step 2 was to sand down the basecoat used to fill the countersunk screws and joints, but I have to say this was a pain. Next time, I think I'll use the Knauf Aquapanel skim and/or filler as the microcement basecoat has aggregate in it so it's impossible to feather out the edges and it's really hard so destroys the sanding pads on the orbital sander. Took ages to only get a moderately good finish here. I'm hope the minor blemishes will be filled when coating. Step 3 just to apply the primer to the boards. Step 4 to add the reinforcing mesh which basically gets stuck to the primer (kind of - it just holds it in place for the microcement basecoat. Next step is to apply two coats of the basecoat, one uncoloured, the other coloured. Pictures attached of the stages completed today.

 1 point
 -
Please be safe. You are building two storeys so odd / unexpected / bad things can start to happen and you have higher loads than say single storey. If you need to ask about the block strength then you don't have sufficient experience in structural design to make sure what you are doing is safe.. and be able to prove it now / later if you need to sell. Sorry to be blunt. What about running this by say an SE, they may be able to say.. hey you can save money here as you are over designing, but here you need to up your game. Ideally an SE / experienced designer should be able to save you more than their fee in the round?1 point
-
Hi, I’m slowly trying to turn our house into something as eco friendly as possible on a timescale that would make continental drift look fast. Hoping to get some advice here so that I can maximise when we can do for our budget. Thanks1 point
-
Thanks again, will try and sketch something up.1 point
-
Without seeing plans it isn’t that easy to comment however the quote should be zero rated for VAT as this is a new build.1 point
-
At least two years ago.1 point
-
Welcome to the forum @Foggy1 point
-
I wouldn’t beat yourself up, as the tile adhesive is usually cementitious and impervious to degradation. The epoxy grout makes you a brave man and a good effort. Do try to ‘ram’ CT1 into every possible gap, forcing it in with your finger. Don’t panic about excess, as baby wipes get rid of it with zero effort ( just use lots of them once only ). Nice job regardless1 point
-
I see what you mean with 'if the glass will slide, there's enough gap for water. I did put a bead of CT-1 but it definitely didn't displace all out once the glass finally went in. On the walls and floor I went with epoxy grout and packed it right upto the glass before siliconing over. Only edge this couldn't be done on is the inside of the shower area as the track is at the edge of how the shower tray slopes down to the gap at the back for the drain. I'll get a tight bead of CT-1 pushed into this and hope that helps. Maybe wishful thinking is the UFH underneath will help it dry out?, not helpful in the summer time though!1 point
-
Thats my gut feeling but it still doesn’t quite add up as others on here have enthalpy units and don’t seem to experience the same problems, @joe90’s experience is similar but his windows are 2g so that may explain his occasional condensation. It was cold again last night and there was condensation on most windows (some with thick curtains, some without) We went for the enthalpy expecting future occupancy to be low as I work away a lot. Maybe that was a mistake. Maybe the house does need to dry out further as suggested in this thread (I hope not, humble pie sounds revolting). Investigations are ongoing, but at a slight pause as I’m out of area at the moment.1 point
-
Hello iMCann. Unfortunately there are at least a couple of other things to consider. Generally a wall of 7.0N (Newtons / mm^2 compressive unit strength i.e each individual block) can carry a surprising amount of vertical load if the wall is loaded about it's centreline and not subject to other sideways forces. But beam and block flooring can introduce quite high local stresses where the beams rest on the blocks, an over stress can lead to local crushing of the block. The walls may also be designed to resist horizontal wind loads which cause bending (flexure) in the wall. Even internal walls are subject to wind load! Imagine you have a big set of sliding doors open and a gust of wind blows in.. it can load the internal walls sideways. It's usually not a problem on domestic houses but on large industrial buildings or houses with two storeys and a vaulted ceiling this "internal wind loading" needs checked. The flexural stength of the wall is partly dictated by the unit strength of the blocks. The higher the block stength generally the stronger (up to a point) the wall in flexure. I would err on the safe side and check first with your SE. Seems odd though that an SE would spec 10N blocks when 7.3 would have done. At the same time ask your SE how to phrase the question (so they don't give you the run around) to the supplier so you can ascertain the strength of the block if 10N are indeed required with some evidence to back up any claim they may make, even though the blocks are stamped 7.3N.1 point
-
That would make sense, and I guess would make it really clear that the authority had decided to impose an optional regulation. There weren't any conditions related to this in our planning approval, so I think we can inform BCO we don't need to adhere to these optional conditions.1 point
-
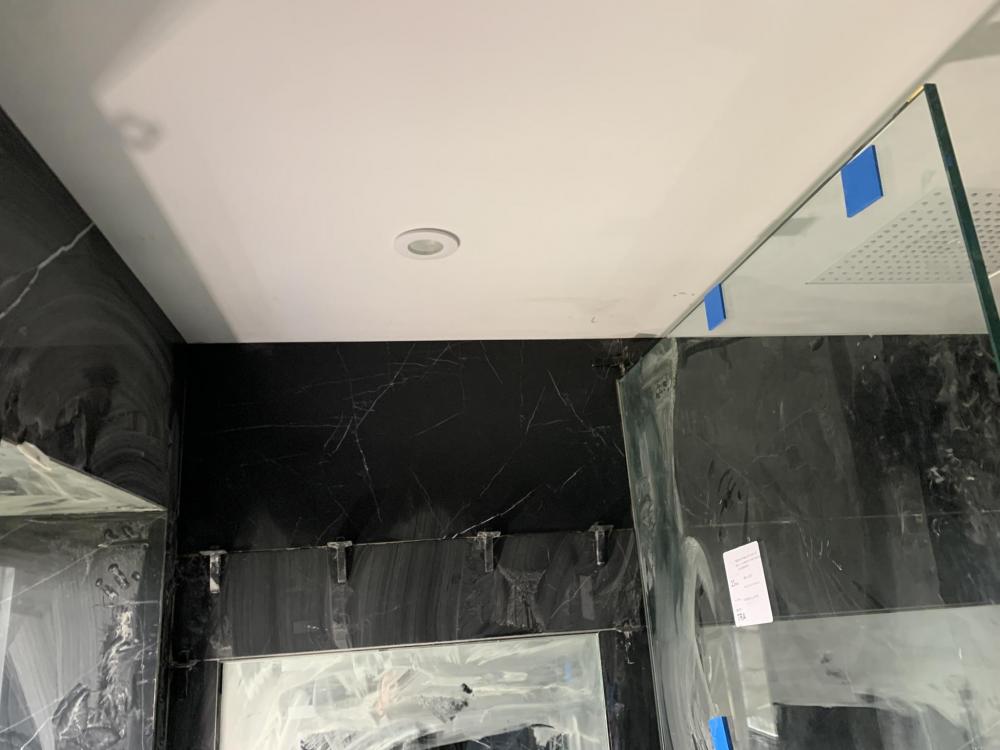
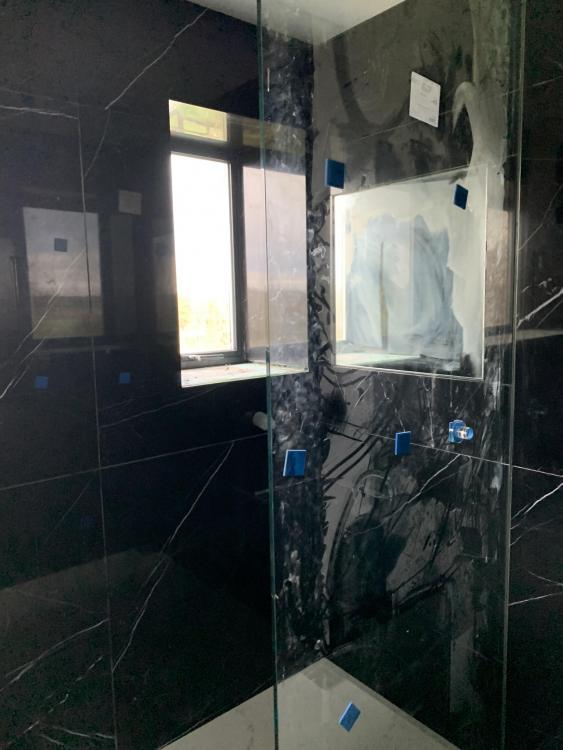
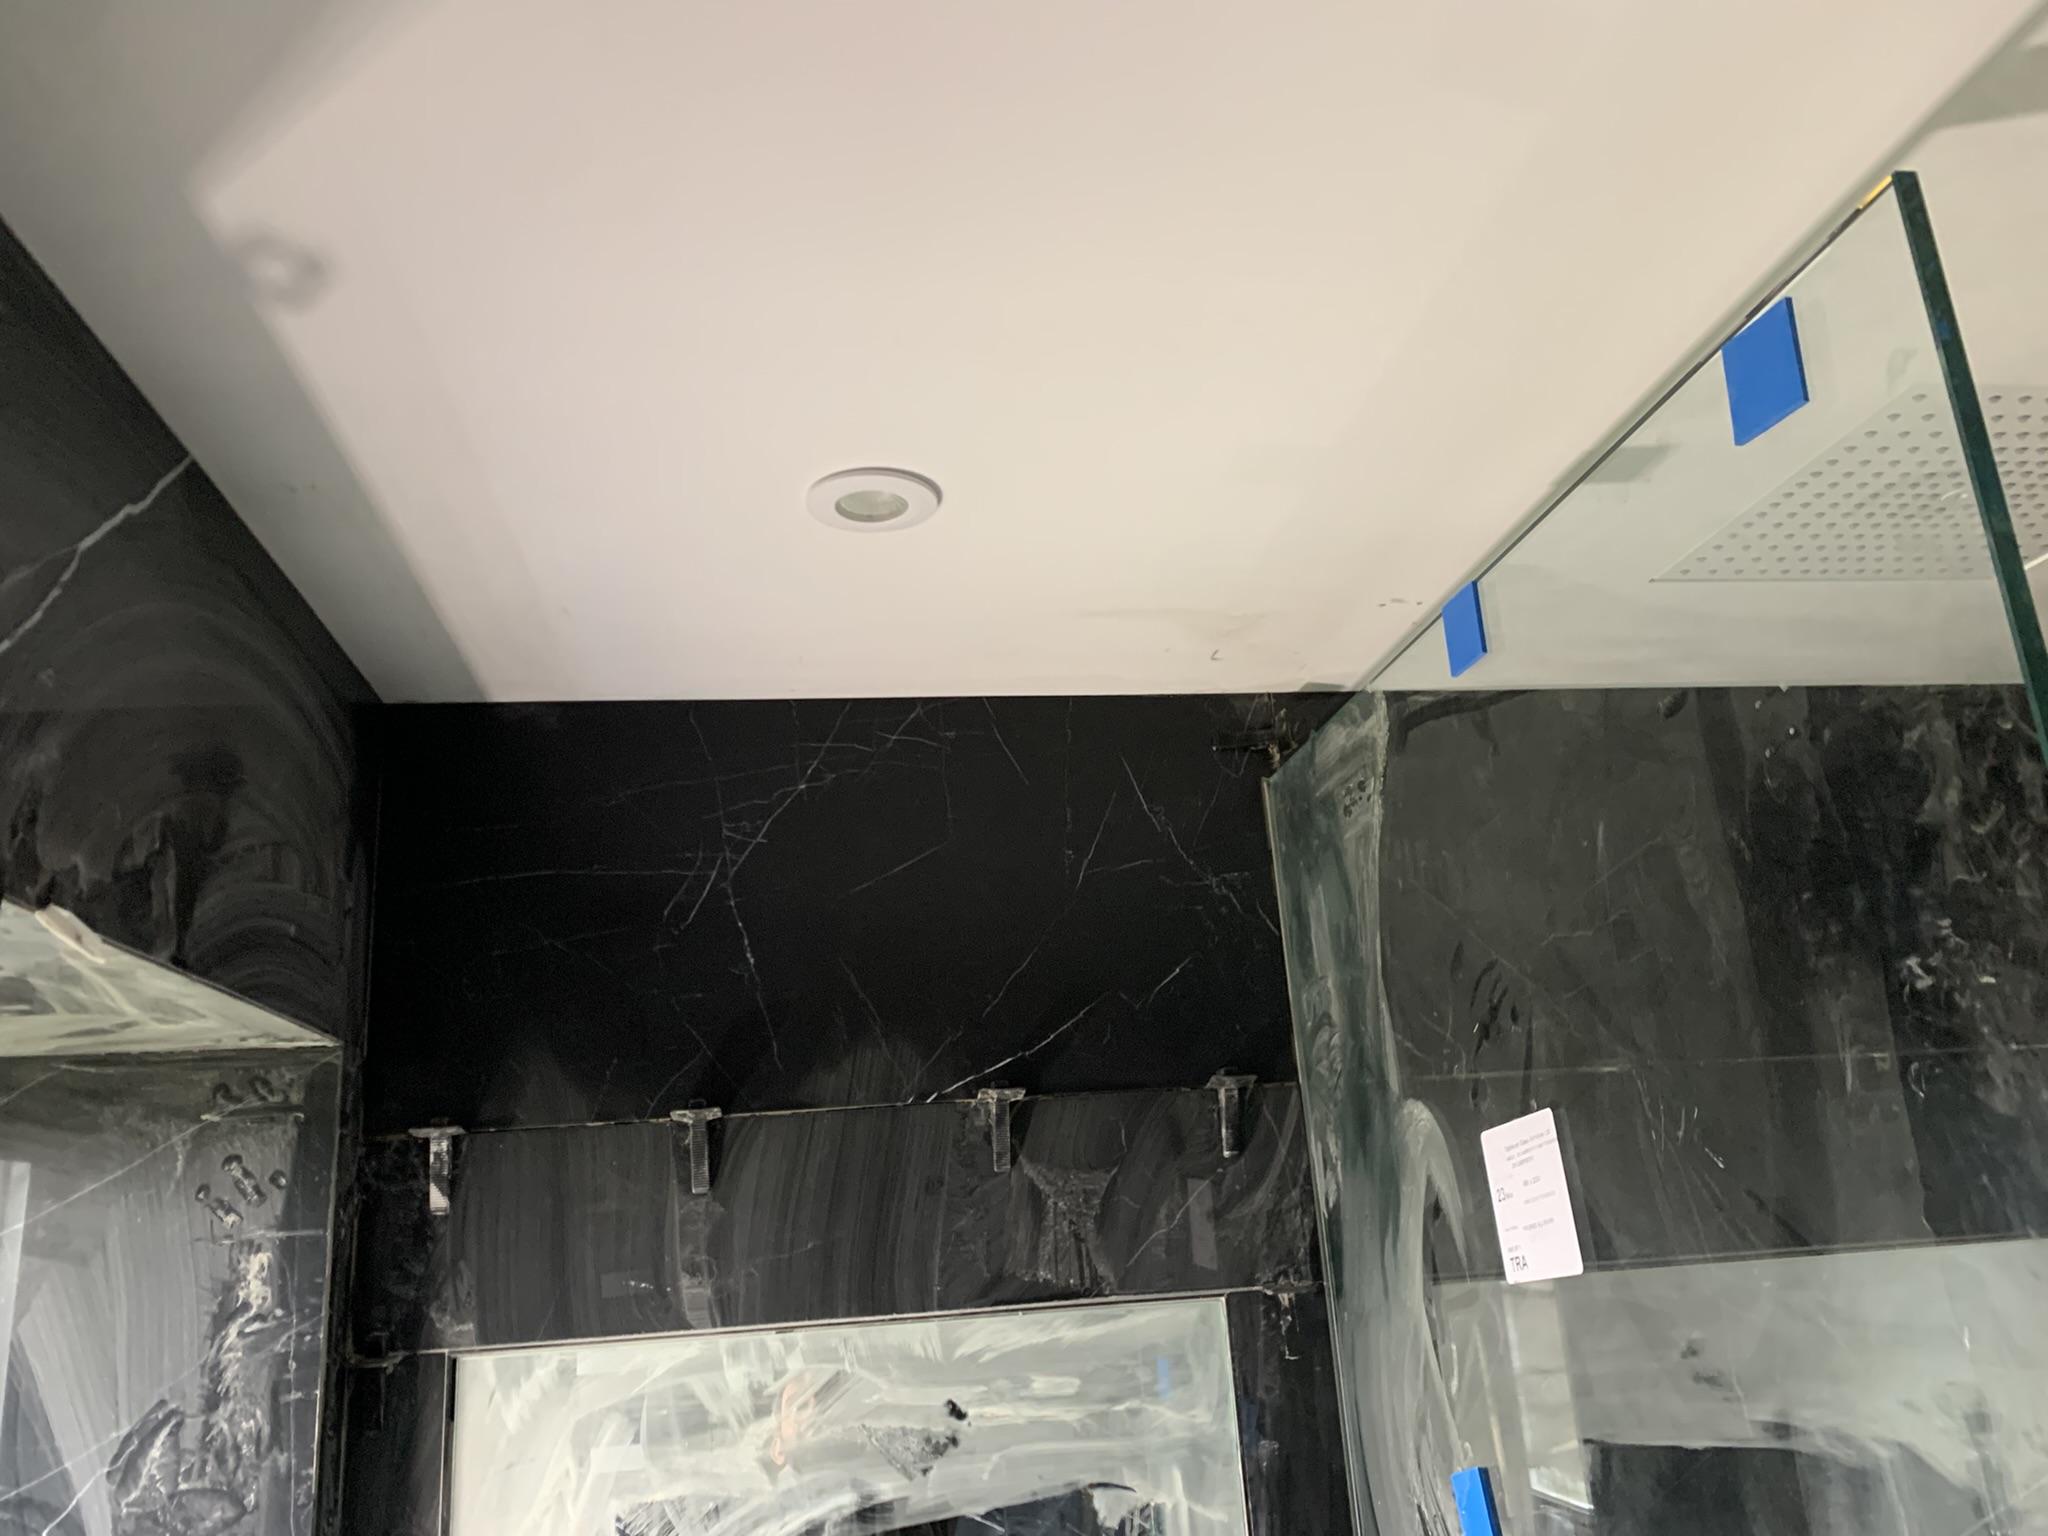
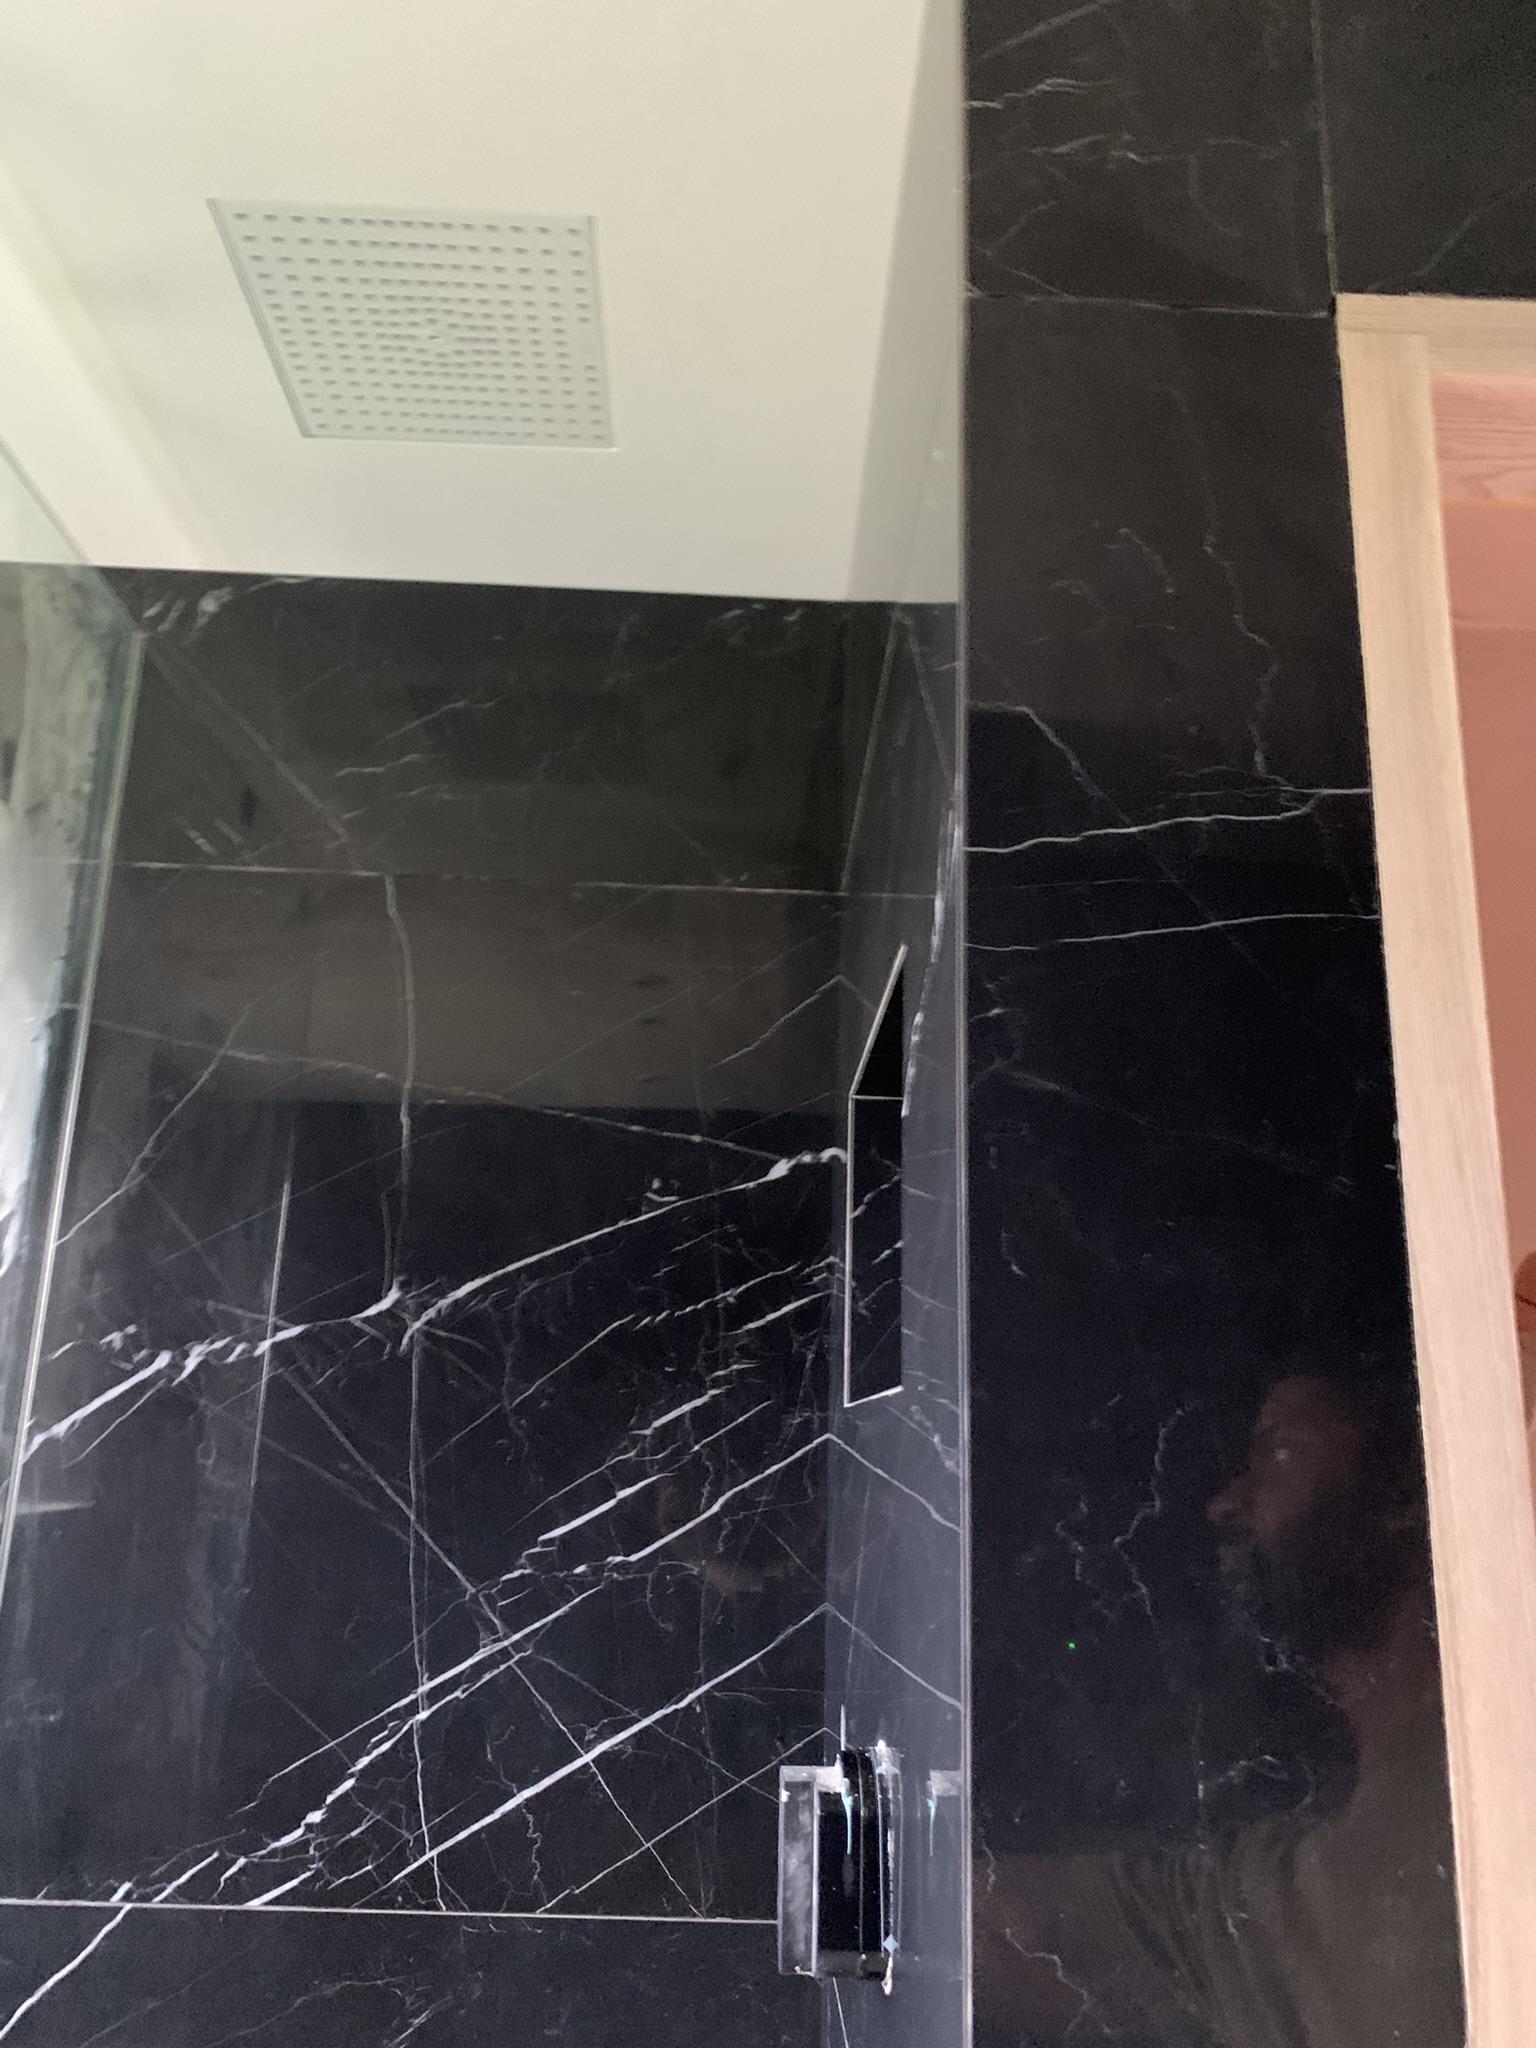
Hi @Kevlar There's no rubber seal. I spoke to Schluter about it when I was deciding how to go about it and they noted they never use it as the track has a specific internal size and you just get the glass accordingly. I went with the 12mm track so got 12mm toughened glass. I did pop a thin bead of CT-1 in the track prior to whacking the glass in, but tbh I don't think that was needed. Its very snug hence having to give it some pretty heavy whacks to get it in! Yes, I just used some roofing baton to rest the glass on, push it up to the wall track tight, and then proceeded to whack it in using the block and hammer. Once it went in all the way in to the wall track, I used a Grabo suction tool on the glass, and then just bounced on that to get it into the bottom track. To give you an idea ion the strength of the track, the glass weights 60kg, and after I had it in the wall track, I pulled out the batons and it just suspended itself there! Its very much fixed in there and would be a ball ache if it ever broke and needed replacing as I cut the last tile on the left to sit over the top of the glass, but hey ho. Cross that bridge if I come to it! You can just about see it in these pics,
 1 point
 -
If the garage is on your planning permission yes1 point
-
I’ve just been through exactly the same thing and reading around it I think these standards need to be applied as conditions in planning by the local authority. Failing that the standard standards apply… that’s what I’ve gone with anyway!1 point
-
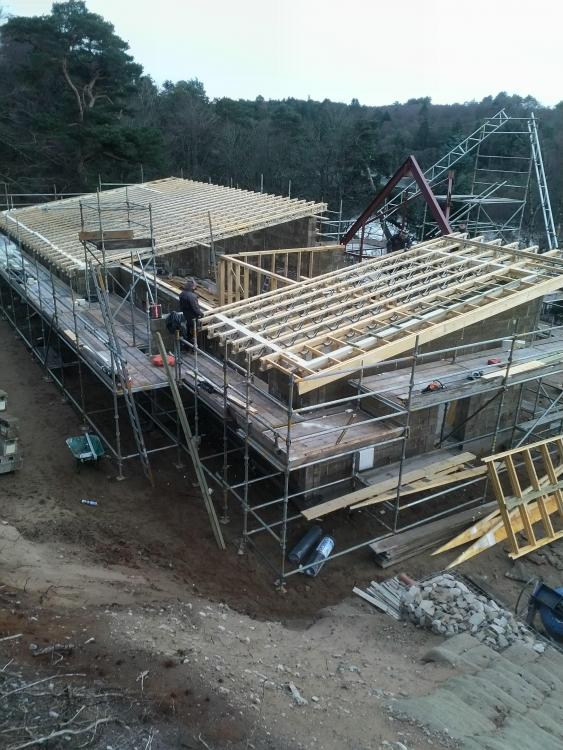
Hello All Building a new detached house in Yorkshire. Project managing and sub contracting. Foundations are complete and the work on the substructure has started Hopefully, my experience will/may help someone out there. I know I will definitely learn from others. Note, there are cowboy architects too. iMCaan1 point
-
There is definitely a fall and I believe the issue to be the step up to the outlet in the corner. It is this I intend to discuss with another roofer after they’ve of course checked the falls are present etc. It should be feasibly possible to lower the outlet by say 10 mm and solve the issue.1 point
-
Was the roofer responsible for the structure underneath being to appropriate slopes? How much fall is there other than this problem area?1 point
-
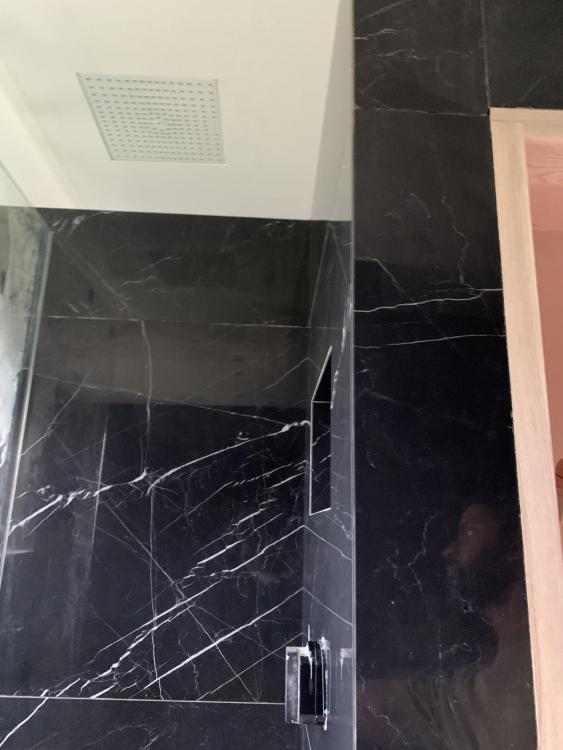
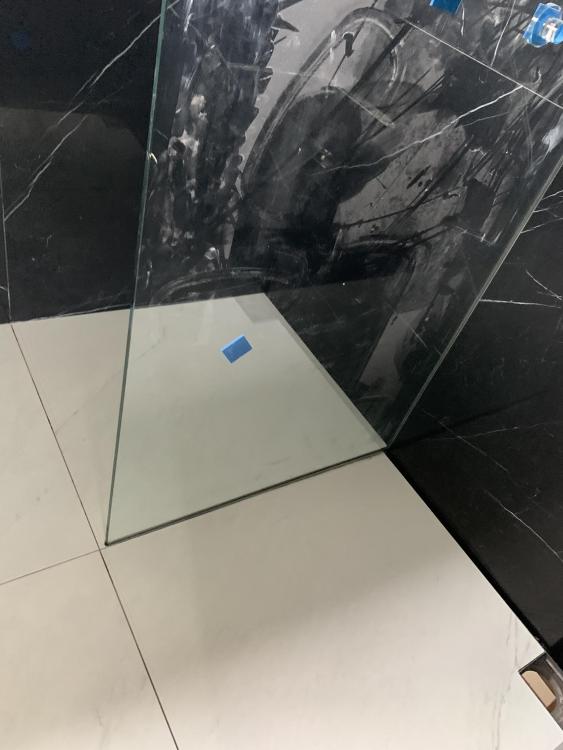
I did something similar to yourself but used an F shaped channel on the wall and floor. Had to install this all plumb and level and then tiled either side. If you're going to do it this way definitely clean the adhesive as it presses against the track and can cause it to pinch. I used 12mm toughened glass. Had it on some battens and whacked it with a hammer and block into the wall track, then using a suction tool pushed it down into the floor track, after removing the battens. It's very tight in the track, and seems to be very stable and plumb. Some photo's of the finished-ish result, This is the track I used

 1 point
 -
If no recommendations? The local paper or free ad paper. Or electronic yellow pages. A small contractor is probably fine. This is one job on site I have never 'helped' with. The small groundworker we used for years always brought in a particular mate just for this, as it needed an 'eye' for the thicknesses, and handling the rake, and the others barrowed and shovelled as instructed. Then rolled it.1 point
-
solar: Someone on Buildhub knows a lot about this, and can calculate if it is worth it depending on location. In principle as you go north you get less sun in the winter, when you need the power, and more in the summer, when you don't. Experts will perhaps join in now they see the change of subject.1 point
-
If the UFH pipe is already purchased and you need screed anyway to make up the levels then your approach makes perfect sense, especially if you can use a bit of EPS to save some screed! I think you'll be amazed at how little you will need to heat your house but, having built at the same time of year, understand how hard that is to realise until you're in. Good to see you're giving the same attention to cooling as you're giving to heating as guarantee that will be your number one comfort issue. One of my regrets is not making provision for air con. I just spent £1000 at Ikea on their wireless battery operated blinds which by pure luck are exactly the right length such that three perfectly cover the large west facing sliders on the ground floor. All connected to their smart hub so controllable by Alexa - will make a big difference in summer as the afternoon sun can significantly overheat the GF. We have cheap linen panels for now which help a little but the blinds should be much more effective. Now, crack on to your next dilemma1 point
-
I would definitely go solar, no moving parts! And fairly low installation cost.1 point
-
They're yours! I'll send a PM FWIW my process was fairly backwards: choosing wiring standard, then the application programming tools, then the dimmer protocols, then built up my cabinet, then did the lighting design. I panicked at the last stage and contracted a professional lighting designer and then eventually realized that getting the design right, then choosing the dimming protocols based on the models available that meet the lighting requirements, then from that selecting the protocols and building the cabinet. That said, it's definitely worth having a splunk with the various parts first so you can rule out any non-starters you just don't get on with. The only thing I'd reiterate about DALI is it's very expensive to get started with on Loxone (over £1k for a miniserver and the DALI extensions), but @Dan F is investigating an IP / microcoontroller based alternative DALI driver and maybe will share with the community if it proves successful?1 point
-
This is where I got to and you also have the cost of maintenance to consider, I will look into it again in the years to come but for now I will keep adding insulation!1 point
-
Chalk and cheese. Those DeWalt ones are superb (& I can't stand DeWalt).1 point
-
Big enough to park 2 cars? What is the arrangament for drains in the new ensuite: it is partially over the stairs and I can't see any provision on the downstairs drawing. With so big bifolds the rooflights won't give too much extra light where they currently are, maybe move furter away?1 point
-
Try this https://wind-power-program.com/ Original worked for me.1 point
-
May have trouble connecting it to the grid. This may help with windpseeds https://wind-power-program.com/UK_wind_speed_database.htm1 point
-
The big challenge with wind is the site. If you don't have an open enough site (360 degree uninterrupted wind) the output is massively reduced. This is quite a useful document: https://www.cse.org.uk/downloads/reports-and-publications/community-energy/planning/neighbourhood-planning-wind-guidance.pdf and this http://www.windandsun.co.uk/information/wind-power/wind-power-siting-and-planning.aspx#.Yd6KdGg6phE1 point
-
if you're drilling steel, and i know you love the firm which comes in a fetching shade of black and yellow, buy their hss drill bits. https://www.ebay.co.uk/itm/154592266014?hash=item23fe6ac71e:g:HoYAAOSwn41hLqWK wouldn't buy their tools but these are superb1 point
-
I take your point, probably aimed at brick and block and we're timber frame but the point is - it takes a long time. Can't do that, the UFH doesn't seem to be working properly. I'll start another thread on that little issue when I get a roundtoit (the house isn't cold though) I'm starting to feel bullied, I'm off to Tesco's to get some Humble Pie to pop in the fridge ready in case I need it. Which is the number one priority. When that box is ticked nothing else really matters (its just a bloody difficult box to tick!)1 point
-
Thought who’s resurrected this old thread. So wasn’t going to comment about the madness of anything other than option 1. Until I got to the feedback. You made the correct choice after listening to all the various opinions and advise offered to you. BS are just guidance for best practice. BC do not enforce BS and as the roof did not contravene the performance requirements of the regulations (the approved documents are not regulations) they could not force you or the builder to do any remedial work. Obviously they would prefer you follow best practice guidance1 point
-
0,65, I think adaptive disabled and room temp mod enabled.1 point
-
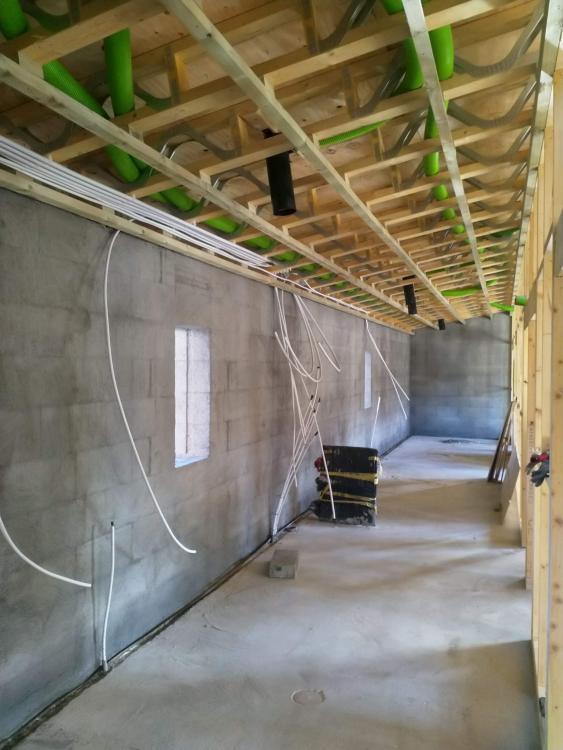
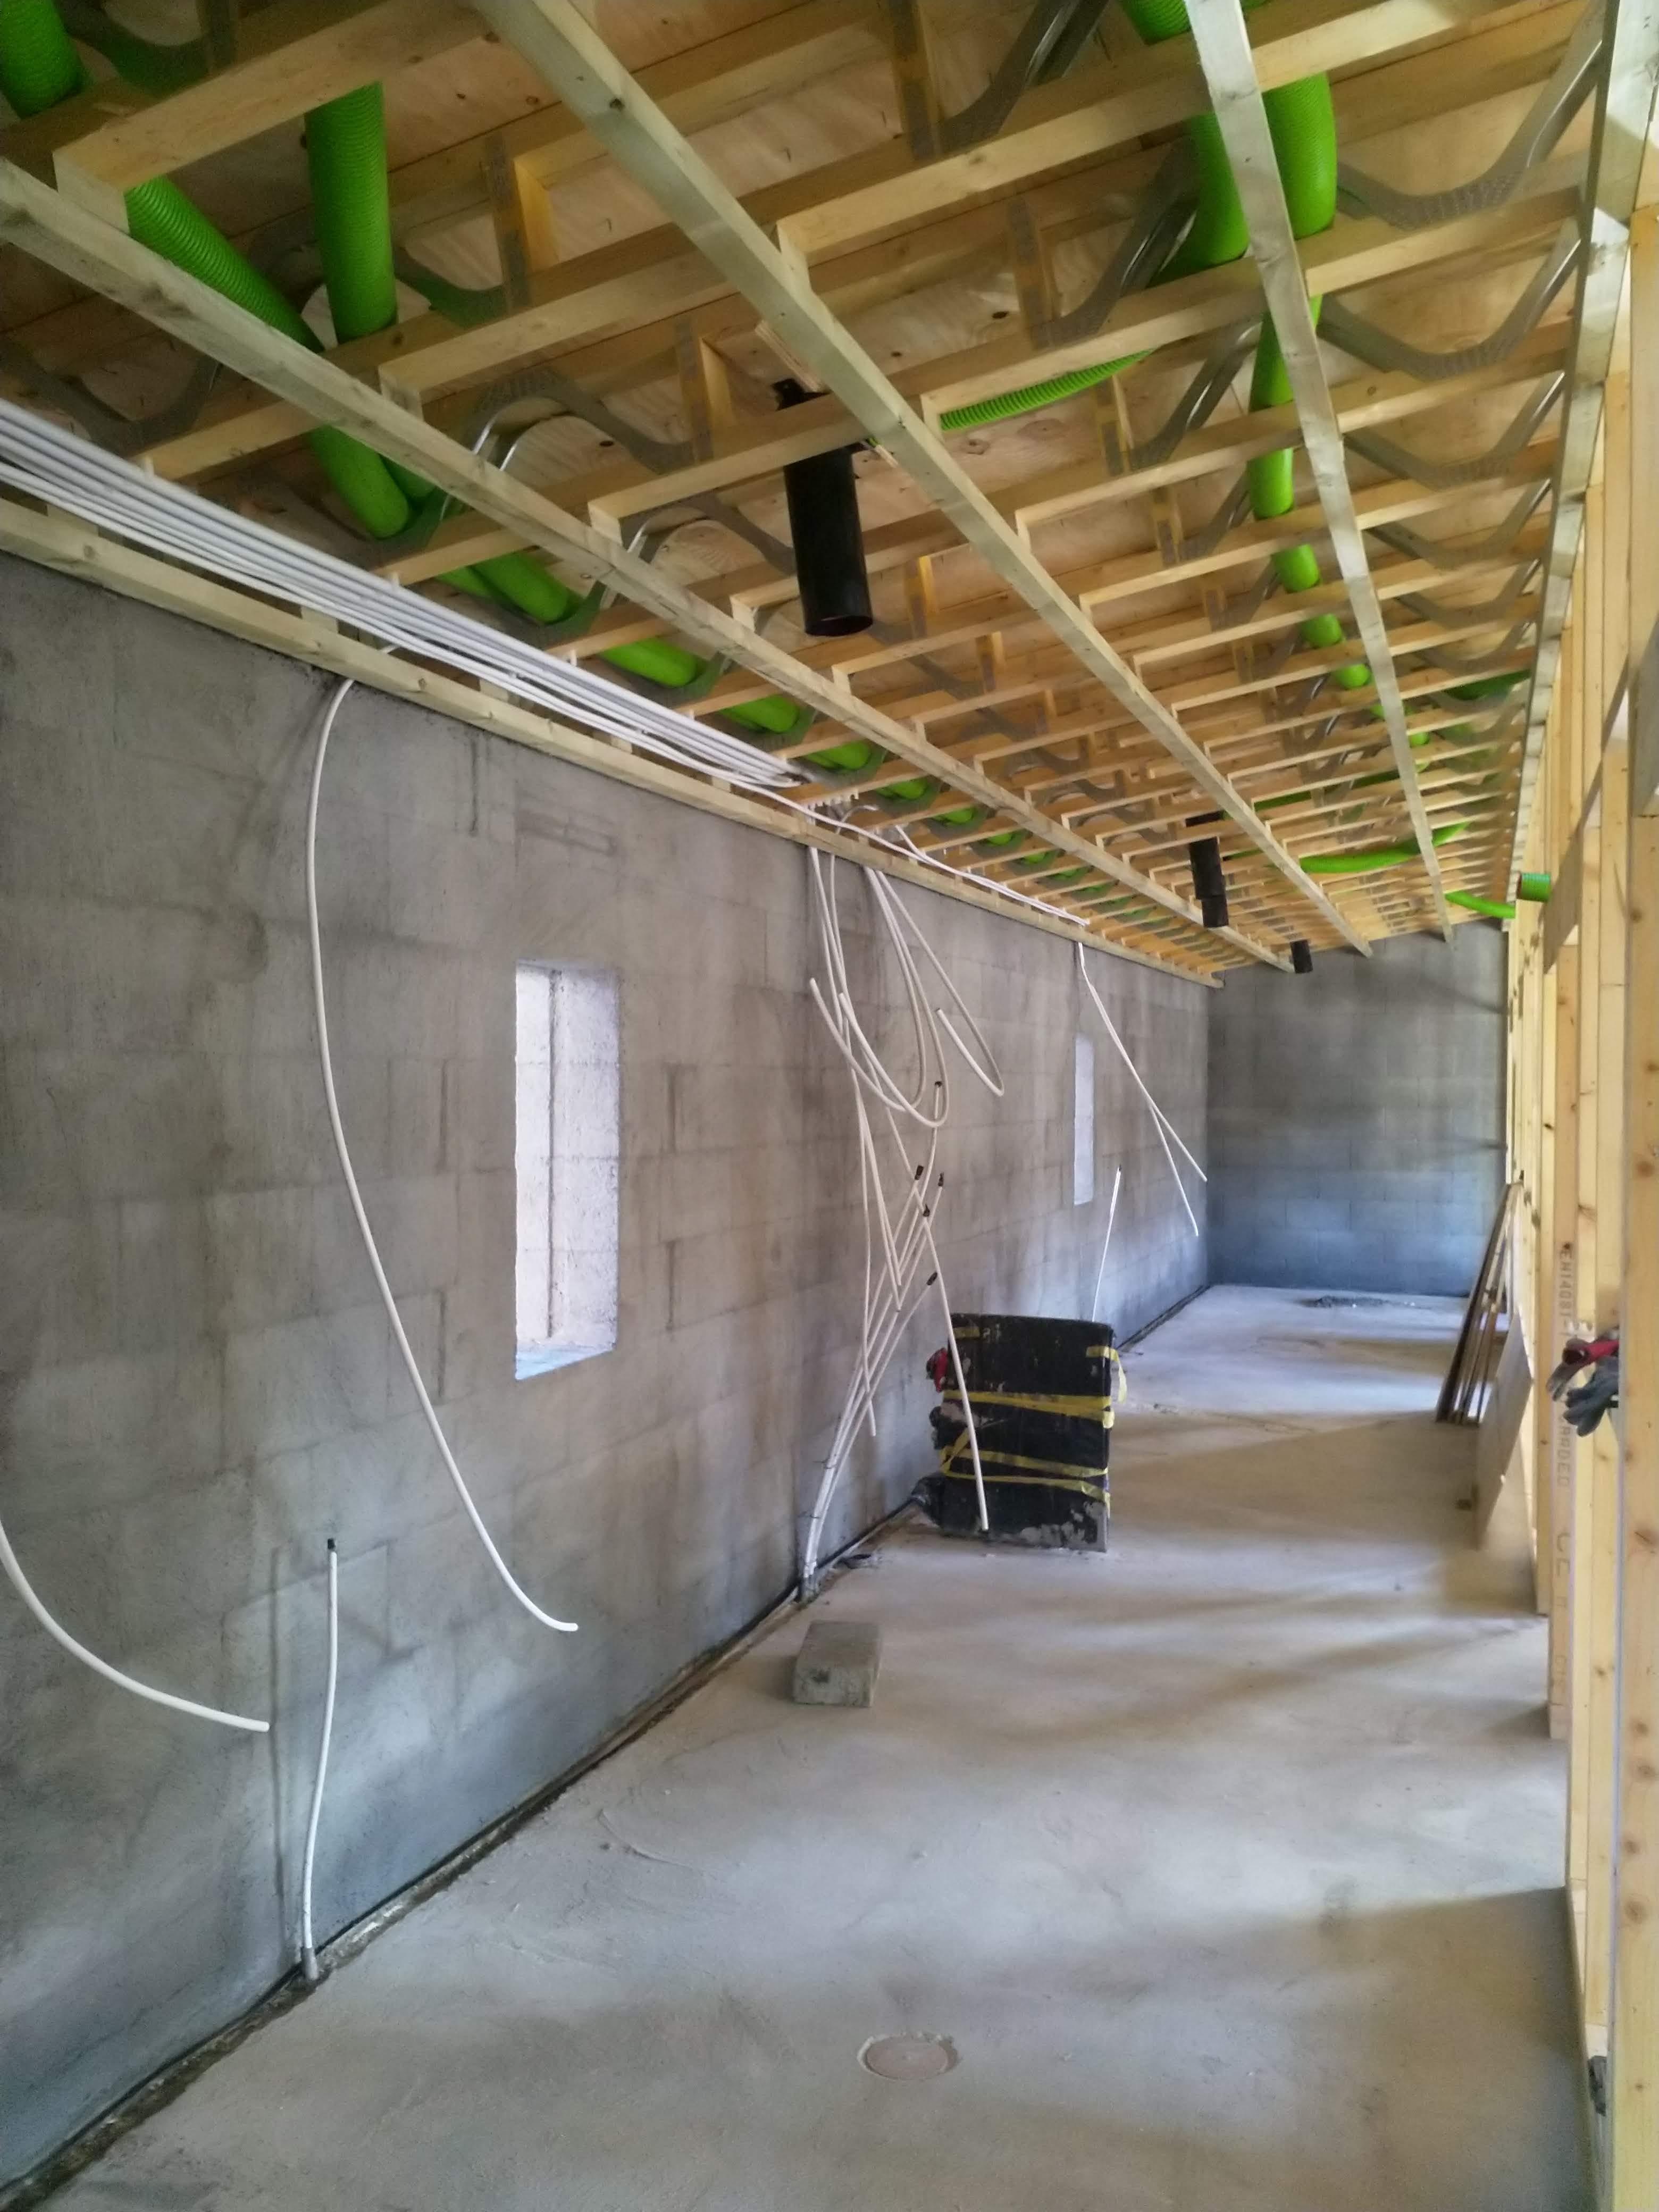
Another option would Posi rafters. These are pre made in a factory, which cuts site time down, ours are approx 9m long. Our flat roofs were ready for boarding over in two days. Used the gaps for running mvhr etc We then under draw with 50mm Short battens, then counter battened with a further 50mm, to give a 350mm cavity, this was then spray foamed.
 1 point
 -
I hear you, I hear you, and I'm very grateful for your (and everyone else) input but I honestly don't think the house is or could still be 'wet' despite what the RH levels say, If it transpires that that is the problem then I will whack some Humble Pie in the microwave and scoff it live on air. I kind of agree there. I can't see how it's going to change much. I'm looking suspiciously at the enthalpy heat exchanger but others on here seem to be using those without issue. The only other culprit (if it's not a 'wet' house) has to be the machine itself. It was a 'special order' so perhaps it's been put together incorrectly... That restriction is done in the manifolds at the MVHR end of things with the red restrictor rings, popping out as many as the supplier dictated. I got those restrictor calculations checked twice so I'm fairly confident in them, I'm also fairly confident the correct restrictor ring is over the correct duct in the manifold. The valves in the room also have adjustment, which in theory shouldn't be required, it's those that are set to 0 at the moment, so they can be adjusted to restrict flow further as required That'll hopefully happen soon with the help of a very kind man who has also lent me a CO2 monitor which has been up and monitoring for a few hours. That CO2 monitor shows that when the MVHR is on a low setting the CO2 readings are high, when the MVHR is on a high setting the CO2 reduces quickly - so air is moving in the right direction. And I'm sure the house isn't 'wet'. ?


 1 point
 -
If budget is tight I would avoid going with a big company like Scotframe. Much cheaper to have a kit cut on site by joiners. I considered Scotframe and a few others, but the problem is, you end of paying all their overheads and profit margin. What are you expected costs for foundations and utilities?1 point
-
8500kWh for a house that size sounds OK. But does that price change calculations around eg solar pv or battery storage? IME SAP is a decent guide to a 'normal' house, and as your house becomes more extreme in any way it becomes less reliable. If the SAP numbers were up in the 80s or 90s I would treat it as at best an approximation. I had a free trial copy of the SAP software from Stroma and did my own calculations to understand the workings. This may still be possible. I would suggest building a heat model of your house using the spreadsheet available here, as a supplement to SAP Do you know about this? HTH. Ferdinand1 point
-
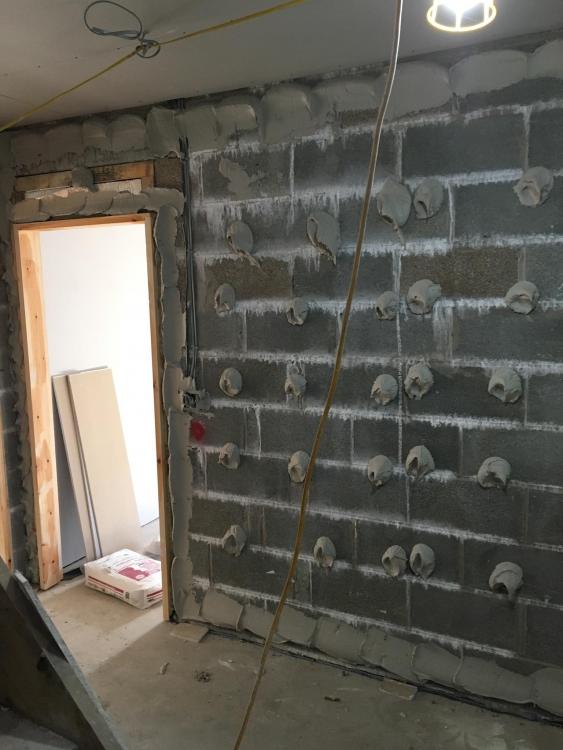
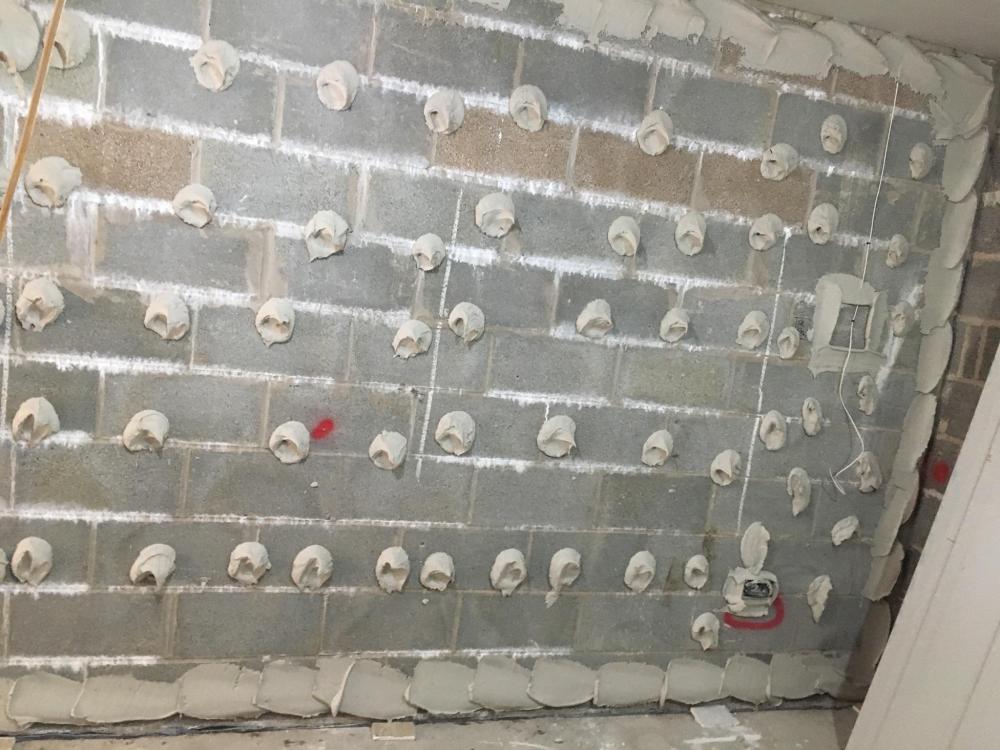
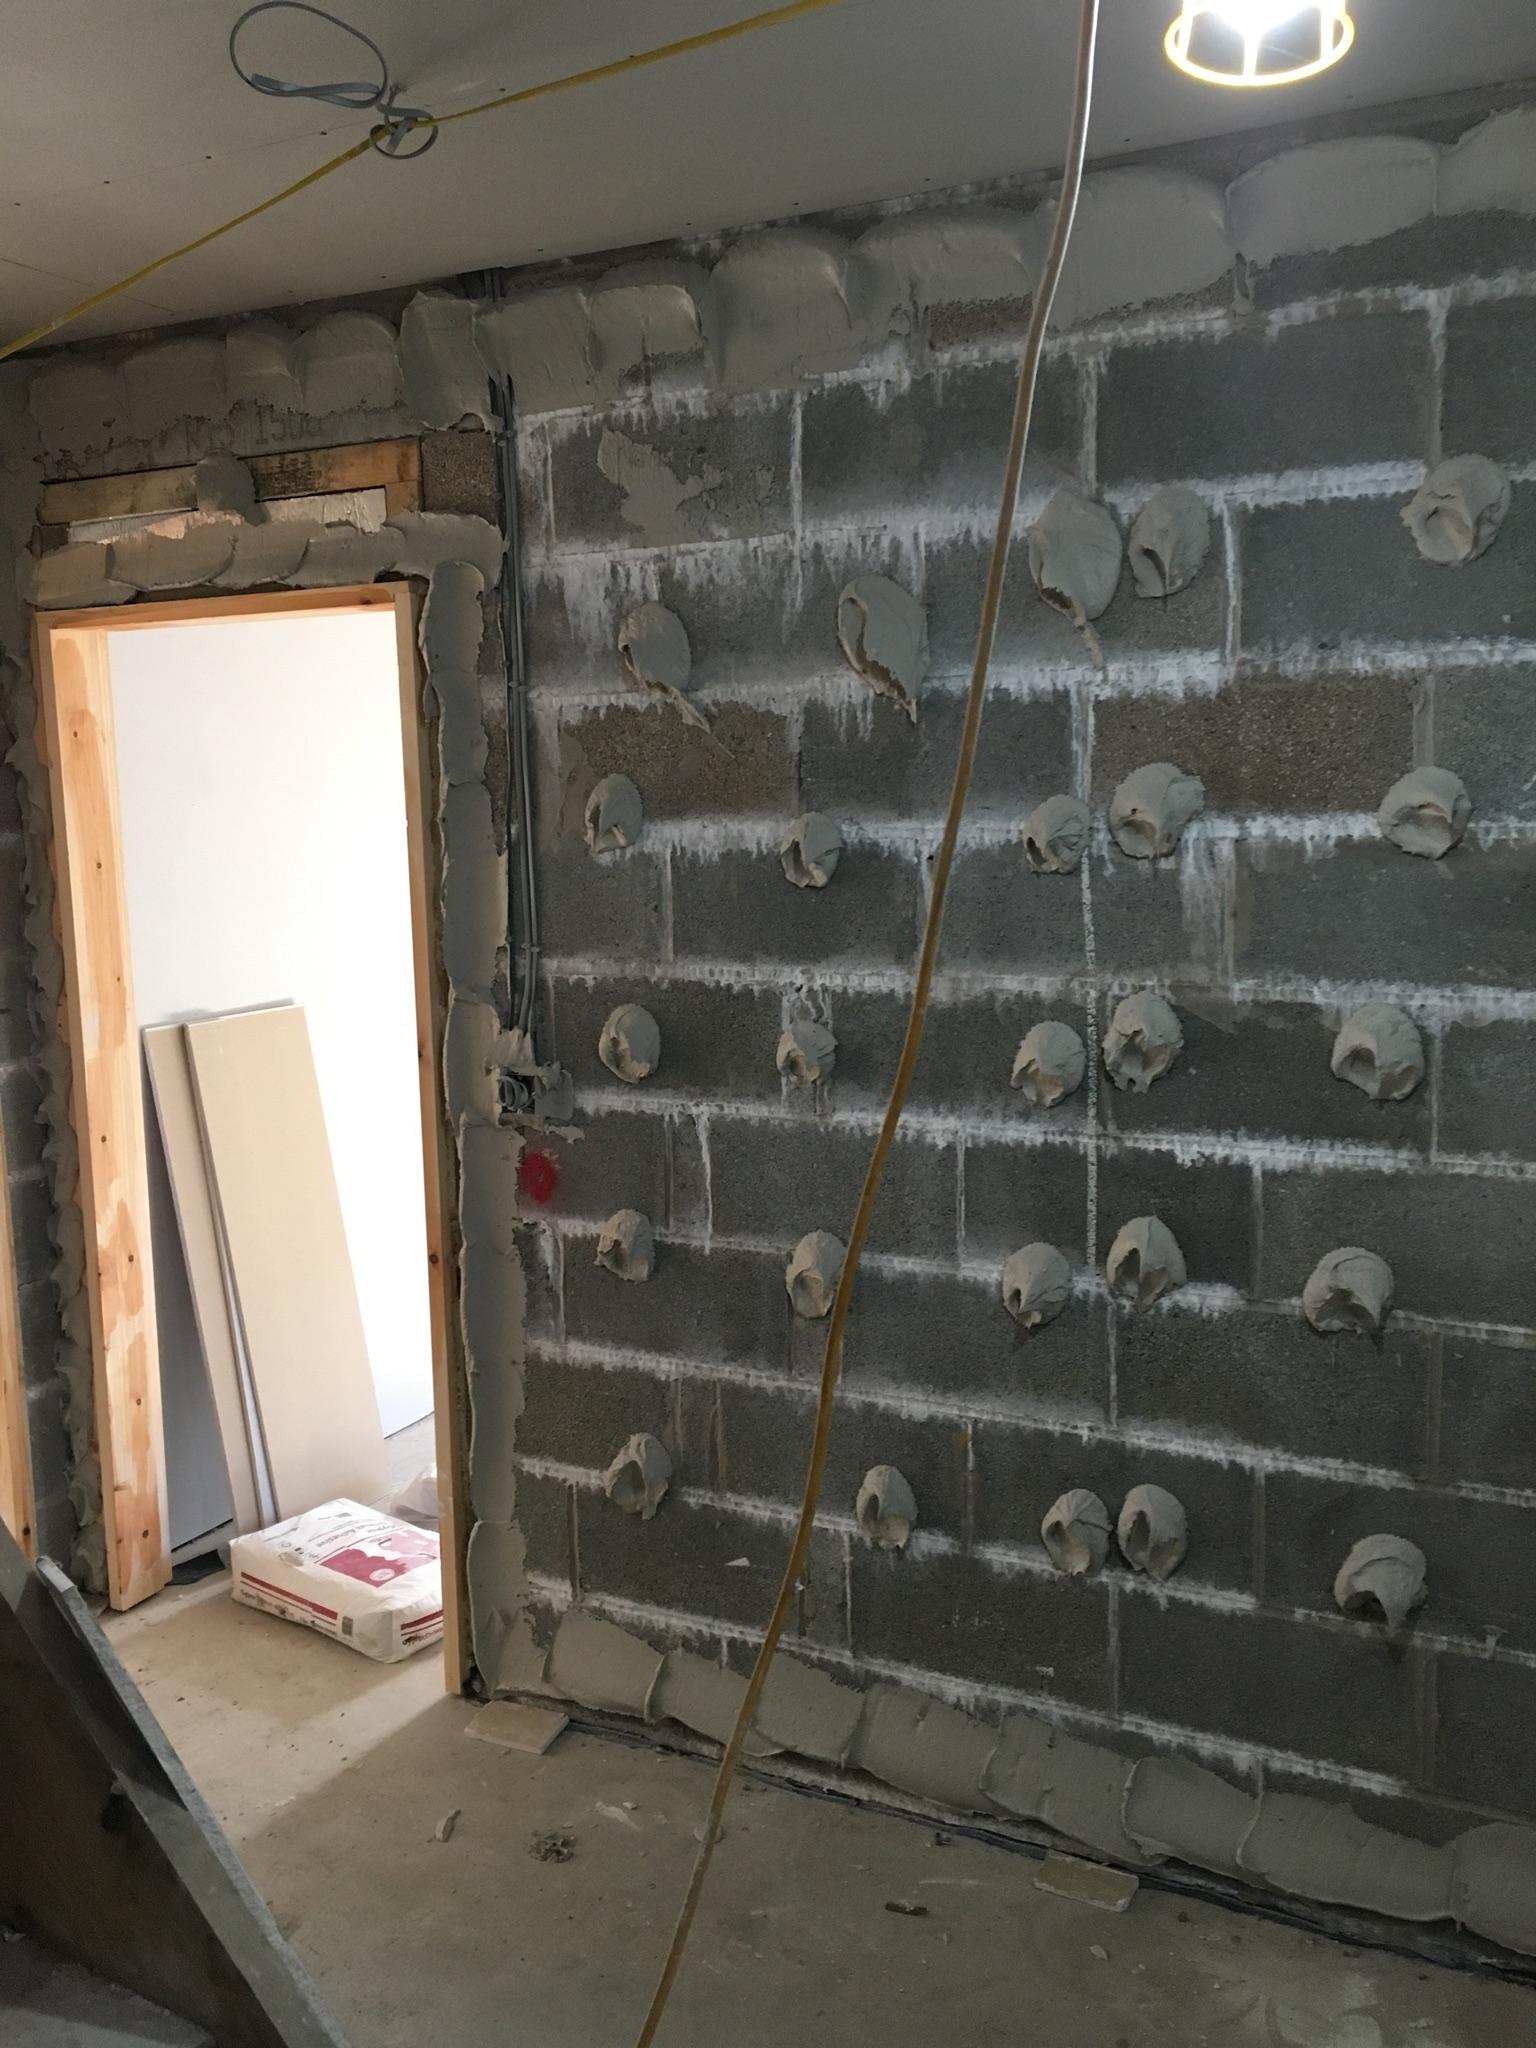
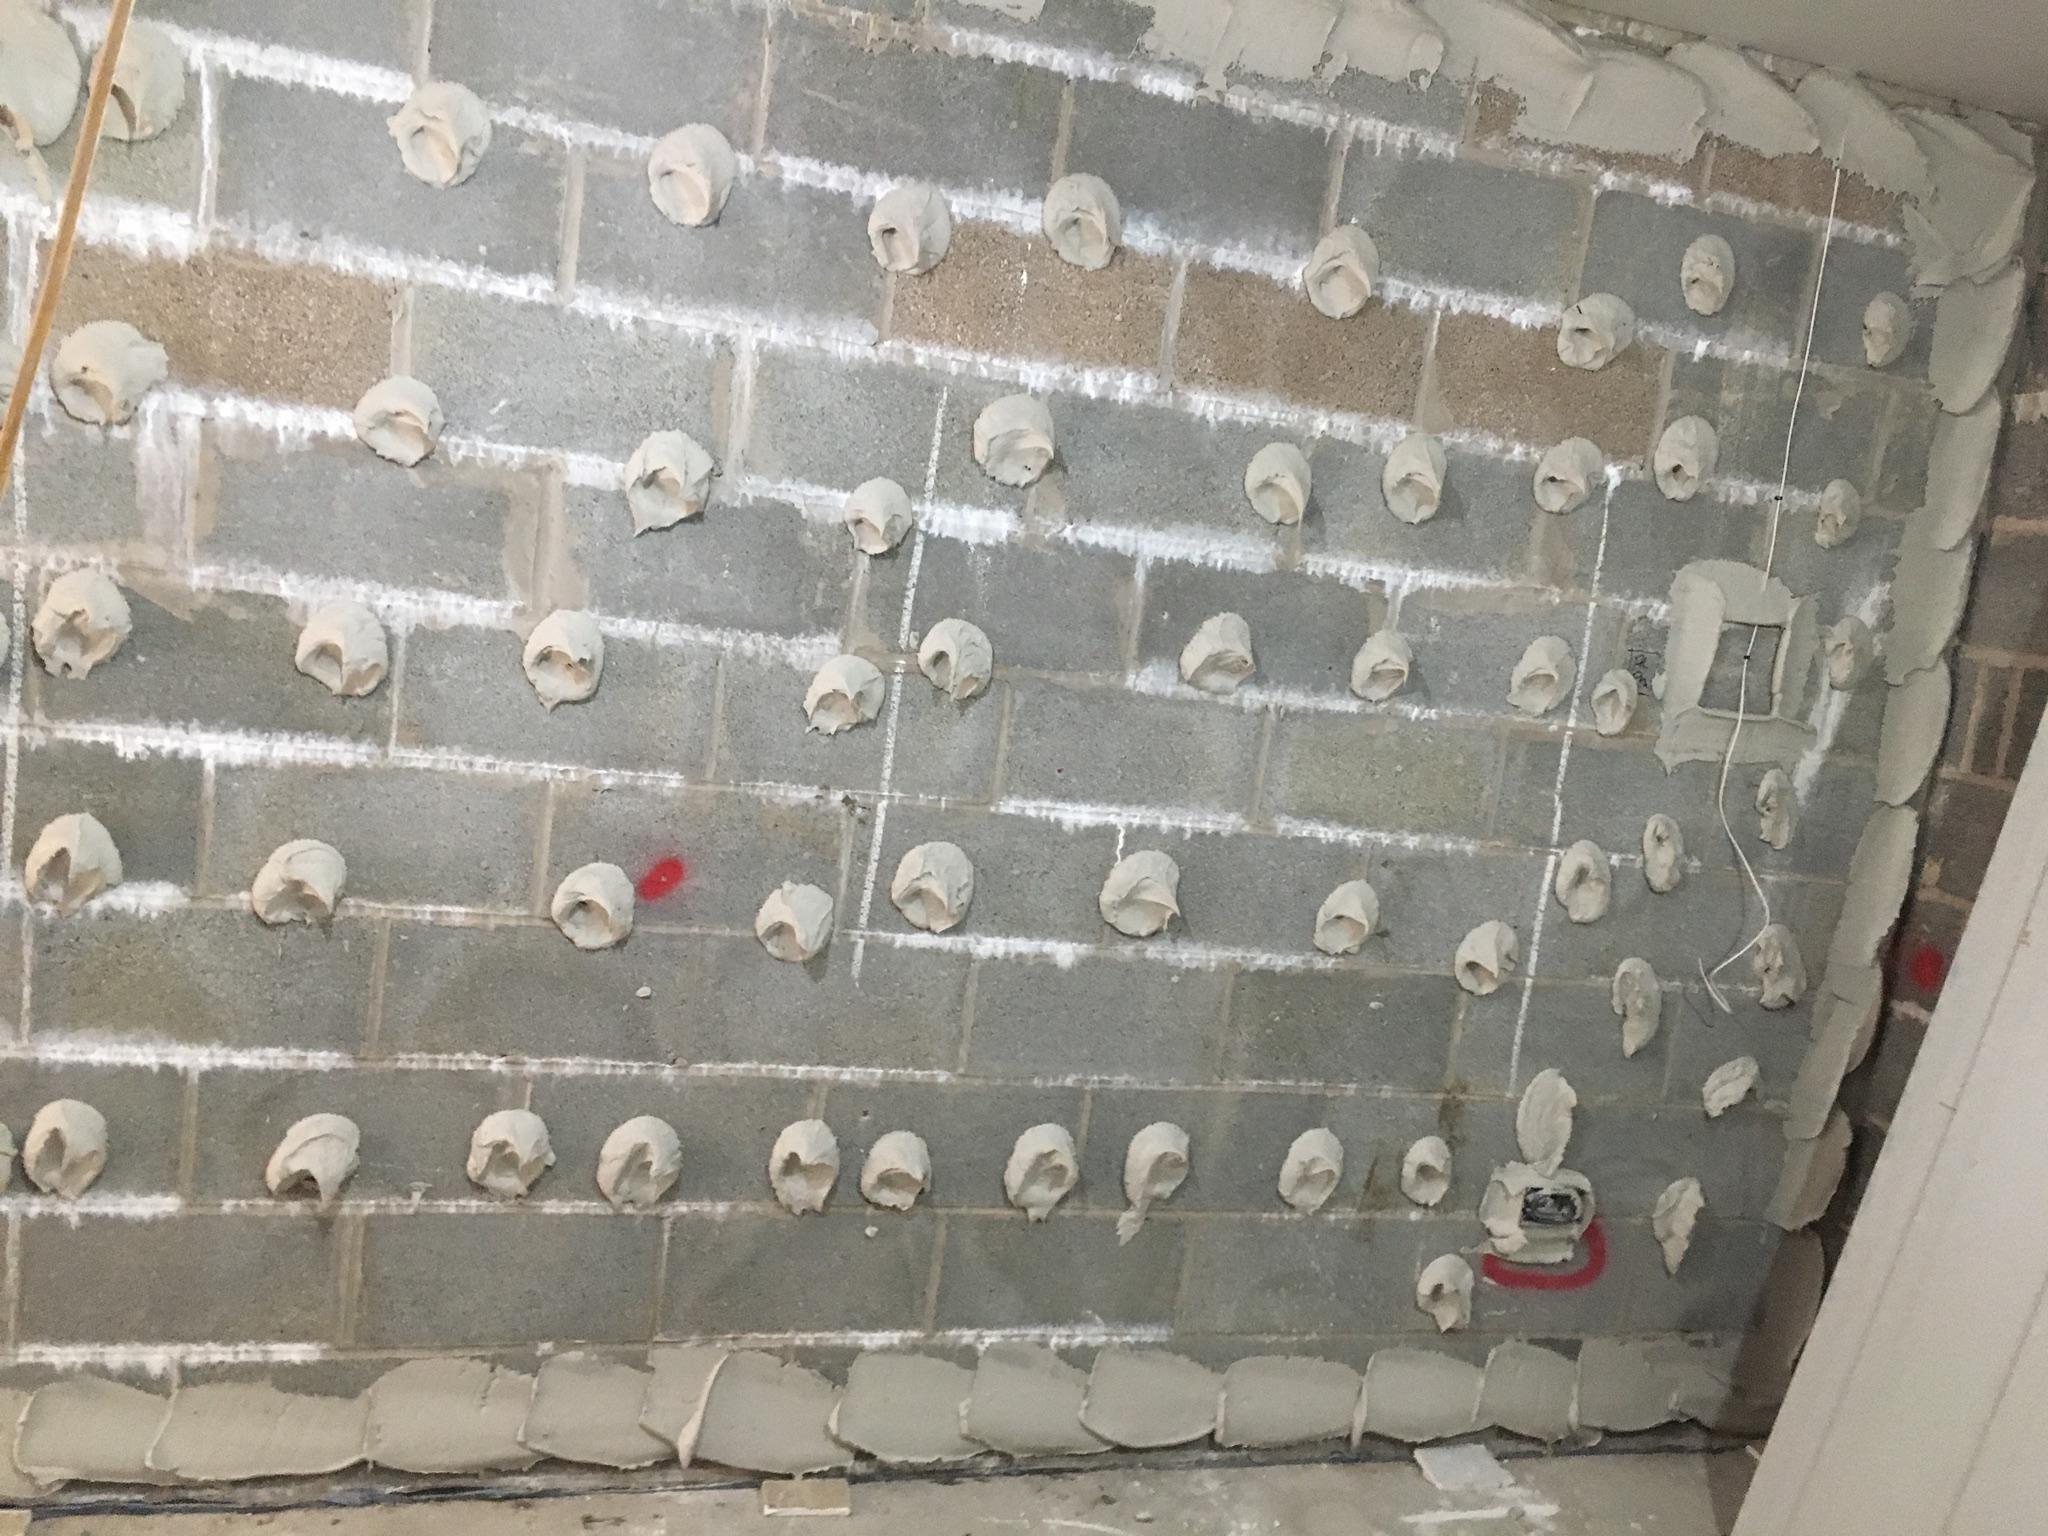
Your not to far off with downstairs I would give all the original masonry a coat of 3-1 S&C Then dab your 37 mil insulated boards Pink foam only You can achieve excellent airtightness with dot and dab if done as pictured Thermal blocks are not really suited to wet plaster Unless you use HSB backing You will have to order that in As a Tiling business I use lots of Marmox But you can’t plaster it So I definitely wouldn’t use it on ceilings Your slopes are better with PIR insulation Leaving an air gap Then insulated plasterboard on the rafters
 1 point
 -
I would be tempted to tell them you have machinery on site and it WILL be damaged unless they move it, might put a bomb under their ass!1 point
-
Coming at this from a contractor perspective, to get the same stage and performance values, we generally came in more expensive than timber frame and on par with masonry subject to geographic area. That is for supply and fit. If you had three houses, one of each build type of which there others but we'll ignore those for a minute, and you ordered all three on the same day, the masonry one would most likely start first and finish last, the ICF one would start second and finish first and the timber frame, in current market conditions, start last and finish second. Note: accounting for lead times. One school of thought might be that a "superior" end product shouldn't cost less than a lesser alternative. Wastage is a product of design and inefficiency. With polystyrene ICFs there should be very little wastage, a couple of dumpy bags maximum. A lot of ICFs can produce all sorts of savings throughout the build. As a contractor again, it's our responsibility to share these benefits with follow on trades. If you self build, be involved, understand the product and extract practical(!) Information from the supplier. And think three steps ahead before you make that cut! And don't cut corners, figuratively or literally!1 point
-
Suppose low expansion would be key to it working well. Wouldn't want to come back to a wall for all the boards to be 10mm out at the top! when doing a ribbon bead I genuinely find that the gear fills up the space1 point


.thumb.jpg.bac90f3bbf6868cf2118d010d936c99d.jpg)


This leaderboard is set to London/GMT+01:00