


Gus Potter
-
Posts
1796 -
Joined
-
Last visited
-
Days Won
20
7 Followers


Recent Profile Visitors
7783 profile views


Gus Potter's Achievements
Advanced Member (5/5)
1.2k
Reputation
-
It is massively hard to get your head around this. I've been dabbling in UFH and stuff for 40 years and the learning curve is hard to keep up with. John makes a valid point about how much it costs (£75.00) to run a circulation pump. Now pumps give out heat. If they are inside the insulation envelope then it is fair game to count that heat in the calculation. To be pedantic.. say gas is 1/3 the price of electricity. Now your £75 quid is more like £50 quid nett, one problem is though.. you don't live in the boiler cupboard... I hope. @LnP earlier and on another thread put forward a proposal that certain publications were using flawed data to argue against climate change. Now what we are doing on BH is building our own houses and extending say. Over my adult life I've come to recognise that the political landscape changes a lot, at the moment with Reform UK this has the potential to be quite dramatic. Govenment policy could change a lot. No matter where you sit on the polical spectrum things won't stay the same as they are now. Research funds etc get directed to deliver certain outcomes. This landscape changes more frequently than the lifespan of the house and probably a mortgage. As a designer I would encourage Clients to think about energy policy and costs and recognise that they will change for good.. or bad and try and design for the long term. Design for durability, ease of part replacement and mitigate servicing cost. This is one key aspect that underpins sustainable and environmental design.
-
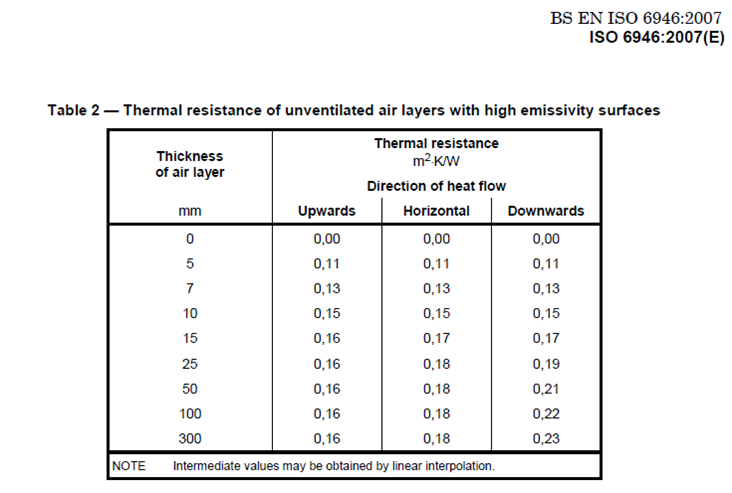
Quick pratical question. If you put your hot water cylinder in a modest cupboard with slatted shelves over the top to keep your linen dry and to get that "crispy warm towel effect" does it help prevent heat loss from the cylinder enough to make the excercise worthwhile? If you fancy a go at a fag packet heat loss calculation for a bit of fun! The cylinder and cupboard insulation coupled with the air gap effect in the cupboard changes the numbers as they work in series. Easier to do a fag packet calc as there is little cold bridging that you get with say repeating timbers in a stud wall. Yes I know you will get convection effects occurring in the cupboard, and so on, but to give you a flavour and to anticipate this question here is a copy of the table from BS.. 6946. The cylinder insulation, air gap, and enclosure all work in series. The question is how often do you open the cupboard, at what time and how many towels do you have? Seriously though. If you are tight for cylinder space then it's worth an ecclectic look. If you look at the table ( developed really for double glazing / secondary glazing) you can see that the horizontal resistance become constant once you exceed a gap of ~25mm. Or... if you are designer and have eh.. designed below the margin.. this might be a way of getting yourself out of trouble! When drowning you will grasp any straw!
-
Are builders currently busy? seems a bit of a slow down.
Gus Potter replied to Edward Brennan's topic in Introduce Yourself
Ah to qualify .. they have up in Scotland.. coming soon to the rest of the UK! -
A good "woodsperson.. woke" woodsman will always choose an axe head made from a steel that can be made reasonably sharp but also be durable. While they may not get the edge perfectly sharp and keen it will still out perfom a steel that can take a good edge but is not durable in the long run. There is little point in installing complex systems which on the face of it will work for a few years and then become difficult to service, suffer from a large drop off in performace or need replacement. Take a step back and use your common sense.
-
It would be a good idea to get an SE in to have a look at this. One thing that you need to look out for is when you muck about with the roof you can change the load paths on the floors below / any old beams and so on. This can become an issue. As a domestic Client you have a good bit of protection under the consumer protection act, the building regulations, CDM regulations and the HSE act 1974. Write to Oso and say that in the interests of fairness it would be appropriate to get a independent opinion. Say you are seriously concerned about the safety of the structure and give them 48 hours to respond. Point out that you have observed excessive deflections. Do this right away, don't delay! I agree with the other posters.. It does not look rosy as things stand and seeing the standard of workmanship gives me concern in terms of safety. You need to take the long view. At some point you will want to sell the house so best to get all your ducks in a row.
-
Are builders currently busy? seems a bit of a slow down.
Gus Potter replied to Edward Brennan's topic in Introduce Yourself
Hard to tell at the moment. As as designer I'm still turning down offers of projects that I get through my (outdated) website as I don't really look beyond a 3 - 4 month workload. This matters in that if I'm not designing stuff for Planning / BC and doing structural calculations then the builders can't start. The majority of my work is derived from two streams. First is repeat business working directly for Clients and that is holding up well. The other is for example where builders will go to see a Client and then pass on my name as a designer. This is more patchy. In otherwords I'm a bit like seaweed when you use it a bellweather. One thing is that for the legitimate builders / say steel fabricators and designers the hike in NIC contribution is an unwelcome introduction and this is having an impact. This extra cost has to be passed on. Then there are the things you don't see at the outset. BC and Planning fees have gone up for example but the service level has gone down. -
Hiya. If you click on the drawing that @Russdl has posted yesterday it takes you to his thread. There is a fair bit going on in the slab. Here is a bit of detail that works for a reasonable lightweight structure like this even with solid single story masonry walls above, which add a line load to the edge of the slab. Your pod will be pretty light but hopefully the below may give you some ideas as to how you can use Foamglass in other ways. If you are close to trees then you'll maybe have some swelling / shrinkage of the soil, thus you'll have some element of excavation to navigate around that. Rather than filling the excavation back up with say type one it sometimes works if you back fill with an insulating materail such as Geocell Foamglass. Below is a screen shot from a data sheet. On the odd ocasion if you have ground with a very poor bearing capacity you can make some headway by digging out the soil and replacing it with a lighter material. Just say the soil you dig out is 1800 kg/ m^3 and the Geocell Foamglass is 150 kg/m^3. Now stick a raft slab on top of that and you basically get some "free load". The excess load is then used in the settlement and bearing calculation.. you need to mindful of the water table for example as this can put a spanner in the works at times. On the drawing posted you'll notice that the slab is 150mm thick.. but it has an A252 mesh which has an 8.0mm bar size spaced at 200mm centres in both directions. It's not uncommon to use a thinner mesh, say A142, for a lightly loaded ground bearing floor slab, which has a 6.0mm thick bar. So why the A252? Using the thicker A252 mesh allows you to qualify the slab as a reinforced concrete slab. And now the mesh serves two purposes: 1/ It allows you to have less movement joints in the slab, within reason, depending on the slab size and it controls the drying shrinkage of the concrete more. 2/ The nuance is that if / when the wall loads induce too much bearing stress on the foamglass under the edge of the slab the A252 mesh starts to work by transferring some of the load back into the slab. This is a common technique used when we design raft founds for houses. You'll see that the mesh is bent down on site. This anchors the mesh which will be in tension. It's ok to bend this kind of low risk mesh on site provided you only bend it once (so as not to work harden the steel) and you must not have too tight a bend radius. In this case the bend radius is roughly twice the bar diameter. You can bend this mesh easily with a bit of steel 22 mm gas pipe offcut while applying some common sense. @mjc55 have fun exploring the pods design.

-
I think this is a great idea as it will give you a feel for the material. I've designed with foamglass before for an insulated raft slab. The foam glass is different to work with when you compact it. Basically you need to give it a bit of a "shoogle / shake about" and it needs careful surface preparation so as not to damage any DPM on top, all doable. It drains well. But roughly for it to work as intended the ground water needs to be below the foam glass or the water will just bypass the insulating effect. Now if you want to use it for your house then we need to know a lot about the ground water levels and what loads the superstructure are putting on say a raft slab for example. Foamglass can deliver a big advantage in that it is able to carry high compressive load with negligeable movement (settlement) and for a house seeking to achieve a good insulated slab this can be a card in your deck you can play, or at least look at as an SE and this can be the key for overall build cost. There are times when it can be a fabulous cost effective solution.. there is a time and place for it.. the stars need to align.
-
No I'm not! The building trade is not an exact science, ground conditions, setting out, making errors in detailing, fabrication and following the drawings. We are all human, mistakes happen. Mistakes happen.. it's a fact of life! It's often easier to navigate an implement a solution if you have local folk round about to help solve on site issues. Maybe you got very lucky and things went according to plan.
-
No, it needs to come out and be redone properly. Some reasons. I won't list them all. 1/ The lead is not pinned in. 2/ The chase in the masonry is not deep enough. 3/ The silicon is not appropriate. 4/ I doubt they have used panitation oil an all sides of the lead. One big thing is that the lower slope (pitch of the roof) looks too shallow for these roof tiles in the photo.. depends if you had the camera off level. This could cause you a very big problem further down the road. BC should not have passed this.. if they did. Hope you get it resolved.
-
Comparing Thermals of Laminate Flooring Underlays
Gus Potter replied to MortarThePoint's topic in Wood & Laminate Flooring
Hi Nick. Me being old school and all have this idea that UF pipes where buried in screed and inaccessible should be installed without joints. Make all your joints, ideally above the floor where you can get to them. If you are making joints during concreting it's sods law these will be the ones that fail as everyone is under pressure. I then think.. say twenty years down the road, various plumbers come and go but one lets some gunk get into the UF and that slowly makes its way along the loop until it catches on the spliced bit with the joint. Then you could end up chasing you tail diagnosing the problem. You might be able to blow it back with compressed air.. but that may over stress the splice joint. Just a thought! -
Comparing Thermals of Laminate Flooring Underlays
Gus Potter replied to MortarThePoint's topic in Wood & Laminate Flooring
And folks it's that little dent that can compromise the whole loop! -
Agree. From an SE view the roof will be restraining the old walls. Once you start to muck about you could break these established bonds and risk things starting to move. When working on old buildings we need to be careful that when we stengthen things we don't inadvertently cause harm.
-
@JamesSmith79 This is the great thing about BH when folk like you come up with ideas. It's not "crackpot".. it's just you asking a perfectly reasonable question. Ah.. but the building has probably settled a bit and the roof timbers are used to the loads.. you need to look at all the load paths and how they might change when you drop the timbers As a heads up.. it's an old roof, maybe the nails and fixings are corroded. You are going to change the load paths and change the stress pattern. While in principle your idea is good you need to look at the knock on effects. Your idea is elegant.. provide you can justify it is not overloading other parts.. call that unintended consequences. You mention "strong boys" For all on BH these tend to have a maximum working load rating of 350 kg or less.. which is not a lot! I can tell you as an SE that a lot of builders have no idea how llittle load these can carry! Always ask a builder if they know what they are doing when they mention strongboys!
-
Comparing Thermals of Laminate Flooring Underlays
Gus Potter replied to MortarThePoint's topic in Wood & Laminate Flooring
As I'm on a roll here is a question for @Nickfromwales as I want to tap into his boots on the ground experience. Nick. Ok say say we are setting out UF pipes. The manufacture gives us a minimum bend radius as we put in the loops. My own experience tells me that even with flexible pipes the centres are tight when we get to less than 175mm. The pipes start to oval if disturbed. I know that when we want to bend the pipe we smooth out the radius on site.. like driving a racing car.. we anticipate the bend. But for all.. you get a UF design, play about with loop cad and then the concrete workers turn up (100kg a man+ with big wellie boots).. they just might crimp a pipe? and then it all goes wrong. UFH pipes need to be designed for buildability and unless you do this then you are on a hiding to nothing.

