
Leaderboard


Popular Content
Showing content with the highest reputation on 01/10/22 in all areas
-
Just an update to this, made up some simple brackets out of 18mm ply and notched out the end. Screwed to the rafters to hold lower part of the OSB in place. Managed to get 8 boards trimmed, lifted and fitted this weekend, slow going but pleased.
 2 points
 -
Hi everyone, Just a quick introduction to our project - we're doing our first self build and will be project managing ourselves. We've got lot's to learn as we go, and so would love to connect with others who are also along the journey or recently completed. If you're interested in following our journey, we're documenting everything on instagram which has plans and more; our profile is here: @thefoxesmaltings Below is a 3D render our architect produced of our project. If anyone has questions on any part of our process so far (securing planning in an AONB/Green belt etc.) feel free to ask and we'll help if we can.
 1 point
 -
Sit rep, I found a spare cable the electrician put in, have decided on the new wiring so later this week will re plumb and re wire ?1 point
-
Have you got planning permission yet?1 point
-
As above, open the boundary box. If there is a red (blank) , grey or yellow (trickle) bung on top of the meter manifold, then you'll need to replace it with a standard white one. Eg.
 1 point
 -
where is the "blanking plug"? It's normal for there to be a cap in place where the meter goes but it should not affect flow.1 point
-
It's a bit bowed but not a lot, a lot house's on the street same..1 point
-
1 point
-
Get yourself to a plant hire place and get a proper dehumidifier. You are going to be at this for months if you continue. I got a big one in from plant hire, was about 30quid a week iirc. I was emptying that every 12 hours and it held 20 odd litres I think. This went on for a few weeks. Taking 6l a day out piecemeal is going to be endless!1 point
-
As @Nickfromwales suggested, if you put a 25mm EPS sheet down first and then your DPM on top you instantly reduce the likelyhood of getting holes in it. Then do what you like with PIR or EPS. If you're installing UFH, the pipe clips struggle in EPS so having an EPS build up with a 25mm - 50mm PIR on top aswell really does help (alot)! We've got 325mm (300mm EPS100 & 25mm PIR) and then a Cemex Cemfloor @ nominal 45mm which is great. With hindsight I would have gone with 50mm PIR for the reason above as 25mm is okay for the clips but a bit thicker would have been easier.1 point
-
Yes if there was a wall below supporting the joists I would sense them breathing a sigh of relief ?1 point
-
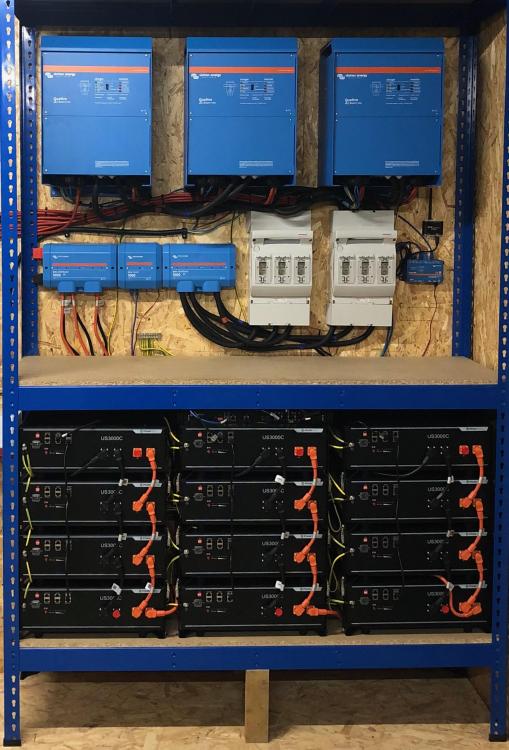
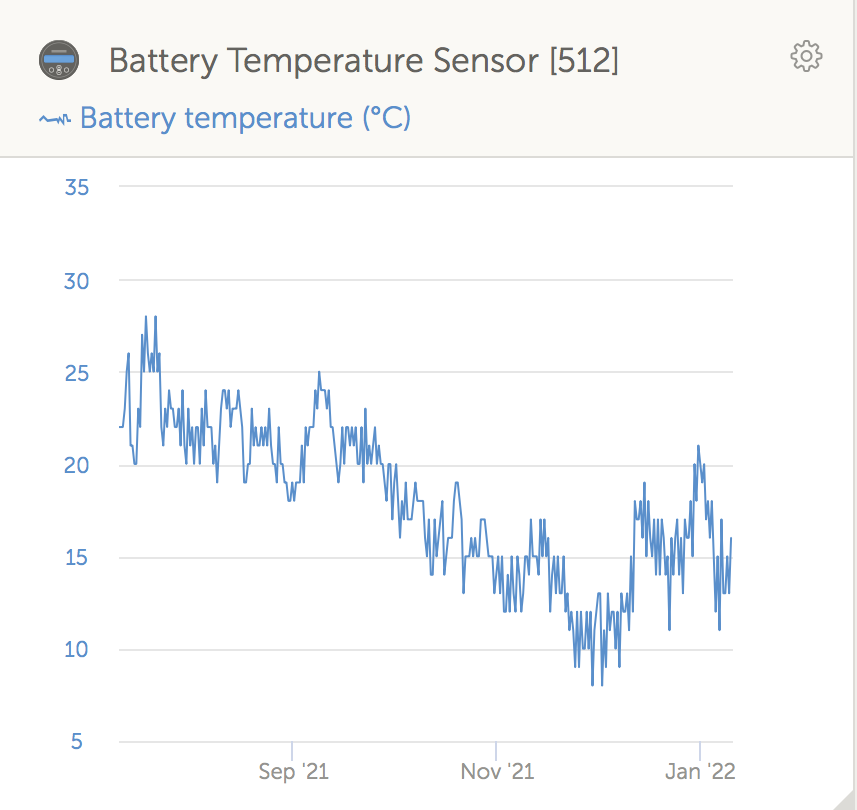
My battery setup is in an unheated and poorly insulated workshop. I found the heat generated from the batteries soon dissipated and the temp dropped. Since putting a crude cabinet around the batteries (mid December) the average temp is 15°C, workshop temp approximately 5°C. At this time of year I charge the batteries from the grid at night. Hope this helps. David
 1 point
 -
Rough order dimensions are fine at large scale for plots, but you should always add a visible scale (inc a scale identifier) on every plan not just the “1:50” etc in the drawing block for the detail drawings.1 point
-
What's not shown is the DPM, DPC, this needs to be shown. I would be tempted to have a 50mm service void then plasterboard and dry line. Overall there doesn't appear to be much insulation in the wall or the floor. If you are going UFH heating your floor really needs a u value of 0.1 or better, in my option, otherwise a lot of the heat will travel downwards. Not really seeing a thermal bridge with option 2, as you have continuity of insulation from the internal wall and around the underfloor areas.1 point
-
The resilient bars are a good call. I also wish I used them. No point for the OP unless they are attic trusses.1 point
-
when I said downlights, I meant LED downlights. Insulation above will be mineral wool between and over. So maybe no need for a service cavity then, just some detailing around and above any penetrations for cabling, light fittings and MVHR. I need to do some looking up on light fittings I think.1 point
-
I wondered about penetrations for SVP and then @Iceverge made this post and I didn't worry about it any more! fitted one of these https://www.slate.uk.com/product/nature-vent/ and it looks great and BCO was happy.
 1 point
 -
I don't think in the UK it will make much difference. Not as if we high temperatures, with associated high amount of AH. We basically have a very stable climate. RH and Temperature is in a small window compared to most parts of Northern Europe. More a case of don't you wet systems when building a house.1 point
-
That's exactly what I was wondering. Knowing outdoor and indoor RH and quantity of water condensed could be all that's needed. ?1 point
-
Not sure what calculator you're referring to but from tables of Saturated Vapor Pressure, Density for Water vapor we get gm/m3 for 100% RH at different temperatures so multiply the lookup by room volume and take the RH percentage as currently indicated. I just did this for a 68m3 room at 20°C (17.3gm/m) @ 50%RH so there's supposed to be 588ml of water that could be condensed out. In reality with a dehumidifier running 24/7 I have to empty around 2L a day. Does that mean the air is being changed 3 or 4 times a day?1 point
-
I just checked, we have three MVHR units and hey are showing RH of 37, 45 and 46%. I used to run them on auto boost and it seemed to me that they ran unnecessarily high to try and reduce the RH. I switched them all to just run on the lowest speed as I cannot really feel the difference in RH. When I did all of this I was seeing figures in the 50-55 range, so it may be that it takes a long time for humidity to get down to the dried out range. The only time I ever saw condensation inside our windows was when they laid the screed. The pool has RH in the 60-62 range. When it is cold outside we get condensation on the door lock on the french doors which is a small cold break and gets cold, but have never had it on the windows in there. The temperature never drops below 21. I wonder if your house is to passivhaus standard, has the heating hardly ever been on since you moved in. We run the heating at 21-22 and it comes on whenever the outside temperature is below around 12C. I am guessing that running at 20C with a better insulated house your heating has rarely been on. My guess is that this lack of running the heating would cause a passivhaus maybe to take considerably longer to dry out than a more aggressively heated house.1 point
-
I think they are fairly good but you need to make sure the correct values are input, such as the actual ASHP efficiency, air leakage, cold bridges and u values.1 point
-
Yes it will, apart from what is lost via noise. A room does not hold much air, by mass, in it, and it only takes 1 kJ.kg-1.K-1 to heat air up. A 300 W heater can heat 10 kg of air (about 8 m3) by 10 K up in 333 seconds (5.5 minutes). You can work it out as you know the room size and the RH levels. Use this calculator to work out how much (little really) water is mixed with the air. Latent heat of fusion for water is 2264 kJ.kg-1.1 point
-
This could be an option. Alpha boilers sell them, may be worth a look. Basically a combi boiler, with preheated water, to up the performance of the combi, so it's doing less work, so can produce a better flow. Combi-SuperFlow-White-Paper-v1-2-4.pdf Canetis-SuperFlow-Product-Sheet-WE-050318.pdf1 point
-
How much DHW do you typically use. May be worth measuring it or only default figures can be used. The cheapest option will be to use less.1 point
-
Get a washing machine saddle drain kit - basically it clamps onto your existing pipe, comes with a tool to drill it, clamps up and gives you a spigot for an appliance. Something like this (check sizes - this one will do 32mm): https://www.screwfix.com/p/washing-machine-drain-out-kit/75883?tc=IB4&ds_kid=92700055281954514&ds_rl=1249404&gclid=CjwKCAiAz--OBhBIEiwAG1rIOuiK91cRQElwKOv1jY3ZPU8g53_G_WA6lEV8otmElobXLBxm-1RxIxoCnGAQAvD_BwE&gclsrc=aw.ds I installed one of these for a neighbour, sort of a temporary solution but it's not actually that bad as a long term solution either, quite well made and has an optional NRV built in. Or, if you feel adventurous, remove a section of pipe, solvent weld in a T, and add a new waste, you get pipe end versions which are designed just to go onto the end of a waste pipe.1 point
-
Are you sure they said a Durgo ( aka Air Admittance Valve / AAV ) ? It is utterly pointless to go to all that length installing anything that does not naturally vent to atmosphere.....Are you sure they did not say a bird cage ( vent ) vs Durgo? The internal AAV's would suffice, and the proposed external rising SVP > AAV is a complete waste of time / effort / money AFAIC.1 point
-
I've been fitting bathrooms for over 25 years, and have used the flexible soil > pan connectors many many times without ever having a single recorded issue. The velocity of the flush is more than ample to see the bi-products of lunch exiting at enough pace to be washed away / over the riffles of the internal corrugations, and as there is a water trap in the bottom of the pan, there specifically to isolate the stench in the soil pipe, hygiene or smell etc will never be a concern. I've removed WC's where these types of connectors have been installed, and whilst there is 'evidence' of what has been travelling through them over the years, I have never ever seen one that has made me think the aforementioned'items' have been hanging around. The supplied pan connector that these guys have abandoned would typically leave a fixed socket for the pan to push back on to. As there is now a flexi in its place you ( they ) will have to pull the flexi out to install it onto the pan, immediately before pushing the pan back onto the bolts and fixed flush water pipe socket. That is the only annoyance when doing this, and you ( they ) need to 100% sure the flexi is firmly pushed onto the WC outlet. I do not use any silicone lubricant when doing it this way so the rubber grips very well. A bit of soapy water helps if it's a struggle, and washed away to leave the rubber friction fix as good as is possible. Express to the fitters tat you wish to know the flexi pan connector has not been installed with such lubricant, as that will stay slippery for a very long time and can proote the connector coming off over time / many flushes.1 point
-
The industry tends to agree that anything over 300mm of roll /wool insulation has more weight than it can support, so the bottom layers gets compacted. Compaction kills off the insulation value of wool so 300mm is the most I've every installed. I also go with 600mm long x 200mm - 50mm thick PIR angled 'wedges' between joists / rafters at the perimeter ( where there are angled eaves ) to make the perimeter; a) more robust for the diminishing thickness, and b) to engineer the solution at the eaves so as to be 100% sure that there is zero contact between roof membrane / felt and the insulation where access is difficult / impossible. Very difficult to detail that with any discernible results with a wool so I gave up on that and went to this 'hybrid' solution a long time ago.1 point
-
The 10 year rule is only for buildings built after 20.03.2013. The earliest such a building could qualify is in just over a year's time. Buildings built prior just have to be be in Use, or if now redundant, last Used, in Agriculture. https://www.legislation.gov.uk/uksi/2015/596/schedule/2/part/3/crossheading/class-q-agricultural-buildings-to-dwellinghouses/made Edited to add the 2018 & 2020 Revisions to Class Q: https://www.legislation.gov.uk/uksi/2015/596/schedule/2/part/3/crossheading/class-q-agricultural-buildings-to-dwellinghouses The Revisions change the area of conversion as well as increasing the max number of new properties to 5 from 3, opening up some other opportunities. There's not yet been a re-write of the "The Town and Country Planning (General Permitted Development) (England) Order" to incorporate these revisions in to the main Class Q, so the two documents need to be read together.1 point
-
Hardwall shouldn't be applied on areas that are likely to get damp He would have been better with sand and cement waterproofer Or one of the renovating plasters such as limelight Your tiler is half right You probably would have been better with bare moister boards in the bathrooms But the weight rule for tiling doesn’t apply to solid skimmed walls in the same way as boarded walls So unless the tiles are 18 mil plus Tgey will be fine on hardwall1 point
-
For those on very tight budgets and traditional block/brick construction Even a few mm increase in cavity width produces a noticeable improvement in U value. Boosts EPC score by up to a point. With blown in EPS beads increasing the cavity a little bit costs almost nothing more for the insulation. Easy to tweak the masonry to gain a few mm. Another cost-effective approach.1 point
-
Approx 200m2 wall, 100m2 floor and 100m2 ceiling. 400m2 envelope excluding windows. 185m2 floor area. At the moment floor insulation is about £35/m2 for a U value of 0.1W/m2K, much the same for cavity wall batts and loft roll is only £12/m2 for a flat ceiling. There's almost no extra labour cost increasing flat ceiling insulation to 400mm ( 2x200 mm loft roll) so I think that is really a no brainer. Going from Bregs backstop to 0.11W/m2k will cost £5/m2. Similarly floor insulation is really only a material cost so I would use 300mm EPS (2 x 150mm) To go from Bregs to 0.12W/m2K at a cost £15/m2. Both are peanuts over the scale of a project for something that will last the lifetime of the building. Unlike fancy heating devices or renewables, insulation will pay itself off at some stage. Guaranteed. Wall and pitched ceilings are more expensive to think about as they come with extra costs in footings, wall ties, window and door openings, timber costs etc but aim for a U value of 0.2 at the maximum. As usual this is in addition to the usuals about airtightness, MVHR and 3G.1 point
-
It only depends on two variables. Unit price of energy and length of tenure. Here is a crude approximation with equal insulation roof, walls and floor. This is for our house using cheap insulation (0.037W/mK) in a mildish area in the South of Ireland. For most people building a futureproof house isolated from the worst energy price hikes to 20 years+ . Southern coastal areas 200mm is enough. Most of the British Isles 300mm is a solid bed. North of Scotland 400mm insulation is best.

 1 point
 -
That is my point really. Doubling the thickness is deemed to double the performance and I doubt that it does. Not saying it doesn't all help, but will be diminishing returns. The suppliers aren't about to test this theory, so the literature and models assume that the second 100mm is as effective as the first 100mm1 point
-
Sorry typo, 200mm PIR ? (Corrected)1 point
-
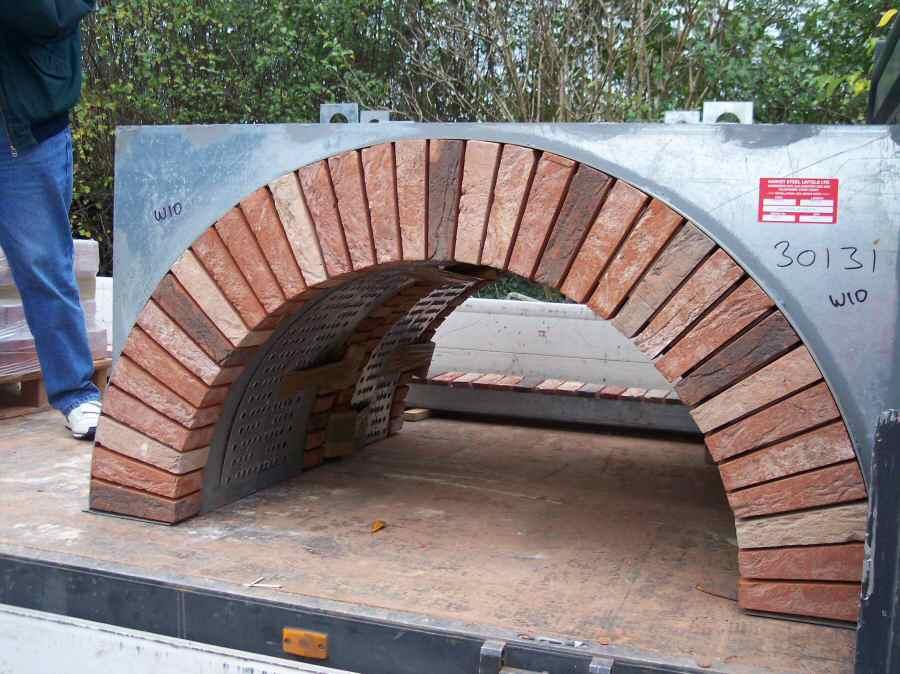
I ordered direct from Kore and asked them to recommend an installer in the UK. At the time there was a minor delivery issue with the Customs Agent and my EORI number. Kore used the drawings from Tanner to produce the exact EPS blocks and provided details on assembly. The blocks took two days to assemble. The previous 2 weeks the groundworkers had prepared the plot up to the sand level as detailed by Tanner. There was a further 4 days for putting in rebar mesh and laying underfloor heating. Then a final day for the concrete pour. I organised the concrete supply, I order the rebar as per Tanner’s spec. The installer power floated the concrete. I was very happy with the whole process. Observations; unloading the EPS delivery is a major task. This was the only lorry driver during the build so far that was unable to get their lorry on the site, we used a dumper to ferry the blocks from the lorry. There were five of us doing the unloading, took at least 1 hour. Don’t throw away the EPS used for packing the foundations, this has been very useful for the rest of the build for making temporary work tables, platforms for timber, temporary window cover, many uses. I will be using weatherkem cement board for finish the perimeter of the foundation. Lots of posts here on this topic. The installer and the ground works did a great job and there was just 1 corner with a 5mm height variance, this was caused by the groundworkers. The ICF builder shaved the EPS here to make it level.1 point
-
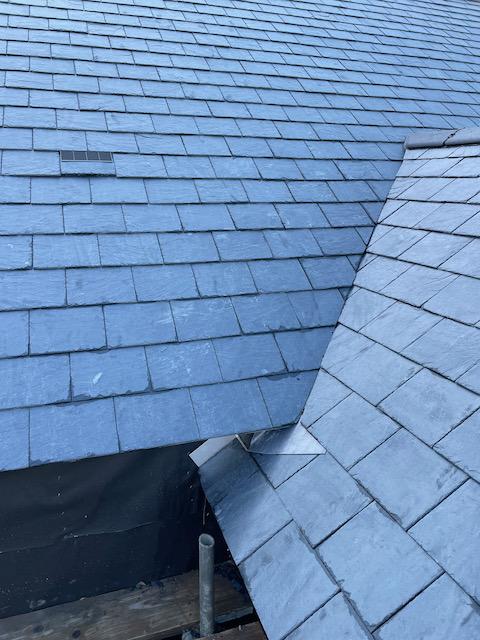
Plus 1 My wife and myself removed 2000 slates of a low building Breaking around 250 in the process Using a towel Scaf at gutter height Using a cherry picker would take days and be expensive to hire If you can do it without much outlay Just your time It would be worth doing Stripping a roof in planners eyes won’t constitute a start1 point
-
Removing slates or tiles using a mewp is slow and back breaking. (Leaning out of the cage to reach the roof isn’t easy). As above, cut your losses and save your time and energy and let the digger do the work.1 point
-
As somebody who spent days/weeks doing exactly this.... Don't bother. Take a digger to the whole lot. It's not worth the time/money/life to strip a roof unless you have valuable slates or similar. Between mobile tower and telehandler, stripping our roof cost just shy of £1k. I got £850 for the slates.1 point
-
Hi. Yes, I re read this a couple of times before dipping my toe here. The transfer rate of heated water from the coil ( note : 5kw ASHP ) to the surrounding body of water in the vessel is insufficient in linear ( attempts to be linear ) output. Therefore we are advising here that the buffer ( a small UVC in this instance ) becomes part of the whole single system. In my pic there will be both hydraulic separation, initially, and then energy buffering second eg when the house comes up to temp.1 point
-
If it’s a stainless coil then fine, but copper coils should never be left open to atmosphere as the insides get condensation and corrode badly over time, hence my seemingly unnecessary inclusion of it in my drawing. Fwiw, I would still include the coil in the pathway, even if it’s just teed in one side ( highest connection ) and capped off at the lower so it stays ‘wet’. The way it’s drawn by you @joe90 is an energy buffer arrangement, and will do as you suggest eg allow heat to the path of least resistance, so when hearing from ‘cold’ the lions share of heat energy will go almost directly to the UFH ( with any residual head diverting / bypassing through the buffer and back to the HP ). Only pitfall is heat has to creep all the way down the buffer to the very bottom to escape as return to the HP. Have the expansion vessel teed into the return down low so it’s on the coolest pipework possible ( or you get a wasteful heat bomb ).1 point
-
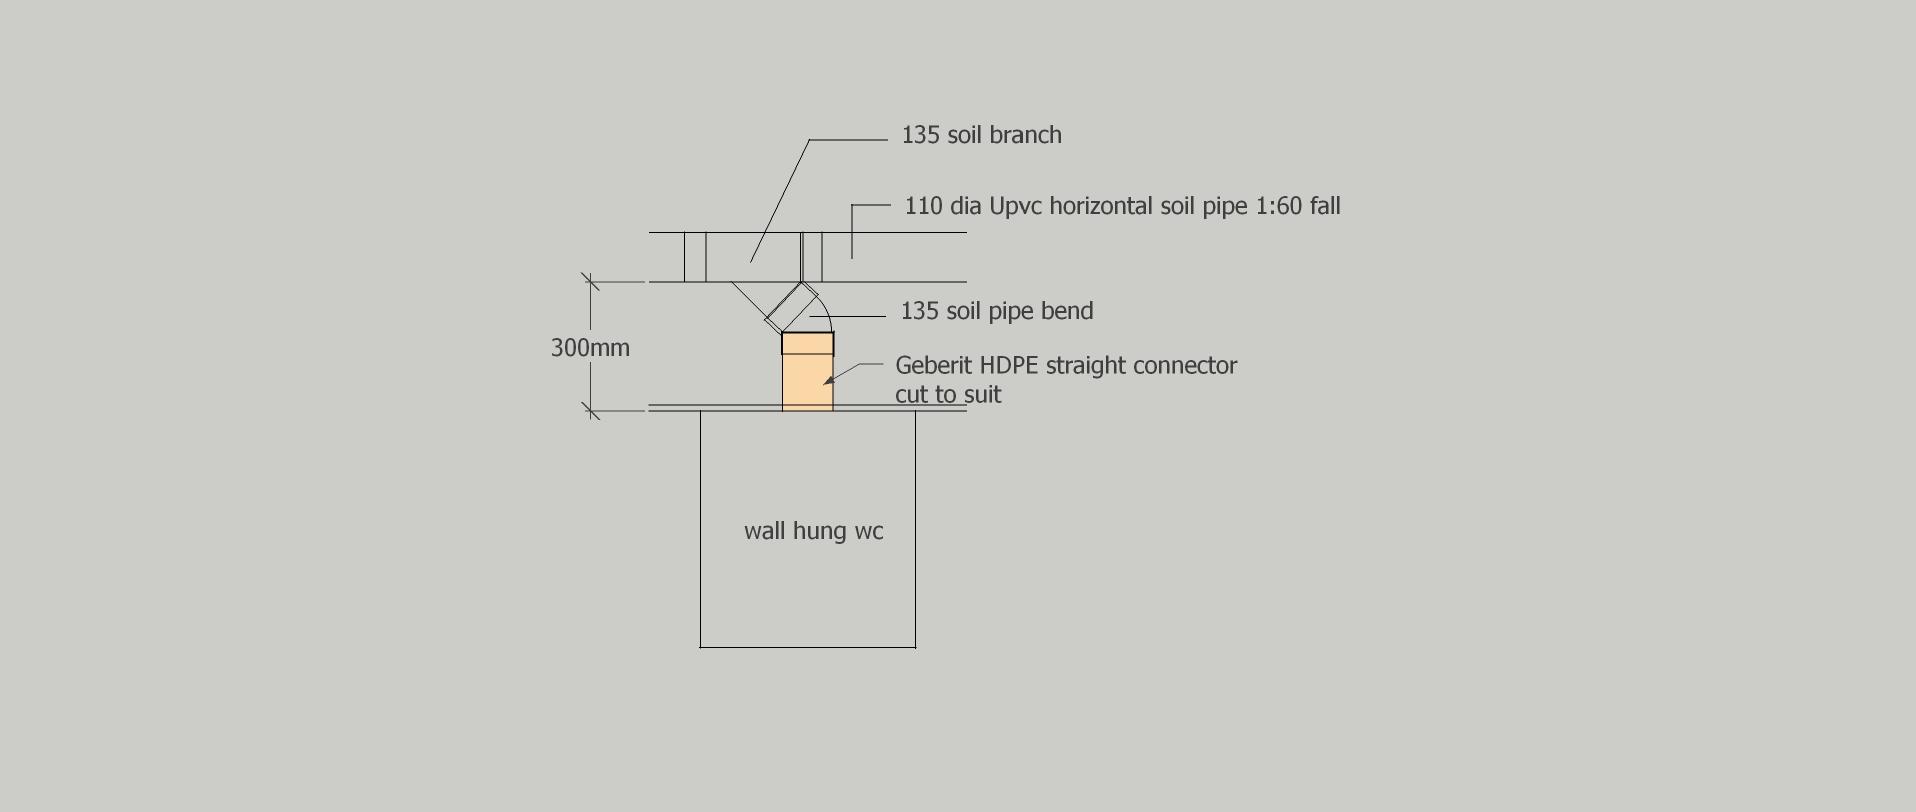
I would say no in that case. Does the frame not come with a pipe fitted in the exact correct place? most seem to.1 point
-
Doesn't the surrounding volume of water act as the additional volume? The ASHP isn't measuring any volumes, it just wants a manageable DeltaT to stop short-cycling...1 point
-
Well the combo is coming together and my wife insists that I make the controls as clear as possible "in case your not here". I wondering what she means. Still a lot to do though..1 point
-
If you set up what you are proposing, you are doing what is generally known as dead reckoning. Even if your system as you suggest is perfectly balanced and heat input = heat losses, how id it going to cope when you have a party and have 20 people in the house and do a lot of cooking? it will overheat. and how will it cope when someone does not shut a door properly and nobody notices for half an hour? it will cool down. I can't see the opposition to simple thermostats and a basic number of zones, it copes with most eventualities like that.1 point
-
@Dreadnaught the Vaillant controller is more than just a thermostat - it also applies the internal room temperature to the flow temperature target calculation (when set to do so) and can self-learn to an extent the heating curve. The room temperature based adjustment shifts the configured curve up and down as a whole. Basically you want this in the coolest place of the house to provide the most responsive system. Ambisense can be added to it to have additional sensors and electronic TRVs around the place, but regardless of the inputs from those other sensors the control panel sensor will be used for flow temperature adjustment. Tuning the curve does however take ages and it is quite surprising in my case the result. 1970s house, CWI and double-glazed with radiators sized for 50°C flow. Five persons and to be fair quite high electrical load, 8MWh pa (computers!). But the curve has ended up being 0.65 with a floor of 28°C. It has taken a full year to dial this in. Based on my models the HP should be within 15% of rated SCOP this year. Since it has both 4-pipe buffer tank and a heat exchanger, I'm quite happy with that. Mid-season, the heat pump modulation ratios aren't as much as it appears because it recovers so much from outside. i.e. 30% compressor still gives maybe 60% rated output when it's about 12°C outside. So it will overshoot then shutdown then repeat; a lot of water is needed to slow this down. @ProDave To get anywhere close to the rated SCOP, the weather compensation is definitely required. Perhaps with UFH where the design flow is 35°C it is less important though.1 point
-
too cheap. 2-3k now.1 point
-
Some of ours..

 1 point
 -
my first post here ! I did a fair bit of research into anhydrite when our 60mm screed was poured. Laitance removal is required where there is a need to bond a floor finish or intermediate product to the screed. The laitance skin can debond from the screed causing failure of flooring systems. I read conflicting views on whether laitance removal speeds up the drying process, I found a study (which I will try to relocate) which found it made no difference. I found most suppliers recommended removal of laitance as speeding up drying but none quantified it, all required it where a bonded floor finish was planned. All of the suppliers I considered permitted the use of UFH to accelerate the drying time. Ask your builder for the contract documentation or at least the supplier's name so you can ask them for the aftercare documentation, they all provide this with the contract as a backside covering exercise. In this you should find guidance on drying and whether you can use UFH. Our documentation went into some detail about UFH temperature control and increasing from ambient temp in 5 degree intervals over several days. We ran ours at a low 35c degrees supply temp for a week and it was bone dry (following a period of 6 weeks of natural drying). I don't think you need to remove the laitance if you are laying a floating floor (not glued down). I nearly forgot to mention that our screed supplier stipulated 48hrs of wind tight drying (all windows and doors shut or openings poly sheeted and taped). It then required 7 days of natural drying/curing before use of force drying with UFH was permitted.1 point


This leaderboard is set to London/GMT+01:00