
Leaderboard


Popular Content
Showing content with the highest reputation on 02/29/24 in all areas
-
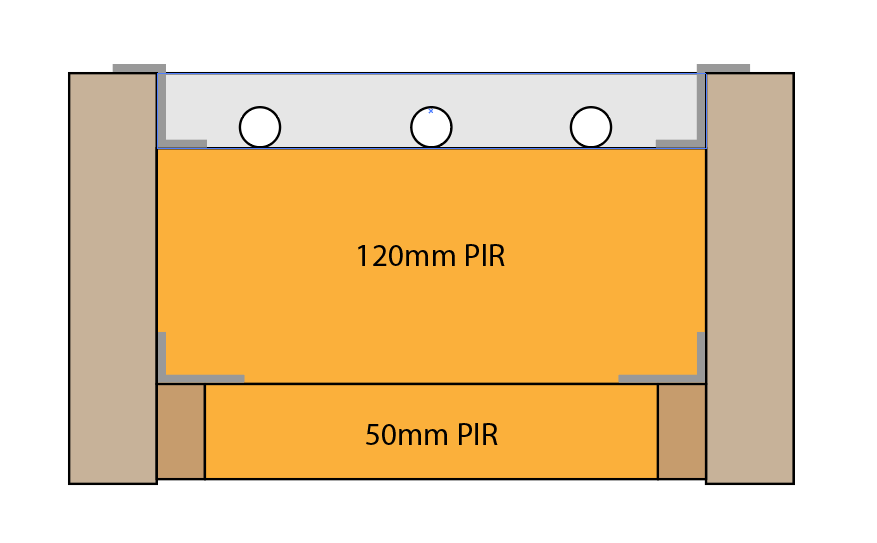
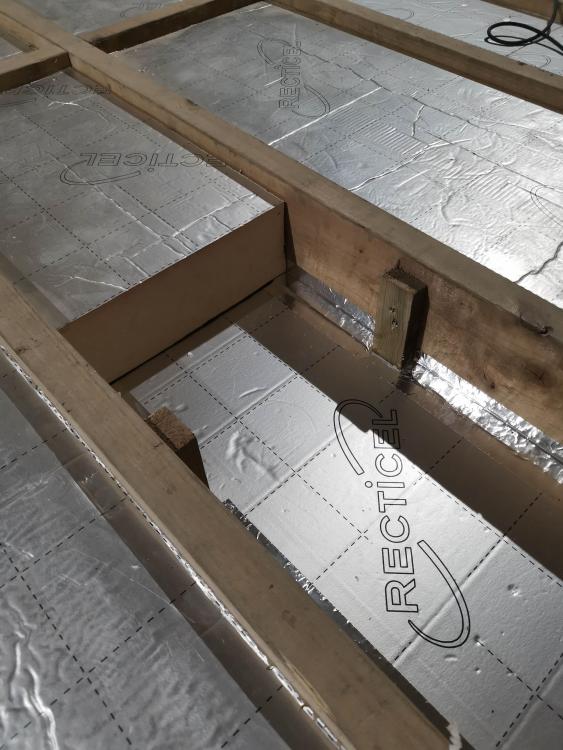
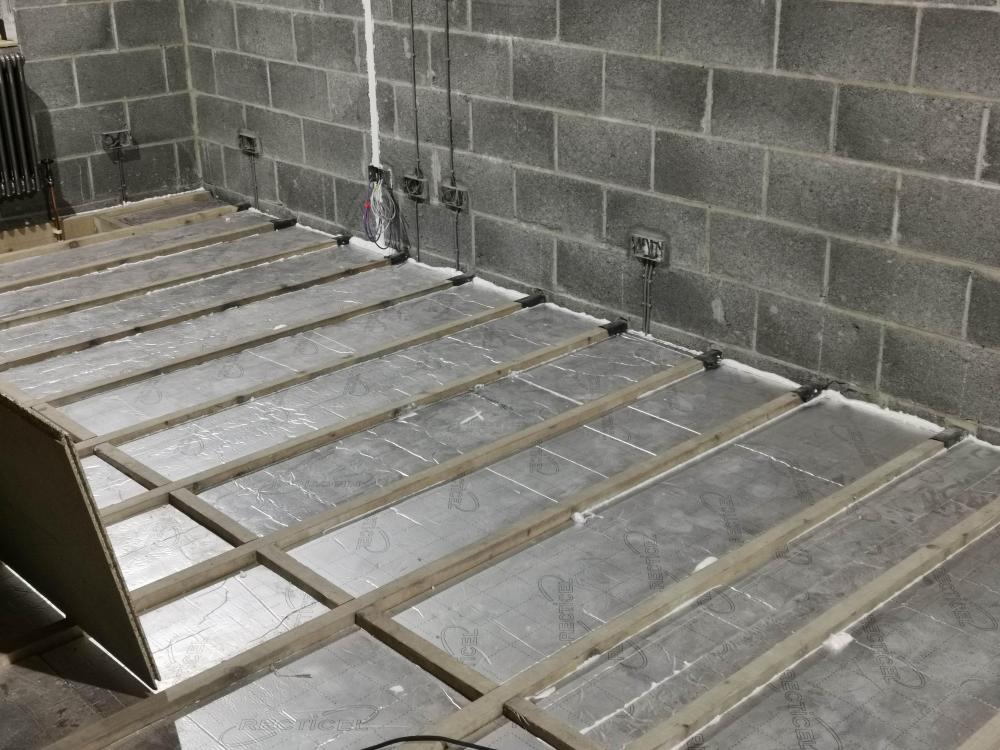
im just doing the job in my place now but im using PIR, 2 layers of with the lower PIR between battens on nails and foamed in, the top layer on battens. Air-tight foamed where necessary, taped over and then the next layer of PIR foamed and taped. Then foam all around the perimeter. Zero drafts, cant feel any air movement at all but it wasnt an easy or quick job but it looks like it'll do the trick for my UFH. Too late to go back now anyways 😆 When i got down to the last piece it was like a howling gale underneath from the airbricks, all gone now.
 2 points
 -
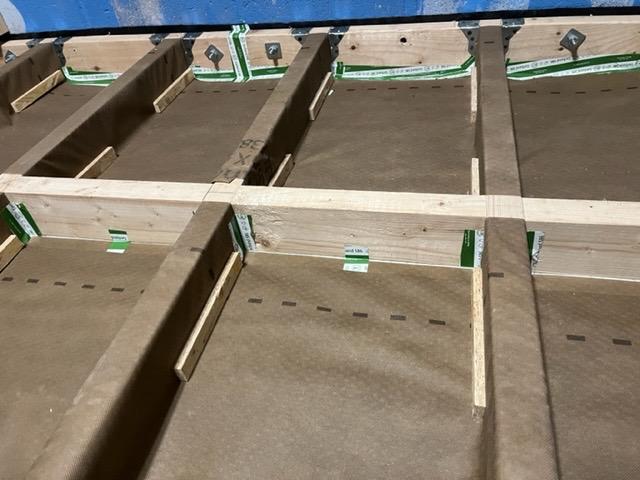
I’m currently installing breather membrane for wool insulated suspended floor. I’m using the ‘up and over’ method (only 150mm gap beneath joists) and I can tell you- THAT is a pain in the arse. Especially around the noggins I’d say if you have access from below, then do it. Will be loads easier. Staple up, tape joins, done

 2 points
 -
This shows this approach: https://youtu.be/fRq_IjiyB68?si=ZIm1Ah5WGJCOLwky&t=6122 points
-
Good to be here thanks for the welcome. Long term lurker (small renovations), first time poster. This forum has great people and great info, looking forward to being part of that.2 points
-
We are right on the border between Dorset and Devon so possibly even closer to you. If I'm not a divorcee living in a box I'll invite you round when done. This house is being built for 3 generations of both my partners family and my family (5 people, extra on the way) and includes an Annexe, a Flat and what we call the Winter Garden which links the two buildings (building A: house, building B: flat and annexe). Large yes but I believe excusably so (the architect politely disagrees). The workshop, courtyard and the garage are about 200 m2 of that too. The combined building is a rectangle that is 42m long, 10m wide and it gets thinner as it goes up. The basement is 500m2. We have planning and we have gentlemen on site forming the access route. Geotech drilling round 2 is currently ongoing fingers crossed for a good result. Planning required a ratcheting approach that took 3 permission across as many years. I didn't want to leave too much to chance and didn't want a refusal. Why not build something smaller and extend: 1. CIL costs would apply to any extension but not the initial build. This is a not insignificant saving of something like £200,000 for the whole build. 2. The site is beautiful and I want to get it landscaped before completely the entire building beyond first fix (we don't need all the space yet). 3. With inflation nothing is getting cheaper, we had a windfall and we don't want money losing value in the bank. 4. Due to the layout of the building (flat, annexe, winter garden, house, 1st floor house south, 1st floor house north) it is easy to take on piecemeal. 5. My family ran a small building company but this is far beyond our capabilities. Once we are water tight we are back inside our comfort zone. 6. VAT exemptions provide further savings. The goal is to try and get substructure and superstructure finished externally inside of about £1 million to 1.5 million. After that I will be starting to run out of money so need to prioritise carefully and not give up my day job! I really don't mind if I'm still plodding on this project in 10 years time as long as my (extended) family are happy and comfortable.2 points
-
Final two photo's 8053 is the steel, sorry it was getting dark when I rembered to take this. Layer of A393 mesh in bottom and top with a further layer of A393 min 1.0 m wide around the upper perimeter (we just used the 1.4m offcuts from the main mesh). A couple of embedded beams using 16mm bars where the main load bearing walls are. 8059 is the finished raft with a muddy surface due to the state of the ground whilst the rain water drainage was being done. I'll power wash it off before the frame arrives.

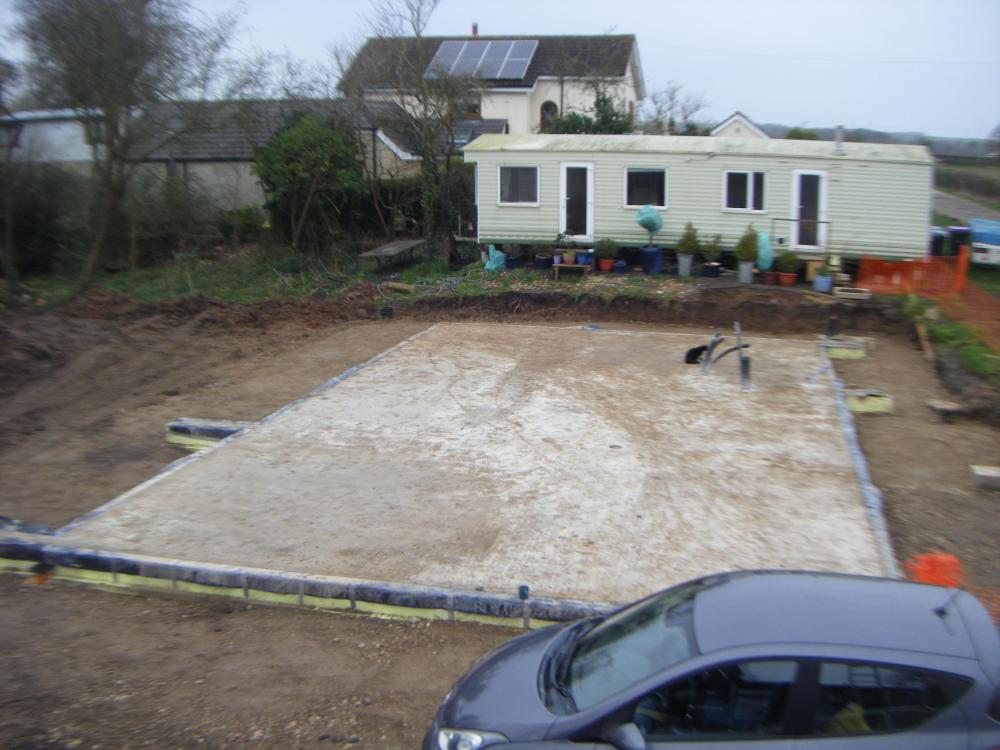 2 points
 -
Just been on my roofing course provided by Catnic using Tata steel standing seam roof. Great one day course provided free of charge incl lunch. Full demo on how to set out and complete your roof and the tools you will need. I know @Barney12 has had an awful experience with Colourcoat Urban which uses the same product but since I found out Catnic are now supplying this product I cannot speak highly enough of the service they have provided so far. Numerous queries over our roof design have all been answered almost immediately and the guy presenting the course said you can contact him with any questions. You get a very helpful installation booklet, T-shirt and a certificate to go on the wall when the house is finished.1 point
-
1 point
-
I took him to mean that the garage alone (without the rooms on top) which is 61m2 (and BTW is oak-framed) would require B.Regs anyway.1 point
-
But it's twice that.1 point
-
They will absolutely require Building Regulations. The oak frame garage alone would trigger BR’s.1 point
-
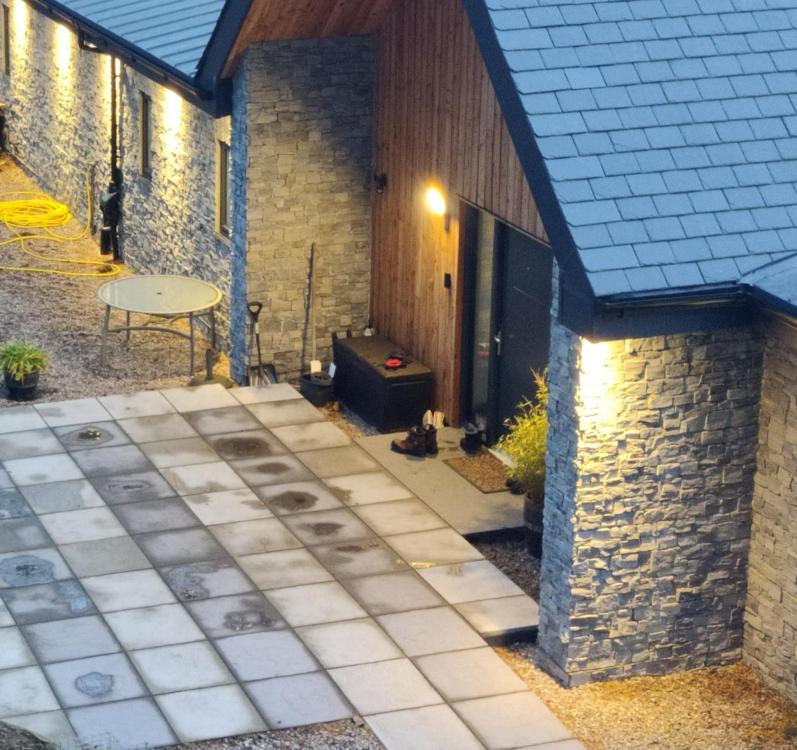
I think I will install sleepers along part of the fence and gravel boards behind the pizza oven. The inspection chamber will be accessible as I will make the shelf removable.1 point
-
What's that old saw - "you can do it cheaply, quickly, or well - pick any two". Do you have time to do a phased approach rather than one ginormous project? Having the best project manager found within a 200 mile radius would help a lot. Do you have those skills within the family? Lastly, having access to a proper amount of 'emergency funding' might well be key at some point.1 point
-
The ultimate accuracy is a class 1 tape which I think is about +-3mm over 30m, class 2 is +-6mm over 30m so not much difference. You can feel a fibre tape extending under pressure so steel is better as it has less flex. I agree that if you want to get it done quickly get someone in. If you value your time then it will cost more doing it yourself too. It's a balance isn't it trying to figure out what you enjoy and think is worth tackling yourself just cause you want too. I bought a theodolite like this one, although mine isn't digital. I plan on making a cad drawing of my founds with all the important points measured radiating out from one position. I can use the cad to calculate all the lengths and angles from that one reference point. Then I can use the tape and angle measurements made with the theodolite to plot them out. To double check I can then measure the distances between the points, that will tell me if I got it right. I mark the points using a 45x45mm wooden batten driven into the ground. I get this near the mark and then use a nail hammered into the wooden stake as the real mark. I usually need a few attempts at getting the nail in the right position. I look through the theodolite sight and make a mental note of where the nail needs to be by looking at notable marks in the wood like knots and wood grain. I walk over to the stake at hammer the nail in lightly, then I walk back and check the position and adjust if need be until it's right. You do this at the same time as making sure it's at the right distance by using your steel tape. You can strike an arc with the tape and a pencil to make a mark of the distance on the wooden stake to help.1 point
-
It will only be storage, not big enough for anything else, other than the MVHR pipes and manifolds1 point
-
Nailbiter, we also have a sloping site and lower floor is partially basemented. Will look forward to hearing more1 point
-
1.5mm2 tri-rated is rated at nominal 21A but you should derate that if you are bunching cables together. Sounds like your sparky knows his stuff though. Besides you have to keep below 16A if you're using the Loxone relays, or 10A on the miniserver relays.1 point
-
Yes. I have used the TG4 stuff and left it for about 8 months. 1 screw per board max. Similar number of sheets.1 point
-
I have a magic spreadsheet that calculates all that for me. 😉 each RCBO for mains lighting is max 2A. the RCBO for UFH and towel radiators in the bathrooms has max 5A the RCBO for the external blinds has max 7A I'm using 1.5mm tri-rated. I'm sure that's fine for those max currents but will double check with the electrician. things get more complicated when I need to work out the total current for the 24V circuits as they're all coming from the PSUB. those 24V circuits are currently showing as 42A max if all were on full power. the total of the PSUB is 40A so I should be within that as there's no way all those 24V lights will be on all the time and I will be restricting the power on a number of the circuits anyway. looking at the PSUB data sheet I see this: so that to me sounds like a peak current of 7A but I need to work on 15A inrush current. so, a 16A RCBO for that one and, most likely, a 2.5mm cable but, again, will check with the electrician as (I'm sure you're aware!) my electrical knowledge is...............errr..............limited. 😉
 1 point
 -
"All domestic customers have a 1 year satisfaction guarantee on their domestic units. If you are not satisfied, you can return the product within 365 days of your purchase for a full refund."1 point
-
thanks @Dan F. i've watched that video and it makes perfect sense. i will pick up some double ferrules and crack on with it!1 point
-
https://www.ebay.co.uk/itm/116085674437?mkcid=16&mkevt=1&mkrid=711-127632-2357-0&ssspo=x2Pf-3PUSXi&sssrc=2566055&ssuid=x2Pf-3PUSXi&widget_ver=artemis&media=COPY Metal lathe available for anyone interested. £1501 point
-
I didn't and building control weren't fussed.1 point
-
The stone was MOT1 type stuff which I think is max 30mm downwards. It packed tight with a 2T vibrating roller. I used 150mm xps for the insulation because the Dan Wood spec uses 90mm of insulation across the top of the raft. I could have added more but it was diminishing returns really.1 point
-
@NailBiter another member @BotusBuild is currently doing a build with Nudura near Saltash. He may have some recent insight as will others on the Forum1 point
-
i would document every thing with photo's in case you need to go to the local authority or HSE.1 point
-
Placement of projector is dependent on model specs and screen size. You need to select a projector and then use an online calculator. https://www.projectorcentral.com/projection-calculator-pro.cfm Distance from screen affects overall brightness, but reduces contrast. Have the projector too close and you might get hot spotting. I have a fixed screen, so no experience of motorised screens. The projector section at AVSForums.co.uk is friendly and helpful. https://www.avforums.com/forums/projectors-screens-video-processors.43/ If you are looking at DLP projectors, make sure you and your other half don’t see the rainbow effect. This is nowhere near as prevalent these days, but if you see it, you won’t enjoy the projector. Each projector type has it strengths and weaknesses. 10 years ago you had bulb projectors and needed to worry about all sorts of issues. Laser has really simplified everything.1 point
-
🤣it will be interesting to see it progress, i have just finished my build on a sloping site. It makes for some interesting challenges and try to minimise expensive solutions.1 point
-
I met them on Sunday. £72/m2 he said. I wouldn't be likely to specify it but there is nothing wrong with it and I can see the attraction.1 point
-
Don't seal up the air bricks. The fact that there is no moisture penetration visible does not mean you don't experience humidity within the space and if what you're referring to as raft foundation is just concrete oversite, it isn't generally moisture impermeable either. Depending on the type of insulation you're using, you don't always have to have a breather membrane but can use a mesh to hold the insulation in place. You then use a membrane over the insulation and floor joists for airtightness and then install your subfloor/flooring.1 point
-
Beads everyday over blown in wool. They flow better and do not snag on the rough inside of the cavity and drain better. If I was building a fresh wall, have a nice wide cavity filled with mineral wool batts however.1 point
-
You can put as many joins as you like I often do single ceilings in excess of 200m2 Make sure you have hangers and supporting bar 300 mill from where your top hat ends Then lap the next top hat by 600 Effectively Fixing through both into the supporting bar1 point
-
PTFE and screwed connectors have been the biggest area of rework on my house. Have now dumped using PTFE completely and now use Loctite 55 sealing cord. Easy to use seals first time, every time I have used it.1 point
-
It's not particularly complicated (no more so than UFH), gives greater freedom over floor finishes, can be more responsive than UFH where required, is materially better at cooling (more than just knocking the edge off; better distribution of coolth for comfort purposes), and similarly zero maintenance.1 point
-
Not ideal but yes you could take lead from under the window frame full cover on cill and then onto roof with lead adhesive/sealant but you really need to cut through the cladding/render to get the flashing under either side of the window reveals and then seal any gaps and edges.1 point
-
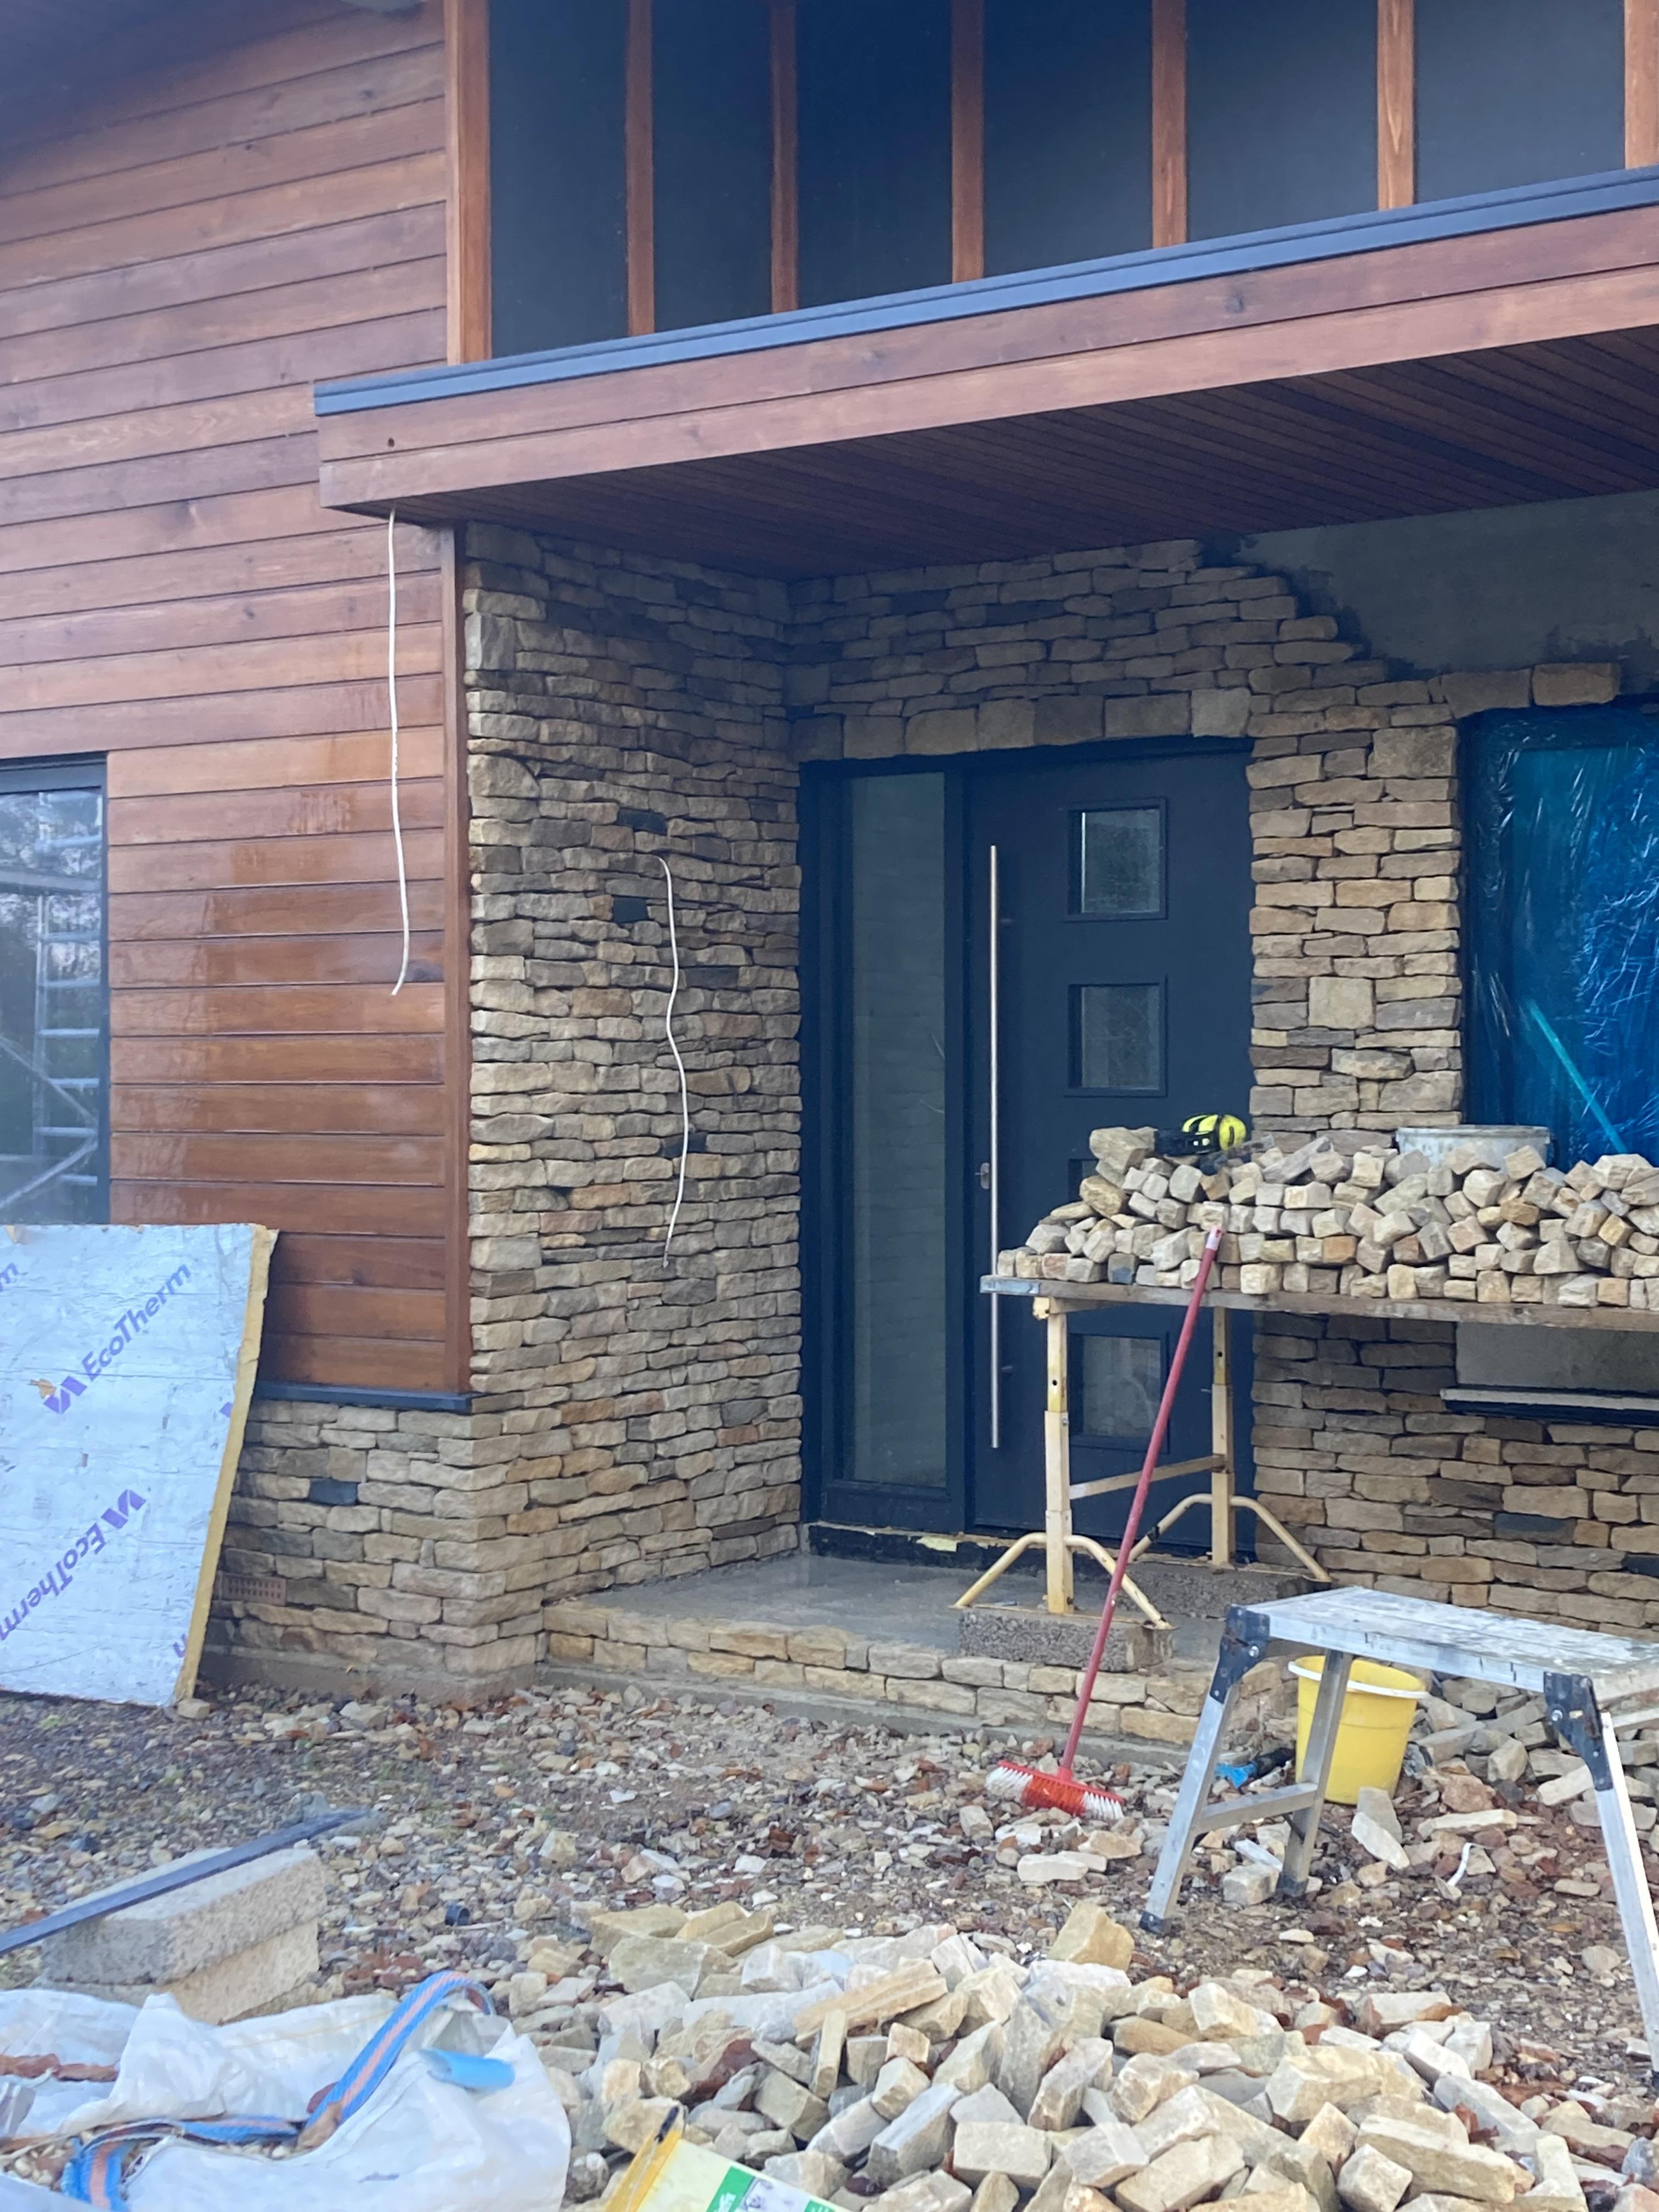
im doing this, Cotswold stone cut down to form a stone slip.
 1 point
 -
spring is back to front or needs preloaded into place1 point
-
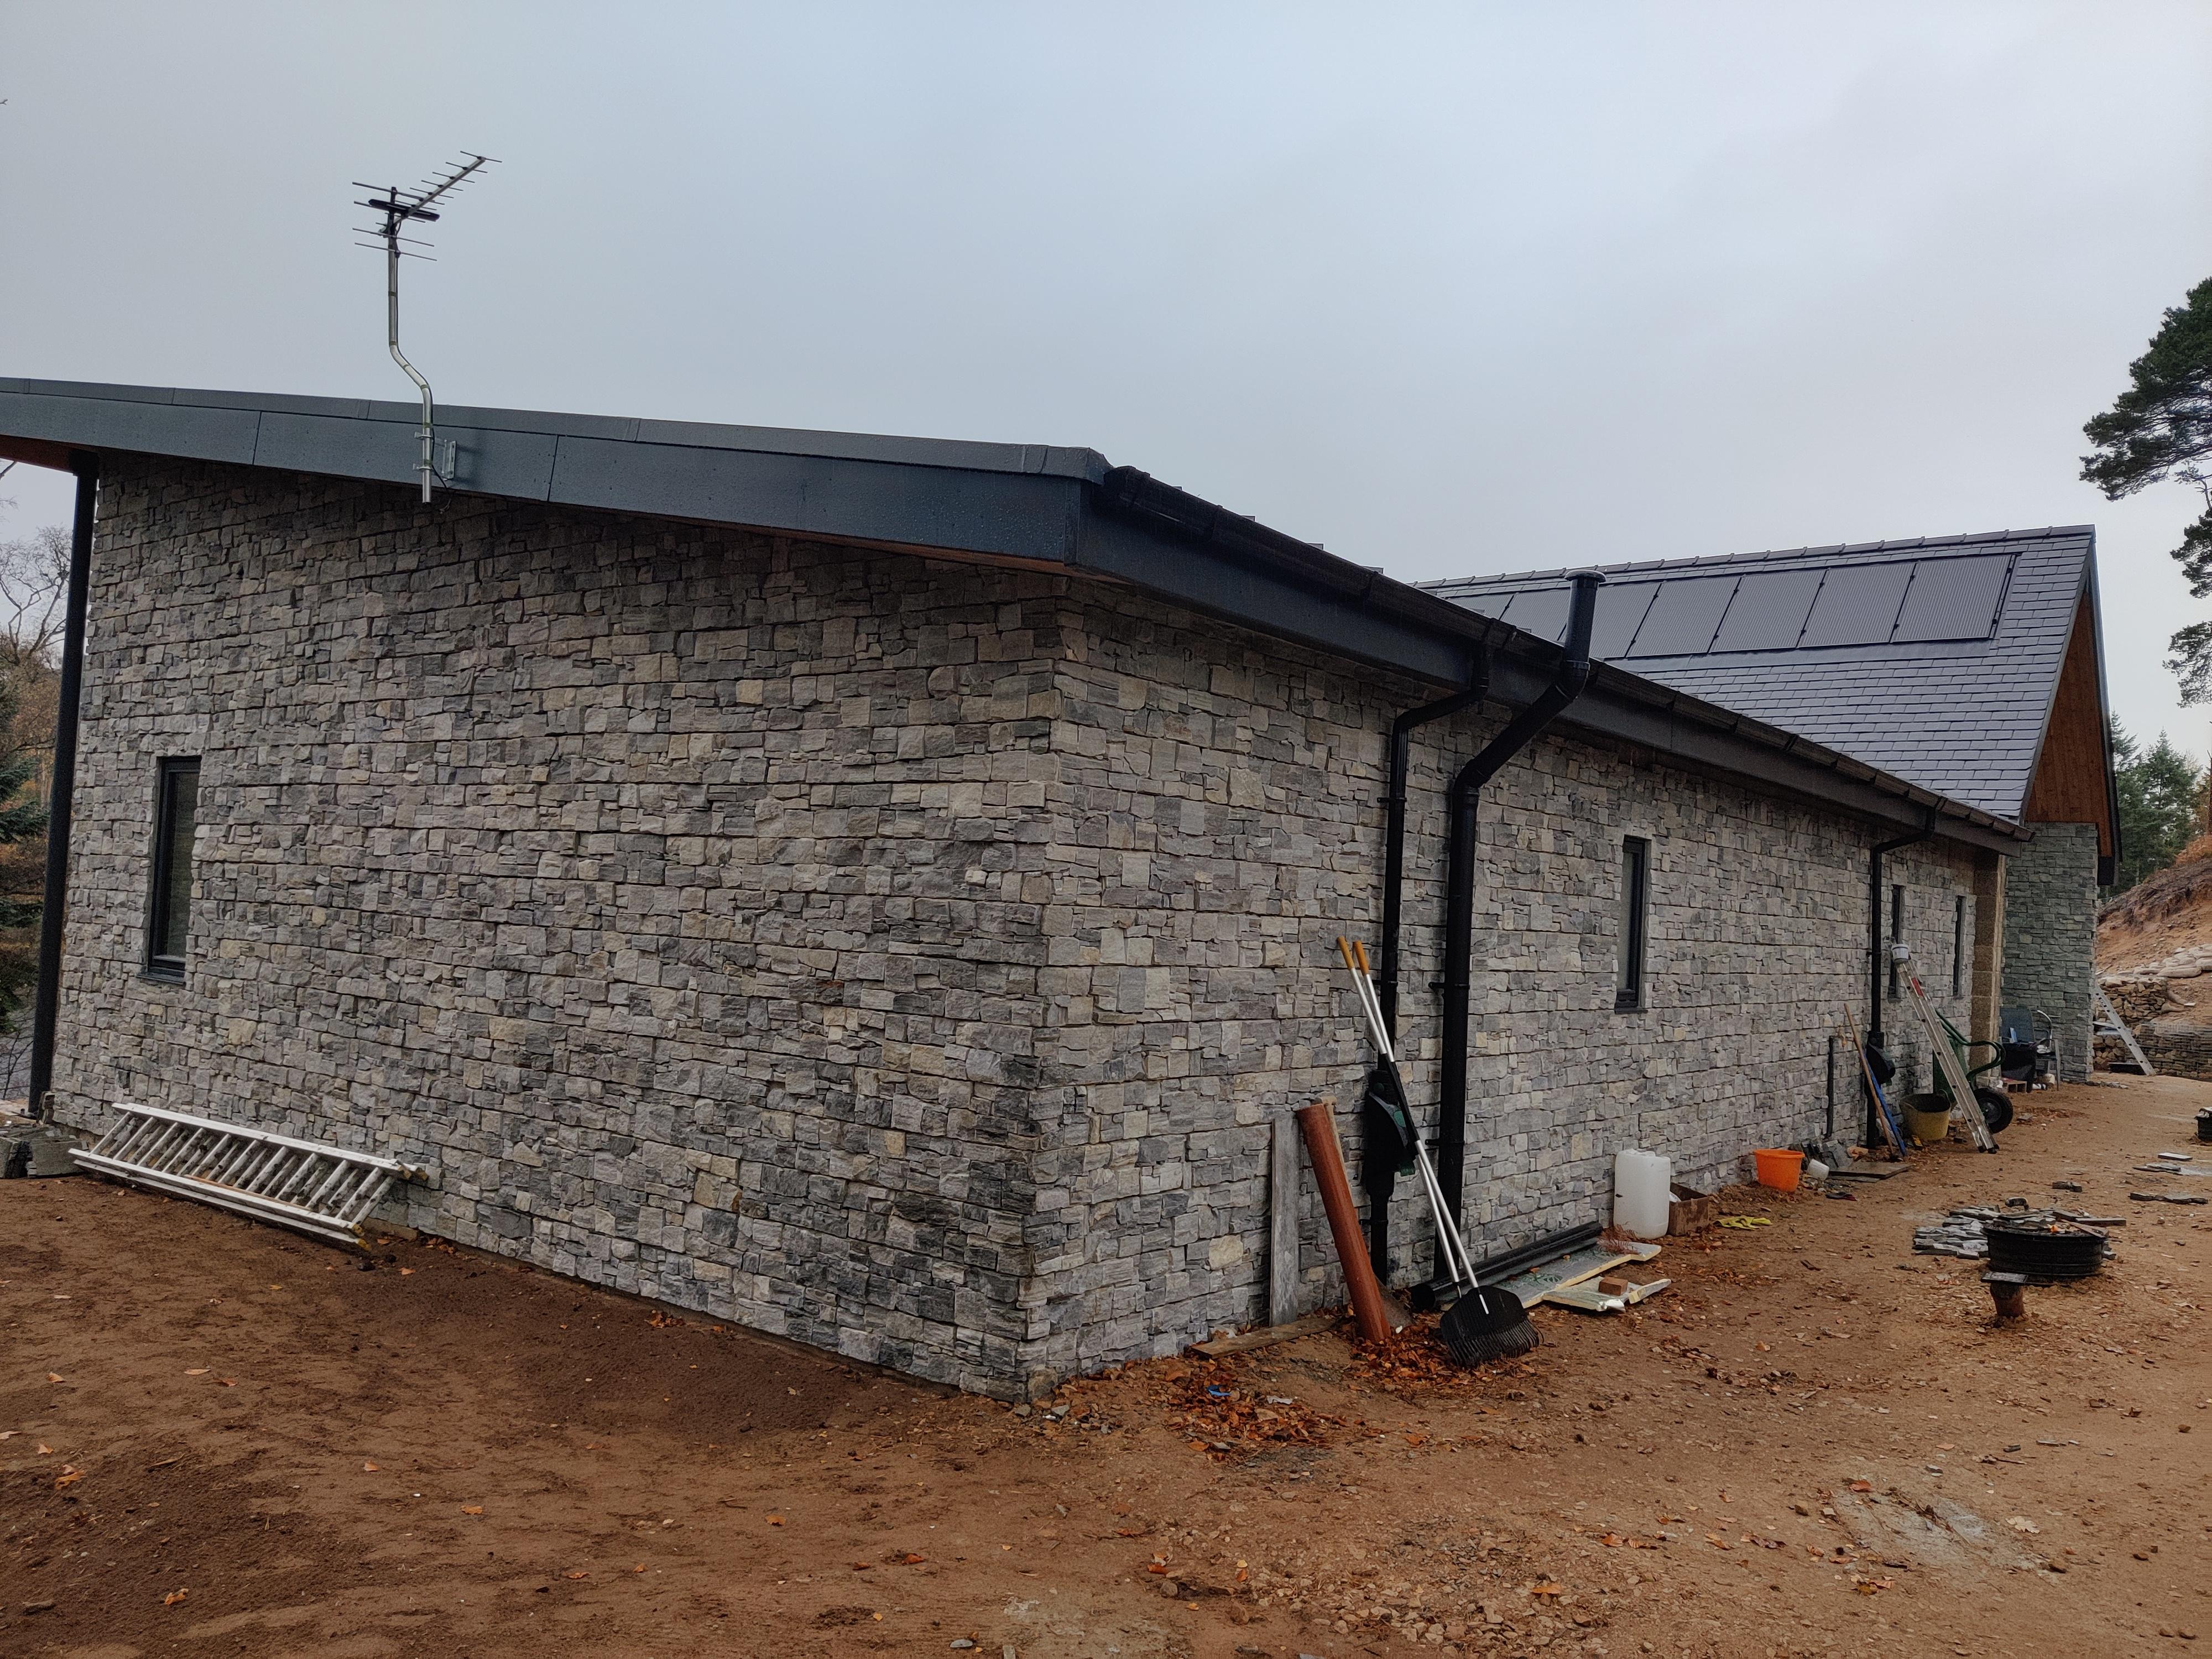
Woodcrete ICF, used exterior quality tile cement and real stone slips direct to the ICF. Photos were taken a couple of years apart.

 1 point
 -
However if you leave the bath water to cool down it will help heat the bathroom 🤷♂️1 point
-
Some say they have been robbing us for decades.1 point
-
The one I use (free of adverts) : https://play.google.com/store/apps/details?id=com.ridgidsoftwaresolutions.digitallevel1 point
-
Good news everyone! We just called their office just to follow up because they didn’t reply from my email. The glass is on order and they will get back in contact to arrange for fitting. (will update you once they have done it) The heavy weight on my shoulders have been lifted!!! Thinking of the court proceedings had given me so much anxiety. All your inputs and advises have helped me so much, so thank you ever so much. This has been a big lesson for me and hopefully this will be a lesson to someone else. Again, thank you!!!1 point
-
If you want any kind of accuracy then a straight edge is essential. A phone is too small, regardless of the quality of the app.1 point
-
What about 445mm long inclinometer strapped to the crossbar? https://www.amazon.co.uk/Digital-Magnetic-Spirit-Inclinometer-Backlight/dp/B00A2B57AU1 point
-
You need to use your phone with a straight edge to get it accurate results. This can be anything about a metre long including a walking stick.1 point
-
There is a vast difference in a digger driver and a guy who can drive a digger. To learn that quick to undertake the actual footings is a massive risk. It's a lot harder than you think to dig a straight line and have the bottom flat. That takes a lot of experience. The cost implications of being out of line are massive. Hire a digger driver with his own machine in and give him a hand. Mark the site out and peg the corners and do all the dirty work and let him dig and earn his money. Help with the concreting and the other jobs he needs a hand with. If you really want to hire a digger in do it later on for tidying the place up and putting the road, paths, drainage etc in. There is a lot more scope here to not be as accurate as you need to be when doing the foundations.1 point
-
I hired a digger driver for £200 a day and hired the plant in. The speed he went was incredible he is so skilled and safe. I saved money by driving the dumper, setting out and holding the laser for him. At times we hit obstacles and I was glad he was there to deal with them. Money well spent and I saved a fortune on the quote I had from a ground worker friend.1 point
-
Voltage drop is going to be your issue. Voltage drop for 10mm is 4.7mV / Amp / Metre So at 16A and 60 metres that's 4.5V drop. That is per core, so total volt drop = 9V That mainifests itself as voltage rise when the inverter is generating. Most inverters will shut down or power limit at 253 volts. So with that much volt rise, if your house voltage exceeds 244V your inverter is likely to either shut down or reduce power. I would first measure your typical mains voltage and see how close you are . With long runs it is better to do a large part of the run in DC cables with the inverter close to the house. Volt drop on the dc side does not usually cause any issues.1 point
-
The cost of our roof has worked out at approx £46/m2. There is no labour charge as we are doing it ourselves1 point
-
What I did was to make a UFH control box that has 12V four relays in it, plus some diode logic to switch the relays in set combinations. One relay controls the ASHP cooling/heating selection, one relay controls the ASHP on/off terminal, one relay controls the UFH valve and pump (this opens the valve in the UFH return line and turns on the pump) and one relay control the valve in the flow to the buffer tank (this is turned off when the system is in cooling more). There are two room stats, one configured as a heating stat, the other configured as a cooling stat. The heating stat is set to 20.5 deg C, the cooling stat is set to 22.5 deg C. If the heating stat calls for heat then the heating/cooling relay is set to heating mode, the UFH relay is set to open the UFH valve and turn the pump on, the buffer tank valve relay is set to open the buffer tank valve and the ASHP on/off relay is set to turn the ASHP on. The ASHP delivers water at 40 deg C, and the TMV on the UFH manifold mixes this down to about 24 deg C. The buffer tank heats to 40 deg C, or as close as it can get to the flow temperature.. If the cooling stat calls for cooling then the heating/cooling relay is set to cooling mode, the UFH relay is set to open the UFH valve and turn the pump on, the buffer tank valve relay is set to close the buffer tank valve and the ASHP on/off relay is set to turn the ASHP on. The ASHP delivers water at 12 deg C, and the TMV on the UFH manifold just opens fully, as it can't achieve the set temperature (not a problem). The buffer tank is isolated for as long as cooling mode is selected. There is an override for hot water, as we use the buffer tank to pre-heat DHW. When the buffer tank thermostat calls for heat (it's set to 35 deg C) then cooling mode is turned off, heating mode is selected, but the UFH valve and pump are turned off if the heating stat is not calling for heat. This allows the ASHP to just heat the buffer tank, not the floor. As soon as the buffer tank thermostat is satisfied, then is cooling more is selected the buffer tank valve closes and the system reverts to cooling the UFH again.1 point


This leaderboard is set to London/GMT+01:00