Leaderboard


Popular Content
Showing content with the highest reputation on 10/07/22 in all areas
-
We finally got our completion certificate! Now I can move from my high rate self-build mortgage to a nice low rate high street mortgage... Bollocks.8 points
-
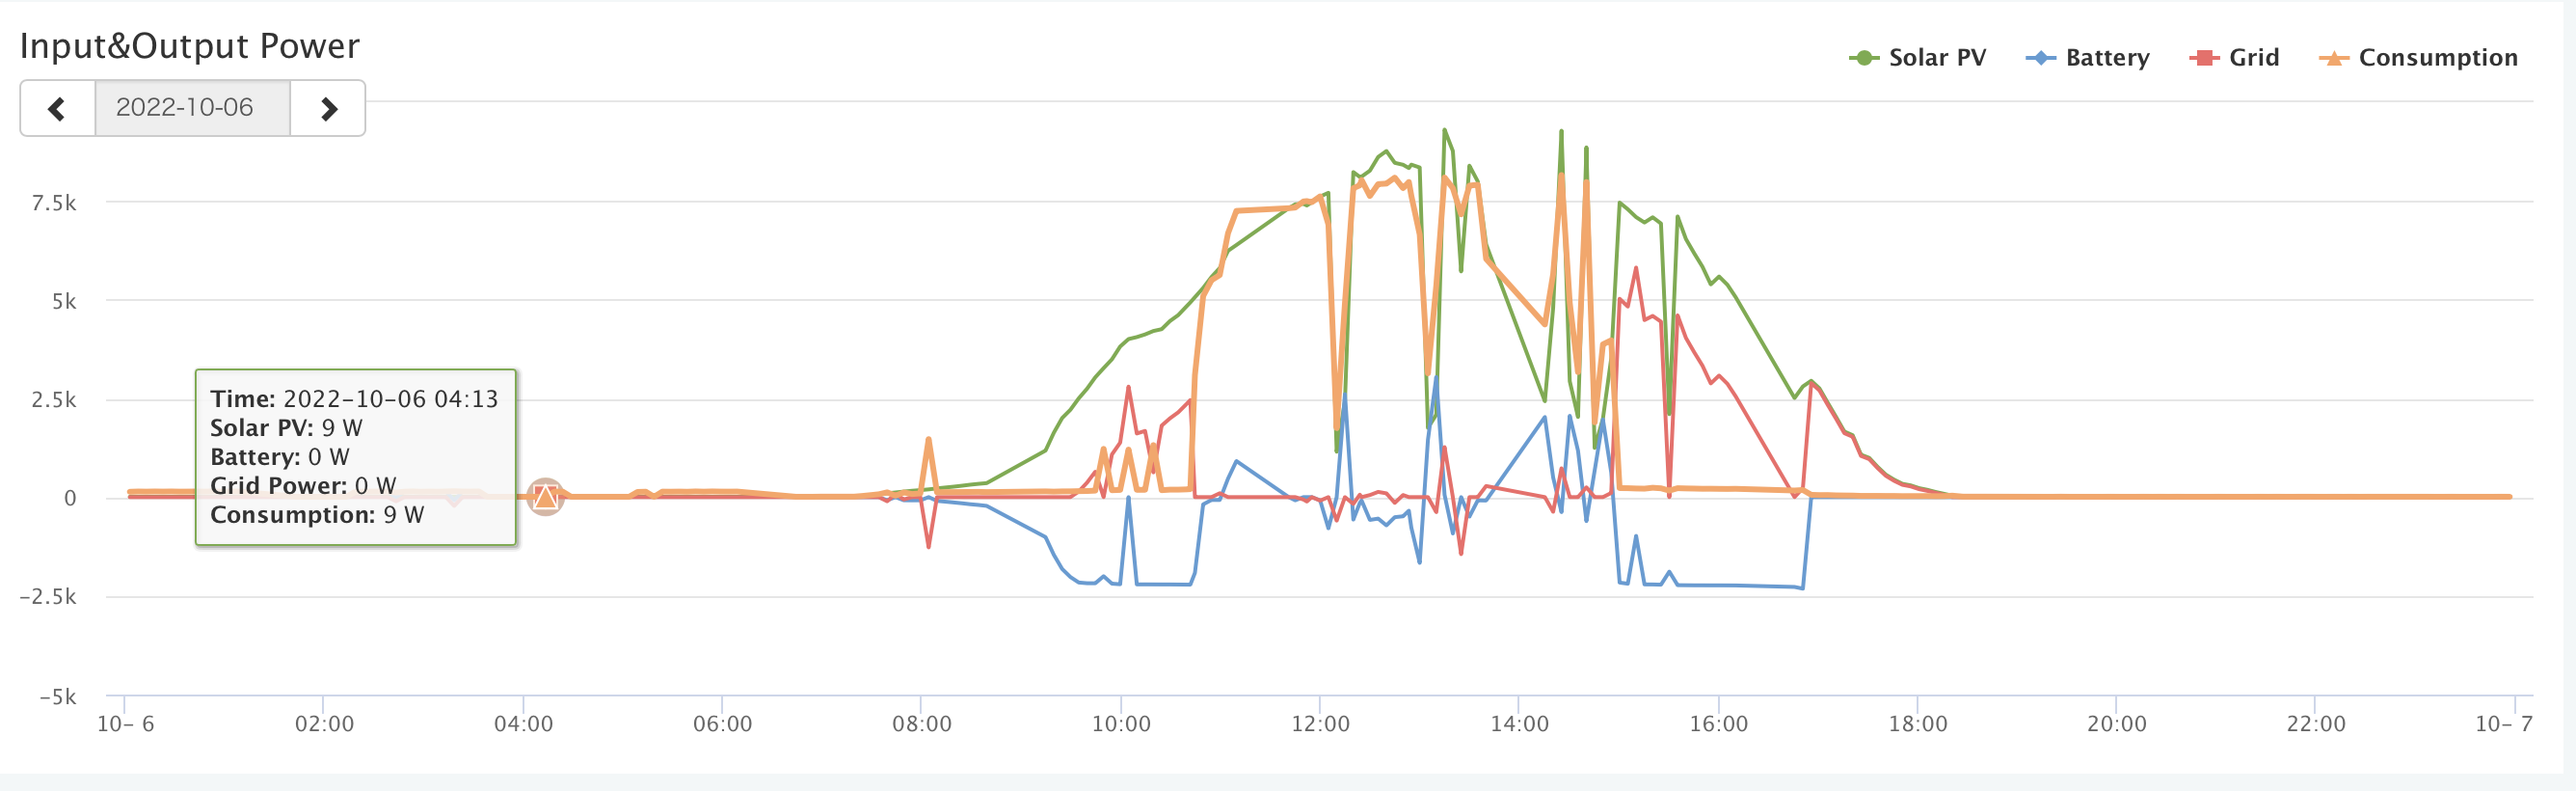
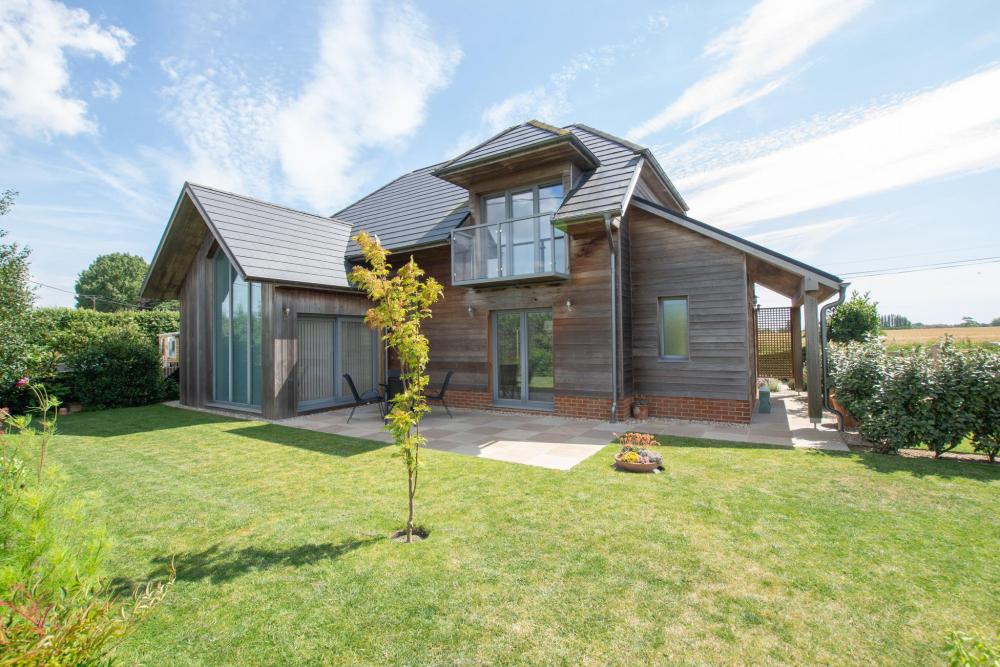
I'm so happy with my setup right now. this was yesterday where I managed to get 104 miles in to the car and then fully charge my 6.4kWh battery storage. you can see where the solar PV dropped off the battery kicked in to keep charging the car (I have a Hypervolt EV charger) and then at around 3pm the car finished charging and so the batteries started charging while also exporting quite a bit to the grid. I'm hoping that once we actually move in to the house we'll self consume more but it's working well at the moment, even with the batteries in the basement!
 2 points
 -
Yep. Also again in my opinion indoor space is 'valued' space i.e. sq meterage has value and use. If you have loads of unused space indoors then I think it's fine. But when you want big sofa's / arcade machines/ massive kitchen/ downstairs WC - then batteries go outdoors 😁2 points
-
Congrats. 7 years bloody hell. I ought to chill. 7 months in from starting the planning process and 1 year from first walking onto the plot. Building starts in March hopefully.2 points
-
Fair play to your builder for having a crack on a trial window but it's clearly a specialist job. His effort isn't really that bad and with a little practice with tightening the bonds it'd look passable for 99% of casual onlookers. The trouble is that he will be practicing on your job and the end result isn't what you want. I'd put him out of his misery and order something premade. https://www.brickfab.com/product/prefabricated-arches There's an option here that would achieve 90% of the architects look off the shelf without having to dig up some perfectionist bricklayers. I mean that literally, most of them who did this are dead with centuries! I think your architect has to be held accountable here, you pay for their specialist knowledge of building. They should have a broad appreciation of every aspect of the house and be able to specify something that is affordable and practical to build.2 points
-
Do you have a puddle on the floor? If not, ignore and move on 😁 It'll swell/rust up and seal... Looks like copious amounts of 55 if you ask me. @NickfromwalesI'm about to buy a bunch of new type22's, can you advise a decent brand that doesn't break the bank? I was looking at screwfix/toolstation specials because I'm a tightwad... Although having used Myson on a previous job, they seem to have a nice offering.2 points
-
@joe90 @Gone West Both fine looking houses!2 points
-
Congratulations on the certificate. We are not quite there yet although moved in this week! Not a great time to re-mortgage unfortunately2 points
-
In my experience its about 50:50. And to my surprise it is not only the smaller contractors/suppliers who will not provide a breakdown. Some of the big ones do too. I tend to especially avoid them. For the small ones, I suspect its a fear on the part of the contractor is that a breakdown will lead to cheese paring. Quite understandable. For the big ones, I suspect its a wheeze to try and conceal high margins. Personally, I prefer a clear breakdown and tend to avoid contractors who will not. But I have made exceptions for small pieces of work and where I felt the level of trust was high.2 points
-
I fully appreciate your point. What I'm getting at as is very easy for the chemical industrial giants to jump on the bandwagon of veganism and basically produce ultra processed sh!t under the vegan banner, charge through the nose for it, get rid of lots of nasty, suspect ingredients to boot and pretend they're saving the planet. Advertising is geared to making you want it. The commodity is irrelevant as long as the masses keep paying for it.2 points
-
Oil won't work without electricity for the pumps etc so that's a draw in my book. Also - electricity supply will always be a priority. At no point for the rest of humanity's future will we not be generating electricity somehow. Fuel oil, however, will hopefully get phased out in the new few decades! I could see a carbon tax being implemented at some point in the next 20 years, and at a minimum the green levies moving from electricity onto gas/oil. For a truly secure back up plan, have a biomass option (I kept my log burners in the house when I renovated). I don't understand the marginal vs the average rationale. Oil con - big ole ugly oil tank in the garden. An ASHP is a fraction of the size (although it does make a noise - not noisy - but a noise).2 points
-
"They" want "you" hooked into a commodity. Whether it be electricity or whatever. The way the whole eco friendly thing is promoted is complete b@ll@cks. It should be on a fabric first basis. Putting an ASHP into an unsuitable setting shouldn't be allowed to happen. I'd liken it to vegan products. Promote vegetarianism and you can grow a lot of your own food at home. Promote veganism and the whole industrial, socioeconomic status quo is maintained. Factories that now produce chicken nuggets produce vegan chicken nuggets. The infrastructure barely changes, profits remain the same or higher. The population becomes reliant and thus controllable. Soylent Green / Red.2 points
-
Nothing wrong with bending your own straps. 90 degree ones are usually used up a wall and over wall plate, twisted are up wall and onto side of rafters or bottom cords of trusses1 point
-
My advice to anybody embarking on a self-build is as follows: 1) Be very clear on your requirements. The following post may be of help on this topic: 2) If your requirements are not achievable for the budget you have available, then focus on what is the most important to you. Eg: If a comfortable house that is cheap to heat is your priority, then you could focus your budget on the fabric of the building and compromise on the size and / or the internals. This will to some extent drive what build method you choose. There is no one build method that is the best but each build method has its own strengths. My overriding objective was to build to a passivhaus standard, so I built using a timber frame as recommended by an architect, passivhaus consultant and builder who were experienced in passivhaus design and build. They knew how to design the frame to ensure it was cost effective, watertight and airtight. 3) Understand what your strengths are and how you can best contribute to the project. There are some very gifted people on this forum. Some have designed their own houses and others can turn their hands to many different trades. I can't do this but I have good planning and research skills which helped choosing the right people with the right skillsets to do the work and working out the cheapest place to source materials. 4) Professional Services are an added expense but if you choose well, they will reduce the chances of errors and can save you money. Finally, plan, plan and plan again. Make sure you know exactly what you want before you start the build. You may not be able to achieve everything on you wish list but it should be a lot better than what you can obtain on the open market. My build was started after a lot of research, but what I did may not be right for you, so it is best for you to carry out the research and come to your own conclusions. Best of luck and most of all, enjoy the self build journey !1 point
-
Mine was (is should I still do it) going in an insulated garage. I just don’t want them in the house in the same way I won’t park the EV right next to the house. The likelihood of a ‘thermal event’ is tiny. The consequence is huge though given they can be hard to extinguish.1 point
-
Cold is more of a problem though. Again, the exact chemistry is important as Lithium Iron Phosphate Batteries cannot be charged at temperatures below freezing. Heaters have to be used in the packs to charge in sub-zero temperatures. They're OK with being charged/discharged up to 55oC so a loft shouldn't be a problem. And if the battery is indoors some of the charging inefficiency is reclaimed in winter heating. Same with inverters. This is why I find it interesting - the heart says outside, the head says inside until a proven hazard.1 point
-
Yep, they're definitely a version of the Sprsun unit1 point
-
Yeah, the BUS scheme. You’ve got to go through the hoops with some MCS certified installer rubbish and end up paying three times as much as if you’d just bought the gear yourself. It's just not practical for me to use an outside contractor on my retrofit job for various reasons. Encouraging to hear you've reached the stage where you're all up and running - glad to hear it's performing as expected.1 point
-
Completely agree. Our plant room is just a bit bigger than it needed to be. You’re paying a lot of cash for the house so batteries outside but I’ve canned the batteries for now anyway.1 point
-
.. and they just tend to explode without actually burning unlike the firework that is the Li battery. I once shot a mobile phone lithium battery pack - fireworks and funny smoke!1 point
-
I am thinking of building a little block kiosk. Dress it up with some cladding or something.1 point
-
Polished concrete needs a good bit longer than 1 day/mm or your surface a) won’t polish or quickly goes dull as the moisture keeps rising. I don’t have enough knowledge or experience to give you trade secrets just a few not too cracking experiences when jobs were rushed1 point
-
Interesting topic. While I have seen reports of Rooftop solar PV causing fires on roofs, I've not seen reports of problems with inverters or battery systems. I'll agree, I'd rather not have Lithium batteries of any variety indoors, due to the difficulty of extinguishing the flame they produce although I can't find out for certain if LiFePO4 batteries have the same characteristic. They have been shown to be safer if punctured or overheated so are preferred for those reasons.1 point
-
For tiling they recommend allowing 1 day per mm of thickness. So 100 days downstairs and 50 upstairs. I would always use a flexible adhesive and BAL is probably the best brand (also for advice). What type of screed? Some anhydrite screeds need special care to remove a laitance that forms on the top before tiling.1 point
-
You basically in theory should start at at flow of about 25 and every 24 hrs increase the temp 5 degrees until you get to 45. If you are well insulated, your flow temps should be low. Our max flow temp is 28 at -5 outside. So I just started it up, plus our concrete had been on place for a year or more.1 point
-
Ah but now you have the completion certificate you can do all the special jobs..........1 point
-
hi @SteamyTea Yes for your home but not for this house! Just like an ASHP installation, the results are affected by the ASHP model, installation, insulation, presumably an MVHR, shadowing of solar, wind, rotation, airtightness, quantity and habits of occupants and finally if the occupants have actually been informed and understand the best way to run an ASHP. Hence the problem when trying to answer the questions people ask like: "Is a ASHP cheaper to run?" or "Will an ASHP work on my house". and to get back on subject, in my humble opinion, both ASHP and Oil have their challenges and the answer depends on many individual specific items.1 point
-
Yes rockwool fitted, we came every day! There was a bit of an argument over plasterboard thickness so we agreed to 12.5mm instead of 15mm specified, maybe if we’d of looked into it we might of ditched the osb for thicker plasterboard, but I don’t know what really would of worked best, it’s definitely feels more hollow than our crappy 1980s masonry bovis home, but it’s also bigger & we don’t own much stuff so probably doesn’t help with how noise travels.1 point
-
Well done on completion. The second most important bit of paper for a self builder (the most important being the planning permission)1 point
-
Let your local councillor know that you are concerned about sewerage escaping from the manholes, sometimes helps to let them get reports from multiple directions!1 point
-
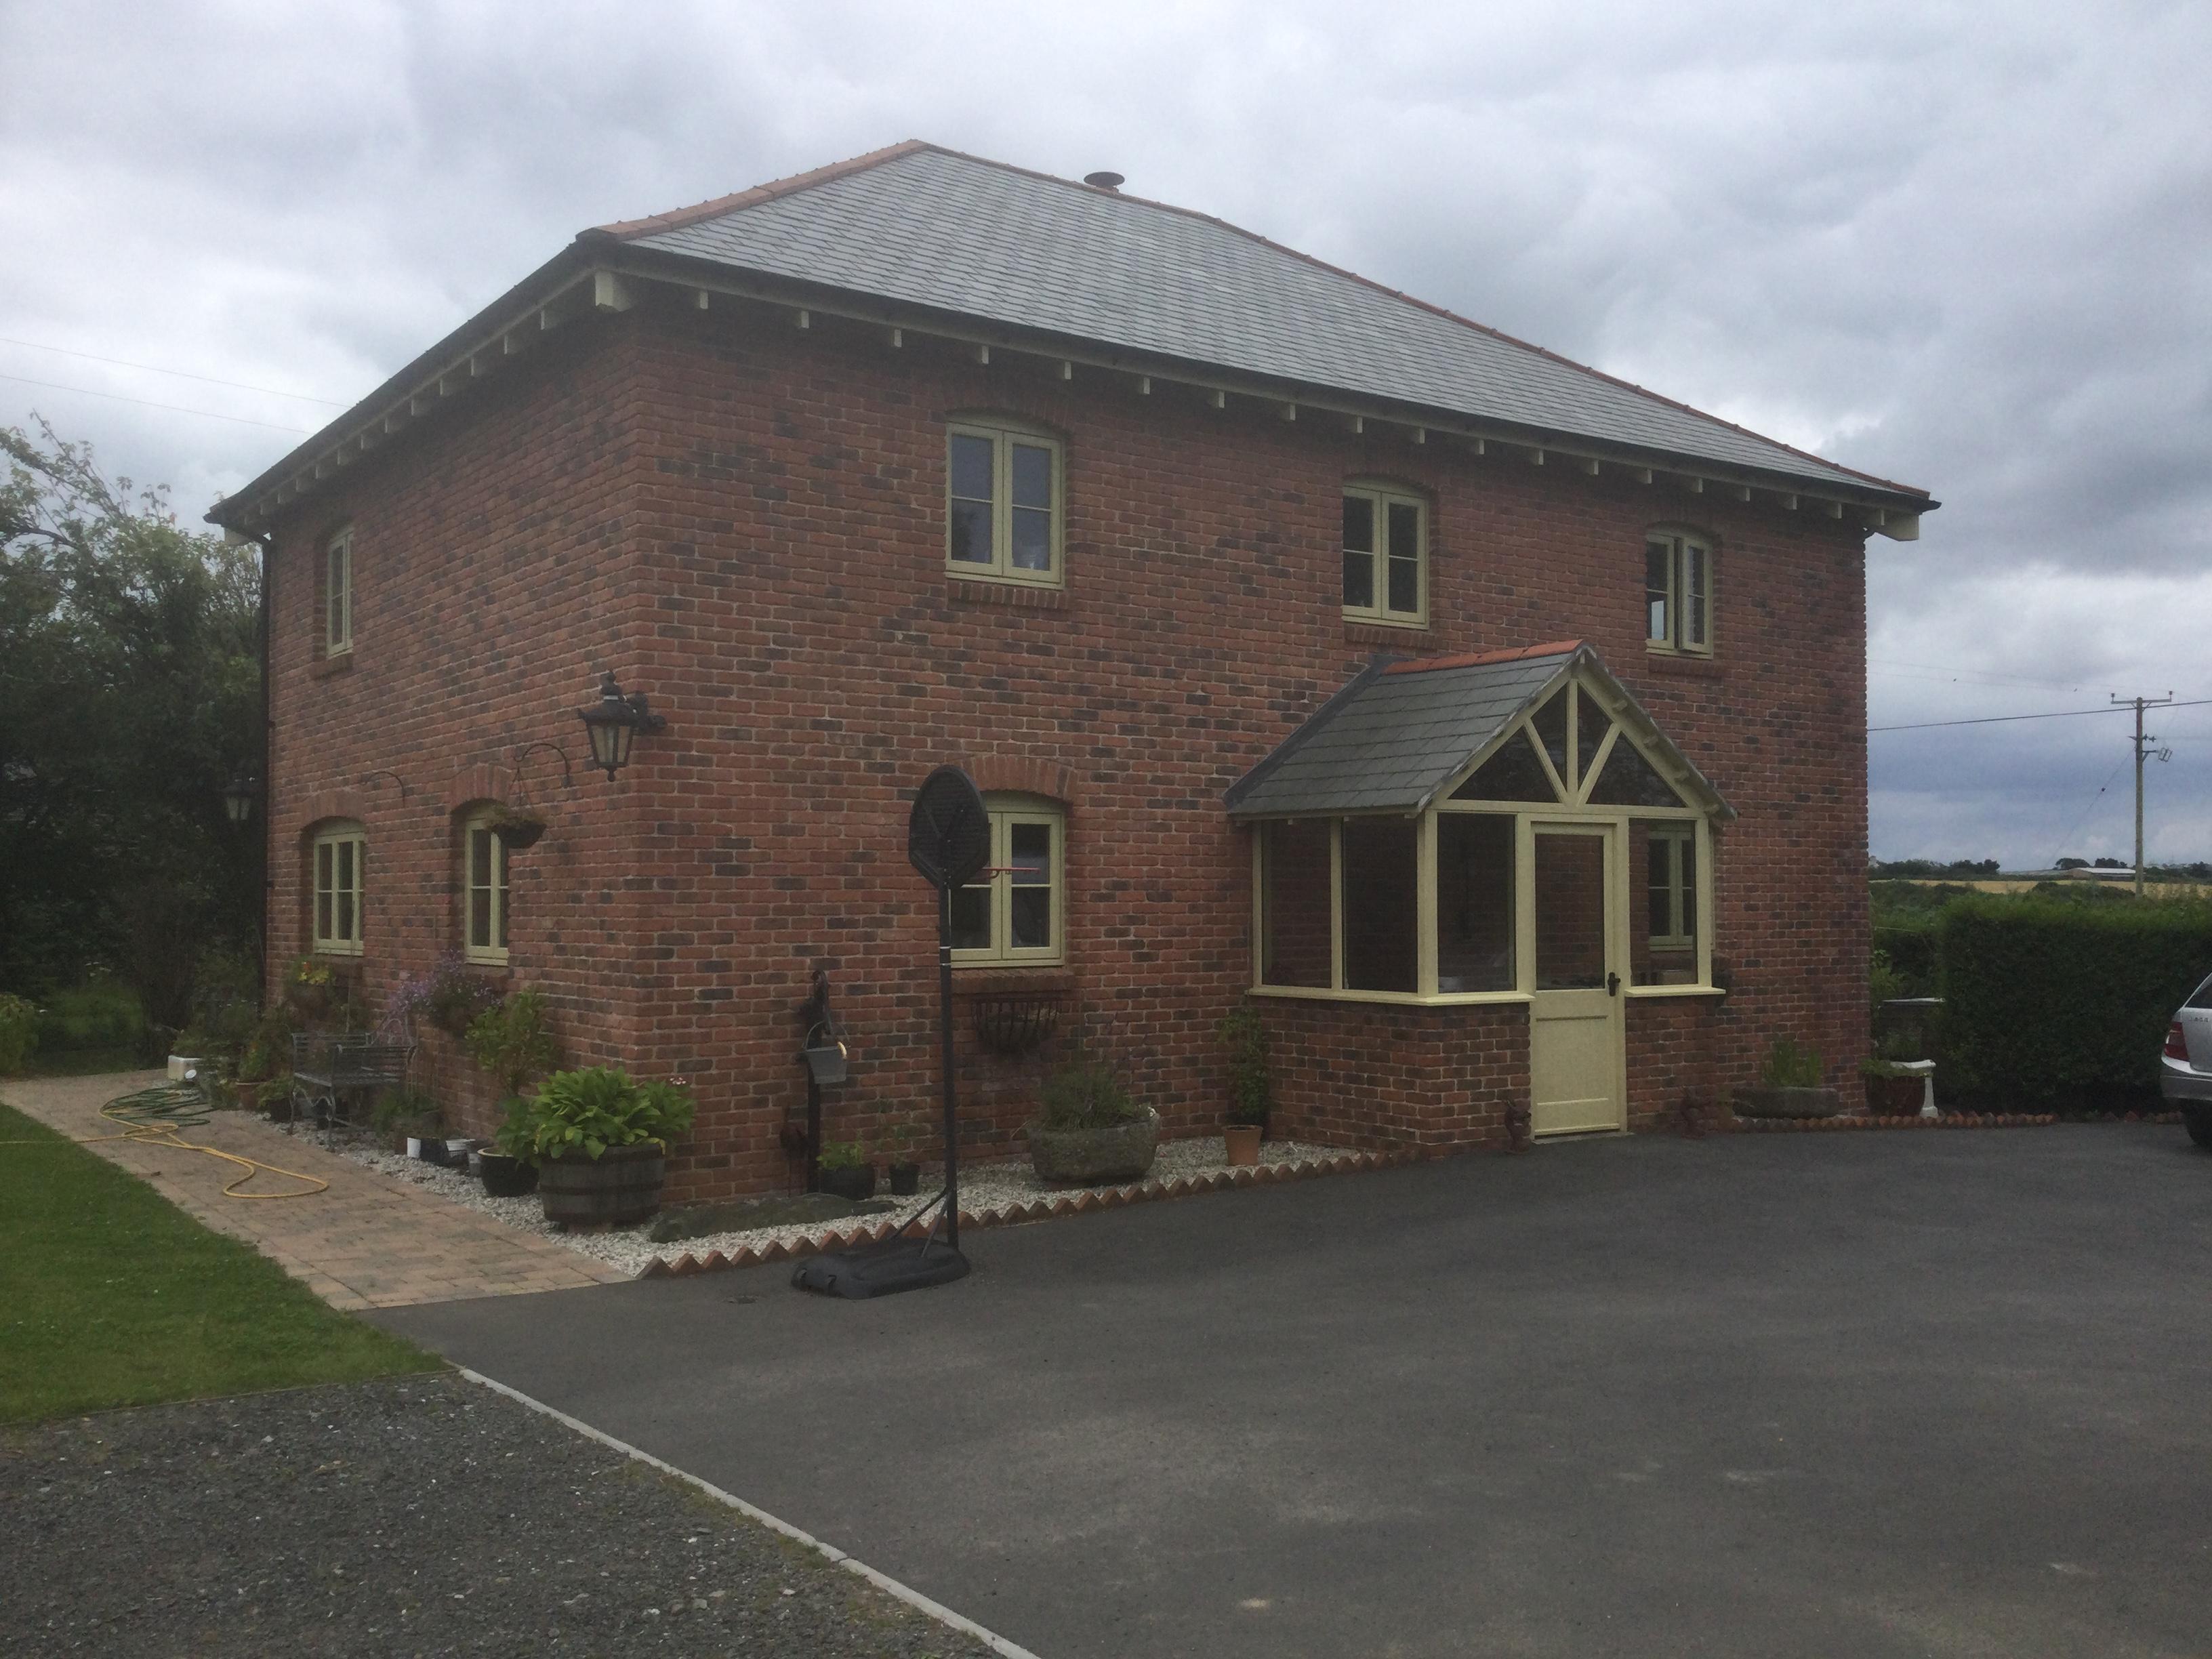
Not everyone’s cup of tea but it works very well fir us and I get constant comments from passers by and neighbours how good it looks.
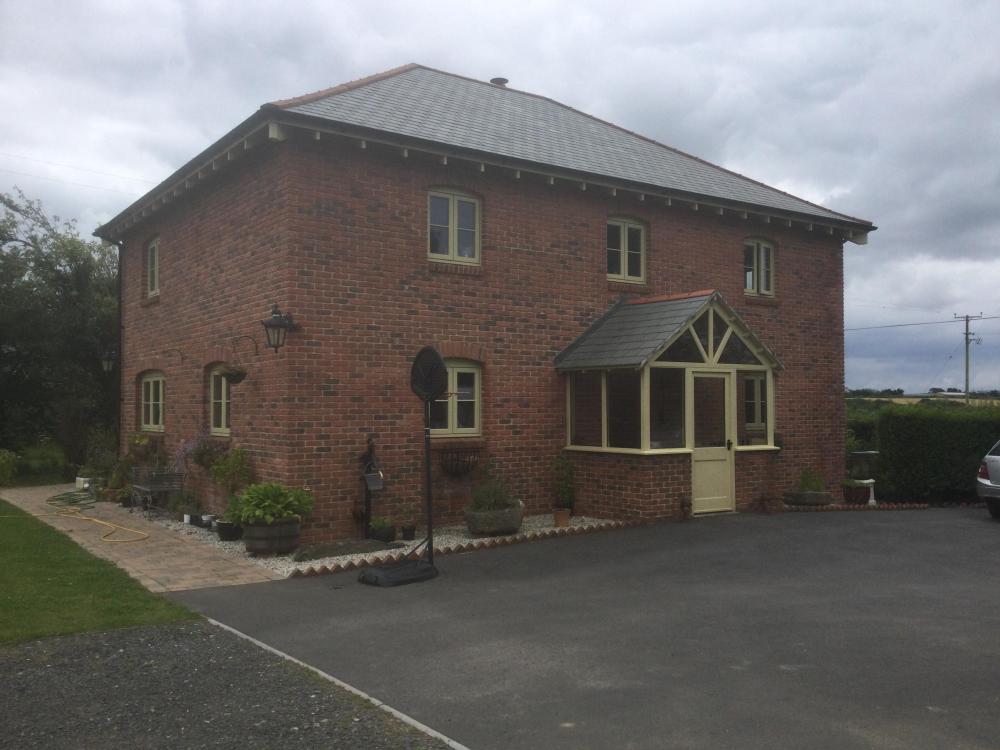 1 point
 -
When I last posted this picture you indicated that you liked it. Has anything changed?
 1 point
 -
As you say, not until we have true excess installed capacity. It is because of this that we are also developing a new nuclear fleet. Now whether that is the best thing to do, or as an alternative, just install a lot more RE and some large scale storage (which can be distributed) is a different debate. Some made up numbers. UK night usage: Between 25 GW and 40 GW, so over a 6 hour window, 150 GWh and 240 GWh. Now we know the price of both wind power and nuclear power, £40,000/GWh and £95,000/GWh respectively. We also know the capital costs £1.25bn/GW installed capacity and ~£8.3bn/GW installed capacity respectively. We also know the capacity factor, wind is around 40% and nuclear around 90%. Once planning is consented, we know that wind can be deployed in about 18 month, and nuclear about 12 years. Taking the most simple arithmetic model, how much wind capacity can we install for the same money as nuclear. 8.4 [£bn/GWn] / 1.25 [£bn/GWw] = 6.72 GW. Multiply that by the capacity factor and you get 2.7 GW. For comparison, taking capacity factor into account, you get 0.9 GW of nuclear for the same money. You would also be generating, with wind, approximately, after 18 months, 3.5 TWh/year. That will increase every 18 months, so: 3.5 TWh/year from Jan 2024 7 TWh/year from June 2025 10.5 TWh/year from Jan 2027 14 TWh/year from June 2029 17.5 TWh/year from Jan 2031 20 TWh/year from June 2033 23.5 TWh/year from Jan 2035 This is the point where the price of wind power equals nuclear power and nuclear is almost onstream. So if we stopped investing in wind here, from every year onwards we would generate another 23.5 TWh/year. Total wind generation to date would be 110 TWh/year. Nuclear 0 TWh/year. But we will give it a chance to catch up, by projecting into the future even more. So nuclear will be generating 7.8 TWh/year, wind 23.5 TWh/year. Really no need to project into the far future is there, nuclear is not going to catch up. Yes we do need some nuclear (or other type of base load generation) so that wind power can be used for balancing, but the problem is at the moment (2022), we need new generation. Luckily the people that put up the money are not investing in nuclear, or hydro, they are investing in wind (solar is a small fraction in the UK) and battery storage, because they know they get a return on their investment much quicker.1 point
-
I can’t see why not, if the wall isn’t boarded yet then additional noggins inserted between uprights close to where the brackets would be fitted will stop and twisting tendency. (C and E sections twist twist inwards with localised bending moments1 point
-
Fungal spores are all around us, there is no avoiding it. Despite its name, dry rot only grows in damp timber so you shouldn’t have a problem in a well designed house. Having said that I would feel more comfortable with clean stone under the house.1 point
-
And now…something completely different….1 point
-
Some day I may tell you of the cable we didn't cut, and that it would have turned off a whole power station.1 point
-
Agreed. But NB that badly fixed ones will move. I once thought they were idiot proof, then encountered a different level of ignorance. DIY or supervise as follows. Hole to be just big enough. Never skimp on the length as the outer 20mm or so does very little. Hole must be clean Adhesive must be fully mixed in proportion...with a mixing nozzle discard any single colour emerging at first Screw, don't push, the stud into place If some adhesive doesn't come to the surface, remove and add more glue. Doesn't work in cold conditions. Nothing more to it than that.1 point
-
Sounds like knowledge gained through experience. I'm quite impressed.1 point
-
Yep. I always put a little drop of washing up liquid in it. Fortunately we have inward opening windows, well most of them, so ladders rarely get used.1 point
-
I think that every brick has been cut on that and it is different to his detail. That looks far better than what you have. Was this shown to the bricklayers on site or did you get it after the arch was built ?1 point
-
Get a little dehumidifier to dry your clothes on the cheap through the winter, save all the condensate and wash away to your hearts streakfree content. Rain drops wouldn’t exist without dirt/dust etc so rainwater is not clean, but stored in a water butt I guess most of the dirt would settle out.1 point
-
I think the original post has been lost over some tit for tat arguing! Poor @Jack757wont ever want to post anything on here again! Good luck with your plans and look forward to hearing your progress 😊1 point
-
When we did ours I just trawled through new builds on Rightmove for a floor plan that suited us. Was thinking most new builds are efficient when trying to maximise space etc. Found one we liked and took it to the local architect. They upscaled it to our maximum allowable floor space, then did a few nice tweaks like relocated downstairs wc and revised upstairs bathroom dimensions to give 4 double bedrooms etc1 point
-
We were going down the architect designed route originally but two things put me off. The first thing one of them said was we can design you an award winning house. What I heard was we can add an award winning house to our portfolio. We didn’t want an award winning house. The second completely ignored our design brief proposing an expensive split level design. I asked if he used someone else’s brief. I get architects want to do challenging stuff with split levels, cantilevered overhangs and complex roofs. Designing open plan square boxes isn’t worth the 7 years studying i guess. In the end we went to one of the shed companies. Not exactly architecturally adventurous but we wanted simple and clean that fitted in to the landscape so that when done it would like like it’s always been there.1 point
-
Yes. It is the easy one to measure. Absolute Humidity, AH, is more useful as you can calculate the total mass of water in the air. You can convert between the two, but it is messy. Relative humidity (RH) The ratio of the actual amount of water vapor in the air to the amount it could hold when saturated is expressed as a percentage, or the ratio of the actual vapor pressure to the saturation vapor pressure is expressed as a percentage. Absolute humidity (AH) The mass of water vapor in a unit volume of air. It is a measure of the actual water vapor content of the air. Thanks to the World Meteorological Organization, we can find saturation vapor pressure given the temperature and atmospheric pressure (read more at Saturation vapor pressure) From the relative humidity and saturation vapor pressure, we can find the actual vapor pressure. Then we can use the general law of perfect gases In our case this is where R is the universal gas constant defined as 8313.6, and Rv is the specific gas constant for water vapor defined as 461.5 Thus we can express mass to volume ratio as , which is absolute humidity. So, for 25 degrees centigrade and 60% relative humidity, one cubic meter of moist air contains about 14 grams of water, which corresponds to conversion table values I've found before.1 point
-
Late comment. If you are on Wordpress (or indeed Buildhub Blogs) you can set dates into the past, so rearrange everything. (You can also - and on BH - set dates into the future, as a kind of draft system for posts. Just don't forget.)1 point
-
i have fitted a few big shelves on timber stud walls and used these brackets https://www.ebay.co.uk/itm/114328853072?hash=item1a9e87da50:g:1eAAAOSwXKdeTY6s&amdata=enc%3AAQAHAAAA4ATIIWPI2wpBIExfpsusBsV0kc1Irjn6FmpJ8WARl0TeNd3hFS7EMfTvzX0W9n%2FZsr1yrT4r4RuIc5GhqMUnQS5LUX4NriFaEkcTlbS%2FSwZ%2Fq3efpqF1lY0%2FwYMiq2RxAgSihd1XE0Qy9yAKl1PKkWUFVh52CSFwxqRAHPoahO5kzXjSai53g%2B6mC%2BhxYu8YaRiAjvLuchWqZr4kRXZsa9JlIX78%2B%2F1u852aPQMFxqnS96MOwH%2FiAepI4M9iGnkBpnX1Su6Gazjmr19sXZKjKB5YWieZeYs5jZC62VZoWuFZ|tkp%3ABFBM4PaJwPVg they work very well and i can easilly support my bodyweight on just 1 bracket, admittantly i sunk the bracket into the studs before plasterboard making the fixing plate completely hidden as can be seen in this photo https://photos.app.goo.gl/ojAfDDAswKvb2NQw61 point
-
Excellent thanks for the diagram Will make things much easier Will go over the battens with the membrane then celotex straight on top1 point
-
I've been looking forward to getting to a point where I can park my car in my driveway again, and finishing my July Post with a part 2 here to mark a finish to my Driveway project finally! Took a bit longer than the two weeks I was hoping!! I just finished adding up the damage and it was @ €7.2k all in all. I think the length of time increased the costs as there were days where I couldn't get to use the compactor and I had to get it back a few times to progress the project on. Some notes observations below: The big Diesel Compactors are heavy duty brutes but also take a specialist skill to start. They are all draw cord and they pulled the arms off me for 25 minutes before I gave up. I was shown how to start it but had to return it to my embarrassment and downgrade! Drainage took a lot longer than I imagined, plumbing in the drain channels was very difficult - I replaced both gully traps and one was encased in concrete by the original builder! Just getting the right couplings and things to fit took me a while to figure out. SDS comes in different sizes, SDS Max chisel bit wouldn't fix my SDS drill so ended up buying an SDS Max drill off Screwfix! I now own 3 angle grinders, started with none! A Screwfix one that won't let me change the grinder to anything else, then a 5" DeWalt, then a 9" Makita. I prefer the cut using this to the block cutter but the dust is gruesome! Grab Hire worked out well, took away 2 x 20 ton loads to clear the site and was able to drop two loads of MoT 804 exactly where I needed them. All moved by hand / wheelbarrow at that stage, was very difficult to find anyone hiring a skid steer for one day. Lots more sand and cement than I thought, all mixed with a wheelbarrow! Using a digger is scary when it starts tipping to the side due to doing something stupid! Two injuries: #1 drilling concrete screw into wall for new side gate, it got stuck and the SDS drill spun violently out of my hand, 6 weeks sprained finger didn't help! #2 seagull poo'd above and dropped inside my goggles, put them on and got acid splash into my eye. Now store goggles between jobs closed to the sky! Broadband issue is fixed - tree roots crushed the pipe on my neighbours property, stump was still there for years. I tried to find the pipe to create a new junction to my new house hear the boundary but only ended up finding the gas pipe by accident with the digger, just the tape over the pipe, where it shouldn't be - should be out on the road according to the gas map. Went to the other end near my old house and finger traced the pipe to a point near the new boundary and created a shore there. Thankfully after two years complaining a crew came recently out to remove said stump, run new draw cord and I'll have no issue getting broadband into my new house now, 1 less worry So I've to finish the very front and put up two more concrete posts and panels. I've to grout using Rompox jointing compound and see how long that takes. Hopefully it will keep the weeds away! But at least I can relax a little bit and use the driveway again. Would I go it again?! Well, I learned valuable lessons, to pace myself, what I can do when I put my mind to it, very useful for my self build next year. My body is certainly feeling the pressure and I'm glad I'm in my 50's and not my 60's!! I overestimated how much work was involved but learnt a lot in the process, not just specifics but about groundworks and hiring plant and grab hire which was new to me. I did get a digger & driver for a day and could see how they made short work of things compared to my efforts so picking and choosing where to spend money best is a wise course of action! Full costings below if interested! I Kept all my receipts for idle curiosity! All inclusive of VAT. Best of luck to anyone out there thinking of doing same! My Driveway area is 75m2. 7265.52 Total 1984.38 Tobermore Paving 210 Paving Block Cutter (€400-sale afterwards) 200 Recessed Manhole Covers 32.69 Spade 690.78 Sand, Easypost, Cement,Gravel 100 Diesel Compactor - unable to start, returned! 32.66 32mm plastic waste pipe as screen level 300 Compactor Rental 39.92 Donegal Quartz stone 89.95 Dewalt Angle Grinder 102.57 Sand/Cement/Gully 44.95 More Gullys 35.47 Lubricant / Sealant 147.08 Donegal Quartz stone & gravel 24.48 Plastering Sand 76.65 Sewer Gullys 11.32 Sewer Pipes 19.56 Sewer Pipes 19.19 Concrete Screws 200 Hire Compactor 500 Hire Digger 19.58 Plastering Sand 86.35 Manhole Cover 292.15 Plant Rental 69.65 Cement mix & misc 45 post and line levels 93 replacement wheel for wheelbarrow & cement 17.7 side gate lock and hook 5.99 petrol can 284.55 rompox jointing compound 12.45 tape 257.31 sds max drill 82.04 kpost 7.15 coupler 38.8 drain caps 15.95 sds max drill 37.25 bits and sockets 38.95 draper cold chisel 700 Grab Hire - removal of concrete/topsoil 300 Delivery of MoT 8041 point