
Leaderboard


Popular Content
Showing content with the highest reputation on 11/18/21 in all areas
-
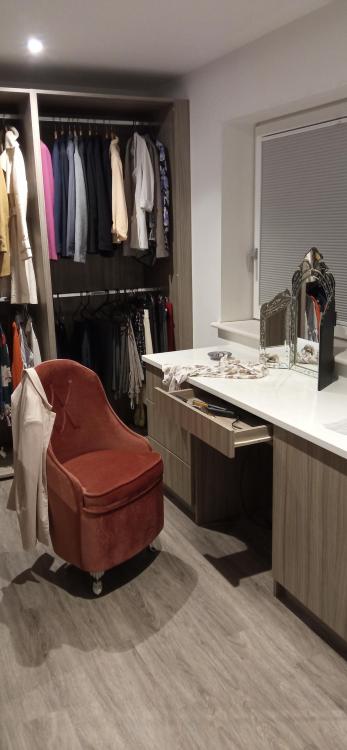
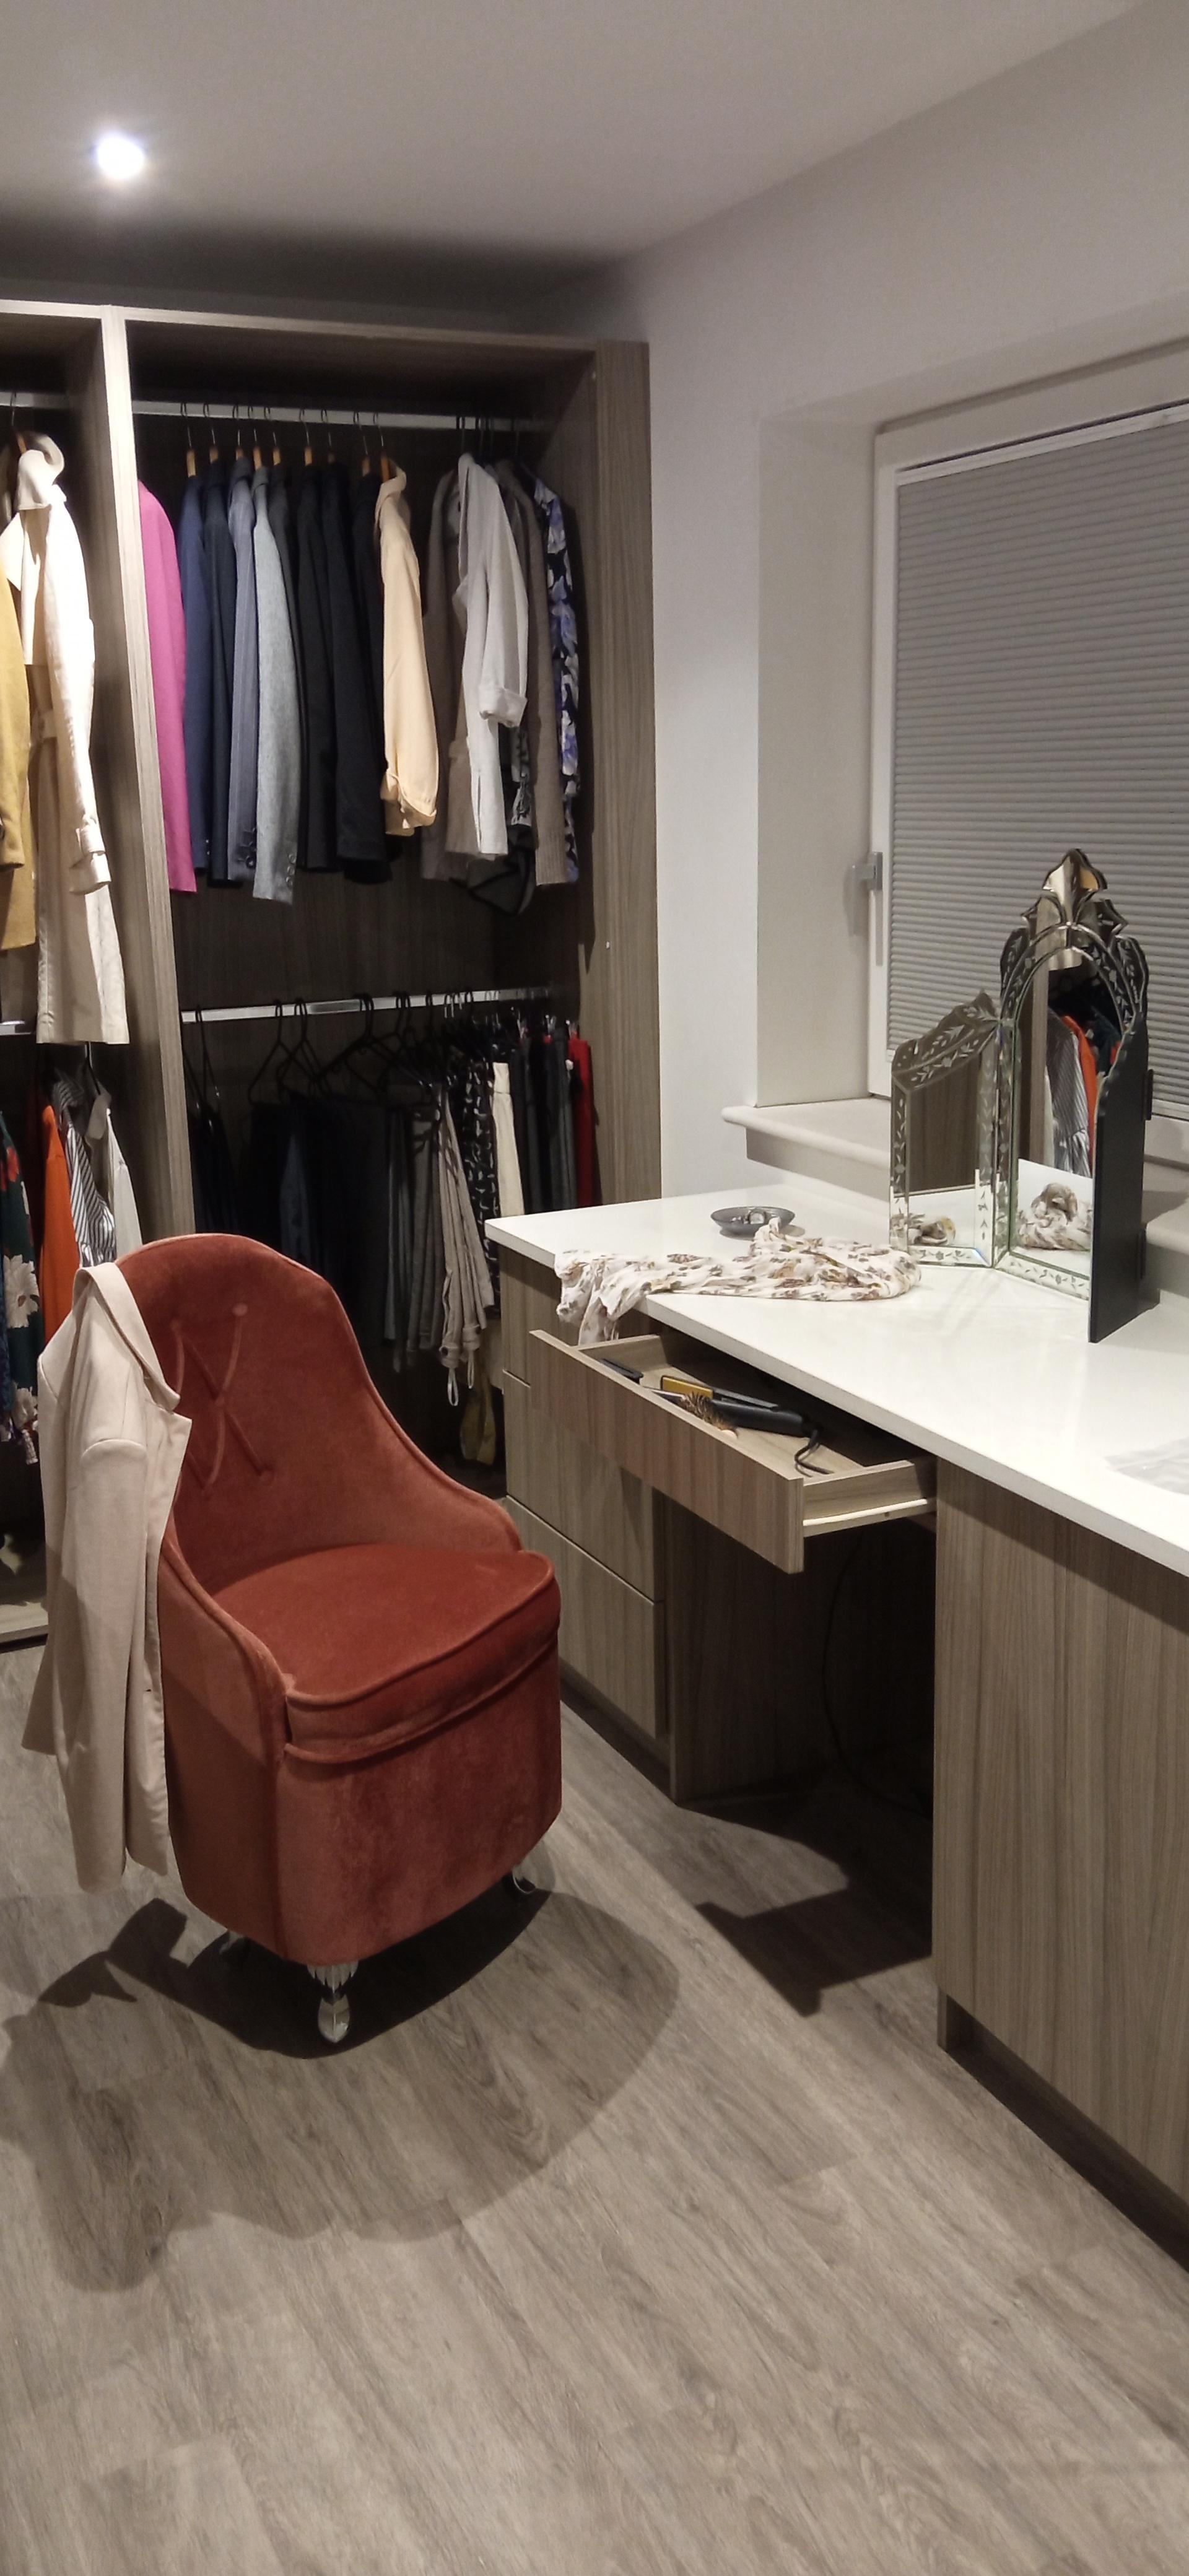
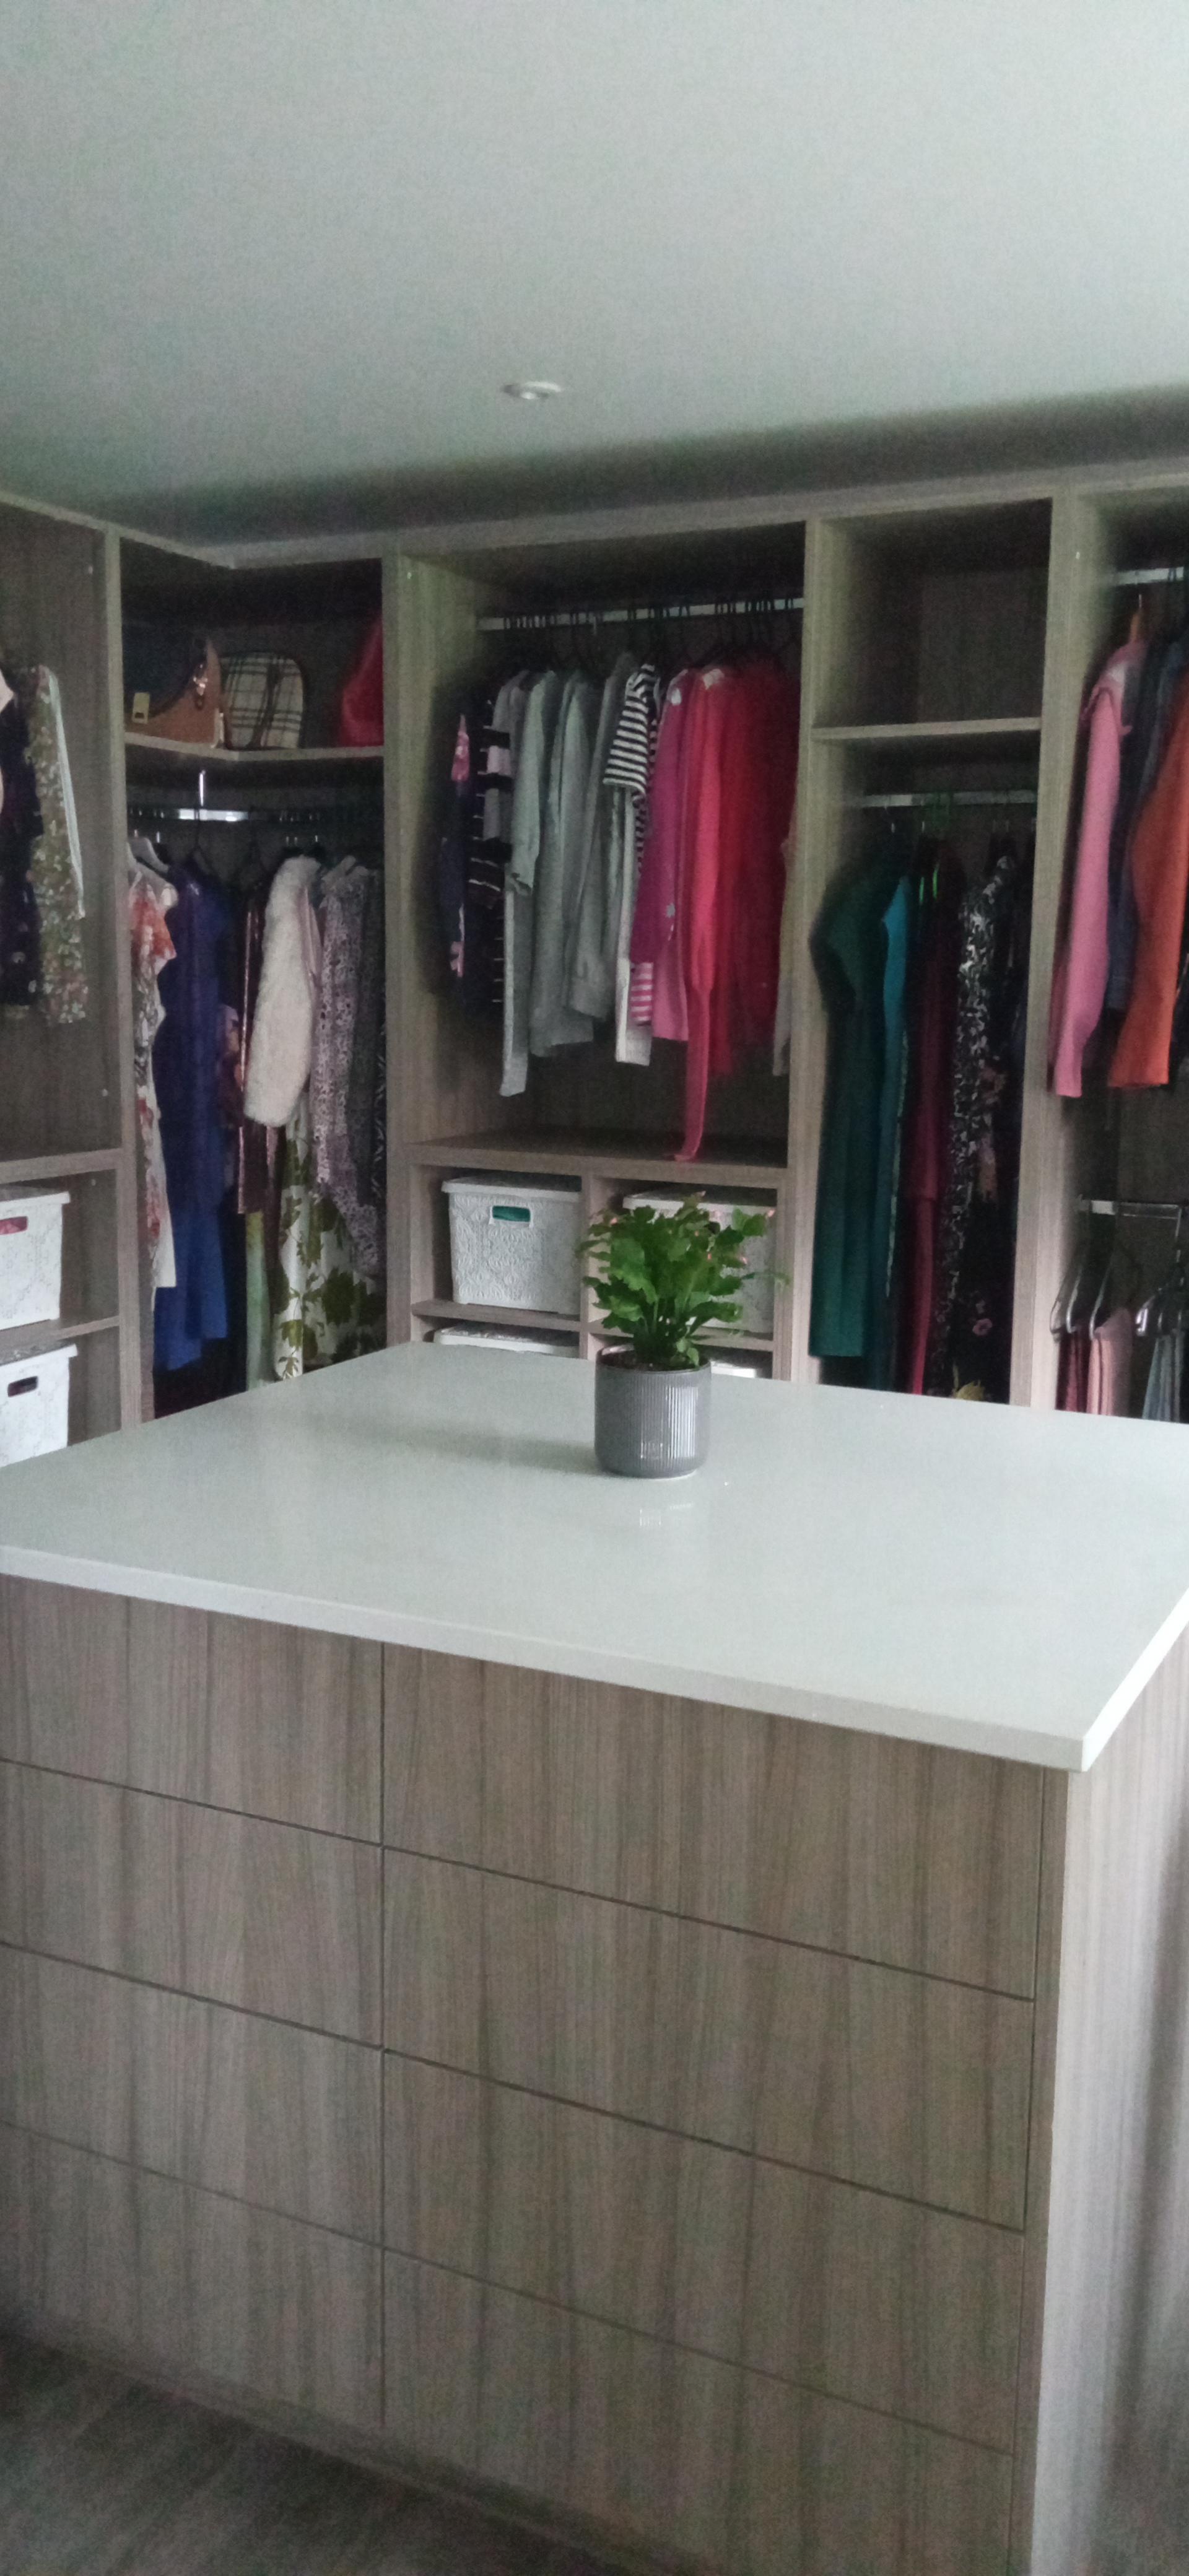
We have got ourselves organised now finally! It's amazing! Accessed from our bedroom.... (Decorating needs to be done/redone next year)! VID_20211118_173929.mp4

 3 points
 -
Why not cut the slate to extend over the hip rafter/batten a little?2 points
-
Much easier to start at the hip and work away, but as a solution, add a piece of lathe to side of hip rafter/batten to support the slate, odd angle to cut but it will cure your problem,or add intermediate short battens as required2 points
-
Jigsaw on internal, and guess what you’d use externally? ??? Yup. The same jigsaw. A few minutes work each hole. A 200mm hole saw will be cumbersome and single use. The jigsaw will become a friend through your build, alongside his best mate; the multi tool. ?2 points
-
You'll remember our quote for ideas for our dressing room/walk in wardrobe being about £7k purpose built. Ikea PAX was coming in a about £2k for just the frames plus we wanted island, dressing table etc and it didn't quite fit our space. Have just got around 10 metres of Porcelanosa walk in wardrobe/dressing room units plus 1.2m island and dressing table for £1000. It's more units than what we need but we can adjust the configuration to suit and due to the height I'm thinking they will need to go through our windows (good job it's a bungalow) and potentially hacked in/may need magic man to sort out any minor marks. Hopefully won't be noticable when they are fitted. Unfortunately didn't include the granite island top and dressing table granite top but we can explore alternatives to use as worktops. So excited!!!!!1 point
-
It all seems massively over-complicated! How do I "tune a weather curve" ? Surely the weather does that ? The only tuning I understand is my cello - and that is pretty hit or miss. However, I am on good terms with the installers - who 'specialise' in heatpumps as opposed to being just glorified plumbers - and have a nodding acquaintance with a couple of people at LG so I will see what they make of it all. Whoever set this system up - whether LG 'default' settings or 'tweaked' by an installer - seems to have got it wrong judged purely by comparing my original heating data with that of today after the alterations you suggested. All I want, or rather all my wife wants, is a house at 20º in cold weather. As you suggest [I think!] fancy thermostats are an irrelevant complication but I can see they have their attractions; by making the process apparently intuitive and more 'plug and play' the average punter [me] does not need to get his hands dirty with TPI, heat curves, set points, overshoots and so on. But the set-up here is far from PnP nor is the LG controller at all user friendly. As a first step I will dig out the [utterly useless] so-called 'smart meter' so that I can at least keep a vague track on electricity consumption and run comparative days with the controller on the original settings compared with the revised settings you suggested. B.t.w., I don't have solar thermal here, only PV. One of the reasons the 'smart' meter is in a drawer is that it takes absolutely no notice at all of the contribution the PV array makes to the grid or my own consumption. Anyway, many thanks again for the help and advice and if I think I have anything interesting to report resulting from future tinkering I will post here. All the best - for now!1 point
-
Yes. It might be dusty, ugly, and feel like living in a building site, but there are no practical downsides.1 point
-
https://www.screwfix.com/p/female-socket-x/77539?tc=FB3&ds_kid=92700055281954514&ds_rl=1249404&gclid=Cj0KCQiAkNiMBhCxARIsAIDDKNUekQc2LPr0XYZlnZpBllCNOCnMqaZTU1AD7MwI9JqB8oeKR1N3QtsaAgMIEALw_wcB&gclsrc=aw.ds ?1 point
-
I'll measure it tomorrow to make sure1 point
-
Liability for the CIL only kicks in when you start implementing your planning permission. Until then the liability can be transferred to a new owner. So it's not really an issue. The important thing is to get planning permission and then formally apply for the self build exemption using the correct forms and get it granted BEFORE starting ANY work on site. Note that the planners may tell you either verbally or in writing that it will be exempt BUT you must still formally claim the exemption or you loose it. Is the land part of your mother's garden? If not then you should buy the land BEFORE applying for planning permission. Otherwise HMRC may go after your mother for Capital Gains Tax on the full value with planning permission. Her garden is exempt from CGT but other land such as a paddock would not be.1 point
-
Yes. By modulating the power during a heating cycle, they can optimise the CoP. This is because heating is not linear. When you have a large temperature difference between a hot body and a cold surroundings, you have high losses, when the temperature difference is small, you have lower losses. Therefore, when heating initially starts, you can put in less energy for a similar temperature rise. As temperature parity gets closer, you have to put in more energy (mathematically, when the surroundings is an infinite heat sink, you can never reach parity, unless you have infinite energy. This is why 'warp drives' don't exist, but the infinite probability drive might). By having the control to modulate during the heating cycle, frosting can be reduced i.e. work the ASHP less hard or take less heat out the ground, for a bit longer. Then increase the flow temperature from the HP as you reach maximum temperature, but for short amount of time. Frosting is a combination of time, flow rates, temperature differences, and in the case of ASHP, relative and absolute humidity. It is all about finding the sweet spot as all the above varies. Worth remembering the the overall temperature differences that a HP works are are similar to a thermal boiler, just lower down the scale. Why we should really use the kelvin scale and not the pesky, arbitrary celsius one. Or create a new temperature scale that has zero at the coldest that the refrigerant gas gets to. Then you will see temperature rises of 90 STs (going to name this scale after me, have to be careful though as we have an St, for stanton number, St = h/pvcp, where h is coefficient of heat transfer, p is density, v is velocity, and cp is specific heat capacity at constant pressure, it is used in geothermal energy, well it should be, but I think it gets forgotten about).1 point
-
Wouldn’t it be better to rely on a vapour barrier for point b? for point a, yes but you need to do this in multiple layers, getting wider every time to feather the join. I prefer wet plaster instead.1 point
-
It was a thinly veiled jibe ref your prowess with the stuff! ? Seriously though, isn't the humidistat just doing its job? I reckon if I got the UFH going it'd help dry the wet room floor out and the fan wouldn't have to work so hard.1 point
-
OMG this looks terrible…….1 point
-
Thanks will start a separate HA discussion then and will tag you to avoid taking my own thread OT ?1 point
-
Welcome to THE forum for people like us. Someone will be along shorty who can answer IIRC you need to get your CIL exemption sorted before you start.1 point
-
+1 i suggest you refer your neighbour (and her so called lawyer) to the Court of Appeal’s judgment in the Network Rail case, summarised here: https://www.walkermorris.co.uk/publications/knotweed-nuisance-court-of-appeal-confirms-liability-for-landowners/ whoever owns the land from which the knotweed emanated is liable for nuisance it causes to neighbouring properties. The legal analysis is simple. Of course, proving the facts is not always simple. Have you got a time stamped log of photos, correspondence, emails etc.? By time stamped, i mean meta data dating the photos, which hopefully show the knotweed developing over time and staying in your neighbour’s property.1 point
-
So it will fall off at some stage, maybe next week or next decade. If it is well stuck then it may also rip off some of the previous surface, making a huge mess and maybe landing on the family. Must have screws into the timber (and they may be quite long as has 2 layers to go through). It will be screwed in is, I think, your next instruction. How close together will be according to the manual.1 point
-
Good to know. I couldn't see 200 on Starrett. The reviews are good which explains why this is £50. But for 2 holes, perhaps not .... jigsaw.1 point
-
No, 22mm or possibly 28mm copper, with a set number of bends and a defined discharge position. I did this myself and the plumber who connected and comissioned the tank was happy, but this was a plumber I knew and with his prior agreement.1 point
-
You can have a hybrid which I've used on a number of projects for various reasons (protected buildings with ceilings we had to retain, refurbishments working from one side, phased projects, etc). A WUFI test would be better as it takes into account the hygric behavior and moisture contained within the materials. eg the plywood deck and timber frame could have a moisture content of 20% if constructed over a wet winter. We had a hybrid roof on one large roof (passive house) and got a WUFI test. It was a complicated timber frame roof that was designed to accommodate a sedum roof at a later date when funds became available. Anyway internally when the building was sealed (windows in roof on) we had to wait until the plywood deck and structural timbers dropped below a certain moisture content internally before we were allowed to add the vapour control layer. Later this void was pumped with cellulose. The roof had PIR on top of the plywood deck. Most major suppliers of airtight membranes will provide a WUFI test if you're buying your vapour control membranes and tapes from them.1 point
-
Walk around on the boards. at 120mm they should feel solid. Any that move, get them refitted. The Pink Grip foam adhesive is very sticky if the foam you have has not worked 100%. Use with a gun and force the nozzle in so it is about halfway down the joist and squirt as you withdraw (oh err).1 point
-
If you use a liquid screed you can reduce it to 50mm, so gaining an extra 25mm insulation. As above, the phenolic foam offers more insulation. Switching to liquid screed and 125mm phenolic will give a u value of about 0.12 as opposed to 100mm of pir which will give around 0.16. With ufh on a beam and block floor this will make a considerable difference.1 point
-
Kingspan is a brand, not a material - in this case it is confusing, as Kingspan offers both PIR boards (yellow, lambda 0.22) and phenolic (pink, 0.18). I'm assuming it was PIR that was originally planned, with phenolic at the same thickness you get 20% better insulation at 80% more price. Aerogel and vacuum panels are unlikely to be economical for self build. Any reason for specifically 75mm screed? There are thinner options available, that would free some extra space for insulation.1 point
-
I started at the abutment seen in the background because I thought it was important to commence with full width slates alternating with slate and a halves. Also the eave slate row worked out nicely where it met the the lower end of the hip rafter. The geometry and cuts of the next three rows was pleasing as well. The problem with a 30 degree pitch roof is that at the hips a few courses work out well using regular slates plus a few slate and a halves. Then progressively higher up the pitch the underlying bond pattern of the rows slides relative to the hip rafter then (guess) every 6 rows results in an unsupported wobbly slate. My hunch is that regardless of the ultimate implications at the abutment by giving priority to the hip slate cutting geometry, no left of right adjustment will allow all cut slates to reach their top batten along the hip. The more I think of it, the lower the pitch of the roof the more problem tiles. A difficult cutting angle for sure and fixing will be a problematic if I don't want to punch extra nail holes through the membrane. Below the green membrane I had already fixed lathes to the side of the hip rafter to ensure the main battens running across over the membrane are well supported below where these battens meet the hip rafter. Ooo now you talking, I like this idea though I will need to lift a few of the already fixed slates to ensure this extra intermediate batten can be nailed to 2 or 3 rafters below. Lucky I went for 300mm rafter centres in the end.1 point
-
All boundaries are shared, otherwise they wouldn't be boundaries! If she's saying it's a shared fence, that's possible, albeit unlikely in the absence of specific evidence, but it's a complete red herring in any event. The boundary is a line. The plant is clearly on her side of that line (assuming the fence is in the right place), hence it's solely her responsibility to get rid of it. If she's spoken to a professional about this then presumably she knows this has to be (literally) nipped in the bud. If you won't contribute - and you shouldn't - then she'll need to handle it herself. She's already shown her hand with allegations about your distant topsoil being the potential source of the knotweed, and now trying to get you to pay for removing a noxious weed that's clearly not on your property. Given her behaviour so far, you shouldn't be helping her to treat it, other than perhaps advising her that she can do it herself for a lot less than the quote she's had. If she pushes back, I'd be tempted to say that if she doesn't take care of it and it moves to your side of the fence, you'll sue her for the cost of getting rid of it.1 point
-
Her solicitor and someone she knows who said it’s a shared boundary …. Sounds like a line from Judge Judy. shared boundary is fine for fence repair but I don’t see how it can relate to JKW1 point
-
No. Think about it this way... Let's say the temperature inside and outside are constant so a temperaturs gradient exist between the two. With a warm roof (insulation above rafters) the rafters will be on the warm side - so there is no risk of condensation on them. With a cold roof (insulation below reafters) the rafters are cold but they can be well ventilated - so there is no risk of condensation on them. If you add insulation between or below rafter in a warm roof you effectively "move" the rafters towards the cold side without providing the ventilation. This risks consensation foirming on them. You can add some insulation between the rafters but I believe its limited to 1/3rd of the total and you should get a condensation risk analysis done. Insulation manufacturers will sometimes do these for you if you send them a proposed sketch ausing their insulation.1 point
-
Yes that looks like a good plan squire1 point
-
It would need to be sealed to the floor and ceiling, which in turn would need to be airtight and the perimeter of all openings, with all fixings and penetrations sealed, so not really.1 point
-
It is until it moves the during drying out phase and then cracks.1 point
-
Not according to @ProDavewho describes this setup as a "plasterboard tent". Is your question in the context of a masonry brick & block build?1 point
-
Hi everyone, came across this site while googling all things self build so hope to learn a whole lot here before we get started...and after. We're in Stirling, Central Scotland and hoping to find a plot in the area.1 point
-
Jack the frame up, lever it up and slide dpc in - last resort is to bang slates in as they will act as a dpc1 point
-
Is the tank steel or plastic? If there are signs of woodworm you need to get the whole roof checked unless you have evidence that it has already been treated. 18mm will spread the load across 400mm without deflection even for a plastic tank and 150mm joists is deep for loft joists but 37mm is quite narrow. Can you lift the tank? If so you could put some cross members under the ply to spread the load across more rafters but given it is supported now and as long as there is no evidence of bulging in the room below replacing the boards with ply should work OK.1 point
-
You can try an insulated floor system such as hanson jetfloor etc, where essentially you replace the concrete block with EPS and then put your layer of Kingspan ontop if needed. There are numerous systems available https://www.bison.co.uk/products/jetfloor/1 point
-
Coefficient of Performance is just Power Out / Power In. But it needs to be within fixed bounds i.e. output temperature 35°C, external temperature 7°C. SCoP is a method to try an mimic real life conditions, so will have a weighted average for different output temperatures and different external temperatures. So a SCoP in maritime Cornwall will be different from maritime Newfoundland, which will be different from the Swiss Alps, which are different from Idaho's Snake River Plain. I would rather see an isothermal chart. But then I understand them.1 point
-
Cold roofs should incorporate an AVCL to help prevent/minimise air movement and moisture vapour transfer through the system - what does get through can then removed by the ventilation above the insulation.1 point
-
there are only two ways to insulate a roof, warm and cold. cold roof is easiest as it needs no vapour barrier as moisture rising through it and dew forming inside it is vented as its open to outside air. warm roof on the other hand has to be sealed so moisture rising up from the house cannot get into it as once it does it cannot get out and you will have mould/rot/mushrooms growing. The main issue with a warm roof is having enough build height as they are a min of 150mm deep usually. obviously in an attic roof you wont have anything like this space available between the trusses so you have to go with a cold roof and copious amounts of ventilation above the insulation via the eaves and ridge.1 point
-
It’s true ! ? Not complete ( of course ) but after 7 years we actually move in tomorrow. What have i learnt ? . With infinite support and help from this forum you can build a non standard house built by an unskilled non standard human ? . I always felt my journey was a testament to this forum . If I were a plumber , joiner , brickie etc. then that would be a distinct natural advantage. Yet I am an ex software engineer who builds his house bit by bit ( had to get that joke in , sorry ! ) There have been mistakes a plenty ( not all mine ) - many wft moments . The build literally consists of blood , sweat , tears and indeed other bodily fluids . So thank you to all that offer help and advice . Those that tolerate seemingly stupid questions ( usually are stupid actually ) . But most of all to give time to help someone achieve more than they are capable of . This is the power of buildhub . I will now post some witty comments elsewhere ; or some obscenity that will get me a naughty boy badge .1 point
-
Oh, and I positioned the MVHR unit as far away from the bedrooms as I could, even taking the precaution of placing it on the far wall of the plant room. In a well-insulated house, which is airtight and triple-glazed, and which therefore tend to be whisper quiet inside, even small sounds become noticeable, sounds that would normally blend into the background of a normal house.1 point
-
The two main sources of noise are (i) the unit itself and (ii) the high speed air in the ducts. And for (ii) especially the turbulence caused when the velocity of that air changes at, for example, the point where a duct joins a larger valve, such as at the point where air is supplied in to a room. (i) is addressed by buying a better quality Passive-House certified unit and fitting silencers. (ii) is addressed by slowing the speed of air flow in the ducts by increasing their cross-sectional area by doubling them up. The rule-of-thumb for noise in ducts is to keep the speed of the air below 2.5 metres per second on boost level. I went even lower.1 point
-
Hello MG_Wales Welcome to BH from me as a kindred spirit! Gus1 point
-
I have just specified and bought my MVHR kit. But I have not installed it yet. I purchased it directly from the manufacturer of the unit I chose. Great service from them, by the way, even including a site visit, when he was in the area visiting someone else (!) Like you I was keen on whisper quiet. First, I chose a PH-certified MVHR unit and bought the ducting from he same manufacturer. Choosing a quite unit I think is key to having a quiet system. And I slightly over-specified the unit too. There was a smaller model available that would have been sufficient but the price difference was small. To tackle the risk of noise, it wasn't required by the MVHR designer who did the calcs for me, but I chose to pay a little extra and double-up almost all the duct runs (other than very very short ones). I also chose to have 1m-flexible-silencers on both the supply and extract from the dwelling. And I have bought a supply manifold which has extra baffling inside too. The ducting is semi-flexible and radial, so no cross talk and I used the wider (90mm external diamater) ducts rather than the smaller ones (75mm external diameter). The expert who sold me the system said that my system should indeed by whisper quiet and the marginal increase in cost will be modest.1 point
-
And, for what it’s worth, the flush plates are different sizes for the different models so make sure if you do get a Geberit you get the correct flush plate for that model.1 point
-
A lot of things aren’t legal, best use common sense! DIY products won’t be effective on Knotweed.1 point
-
Hi I was just using design software to refine our house plans to submit an amendment to our application and thought itshare that before we appointed an architect I was drawing our house plans on graph paper and using tracing paper for floors (this was very painful when making changes!) until I came across software which is aimed at self-builder's. As a complete novice and without training (which is always available) with a bit of trial and error the software enabled me to upload a photograph of my plans and transfer them to scale, add floors, rooms and manipulate the plans to include windows (colours, types, etc) doors, room heights, wall and floor / carpet colour (with actual paint manufacturer / carpet codes), add kitchen cupboards, wardrobes, sofas, dining tables, bathroom suits actually available in the market etc. They will even add items specified not in their available catalogue under each type required to create a house visual so you can update your design in that level of detail. For a £5 a month no contract fee I found NuVuw to be invaluable. I think they have a free trial on at the moment: https://www.nuvuw.com It even has a project management tools built in which I plan to use for our next phase.1 point
-
thanks for the link. may I take this opportunity to big up the Dialux Evo software for lighting design. https://www.dialux.com/en-GB/ it's free and very easy to use. I've had lots of fun designing our lights. when I've had issues their support is willing to help via the forum.
 1 point


.jpg.c21f3ac78c9b7efd90cbdcb312744dc5.thumb.jpg.7adcad4c0e384f5ecd7d56b0618df6e5.jpg)


