Leaderboard
Popular Content
Showing content with the highest reputation on 11/22/23 in all areas
-
I’ve lucked out and managed to get the best plasterer in the area by all accounts. He started this week and by the end of tomorrow nearly all of the downstairs will be completed. His work is certainly excellent. He has a few other jobs in the diary but by end of January we’ll be fully plastered and I’ll be finished most of the painting. The slow start to the plastering is now causing me scheduling problems as the staircase is built and ready to be delivered next week. The main kitchen is due to be delivered in a few weeks as are the tiles so running out of space to put everything. I should have sacked the first plasterers off much sooner. The quality was good enough just painfully slow. Important lesson for future fellow self-builders. If you have any doubts then don’t bury your head in the sand hoping it will get better have an honest conversation with them and move on.2 points
-
Grohe shower mixers used by me, really need 47/48 degrees for a nice hot shower, 45 and it's getting cooler in the shower. Seem to be getting about 10 deg temperature drop via mixing.2 points
-
My idea worked out so well! 3 perfect cuts and two perfectly placed holes. Small achievement for pros but a massive one for me....chuffed to bits!2 points
-
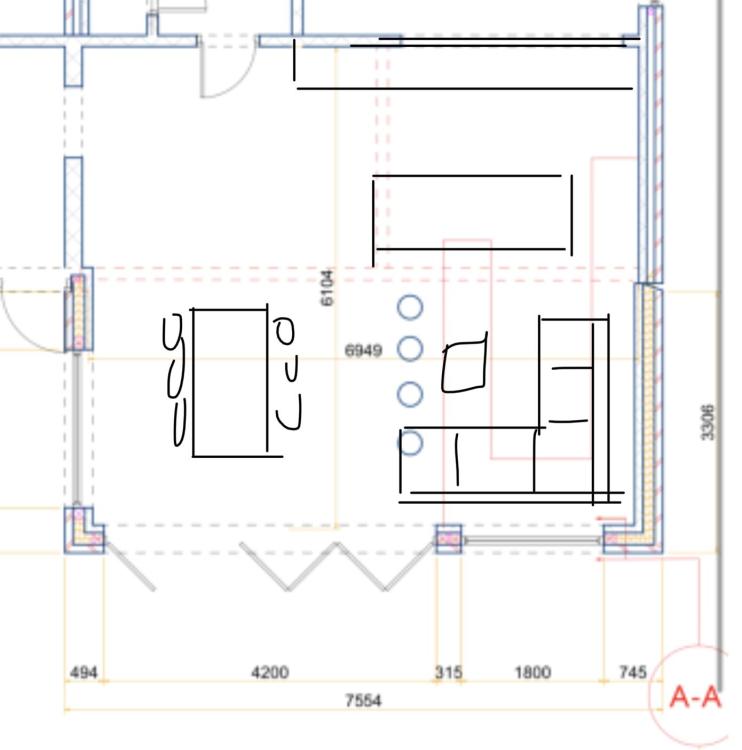
Your wife is right, if you put a wall between the living room and the big room that top right corner will be the darkest spot. But your dilemma of course is without a wall there where do you put sofas in the livingroom. But if you had the kitchen oriented toward the south you’d be looking toward the light. using good lighting etc and keeping decor light should mitigate this a bit too. your house and extension is the same as our last house and it was difficult to get right. We didn’t get ours right so what I’ve suggested is based upon our experience and learning from our mistakes. hopefully others can provide alternate ideas.2 points
-
I followed your @TerryE story a number of years ago and designed my system based on your posts. Thanks for all your detailed posts all those years ago. My system: Installed and running 4 years instead of 6 yours like yours Heated by the same 3kw wills heater during the night 100 sqm of polished concrete, 100mm deep and reinforced with fibres not a steel mesh. Self installed Wunda 16mm PERT-AL-PERT PIPE, manifold and pumpset - 5 heating loops with similar double back loop design. The pump is on a low nice quiet setting. I’ve no idea how to calculate how much water it pumps or the flow like you did nor do I feel I need to. It's working so I’ll leave it. I’ve a temp difference of circa 5 degrees after the system is up and running. It’s the basic temperature dials on the manifold so this isn’t digital or recorded like yours. Portable oil heater for the misses for when she thinks she’s cold. We’ve our temp between 20-21 degrees so lower than yours It was a major refurb, not a new build but we did a PHPP for the house which I can compare to. Main differences: I don’t have all the fancy temperature probes or data logging you have. We have temperature sensors but they aren’t recorded. I could fix this by purchasing a few but don’t really feel the need. I have an electrical meter on the wills so know exactly the energy going into the slab. I don’t run the pump after the wills is off to spread the heat like you nor do I do it for a few minutes on the hour. I did play around with this for a while at the start but it doesn’t make a massive difference. This slab is all one large open plan kitchen / dining / living / entrance hall area. You do notice the floor warmer in the hallway nearer the manifold but this is fine as the heat rises in this double height area to the upper unheated rooms. Things I’d change: I don’t have the fancy controls you have nor do I have the coding skills to develop it. It’s therefore a much cruder timed system. Note I’m based in Ireland, not the UK. For the first two years it was definitely cheaper to use a cheap wills than invest in an ASHP but the massive increase of the electrical unit rate has changed this. I've had the ducts fitted for years from outside to the wills heater so it’s an easy swap we’ll have to make soon. All loops are circa 90-100 meters long so I’d like to connect the ASHP directly to the slab avoiding a buffer too. Question: If I were to data log temperatures does anyone have any advice on what products to use that don’t require coding, are relatively cheap and what number would you advise getting and what to record? Do I go all out and record the flow and return temperatures for example? My biggest achievement: For the winter period 2021-2022 when everything was turned off in Spring the total units used was 3,347.1 when PHPP has a number of 3,349.0. Other years were higher or lower but that year was bang on!2 points
-
Hello, hopefully we will get a roof in the coming days and the electric pole blocking the entrance has moved and we have secured 3 phase. I have made so many mistakes on the way with the actual construction (don't ask tis resolved) and real life/other stuff took over big time - why on earth did I think this was doable? Definitely ADHD got me here. I will post pics soon. Grateful to this forum, wise heads on here have helped a lot.1 point
-
Agreed @saveasteading, but I'm unsure if I'll follow this through as my main concern is the quality of what I have and the general consensus is that its fine. To go for cost rebate, I'd have to be 100% sure of depths in middle of floor, which presumably would call for a couple of drill holes, which is a taking from quality and would rankle the builder if I'm wrong - on balance, I think it's best to move on.1 point
-
1 point
-
Doors in a two storey dwelling do not need self closers except a door between a garage and the dwelling. The doors from the kitchen to the hall can stay open 24/7 365 days of the year - they only have to exist.1 point
-
1 point
-
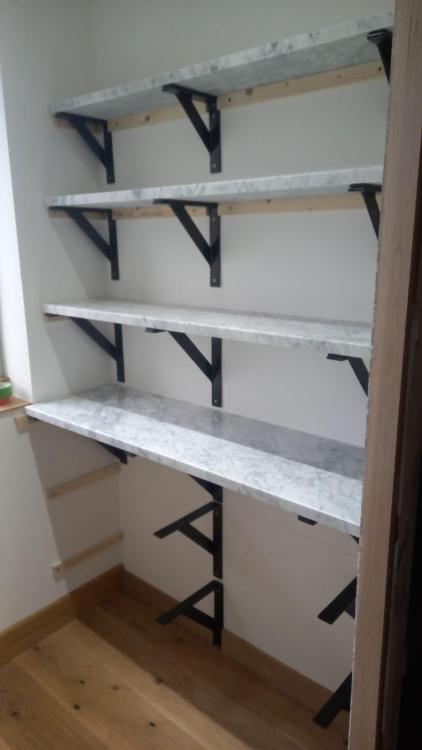
This is progressing reassuringly slowly. Mainly due to taking a long time to make up our minds just how to proceed. But today was a milestone, we collected the stone shelves and lifted them straight into place. Unfortunately the bottom one was supplied wrong, it should be a little deeper. They are re making that one. The bottom 2 shelves will be painted wood. Until the correct bottom shelf is fitted I can't put the door on or else it would be in the way. Now we have another design problem. The wall opposite the main shelf wall, we want some shallow shelves, big enough for tins and jars, so shelves big enough for a standard baked bean tin, with a lip to stop them getting knocked off. Preferably something ready made as a shelf unit. But i can't find anything. Looking for something like this which you can buy from some kitchen suppliers as a shelf unit fitted to the back of a kitchen cabinet door But I can only find those as an option to buy with a kitchen unit. I just want something similar to screw to a plain flat wall. any ideas?1 point
-
The obvious place for the tv and comfy sofas is the living room at the front. The obvious space for the dining table is the bit room at the back with the kitchen. From personal preference you WANT doors between the living room and the kitchen diner. I like a pair of glass panel doors or maybe a bifold set. There will be times you regret not being able to separate the kitchen from the living room without them, unless you like sitting down for a quiet night witht he hum of the fridge and dishwasher spoiling your peace.1 point
-
I am about to fit a (smaller but still quite heavy) bifold door to my pantry. Quite a lot of people that reviewed the door I have bought have ditched the top and bottom pin arrangement as being lousy and not well built, in favour of just hanging the end door on normal hinges mounted into the door frame as any other door hinge. Is that an option for you to consider?1 point
-
The rational for the doors is straight forward - they are there so that the bedrooms upstairs are not accessed through the kitchen. If the doors were not there the whole hallway, the staircase and the kitchen would be considered as a single space. Alternatively look at sliding doors or a Automist system. BC may allow you to install an Automist system in lieu of separating the kitchen from the staircase. I presume you have EEWs in all bedrooms on the first floor? and that this is only a two storey dwelling? Anything else and the requirements for means of escape get more onerous. Automist Smartscan fire sprinkler: water mist fire suppression1 point
-
best thing I ever bought.... hope you got jaws with it. I ended up spending close to £1k on jaws for my £80 gun. AFP101, modified to run on Lidl 12v batteries, angled jaws and a full set of M and U jaws.1 point
-
I've just had a quick chat with my chippie and he has suggested a possible solution would be to drill 5mm into the screed and use a resin to bond the screws in as well as putting resin under the plate. he also mentioned cutting out a bit of the tile (doesn't have to be the whole size of the pivot plate) so that the resin has a 'base' so to speak. my analogy would be an iceberg. so that the thin layer of resin under the pivot plate would actually go further down forming a solid block to resist the lateral movement of the doors when opening. as such I'm confident that we can make this work. 🙂1 point
-
But if you've paid for 50mm and its a big area, then there should be a rebate.1 point
-
The same as what is there will do or denser.1 point
-
The bolts only stop the timbers from moving or bending away from each other. They don't prevent movement the other 3 directions. So yes they should be packed tightly between, or have nuts tight on the inner faces. It's so easy to do, especially at initial construction. But can still be added in a half hour. Timber to timber. Perhaps folding wedges is easiest.1 point
-
Well I would not be happy with that and I would put spacers in there, if only a chunk of timber. Anyone else got a view?1 point
-
FYI there's a current thread on condensation risk here with a lot of detailed info. In short - it's easy enough to model the options but a little more difficult to interpret the results for moisture. The heat results are fairly accurate though - except for reductions for any unmodelled thermal bridges that you anticipate. If you're mischievous, you could ask any of the 'advisors' whether they've modelled the option they're recommending - what u-value does it give etc1 point
-
That is bad IMO those bolts are bound to distort the frame, what does the instructions say?, best confirm this with the manufacturer.1 point
-
SI units save confusion. Volume = m3 Time = s Mass = kg (the odd one out) Temperature = K Electrical current = A Amount of substance = mol Luminous intensity = cd You will notice that there are no units of volts or force, for instance. This is because they are derived units. A volt is kg⋅m2⋅s−3⋅A−1 and force is kg⋅m⋅s−21 point
-
Hello @Gaf whoever told you that this was the place to come for help and advice was spot on. Good luck with your project and ask away, tons of expert advice is waiting in the wings.1 point
-
Don't worry to much every single person sooner or later during their build hits the wall and questions why da fook did I ever start this. Just remember how far you have come and what the prize is at the end. It's not an easy thing to do for anyone even those with lots of experience of construction still find it difficult.1 point
-
I tried a few cheaper options until I found one that was reasonable light and quiet. I'll update later when back at home with make and model1 point
-
Oh I see, sorry when I mentioned manually enabling cooling I mean from within the Vaillant SensoComfort controls, not from something external. We don't have any zones, it's all on pure weather compensation with a steady-state curve - Room influence is fully disabled. (Except for a timed 18C setback temperature overnight) The property is one large zone. (It's an annexe so it's basically and upstairs and a downstairs room.) We didn't want any sub-zoning on the heating to maximise efficiency. (Typical Heat Geek setup basically) Pure weather compensation is working extremely well for the property, upstairs and downstairs are both very comfortable holding a constant 21-21.5C with a COP of 4.5 over the past month - Far better than expected without the underfloor heating. The curve is currently set to 0.5. It's worth noting that we only have the heat pump interface, we don't have the expansion unit so we only have those two MA1 and MA2 outputs - Was really hoping to be able to do it with just that unit. As I say it's all open-plan, so the idea is to put one fan coil downstairs in the kitchen (Supply duct will pull from the hallway so that it doesn't just pull greasy air through the fins) and the other will be upstairs in the bedroom. That should cover the entire property pretty well. So with that in mind, we want to retain a single zone across the property. I can see where the manual cooling mode option is in the Vaillant controls although haven't been able to test that because of the outside temperature limit they've set for some reason, the only thing we seem to be missing is the way to tell it that MA1 should be treated as a cooling zone output - I don't know if that should just automatically work? This is a diagram of the wiring - The heating/cooling mid-position valve is actually plumbed backwards to what you might normally expect, the A port goes to the fan coil units and the B port goes to the radiators: heat-pump-wiring.drawio.pdf Truth tables for the mid-position valve, this is how we have a switch controlling the two modes: If the white wire is connected to a permanent live and grey is connected to the cooling signal from the Heat Pump Interface: White | Grey | Output On | Off | Fan Coil Unit + Radiators (Heating) On | On | Fan Coil Unit (Cooling) If the white wire is also connected to the cooling signal from the Heat Pump Interface: Grey & White | Output Off | Radiators (Heating) On | Fan Coil Unit (Cooling)1 point
-
Sounds like at the worst you need thicker underlay of flooring to make up the level if needed.1 point
-
Nobody is going to fall through the floor at 40mm. Think of the thickness of a paving slab. If you've got no signs of ufh pipes at the surface then that has worked out OK too.1 point
-
This one might have a low force - https://quietswitch.com/products/quietswitch-quiet-pull-cord-switch-for-better-sleep1 point
-
You don’t “need” to submit a LDC application as it’s optional. My advice would be to submit a BR application, commence the works and arrange a BR inspection as soon as you can. It’s more to do with when you start the works, not complete them.1 point
-
We've normal carpets with the special underlay and it works fine. You don't need that much heat output upstairs anyway.1 point
-
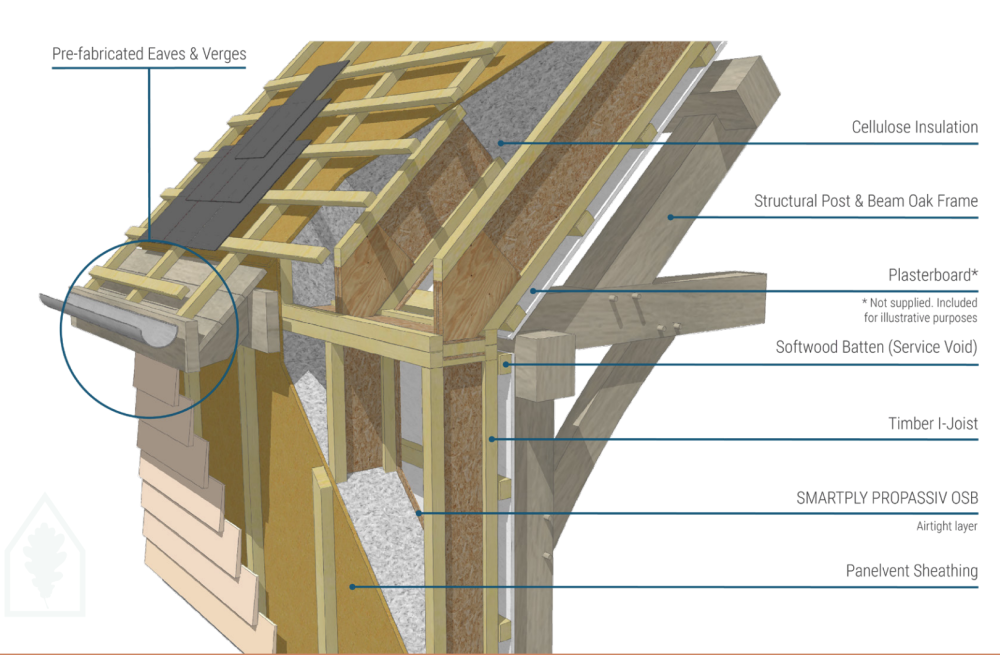
Interestingly, Oakwrights (where the image in the first post came from), have almost this solution for their PassivHaus option. They just don't include any insulation in the service void, and use Panelvent Sheathing instead of Egger. I have a friend with a beautiful, Oakwirghts' Framed home. It really is lovely. It has been a labour of love for him though to keep up with all the movement of the frame. Every year he goes around filling, caulking and redecorating. He's about 11 or 12 years in now, and it's still moving. At times there have been gaps between the Oak frame and the plasterboard that you could get you hand through. For the PassivHaus option, I assume the Oak Frame is independent from the I-Joist Frame, which seems quite an expensive option. @Alan Ambrose, What's your expectation of the Oak Frame? Will it be a green oak frame and will you be using someone like Oakwrights? Do you want the oak frame to be visible externally, at all? Do you want frame to be structural, or are you happy for it to just appear to be so. To combine a green oak frame with Passivhaus type aspirations is likely to lead to some redundancy, and therefore a higher cost, and maybe some compromises.1 point
-
A quick update :- The Y-Strainer was completely full of crud. It looks like stone flakes of some kind. At a guess I would suspect this was kicked up by the local water company doing repairs a few months ago but may have been building over the last 6 years. I'll closely monitor the thermal trip status for the next week or so before declaring success.1 point
-
@Cooeyswell, do you use something like a Harvey water softener on your potable water supply? If you don't on the HW, then pipe furring can become a real issue over time and cause TMVs etc. to fail as the fur builds up in such devices and pipework. This is why the SunAmp people say that you should using a water softener for all potable water if you have anything but a very soft supply. This is especially the case as heat cycling causes calcium salts to precipitate out on the surfaces inside the SA. Unlike the classic CH pipework which runs that water in a closed cycle and you add scaling inhibitors to it, the SAs use open-cycle potable water so scaling will become a problem. (Think of what happens inside a kettle, and hint: if you need to descale your kettle even once a year then your water is too hard and the Sunamp units will fail over time.) If your circulating pump is getting noisy, then you do have a furring problem. If you are in this situation, then the unit might need a complete strip down and descale. However, note my above high-jinks: the SA unit needs to be cold before you attempt any panel removal for disassembly otherwise the cells will sag and bulge, and you won't be able to reassemble. I suspect that this a 'once every X years' sort of service, where X depends on residual hardness. (In my case I am at 6 years, and X is probably 5. 🤣) This is all a pretty straightforward job, if you have any plumbing experience as the pipework has demountable joints at all the necessary places. Just make sure you know how to demount standard compression, Pegler Tectile and John Guest Push-fit fittings before you begin. (Watch a Youtube tutorial.) Also take a load of photos during each stage of disassembly, so you can reverse it to reassemble. One of my big bugbears with the SunAmp factory assembly is that they didn't use PTFE tape on the standard compression couplings so many of mine have wept over time until being sealed by the weap furring; these will all need clean-up before reassembly. I guess that this is a job that I am going to have to schedule for next spring, if I want my SunAmps to last another 6 years. In my case I have 2 units, so I can do one at a time without loss of hot water. My concern here is that the thermometer on the heat outflow is an analog one that is clipped to the output pipe: any scaling in this pipe section will cause this thermo to start to read low so the SA control algorithm will tend to run hotter over time and eventually the independent safety cut-out (which trips at ~80°C) will start to trip. I have now lagged around these thermometers, so hopefully they don't read low now. In my case, I already have a load of DS18B20 digital thermometers wired into my CH system (which runs using Node-RED on an RPi). So it is relatively straightforward to tape another DS18B20 to the pipe coming out of the heater (next to the analog thermometer that the CS control uses and to gate the SunAmp demand on that, so that the SunAmp never overheats. @Nickfromwales, you are probably the most experienced member with installing and using SA units. Have you any comments or advice?1 point
-
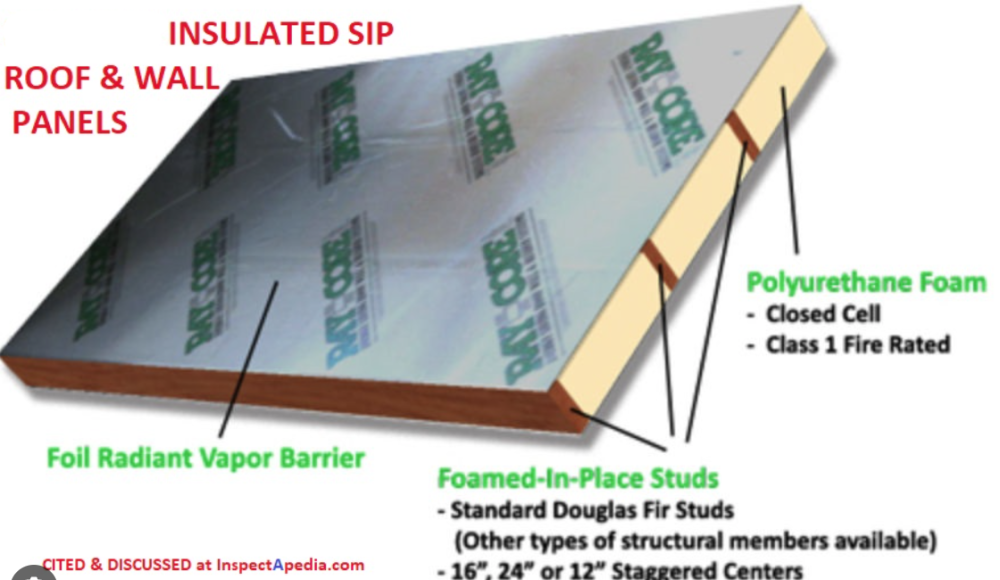
Yes, more like that. Maybe still some work to do on I-Joist spacing. 400 centres may reduce the performance a little. No, I'm thinking of the extra timber content that gets included once they actually Engineer the panels for your roof. Assuming the SIPs will be structural, there will be timber sections running the length of the SIPs to help take the load, and these create cold-bridges through the panel. I did have a SIPs structure costed for my own build and my experience was that no one tells you about the performance effect until the last minute. Random picture off the internet to show what I mean. The SIPs roof engineered for my build had quite a bit more timber that shown in the image, but I do have a shallow pitch and 6m spans.1 point
-
Ok no money tree. What about taking this approach? If you have piles and a ring beam then the concrete is probably going to be around a RC35 (the RC indicates that this is a reinforced concrete) and thus if you lay, compact and cure it properly it will be pretty resistant to moisture. Now we do this a lot on industrial buildings.. B & Q for example. Take a leap of faith and recognise that this is not a habitable space.. all you are doing is controlling moisture from the ground in most circumstances. This type of conrete is good enough to be pretty impervious.. but as it is a stronger concrete it will tend to crack. so we put in reinforcement to control the crack width. In other words treat this as an industrial building and there are tens of thousands of these that are built this way. BC are ok with this appoarch. Just remember if you want to convert it later to a home office it may need a lot of extra work, not least as you have an unisulated slab. If I was designing this at concept stage this I would decouple the design into different elements. It will save you money on builder cost. I say concept as there are doors / threshholds etc that need to be considered and you may have varying ground levels externally. I would pile it first. Now you have potential ground heave, hence the clayboard. I would put the clayboard under the ring beam so you don't generate uplift in the piles. I may want to put it up the sides of the ring beam as well to stop swelling soil pushing the piles sideways. Once your ring beam is in place build your brickwork inner skin. Lay the clayboards in the middle and put the DPM on top of them. Then do your reinforcement for the slab and cast the slab. Now that sounds simple but there there are things you need to know about clay boards.. some need watered so they degrade and collapse. To get more guidance tell us about what the size of the garage is (floor span and length is important, as it relates to a good economic slab depth vs the amount of rebar you need to use and if you need joints in the slab) and why you need clay boards in the first place.. a soil report would be helpfull. Some garages are small and don't need much thought.. but some are very big.. the size of a small house so you can lose a lot of cash if you don't grasp the basics of design. I think you need to go back and identify how the soils behaves, what the piles are doing, if you have trees close and thier type and size and your ground levels. Only then can you get the right position of the DPM and DPC's. Best thing would be to post as much info you have as this will invite the best response from BH folk.1 point
-
No comment on the joinery. But as to the larder, cool is best, so you don't want that warming up to room temperature, and a reasonably close fitting door is best. Bi-folds have gaps all round so won't do that, unless you also fit seals and closures. That's a well used set square. Reminds me that I meant to broadcast that Tescos had school geometry sets for about £1.50 recently.1 point
-
Small update regarding the r9s. The guys have been working incredibly hard in a more difficult house than expected to install. There's some making good of wood, having kept the interior cills and surrounds. I believe we may be the first official r9 install in Scotland, eg not went through an English company for supply 😛 They are definitely the right windows for the house although we're ready to move on from this stage of works. But I have to keep saying it's not a paint colour we can correct later, this is permanent let's make sure it's done right no rush!1 point
-
I only consider condensation on the cold ( far worse in winter ) an issue, so insulate the cold runs if I think there’s going to be any chance of a problem. For the cost, it’s something I’d go for tbh. On the hot runs, waste of time afaic, unless you’re running an HRC.1 point
-
another question.....pipe lagging with hep2o. is it really worth it in a well insulated airtight property? I'm aware that the first 1m or so from the UVC needs to be lagged and will be and my pipes from the ASHP to UVC will be lagged for their entire run but taps/sinks/showers/baths? ps. I know this subject has been done to death on here but, from my reading, there's still some fore and some against! what's a beginner to do if the experienced ones can't decide?1 point
-
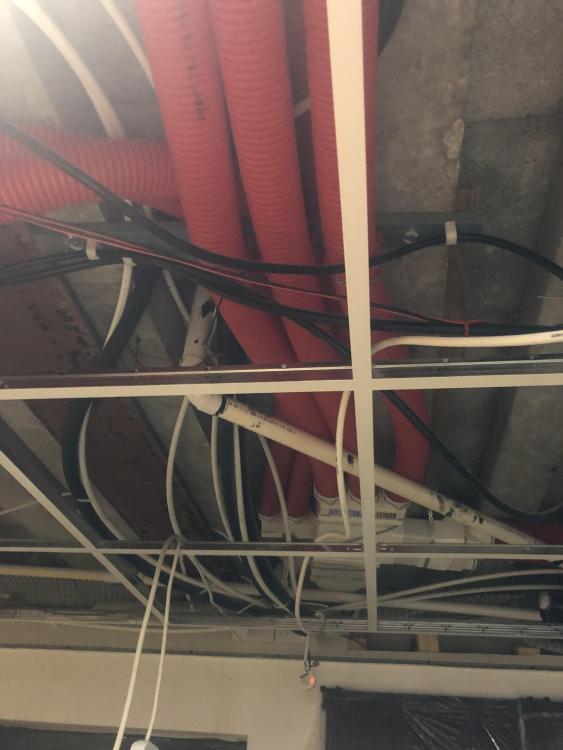
The biggest killer of pushfit pipe is linear scratches caused by pulling long lengths in through cut various cut / drilled holes and notches which are sharp / abrasive / or worst, have a nail or screw in that you've not seen. Pushfit fittings rely on the outside surface to create the water-tight seal, so be very careful to preserve this during 1st fix.1 point
-
Isn’t this a scene from the mother Alien nest where she penetrates everyone ?0 points
-
0 points
-
That creates further doubt. Needs 3 levels and 2 of them to agree. Btw Are lasers always correct? How are they checked? Certainly site levels can go wrong. I know how to check them though.0 points
-
I'm the exact opposite. I am very close to binning my Sunamp PVs, the replacement will be a well insulated UVC (OSO or similar). I am spending far too much time without hot water to justify continuing with them. You may detect a hint of exasperation in this post. The crud filled Y-Strainer was a red-herring, the Sunamp-PV is still tripping out every half hour or so. I'll see if technical support have any ideas.0 points
-
Yes. Geberit do a series of them . I already have to use one (back injury). They all have an app from which you can operate the flush, the temperature and the flow rate. It runs on my phone. If I were further incapacitated, a carer could operate it for me. It also prompts you to descale and maintain it. It shows you how to do it with a video Of course my misplaced sense of humour got the better of me.... you're there before me aren't you.... I still have a considerable number of Brownie Points to go before she forgives me for operating the flush from my phone while she was on the loo, and I was outside in the garden. Honesty is not always the best policy.0 points
-
0 points
-
0 points


