Leaderboard
Popular Content
Showing content with the highest reputation on 02/08/21 in all areas
-
This is an infuriating thread! there's no need to drip feed the information like this! We still have no idea of how the site was actually set out, what information and measurements were used for that, who provided that information, who provided the information for the decrofting and why is it different to the red planning line? Any time I've decrofted sites, it's used absolutely identical information! No indication of whether the site has ever been surveyed etc... I'm doing an bannatyne ?5 points
-
3 points
-
As has been said by others, minimum hire tends to be 12 wks with a nominal rate after that. Mine ended up being up for 16wks, you'd be surprised how much you can get done in that time. They will also do adjustments as and when required, think it was about £100 a time when I had something changed. Don't underestimate how.much work will be involved in doing this yourself too, a scaff crew will come mob handed and get it nipped in a day or two. The key thing for me is liability. Yes you may be covered under your insurance policy but I wouldn't want to test that in a court of law. I'd be amazed if insurance companies didn't require a 'competent person' to erect the scaffold in order to be covered and how do you then prove/demonstrate your competence? Seems like a massive rabbit hole to potentially find yourself going down. Yeah it feels like money for old rope but suck it up and get the pros to do it. I would only use my own scaff if I was the only person using it. Contracters - hire in. Like John said, get a tower for nipping smaller jobs at your leisure later on. Funniky enough, I did that too - spent £800 on a tower as I have some work to do on the dormers in the summer, solar panels to put on, and a vaulted ceiling in doors to work on. I intend to keep the tower as you never know when it will come in handy.3 points
-
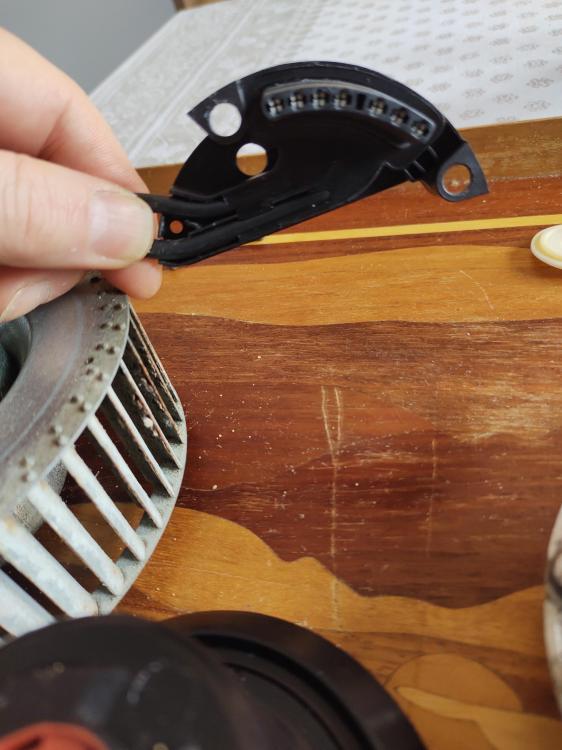
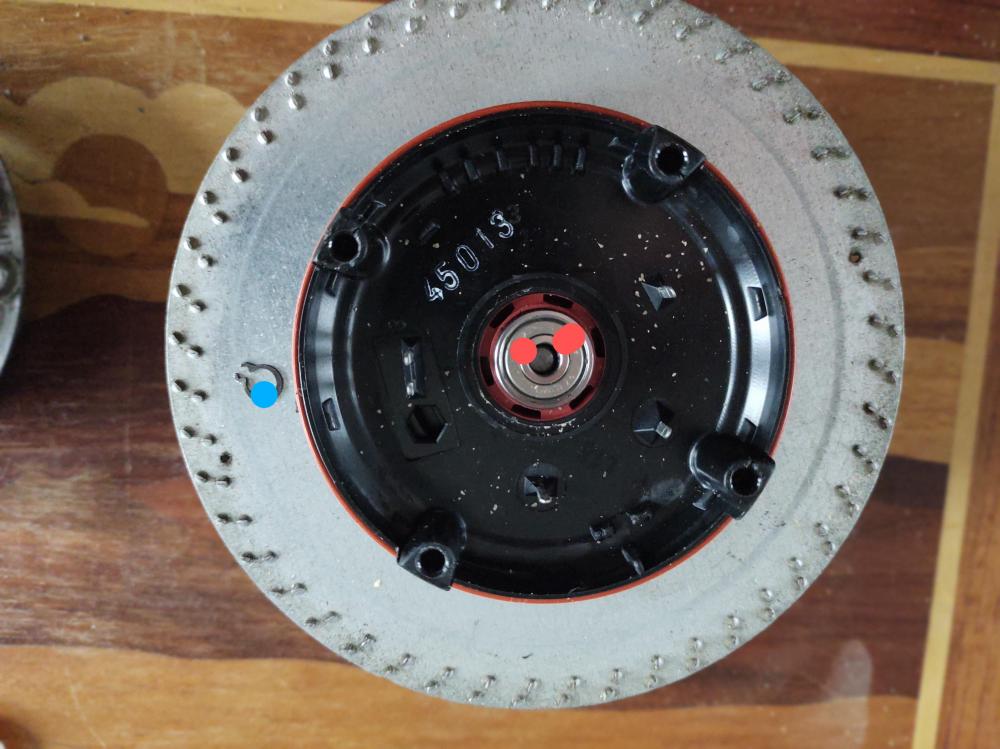
Hi All, Hopefully this will help someone as I could not find anything online. I was about to pull the trigger on a new fan which is really limited as to where you can get them and expensive. A new fan from Vent Axia is £280 I sourced bearings from Amazon for £7. Below is a series of pictures showing the fan in various states of disassembly. To remove the fans from the unit requires a full strip down of the unit unfortunately, this is not difficult just a pain, especially if your unit is in the loft like mine. Picture 1 This shows the fan body from the top, first remove the 3 screws in red, gently pry off this black housing, this houses the contacts so go easy, it does lift off without any resistance. Now remove the other two screws in blue. Picture 2 The contacts mentioned above that you will not want to damage. Picture 3 This show the fan in two main parts, the upper with the circuit board and the body that houses the bearings. You can remove the circuit board but I would advise against it, no reason to unless you think it is faulty. Lift off the white rubber cap (red dot) to reveal the upper bearing. Picture 4 This shows the upper bearing already removed with the retaining clip (blue dot). The clip is really small and a bit fiddly, if you push down on the hub assembly if will give a little space between the clip and bearing, this will allow you to get a plain bladed screwdriver into the clip and spread it slightly to remove it. Once the clip is off just lift the whole hub assembly out, it is not stuck or tight but held in magnetically so just pull up. ;Picture 5 This shows the underside of the hub with the bearing already removed, the bearings are easily remove as they are not tight inside the hub, just gently tap them using a long screwdriver from inside the spindle shaft hole, you will see them move out. Picture 6 This just shows a spring with a flat washer on top of it, just in case it drops out when you are lifting the hub etc, just leave it in place. The blue dot shows the magnet Re-assembly is just the reverse when you put the new bearings in. The bearings are marked 626-2Z, these are the one I got from Amazon. https://www.amazon.co.uk/gp/product/B07FMV2ZHR/ref=ppx_yo_dt_b_asin_title_o00_s00?ie=UTF8&psc=1 Hope this is useful to someone.2 points
-
@MikeGrahamT21 for what its worth, im presently replacing my kitchen and ended up ordering the cabinets and doors from Wren, i couldn`t make them for the price. I used their designer to and 3D rendering to sort the design but i will be fitting my own hardware, handles, bespoke drawers etc.2 points
-
Birch ply is fantastic if you are leaving the ply face and edges visible as a feature, if not they are more trouble than they are worth. Yes ply is pretty stable, but its still a wood and will move unlike good quality chipboard. I made all my workshop units from marine ply and they stil;l; move and drawers bind due to atmospheric changes2 points
-
Yup, looking good, and any progress is good at this time, thankfully things look less bleak for the future so onwards and upwards ?.2 points
-
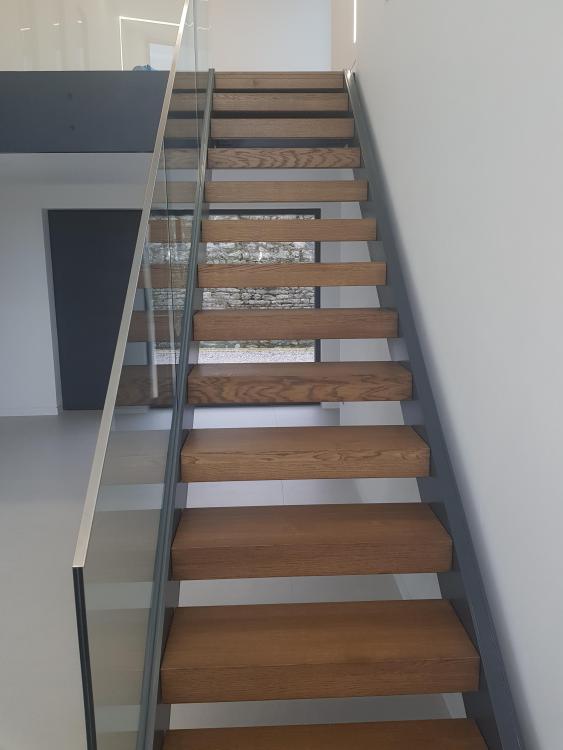
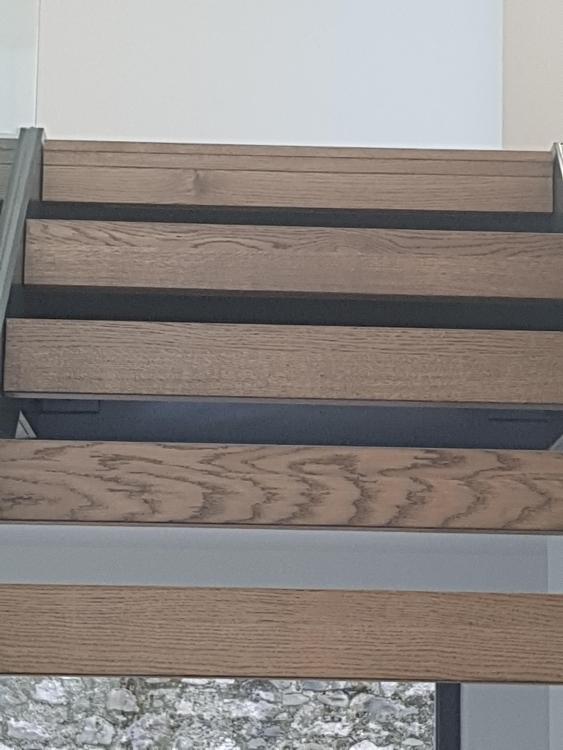
Just thought I would show some pics of our timber treads in situ. We are really pleased with them and they are very solid. The second pic shows the top of the stair treads were they meet the oak flooring on the landing and it is a perfect match apart from the different make up of the wood detail. The wooden treads and wooden flooring are completely different manufacturers so we are really pleased with the colour match2 points
-
1 point
-
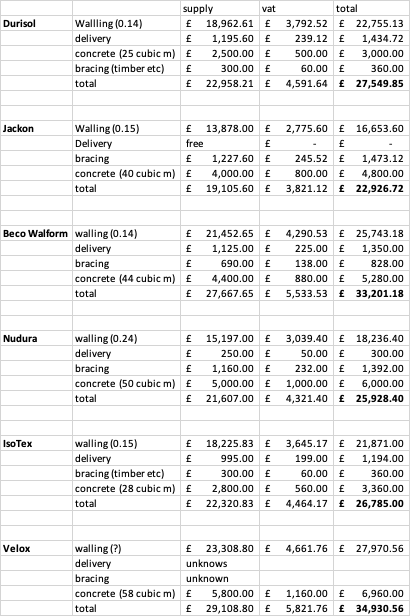
So all of the ICF quotes are in. I've tried to standardise them as much as possible, but some have interesting notes which I'll detail below. Putting this up for others who might find it useful in deciding their supplier or working out costs, but also for any feedback or thoughts from the more experienced (that's all of you!). Our build is approx 220sqm footprint and 260sqm of wall. Durisol includes a 22% discount that they put on without negotiation Beco Walform have quoted for the 375 but say the 313 would save around £8K (inc vat) and only increase the U value to 0.165 (though the published value is 0.18) so much better value Nudura say that a U value of 0.24 is plenty and anything more gets really expensive Velox includes the steel that goes inside the wall. I've included a price of concrete at £100+vat/cbm. This is a little on the high side, but it gives comparison. None of the quotes include rebar (if required [except Velox]) - would have to wait for SE calcs. Can anyone suggest an amount (in £ or quantity) that they used on their build? I know that we'll be able to reclaim the VAT on a new build but were costing things as a worst case scenario. Labor to construct I'm guessing at 9 days for 1+1+me: 2 days build, 1 day pour (lower ground). 3 days build 1 day pour (upper ground). 1 day build, 1 day pour (gables, finishing off etc). Hope that helps someone and thanks for your thoughts!1 point
-
1 point
-
1 point
-
Yes sure you can still use them...if you grind off any laitance. Its just a job I'd avoid if possible.1 point
-
I'd put the ones spec for 600mm at 400mm. Mate did that - rock solid.1 point
-
At least you got somewhere. It rather goes against the idea that demolishing an existing building can be zero rated but disconnecting the supply to allow the demolition to take place can’t. Oh well.1 point
-
M.G.H gives you the power of a water turbine. M is Mass Flow Rate in kg.s-1 G is gravity 9.81 m.s-2 H is height (or drop) in m. A wind turbine a a little more complicated, but still only multiplication. P = Cp.1/2.p.A.V3 Where P = power in watts Cp = efficiency of turbine p = air density A = swept area of turbine V = wind speed1 point
-
More likely engineer would want steel beam, SJ, channel etc to protect their PI insurance1 point
-
Eutrac is about the best, distributed by SLV and is sometimes just called SLV track, used domestically and commercial, galleries and retail etc. I have 2.8m in black you can have if you want it.1 point
-
The more I look into it the more I think ICF is the right way to build. This is especially true as houses get larger and more substantial. So for a modest house in timber frame ICF might be more expensive and offer few benefits. But for a larger house built in block with concrete floors etc, then ICF has many benefits to the finished house in terms of insulation, air tightness, noise and so on. I think many of these benefits will only show up with occupation and this is why ICF isn't more popular. When people price ICF and masonry I am not sure that they price like with like, there are many extra costs in masonry that may be missed in initial forecasts. You will likely need more steel and lintels. Pipe stacks can go inside the ICF walls instead of needing to be boxed in inside rooms. There is a lot less need for air tightness tape, expanding foam etc. I think a lot of the small sundry items add up and often don't make it into initial costs. A lot depends on how complicated the masonry build is. We have a load of steel in our walls supporting concrete upper floors. I suspect this might not have been necessary with ICF.1 point
-
@gc100 It can be done but not ideal, I suggest you give Paul Gribben a call at gribbenroofing 07881095628, he has been very helpful to me1 point
-
Yes garage built to same spec as house insulation wise, think I will call BCO Will probably do it in pink board just to make sure.1 point
-
Can do both but tbh the quickest way is just close them down to 400mm centres with the same depth; secure the ends of every hoist properly; ensure all floor and ceiling noggins are installed with z-clips; ensure all boards are glued with D4 to every joist and every joint. That will give you the most solid floor with the components properly installed.1 point
-
Sorry Russ bit short we had prices from Wickes Howdens and Magnet All more than a Nolte kitchen The German kitchens are so easy to fit Even the kick boards are cut to length and all edges bound It very much like comparing a Ford and a BMW Both do the job But a Beamer just feels better made1 point
-
1 point
-
1 point
-
I did, but cut bricks into slips and glued them on afterwards,( lintel recessed enough.)1 point
-
Precast floor is unusual. Is it the hollowcore planks? They have a fair bow in them so you need batten on underside a levelling screed on top. Also, if you are having UFH at 1st floor you need insulation. Look up the Tony tray as used by @tonyshouse.1 point
-
That wasn't what we were told by the insurance company as the policy was the one recommended by them for our situation.1 point
-
its not really vague at all. Its a building site until you have a completion cert. You cannot get a completion cert if you do not have all the other signoffs in place.1 point
-
The gap issue would be easily overcome with a mortar joint at installation; not so the calcs issue. Easy to get annoyed when it’s my name on the sign off,even if your feeling is that it’s fine. Had to fit the additional concrete lintol on a cavity lintol many times when there’s a precast floor bearing on it-always seems to coincide with a batch of lintols which have been battered out of true in transit!1 point
-
Could you not get multicoloured then you can select the colour depending on the mood... ?1 point
-
Clear CT1 is your friend here. Warm in bathrooms is nicer than cool.1 point
-
That could well be it - the 'decent standard' may well have resulted in less natural background ventilation in that room. Completely disagree with you their Zoot. Behind that question lies the answer to your problem. There's no magic going on here - it's just scientific laws being followed and whilst you might want to believe they don't apply to your part of the world I'm afraid there's no escaping the fact that they do.1 point
-
Tenants want something that "works" but importantly from your point of view that the tenants can's mess with and break. A lot of ASHP's have fiendishly complicated control units supplied with them. I can imagine if the tenants started trying to understand one of those, they could rapidly get in a mess, change some settings they should not and do not understand and stop it working. So i would suggest you do as I do, link the ASHP to a conventional central heating programmer to set the HW and heating on and off times, and put the ASHP's own controller away somehwere the tenant can't get to, like a locked plant room.1 point
-
Where do you think that damp air goes then? Some of it gets carried by (relatively) warm air upward to your nice new, sealed (relatively speaking) room where you add to it exhaling etc. No concern? I think you'll find it is!1 point
-
1 point
-
I know BCOs who won’t accept that as there is a gap and they will only go with the load calcs of a single lintel. If we’ve needed to beef up an opening then using a concrete lintel on the inside flange of a standard cavity lintel is another option but they are heavy and need propping while they go off.1 point
-
The fundamentals are the same as any heating system, just that sizing, heat losses and installation have to be done right. Just like any heating system. All you have to do it tell the tenant that if does not heat the air as quickly as an oversized gas boiler.1 point
-
...or two 215x100 lintols side by side. Agree block on flat is massive overkill on 1.5 storey house. Save your money-you’ll want it elsewhere on your build.1 point
-
Nolte. Rich fella like you can afford it..... (no German spoken: just trashy musak) . As I understand it, they supply many other manufacturers.1 point
-
I've only ever dealt with DIY Kitchens Online, so can't comment on others, but from what I've seen of my units the carcases certainly are pretty much the same as any other carcass. The DIY ones are flat colours, i suspect if you want a wood grain effect you may have to go to luxury provider and pay a lot of money. All the end panels and plinths from the above supplier were MDF, and were painted to a high quality. From what i've read in magazines, I think the general thought is to buy cheap carcasses (but get the ones which are glued and ready built), and then if you want more expensive doors go for those seperate, just make sure you've bought standard size carcasses to keep costs down1 point
-
I would say that’s part of the main house structure as it is under the main roof so the planning rules on adding a front porch to that would apply. @DevilDamo..??1 point
-
I think that says it all, your openings are not oversized (IMO) so I think it’s OTT.1 point
-
If you want a thicker wall then go for 140mm blockwork - 215mm is overkill and unnecessary.1 point
-
Best NOT to have a vapour barrier or impervious layer on the cold side of the insulation, MDF is prone to swell and change dimensions irreversibly if it gets damp1 point
-
Cordless grinder, diamond blade, lots of water, lots of mess. I would have a go myself, but I’m a bit of a no guts no glory merchant, so I just get stuck in and wait and see if the shit hits the fan or not.1 point
-
There's so much sensible input here already on this so I'll likely duplicate much of what has already been said, but here are some of the things I've learned. Know your area - by this I mean build somewhere you know already people or know people who know people. We moved regions, away from a network of trades and contacts to somewhere we didn't. None of the trades/contractors knew me and this really made things difficult and time consuming because I had to find people, or as what has happened, do it all myself. If trades know you, that you won't waste their time, you make decisions and stick to them, treat them with respect and you pay on time, they'll come back. If they're busy, don't know you, and don't know if you have the experience to manage them, you're less likely to get them. Design your build to use squares and triangles. A square shape is more space efficient than even a rectangle. Triangles, as in on the roof are well understood, simple and cheap to build. Avoid things like dormer windows etc. Not only do they add complexity, they're more difficult to detail for energy efficiency, for example. Avoid large spans as this requires extra structural design and materials. Keep materials and build method standard. For example, use standard sized windows & door so you can get them off the shelf. Design according to material sizes - 8' x 4' (2440 x 1220 or 2400 x 1200) sheet materials and as close to standard lengths for carcassing timber etc. The easiest place to spend a lot of money is the bling that lots of self-build magazines will try to sell you - high tech stuff, home automation, network cabling, even the type of light fittings. Really consider how much you really need all this stuff as much of it will be obsolete in a rather short period of time. My electrician has, for example, suggested using standard GU fittings for downlighters and using replacable LED bulbs - far cheaper than your LED units (I think there's already lot of discussion about this on this forum). When buying materials, go to the supplier with a large order quantity, this will get you a better discount and potentially reduce your delivery costs. Get multiple quotes and play suppliers off against each other if you can. A minor thing, but over the course of the project which can really help is to phone online trade suppliers. For example, I saved £200 on my framing nailer and received and automatic 20% discount on all fixings from one supplier compared to if I'd bought online from them, all with next day delivery. An alternative option for some purchases is to use your architect or someone else in the trade - this way the supplier thinks they may be in for repeat business and may be more helpful. There's also a couple of items here that I think is the most important, but often overlooked - also contrary to what many people might say! Give yourself time to think things through when you need to. The building schedule can often be very intense and trades, if they come up against an issue, will want an immediate decision on a solution or diffierent way to do something. Don't fall into this trap and instead seek to understand all the implications and take time to think through all the alternatives - but when you make your decision stick with it. Do not be afraid to change your mind and stick to your guns! This is your house and your money. I don't think there is any way you can really know what your house design is going to look and feel like on paper so I personally think you need to give yourself leeway should you feel you need it - if you include this in your plan and design it will save you money. The building trade is notorius for given advice that suits them, not you. They'll almost always tell you that anything you ask, that's different from what they have in mind is going to cost you loads of extra money. This is not born out of truth, more a trade culture in the UK. If something doesn't feel right, stop what's going on, think it through and take a different direction. I've found that having thought something through and then explaing it well to the trades can often overome this problem. Sometimes this may end in a builder or tradesman walking off site, but if that happens you may just be better off anyway. Finally, do as much as you feel you can and want to do.1 point
-
1 point
-
Like everything pros and cons. I had met blow at ext mitres in old place but I was pretty severe with the mop. Cleaner in latest place seems to not drench the floor as much.1 point
-
Speaking on design. (Deliberately not talking about aspects of the plans, rather thinking around the box.) I think that one risk of your narrowish (and not *that* deep) plot is that the house will look (and feel) like a big shoebox for storing people in. Having said that 10.5m width (or 8m for the house, or 7m for inside the house) is more than most people have, but is not generous. Oversized-shoebox is a classic shape for a pushed-slightly-too-far selfbuild. The house is half of the length of the plot. The front is 10m deep, so you risk the backgarden feeling very short. The surroundings are ribbon development both sides of the road, detached houses of varying age and the rear facing North East. In Lancashire (Q: are you windswept?). One neighbour is close, the other is a drive width away on their plot. OTOH, you have open fields to the back. I think that is actually quite a challenging context, and there are a lot of limits on what you can do. The design needs to be creative in getting light into the middle of the structure, and making it feel like a house-nearly-in-the-country rather than something that could be in a former factory in inner-fringe London where it all has to look inwards. So IMO crucial aspects to do carefully are: 1 - Connections inside to outside - for light, views, and movement. 2 - Face to the street. 3 - Using the countryside outside your garden at the back as part of the garden. How you view the countryside from the inside. That all on top of the basic functional requirements. What would I be thinking? Different from the neighbours not fit-in, maybe non conventional roof shape - possibly with routes to get light in, big roof terrace at back (might even consider a roof-garden over the whole thing or smaller footprint and basement), look for my own aesthetic not try to be polite, try and make the ends articulated not flat - to minimise garage at front and make garden longer at the back by entering through set-back part. Small court / light well half way down one side. Articulate the front so sunlight reaches farther back? Inspiration? Whilst thinking about this I thought of the roof terrace of the Grand Designs "Ice Cube" house in Brixton, and the roof shape of the Wiltshire Grand Design barn conversion near Marlborough. Just thinking aloud Ferdinand1 point


