Leaderboard
Popular Content
Showing content with the highest reputation on 02/01/21 in all areas
-
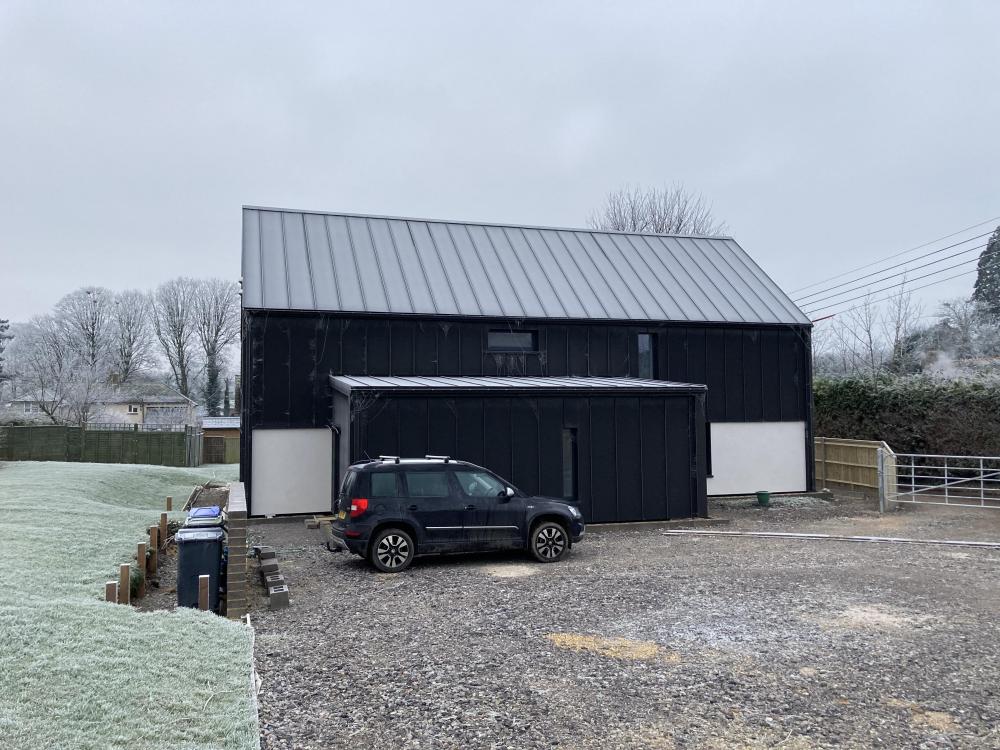
Now that the main part of our house is finished, I sat down and added up the build cost, excluding land cost, design, planning legal and professional fees. Total cost £141K House floor area 147 square metres So that's a cost of £959 per square metre. Well chuffed to just get in under £1k /m2 That is just the main part of the house. The sun room is yet to be completed (though that cost above does include the shell and the roof of the sun room) and there is still outside work to complete like decking, driveway to finish etc.10 points
-
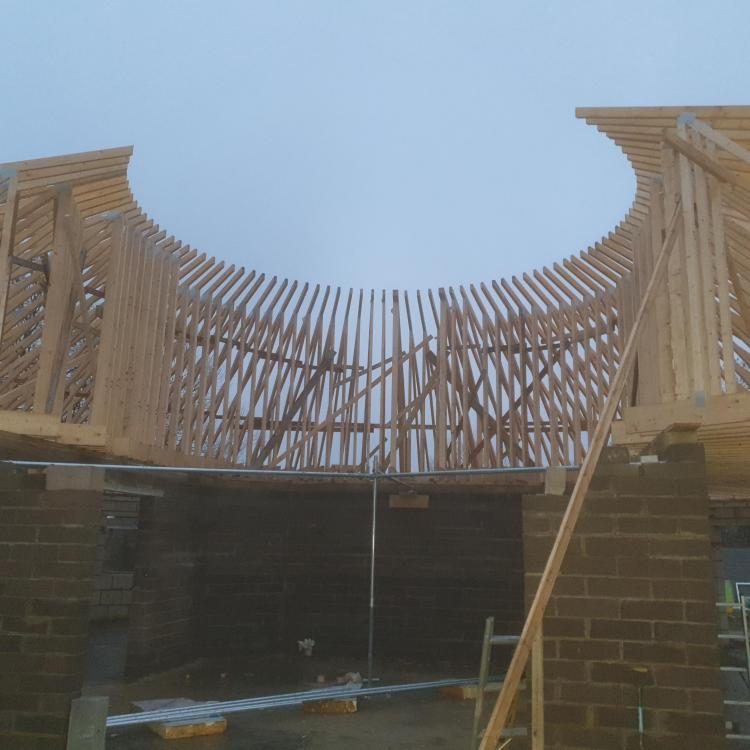
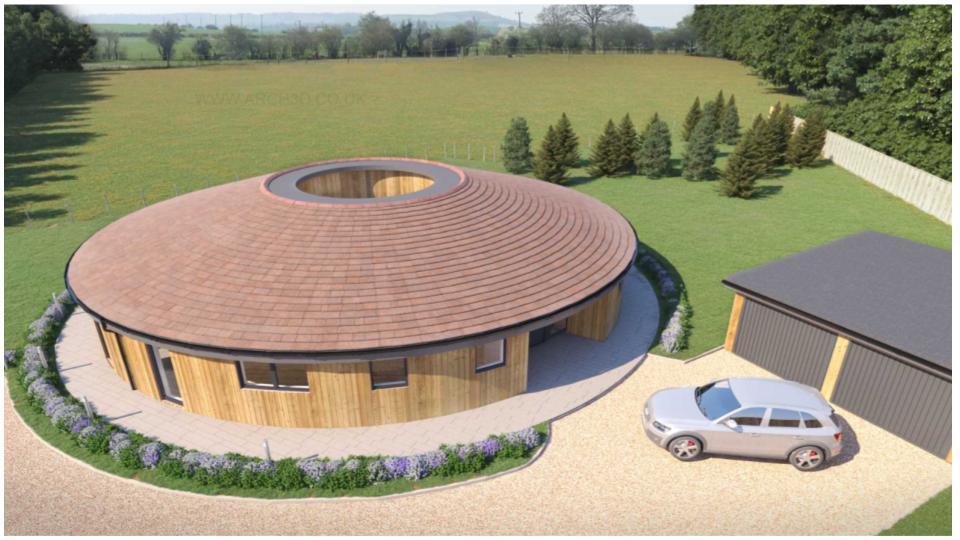
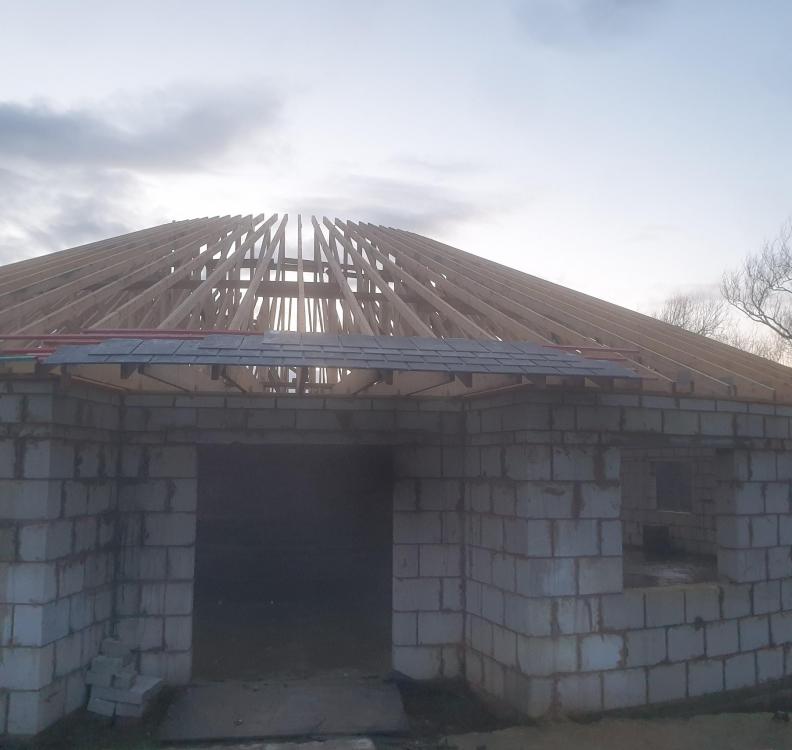
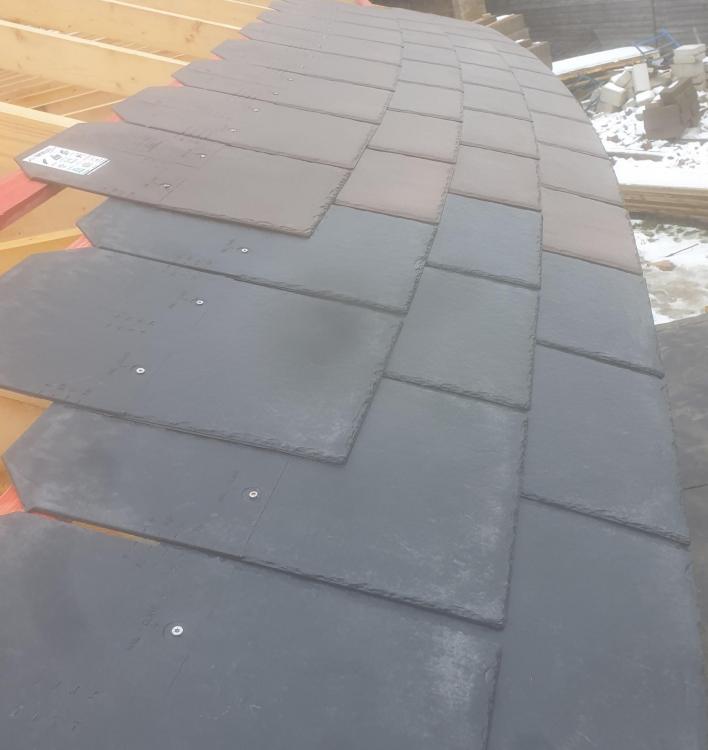
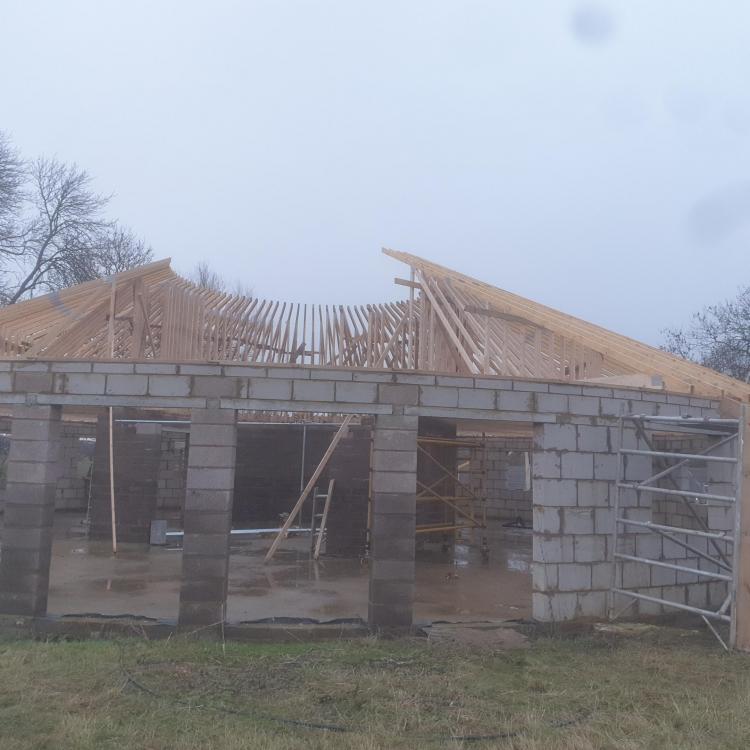
Hi All, I had some delay due to other work commitments. I am now back with the build and I need to decide between synthetic slates (Tapco / Britmet) and natural slates. I've put it below my thought process that might be useful to some but I would love to ask the community two questions: 1. What colour would go for the roof for that project? Brown or Black 2. Would you go with synthetic slates or natural slates? Here is mine decision making process based on limited knowledge: Synthetic (Tapco, Britmet) Positive: All uniform thickness, no selection needed. Also because of that possibly less sticking out edges on the round shape. Easier installation as lighter and pre marked for gauging Less likely to get damaged if I need to walk on them Natural Spanish slates Positive: Cheaper Possibly fewer slates as the required overlap is smaller and the gauge is larger Proven long term durability and appearance Natural product Non combustible When cut it still have original edge finish. The roof pitch is 25degree I have attached few photos Architect 3d vision Roof trusses Trial with synthetic slates to help me decide on the product and colour Thank you in advance for your comments4 points
-
We’re getting there! flooring, kitchen and stairs, just bathrooms to go. It’s great to see it all taking shape as the finishing jobs get done. Not that it’s all gone to plan. The first job we tackled was to get the floor down. We wanted to get it done before installing the kitchen rather than having to work around the units. As the kitchen is part of the open plan living area on the first floor it meant doing the whole area some 70m2. It’s a lot of flooring and we needed something that was easy care and tough. After a fair bit of looking at the options, we opted for lose lay vinyl. There seem to be three vinyl options, adhesive plank, click and loose lay. I didn’t fancy sticking down such a large area and we have a couple of floor access panels that I wanted to keep access to. The click version is not dimensionally stable and requires an expansion gap and it’s not designed to have heavy objects such a kitchen units on it. Loose lay ticked the boxes, dimensionally stable, OK with heavy objects and as it turns out the simplest to lay. Karndean and Amtico both have loose lay options but they come in at £30-£40 per square metre. By lucky chance we found a commercial flooring supplier Quadrant who have a loose lay flooring system Salto with a spec pretty much identical to Amtico Access but at £22 per square meter. The planks get laid onto a three metre grid of tackifier, a non setting glue that just stops the tiles from sliding rather than actually gluing them down. If a plank gets damaged you can simply lift it out and replace it. Laying the floor could not have been simpler. In a couple of places we found that the tackifier was just not enough and we ended up fixing one or two end of row planks with a patch contact adhesive. With the floor down we could then start on the kitchen. With no stairs in place we used our electric winch to get the cabinets and appliances to the first floor. We bought the winch to get the 80kg MVHR unit onto the second floor and it has been invaluable in getting flooring, doors and many other heavy bits safely upstairs. With the units all upstairs we made a start putting the kitchen together. We had gone through a couple of design iterations and of course the one we settled on meant that the electrical sockets we put in when plaster boarding required moving to meet the 300mm minimum distance requirement. It’s easily fixed with a splash back so not a real problem. Our appliances are built in, a first for us. So we started out by getting the fridge freezer into its tall unit. There certainly is not much clearance, having carefully got the fridge correctly located I discovered I could not fit the hinges with the fridge in situ, so had to drag it out of the unit. Unit doors fitted and fridge shoe horned back into the unit. You then have to connect the fridge doors to the unit door, a bit fiddly but it all working nicely. Pushed the unit into place only to find the lead was a couple of centre metres short of the spur socket installed for it. Dragged the fridge out, made another hole in the carcase and re-routed the cabling, put fridge back in unit, push unit back into place only to remember the unit had not been secured to the wall after the second cable hole had been made…needless to say there was a bit of cursing as the fridge was dragged out again! A least if we ever have to fit another we’ll know how to set about it. The kitchen has a long set of linear units, which should have been a doddle to install against a nice straight wall. Unfortunately the wall they were getting installed against was the one that didn’t get braced properly on the final pour. Needless to say the units all required spacing out from the wall to form a line. A task not made simpler by the design which has two rows of bridging units over the hob. These are mounted on a wood frame constructed to fill the gap, which of course I cut before remembering the wall was not true. It didn’t take much work to re-jig it thank goodness. We also had to construct the shelving unit as this was a bespoke piece, to make the position of the boiler housing correct. With the linear section of the kitchen built, it was time to build the island. As it turned out this was a much more straight forward proposition as it didn’t involve and dodgy walls. It did involve cutting down a unit by half and cutting the composite worktop. We discounted doing an under-mount sink as we were cutting the worktop and any router chatter would ruin the worktop look. In any event the island went together nicely and the kitchen looks the part. One by-product of having the kitchen done was the completion of the electrical circuits. We duly called back in our electrician to do the final checks. With a couple of minor changes it was all passed. A significant mile stone to pass regarding building controls. Our electrician has been brilliant and supported our work through the build. Not something that all electricians are prepared to do and we were fortunate to find such a good one. It’s been cold and despite the high level of insulation in the house we were getting uncomfortably cool and decided it was time to get the gas boiler connected. We calculated our structure requires about 68w/degree input so very minimal heating should be required, making heat pumps not cost or energy efficient, hence the gas boiler. The boiler feeds two towel rails, no radiators. All the pipes had been put in place long ago before plastering and painting. A bit of a risk but we pressure tested everything before we put the plaster board up. When we finally got round to filling the system and pressurising it we found we had a leak and water was running down behind a radiator. Careful removal of plaster board revealed the cause, I had put a plaster board screw straight through the pipe! With the damaged pipe cut out and fixed, plasterboard and plaster re-done. I put the radiator back up and pressurised the system again only to find another leak. This one took a little longer to find. Again it turned out to be pipe damage, this time on the other radiator, and was one of the radiator mounting screws. Not impressive and something we’ll conveniently forget. At this point the system was holding pressure and all looked good, time to call in a gas safe man to commission the boiler. Called a couple of local gas fitters only to discover they were not prepared to commission a boiler they had not installed. Tried “check a trade” and one of the gas fitters replied saying he wanted to see the installation before taking the job on which is fair enough. Well, he turned up looked at the installation and said he was prepared to do the commissioning, he also pointed out that pipes within 1M of the boiler should be copper and not push fit fittings. We’ve been reciting building regs in our sleep since starting this project and had completely missed this requirement. We had done the gas pipe in copper of course, but why the water pipes? Still no point in arguing….so out comes the carefully installed kitchen cupboard and pipes replaced. Pressurised the system and guess what a leak, this time in a push fit with the new copper pipe. The pipe had caught the o-ring and cut it in two. Easily fixed but none the less annoying when you can’t see any benefit from changing the last meter of pipe to copper. All fixed time to call the gas man in, only to discover his colleague had a covid contact and they were all waiting on test results. Two weeks elapsed before he could come back and the boiler was commissioned at last. Bliss watching the room thermometer slowly creep from 9C to 18C. It certainly makes turning up on site a lot more welcoming. Last but not least we got our stairs in. We had bought the stairs from Fontanot last year and had agreed that the manufacturer would store them until we could take delivery. So they had been sitting in packing crates in Italy since last June and we didn’t get them delivered until October. They were well packed and all we did at the time was a superficial check of the contents, no damage, all present and correct. The stairs are modular and very minimalist, they give the impression of floating in air. Each stair tread support is connected to the next with an M20 bolt through the steel tread supports and spacing shims. It gets built from the top, so you start by installing the head bracket, then each tread until you get to the bottom step where another bracket secures the foot. On the ground floor this is fine, on the first to second floor it isn’t as the stairs don’t terminate on a horizontal floor. The manufactures representative had been on site so was well aware of this, the drawings also showed this but the stair kit shipped was identical to the lower stair. We contacted the supplier who was very responsive and would get back to me with a solution. Time ticked by with no word, so we contacted them again. They rather sheepishly admitted they had no “stock” solution and would have to make up a special bracket. Time ticked by again and we contacted them for progress. What they came back with was not elegant to say the least and would have spoilt the line of the stairs which are a feature of the build. We took a look at alternatives and realised that modifying one of the standard head brackets and mounting it inverted would provide a much better looking solution. New head bracket ordered from Italy along with a tread support. The tread support was modified to bolt directly to the head bracket. Progress at last. Modified bits arrived and unpacked, modifications just perfect, but they were the wrong colour...doh! So we are not out of the woods yet. It will get resolved just it is proving a rather painful process. Back to installing the ground floor stair. Working from the top, the steps adding one at a time using hand rails rods to maintain positioning. The bolts get torqued to 140nm, even so the stairs moved around rather worryingly. Every third step we put a wooden prop to support the construction. By the time you get the bottom step there is a LOT of weight in the structure and it did not feel at all firm. The bottom tread support bolts in to the floor. In our case this is an insulated concrete raft, which is fine as it is strong and plenty deep enough. However it does have a lot of re-enforcing rod, needless to say we found it on two of the four holes. Drilling through with a masonry drill should be possible, but we didn’t manage it and ended up ruining two good quality 12mm HSS bits to get through it. I’m sure there are better ways to do it, over an hour per hole. At last we could bolt down the bottom step. With all the steps secured we left the props in and installed the had rails and four stabiliser brackets. With some trepidation the supports were removed and a tentative test at climbing them was made. They were solid as a rock! Result.4 points
-
It's on Wayback. https://web.archive.org/web/20200923193339/http://www.mayfly.eu/2 points
-
Cool build, credit to you for escaping the rectangular box house2 points
-
Yes I have that unit. It was a cheap ebay purchase. When you drill down into the detail, my understanding was it cannot extract entirely from a humid area so no good for a swimming pool or large changing room. But in a domestic setting ours extracts from 2 bathrooms, a kitchen and a utility room. It is rare for more than one bathroom to be in use at once and the utility and kitchen are rarely very humid. So the high humidity while showering is "diluted" by the other rooms. It certainly does not give any issue in use and the heat exchanger core never appears to be wet or in any distress. As to the question in the OP, mine is off to one side in the house not central with the shortest vent run being about 3 metres and the longest about 10 metres. It was no problem balancing it.1 point
-
You have to remember, these chumps are trying to part you from your cash. The fact they are running high numbers for gas cost etc tells me all I need to know. They are rigging the game in favour of their product and hoping you don't scrutinise too closely.1 point
-
You seem to be seeing invisible ink. I am not after free...but then a good number of merchants offer "free" delivery. Pick the right product by all means. But I expect to pay a reasonable cost. And yes I do know how much artics cost thanks.1 point
-
Are your plans on here somewhere? Would be good to see. We've had ours fettled today, think we've nailed it. 170m2 plus the 24m2 carport. Seems to pretty much tick all our boxes. Our aim out of this is a stunning but modest home that we can hopefully finish without needing a mortgage. If we overkill the size, we'll be paying for it every month, which for 2 of us will be a regret I'm sure!1 point
-
My transport costs to Norfolk have been all over everywhere: Nudura £250 Warmerwall 3538 Izodom £1906.501 point
-
This is 3 bed detached with a single garage. A very similar sized house locally that was 4 bed (but one of those downstairs) so very similar, sold last summer for £250K. Our all in price with land, services and legals will be about £225K so I am absolutely convinced if I had paid for all the labour, the total cost would have exceeded market value. As it is arguably 5 years work for £25K "profit" is poor value. But we have got a better house than if we had just bought one. The weather man confirmed this evening what I have thought that we have just had the coldest January for 10 years yet we are nice and cosy, never feeling cold and with nice low heating bills. As I say not finished yet. Sun room,. decking, car port, driveway to finish, balcony, a bridge over the burn, garden fencing, another shed at least. Yep i will be at it for another 2 years I bet.1 point
-
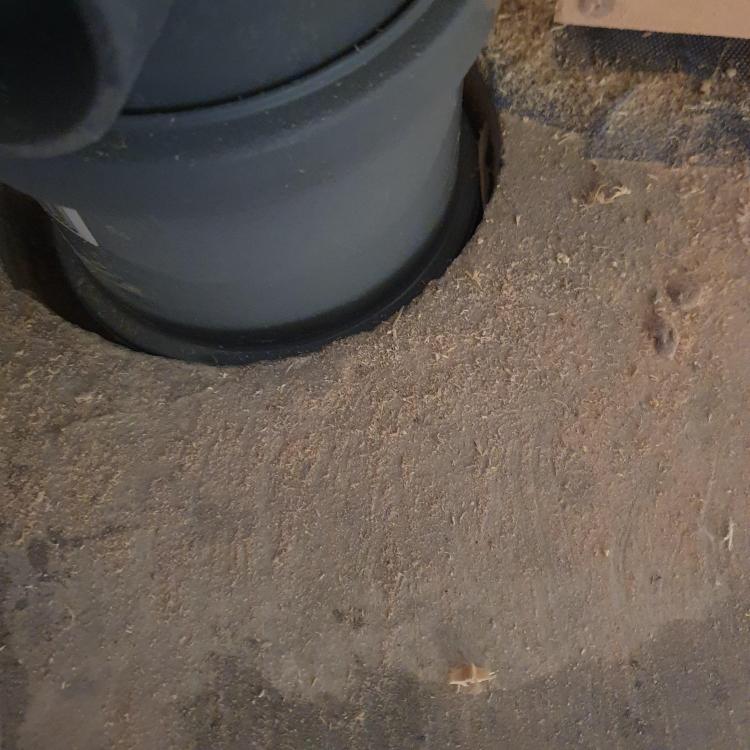
I just used some 15mm foam i had laying around, gave it a couple of turns around the soil pipes and taped in place. You can see in the pic it leaves a nice tidy gap around the pipe in which to get a coupler, just set my foam a little higher than I would have liked but it worked. I haven't any experience with rebates etc. I suspect you're on the right lines with setting some EPS in place as a mould.1 point
-
https://midsummerwholesale.co.uk/buy/roof-integrated-solar-pv - £33 exc VAT, before any discount. It **just** gets to £100 a panel if you are only fitting a single panel and using the GSE flashings all around - as soon as you put in a big block the cost comes right down.1 point
-
cheers ? yours was a bit of a nightmare, i bet that was a bit stressful. im going to look at a traditional slab, with the view to maybe adding a bit more insulation1 point
-
Yes cost includes VAT, about to send off my VAT claim. The refunded VAT should complete the sun room and other stuff so net build cost should not go up any more. I will recalculate when finally finished to take into account larger area and final costs.1 point
-
1 point
-
The principal is straightforward - pre-formed high density (200 or 250 grade) EPS is used to form the slab perimeter and sheets used for the underside. Sits on a blinded, free draining stone base. Membrane over the top of the EPS. Reinforcement is then laid on chairs on the EPS base and UFH pipes are clipped directly to this. Services laid and then concrete poured (sometimes power floated) and you then have a slab with integral UFH that is fully insulated off the ground and to the sides. Savings on traditional shuttering for the slab and slab build up (e.g. xps & screed) offset the cost of the special EPS. The whole system needs to be designed for your ground conditions and structure above. The insulated layer of the slab is intended to line up with the insulated layer of the structure above so you end up with a complete insulated envelope around the structure. I did something similar when building my basement - laid 300MM EPS 200 to support the slab which was cast on top using traditional shuttering, as were the basement walls. I ensured the under-slab EPS extended at least 200mm beyond the concrete and stuck 200mm sheets of EPS 70 to the external walls using LE foam.1 point
-
Yes I have a passive slab and the insulation is by Isoquick. Ours was the first Isoquick installation in England and we had the Isoquick insulation laid for us but having seen it installed it could be done DIY as it just slots together like a jigsaw puzzle. If self leveling concrete is used it would be relatively straightforward. We did encounter some problems which are in our blog.1 point
-
Depends on the ground. You need to dig out the soft topsoil until you reach firm ground. Maybe 300-450 square. Concrete 150mm thick min according to your finish levels. You don't want the deck to be wobbly but neither are you going to drive over it.1 point
-
There are quite a few on here that have done passive slab. It has insulation with reinforced concrete on top, thicker around the edges. It does need specialist design. They often have underfloor heating pipes run through the slab. @PeterStarck has one.1 point
-
Don't sink the support posts into the ground, just create concrete pads and use galvanised post bases. This will stop the posts rotting.1 point
-
Our neighbour was more personal and nocked on all the houses on our street to get them to object. Then they call family members who dont live on our street and asked them to also object. Got rather silly to be honest and the planning officer said it was very petty. He ignored them all as they were just 'i dont like' comments with no valid objection. We got ours approved1 point
-
@Declan52 It's a 270l tank, there's piccies upthread a bit. It was quoted as a very high recovery coil and that seems to be the case alright I'll get a photo of the unit installed later, but it's still a bit lashed-in for now, insulation to finish and the unit levelled etc.1 point
-
Really ..?? Count all your double battens etc for the slates, and take a broad brush of £75/m for material and labour for a slate roof. Then look at the cost of the systems and you’re probably looking at around £40/m to purchase and I would expect around £15/m to install. That’s a £20/m saving, and you have a system ready to receive the panels. For a standard 14 panel install, and panels at ~£100 each, your saving pays for 5 panels so you’re at net benefit with using the system with PV (if required for SAP).1 point
-
Forgot to mention this before, but one solution is to wrap the stub in a couple of layers of foam roughly at the height of where the concrete slab will finish. That way you can pull out the foam, trim the stub and get a coupler to sit nicely into the slab in the gap created by the foam. I was connecting my stacks up the other day and this worked almost perfectly. I got the foam out, no need to chisel any concrete and the 15 ish mm gap created by the foam was just right for a coupler to push into. My mistake was to be too high with the foam on the pipe, I was only an inch into the concrete when I pulled it out, it was enough but if id placed the foam a little lower I could have had a good two inches space to play with. @SuperJohnG may be an option when setting your pipes in. It saves the headache of getting the socket to the exact height it needs to be.1 point
-
I spoke to him a few weeks ago. Sadly his main back up was, you guessed it, also on that domain, so he has lost it. He thinks he may have a hard back up, but hadn't gone searching for it, so at the moment, the short answer is no.1 point
-
1 point
-
@SuperJohnG, there is one for loan from the forum, I know I borrowed it and posted it on (can’t remember who had it next).1 point
-
Try some foam gun cleaner maybe, it's acetone I think. Might soften it.1 point
-
But very good at building posh sheds!!! https://forum.buildhub.org.uk/topic/12942-my-new-shed/?tab=comments#comment-2164281 point
-
I would still try very hot water and a stick. Or isopropanol, or even meths.1 point
-
We used Spanish Mainly due to planning constraints It took my wife and myself three weeks to fix and a week for the two garages We returned a 1000 slates that weren’t useable All time consuming If we had got a contractor in these would have been thrown off the roof We will look at synthetic for our next build for the reasons that you have already stated1 point
-
Nice build. Can't help to much with your questions but we have tapco slates in pewter grey, they have slightly faded over a 24 month period. They seam to stabilised now though.1 point
-
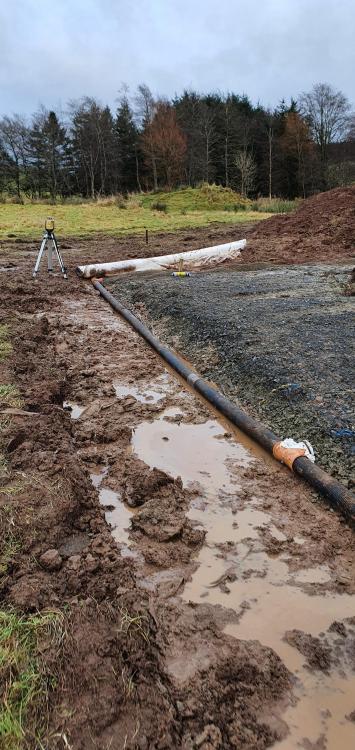
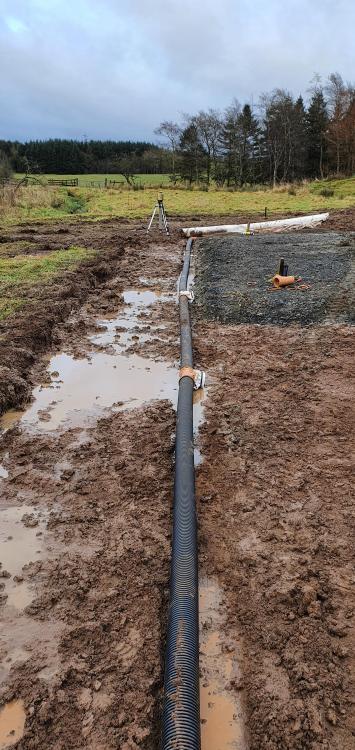
This is exactly what I'm doing right now....I have 110mm twinwall land drain which I've just laid and added tees where the downpipes will drop in later on and then the whole lot discharges onto the burn. Few pics....and also the swimming pool at one end of my foundations (which no longer exists thanks to the drains. )1 point
-
1 point
-
We have just used silicone. They fitted about 40 of these on a project a couple of years ago. No problems at all.1 point
-
Welcome. Happy birthday from all of us at BH too! I can't answer your question directly: but I do know that you should get some data about the ground in which you want to dig. And then get an SE and maybe an architect's opinion. Tell us where that 4m from the house statement came from, please. Ian1 point
-
I think he is trying to be smart with her, what he is saying is, if their is an issue then how can he provide a cert? If you say you accept it all the cert will appear I'd say. At the detriment to the buyer of the house I would be tempted just to ask for the cert and move on. It won't be her problem soon, I know that is a terrible attitude but is she going to let the whole sale be held up because of probably, one of the most ridiculous certificates in the history of man.1 point
-
1 point
-
It's what I've got and no issues raised yet. I am wondering whether it is correct/acceptable to push a single socket pipe down on to the stub? Feels like using the pipe in this orientation is wrong...1 point
-
1 point
-
Is it the area with the chair on? A layer of 25mm or 40mm insulation then clip your pipes to it and screed to finish level. Get someone in to either liquid or traditional screed, you'll be glad you got someone else to do it once you price the cost of materials. As others have said match the other area with insulation1 point
-
I'm happy to go for it just so I don't have trickle vents. Why would you install reasonable/good/excellent glazing and then put a big hole over the top of it?1 point
-
My experience of having a new boiler fitted to an old CH system was that the power flush (which was mandatory - the boiler warranty was dependent on this having been done) washed masses of crud out of the system, but also highlighted internal corrosion in a couple of radiators, that then developed pinhole leaks at the bottom a few weeks after the system had been flushed. The leaks were exacerbated by me replacing an old system boiler, fed from an F&E tank that was only around 10 ft above ground floor level, with a combi boiler that is pressurised to around 1.5 bar, so the radiators were not only washed clean of crud, but were now operating at around 4 times the pressure they were seeing before. I also suspect that the old system had been run without any inhibitor, or that the inhibitor hadn't been changed for many years. A magnaclean or similar in the return to the boiler is, in my view, essential, as it does help trap a lot of the loosened crud that will remain after the flush, and prevent it reaching the boiler heat exchanger. A lot of boiler problems seem to be caused by crud getting into some of the fine passages in the boiler, and disturbance to the system, like draining it, hose flushing it or power flushing it will end up loosening up crud. Our system was power flushed for around 2 to 3 hours and a staggering amount of crud came out of it. When the guys emptied the power flush tank and cleaned the magnetic filter in it there must have been a good bucket full of solid crud that came out, yet we had no symptoms of this, all the radiators were working fine before it was flushed. I've since flushed the system out with a hose, as we had a problem with an odd incompatibility between two different inhibitors, that arose when I topped up the system after changing the pin-holed radiators and fitting a new towel rail. For some reason the two different inhibitors created a lot of gas in the system and when I drained it what came out was very frothy and milky-looking. Flushing via the drain off points with a hose seemed to work OK. After around half an hour I had clear water running out and felt reasonably confident I'd washed the system clean. Since refilling it with just a single brand of inhibitor we've not had another problem with gas build up.1 point
-
Exactly the same from the guy who did our decorating. The colours can be matched by many other paints. The "chalkiness" obviously isn't there, but apparently it's a nightmare, because the moment you touch, scuff, or wash it, you get a patch that looks different from the rest.1 point
-
0 points
-
Yes, and epsilongreedy, then see if we can get this topic up to 1000 pages. And you will still have a constipated pot.0 points
-
Like an executive summary... no more than 4 pages please! Capturing the lessons learnt would be incredible ... so we never ever have to suffer a thread like this again ?0 points
-
0 points
-
Know what folks, this thread really does repay close examination. There are all sorts of jewels of information here: I'm thinking I ought to provide a thread summary. Maybe I could draft it in sections. Maybe I should do it over Lent, as penance.0 points







.jpg.c21f3ac78c9b7efd90cbdcb312744dc5.thumb.jpg.7adcad4c0e384f5ecd7d56b0618df6e5.jpg)

