Leaderboard
Popular Content
Showing content with the highest reputation on 05/18/20 in all areas
-
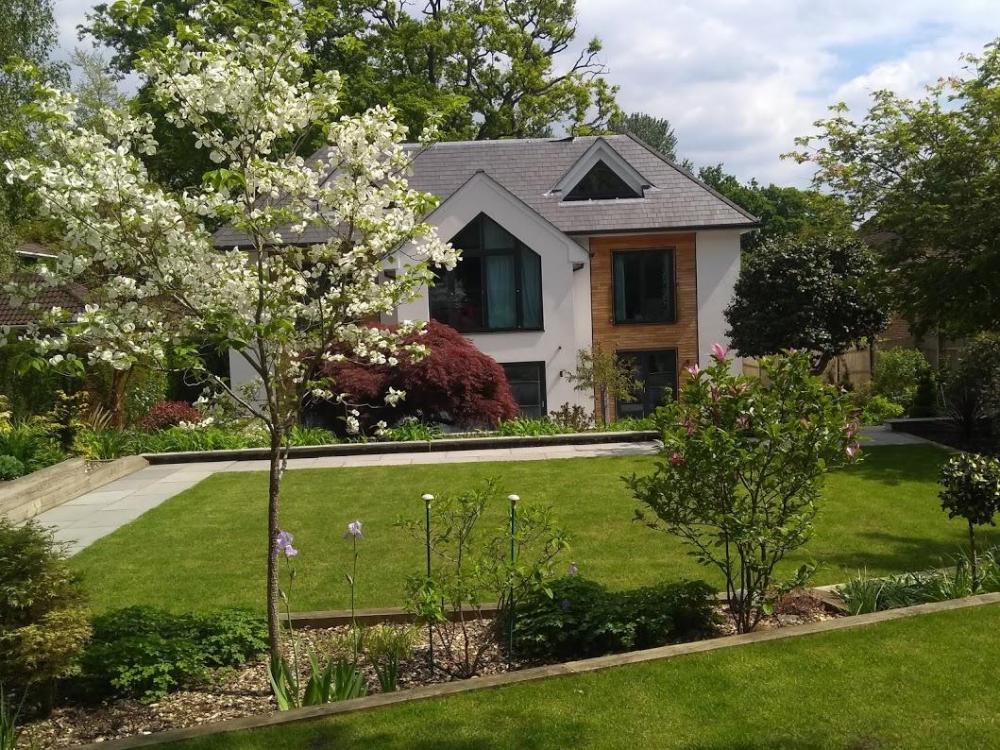
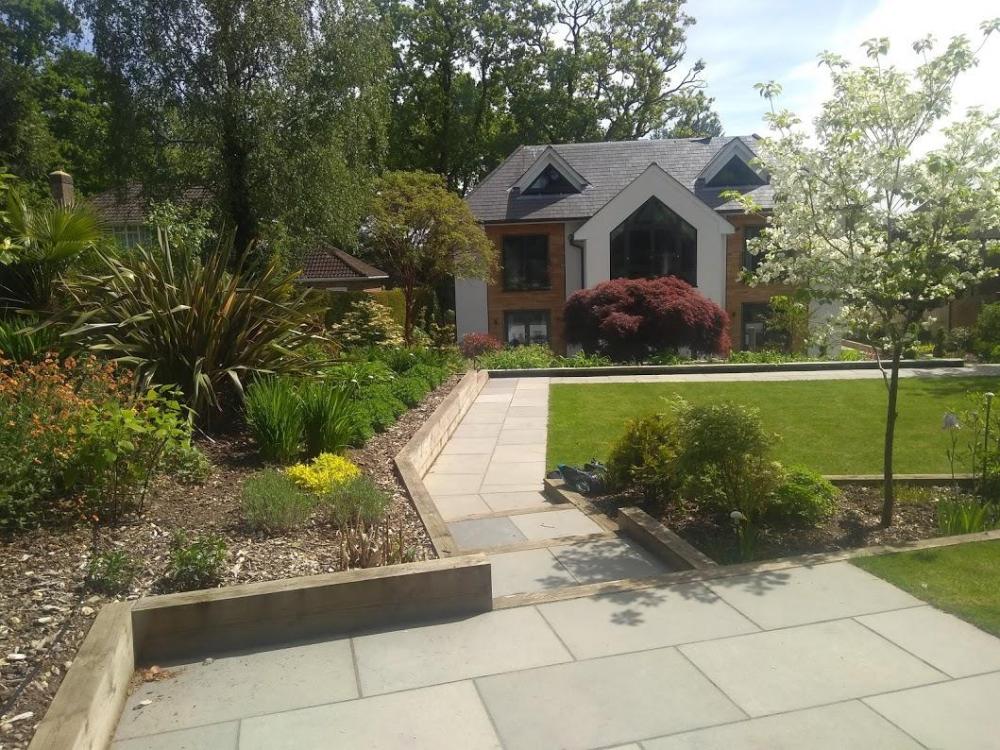
@PeterW absolutely correct about pricing and how it ramps up if you require all the services, especially in Surrey and Berkshire, where we built.. For our concept design, the total cost was £3,500 (including VAT which could not be claimed back as it was design service). I will admit to being horrified at this but SWMBO was adamant that it would add value to our overall scheme - she was right, as usual.... The proposed costs estimate for the next phases, including detailed design and then supervision of construction (hard landscaping) and planting would have been £ 6 to 10,000 , depending on the cost of the landscaping works - see my post below The photos I attached were last year. The garden is now looking great, especially with the lock down and all the work that SWMBO has been putting into the garden recently5 points
-
You could bulk up the centre area with aerated blocks to save on weight, just needs 100 mm all around the outside in concrete.3 points
-
We used a landscape/garden designer for our garden. Our site sloped up from front to back and side to side. We could not envisage a way forward but the landscape designer developed a clear design that we incorporated in the PP and in construction plans. It was expensive but well worth it, as it provided a clear plan for groundworks and landscaping, which allowed us to utilise the heavy construction equipment as part of our ground works contract. Broadly, they gave us a landscaape concept design, incorporating existing trees and shrubs and using the topographic survey daata. . SWMBO did the planting plans and did all the plant (with a little manual help from me) I attach the concept design, some early ground clearance photos and a couple of recent photos. The company we used was PC Landscapes based in Farnham. pclandscapes_Concept_Design_a.pdf2 points
-
@AnonymousBosch If you are DIYing the whole thing then it's likely that the design will be a bigger issue than the construction. Eg: that initial flight of stairs from the Building the Dream house in your photo doesn't comply with Part K of the Building Regs in numerous areas of its design. The risers & goings are all different from each other as well as being different from the timber section of the stair. The riser can't be vertical like that but should be angled as the diagram below from Part K. Also, the landing width is made non-compliant by the way in which the sides of the timber stair bears onto the concrete landing, obstructing the full width of the stair. The handrail is also non-compliant for numerous reasons but that's a separate issue.2 points
-
Since our last entry we've been concentrating of getting the standing seam roof covering on. It's one of those jobs where it would be nice to do someone else's roof before doing your own. We're using a roofing system from Blacho Trapez, broadly similar to the Tata colourcoat. It requires no crimping and minimal special tooling. It's around half the price of Colorcoat. The HPS200 coating we chose comes with a forty year guarantee. Our first impressions is that it's a quality product that's really well thought out. I'll raise a topic thread on the roof system with detail information from our install.. Here's a link to the Blacho documentation for more info: https://www.blachotrapez.eu/pl/26/instrukcje It was another Buildhub find. Back in April we came across an entry where one of the members @Patrick Who wanted to buy his roof abroad and was looking for someone to share transport cost. Enter Patrick, we exchanged emails and found we were going to need a roof on a very different time frame as Patrick is still in the site clearance phase and we were going to be ready to start in around six weeks. Lots of emails were exchanged and there was much head scratching over which components to order, In the end it turned out that three Buildhub members wanted roofs making sharing transport even more attractive. Patrick had been in contact with Blacho for some while, he's multi lingual himself and has a Polish wife. Without their help it would have been just too complex to sort our way through the parts catalogues even with the help of google translate. Having managed to get a list of parts we thought would do the roof, it occurred to us it would be good to get the guttering from the same source. It proved to be a step too far, we decided against it as the chances of getting all the required components correct the first time round was just too daunting, All is not lost though as it now looks as though there may well be an opportunity to get some steel guttering from them in future to replace the UPVC we have. Back to the roof and installing it. The three roofs were ordered and transport arranged to collect them from the factory on 03rd and deliver them to the UK on the 6th. The other Buildhub member ordering a roof is Greg, who is a builder with a yard with plant to unload and was happy to store the roofs ready for collection. The initial plan was to have all three roofs delivered to Greg's place and then we would collect, again Greg could help out as he has a lorry. The only slight problem was some of our roof sheets are 7.2M long and too long for the lorry. More negotiation with the transport company and they agreed to do a second drop off for a an additional 200Euros. All set for an 11:30 delivery on the 6th, we had arranged to have help to unload, no machinery just bodies. To our surprise and dismay we turned up on site at 7:40am on the 6th to find the delivery lorry already waiting...with just Pat and I to unload...by hand. Help was at hand in the form of the two guys who had come that day to do our roof insulation spray foam. They were brilliant, and between the four of us we had the roof sheets off their palettes and safely stacked on site. In addition to the sheeting there where also two smaller pallets for the other roof components, such as barge boards, eaves edges, screws etc. The lorry driver was getting a little fraught by this stage as it was all taking longer than it should have, not aided by lack of a shared language and the delivery documentation all being in Polish. Having unloaded and sent the driver on his way we started to look at the delivery documentation, this time under less time pressure. It turned out we had most of Greg's and some of Patrick's accessories. No big deal as we had already arranged to follow the lorry to Greg's yard to say hello and to borrow some roof tools that he had kindly offered to lend us. Meanwhile the delivery of the materials for our render arrived, 72 x 20kg sacks plus 20 x 25 kg tubs all to be shifted onto site..Just got that cleared when our MVHR system arrived, hotly followed by a soffit board delivery. Once done we set about loading the roof bits, only to find the length and volume of bit's overwhelmed the Jazz and we had to borrow a van great for volume but not so good for the 2M lengths and required me driving with my seat fully forward. Two and a half hours of agonizing cramp we arrived at Greg's, said our hellos and exchanged parts so we had the bits we needed to complete our roof. Finally got home around 10pm, oh the joys of a self build. A day to draw breath and it was time to start putting the roof on. The sheets themselves are 540mm wide and supplied to the customers required lengths up to a maximum of 8M, Being just 0.5mm thick steel they are not heavy but they are fragile, picking up a long sheet badly will result it it creasing, so care is required handling the sheets. The sheets had been packed at the factory front to front with polystyrene packing spacers which had stuck to the surface of the sheet requiring it to be cleaned prior to installation. After a bit of head scratching we decided to use a ladder to support the sheets. With the ladder tied to the scaffold we loaded each sheet, one person pulling the sheet from the top and another raising the bottom of the ladder we managed to slide the first sheet onto the front of the roof. All a bit “Heath Robinson” but it worked. Each sheet was then fixed in place and the process repeated. Soon we had a good part of the front roof in place. Cleaning loading and fitting was taking about an 90 minutes a sheet. Doing uninterrupted areas of roof with decent access proved straight forward and the front part of the main roof was done in a couple of days. Then we started on the rear of the house. This part of roof has two large roof lights and requires sheets to be joined as the roof length 10M exceeds the 8M max sheet length. The roof has two sections one slightly shorter at 7.2M, the largest of the sheets we had ordered. It quickly became apparent that there was no way we could get a 7.2M sheet onto the roof from the rear of the house. At this length the sheet is very fragile and requires multiple supports to stop it from folding. We quickly abandoned any hope of using them. Fortunately we had ordered some surplus material, so not the end of the world. We decided to start on the side of the roof with the roof lights to allow us to minimise sheets cuts. Partick had kindly volunteered to come over to get some first hand experience of the Blacho system. We started framing the roof lights. All did not go to plan and found that we had a 10-15mm alignment problem, nothing to do with Patrick just a bad datum line. No easy way to correct this so we removed the sheets and started again from a more accurate datum line. Second time round was a better result all round and we were able to continue across the main roof section. A lot of work but worth it..now we just need a good downpour to validate the flashing. . By good fortune a thunderstorm provided a test for the flashing, all was nice and dry round the roof lights. Sigh of relief all round, the roof is now on.1 point
-
One question my dad asked me on Saturday. He only came up to get rid of a tree stump in the garden that's been there since Storm Doris blew down our Silver Birch. Job done, we thought whilst he had the digger he could tackle 7 other stumps in a large overgrown border near our drive. He then asked the question he would now probably regret and was met with a response of "we will probably extend the drive at some point". He looked at my like he did when I'd told him I'd failed my GCSEs and explained we were going to pay a builder to get rid of all the hardcore then buy it back in again at some point for hard standing and that we can save 'thousands of pounds'. So, dad realising what he had talked himself into dug out the area under strict permission not to damage the Christmas Tree because where would we hang our fairy lights otherwise and I was on social media advertising 20 tonne of topsoil and moving stumps. The neighbours must wondered what was happening with an endless supply of trailers, cars and even a JCB Fastrack. The wheelbarrow clearly felt the impact of yesterday's hard work and pretty much sums up how we feel today too (another job dad sorted).1 point
-
1 point
-
Our bathroom has a sloping ceiling and triangular dormers which limited where we could put downlights. Electrician recommended a single line 55cm away from the wall that has the basin/mirror and shower against it. Actually works better than expected. Personally I prefer wide angle downlights (say >100 degrees) rather than narrow angle (typically 36 degrees). I feel the wider angle produces more even lighting and less shadows. If not too late put Zinsser paint on the ceiling (especially above the shower). After the problems we had I wouldn't use anything else now. Someone here recommended it to me. Fantastic stuff.1 point
-
I've never used soda blasting but I've had to strip quite a bit of Oak. I used a coarse 36 grit on a Polisher/sander (aka MOP). I think mine is a cheap Silverline but its similar to this one from Draper. https://www.toolstation.com/draper-53016-1200w-angle-polisher/p19277 Not exactly an easy job but did the job for me. Main problem is stopping your visor steaming up so you can see what you are doing. PS: Mine was exterior oak so the rough surface it produced was ideal for taking Osmo UV protection Oil. If it's indoor the result of using a MOP and coarse paper might be too rustic?1 point
-
I have just reread your initial post, is it something that looks the same that Debbie likes, or does she specifically want a lump of concrete that looks like a 1950's prefabricated staircase in an inner city council built, by lowest tendered price contractor, sink estate, tower block. If that is what she is after, you will have to train the cat to wee on it.1 point
-
We’ve just done our final concrete pour, in fact two pours in one week. From ground floor to gables in two weeks with Easter in the middle is quick, a little too quick to enjoy. We can now get a real sense of how the house will look. Next week we are ready to start work on the roof. Before building the first floor, a temporary floor was laid around the room perimeters using 12mm OSB. This was done to provide a working area to build the blocks from and allow bracing to be put in place without damaging the final floor. 12mm board seemed awfully thin to walk on! . With our builders now familiar with the wall plans the blocks went up very quickly indeed. In practice it takes longer to do the bracing and shuttering than to do the building. Not having to cut blocks on site is a major advantage, not just from an accuracy point of view but it also makes the site much cleaner. Some ICF sites look as though it’s been snowing with polystyrene. As mentioned in out last blog entry we had the option to do a single pour combining the first floor and gables. We’re really glad it was done in two stages, attempting it in one pour would almost certainly caused major bracing issues and risked the block work due to the higher pressures resulting from the depth of concrete. Never thought I would be happy to shell out £1000 on a pump. Having no experience of other build methods it’s not easy to evaluate the pro’s and con’s of each system. For us, the need to use concrete pumps has to be the worst aspect of ICF. It just seems like you’re never quite ready and there’s another dozen details to attend to before it starts. With multiple companies involved for boom pumps and concrete delivery, it’s both expensive and difficult to get people to turn up when you asked for them. Our last pour was scheduled for 11am and the concrete lory finally arrived a 3:30pm...To add to the entertainment the pump has to be vented after use. This involves a set of guys you probably won’t see again and want to be elsewhere dumping large volumes of concrete on your site. After three pours we have somewhere in the region of three tons of set concrete to break up and pay to dispose of. Some of the last lot got dumped on next doors newly block paved drive. Lots and lots of cleaning up. It’s not too much of a surprise that the builders don’t include this in there list of responsibilities. Definitely the Achilles heel of the ICF build method. Enough moaning, it’s been a long couple of weeks with many disturbed nights worrying irrationally about being a lego brick short at the end of the build. We now have a house, no roof, but hey we have to do something next week.1 point
-
Might be so, some European pumps use 1" or 3/4” BSP fittings, obviously need to check the fitting accurately.1 point
-
I've done both but for our build we had a screed pumped in - at ~ 75mm thick they can use a lot less additives so we got V little lattice formation but just to be safe it was all sanded down. Our floors took 10t and cost about 2.5k. 1 morning and its done. I could never have done it for enough less to make me want to find enough mates & time to do it. I walked on it the next day & did other jobs and felt great about the choice. I was very careful with the choice of tile primer and tile adhesive - stuck to what was recommended by the company. They have some info on their website https://www.ryflow.co.uk/. I also put a plastic sheet on top of the floor insulation to stop the leaks and made sure the ufh pipe was well pinned down. The screed won't take weather (it sort of breaks down) so the house does need to have a roof on it.1 point
-
I laid a traditional 75 screed in our 158m2 20 ton I could hardly get out of bed The following morning Still thought I was 25 Originally I was going to let someone else do it and go with the flow screed Great for tilling You can tile on it the following week Like you mine would be stood so not a lot of gain At least a third more expensive than getting someone in To do a traditional screed We have had a couple of problems with flow screed when tiling UFH pipes on the surface or clips showing I also worked on one job recently and they had had difficulties with the flow burying through the insulation and finished with a 9 mtr ridge down the centre of the room I think the flow can be a bit hit and miss1 point
-
It can sometimes be a bit tricky to find room for these, especially with full height windows, doors, steel columns, wind posts and services. With your brick bond make sure you leave lots of space with a bigger lintel on the inner leaf.1 point
-
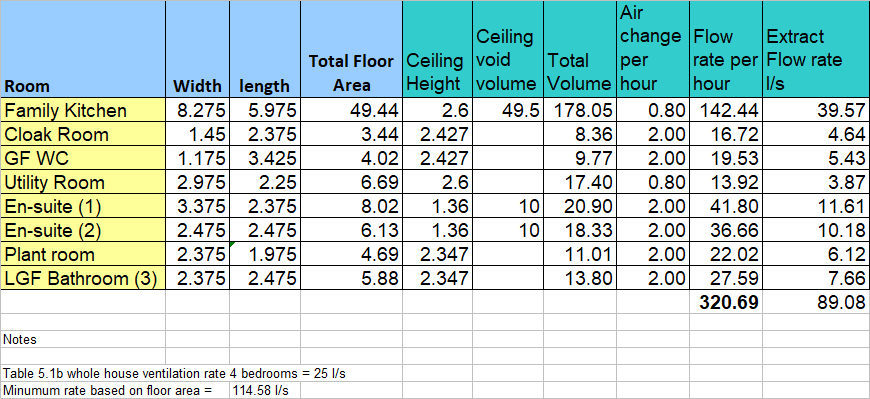
I'm struggling and need your input. I've rather foolishly designed and build a large volume house. The Kitchen / family room, the master and second bedrooms all have cathedral ceilings, as do two of the en-suites! I send my drawings to a number of MVHR suppliers who offer design services and got three quotes back, each one was different in what was specified and none provided technical detail around calculations. The simplest design was a single MVHR unit and at the other end of the scale, they specified two of the largest units on the market. I'm now thinking I need to do my own calculations and try and clearly identify what is required to meet Part F of Building Regulations. From what I've read in Part F, the Whole house Ventilation Rate is 25 l/s (based on 4 bedrooms), however, the minimum based on floor area is 114.58 l/s. Having done a spreadsheet (below) it would appear that I need more air extraction to meet the minimum ventilation rate? I assume the input air designed to balance the extract rate? Looking at the first of my quotes they suggest a single unit 650m3/h, the other quote suggest two units with a total 985 m3/hour. Am I on the right line here, or am I missing something? All help gratefully received!!!!!!1 point
-
with the power isolated push a pin/ straightened paperclip/whatever into the small hole beside the one the wire goes into.1 point
-
475mm from the window wall to centre of the spot, body dryer, rainfall head. Then 575mm from the wall on the right, to account for the 100mm full length shelf. Room is 2.9m long tile to tile. Spots are: Enlite DE8/40 8W IP65 Fire rated Fixed Cool white 4000K Dimmable 60 degree angle1 point
-
In my last house there was several spot lights in the bathroom ceiling. I absolutely hated them, horribly over bright, and no at all relaxing in the bath. I have a very different setup for my build in response to that. In fact there are no spot lights planned in the whole build aside from some accent lighting.1 point
-
1 point
-
I think lighting is THE most important aspect of the interior design of a house. So hard to get right. I read this to get me going and I learnt a fair bit https://www.amazon.co.uk/gp/product/B07FPX2Q66/ref=ppx_yo_dt_b_d_asin_title_o04?ie=UTF8&psc=1 My issue is I have no idea what will work, especially around if I have enough lighting/too much without actually experimenting in each room.1 point
-
You can use a regular circulation pump if it's a sealed glycol system , but, it will degrade somewhat. If it's an open system then you can use a bronze body pump. £300 seems stupid high, I'm sure you can get solar circulators way cheaper than that.1 point
-
1 point
-
There is a start capacitor, probably inside the terminal box, a big cylinder with 2 wires emerging. That has probably failed. Turn the power off and lift the lid off the terminal box and post a picture.1 point
-
1 point
-
I've got 5 with the rainfall head where the "6th" light would be. I aimed for symmetry with the body dryer, ceiling speakes etc.1 point
-
1 point
-
Search for TeleBeam Have any of your neighbours got rear dormers..? Can do some really nice things if you go full width or peaked down to wall plate1 point
-
Have you got a sliding bevel??? https://www.screwfix.com/p/magnusson-sliding-bevel-300mm-11/8662v On your last full board put the bevel on top of it and set it to suit the angle in your roof. Then you measure from the wall to where the board will touch the roof, set your bevel and then Mark on the new board a line up giving you the pitch of your roof. Then it's up to how straight you can cut. It's easier to cut the plumb cut straight so if the board you need is 1800mm then measure at 1850mm. Mark with your bevel and cut. If your happy with how your cut looks , nice and straight, then cut the plumb bit that goes against the wall and that's it done. If your not happy then the extra 50mm will give you a chance to sort that out. After 1 or 2 cuts you will get the hang of it and not need so much of a safety net and hopefully be able to do just the 2 cuts. Hopefully!!1 point
-
Framework in industrial buildings for hanging cable tray, air conditioners, pipes and just about anything else from. Look up next time you are in one of the sheds. I used it for the frame for my solar panels, a lot cheaper than the aluminium stuff you are supposed to use. (driving home with 10 6 metre lengths on the roof rack was interesting)1 point
-
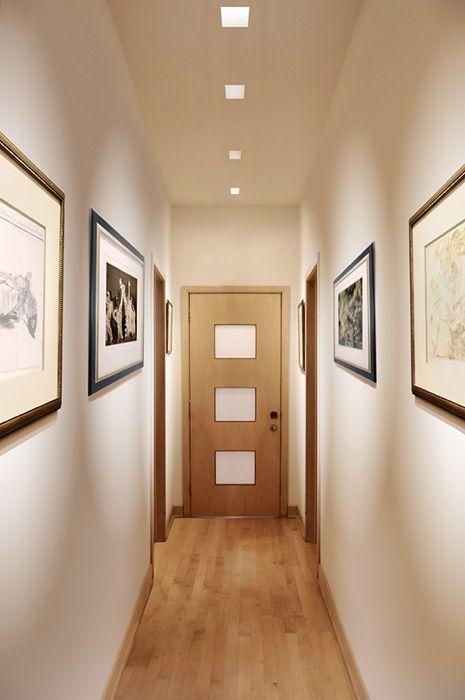
It depends what you like/want. I like creating scallops of light down walls, I like creating interesting light, my attitude is an office should simply be lit whereas a home should be bathed in light. Light is a medium and lights are light artist tools of the trade. Look at the lighting in this hallway - it is subtle but very cleverly thought out. So you need to consider, the optics employed, colour temperature, sharp or soft cut off's etc. Also bear in mind, that when lighting a space, you must consider what your eyes are going to be looking at, no point in having the floor of a room lit highly yet the walls are dark because that automatically makes the room feel dark. Some rooms benefit from the walls and task areas being lit but very little attention to general light. Restaurants are often lit like this - very low ambient level, but tables, bars and areas of importance picked out in light. You have only lifted the cover of this book!1 point
-
If you are using concrete beams why are you needing a lot of ventilation ..?? It’s mainly there to stop damp getting into timber beams, you don’t have that issue ..??1 point
-
I'm not sure how well that would work. They are really cheap to buy: https://www.toolstation.com/bostik-fibres-for-concrete/p690601 point
-
Put some polypropelene fibres in your cement mix too to stop any cracking if you are pouring your own mix1 point
-
So far I have the design needs to be BR compliant : read Part K does not need to be solid concrete : pad it out with blocks or similar : 100mm of concrete is fine consider how to radius the steps : silicone , plastic ; careful with the landing width line the block with soffit board maybe? consider adapting precast blocks It's obvious that @Ian's point is the key to success on this one. So, I'll get on with the design and post it here. Thanks everyone. Ian1 point
-
The rise and going of all stairs in a flight must be the same. I have always taken that to mean ALL if them. Are you suggesting this is treated as two separate flights so they could be different? I think that would be very odd, so I would try and make them all the same. How about creating what you want with pre case concrete steps You will get a better, guaranteed finish on each step. you just have to build up blockwork at both sides to support them, and render the blockwork.1 point
-
If you do this carefully you could incorporate mat wells on each step or recess features in the side. Line your mould with sheets of glued on DPM and the finish will be like glass. Top step where you pour from might look different..... Ooh...lights. Or infill the "mat wells" with coloured gravel, crushed glass etc and clear resin....1 point
-
Good idea. Much easier to demolish when you remove the shuttering and it looks sh!t! ?1 point
-
You'll need a poker too to vibrate the concrete into every nook and cranny. Once your ply "mould" is built you can do the internal corners of what will be the step nosings with tooled silicone to give a nice radius. Guessing a 3:2:1 mix using 10mm pea shingle rather than 20mm all in ballast might be better?1 point
-
a good place to get rid of some hardcore waste -deep in the concrete -1 point
-
1 point
-
Cut sheet insulation into the open cavity , I closed off with plasterboard fully bonded to reveal then wet plastered the walls http://tonyshouse.readinguk.org/274-2/1 point
-
You can get an 11.5kw Mitsubishi with a 250L Mitsubishi tank for £4600 + VAT from Secon. https://www.seconsolar.com/mitsubishi-pre-plumbed-standard-cylinder-package-3364-p.asp They are trade only but should give you an account if you let them know you are a self builder. If you have a Mitsubishi registered installer locally who will install the ASHP, then this would would work out a more cost effective approach. I have a ASHP with oversized radiators. The system works very well, but my house is well insulated and airtight.1 point
-
@Patrick I'll PM you the details of a carpenter who's not too far from you. He's worked on and off on our build, he's hard working and his workmanship is good and I'd thoroughly recommend him, but: ❌ No. He's a one man band but can probably get hold of others. ✅ ❌/✅ I guess it depends how you define that. He earns a living.1 point
-
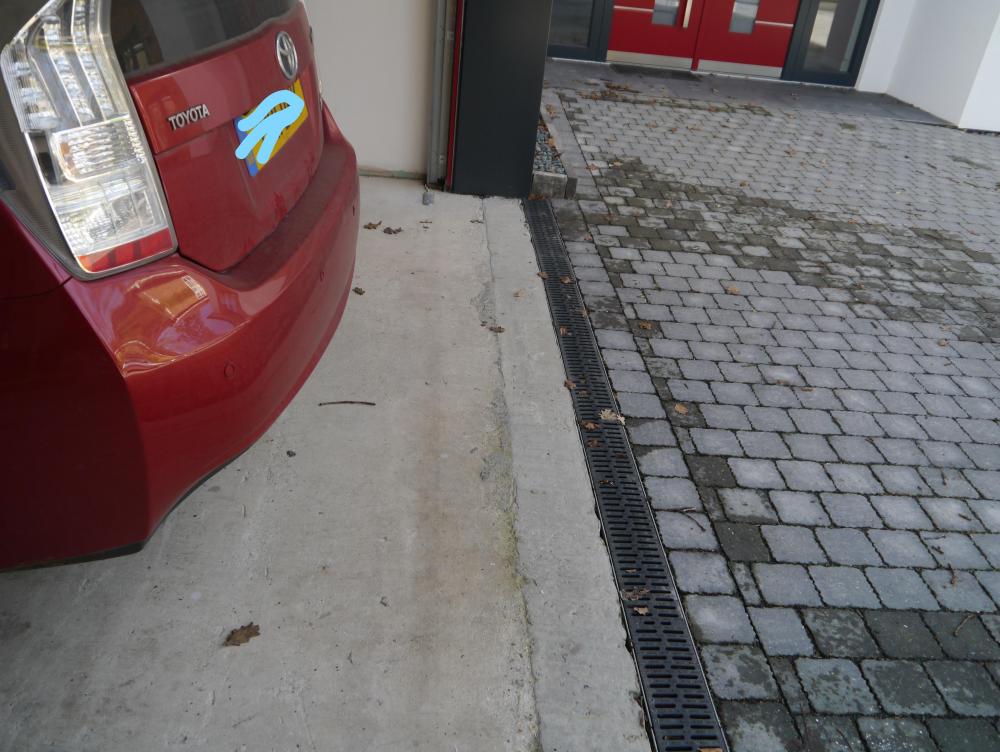
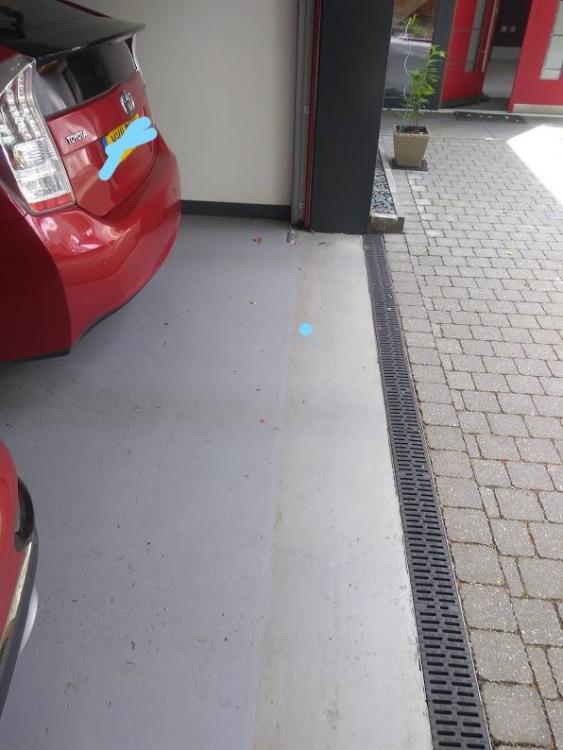
We cut out the EPS upstand in the garage door opening, pulled back the DPM and cast a level concrete infill. The DPM was just laid under and around the cast concrete infill. Looks like the same/similar approach as @Weebles Looks a bit rough in the first photo but it was leveled with epoxy and a commercial resin floor finish was applied to the garage floor - see photos taken just now. The slight colour difference on the garage floor is just sun and weather outside the garage door ffre1 point
-
I shopped around for the various parts needed from several online suppliers, including CVC. The design was pretty easy, just stick the extract terminals as far away from a room fresh air inlet as practical, and the reverse for fresh air inlet terminals. In practice we've ended up with a near-ideal arrangement in most rooms, with the air having to travel via the longest path across the room, which aids diffusion and reduces the risk of there being ventilation dead spots. There were two places where I had to compromise with terminal positioning. One was the bedrooms, where, because of the high vaulted ceilings, I couldn't easily fit terminals high up, so had to fit terminals in the low walls, but I fitted them with directional terminal vents, so the air is directed upwards, more or less along the angle of the ceiling. The other compromise was in the utility room, where I fitted the extract terminal dead centre above where the clothes drying rack is. Not ideal, as having terminals towards the centre of a room is always a compromise in terms of best air mixing, but OK, as the utility has through air movement, as there's a door from the end of it that leads to the downstairs WC, with another extract. I found that the various companies supplying semi-rigid round duct were all selling pretty much the same product, perhaps in different colours. It seems that there may well be licence deals regarding this, so the same stuff is marketed under different names (for example Domus and HB+ seem to be an identical product). There were also wide variations in plenum chamber and terminal prices, and I ended up shopping around for those, and think I used different suppliers for each. Our terminals all came from CVC, as did the terminal to semi-rigid duct fittings, the plenum manifolds came from another online supplier, as they were a lot cheaper than CVC, and the coils of semi-rigid duct came from yet another supplier (I used stuff that was branded HB+, but it was 100% compatible with Domus fittings, seals etc).1 point
-
Literally can't hear ours running, even on boost. That said, ours runs in Lindab spiral ducting with silencers adjacent to each vent and exhaust fitting. We also 'isolated' the ducting and silencers by mounting on soft rubber blocks to mitigate any vibration/sound transferring to the timber frame/structure. It's so quiet I occasionally hold a tissue against the vents to make sure it's still blowing/sucking!1 point
-
Silencers work in any orientation, so horizontal is fine. Based on my experience, I'd definitely silence both extract and supply. Our noisiest terminal before I fitted silencers was the extract in the utility room. It's a short duct run, and the fan and compressor noise from the MVHR was very prominent until I fitted the silencers.1 point


