
Leaderboard


Popular Content
Showing content with the highest reputation since 05/07/23 in all areas
-
We had our first air tightness test today and achieved 0.25 ACH!! 🎉 Absolutely chuffed to bits with that. We have spent a lot of time taping every possible penetration, but I was still anxious in case we hadn’t quite been as scrupulous as needed.20 points
-
The majority of the scaffolding is down. A long way to go still
 15 points
 -
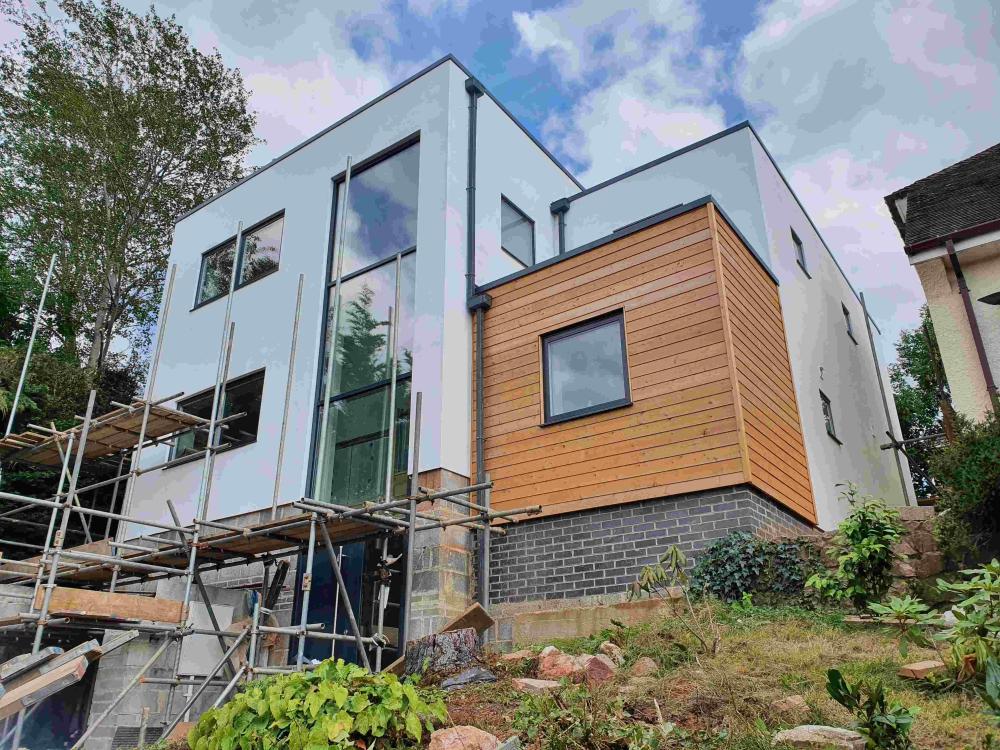
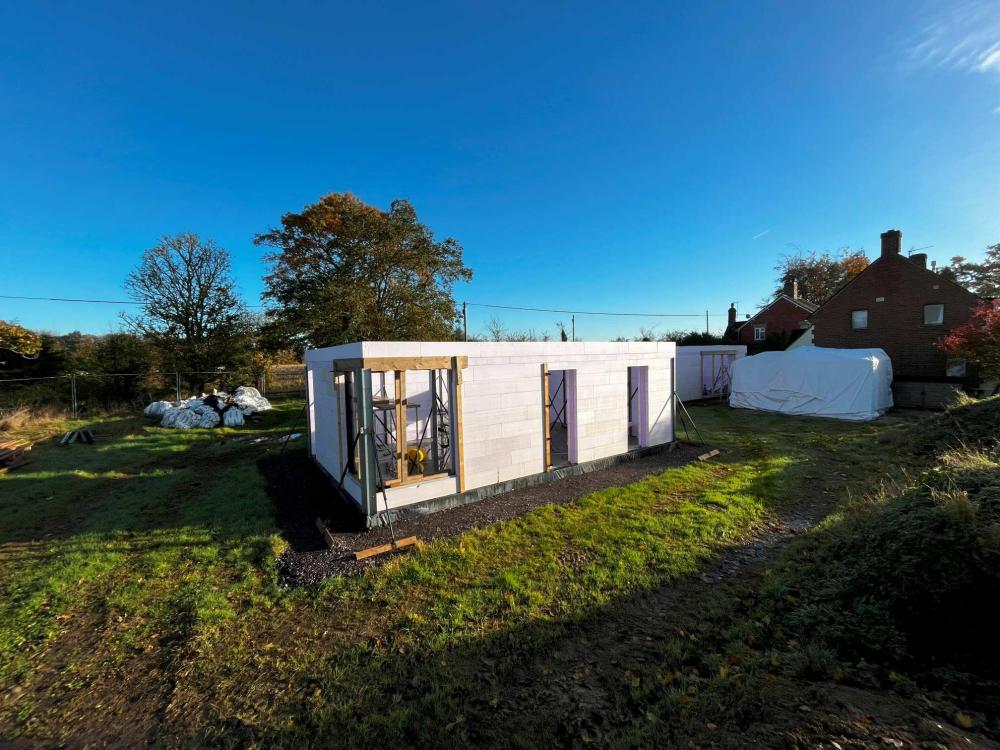
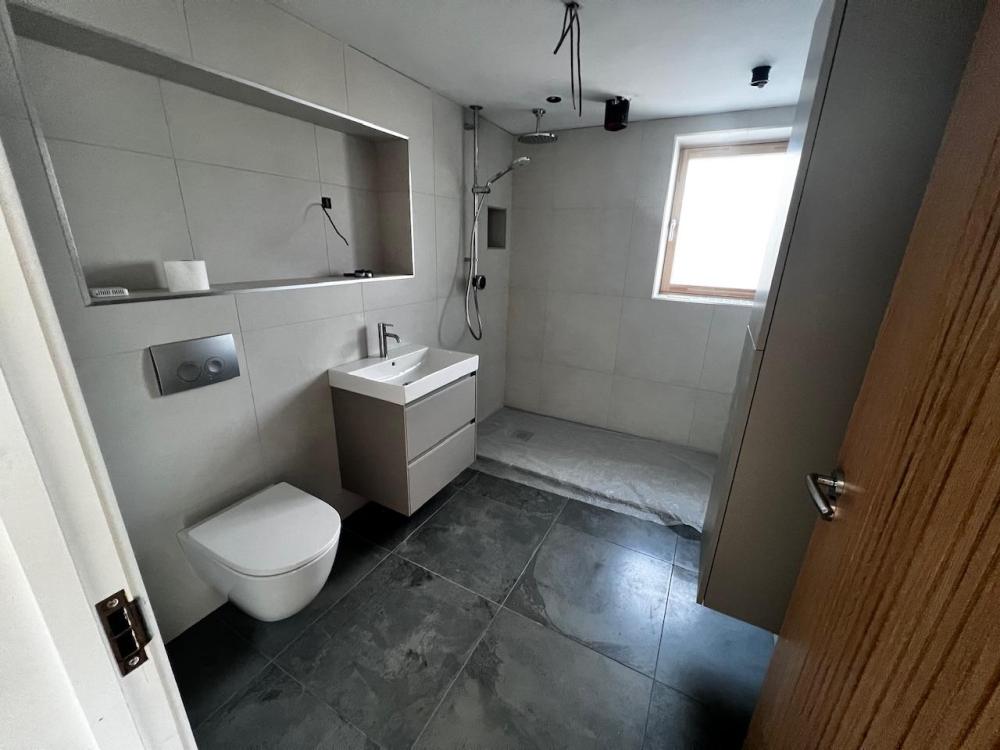
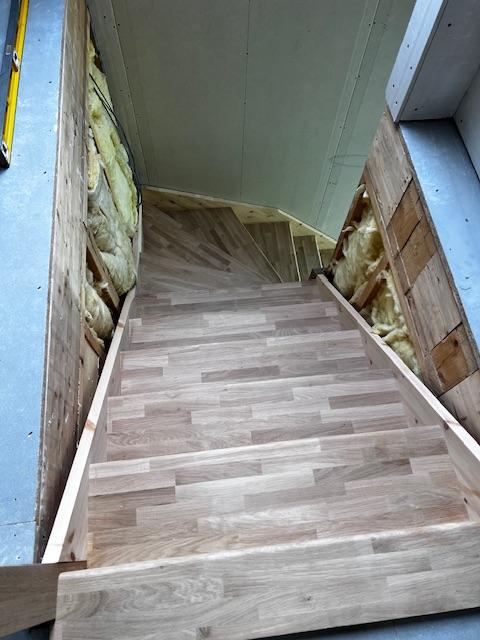
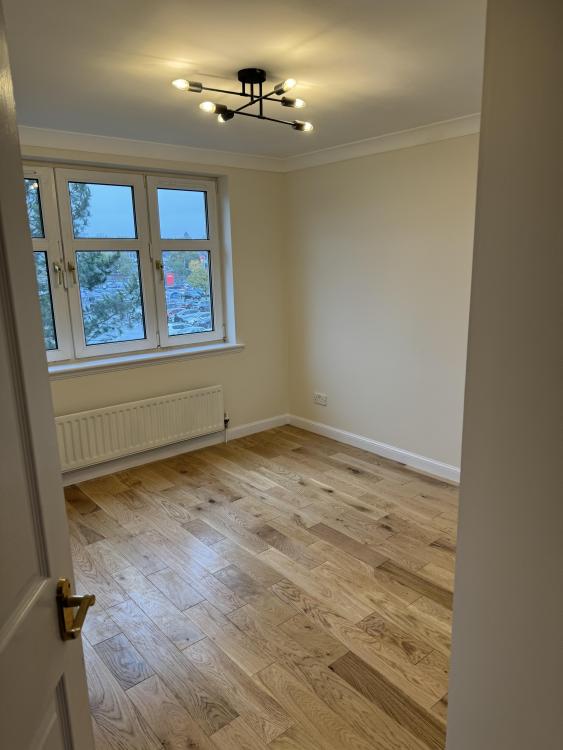
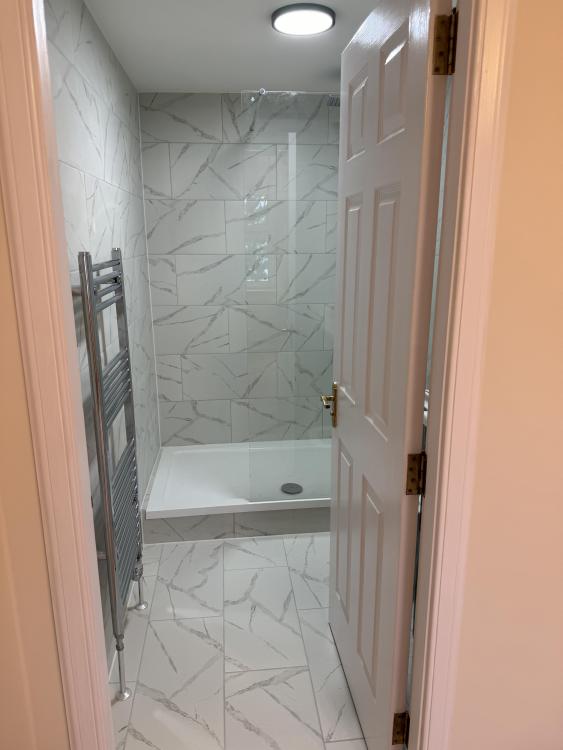
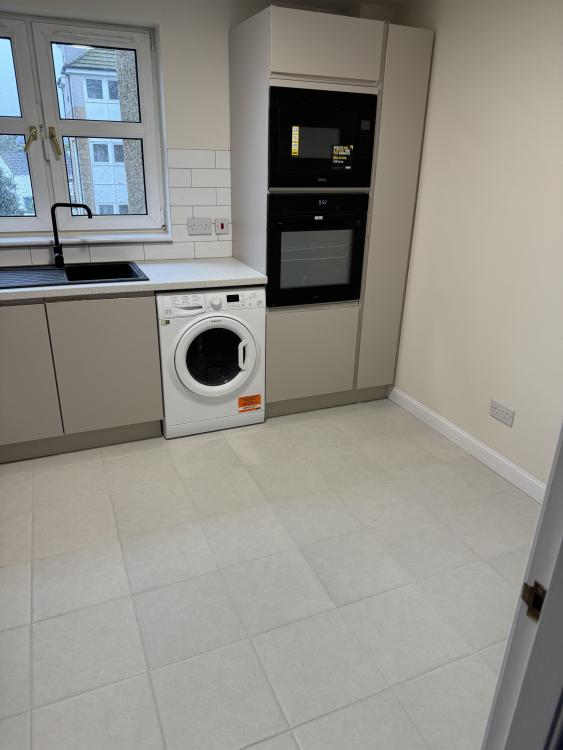
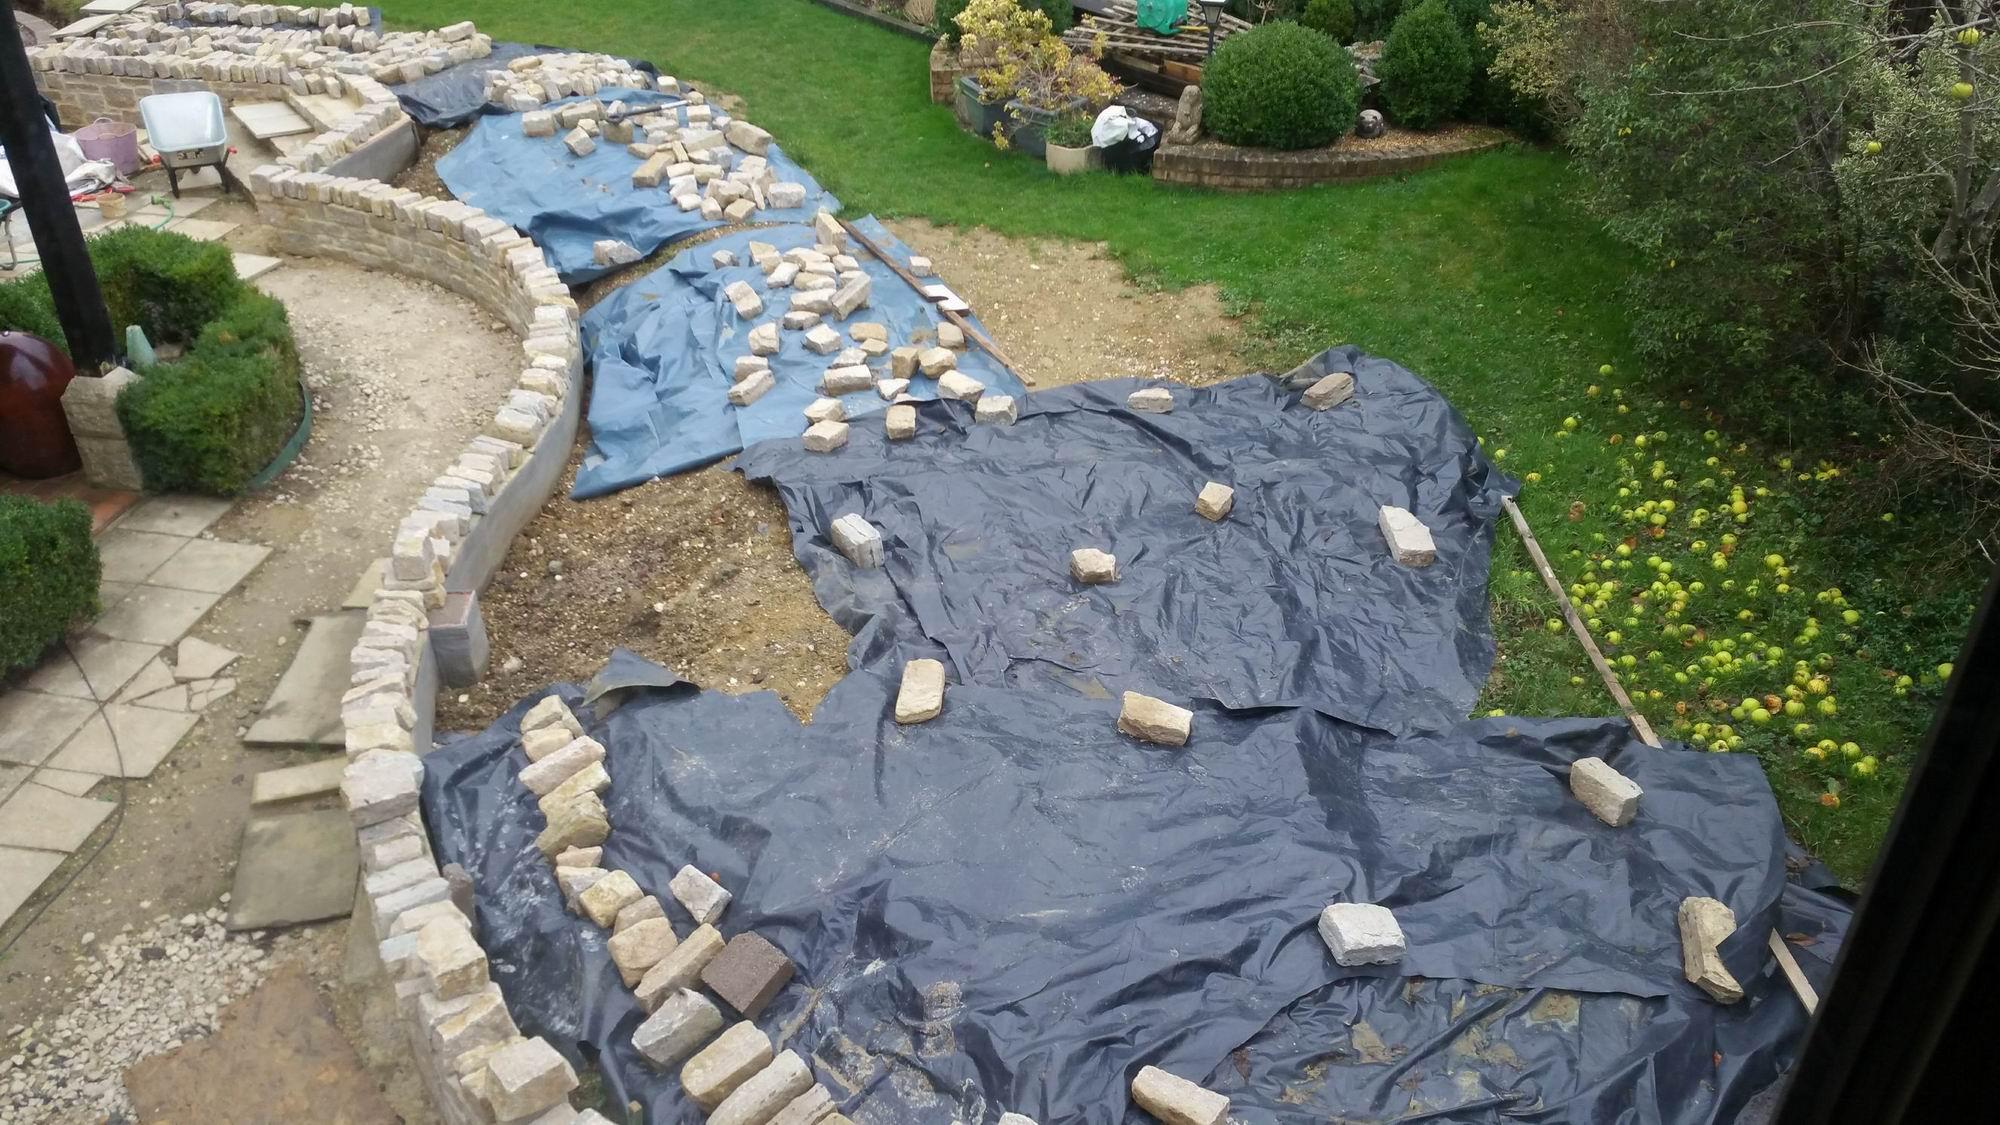
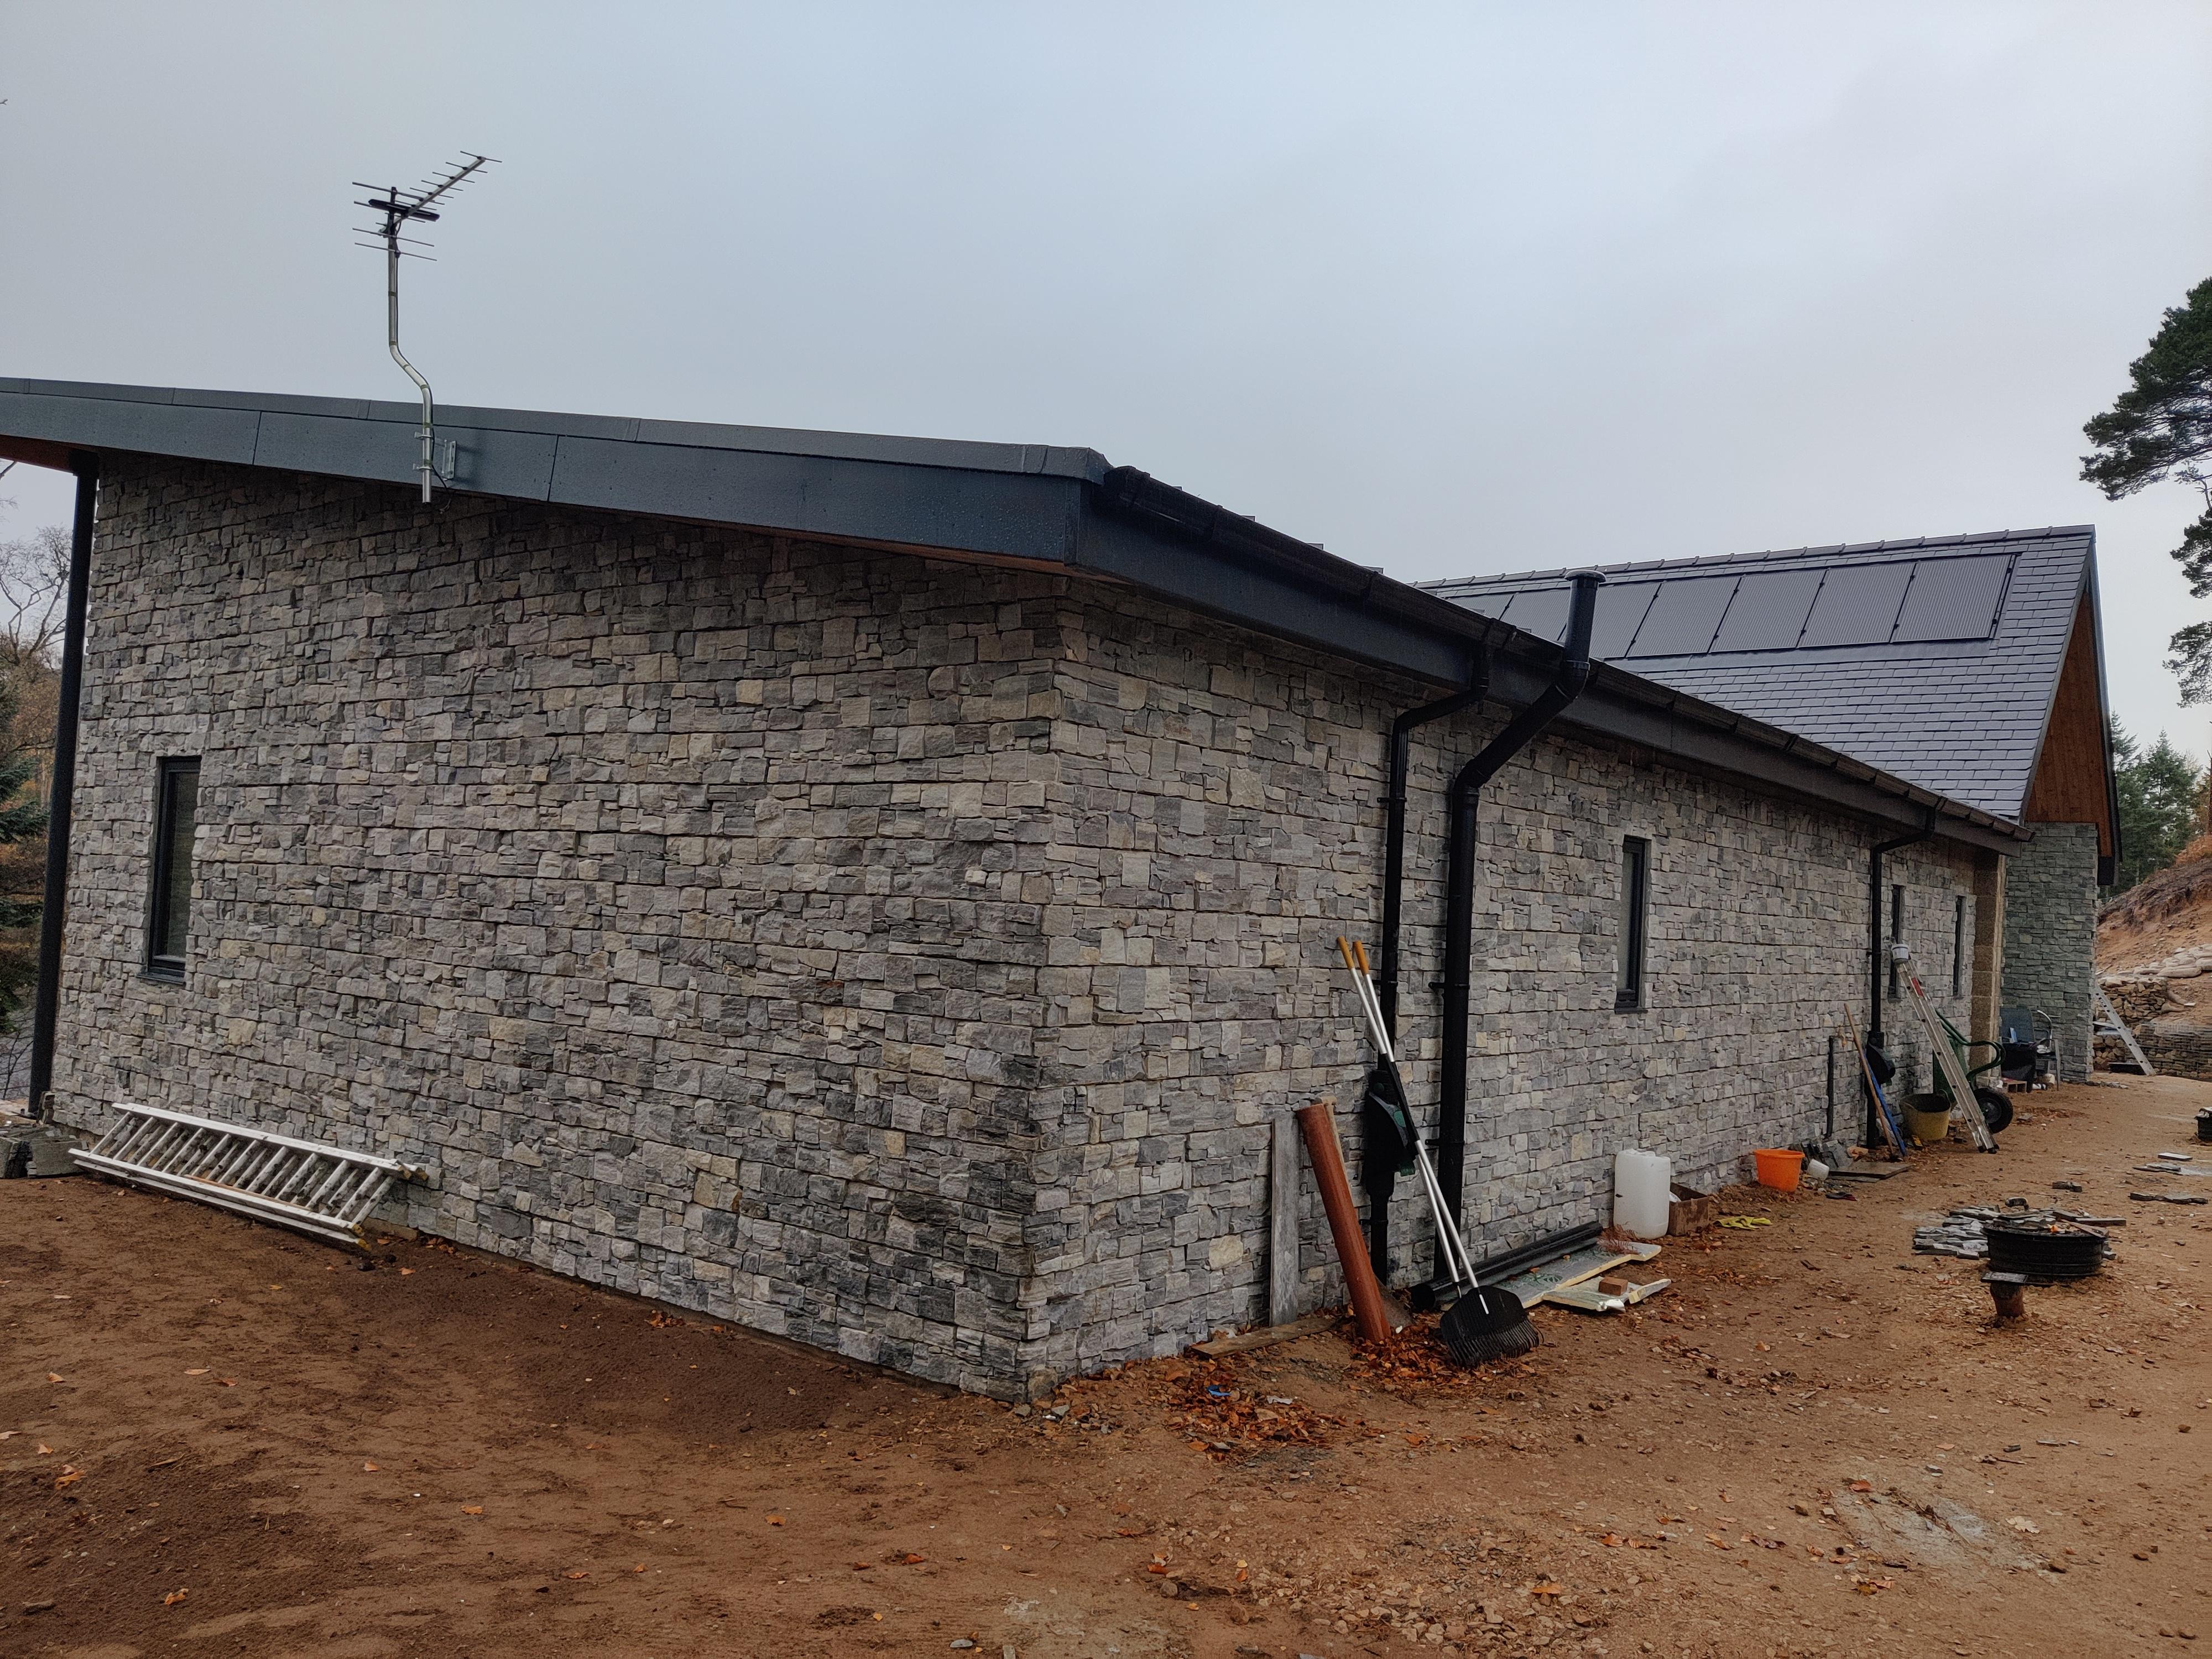
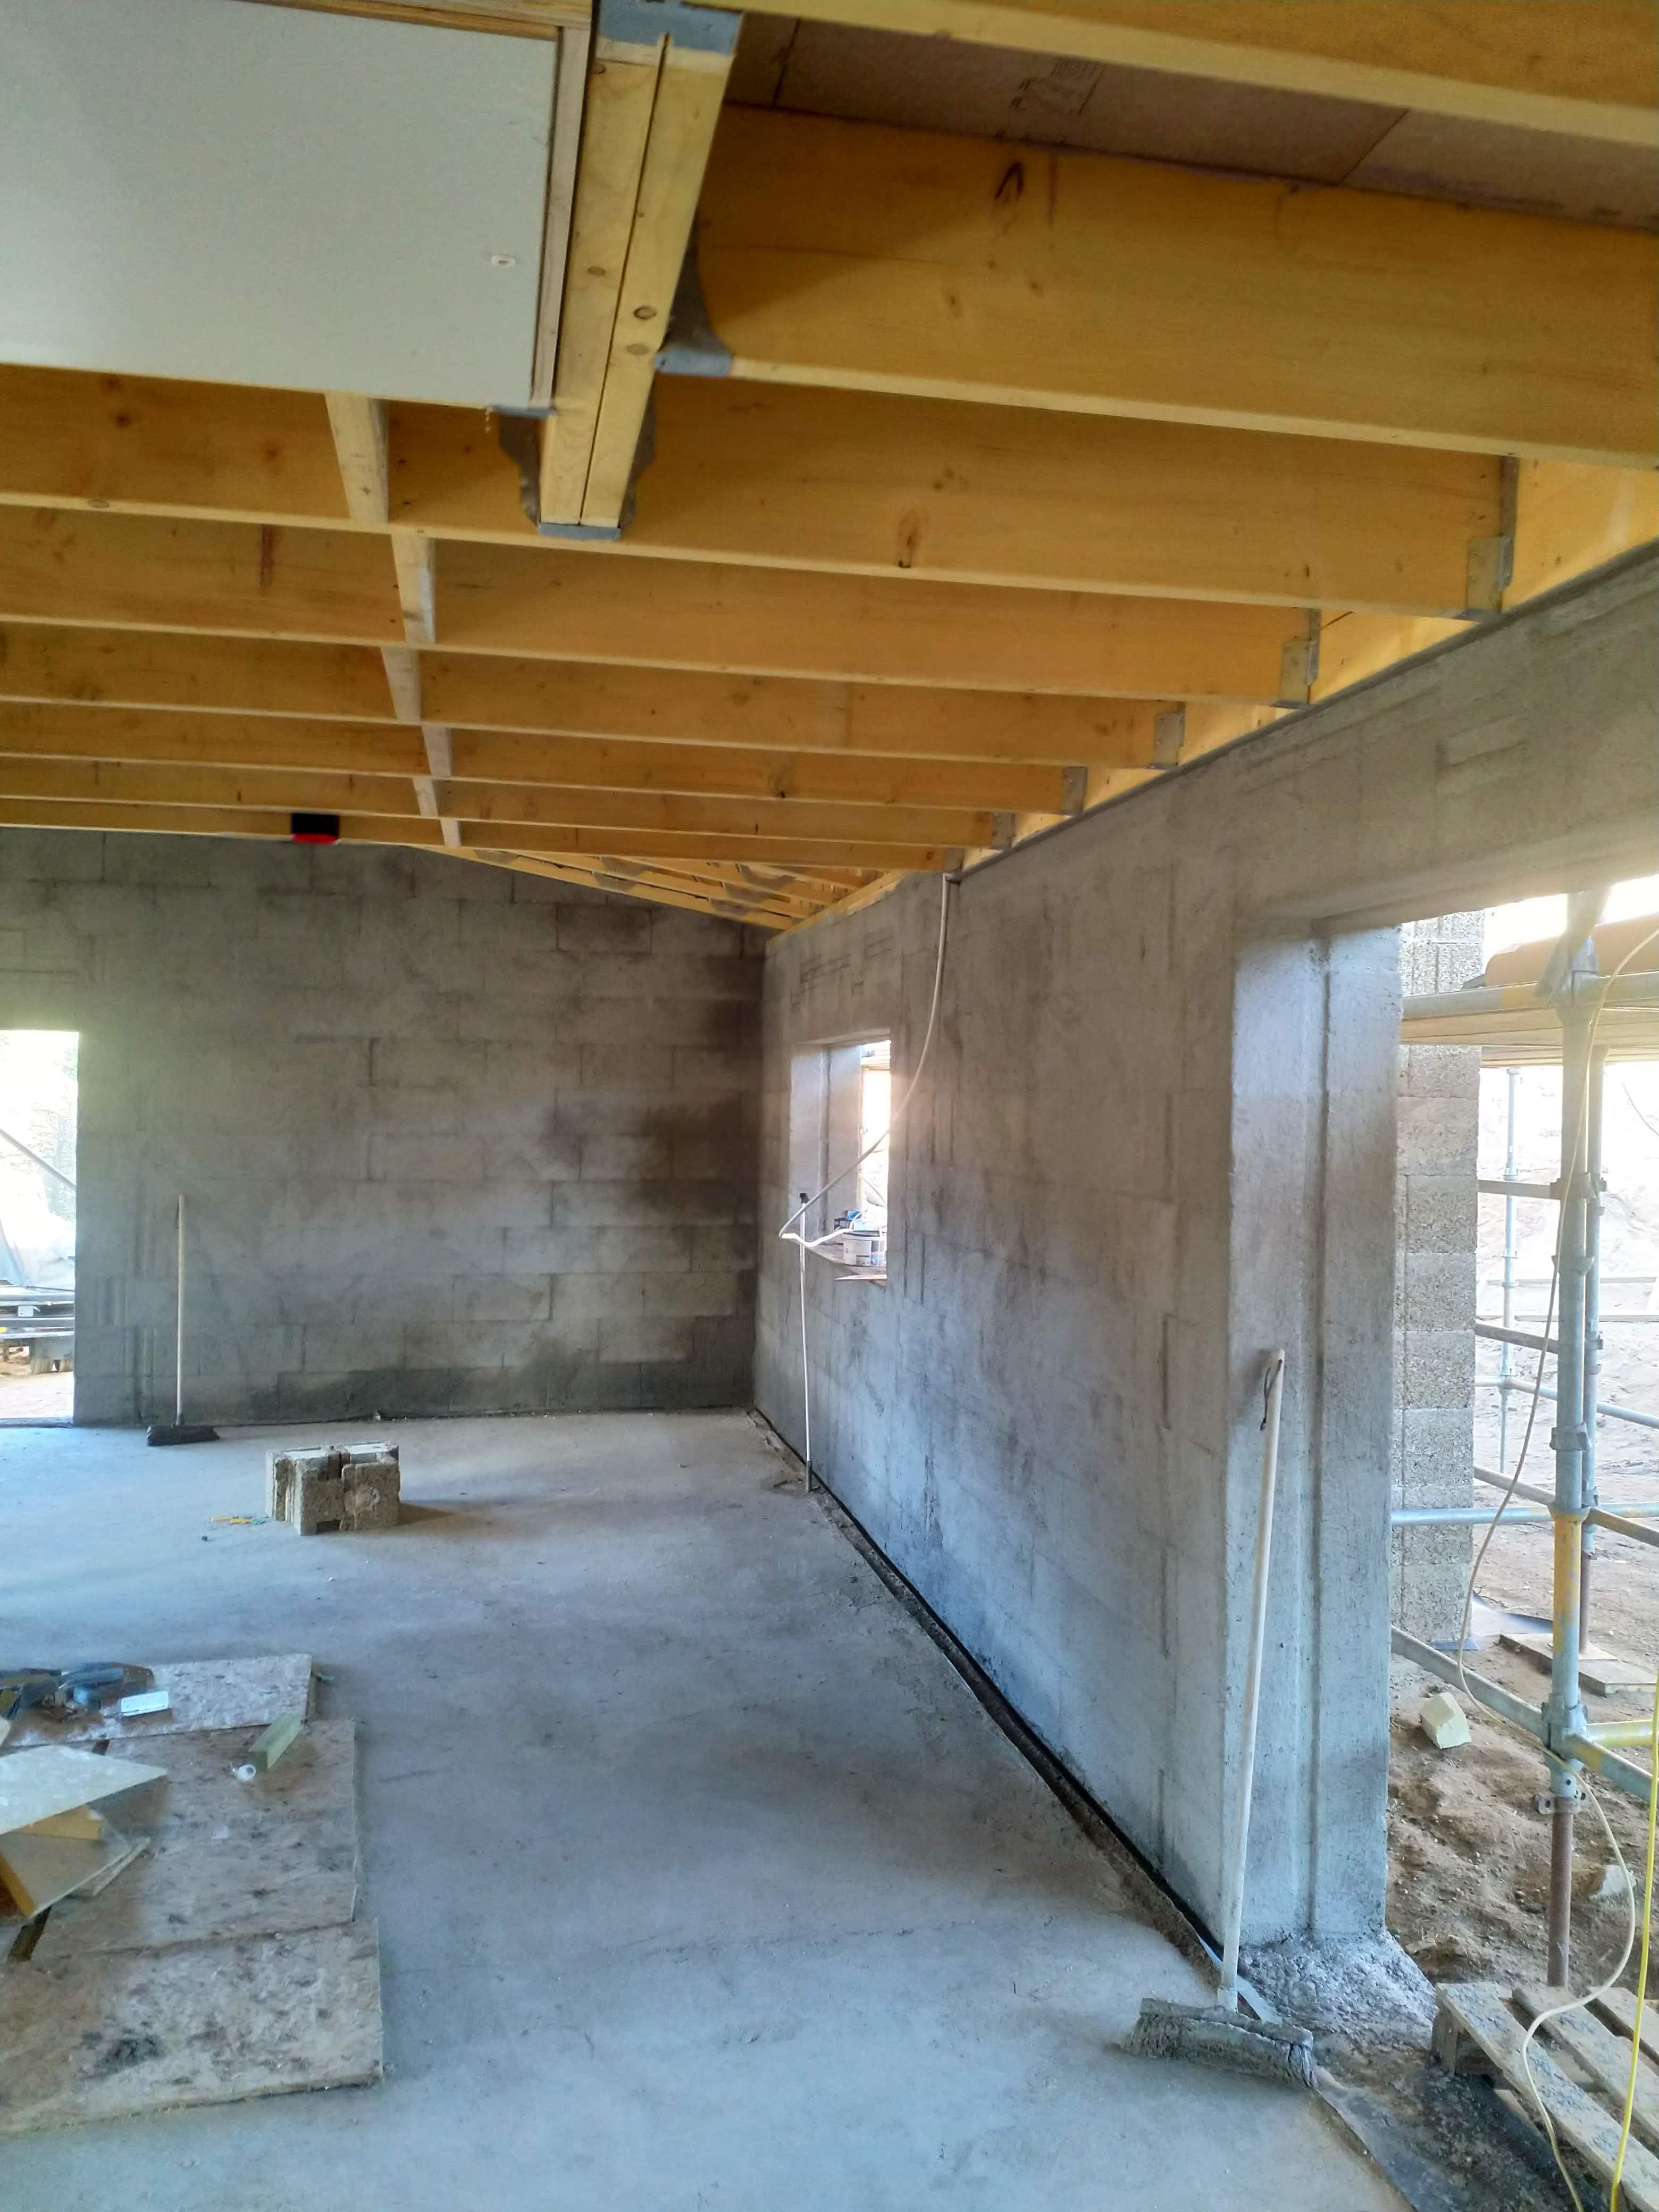
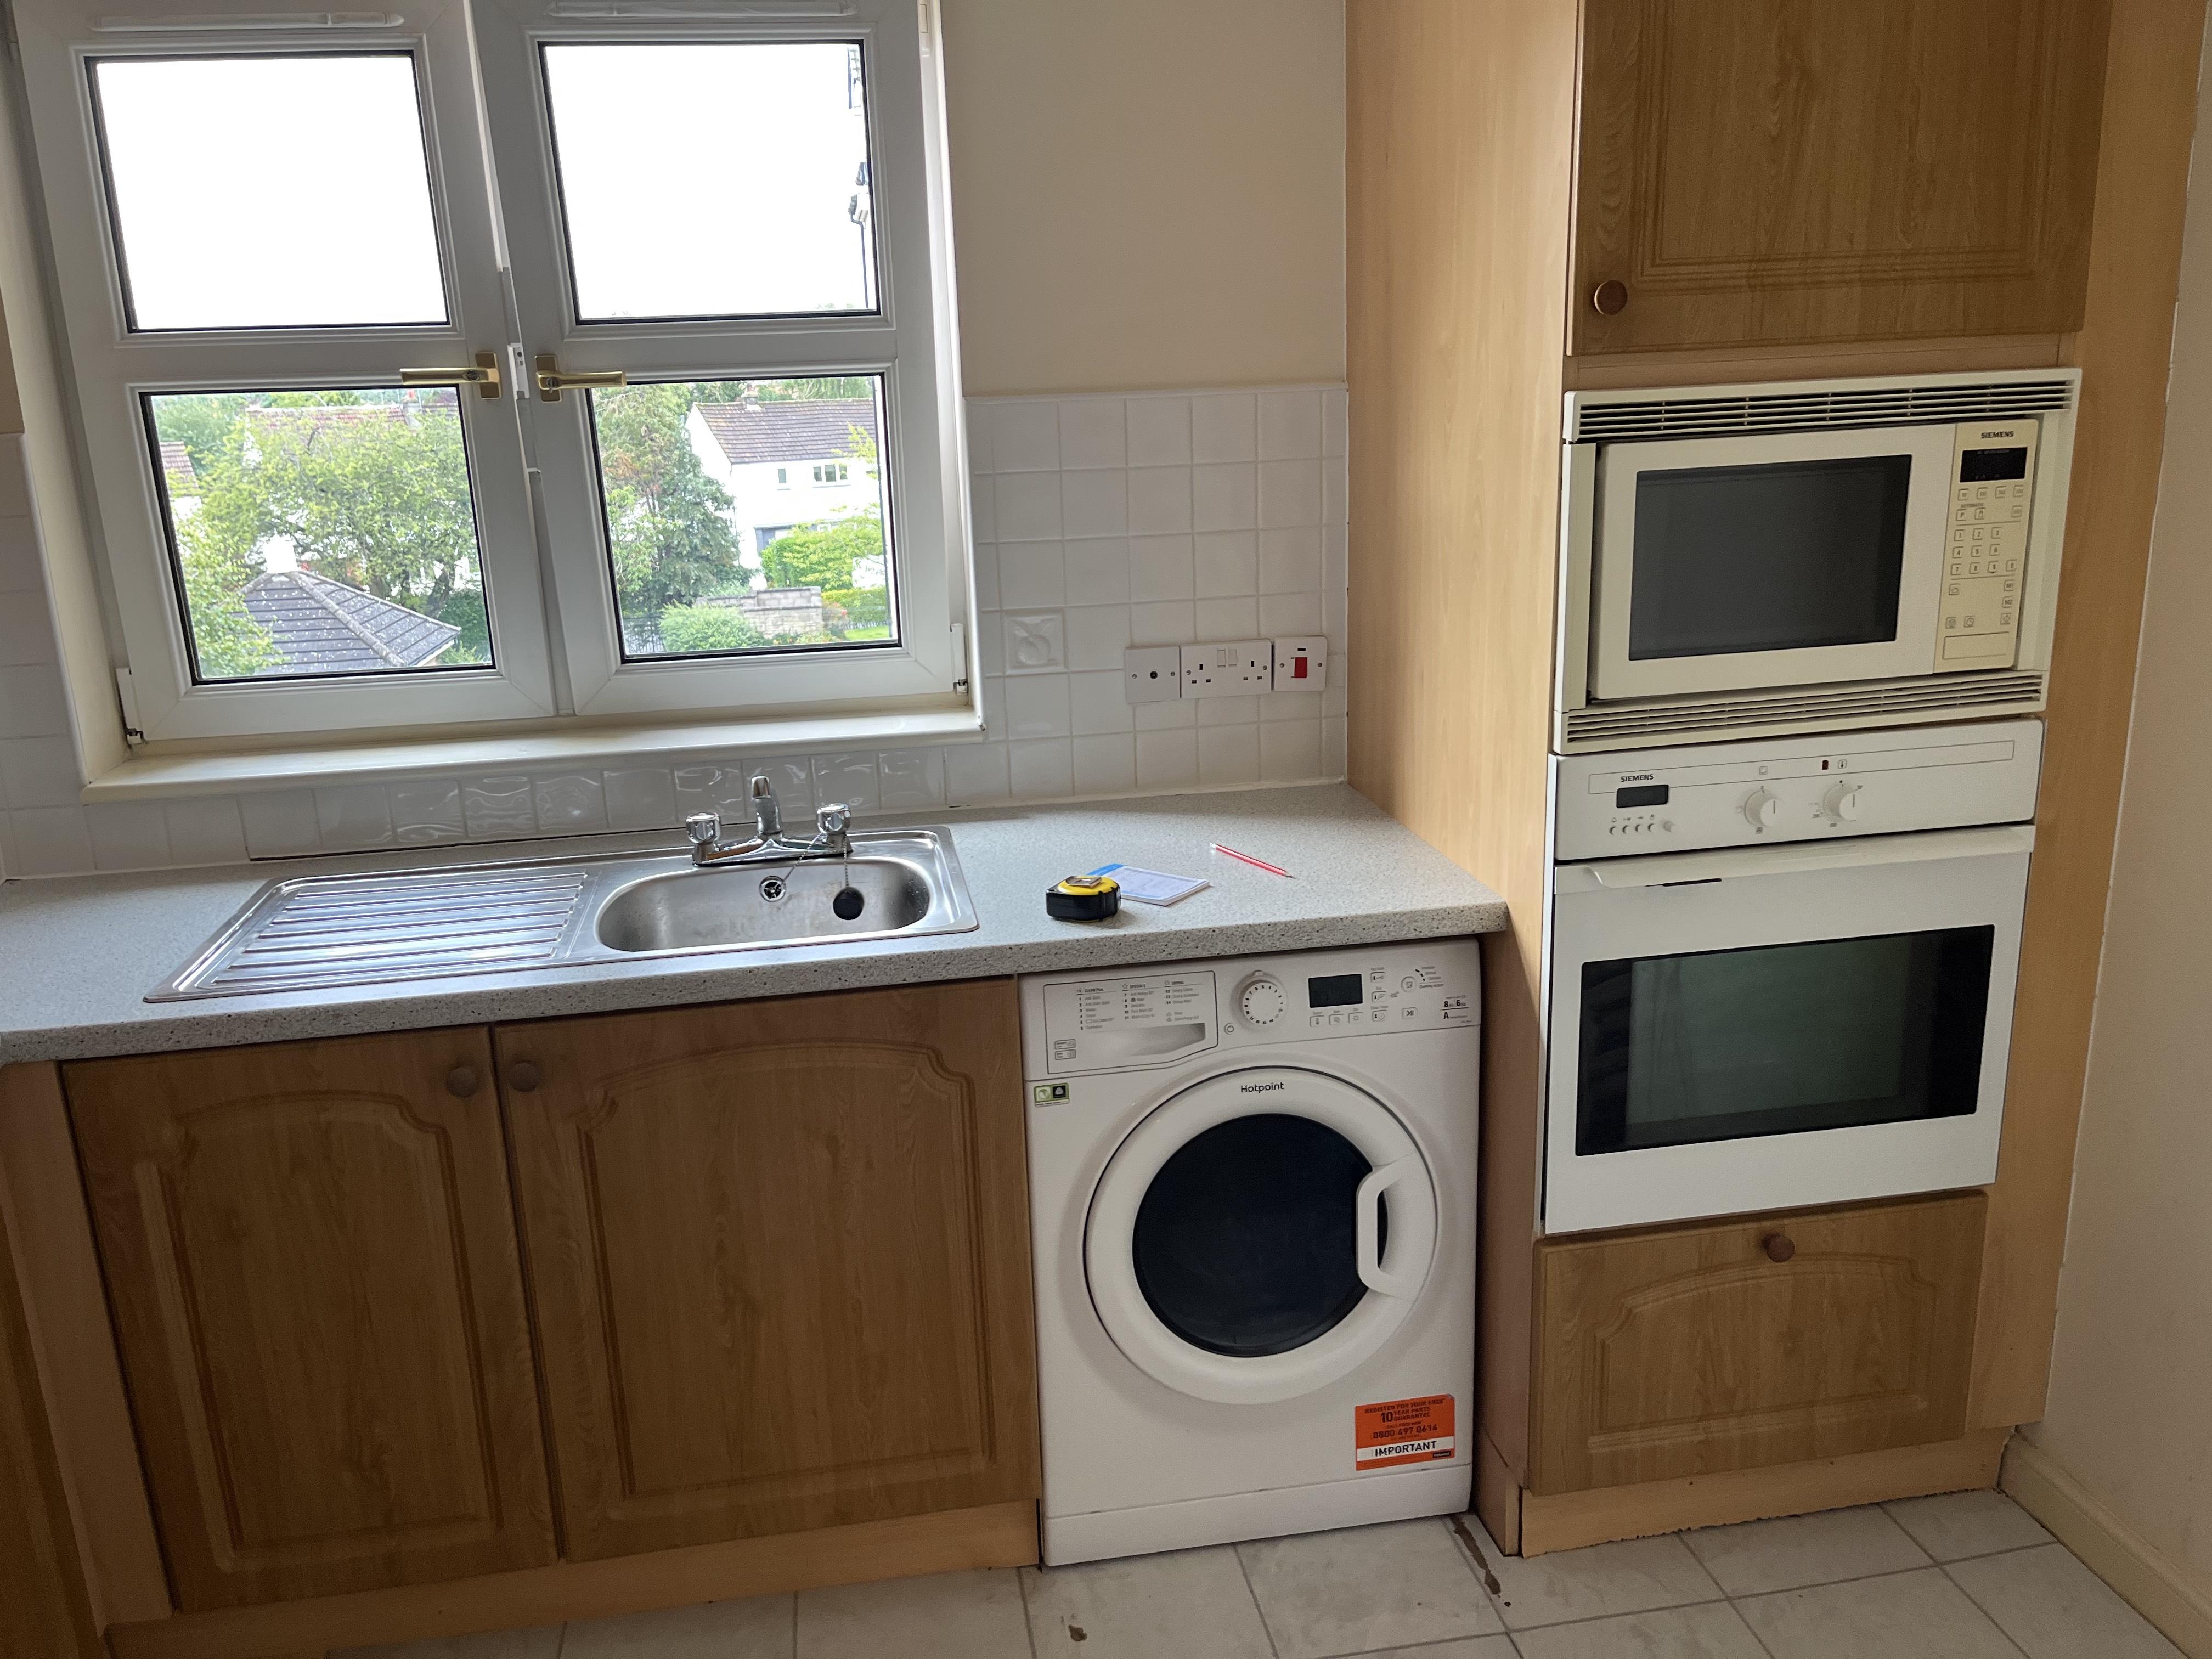
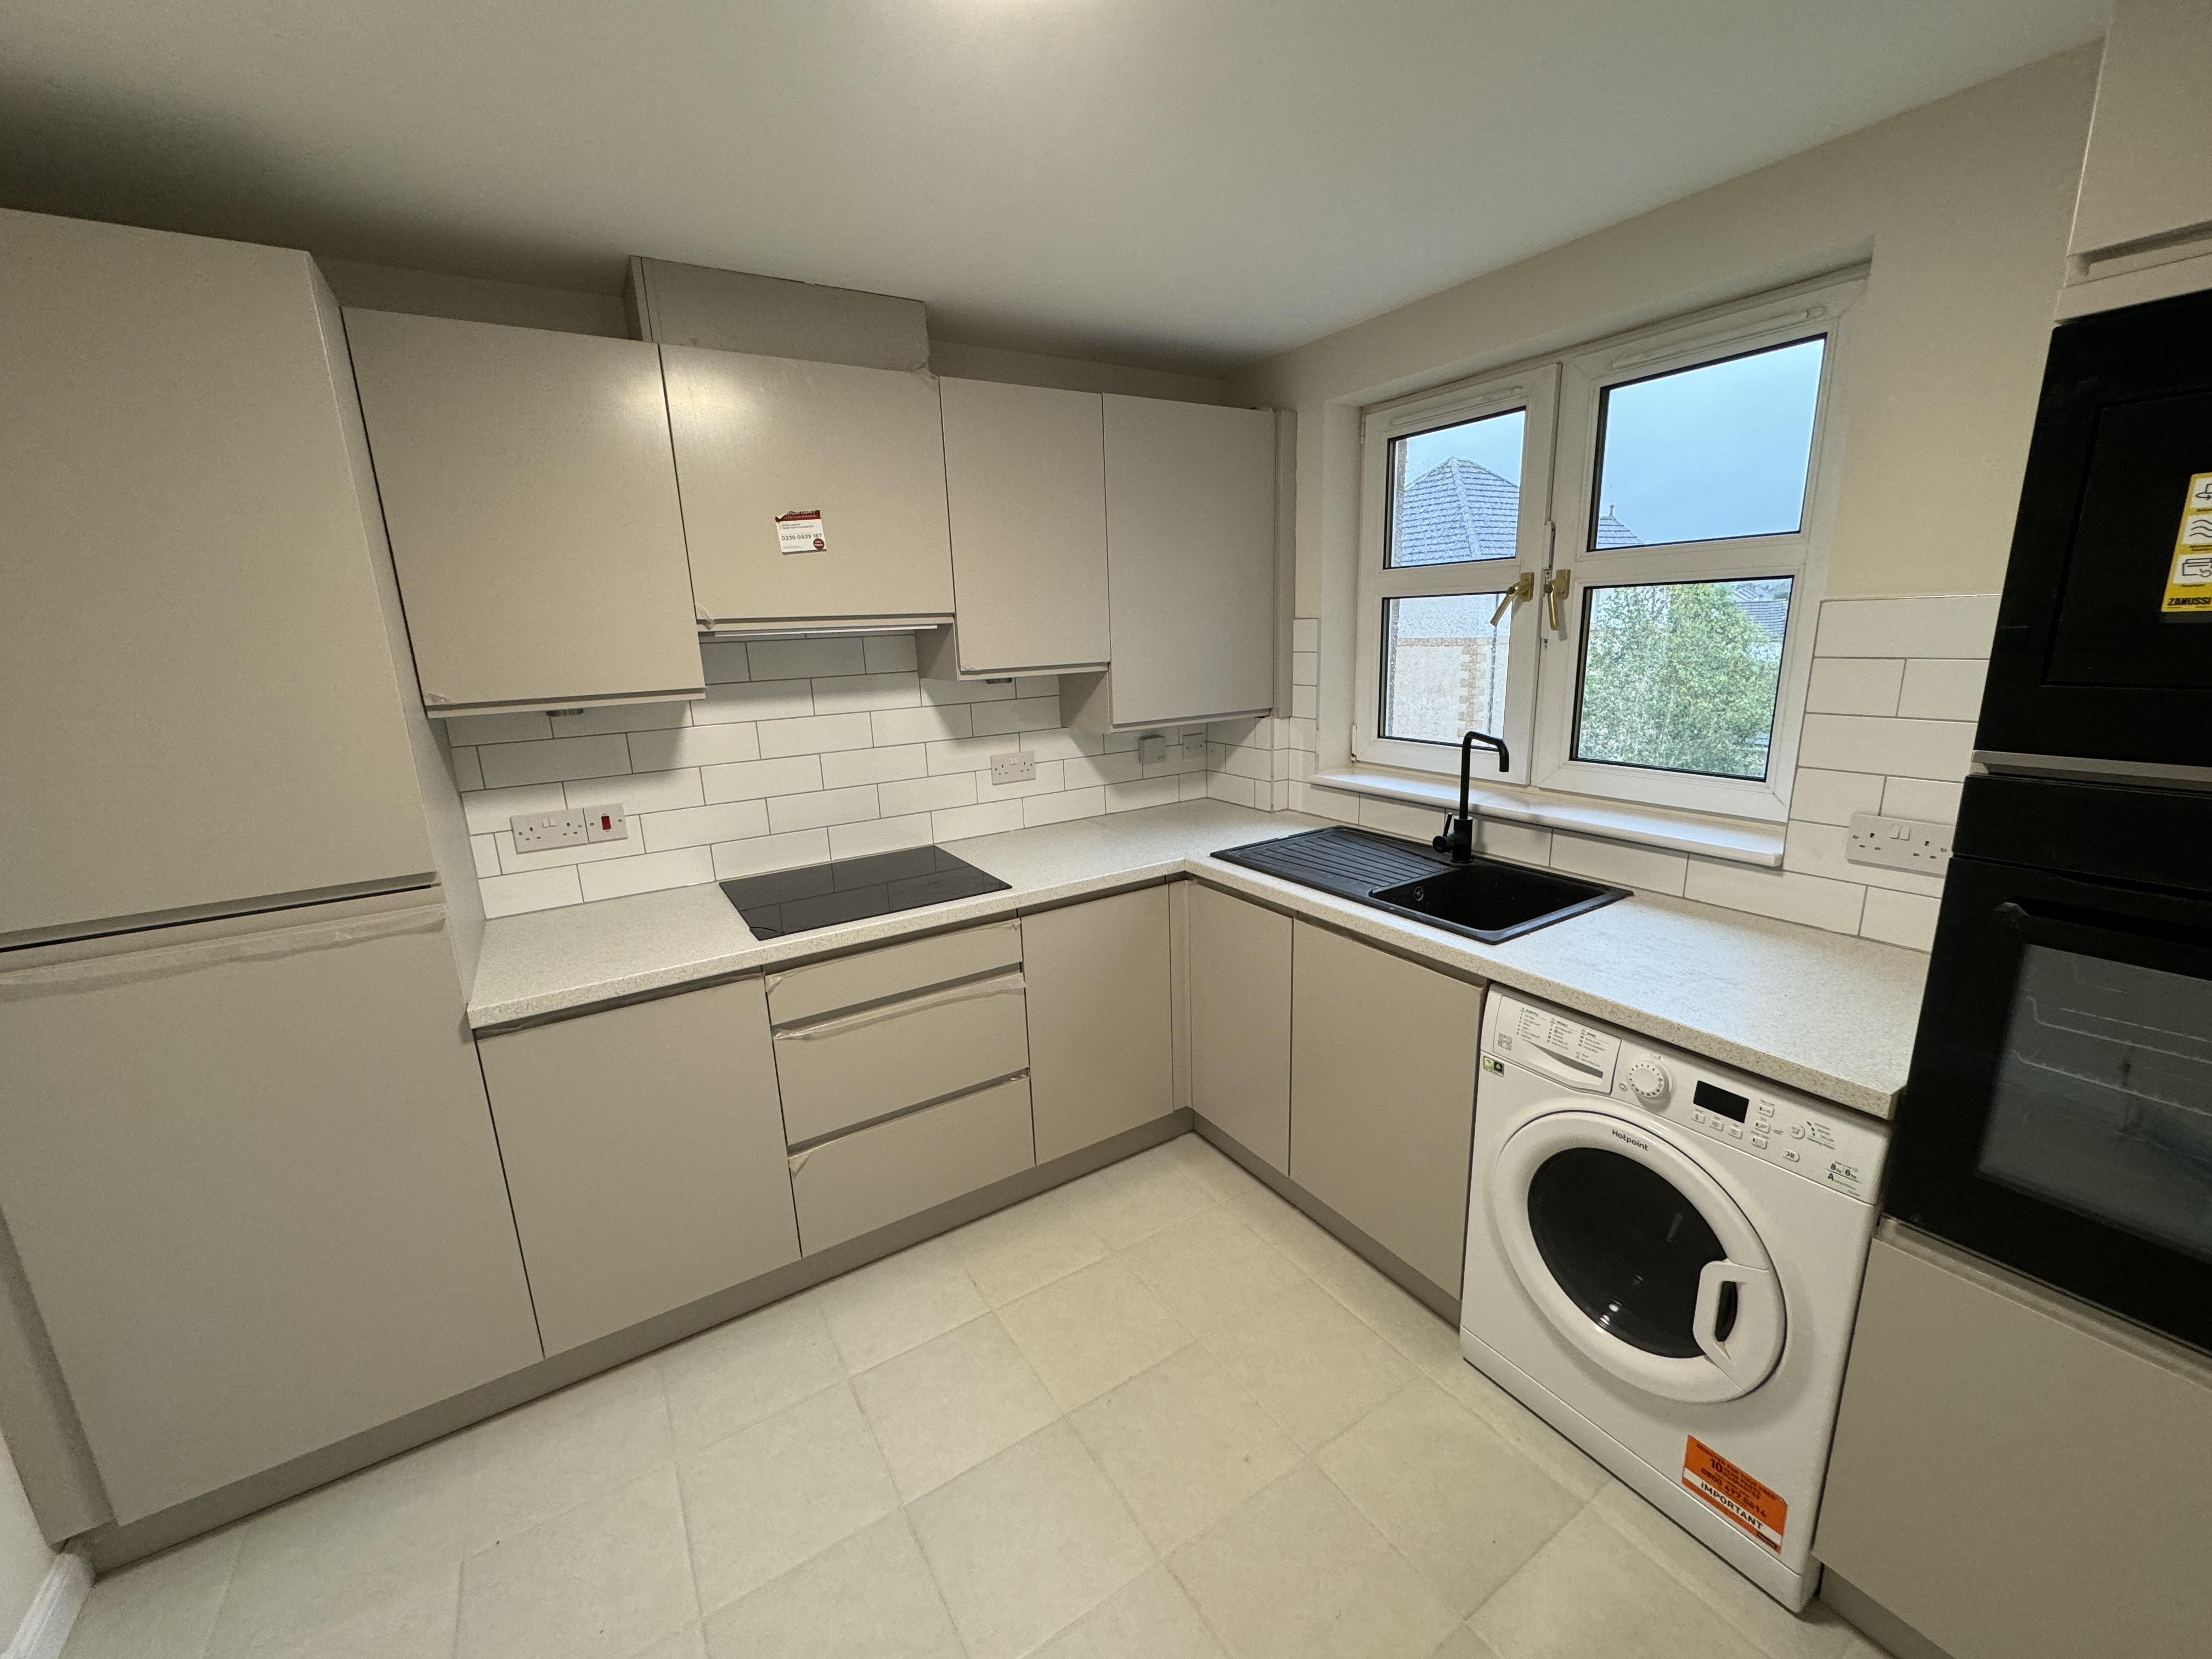
It's been a while since my last blog, but we've not stopped, the days are shorter and the weather skipped autumn🍂 and dived into winter with a few storms and loads of rain. Our windows are budget friendly triple glazed UPVC, and composite doors. The external EPS was sealed at the cill with EPDM airtight tape, the tape has reinforcement in it and can be moulded, it does crease but creates a water tight junction and sticks like the proverbial to the EPS. We created a cheek reveal with an additional layer of 50mm EPS and sealed the upvc frames against this, I then ran a bead of sealant against the face and edge of the EPS giving two seals. Then when clad a third seal. I used soudal air tight foam and I thinks it's LMA sealant, soudal's airtight solution. The winds gave good opportunity to test for air leaks when had several days of 35mph winds. This proved a good test with a smoke pen. The internal frame was sealed with soudal sf40 which adheres very well to the upvc and timber blocking, when cured it is like rubber. The cladding is larch boards in 2 widths 150mm for the bottom layer and 100mm for the top. We finished the top of the windows with a custom palistol coated drip The bottom of the EPS footing was finished with reclaimed slate. Inside we are having a cold roof. We needed to add 25mm pir under the truss cord to satisfy the tightened regulations in Scotland. We tapped the foil boards with foil tape, and the perimeter boards were pushed to touch the wall plate. Then used airtight foam between the PIR and internal IFC wall creating a seal. Under the PIR I used plastic membrane that I spray glued to the PIR, and this draped down the perimeter walls. The under ceiling was battened and counter battened, this created a service void for the cables and not penetrating the loft. The plastic was jointed with EPDM airtight tape on joins and walls. Cables were put inside Flexi conduit that was cut into grooves in the ICF. (All water pipes were run under the slab.) This picture shows the detail for the airtightness and the service void. MVHR ducts (7 plenums ) were run in the loft, and under 400mm of loft roll. The manifolds are also under the loft insulation. I made these airtight using the same EPDM tape. I made gaskets out of the plastic with a circle cutter and stretched it over the plenums, then air tight tape to seal everything to the plastic/ PIR. The walls also needed some IWI to meet the tighter regs, so decided to go with 25mm PIR. This also added another seal for the plastic airtight layer and walls. The poly steel ICF has these metal plates at 150mm ctrs that allow the cladding battens to be secured externally and the plasterboard internally, we used self tapping drywall screws and insulation discs to hold the PIR in place before installing the plasterboard. Picture for detail below. At this stage we've got a large airtight box. Now it's a case of installing the stud work. I lined the plant room with pre painted 12mm OSB, and the bathroom with 18mm OSB ( a Scottish building regs requirement needing the ability for future hand rails etc) Electrics are simple, a few Ethernet points and sockets and spotlights. One pendant over the dining( and if I get my way, and budget allows pool table). The only penetrations from the loft are a light, PV cables, TV aerial, and 4g antenna cables. These are in conduit and sealed both ends. All other cables run in the ceiling void or stud work. I've put a few sensors in the studwork for future Arduino projects to accompany the in slab sensors. The plant room is compact, and work in progress. The PV is up and running and to date produced just shy of 300KwH in 5 winter weeks With the first fix complete it was time to plasterboard, we got 80 boards delivered Wednesday midday, just as storm Babet hit, it was too windy to bring them in, I tried, I failed so it had to stay outside 😭, covered in plastic, tarpaulins, scaffold boards and the obligatory ratchet straps. 3 days of constant 35mph gusting 50mph gave opportunities to check for airtightness. I managed to install the flush shower tray during this downtime. Once the storm blew though we got the boards inside and cracked on, the open plan lounge, diner, kitchen was boarded first and as soon as it was complete I skimmed the ceiling, 11 boards was too big for me and my tennis elbow, that coupled with not plastering anything for several years. I split the room in two and used several layers of scrim tape to plaster up to, then remove the scrim tape and skim the 2nd part. It worked well, and it's painted and the join is seamless. The next few days we mixed it up skimming in the morning and boarding in the afternoon for the next day. Today is day 182 of the build, this is basically from the cleared site that was down to rock with the pecking already done. Currently the house is fully skimmed, most of the ceilings have been primed and painted white and we started the kitchen install today. All the bathroom is here waiting to be installed, and some appliances are here most arriving this week. This has been pretty much 7 days a week, with only around 12 to 18 days off to earn some money and pay off some labour debts. We're hoping to move in, in 2 weeks with a working bathroom and kitchen 🤞, the static has now reverted to ice box during the night🥶14 points
-
Apart from the “picture from the mound” timelapse blog entry, there’s not been much of an update since mid September 2022. So, get your preferred hot drink (maybe a SteamyTea), and settle back for the next instalment. Where were we? SWMBO was still in recovery from her foot infection - you remember? The one that might have killed her? The second floor ICF had been installed, and the concrete poured. I’m still going to spare you any pictures of the foot, but here is a concrete pump truck instead. So, next on the list - a roof please. But before that, the final steel beams had to be installed [FX - thumbs twiddling in the foreground and whistling can be heard as we wait for the steelworker once again], but it wasn’t too long a wait, and by mid October 2022 we had the beams installed. In late October and early November I set to work with the ground worker to do some backfilling, and of course on the days I chose to have the digger onsite, Cornwall delivered some of its traditional autumnal weather so any attempt to properly compact anything was nigh on futile. In the meantime, more joists, endless sheets of T&G OSB, vapour barrier, 160mm deep sheets of PIR insulation, and some of the biggest screws are readied for ordering. The joists arrived in and in early December I had my supervisor and client (SWMBO) back on site 🙂, and she has graduated to being a mountain goat. She now refers to the site as her "happy place", even though we have a strong suspicion that the infection was started by a visit to a local beach. By mid April, with help from some now local family members, we’d installed the roof joists, and in mid May we were ready to start boardin’, vapour barrierin’, and insulatin’. The GRP was installed in mid July 2022 (by others). I’d also been readying the Great West Wall (GWW) to have the triple glazed sliding doors and windows installed (by others), and this took place in mid August, just in time for my significant birthday. There were some fitting errors, but I have to take my hat off to the installation company, they have been back to rectify their work, and have supported me with making the suppliers change some of the sliding door fittings as they were just not correct despite their protestations. In October, we had the mains electric and meter moved from their temporary location to inside the house. Over the ensuing autumn and winter months, we’ve been installing some of the final internal partition walls, running water pipes, installing more insulation around the GWW windows, and recently started on the ventilation ducting following some core drilling being undertaken (Tip: always ask for a hole to be drilled that is about 10mm bigger than you need - expanding foam is your friend. I donate my scar tissue to you all 😂) In December, I got made redundant. No worries, this may actually be a blessing in disguise. Next up on the list: Finish ventilation system Finish insulating the GWW Finish backfilling Electrics Floors Walls ASHP and HWC Kitchen Bathrooms The remaining plumbing Outer wall coverings But, in the meantime, we have the small matter of our daughter’s wedding. DOES SHE NOT KNOW WE’RE TRYING TO BUILD A HOUSE!? (Time to end: 2 years 🙂 )13 points
-
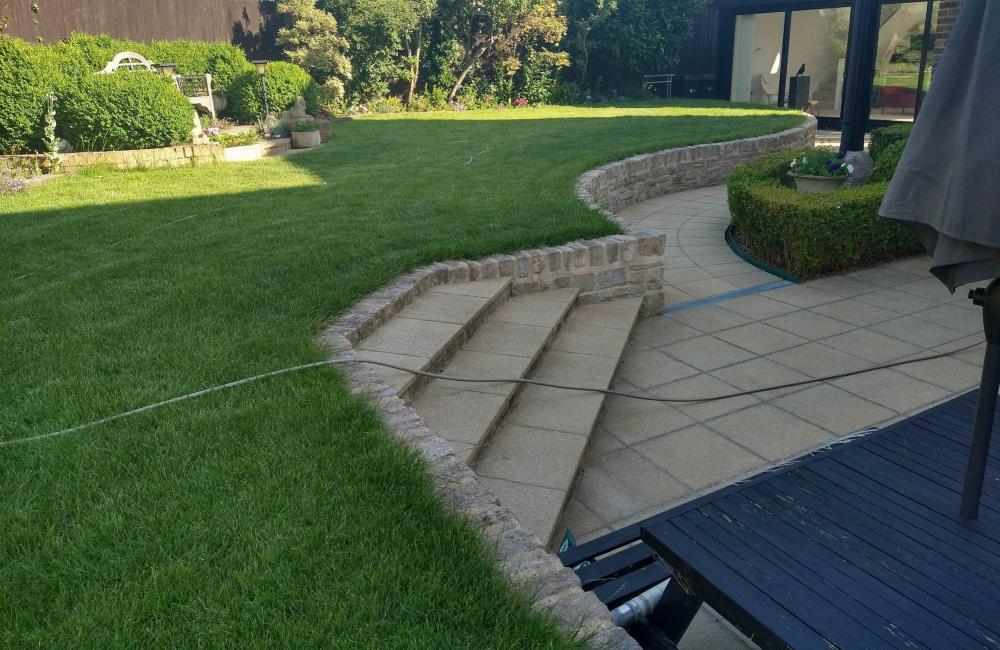
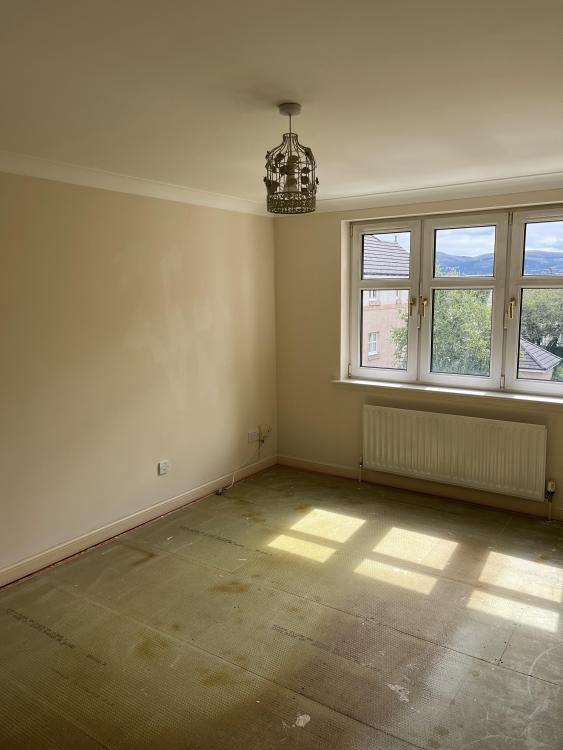
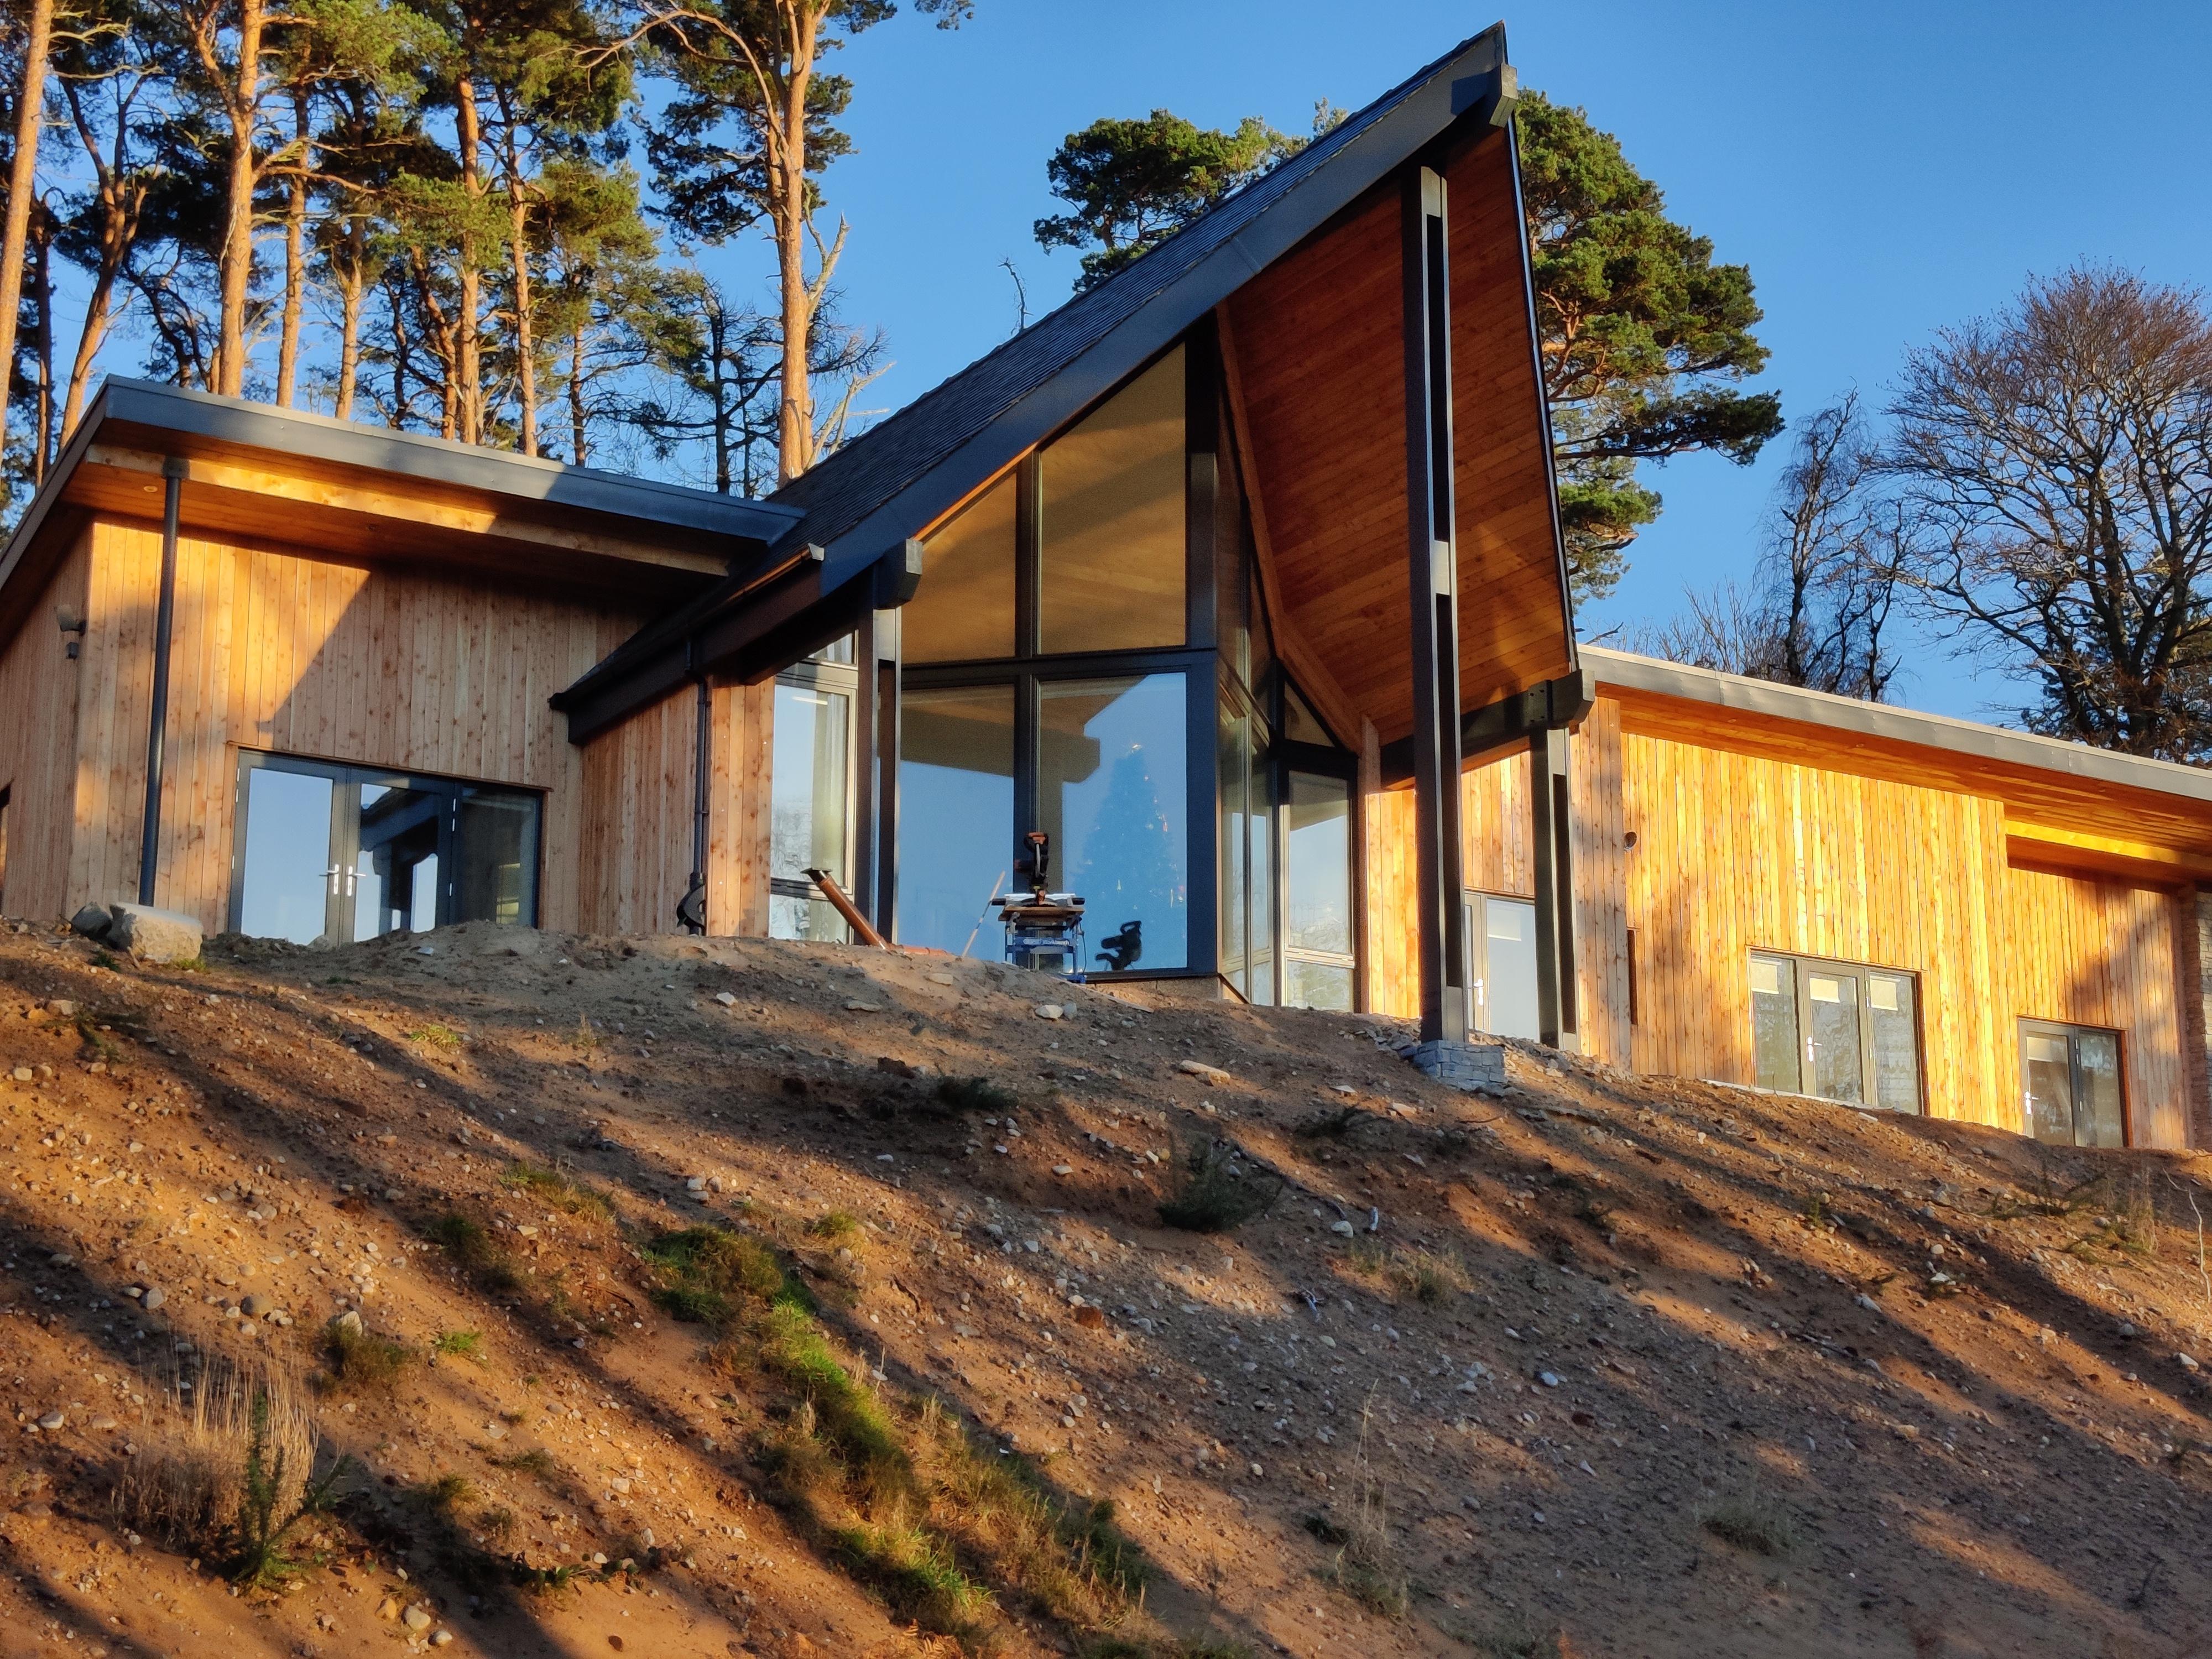
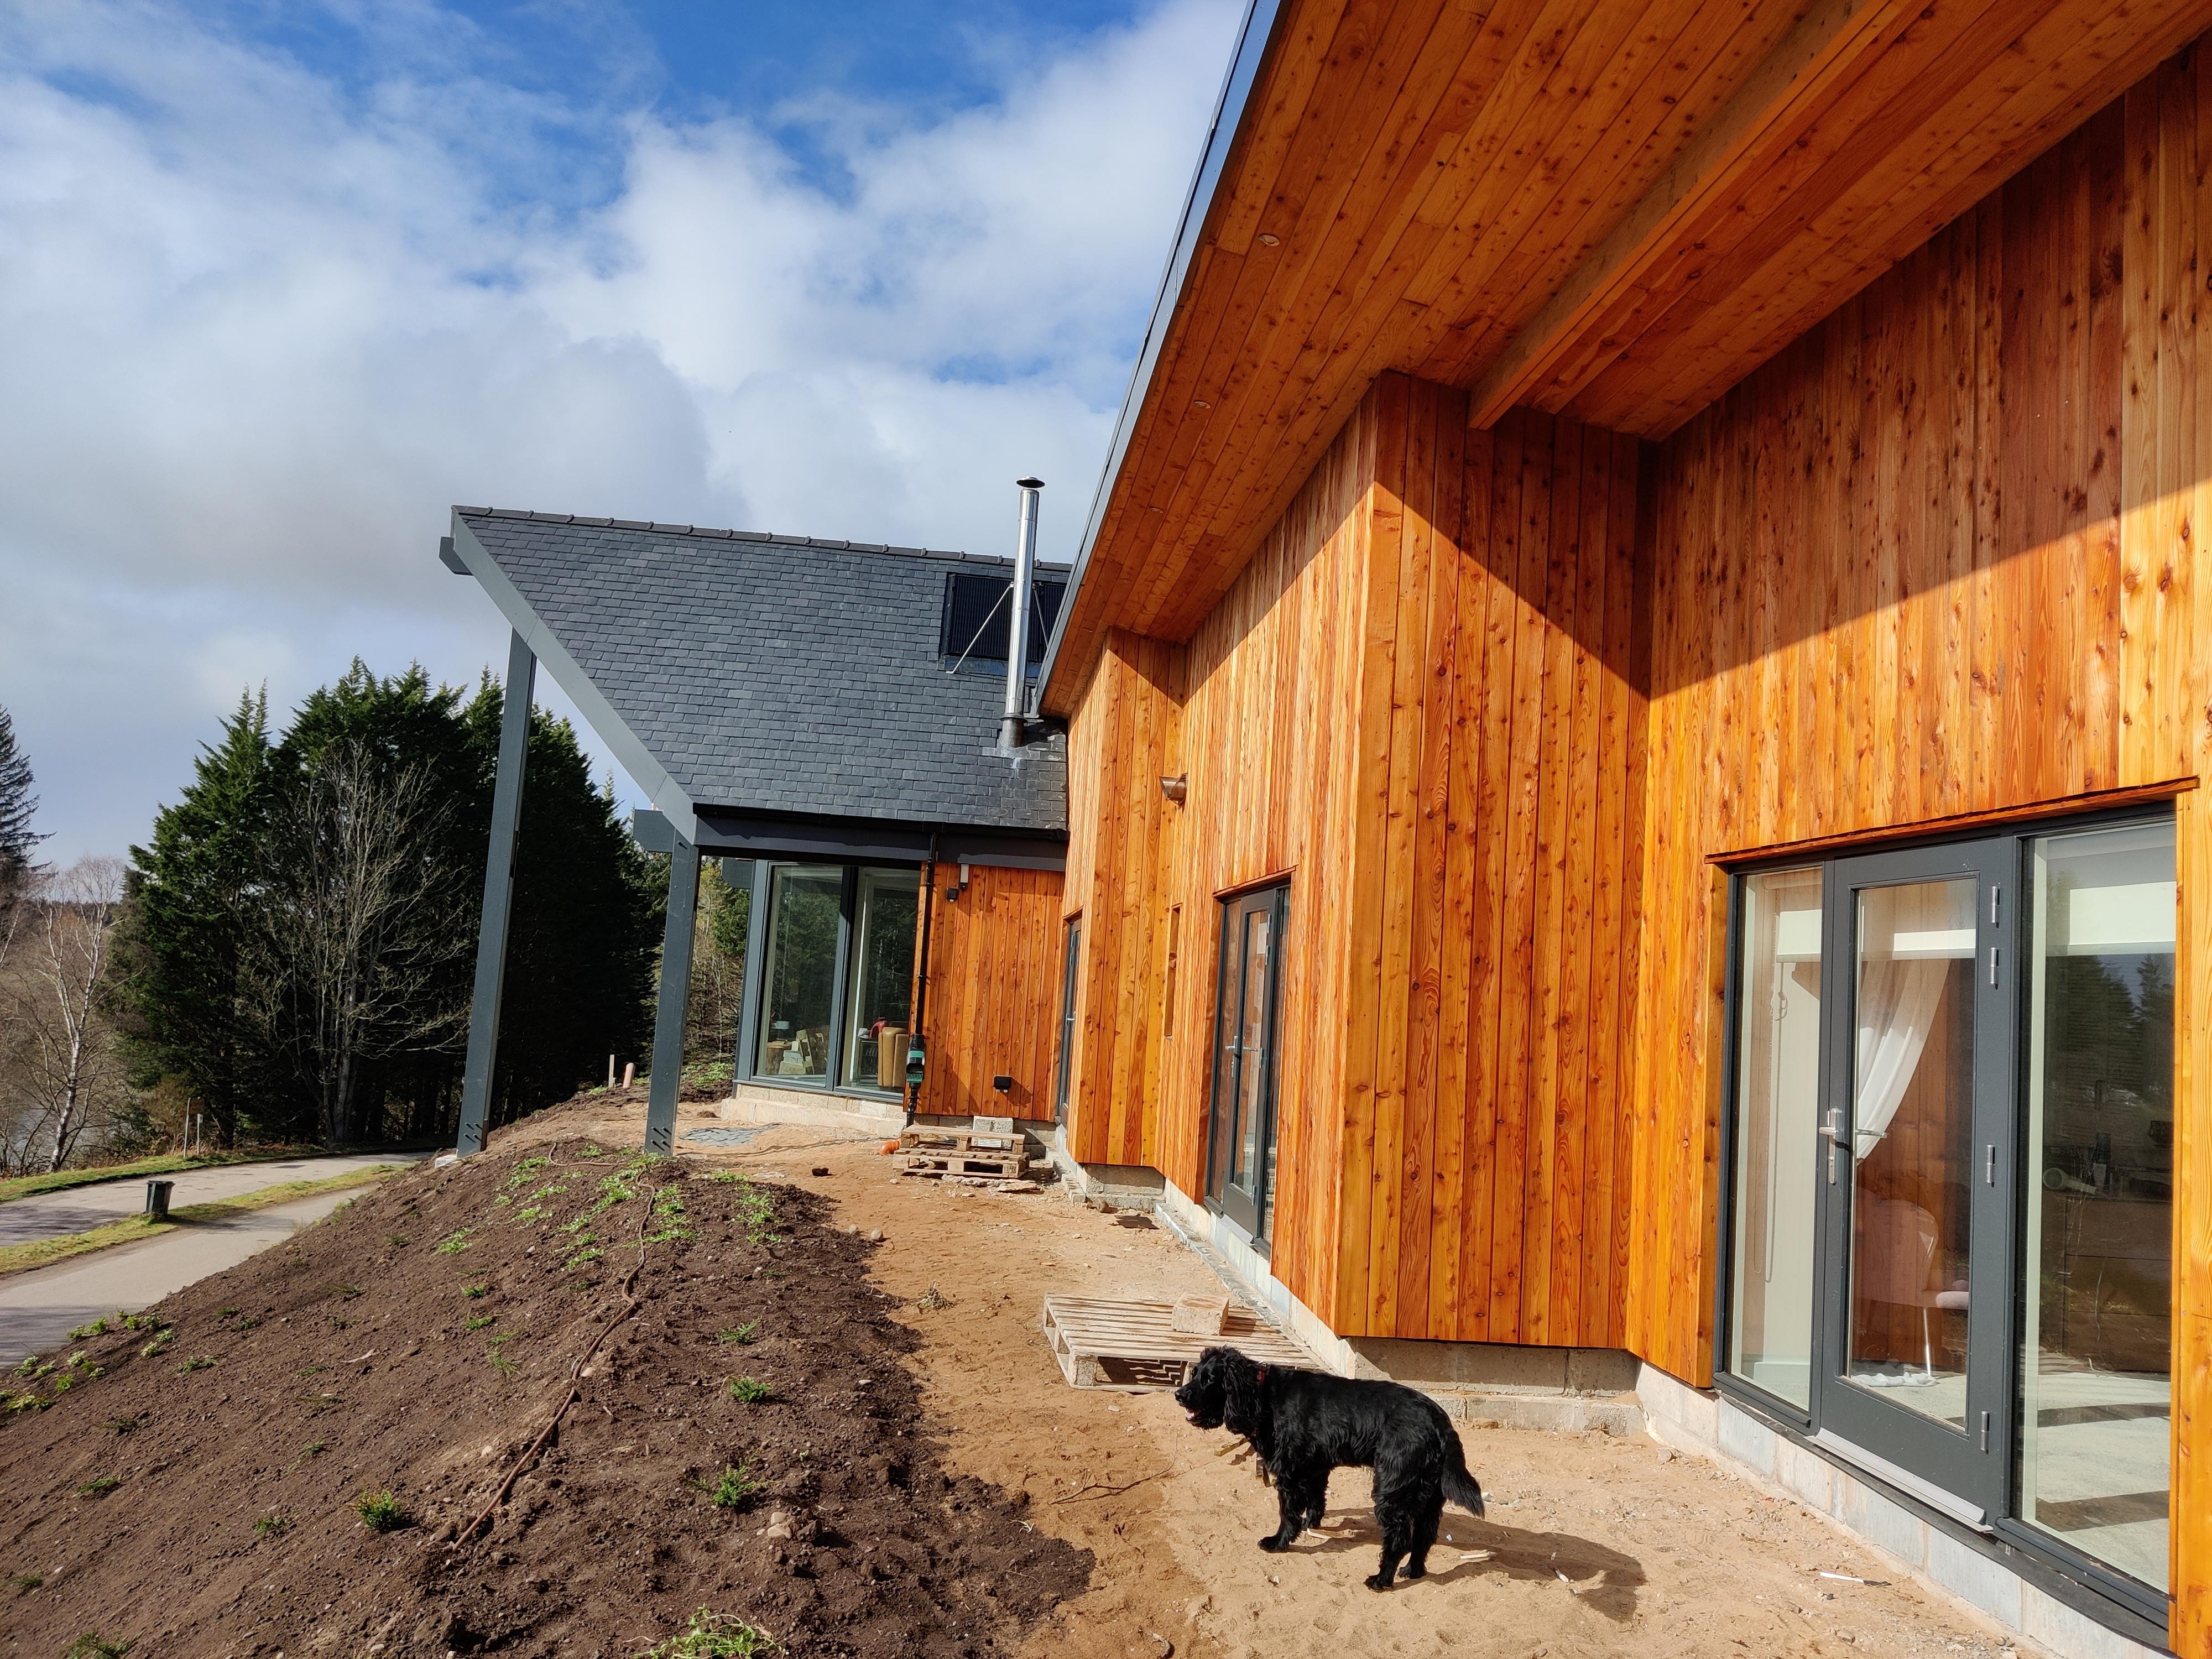
Not complete . Glazing on sides to go in later - very happy with it so far .
 13 points
 -
In my topic Modelling the "Chunk" Heating of a Passive Slab, I discussed how I used a heat flow model to predict how my MBC WarmSlab heated by UFH + Willis heater would perform. What I wanted to do in this post is to provide a “6 years on” retrospective of how the house and slab have performed as built based on actual data that I’ve logged during this period, and to provide some general conclusions. In this, I assumed 15 mm UFH pipework, but we actually used 16mm PEX-Al-PEX pipework with an internal diameter of ~13mm. At a nominal flow rate of 1 m/s, say, my three pipe loops in parallel have an aggregate flow rate of 0.4l/s or 1.4 m³/hr. At this flow, a 3kW (2.88 kW measured) heater will raise this stream temperature by 1.7 °C. However, when I commissioned the system, I found setting the Gunfoss manifold pump at a high setting (roughly equivalent to this flow rate) gave a very noticeable circulation noise in the adjacent toilet, so I tried the pump on its lower settings and found that the flow was almost inaudible on lowest one with in to return delta at the manifold still only about 5°C, so I stayed with this. The actual as measured delta for two loops of 4.9°C and the third slightly shorter loop of 4.1°C (close enough not to bother balancing the flows out). This corresponds to an actual flow nearer to 0.4 m/s or 0.56 m³/hr by volume. When scaled to adjust for this lower flow rate, the actual measured temperature profiles are pretty close to those modelled. I measured the actual Willis heater’s heat input as 2.88kW. In analysing the actual slab heating rates, I found that this raises the overall slab temperature by some 0.45 °C / hour after the initial start up. Plugging typical specific heat and density figures for the concrete, this is empirically equivalent to heating 25 tonne of concrete (Cmass = Ewillis/ΔT/SIconcrete = 2.88*3600/0.45/0.9 kg), or 10.6 m³ concrete by volume (23000/2400 m³). In the case where the Willis provides heating for the full 7 hour off-peak window (just over 20 kWh), at the end of this heating period the flow input to the slab is +9 °C above the initial slab temperature and the flow return is +4.4 °C. The temperature of the concrete immediately in contact with the pipe will follow this same gradient, with this temperature excess decaying radially away from the pipe centres. By the end of this heating window at the slab surface, there is barely a noticeable difference in the measured temperature of the floor above the out and return UFH pipe runs (perhaps 1°C). These temperatures and gradients are also comfortably within the reinforced concrete’s design parameters. As soon as the Willis is turned off, the internal temperature gradients start to flatten and any unevenness redistributed across the slab; the rebar reinforcing has a thermal conductivity 60 × that of concrete and this accelerates this, so that within an hour or so of the heating turning off, the overall slab is left about 3.1 °C warmer than at the heating start time (actually about 10% less than this, as the slab has already started to dump heat into airspace). In my original modelling topic, I mentioned that my passive slab has ~73m² of concrete 0.1m thick (~ 17½ tonne of concrete with another ~10 tonne of perimeter beams, cross bracing and steel rebar, with the UFH runs laid in 3 × ~100m long standard “doubled back” spirals (common to most UFH designs) on ~150mm centres and roughly 50 mm below the slab surface. (Actually only 75% of the slab is covered by the UFH runs, because of the need to avoid proximity to ring beams, partition walls, areas under fitted cupboard areas, etc..) Nonetheless, this empirical 25 tonne figure is still consistent with the total volumetric 27½ total estimate if we assume that the rebar is effective at spreading heat through the wider slab over this multiple hour timescale. In conclusion, based on this modelling and observation: First recall our context: our house is near passive in class with a lot of internal specific heat capacity. We only need about 1kW overall heater input in the coldest winter months to maintain overall heat balance, e.g. either by a resistive heater such as a Willis or an ASHP. IMO, there are two extreme approaches to house heating: (i) “agile” tracking of occupancy patterns so the living spaces are only heated when and where occupied; (ii) a 24×7 constant comfortable temperature everywhere within the living space. Our warm slab design is very much optimised for this second case, and our slab supplier did a good job in designing an UFH layout to match the slab characteristics to this The slab is covered in “doubled back” spirals with each loop using up a full 100m roll spaced on roughly 150 - 200 centres (and avoiding partition walls and cupboarded areas) so that each heats roughly 15 - 20 m² slab. In our case three loops were enough, and there was no advantage in trying to squeeze in a fourth. Our 3 loops will happily take up 3 kW heat input. Circulation speeds between ⅓ - 1 m/s seem to work well, with the only real difference being the slower the flow speed, the higher the delta between in and return temperatures. The slab does just as its trade name suggests: it can be treated as a huge low temperature thermal store, but because of its extremely high thermal inertia, one that is not rapidly responsive to heat input. In our case, a heat input of 3 kW input will only raise the slab temperature by 1°C over a couple of hours, and radiating 1kW will drop the slab by only 1°C over roughly six hours. In a true passive class house, one key to heating economy is the high level of thermal insulation coupled with a substantial internal heat capacity. Trying to drive such a house in an agile manner is a fruitless exercise, so forget the traditional having room-specific thermostat control; forget having traditional time-of-day heat profiles. It is far easier to treat all ground-floor rooms as a single thermal zone to be kept at a roughly constant temperature. In my view, using a resistive heating approach (such as a Wills heater) as well as an ASHP can both work well. In this second case something like the 5kW Panasonic Aquarea ASHP would be a good fit as it uses a modulated inverter compressor so it can heat the slab directly without needing a buffer tank. The choice is a trade-off between running costs vs. installation costs. In our case, switching from a Willis to this type of ASHP would save me about £600 p.a, in electricity cost, so I would really need to do the install for a net £ 3-4K to make the investment case feasible. However I would like to defer this discussion to a separate thread because there are other issues that such an approach would need to address.13 points
-
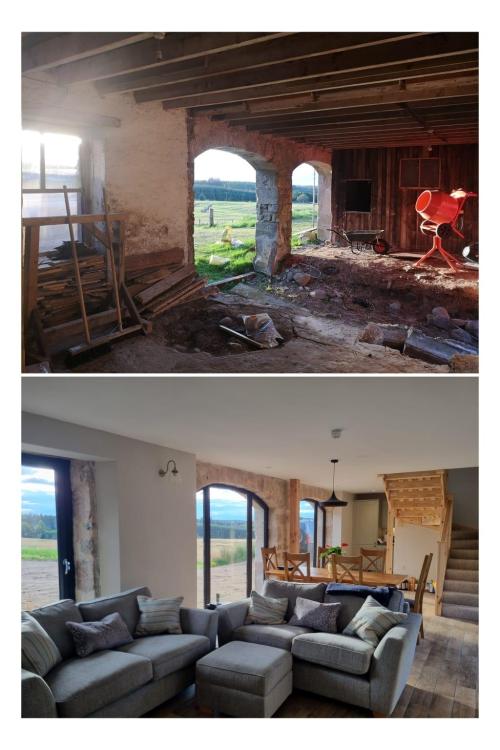
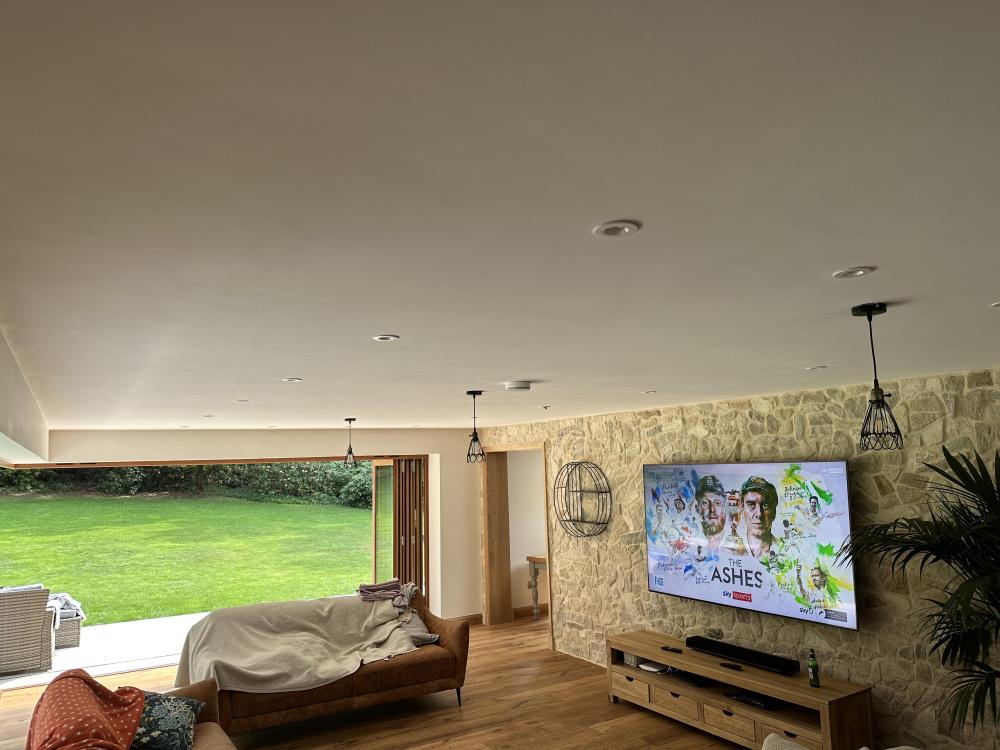
Not so long since this was a storage area with a passage still full of mud and cow manure. Curtains up is a big moment. The rest of the place is at first fix with pb coming behind it.
 13 points
 -
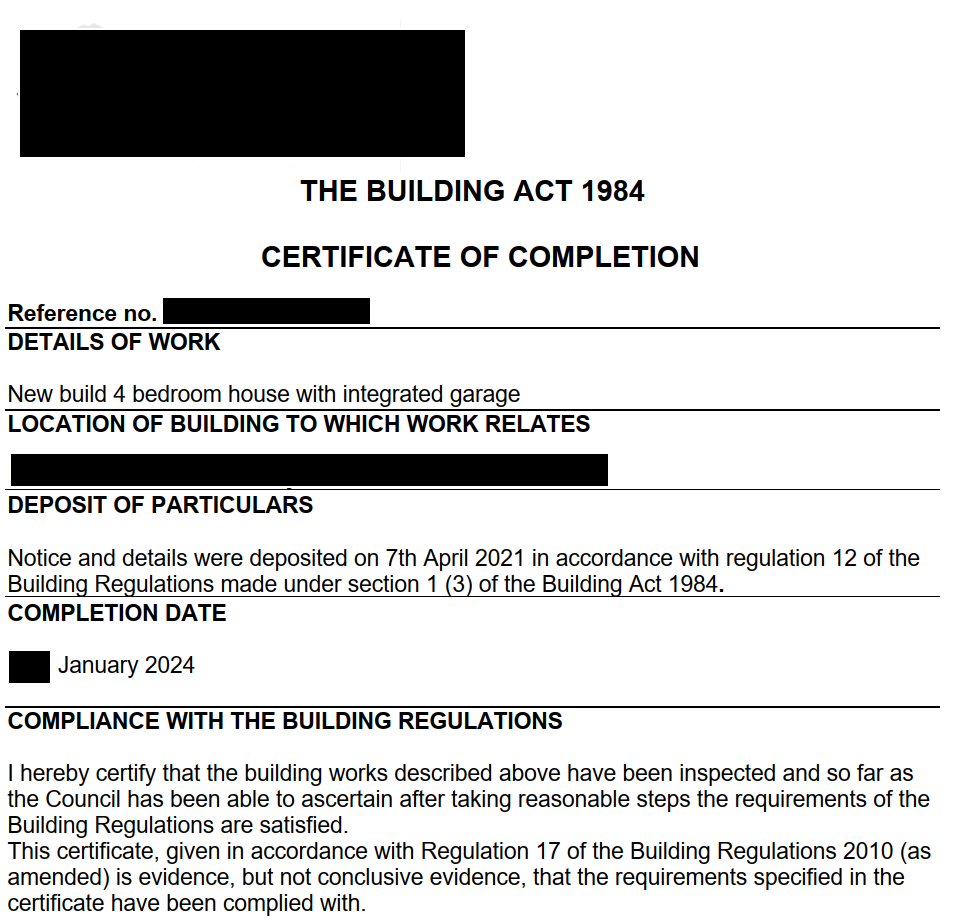
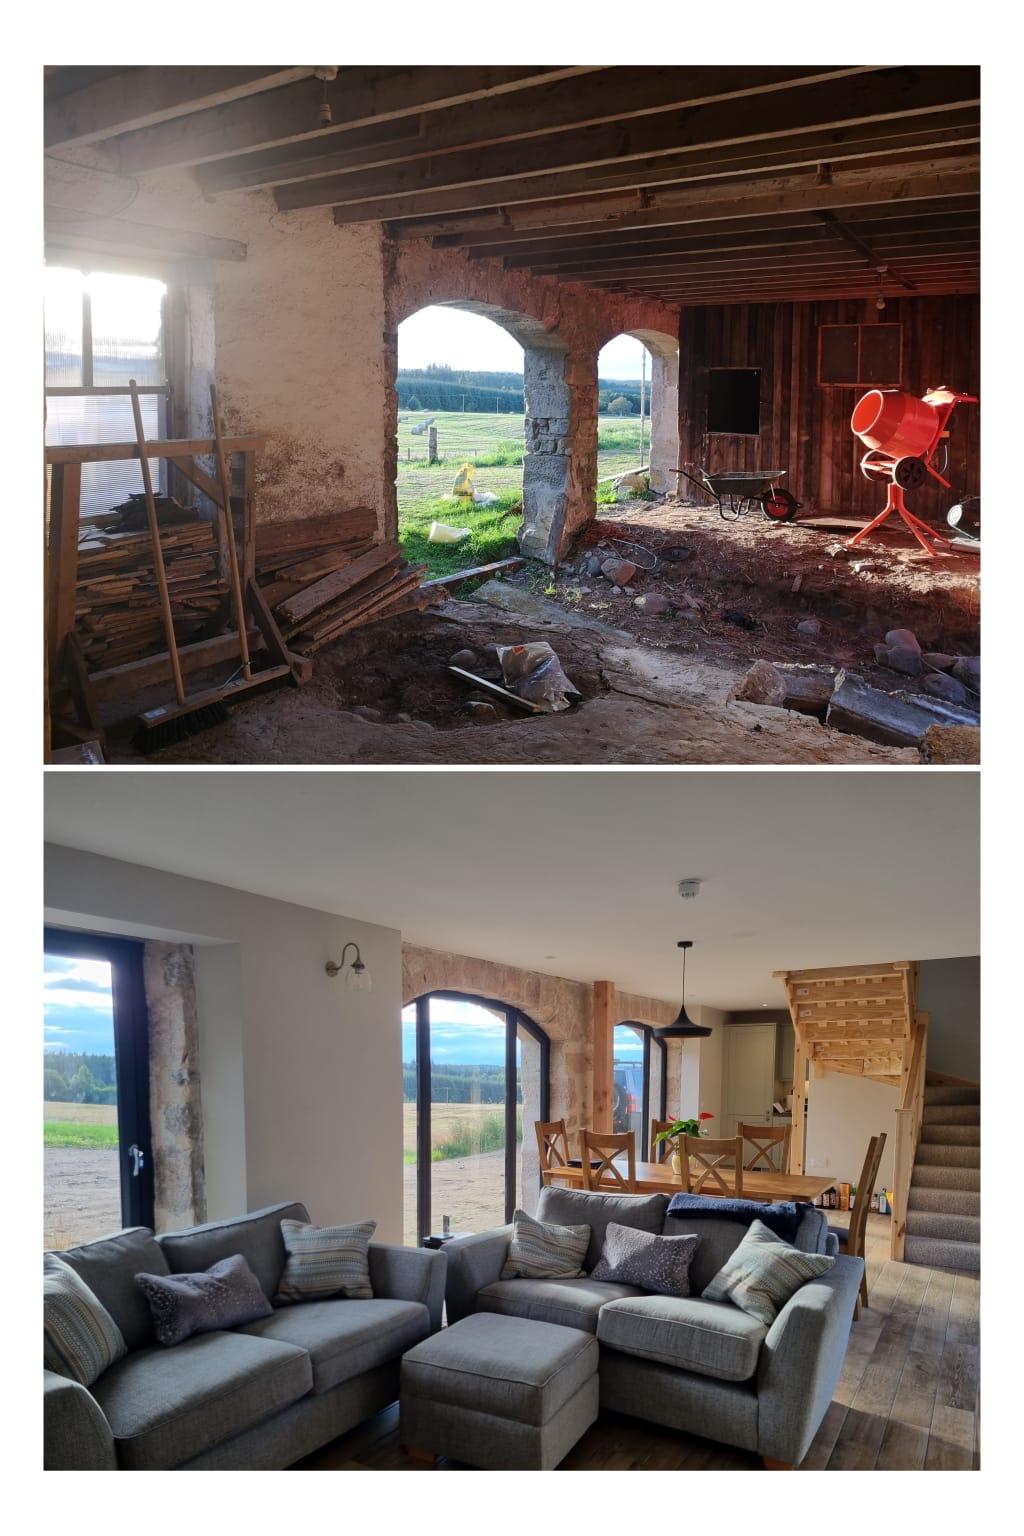
Around 11 months ago, we started from a stripped site, the treatment plant was in and running the cabins / static so drainage just required connecting up. we had to wait for the warrant to be amended (change to the certificate of deign) this held us back ma month or so until the BCO just said "get on with it, we can sort that later"- top guy!! If we had waited for the amended certificate of design we would still be building, it took him 5 months to get it to us. I've documented most of the build in blogs on here, partly to have a refence to remember the process, partly as pay back to Buildhub for the inspiration and pointers in the planning / design stage. I'm so glad I spent hours looking at and reading others blogs that we made the switch to ICF. I'm convinced there is no way I would have achieved the efficiency I have for the money spent. Budget was always tight, so some decisions have been made due to Hobson's choice, leading to triple glazed UPVC windows and composite doors. The front door, south facing GRP Composite with low threshold and a slim glass panel leaks with 40mph winds, this leaks through the gazing cassette, and the low threshold. as I know we wont use this door much, we went for a slam lock, another mistake, it blows a gale through. To be fair the company are re making, I'm just not sure if there re-making the panel or the full door, I did ask, if they were remaking the full door to change to standard handle and lock, so it can be adjusted to minimise the drafts. we will see what happens, a full door replacement will mean taking off the reveals in side so a complete PITA, but worth it for no drafts. We had the airtightness test carried out, and they used the front door for the blower door to mitigate any issues with that door. I had put caps in the MVHR. so he just cracked on, the back door is not perfect again due to the low threshold. He didn't seal the blower door to the frame, not sure what the procedure is but seemed a little frustrating. We achieved 0.88 Air permeability, which I'm very happy with, budget wise we didn't spend hundreds on airtightness tape, just designed good solutions, and the doors leak a bit . Our As built EPC came back at A103 , with a possibility of A128.. the report say A105 if we install Thermal Solar EST saving of £40 pa , and A128 with a wind turbine EST saving of £1100 pa, so pretty much the best we could hit. To finish we need to sort out some paths outside, ramp, and the rain water pond, but other than the second bedroom need decorating the house is done. Next week we will hopefully get building control around to see what he 'needs' to get a completion cert. I'm hoping for some flexibility on the ramp and pond, . We need the VAT refund to pay for this stuff. We are working our way through the invoices, but we built for less the 90K and we still need the VAT refund. I've enjoyed it all, and we both agree we have a home. Good luck to all of you with your current builds.12 points
-
I had never built a stone wall before but decided to give it a go. Stone IMO is way more forgiving than brick or block - by its rustic nature! Think I got away with it...
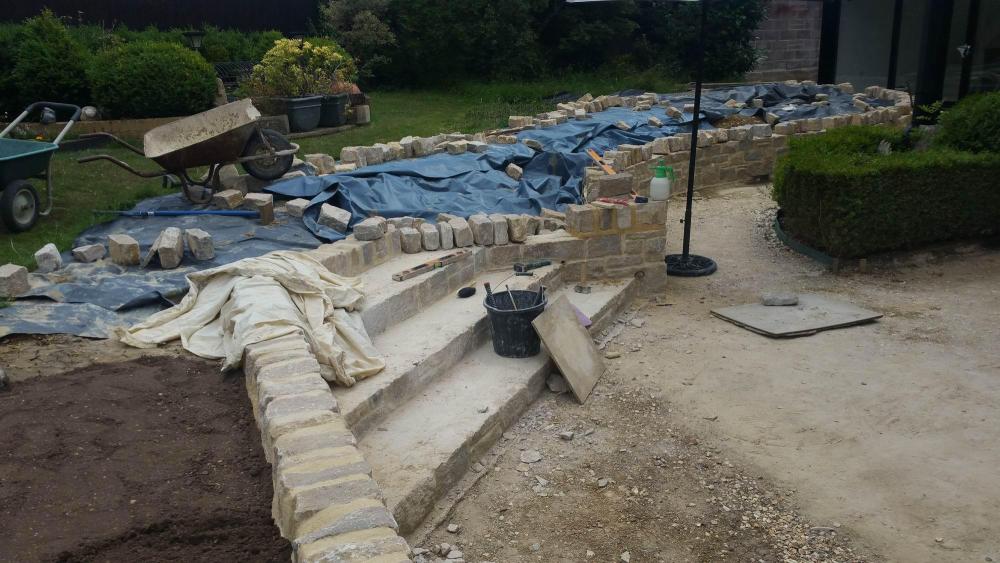
 11 points
 -
Good evening all, Today we received a letter from HMRC dated 16 June telling us that our claim has been accepted (with no disputes!) and would be paid to us in 10 working days. Great news, but even better the payment was already in and made on the 16th. Sharing this news here to: 1. Let others know the current timescales of claims. We posted ours a few days before the end of April this year, so around 7 or 8 week in total. 2. To say a big thank you to the members of forum for all the great advice shared. I spend more than a couple of evenings browsing past posts and learnt considerably more about the VAT claim process here that anywhere else, and it all paid off. Great job.11 points
-
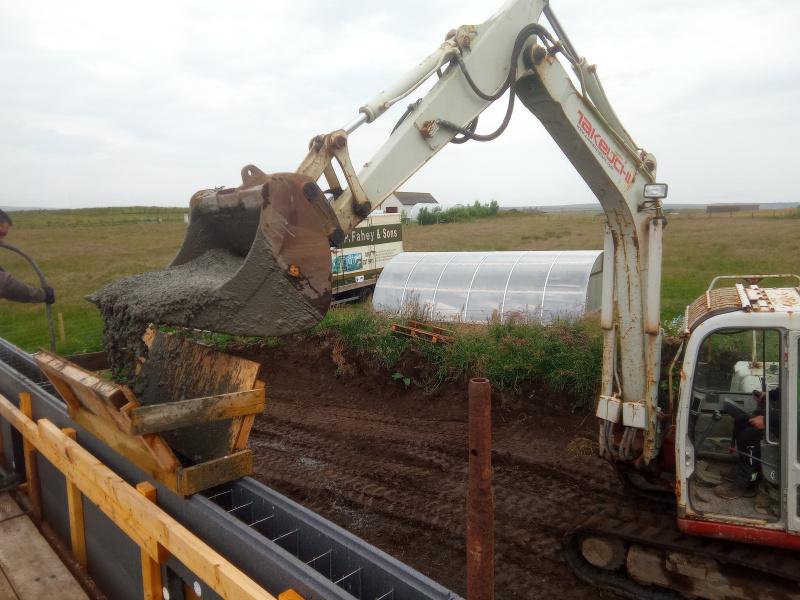
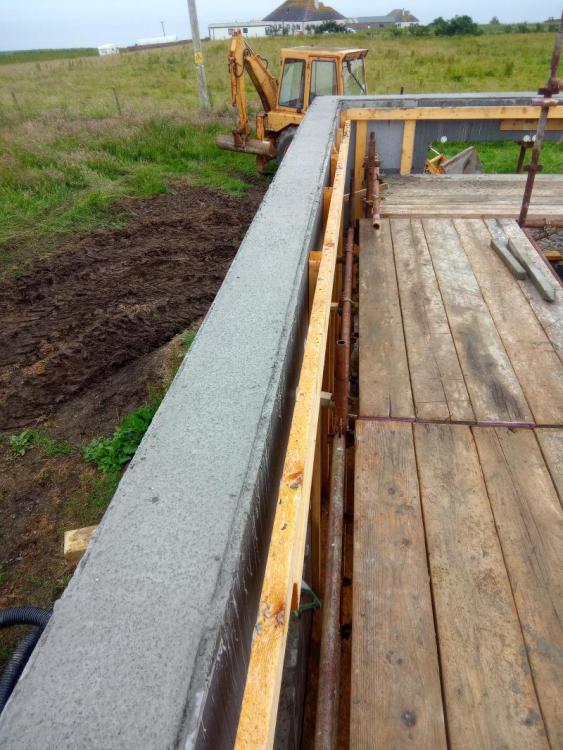
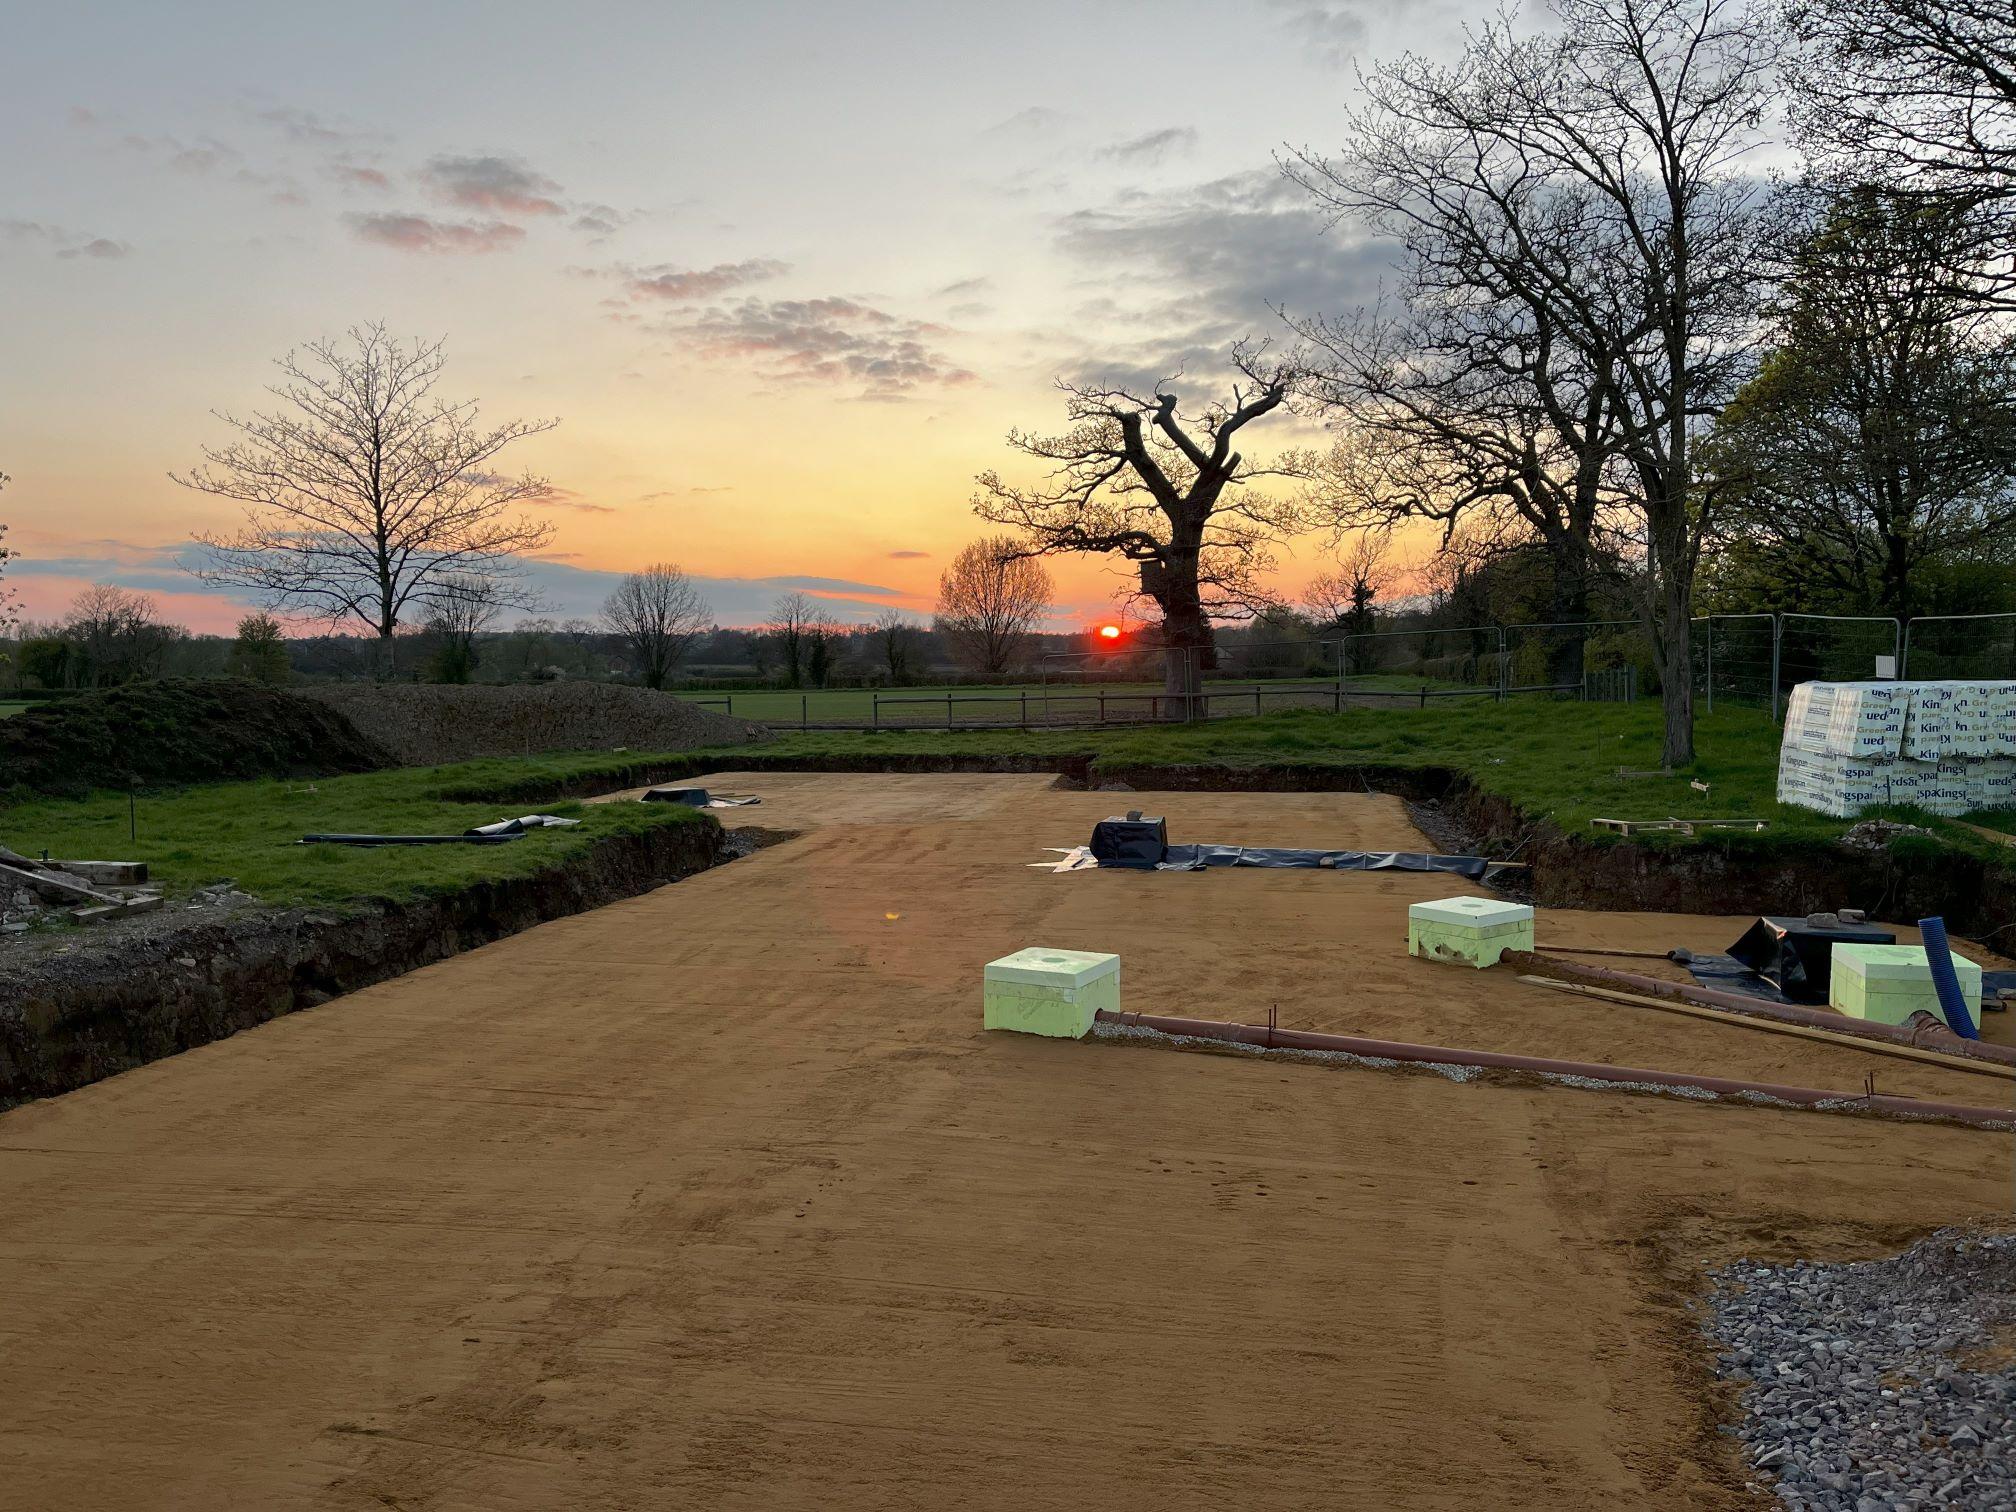
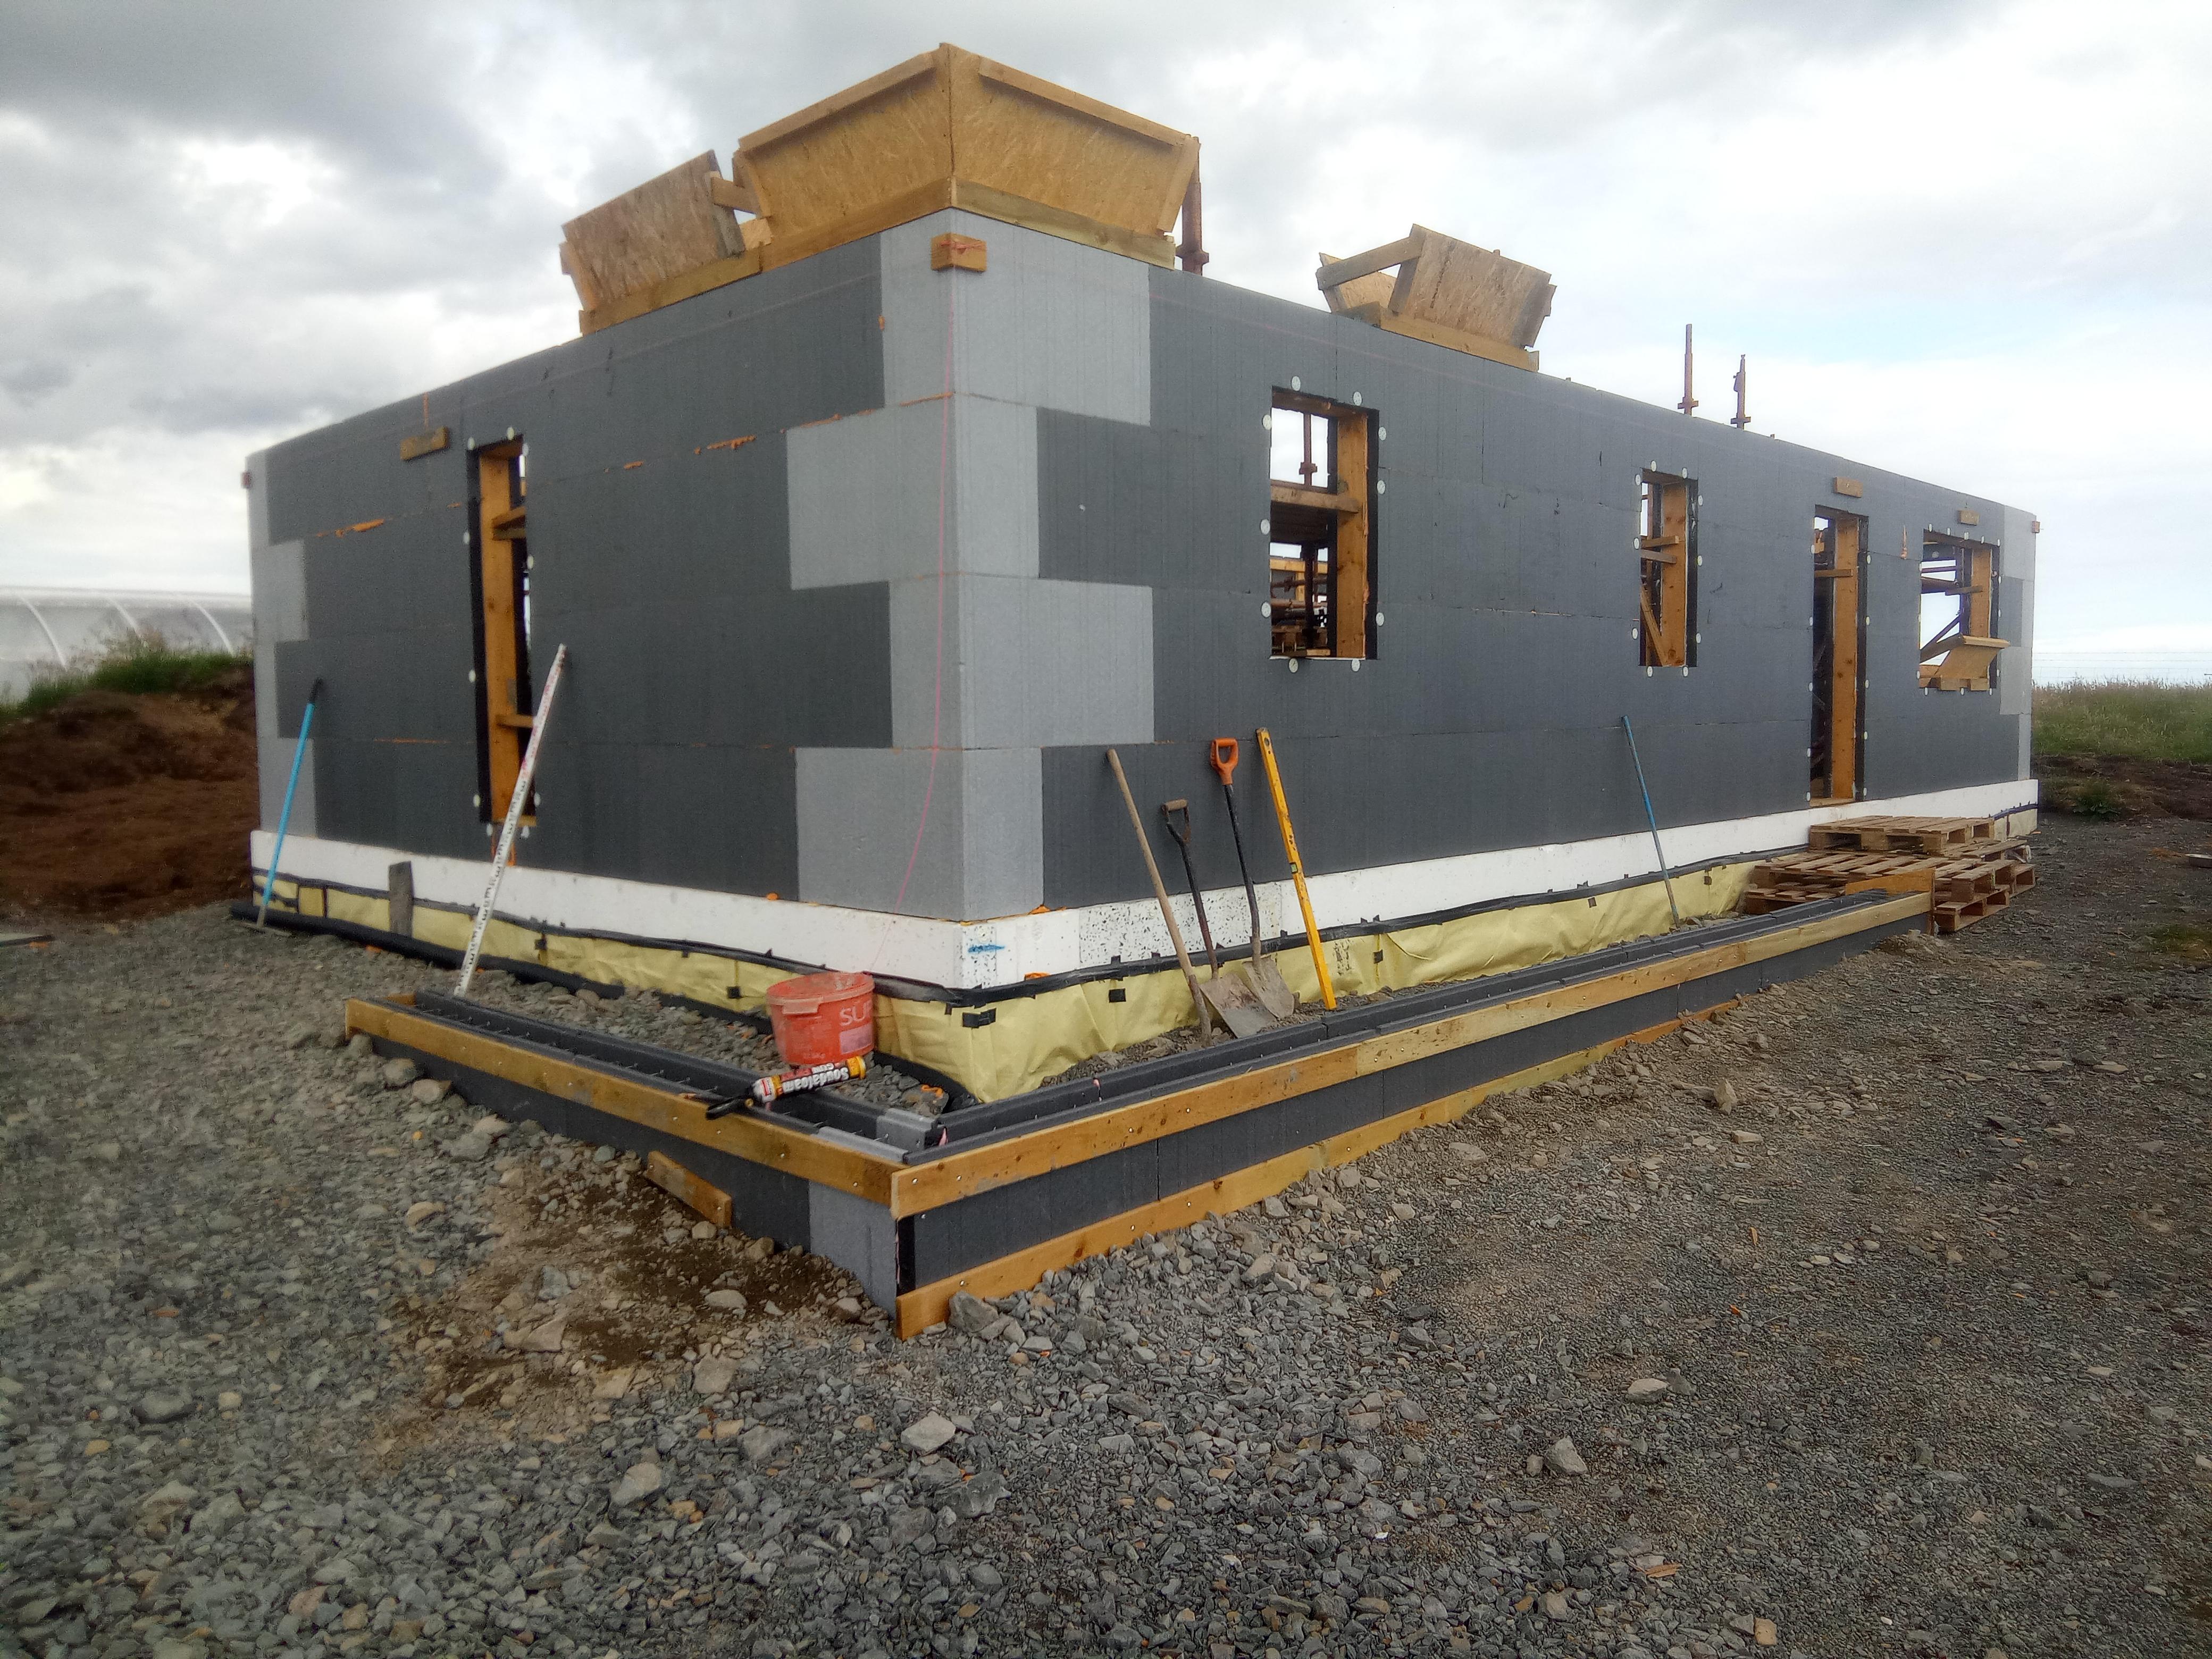
Finally made a start in earnest. The original plan was to stick build on site, but the cabin builds opened my eyes to the winds up here, and established concern for getting the house airtight. I priced ICF, and although the costs are higher in the begining I think, I can self build for similar money, but get a far superior product. This is a budget build, most of the nice to haves have been dropped. The only redline is we want to ensure this is future proof, so all on the ground floor. Around 12 months ago the area where the house is going was stripped down to bedrock. The initial plan was a DIY insulated raft, but the move to ICF opened up a more traditional strip footing using the ICF. Back in February we hired a 360 with a pecker to break out some of the rock to lower the NE corner, as the bed rock slopes to the SW. Bed rock exposed looking East NE corner We broke out and removed around 400mm of rock along the W and N elevations, the break out got shallower towards the SW corner. The main aim here was to reduce the height of the house on the SW corner, we will be bringing the ground level up to minimise the impact. We also need to strip some rock of the slab area to allow for the 300mm insulation. This week, thanks to an understanding BC officer, ( still waiting for the revised certificate of design to change the building warrant, but he's happy for me to proceed with the old warrant for the time being👍❤️). We made a start preparing. The plan is to shutter the strip foundation. First step was to level the strip with layers of compacted 40mm to dust stone, and also level the bedrock for the slab. Ready for stone looking W Starting on the North trench we barrow in the stone and compact. Adding more stone in layers and compacting, the backhoe loader was doing some of the grunt, but the leveling was all by hand, 100mm layers at time. looking NE Took the decision to build the sub slab to what will be the same level as the strip footing, this allows for the Radon barrier to be put under the strip up the side and then on top of this sub slab, then all services will be above the radon barrier and below the insulation in another layer of compacted hardcore. The main reason for, what will be a fiddly taks of having the radon barrier under the strip, is that the strip footing has 288 starter rebars and sealing these penetrations would be worse. Once the strip is poured we will finish of the back filling and install the radon barrier. More stone looking East So 5 days in me and Mandy have moved levelled and compacted 70T on 40mm to dust. And around 5 ton of quarry dust, this is used up here as an alternative to grit sand for blinding and pipe bedding. The shuttering is 150*50 timber that will be leveled then the radon barrier folded to form a tray, later to be joined to the slab. I'm going to use 6mm threaded rods to link the two shutters together, preventing any spread when the concrete is poured. Hopefully next week the ICF arrives, in I've got a 10 hour round trip to collect rebar. For a tank of fuel and a days driving I can save around £500 collecting from Central rebar in Aloa. For info, £930+ / ton direct Inverness suppliers (100miles away) we're after between 1250 & 1500/ton plus delivery charges ranging from £200 / £350 plus vat.11 points
-
Since starting this build we've had a handy mound of "spoil" from which I have been taking regular photos from the same(ish) spot to remind me of progress during the "down" days which we self builders all suffer from time to time. I thought I'd share this with you. It starts in May 2021, when the major groundworks had been underway for a few weeks and goes up until April this year - about 2 years. First a picture of the mound of spoil for reference: and now the "timelapse": Since that last picture we've been putting on the warm roof structure, so any further photos from this vantage point don't show much sign of progress. so until something significant happens in August this view won't change much9 points
-
Submitted on the 18th 22nd they emailed requesting i upload 10 specific invoices, uploaded that night. 26th, full claim amount landed in my bank account this afternoon new system seems pretty good!9 points
-
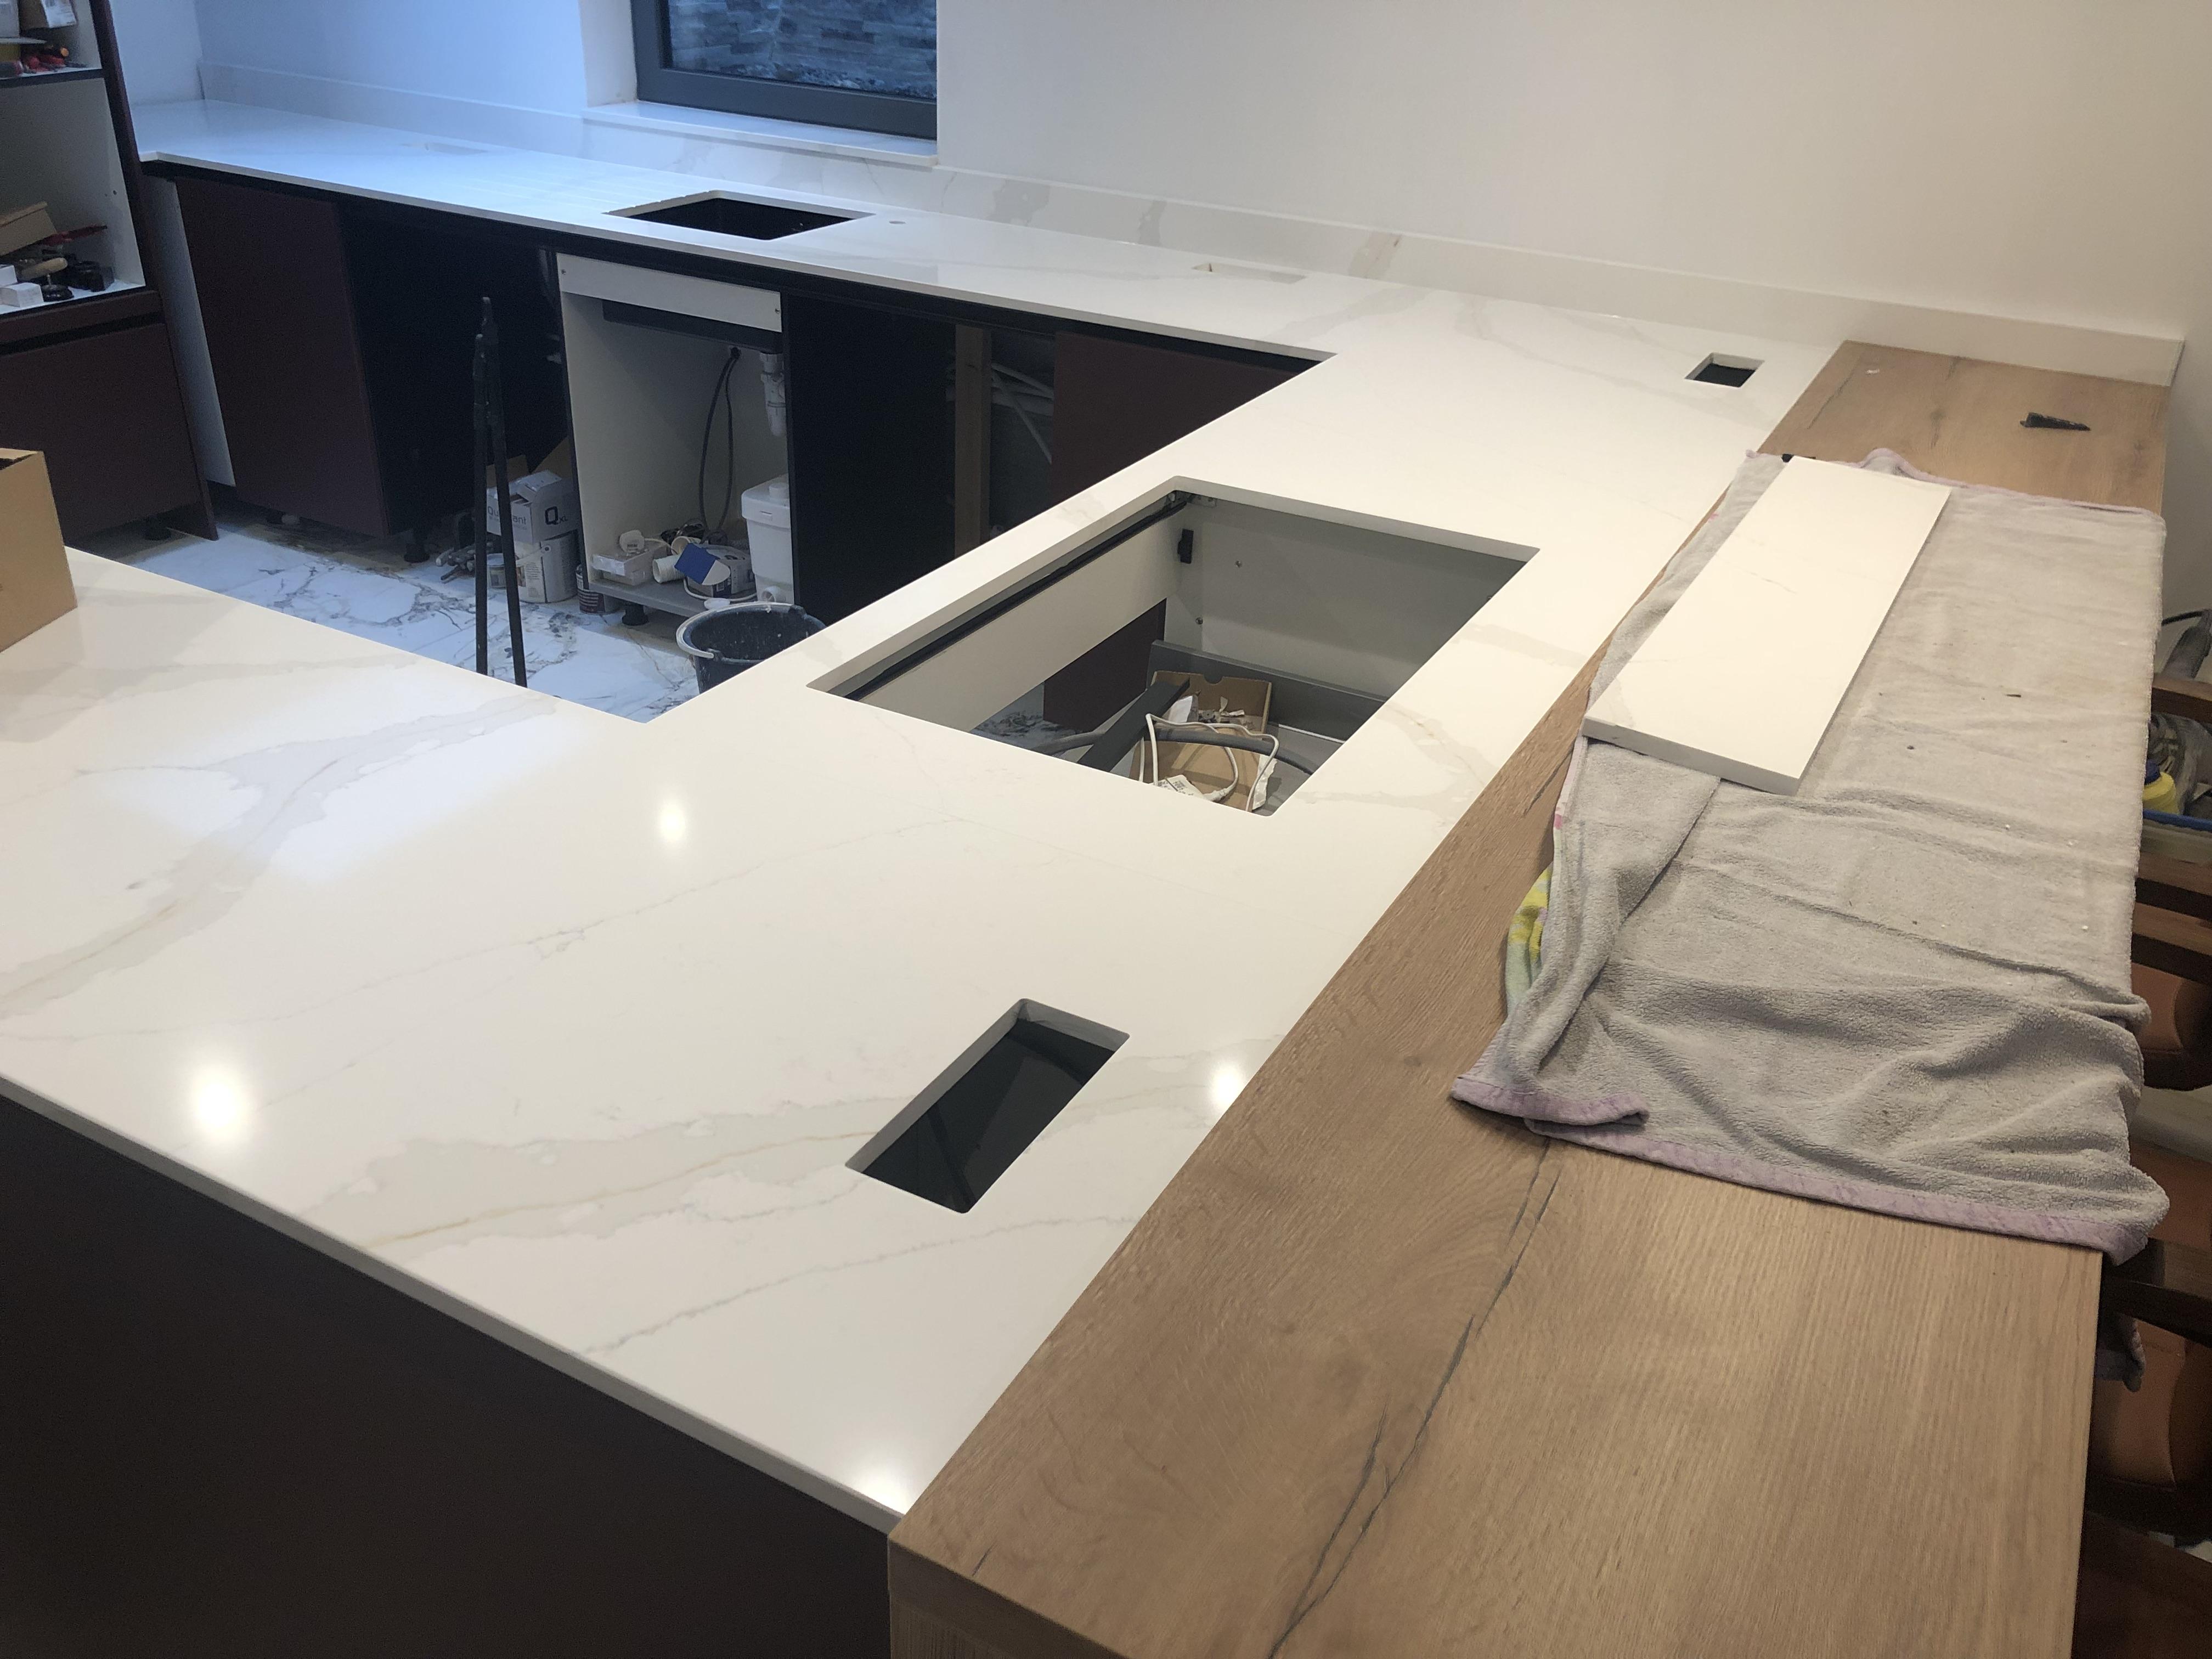
Worktop went in easily .

 9 points
 -
Got the drone up yesterday. First time the flat roof has been clear of stuff since April. Also did another tidy up so the whole site is now clear with the spare materials organised by type in one corner out of the way. We should have been getting the drainage finished this week but the flooding in the local area has held the team up on another site. I suspect there will be another delay due to the coming storm. Interesting comment from someone yesterday. I had the magic mastic man have a look round to get an idea of the size of the job. I can apply mastic well enough but he’s a bit of an artist with the stuff and his work is impeccable. He asked me where the heating was. I told him there is nothing in the house yet. He couldn’t believe how warm it was.
 9 points
 -
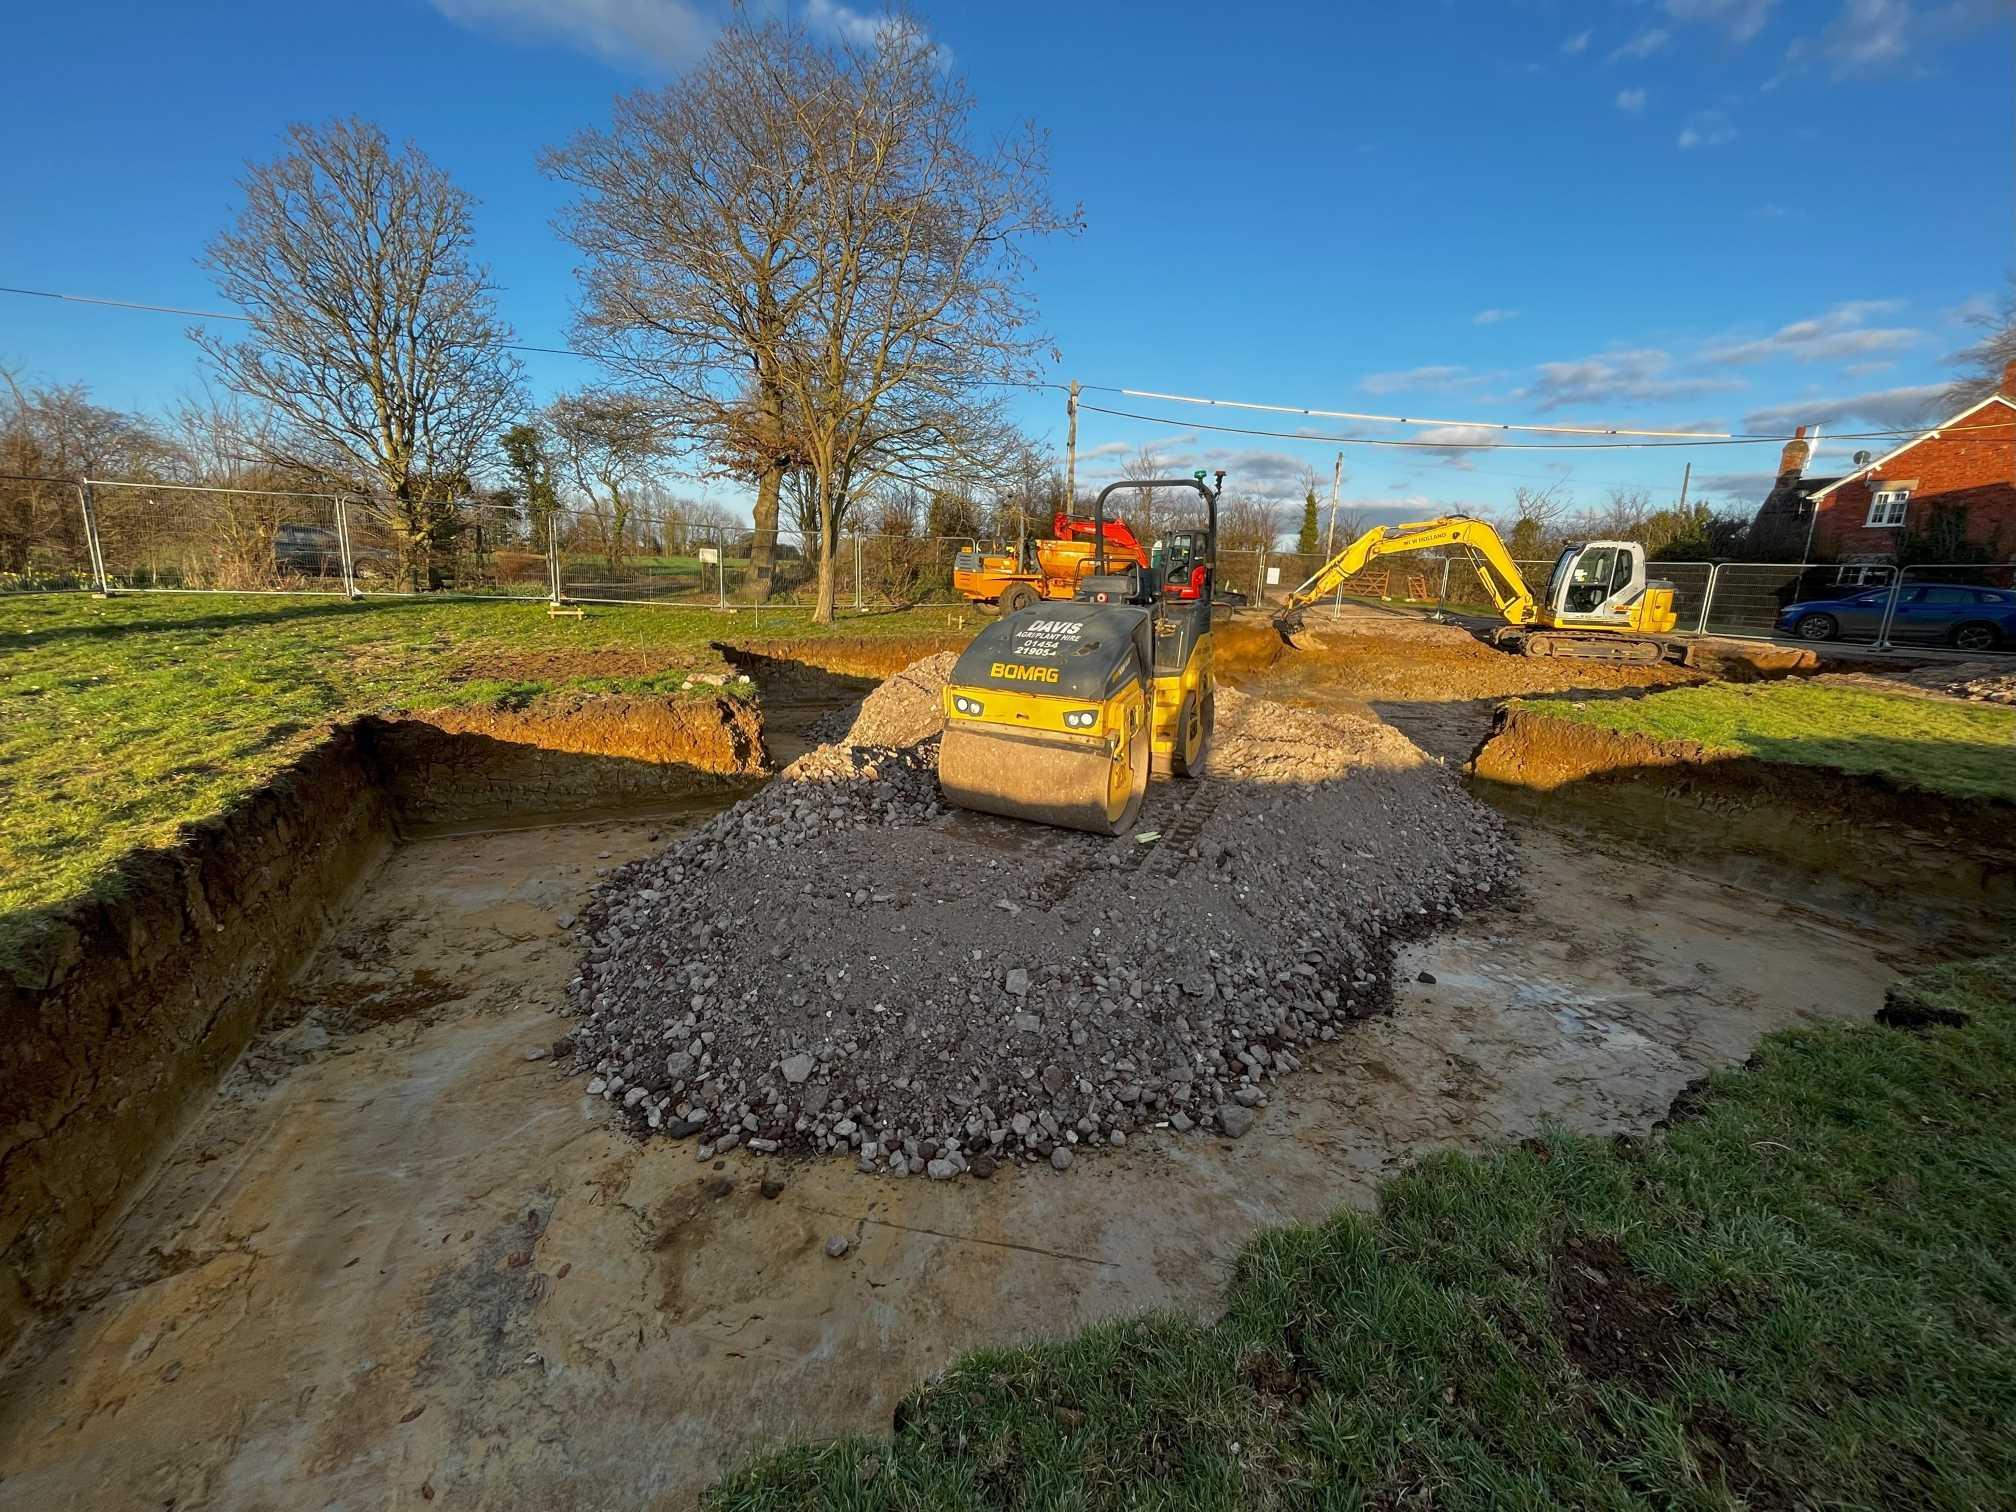
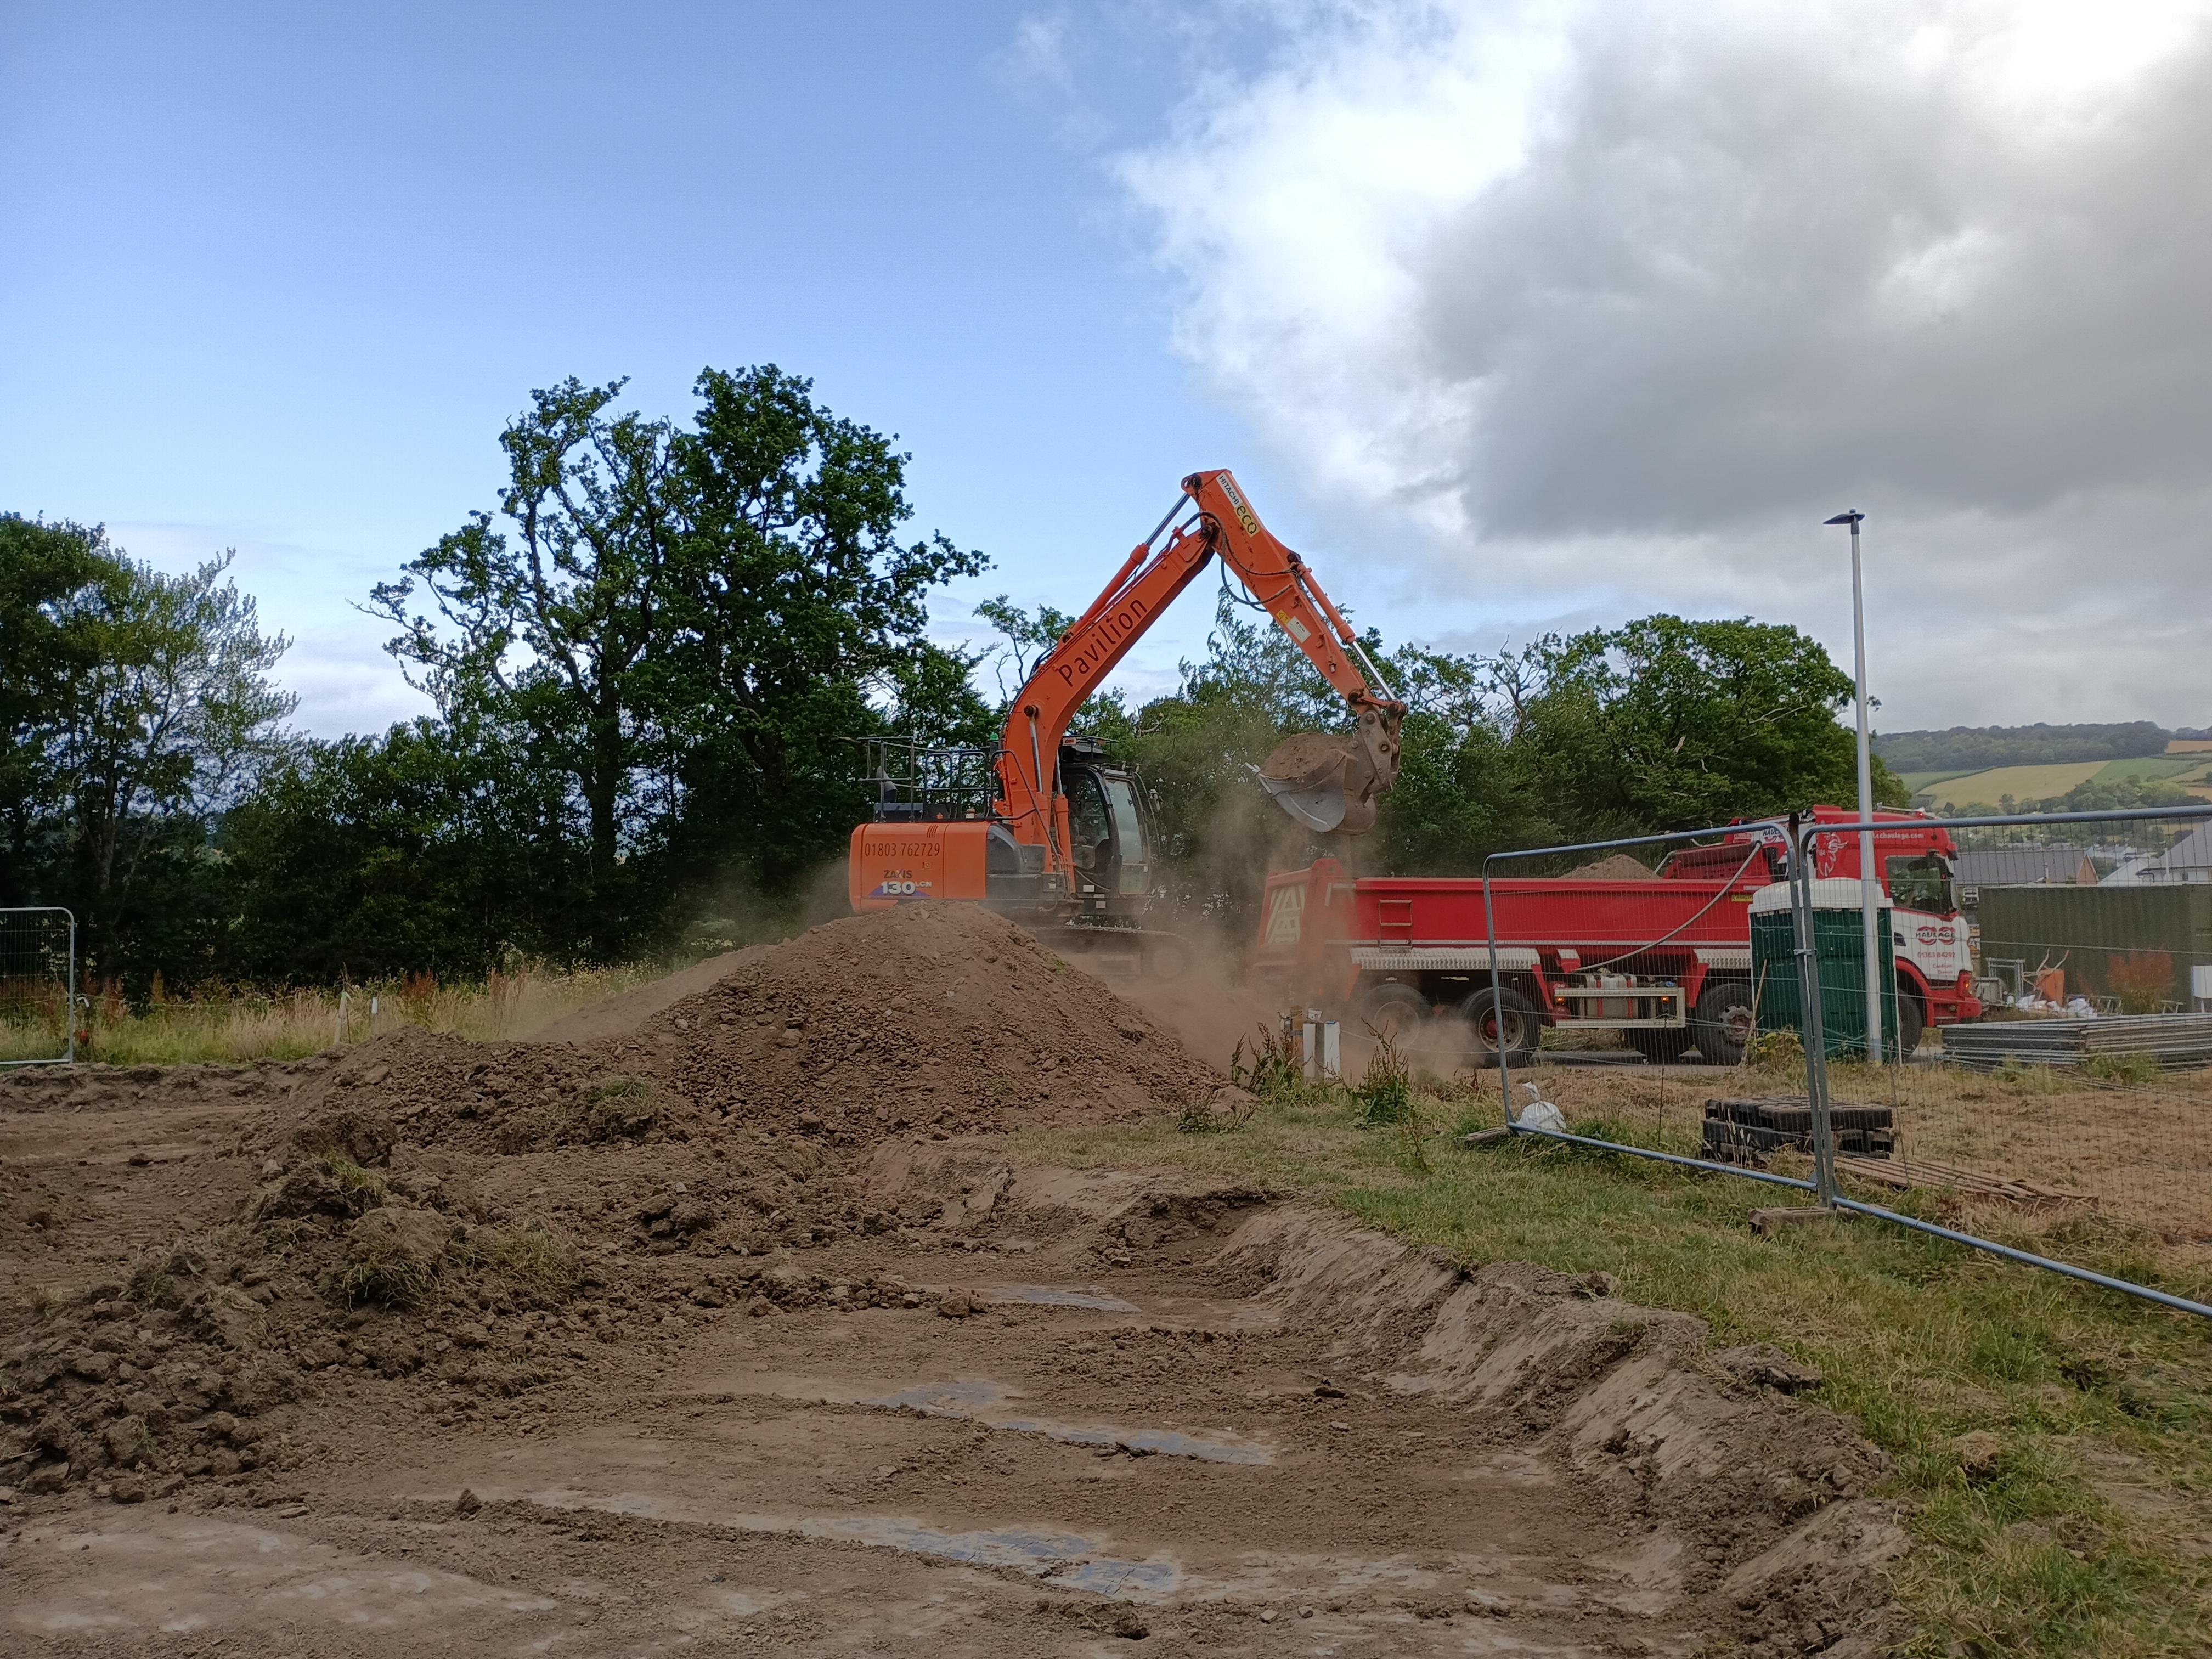
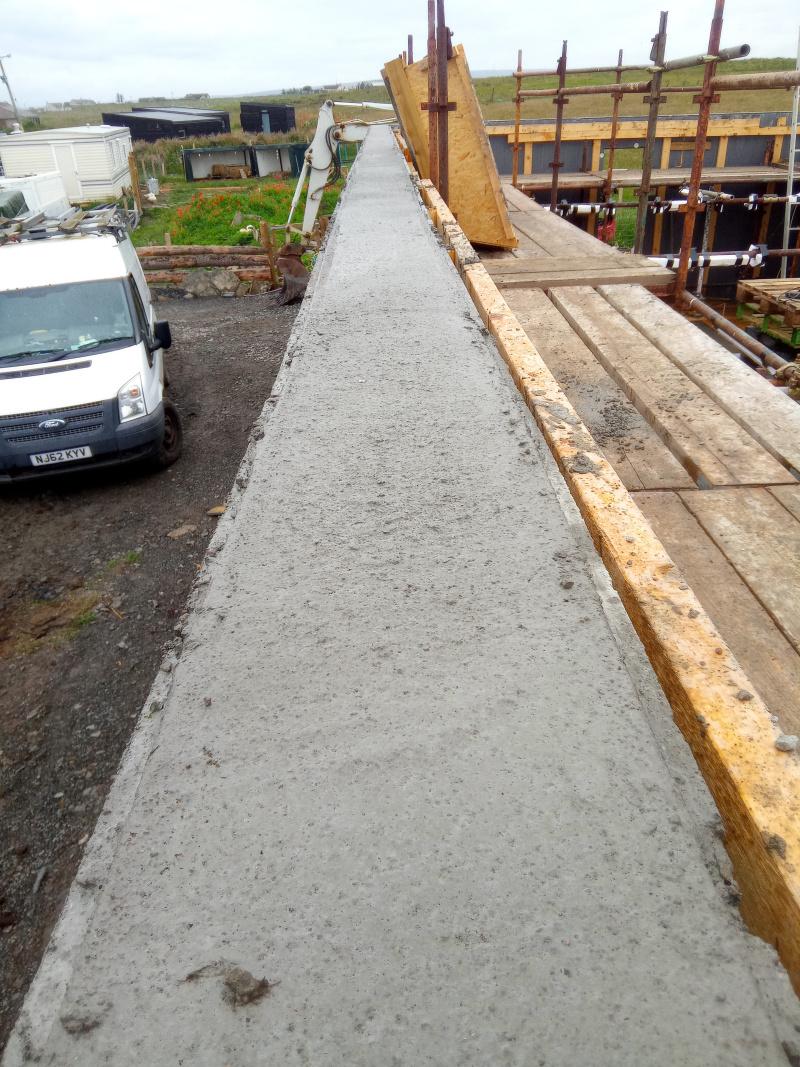
So to recap: we bought an old house with a bit of land at the back. We tried to get permission to knock it down and do a new build passiv house in the backland. The council said no no no, we lost an appeal, then put in ridiculous plans for a massive extension with basement on the existing old house, plus a large stable block on the back land where we wanted the new build. Council said yes yes yes, thats fine, please go ahead.... Having never built anything major before, we hired a 9 ton digger and a small tipper truck and set about digging a hole. The basement would start over 4m back from the existing rear wall of the old house and as long as we graded the excavation where possible and used plenty of sheet pilings, it would work out fine. To get rid of the clay soil, we just spread it out on the land at the back saving quite a bit on grab lorries. We originally planned for a four week hire of the plant, but we ended up taking about six weeks. Prior to digging I made a few test trenches to check the soil and water level. We also found an in depth soil survey from a major development next door. Once we had the hole dug in the right place, and sorted some temporary drainage, we set about levelling and pouring the basement slab. This was designed to be 300mm concrete on top of a tanking membrane, with tons of rebar. We just followed the drawings and building control came a few times to check it all. The waterproofing was overseen at each stage so we could get the warranty as well. We poured the slab in winter of 2022 and had a few cancellations due to frost. In the end we made an insulated temporary roof over the basement and used gas heaters the night before the pour just to be safe. The concrete went in very well, i think it was two loads of waterproof concrete, then we could start on the nudura walls. The hardest part of this section was wiring all the rebar together and getting the 20mm OD L bars in place which connected the slab to the nudura walls. These were doubled up all around the perimeter every 8" and a pig to get in amongst all the rebar mesh. Assembling the nudura walls was very straight forward, once i got my head around the idea of a common seam - where due to the plan measurements, the nudura blocks needed cutting and joining together. We had done the nudura course and the rep was very helpful with all my questions. Once built up, building control came out again and we ordered another three loads of water proof concrete for the walls. Where the walls joined the slab, we used an expanding waterbar and kept it dry until we poured the walls. We hired a concrete pump for the pour and because it was a basement we just used the nudura walkways and scaffolding to allow the pump hose to get round the whole perimeter. I was concerned about blow outs- especially on the first load dropping down into the bottom of the wall so I over did the shuttering on the outside of the nudura - including 220mm x 50mm floor joists screwed all around the perimeter outer edge, plus lots of OSB shuttering at all the weak points. It all worked well and it was a major relief to get the walls filled up.9 points
-
4af3a3b61d25366b7b1efa7923eea289.mp49 points
-
Just seen this highlighted on a tax & finance email I get, and couldn't see it mentioned here yet https://www.gov.uk/government/publications/vat-diy-housebuilders-scheme-digitisation-of-claims-and-extending-time-limit/vat-digitisation-of-claims-and-extending-time-limit-for-diy-housebuilders-scheme From 5th Dec 2023 apparently: * The time limit (I think for all claims) will be 6 months from completion, not 3 * There'll be the option to claim online (which presumably will also let you see status etc) * They will apparently no longer require all the invoices at the time of submitting the claim. I assume that will put things on a similar footing to businesses, where they might inspect some claims/ask for a random sample of evidence, and potentially impose penalties etc if they discover you've claimed something you shouldn't have - they don't spell out exactly how that will work. So would still be important to make sure you have & have checked all the invoices, but no longer the need/risk to post off all the originals to HMRC and hope they arrive...8 points
-
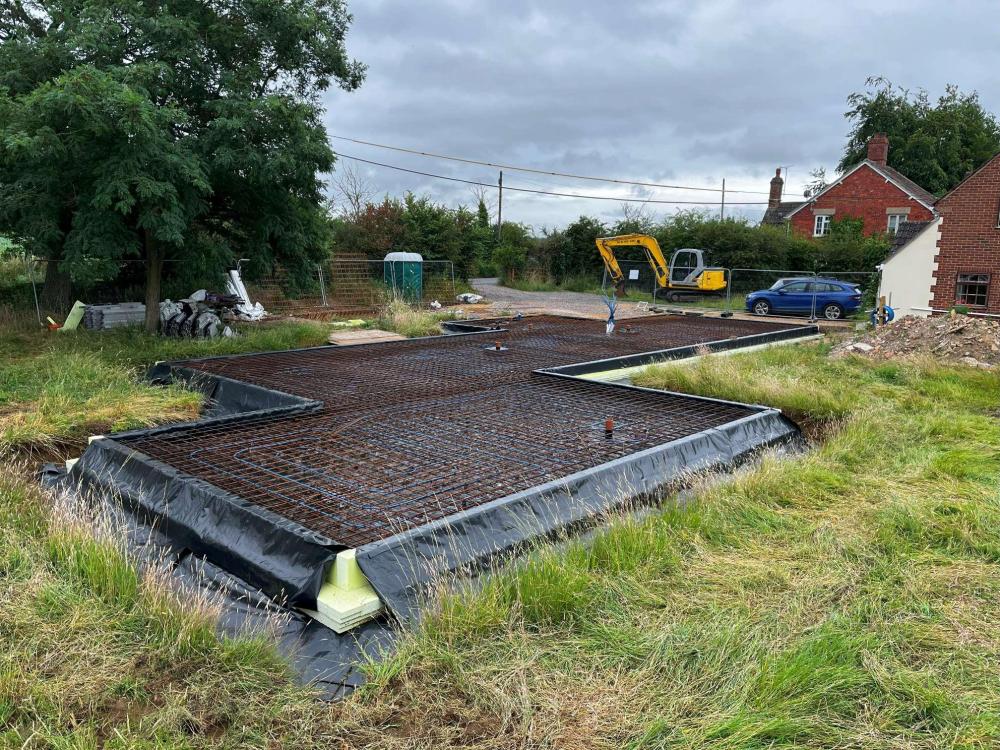
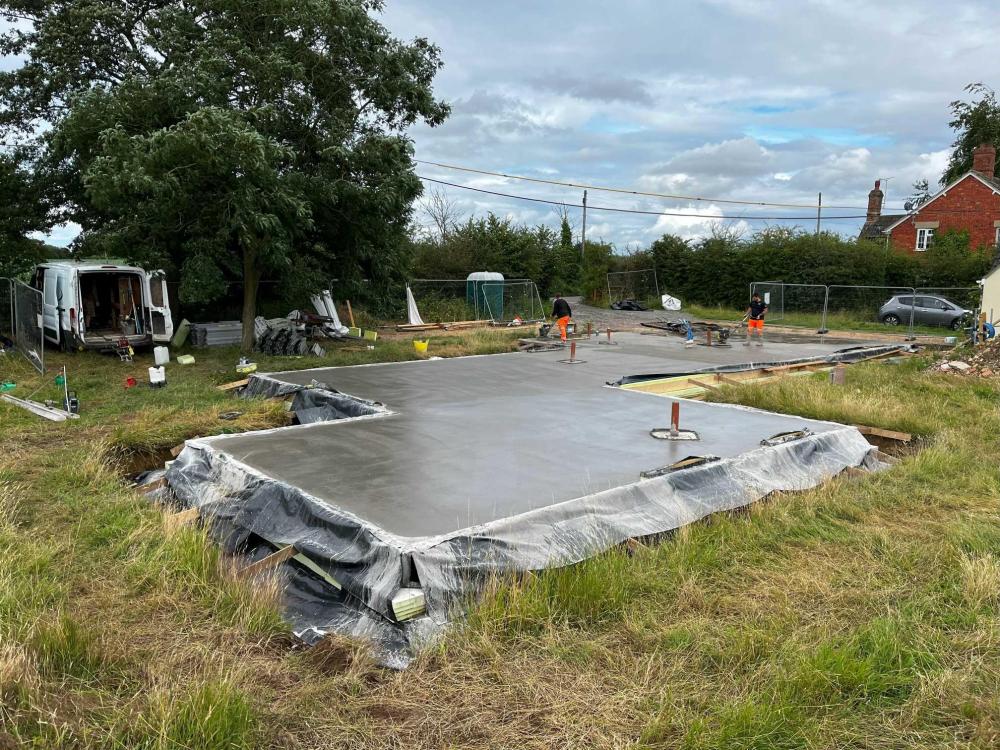
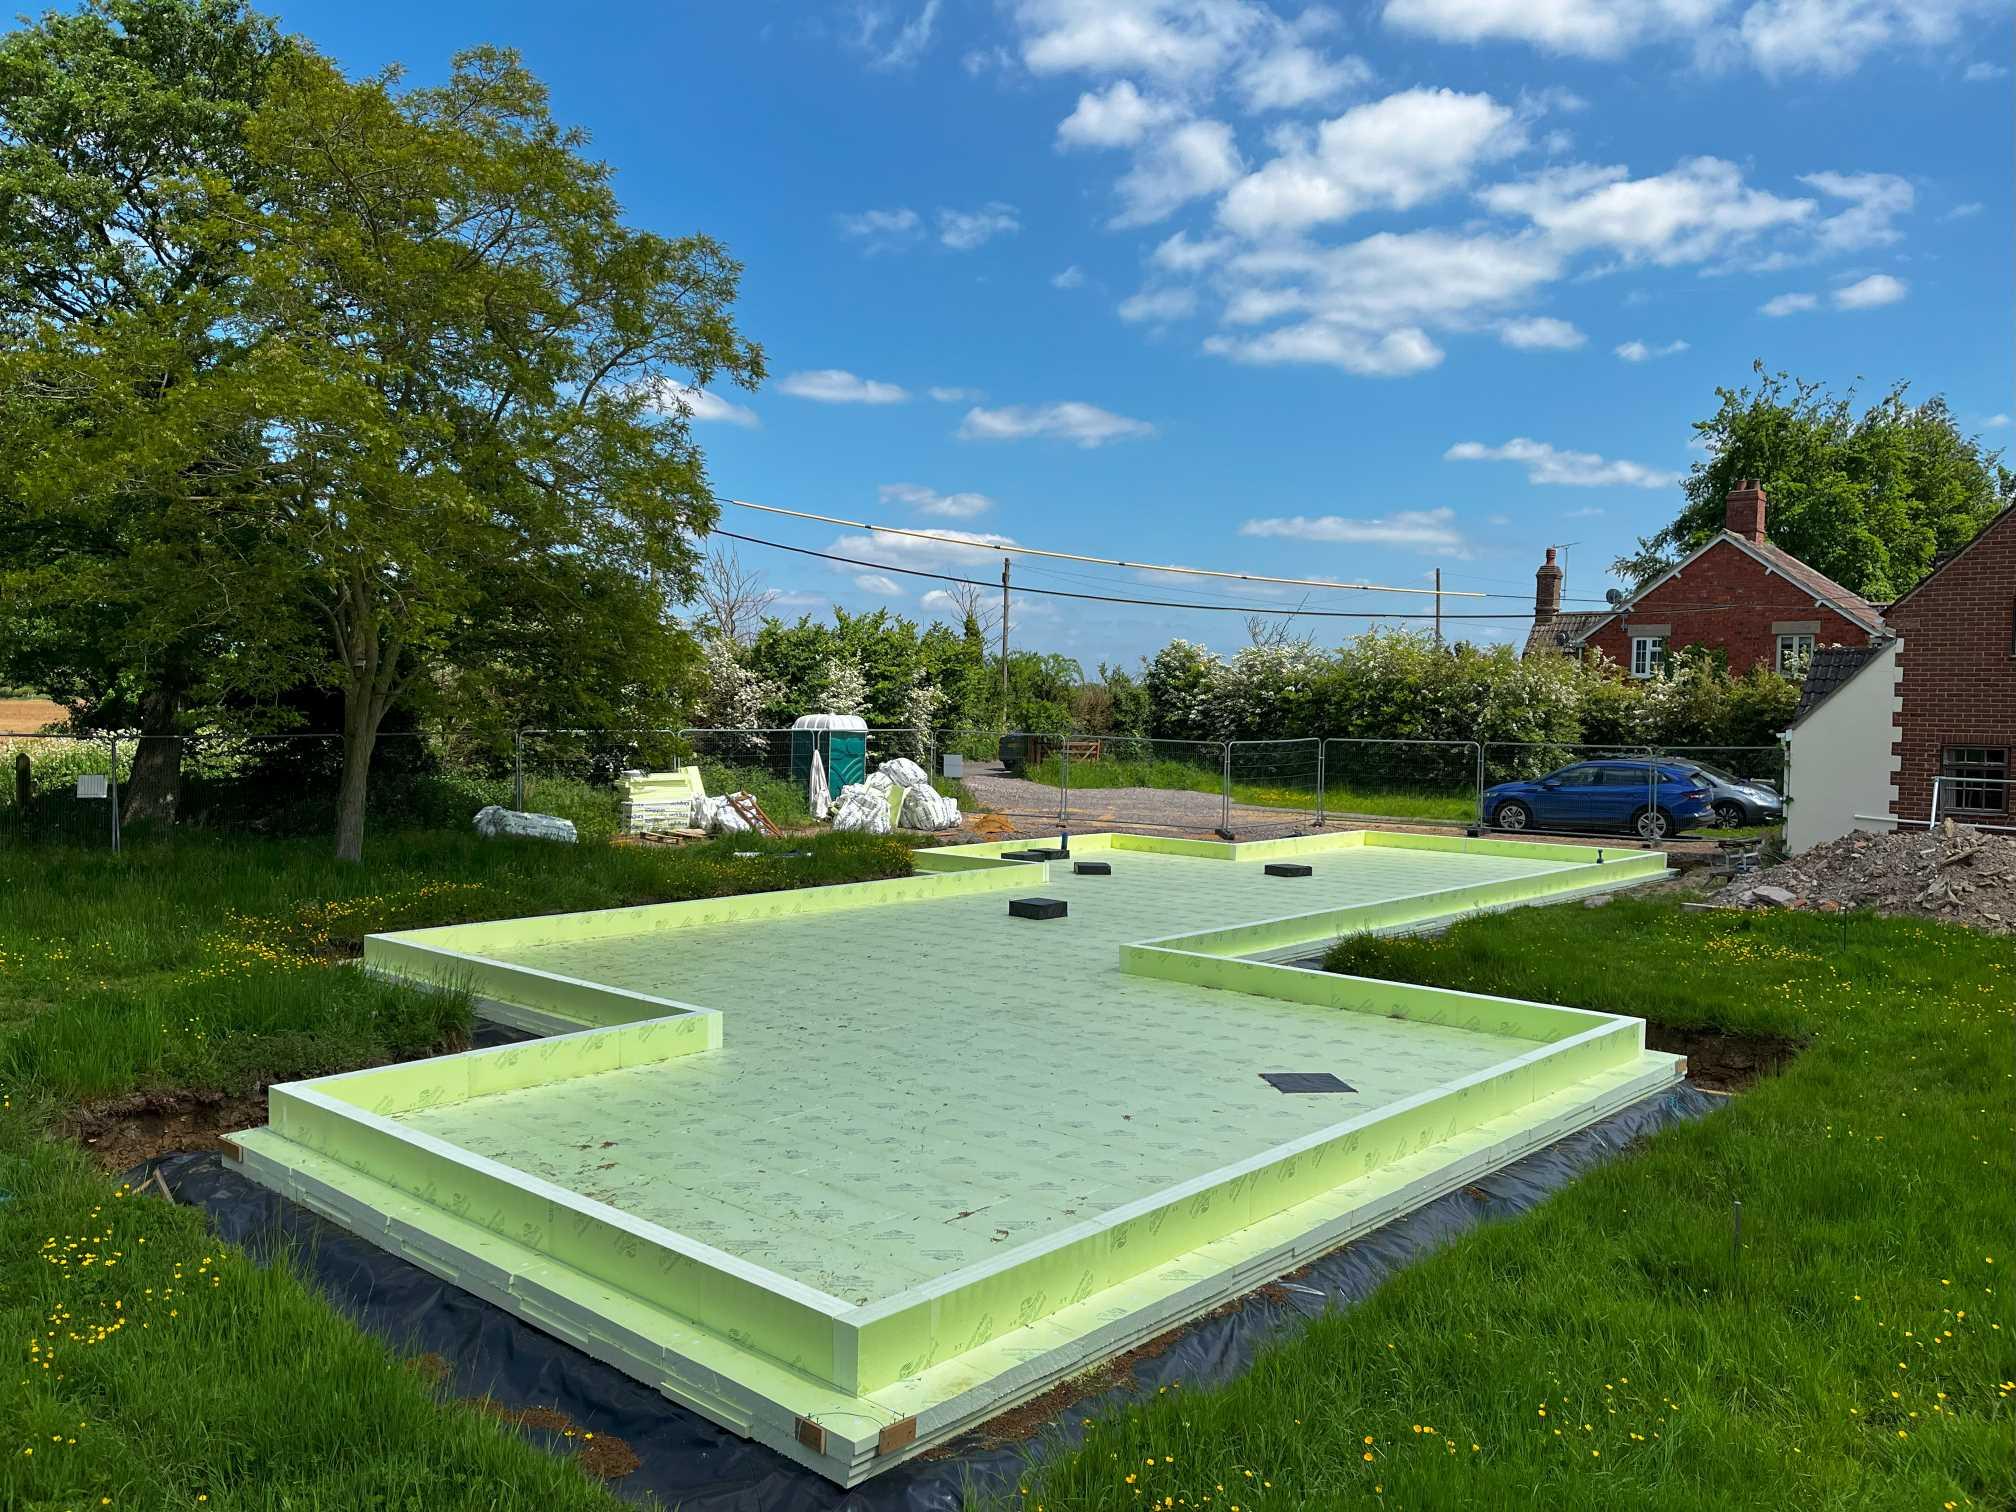
Hi, I wrote an introduction post on here back in 2021 and shared some floorplans for our planned new build in North Wiltshire. As it's been a while, I thought I'd re-introduce myself and do an update post. In early 2023 we broke ground. Since then we built the insulated raft foundation (Greenraft) and the ground floor walls in Polarwall ICF. It's slow going as I'm doing almost all the work myself. We've had a fair few issues, the biggest were our first wall supplier (Isotex) going bust after we’d paid them, and I had to fire our combined engineer/architectural technicians (probably worth a post in itself – but long story short, I can't recommend Build Collective). I’m hoping to ask around the forums for some help/advice on a few things in the coming weeks. In the meantime, enjoy some progress photos! The dig and backfilling, with roller. Sand layer with insulated drainage pop-ups Greenraft insulation for insulated slab foundation. 200mm insulation and 300mm concrete slab Mesh, rebar and underfloor heating Concrete pour And today, with ground floor walls up - ready for the pour


 8 points
 -
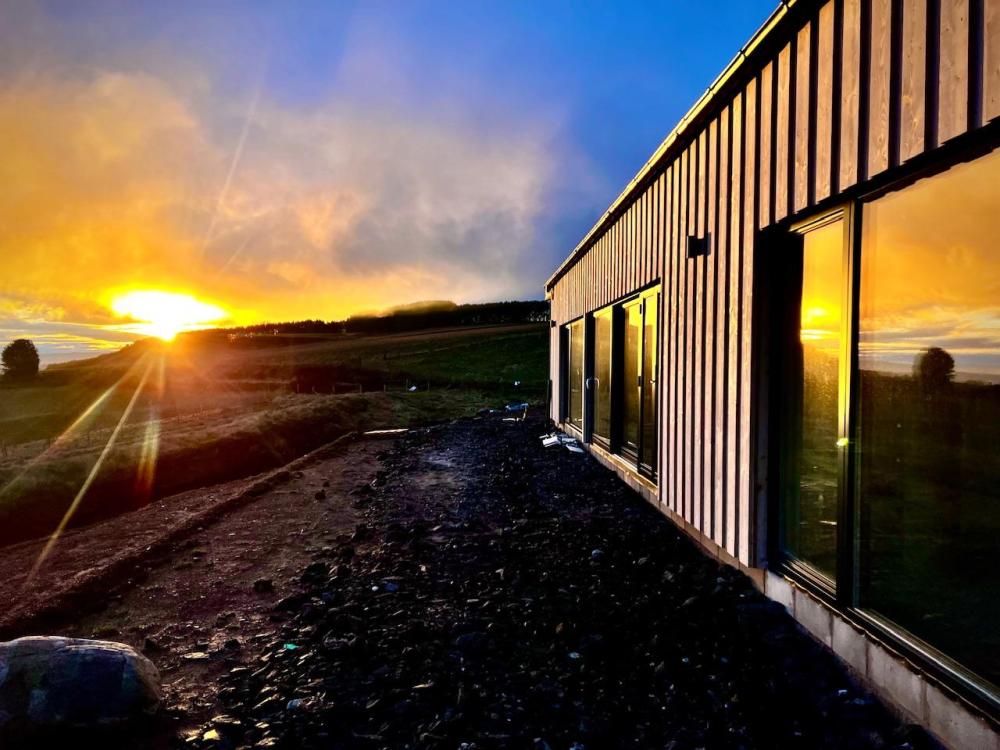
Just a very short blog to show the windy roost ( not fully finished, is a self build ever?) plant room. I'm quite chuffed I got it all to fit, and I think it's quite neat. It's full DIY and house's the UVC and combined buffer, UFH manifold, MVHR unit, inverter, consumer unit, network hub. All in 4M³. Plus storage to come. Yes, the printer doesn't fit, but it's coming to its end of life so that's all it's getting for now. Jobs to do: Ceiling Insulate MVHR ducting / box in Shelves on the left hand side Clothes Airer ( a Scottish requirement to have one)8 points
-
Came downstairs from painting to this
 8 points
 -
Help BuildHub financially while getting a £50 credit on your energy account! For anyone considering moving to Octopus Energy, please message me for a referral code. Using that code will result in £100 being split between you and Buildhub. When the credit arrives in my Octopus account, I'll transfer £50 to the BuildHub Paypal account and post a confirmation screenshot in this thread (or to you privately, if you prefer) as proof the transfer happened. As you know, BuildHub is a non-commercial forum run entirely by unpaid volunteers. We pay for hosting etc solely through member donations. If this referral scheme is successful, the need for periodic donation drives will significantly be reduced, or perhaps even done away with completely. Thanks for helping to fund the forum! List of referrals: @trialuser @Dobbie @Jenki @Originaltwist @Chanmenie - Code submitted 30 April 2024 - payment might be a while as not yet connected. @Mattg4321 - Code submitted 3 May 2024.


 8 points
 -
Finally!!!! pretty much 2 3/4 years after breaking ground. I think that i will be having a drink tonight!!!
 8 points
 -
Like many other people, I have had slow progress getting started, but I now finally have the diggers on site.
 8 points
 -
Lots of the ideas in this thread revolve around sight lines. For good reason. Lining up sight lines doesn't necessarily cost anything but can really change the feel of a place. It's one of the things that makes a bespoke design different to an off the shelf one. My own build was done to a tight budget (about £20k for 50m², plus groundworks/services). Here's some of the decisions I made to keep the budget in check whilst retaining what I think is a pretty nice finish: -My favourite tip is to avoid small windows. Consolidate all your glazing in to a few huge windows. Non opening if possible. You will get a much lower cost/m² with much better thermal properties. It's an absolute win-win. I was really surprised by how cheap a huge non opening 3G window was. -I'm also a big fan of bamboo flooring. I'm not up to date with prices but about five years ago it was half the price of decent oak, and much sturdier. -you don't need solid oak skirtings and door linings. I went with MDF which was a fraction of the cost and also much easier to fit. Need to screw the skirting to the wall, or messed up amitre? Just fill and paint afterwards. - larch and corrugated steel make very cost effective finishing materials, quick and easy to work with. - it's not necessary to spend big money on kitchens and bathrooms. I've seen people spend more on a kitchen tap than my whole bathroom cost. I went secondhand for all my kitchen appliances, but bought good brand names (Bosch and Siemens). They've outlasted the cheap brand new stuff I bought in my other house.8 points
-
Perhaps this can inspire anyone in the process of renovation/ transformation. This has taken 2 years from purchase, and the rest of the building is still a shell being fitted out. But, yes it's a liveable space, and the caravan is almost redundant.
 8 points
 -
With the great weather in the last two weeks, following on from the slab pour, we will endeavour to pour the walls of the house tomorrow. I'm thinking I won't sleep tonight. Mentally listing all the things I wanted to do, and re ticking them off. First 7 cube is arriving at 8.30. 🤞 I'll leave this picture with you....
 8 points
 -
and the results are in.............. ........0.98ACH! i'm very happy and hit my target of 1ACH. could we have got it lower? maybe, but we calculated the internal volume at just over 1400m3 over 4 stories (basement, ground floor, first floor and loft) and it's got some interesting junctions between sections of the buildings so i think to get in below 1ACH is a job well done.8 points
-
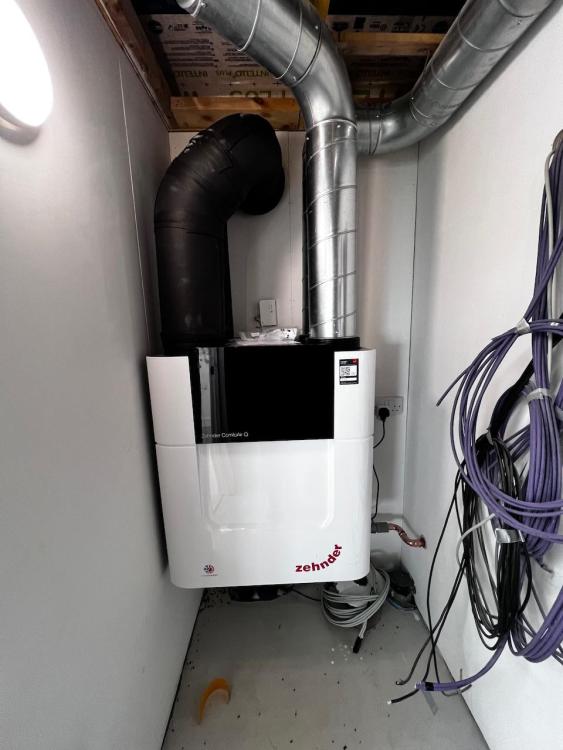
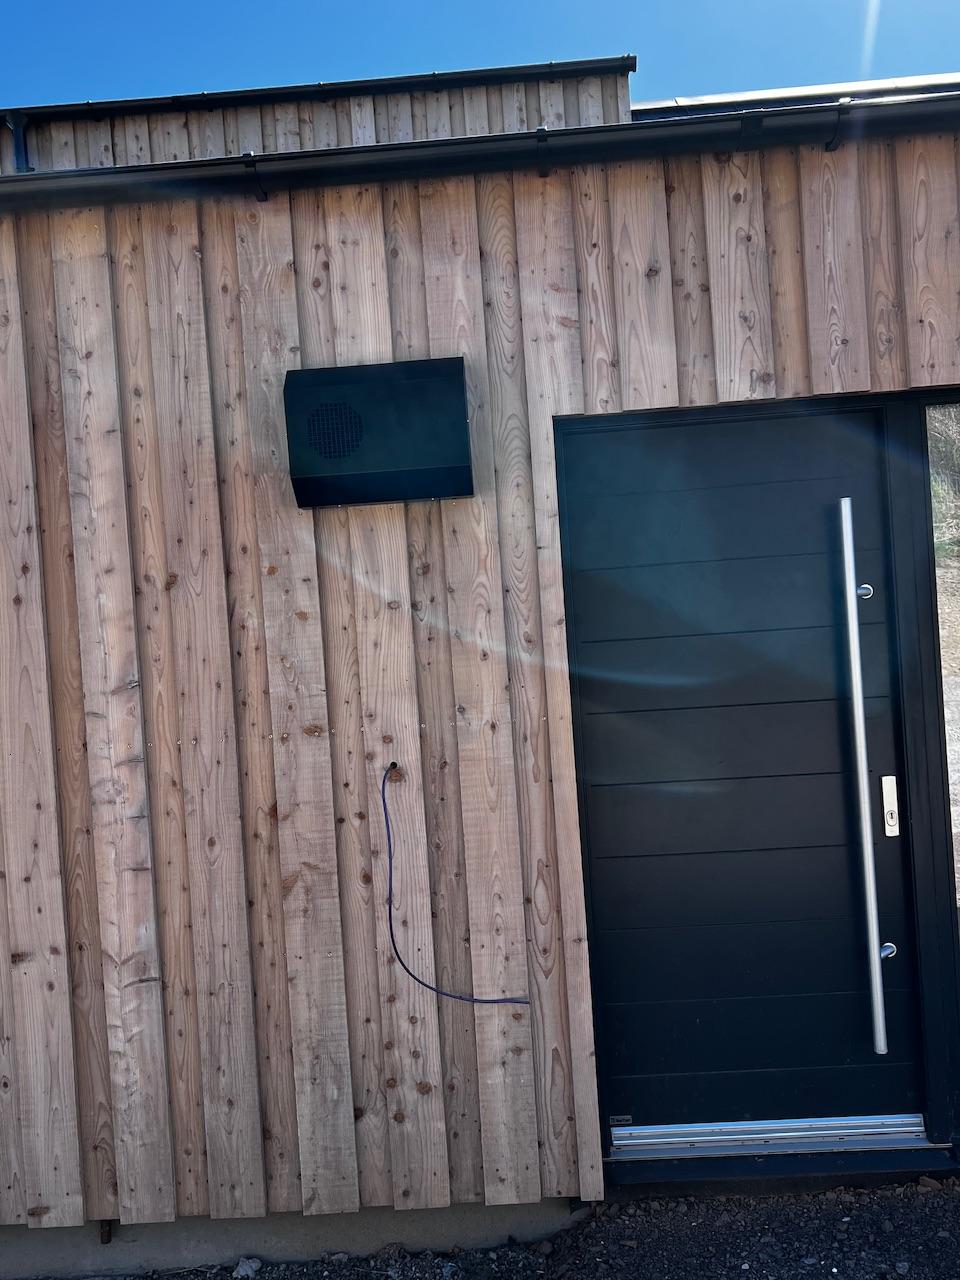
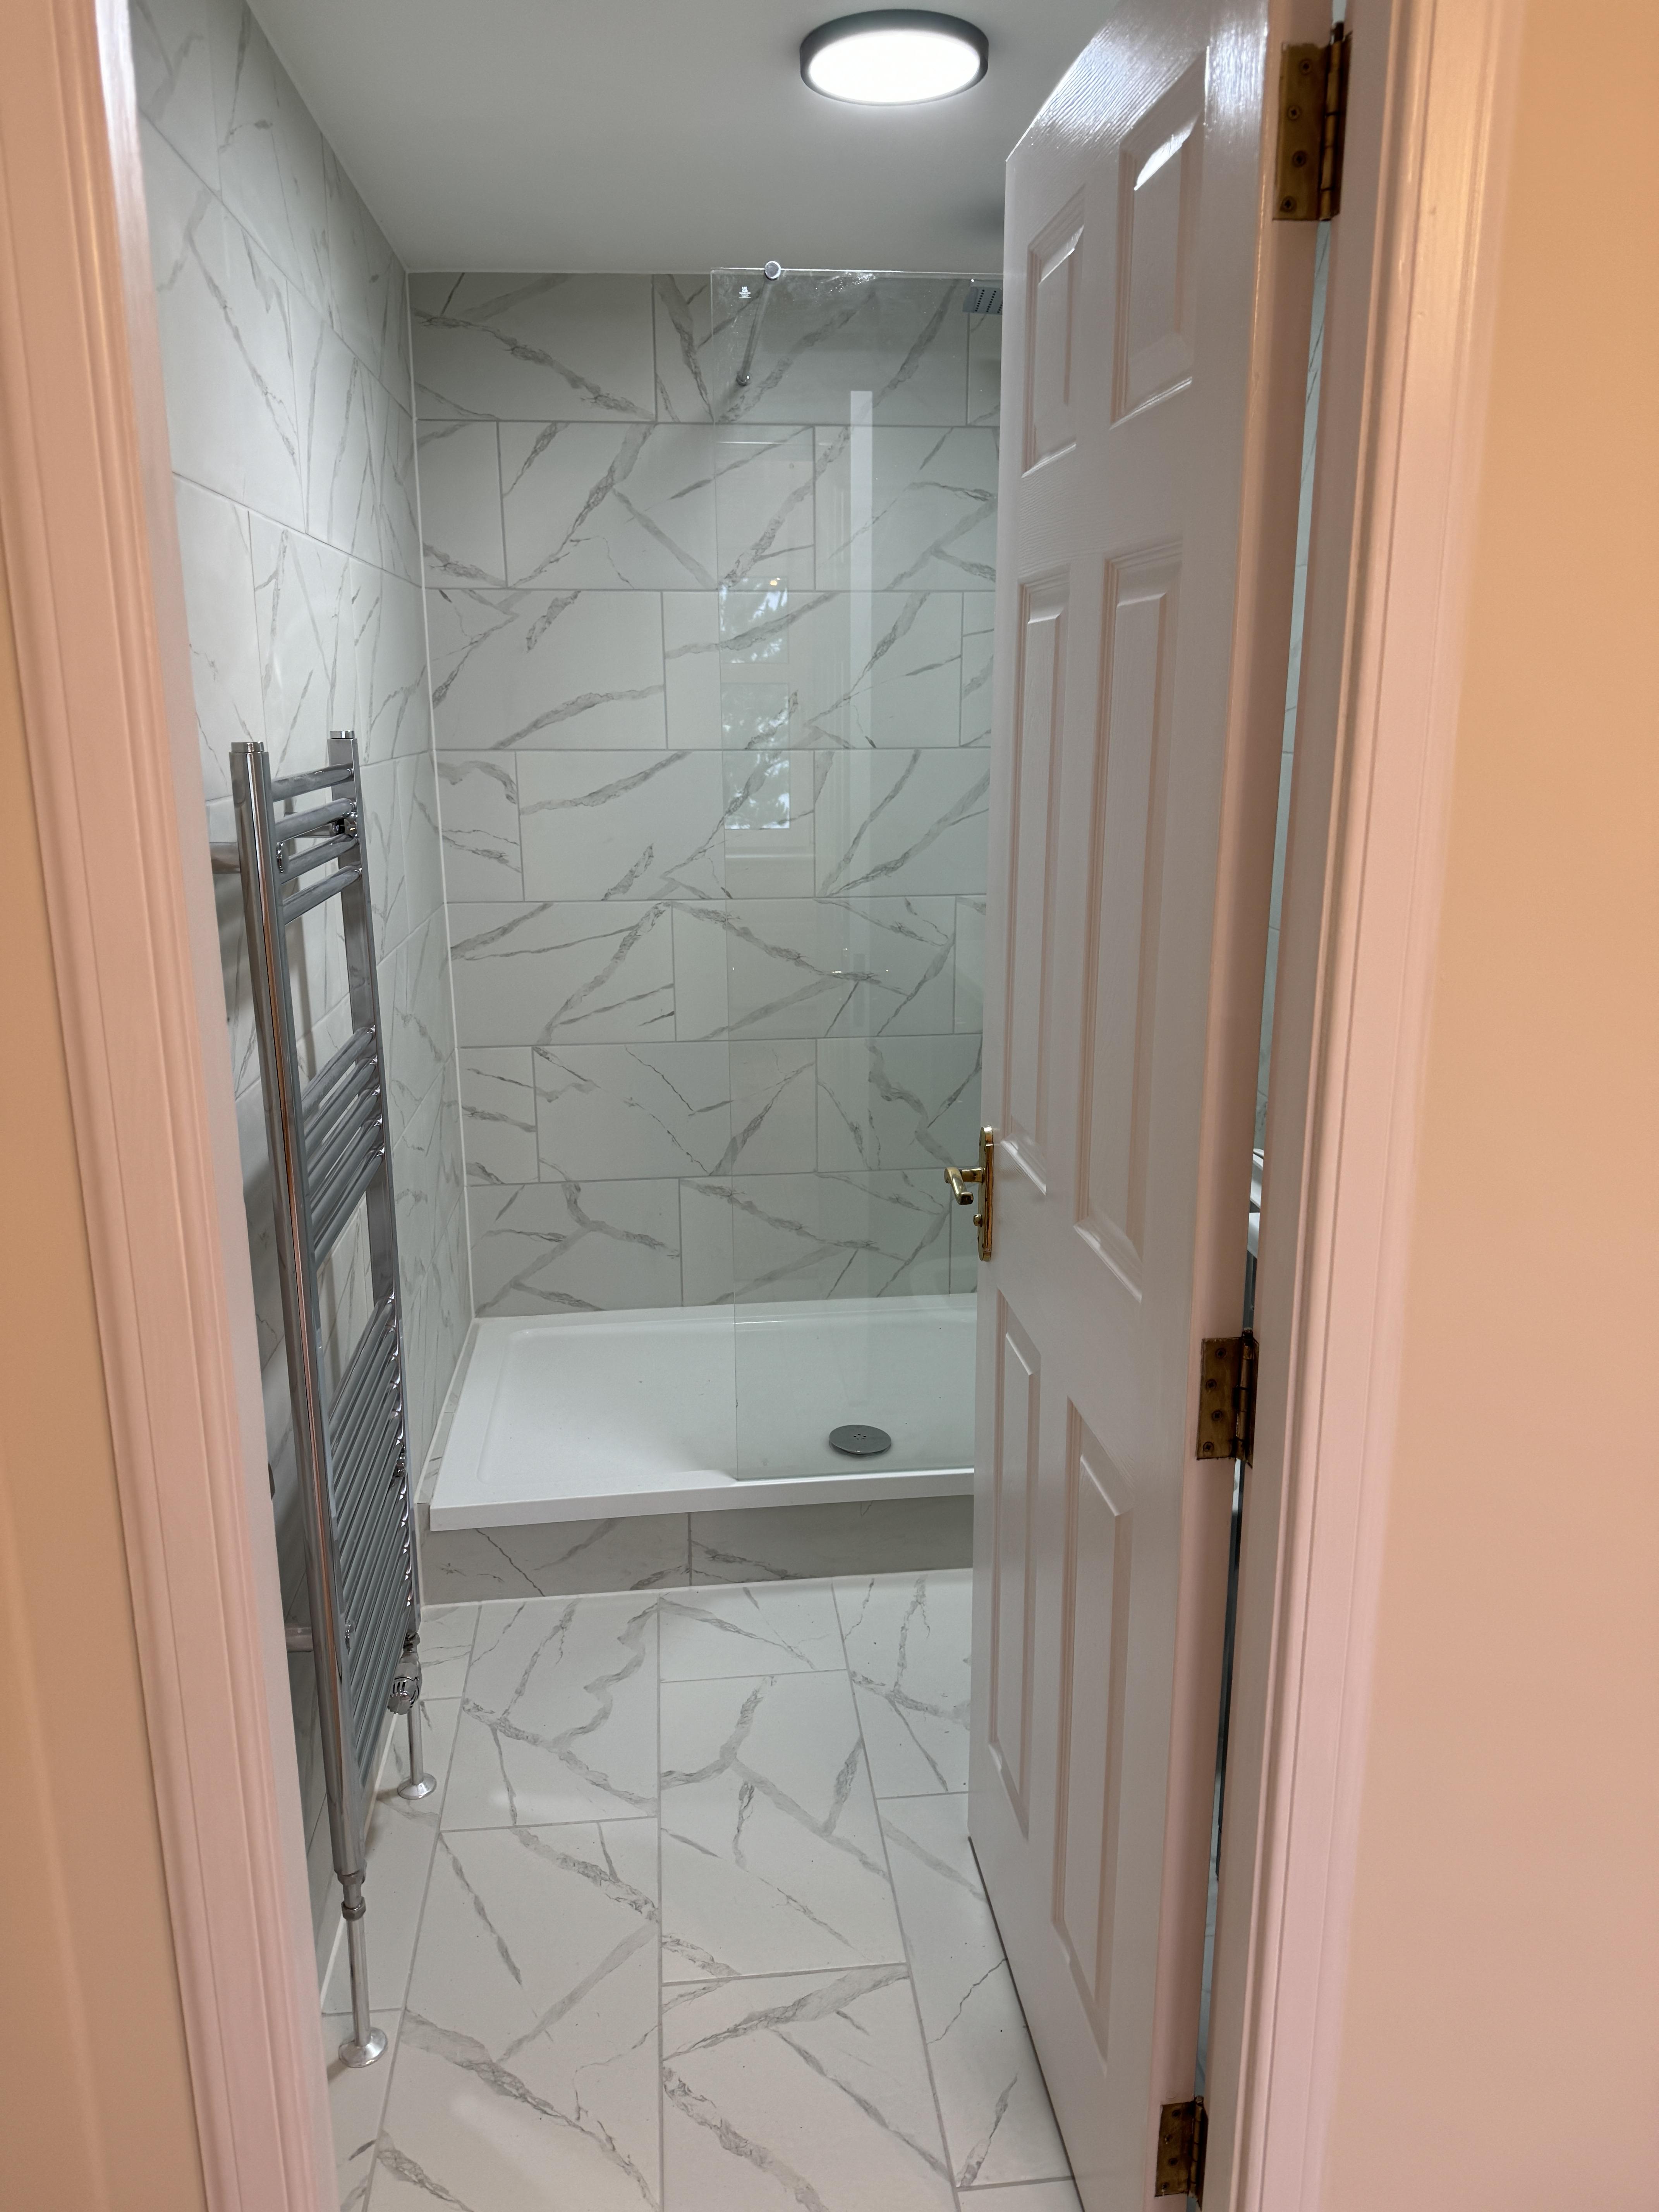
I installed the MVHR unit this week and got someone to commission it. It’s very quiet. You can hear a gentle hum from the kitchen terminal when standing underneath it but the others are silent. The external terminal isn’t as bad as I thought it was going to look but it’s still by the front door. I regret a bit not changing the whole floor plan of the porch/lean to bit of our house putting the plant room on an end elevation. In hindsight I ought to have combined it with the utility room with a wall separating them. The benefit of where it is that’s it’s right in the middle of the house though. The other small issue is the board on board cladding creates a void behind the terminal where the inside cladding board is which could allow rainwater to sit. I’ll need to add a block to fill it in. The board on board cladding has caused similar issues like this across a few areas of the house. Worth thinking about for anyone else considering board on board. Downstairs bathroom nearly finished. The Aqualisa shower was straightforward to fit but we pulled the speed fit hose out of the connection inside the rail which was a bugger to get back in. Bit concerned it came out so easily. I’m not massively impressed with the Aqualisa Optic Q shower control given the cost of it. It all feels a bit loose and plasticky. We have two and both the same. The rest of it is well made. The mixer and diverter are in the coomb upstairs making it really easy for future access as I made the coombs slightly wider and higher by removing the coomb completely on the opposite side of the roof. We gained a bit of floor space and it allowed me to widen this coomb by 150mm. I did this to make fitting the shower controls up here much easier. It would have been very tight otherwise. Doors and skirting fitted. Doors and hardware are by LPD. Unfortunately they don’t do smaller doors to fit the wardrobe. However Deanta do a very similar door (looks identical in the pictures) which can be custom made. Not cheap unfortunately and the lead time is 20 weeks. Also removed all the dust protection from our lights in the vaulted ceiling so it’s the first time we’ve seen them up properly.


 7 points
 -
After my horrid time earlier this year I am now going to post something more positive. As of yesterday, I was offered a job, not ideal (is any job ideal), rather than working from home I must go to the office which takes 40mins each way and hubby is disappointed that he will be left on his own all day. That said even with time out for funeral 250 miles away and wet, wet, wet we have progressed. Some pictures. hardcore & binding (take 2 after previous issues) now the expansion foam around the sides The heave protection next then taping next was the rebar here is the pour on top of the rebar - 200mm drying concrete slab with no hint of everything underneath, typical building, lots of expense and nothing to see. the first row of outside blocks added showing the cavity first blocks over DPC with all the rain we have created a bit of a swimming pool It was at this point that we purchased a puddle pump as hubby really didn't like having to kneel and build low in water going up with some windows & doors framed insulation going in joining the existing walls to the new part this is where some of the kitchen cabinets will be hung, so although internal we are using heavier blocks to take any necessary weight On the left hand side you can see part of the existing barn that will be staying. The roof is currently being held up with barrels and wood building from scaffolding is a real milestone, makes it seem like we are getting somewhere. To protect the insulation, we have the original insulation from the barn roof cut up to provide a 'roof' over the cavity. Having made the frames for the remaining to windows these need to be placed in situ for building around. This area will be our front hall and snug. Of course, the front door will only be used by visitors, but we will go through the hall internally to get into the snug. With all the cavities it is smaller than I hoped, but with all the insulation it will be much warmer than our single skin house. Hope you enjoy the pictures, next time I hope to be at lintel and wall plate level, but we would like the weather to improve. Thanks for reading Jill7 points
-
Hiya. I'm Scottish base and have family that live on one of the inner Hebrides and have lot's of experience dealing with BC on the Islands. Also I deal with Scottish Building Standards on a regular basis and have done so for the last 40 years. Some of the BC officers I know quite well, we have a chat on the phone about our careers and reminisce on how good the old times were. In other words they are folk just like us.. there is the odd exeption but that is life. In the round though BC officers actually do have your best interests at heart. It would be great to have a BC officer or two join BH! On the Islands there is a lot of politics. Some Island builders are really shite, cut corners in a big way, some are better / good. BC know who they are so maybe you are getting a heads up and not just seeing the wood for the trees about the work that has been done by others. Now you are doing a bit of work yourselves.. well how much and when did you start doing a lot yourselves? It is in your own interests to build your house right? There is always friction on the Islands... BC know this but are not corrupt at this level. There are loads of other Islanders and folk moving there that do DIY projects so you are not the first and last. @JWHIT "surely this is trespass" My advice.. get this right out your head now. If the BC officer can access your site then you have a Health and Safety issue and they can hammer you on that. The HSE law is quite clear on this all over the UK, if your site is accessible then you are on a hiding to nothing. Have a looked at your site security? Don't pursue this route as you will likely regret it. Too late for that, BC can hammer you much earlier. There is no argument in law for shoddy HSE by saying.. hey I'm insured. Insurance is for when you have tried to do your best and things still go wrong. If they can see bad things from outside the site boundary then surely.. you may be making a cock up? If you try and play hard ball with them then they will pull your trousers down and you won't get to pull them back up until they have run you ragged. Now you may feel that the BC officer has turned up with no appointment.. but they are allowed to do this under UK HSE law (not just Scottish law) .. part of their remit is pubic safety.. they can hammer you on this too! To lay it on a bit thicker they may start to ask if your project should fall under CDM regulations., just to give you the run around. In summary: 1/ Yes there is Island politics, don't worry too much about the main Island Contractor not getting the job. 2/ Phone the officer up and ask when they are next on the island and arrange to meet them in person. This is so imprortant. You are on an Island.. you must get to know folk.. the emails you get from BC only show a snap shot.. sometimes they write stuff that seems really daft / aggressive.. but they are pushed for time and under funded. Cut them some slack and cut yourself some slack too. Keep an open mind as while you see this as a personal opinion then they may be able to give you good advice? Also if you hit it off with them then later on when you apply for a completion certificate you'll probably find that part of the process much easier and not get hit with a load of things that don't conform. 3/ Build a rapport with the officer.. recognise that they may be trying to help you rather than hinder. You may have a young and inexperienced BC officer. Be very careful here not to bully as their boss will then give you the big stick! Listen to what they are saying.. put forward your ideas and have a bit of fun.. seriously they are just folk. To finish @Kelvin may be able to give you some advice about how you deal with BC when relocating to the north of the UK ( Scotland) 4/ Some of my family live on Tiree. Clocked this at the end! Well it does.. Some of the building regs are open to opinion / discussion / detailed design. BC officers often hold professional qualifications / have great experience. They are entitled to question. As before one big stick they do hold is the public safety issue (I do it too as an SE) . Lot's of folk on BH think that this is their house and they can do what they want. BC say and I.. that house has to last for 50 years at least and you may sell it to a family in a couple of years time. Our duty is not just to you but all the folk that come after. Just copied this right at the end. The above is misleading as if it is deemed to be a risk to public saftey then the LA can effect immediate access as what they do will call on the Fire service, the Police , gas board and me as an SE. You see.. who knows what building regs have been compromised? Is it just an extractor fan of a serious structural defect that could cause a gas leak? If push comes to shove and I'm acting for the local authority.. I'll find a legal way of getting into your property if I feel there is a safety issue. You are pissing in the the wind! If you have nothing to hide then you should be relaxed about all of this.7 points
-
My initial plans were to have rainwater harvesting, build hub taught me no.. so with that scrapped I needed an alternative, soakaways are difficult due to bed rock levels. In addition to this we have lots of run off on the croft, and the track to the house floods. We have already installed a pond for the ducks and this has a large berm to the back and sides so that the runoff is held back and slowly soaks away, but this winter has proved it overflows regularly, that's around 3000L extra. So the plan was to install an overflow pipe from this pond to a new larger pond. The larger pond also acting as rainwater run off capture. The larger pond will have 2 levels, a pond and then an extra layer to act as a overflow that can evaporate and or be pumped to the rubble drain in drier times. I got a big carried away with the backhoe and ended up with around 10M x 8M and over a meter deep. The overflow capacity will be around 30k - 35k L. We had to peck out some of the rock to get depth, and at the front used "as dug" rock from the quarry to form a rough and rugged stone wall, quite in keeping in Caithness. Time will heal the scars and soften the edges with planting. Due to the two levels we came up with the idea of hiding the liner under some camo net, that we intend to plant up in time. Not sure how this will stand the test of time. From the house the rainwater enters a rock filter, an idea loosely based on a post from @ToughButterCup- thanks. From the rock filter we have created a little stream that the rainwater will flow down and into the pond. In addition to this we have a pump that will take the water via a home made skimmer from the pond and filter the water from the pond through the rock filter and stream constantly. This also has a diverter to pump the water past the house and into the field to reduce the overflow capacity in drier times. This is the rock filter, and some of the pipework yet to be buried. Getting to this stage ticked a box for building control as we now handle our run off. We got our completion certificate on the house this week, yeah. There are some things to finish, the second bedroom needs decorating and trim work. And a few small jobs here and there, but in general the house is decorated, and fully functioning. We started the build in earnest around May 23 I think, so quite pleased with the effort and timescale we achieved. It's was built by me and Mandy with the odd person helping with concrete pours. 3 months in summer were busy with the cabin rentals that saw Mandy spend 3-4 hrs a day turning them around for the endless NC500 travellers.😁 We're embarking on the VAT reclaim soon. To summarise the build: 89sqm True bungalow Floor 0.094U (300mm EPs 120mm concrete) Walls 0.139U ICF with 50mm EWI and 25mm PIR IWI Cold roof 0.1U 25MM PIR 400MM mineral wool. UPVC triple glazed windows and composite doors MVHR, 4kW PV in roof, 5kW ASHP, UFH. EPC A103, Airtightness 0.83 ACH.7 points
-
The timber frame arrived this week from the factory. There was a large crane onsite all day yesterday. Got decent weather, no wind and only a bit wet in the morning. The lads have the walls fully up, 1st floor done and a ridge beam in place. They are starting cutting the roof today as that is built in situ. Really surprising walking around the rooms after looking at drawings for years! The window openings are a LOT bigger than I ever thought though, huge would be the description! Had a lodger arrive already - neighbours cat performing 1st inspection! Thanks to everyone on BuildHub for their support, advice and inspiration from their own experiences to help me get this project off the ground after SO long!!7 points
-
Good news everyone! We just called their office just to follow up because they didn’t reply from my email. The glass is on order and they will get back in contact to arrange for fitting. (will update you once they have done it) The heavy weight on my shoulders have been lifted!!! Thinking of the court proceedings had given me so much anxiety. All your inputs and advises have helped me so much, so thank you ever so much. This has been a big lesson for me and hopefully this will be a lesson to someone else. Again, thank you!!!7 points
-
The house has warmed up and stayed warm! I’ve booked the original plumber to come and do a full service in the new year and flush the system (mostly so I can see him squirm). im going to clean it again in a couple of days and see if it’s got anymore in. thanks again everyone7 points
-
Hah! It's amazing to see the forum is still in full flow with the architect bashing. It's amazing the misunderstanding of what we actually do, fees are not just based on the time taken to do a task, I can do a house layout very quickly, but only because I've accumulated years of knowledge, worked with various planning departments, worked with different build methods on different types of sites, have appropriate insurance, have a network of consultants to deal with any scenario etc etc The fact is that buildhub continually perpetuates the myths that architects only draw pretty pictures and don't have construction knowledge - and that percentage fees mean that architects don't have incentive to keep budget in mind etc. It's just a nonsense and the old heads who dominate the forum giving out poor advice to people at the start of the process which can never be rowed back from. Really the main reason that I stopped frequenting the forum, I'm amazed that there are still some who bother wasting time helping people and trying to defend a profession against ignorant misinformation. The number of times I've heard on here that construction drawings are just a copy and paste exercise is crazy - especially post grenfell and in the throws of brexit. In the case of the op - there are a number of options, whoever you decide to use - make sure that it's someone you can get on with, you're likely to deal with them for a reasonable amount of time. You get good and bad in all walks of life, look at previous work, maybe speak to previous clients. Go and visit the neighbours one which you want to mirror and make sure it's what you actually want too - building is expensive so make the most of it!7 points
-
Thanks for all the comments, I ended up painting the ceiling with Tikkurila Anti Reflex 2 and it looks so much better!

 7 points
 -
@FM2015 I'm just about calming down. Breathe.. It's up, the walls are straight/ plumb, but the day had some issues. Used hoppers and a 360 until it broke🙈. I'll write up a blog, but we got 12.3cube in the walls, the 360 gave up with about a cube to go. Managed to finish with a manatu, buckets and shovels. Also managed to pour a foundation wall for the path with offcuts of the ICF. So beer time.
 7 points
 -
Well it's the second day on week 4. The ground floor screeding is being done as I type this. To date all the walls are up (they come fully glazed, partially rendered and plasterboarded). The roof has been tiled and guttering fixed, the first fix electrics are done, the first fix plumbing is done (wastes and supplies for basins, wc's etc come ready installed in the panels), the underfloor heating is in and the MVHR ducting in place. In the service room is the cylinder, expansion vessel etc for the ASHP and the external unit is here wrapped, sitting on it's pallet. They started on the 8th April and expect to hand over at the end of May. We elected to use Dan Wood as a "half way house" - it's our original design (although with a nod to that sort of style). We didn't go extreme, much as we would like as I wanted a smooth planning experience, which we got. So, some of the standard Dan Wood bits we omitted. They can finish right up to carpets; handing over complete, save for the kitchen (too many choices apparently). We wanted a UK stair with closed risers so it could be carpeted. DW use bare wood, open riser and being aimed at the German market, the pitch is lower so the going messed up our internals too much. We also left out the doors (odd looking with the leaf rebated and closing against the face of the frame) and floor finishes save for the bathrooms. Those are now down to us. We had to provide the foundation (insulated raft for us) and drainage/service connections. However, it's been a dream not having to organise anything once they sign off the slab as ok. Men turn up at 7.00am sharp and work to between 5 and 6. Saturdays 8 till 1 ish. All materials are either brought with them or turn up on time. Electricians, plumbers, and scaffolders are woven into the work and are here at the correct point. The electrician was here until 11pm finishing off first fix because the next trade needed it done. Every single day it progresses. It probably isn't the cheapest way of doing it ( about £1730/m2 ex foundations) but the joy of not having any arguements with individual contractors makes up for it and there is no doubt the polish crew working on this house work damm hard and do a good job. You have to credit their attention to detail too. They obviously do this all the time as all the membranes are properly taped and sealed, the windows being inserted in the factory are done properly, etc etc. It's clear they have designed out issues over the years and have come up with solutions that work - hence the 20 year guarantee. We could buy the plot but needed to sell our house to fund the build. We are in a static caravan at present on site. Having reached retirement the certainty of getting the build done in a sensible timescale so we could get on with enjoying life was a big driver for this approach. Hopefully it'll be a family Christmas settled into a house this year instead of renting a cottage to escape the cold and damp of a 32ft static!6 points
-
I see a few mentions of the expense of MVHR. I self installed a simple system complete for less then £1500 in a 260m2 house. It has no sensors just manual boost which we use occasionally, otherwise it stays on trickle rate 24/7, even when some doors and windows are open. Really happy with the air quality (which I monitor with sensors), best value for money in the whole project and a no brainer in a new house IMO.6 points
-
They look good the HEP20 ones...
 6 points
 -
Heya , I'm 'self-self building' small dimension timber frame structures [Doug Fir] to learn how to eventually build a house ... car tyre and gravel foundations , 63 by 38mm studs , joists and rafters - sheep's wool + straw bale insulation , tyvek and slim board cladding for walls and the roof , - with 8mm timber panelling and clay plaster frames on the inner walls and cathedral ceilings , plus oiled 20mm boards on the floor ... refurbished 2nd hand doors and windows .
 6 points
 -
I DIY fitted a MVHR. It works really, really well, however do not under estimate the work in installing. We went from a house that had mould in the bathrooms (no extractor fans) to much better air quality. Running the ducts in the loft was the easiest, for a given value of easy in the loft. Running ducts down to the ground floor took a while as hiding ducting in cupboards and also ensuring the loft end worked was more effort. Fitting the intake/extract vents in the roof was straightforward for a roofer! It took five weekends; One for the intake/extract/condensate drain/unit setup. One for the upstairs rooms (two bathrooms, three bedrooms). Another for an extension bedroom (should have hired a core drill for going through an outside wall that is now internal). Another for downstairs ducts to kitchen and lounge. Another for a downstairs loo that involved dropping part of the ceiling to fit the ceiling duct as I could not access above it. I think I could do it in half the time or less as now more confident. All my parts came from ebay, isells, BPC, Screwfix. I did the design myself with a spreadsheet of room volumes and flow rates. I went slightly below the suggested flow rates for "Normal" rates and over for Boost. I overspeced the ducting to reduce noise (ie twin ducts to all rooms as running these is not much work relatively). I fitted noise silencers. I would go higher for boost, to clear damp air quickly, however above 90% flow rate it is noticeable noisy. We have virtually zero condensation. The odd, tiny bit behind some plantation shutters on some cold nights. Some condensation on a door lock that is a cold bridge in a yet to be vented room (its the hardest to get to) and sometimes on the letterbox flap (needs more insulation!). If you have reasonable loft access and only need to do runs in the loft this will help reduce install effort allot. I assume you could have the intake/exhaust through a gable end which should be quite easy (given value of easy). Think of the condensate drain and where that goes (I suggest a soil vent spigot to keep it warmish). It is great, but allot of work. I would have a strong think of doing it again, but on balance would do it again. I did consider four individual room MVHR as these would be quite allot of work to install (core drilling, running electrical feeds) and these are expensive units. I think this would be cost neutral compared to my MVHR. Maybe slightly less work, but not much. Running costs would be more due to more fans. It would not have improved the air in non-vented rooms compared to MVHR. Your air leaks might be an issue although depending on units you can set them to run intake fans faster than extract to positively pressure the house which will help with internal air quality. This would be slightly less efficient as you are losing air that is not going via the heat exchanger. On either method consider the filters the units have. Mine goes upto M5 (A "Pollen filter" ie 50% of Pm10). Newer models have HEPA level filters. You could DIY a HEPA filter on the intake from BPC/Isells bits. Sorry that turned into an essay...6 points
-
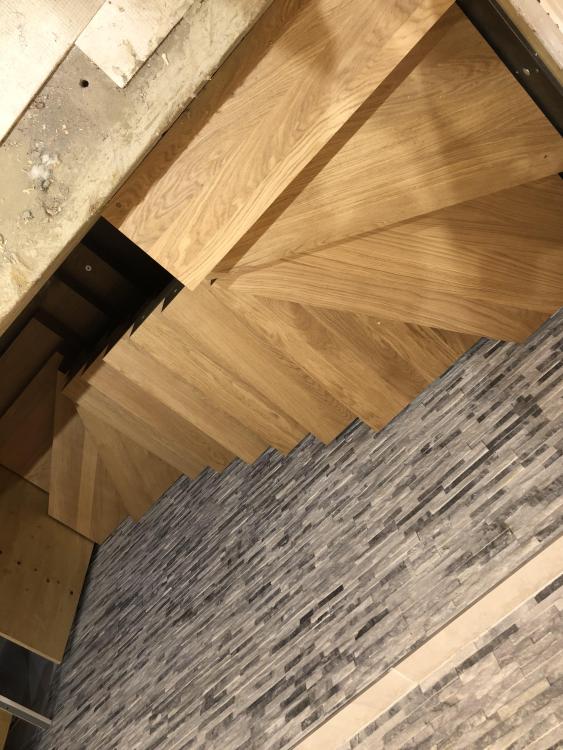
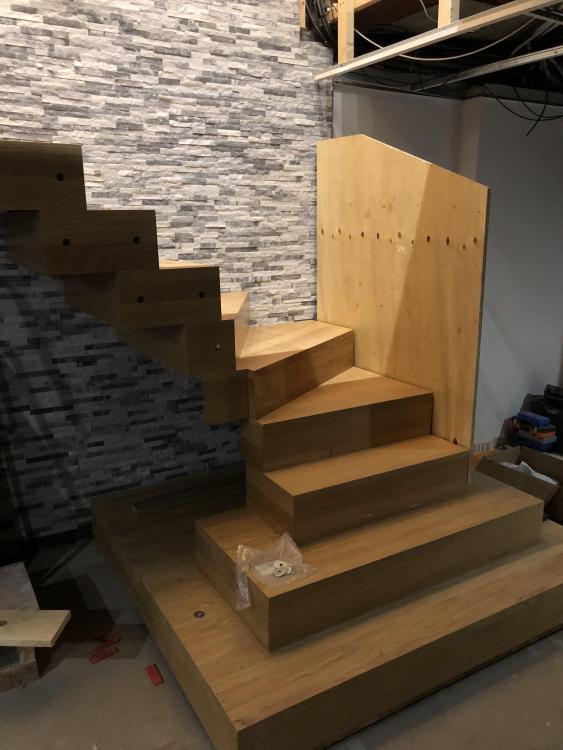
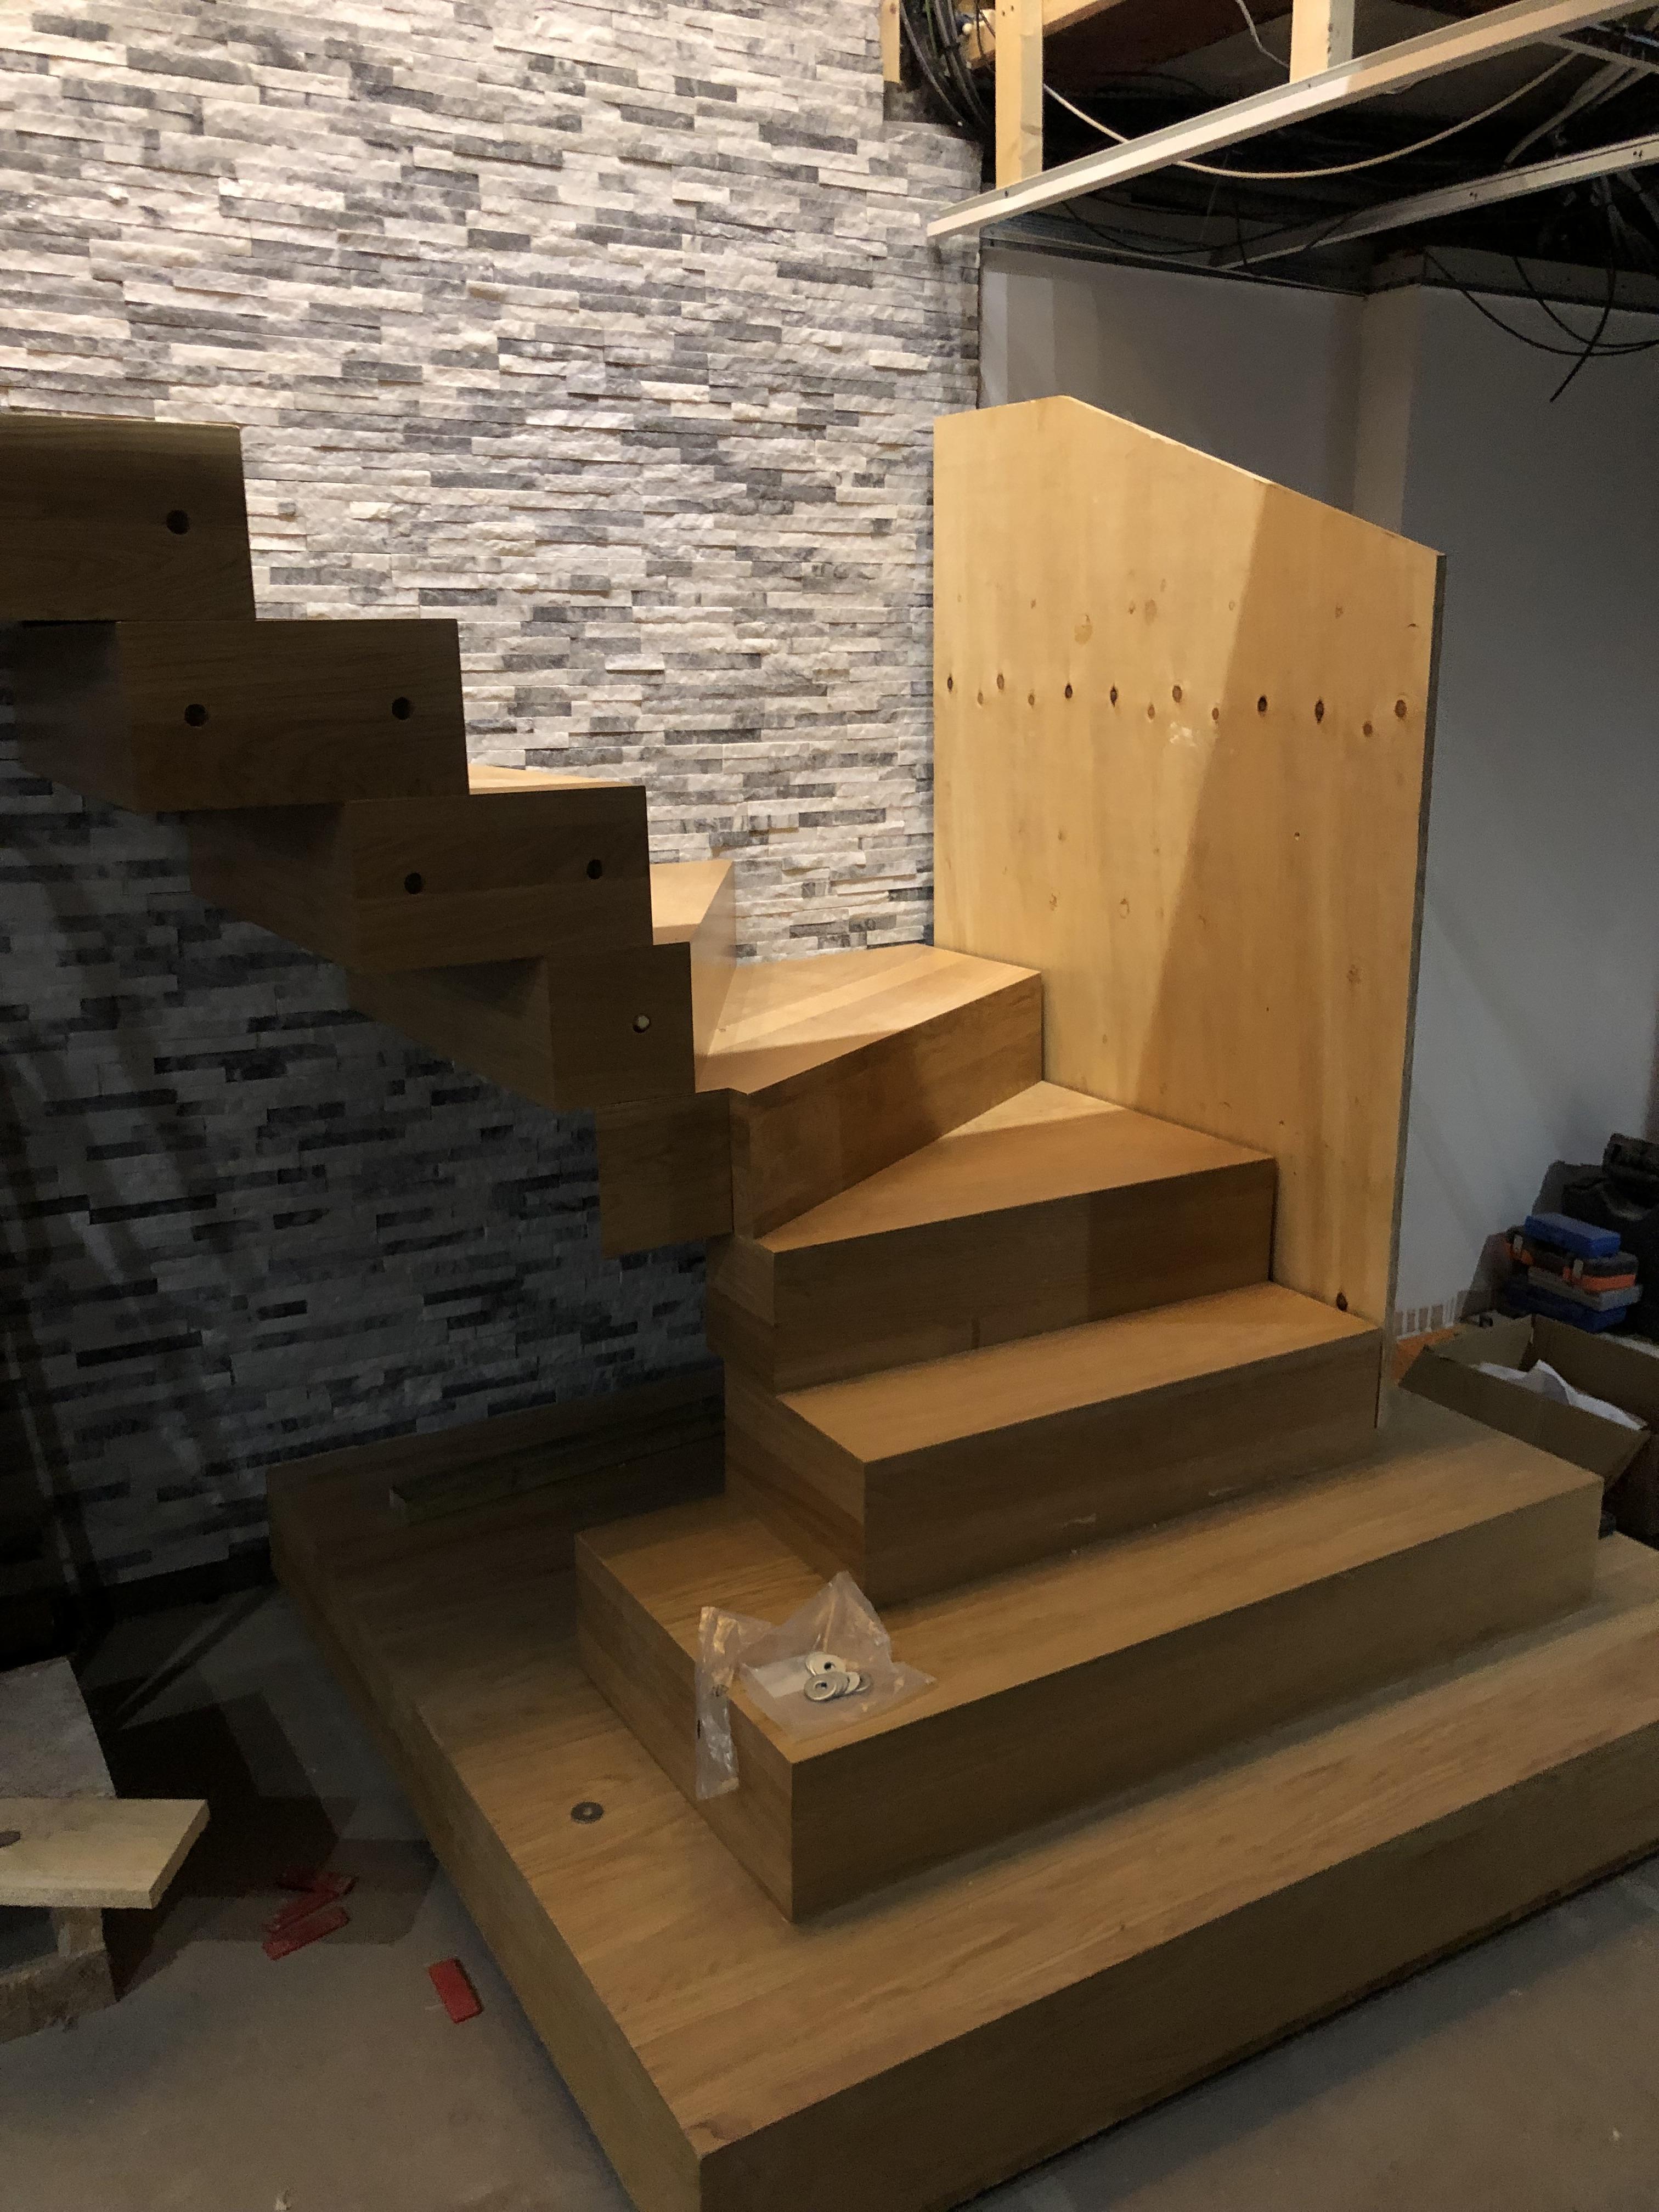
Staircase in. Feels like a big ‘step’ literally. Really happy with it. Nice job. Made locally and not too dear.
 6 points
 -
This thread is about trust, not plumbing. @Dee, Forgive the change of focus to my experience: I write this to illustrate the point about trust. I paid my way round my first degree by cleaning the windows of the Great And the Good in Oxfordshire. Often, I (stupidly) gave a year's credit impressed as I was -then- by customers' status - many of them landed gentry. Think of the largest estate in Oxfordshire - it's an offical palace linked to Wellington. Well I cleaned there, and the Lord Lieutenants, a very famous bankers house(s), and a good few Peers of the Realm, not far from where Clarkson lives now. I had been working there for two or three years. At the end of one year, I asked for payment. The non-resident owner (he lived in Charlbury nearby) asked me how much it was. I've forgotten how much now..... He grunted, took a large roll of £20 notes out of his back pocket and peeled off £100 LESS than he owed me. "I'll owe you the rest" he said looking at the floor. I looked at him and his wife who was standing nearby. Her face flushed red, and glared at him . "Your Grace," I replied, "Gestures like that are designed to remind me that I'm down here, and that you are up there - and we knew that before I stated cleaning your windows: could you pay me the rest please" He hadn't heard because he had disappeared down the corridor. His wife silently took out her checkbook and wrote a cheque for double the difference. Next job, that day was the The Lord Lieutenants place - as it happens right at the end of the estate private drive. I was still angry when I got there. He sensed it and asked what was wrong. I told the story. "Hmm , he grinned " he just wants to make sure you come back: had he paid you in full, you might never go back. And he knows half the Board at St Cross (my college)- if you put one foot out of line, you'll never work in Oxfordshire again - you're not just cleaning windows - youre selling TRUST AND clean windows. Now, pop down to the wine cellar and choose yoruself a good claret" Top bloke. Sir Ashley Ponsonby that was. When I got my degree, he put on a silver service tea for my whole family at his private residence. Taught me an unforgettable lesson. Unless you have come to know and trust a tradesman, initially retain an appropriate amount. For the first time someone works for us, I usually ask for the trades day rate, and pay promptly for the labour. And pay for the materials after 30 days if all is well.6 points
-
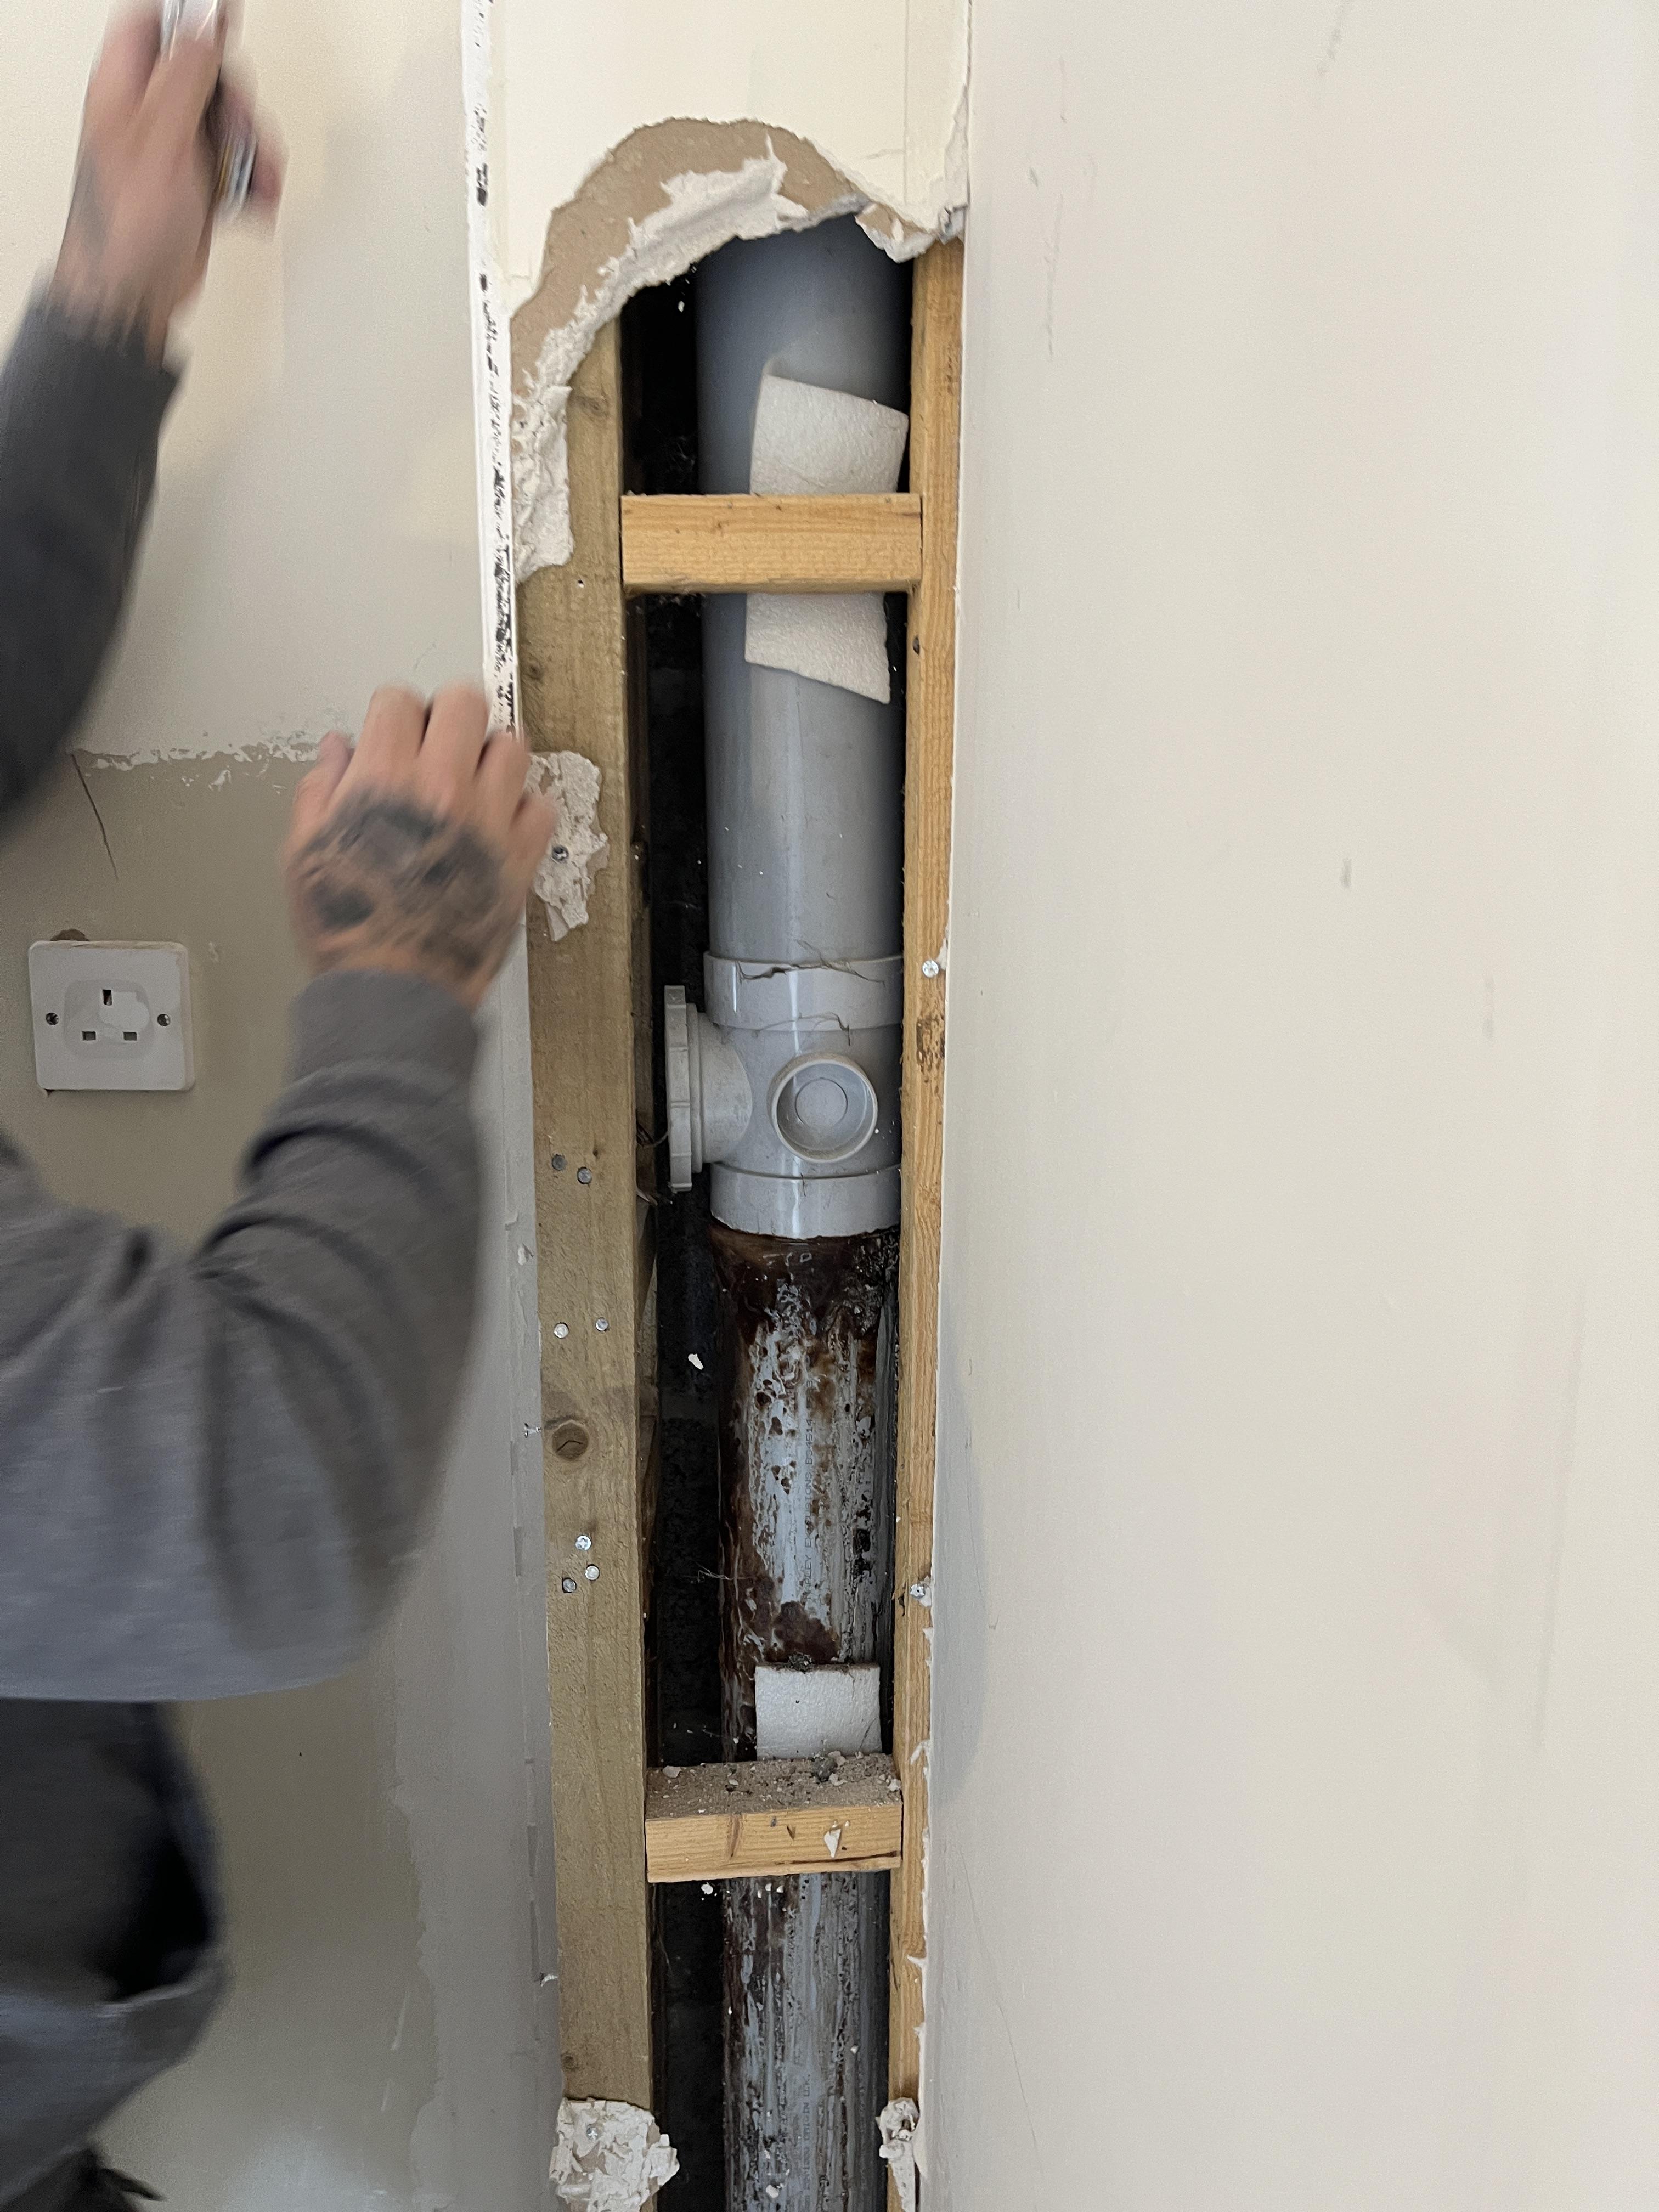
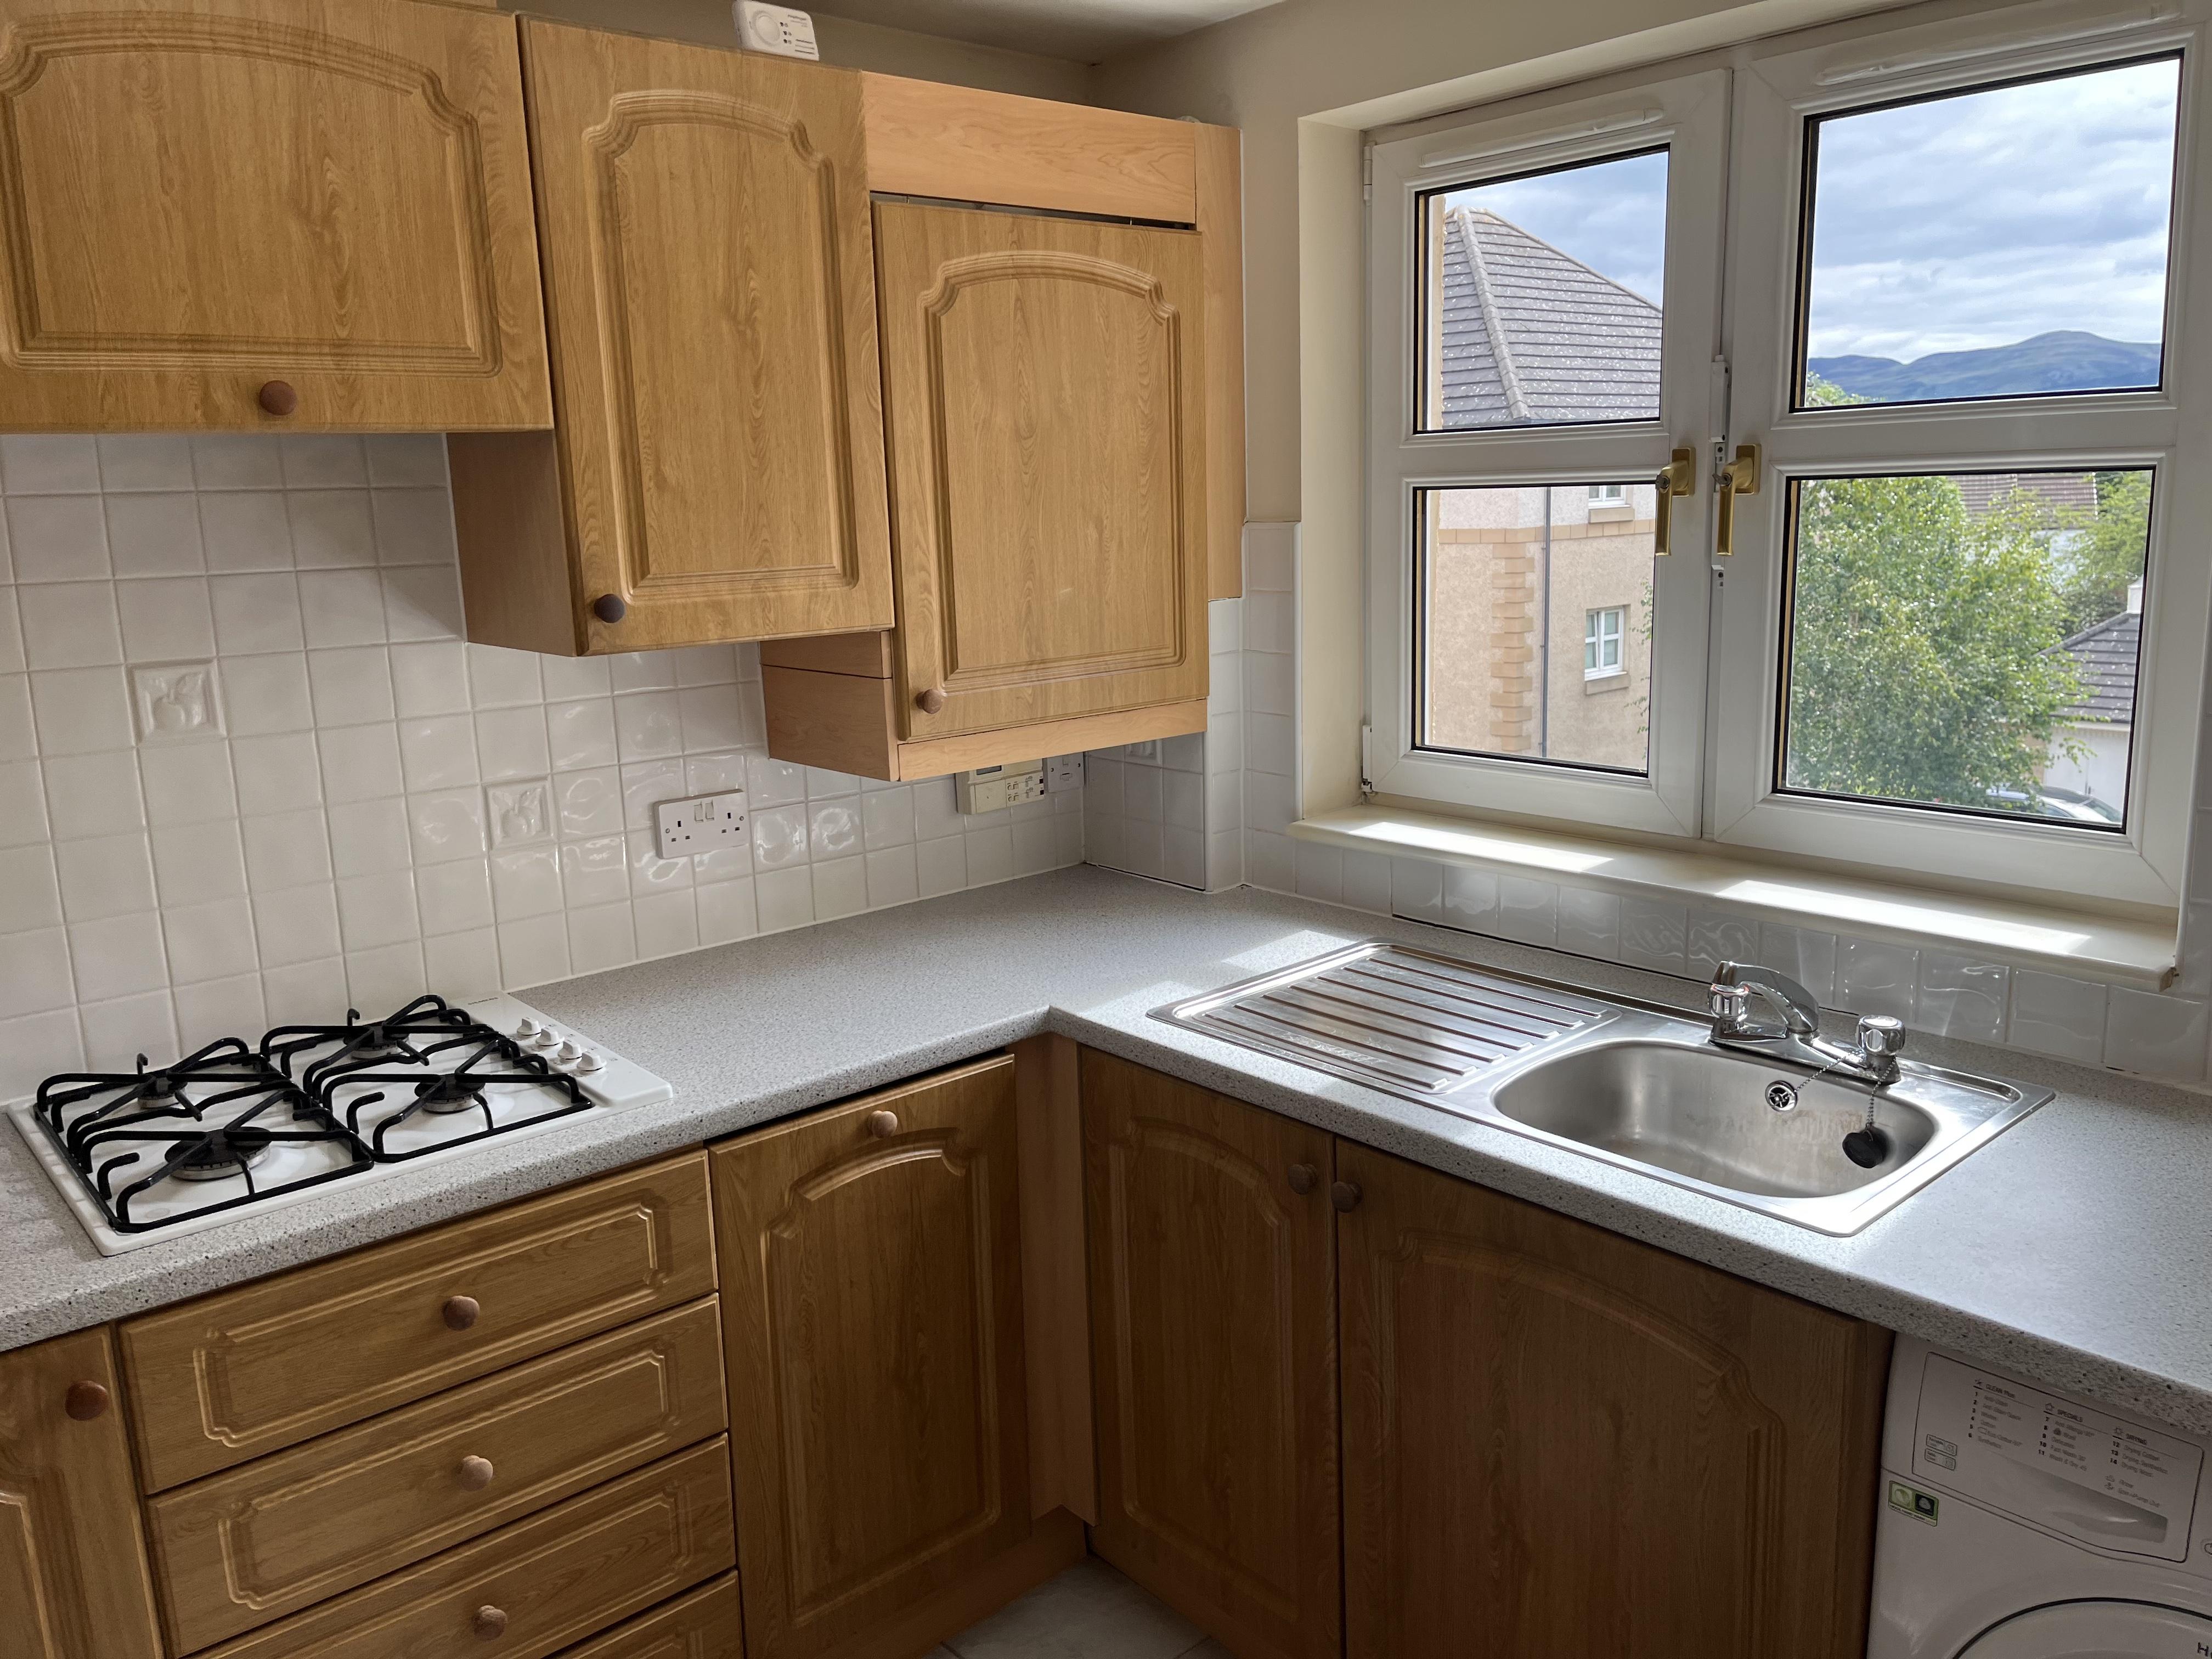
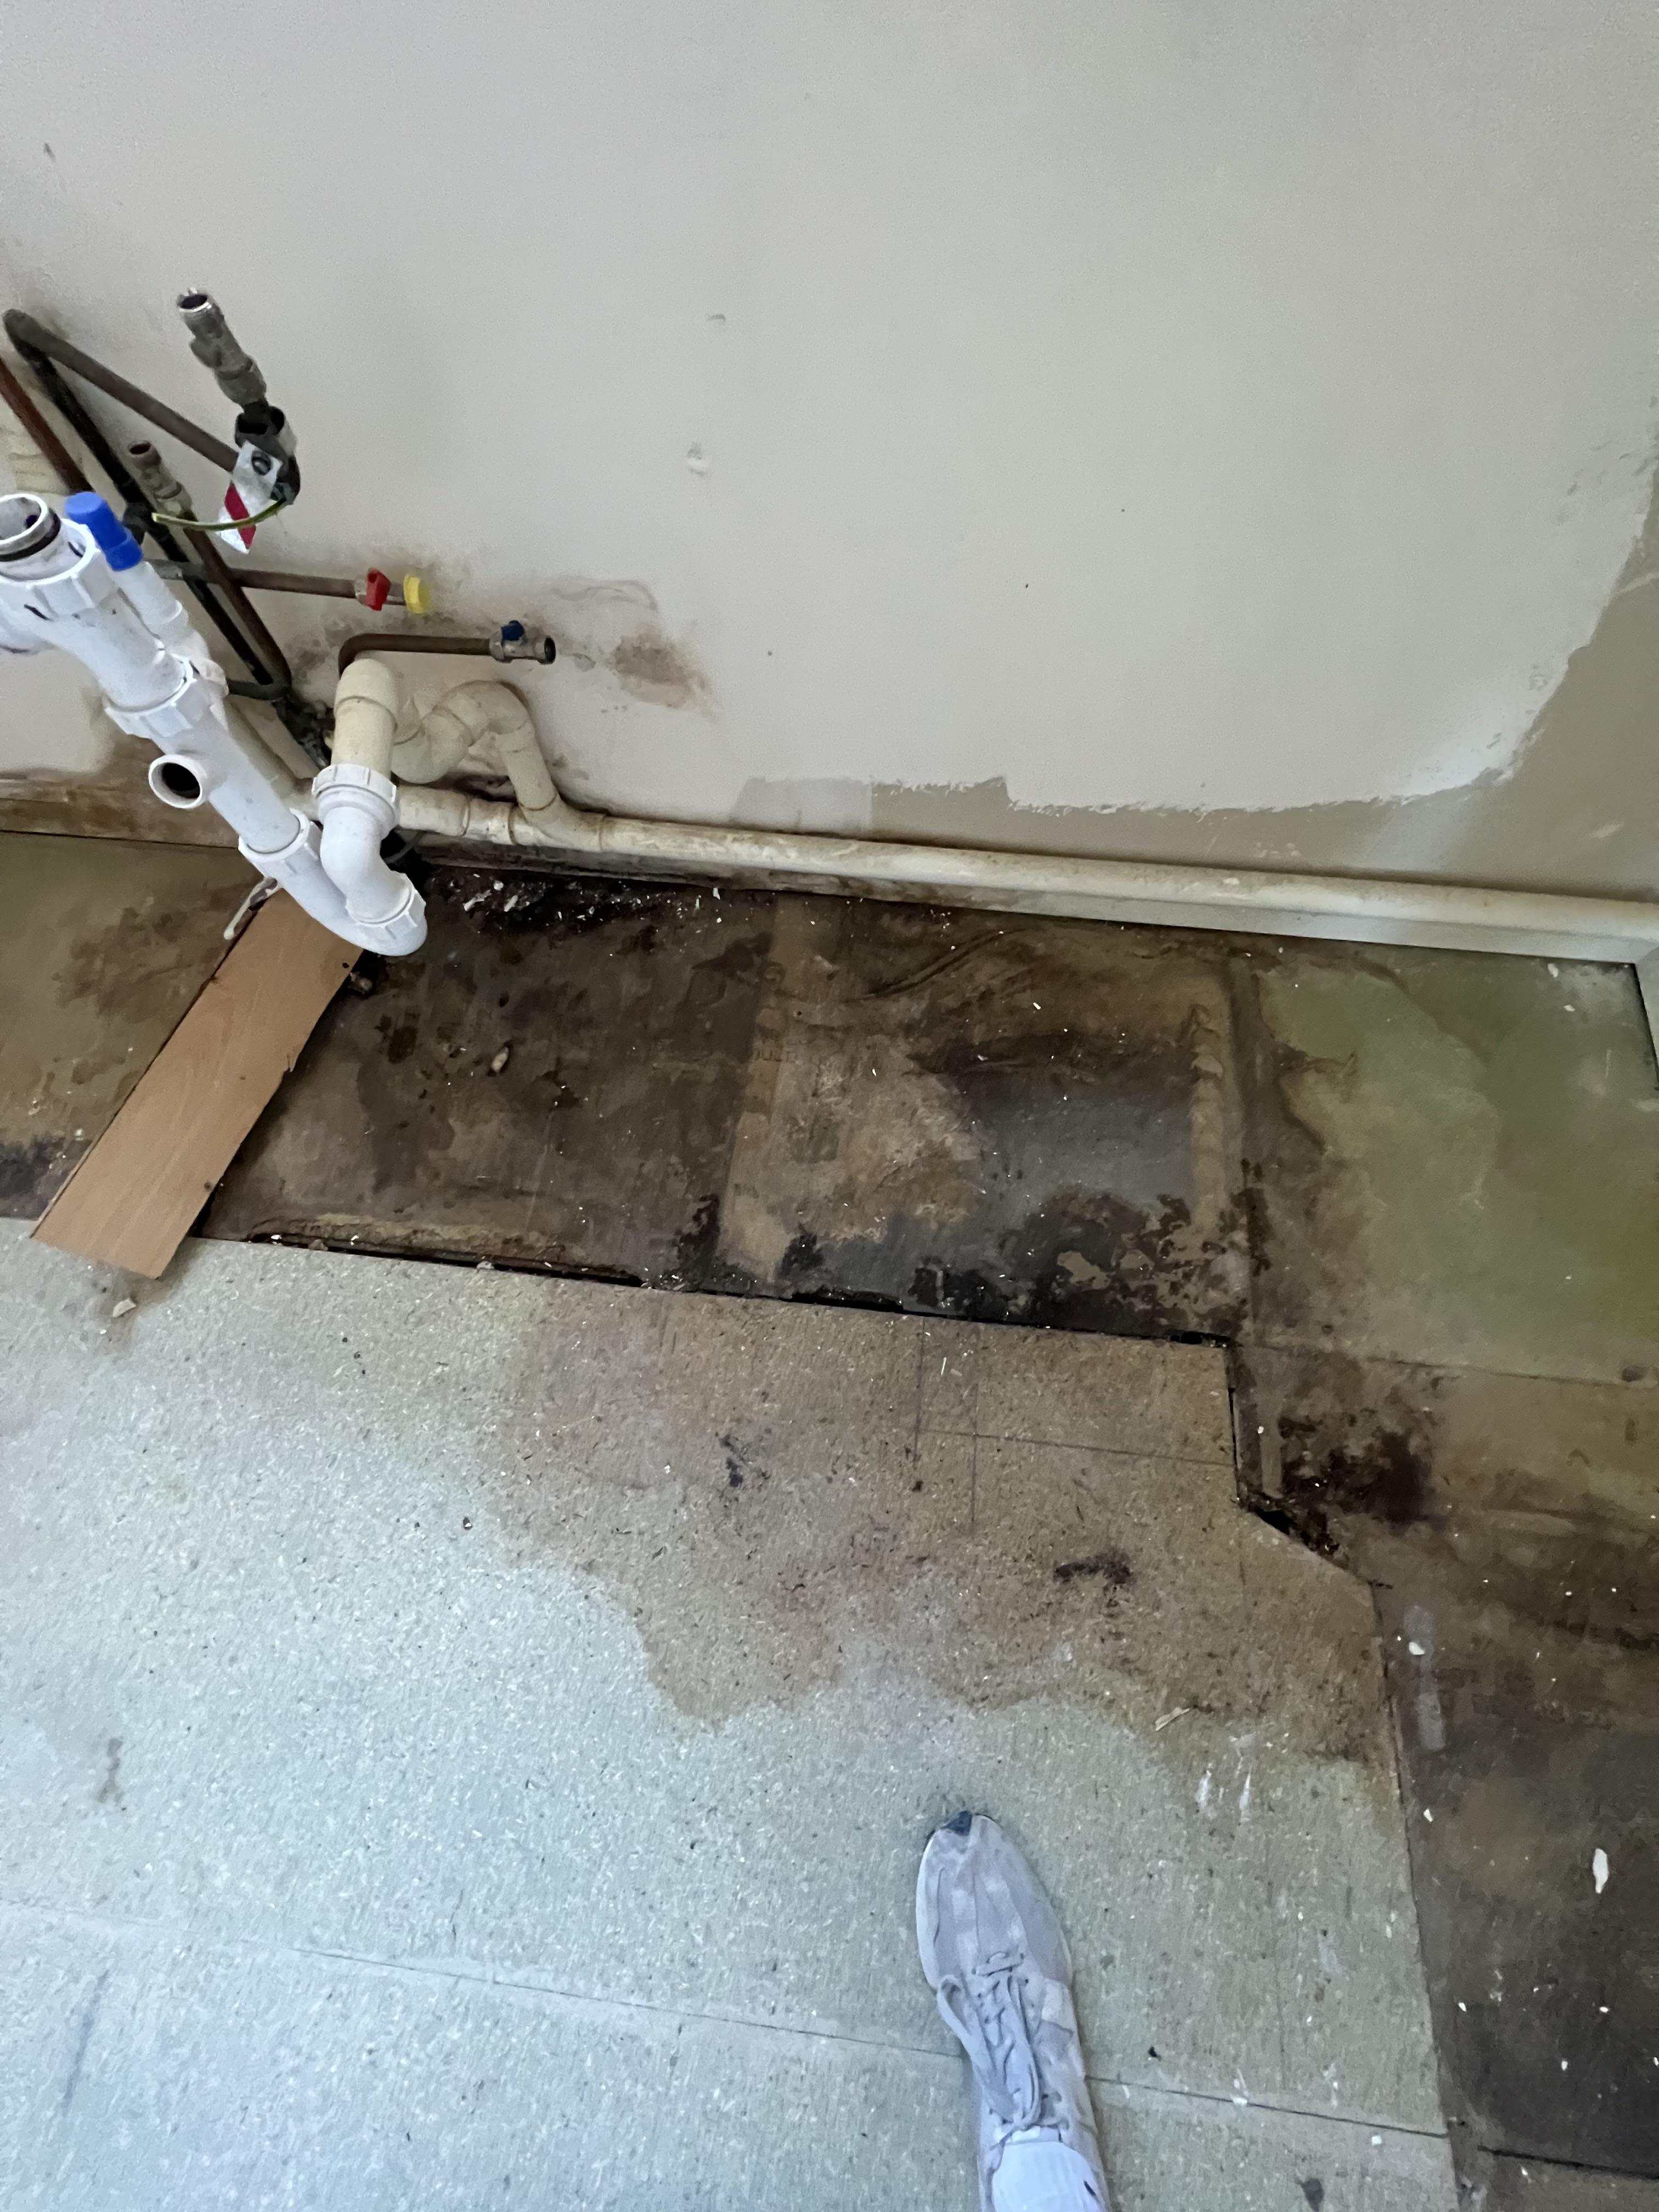
Sadly in the summer, my brother's wife died very suddenly and unexpectedly. She had been something of a hoarder and none of the family had been to visit them for some years. They would only come to us. When we went to his flat we found it was a mess. We had professional cleaners in and then I arranged to have it totally refurbished, so that it would be easier for him to look after once he moved back in. He has been staying with my parents for the last few months. We were very worried about his health, but he is doing much better now. The flat actually smelled like someone smoked even though they don't and I think the air quality affected their health. They purchased the flat when they got married 22 years ago and it had not been touched since then. Further they refused to open any vents and properly use extractor fans so they had a big mould problem. We replaced the kitchen and an en suite, replaced all the flooring with hardwood and have had the whole place redecorated. Hardwood was expensive, but will be a lot easier to look after. The previous carpets were stuck to the floor beneath them. When the flat was built the woodwork was painted cream eggshell, it looks awful as it is so similar to the magnolia walls, that you would think someone had emulsion the woodwork. Took three coats to get it white. As well as organising everything, I did the new kitchen design and put up the light fittings. I reckon spending just a few pounds on lights massively elevates a place. The kitchen and en suite floors had to be replaced as they had started to rot due to water leaks. I also luckily discovered a leaking soil pipe just before the new kitchen went in. Just need to order some new furniture now and put up some curtains. Found a small building company to work with who were very good. Very impressed with DIY Kitchens. The original kitchen had bizarrely been installed around 50mm into the room to avoid cutting the pipes into the back of the units with the oven jutting out a further 150mm due to the soil stack. I fixed this in the new design. It was quite a bit of space to lose in a room basically only 3m square. I think the before and after pictures are pretty obvious. The before pictures are after the professional cleaning.


 6 points
 -
Very nice garage, I am quite jealous. That’s on the list for when I get a plot near to me somewhere. Currently on the hunt and hoping to find something in Wales that is very good bang for the buck and to build the forever home in the background. Been busy creating homes for others for a long time, my turn soon hopefully!6 points
-
If you read my posts, In my location they wanted £2k for a pump. That's £2000 pound. Sorry I've baffled you, we can't all be superman @Dave Jones😍6 points


.jpg.c21f3ac78c9b7efd90cbdcb312744dc5.thumb.jpg.7adcad4c0e384f5ecd7d56b0618df6e5.jpg)


This leaderboard is set to London/GMT+01:00