
Leaderboard


Popular Content
Showing content with the highest reputation on 05/06/21 in all areas
-
It's kind of taken me 4 moths to get here, we broke ground start of January took a while to get the road and the rest of the ground built up with the stone (700 Tonnes circa!). But we have finally done the UFH, tied the mesh and then poured the concrete. UFH: Fitting the UFH was pretty straightforward to be honest. I had 1.1km of pipe to lay, and just planned it out as per the Wunda drg, I adapted a little as I went along to avoid awkward bits but it went fine. The UFH stapler was a godsend, made it Uber easy and was just great putting it into the insulation. The decoiler also a godsend, god knows how you would do it without one of those. Both well worth the purchase. I laid pipes out in concentric layout, it gives the most even heat distribution as a return is next to a feed pipe. It was fine doing it, i started with outer at 400mm centres and then turned back to leave me with 200mm spacing. Once back at the UFH manifold point I cut the pipe to confirm it wasn't burst and got a big whoosh of air (Wunda pipes come pressurised). The only mistake i made (or remember making was the lengths. I thought i had 11 100m loops, but turns out I had 10 loops at less than 100m, then 1 loop at 101m - which they supplied a 120m length for. Of course didn't realise that till the end and it was the last pipe to be laid...purely coincidentally. I took a slightly shorter route, but either that pipe was longer than 100m (I had at least 10m spare) or the length they worked out was wrong (unlikely) fortunately it worked out fine! I also used the clip track to secure them, which works well and sticks good to the insulation, doesn't do well at loops close to it but staples there sort it. I never fitted the manifold, I just used a clip track mounted high on a wee frame I built where the manifold will go. I didn't pressure test either....or pressurise for the pour, I wasn't concerned about holes as I was the only one there and I put 1000+ castles down to support the mesh to the heavy ground workers wouldn't' squash it on top. My pipes were laid on the insulation at the bottom of the concrete well away from the mesh and any chance of people drilling through them. I'm confident not pressuring will be fine during the concrete pour - those pipes are very resilient. Mesh: By Jesus - straightforward again, but f$ck me....the bloody wire tying loops. My back was dead..and i don't have any back issues, I was like Quasimodo bent over for days tying mesh together. I had a single layer on the main slab, with two layers in ring beam and three at sliders. I used maybe 1000 ties. The mesh castles worked well to support it and the hystools too to give the spacing. I defo didn't think about heights where your lap the mesh sheets as you end up 20-40 mm higher due to where triple sheets lap each other. So I have lots of spare hystools at 100mm. I had approx. 360m2 of mesh to put in, cutting it was done with stihl saw (quik cut) - made life easy. I also purchased a dewalt cordless grinder originally to do this but you would go through wheels like a maniac. So that was used for small cuts and came in handy trimming bits. The stihl saw (which i own anyway) made it easy. I did buy a set of 36" bolt cutters as someone said to use that - shit idea, mega hard and I'd have been there all day using them. They done two cuts, went back in the box and were returned to Toolstation. Rebates: I planned two flush thresholds for my sliders - I shuttered these using the 50mm packing that came with the Insulated foundation, worked ok - But i had to weight them down during the pour. Also - I worked the concrete below the long one, but forgot the short one and it left a space which I will fix this week prior to kit going up. I also done a shuttered section at my downstairs bathroom so I can fit a floor mounted shower tray. That worked fine - just need to dig it out. Concrete: We had C25/C28 Specified but just put in C35 as it was what the guys normally use. We had a lovely day for it, 14 degrees and sunny, went pretty well. We had a bit of a delay with the last part load - which was at garage, but turned out fine. We also done the pads too and just overfilled them with extra that was left, my pad heights externally to the footprint are for posts to support my canopy and ended up different heights but I just gave the kit supplier all the heights and then are cutting to suit. They are all well below the ground anyway. I wanted to power float, but I didn't manage to get it arranged and my guys didn't seem keen. I was going to do it myself, but ran the risk of doing it for the first time on my own slab and didn't want to majorly mess up what they had done as it would have been in the evening by myself. 36cube in total went in. The only issue I was left with was that the boys forgot the poker. They did the vibro screed and all areas were filled, but missing the poker meant that we missed the concrete under a slider rebate. The long one (4.6m) was fine as it floated up a little so I hurriedly spent some time moving it up and down working the concrete below it, then I added stones on top to level it off. I shoudl have done this with the short (3m) one but didn't think as it didn't float up. It's no major drama, getting some concrete this week and will fill it. It'll be a cold joint but it's at a slider with no wall attached. I added ducts for the island below the mesh to we can get power there. The day after the pour I cut a control joint and then I tried to cover it with plastic (DPM actually) but I was ill prepared and didn't have enough, so just stuck with watering it with a hose each day when I could. I did get a couple of small shrinkage cracks in the main slab where it dried too quickly (they had appeared the next morning) due to it being so sunny the day of the pour. But they are small and nothing to worry about. all in all happy. There is lots of other stuff I'm sure I forget but it always seems to elude me when I write a blog post. I also find it hard to find the time writing them - but that's self building for you! Pictures tell better stories! Lots included. I'm learning to not sweat the wee details, it's ok if things go a little pear shaped. It'll work out in the end. For now Foundations are finished and it feels good to be done here, we will backfill later and finish drains but that's in a few months. I just have DPM to fold up and attach this weekend (How do you fold up internal corners?!) prior to kit being delivered and erection starting next week. I've had two weekends off since the pour and it has been weird not being there every night and weekend. Things I learned: 1) Check all pipes lengths and lay them out first of all! 2) Buy the stapler 3) Buy the decoiler 4) Plan all your cuts out for mesh 5) Don't bother with bolt cutters 20210421_093630.mp43 points
-
Just a little to add to the topic. We have 4600L Kingspan Klagester rain water harvesting system which we installed primarily to take care of surface water as the cost of connection to the surface water drain was prohibitive. The system cost £1789 back in January 2019. The system has a few benefits over just a straight tank and pump solution, allowing levels to be monitored and also top up from mains water if required. We use the water for the washing machine, to flush toilets and the garden. It looks and smells like clean water. The tank has a leaf filter, we also added scotch brite mesh filters to the down pipe drains. Keeping light from the water is pretty fundamental and I would not go the IBC route myself. On the minus side. We didn't have a good experience with Kingspan as our pump was found to be faulty but was deemed out of warrantee which is just one year from delivery, We didn't commission the system in the first year of our build! The pump has been replaced with a better one from Divertron which cost less than the £300 service charge that Kingspan wanted just t look at the problem. A bonus from the pump swap is that the pump has a float intake so water is taken from the tank surface rather that the bottom of the tank where sediment will inevitably build up.3 points
-
For Tesla Model 3, look here: https://ev-database.uk/car/1321/Tesla-Model-3-Long-Range-Dual-Motor#charge-table You go from 7.4kW to 11kW, so 25 to 38mph. For Tesla Model S Plaid: https://ev-database.uk/car/1406/Tesla-Model-S-Plaidplus#charge-table You go from 7.4kW to 22kW, so 22 to 50mph. So for me, future proofing home charging and having PV and an ASHP plus no price uplift meant 3 phase the way to go. I even have a smart meter but that was a battle and a half to get...2 points
-
So... I went through a real conundrum with our flat roof made up of PVC and used as a terrace. When we looked at the house, it had a leak and that was supposedly resolved by renewing the silicon between the up stand and wall (or so we thought). If the truth be known my gut told me the roof would cause us problems if we brought the house, but I chose to ignore it!! The roof terrace is ~4m x 4m and has two parapet walls. Around a month after moving in, following no real rain but a hard frost we had some damp / blown plaster over the top of the wall underneath one of the parapets, near to where the outlet is for the terrace. I got some folks round to look at the roof and remove all the slabs, pads, protective fleece etc. to inspect the roof and outlet. Everybody was convinced it wasn't the roof stating it looked in good condition and was a "good job". I was persuaded it must be the copings letting water in. So off they came, to be re-laid with a DPC underneath (apparently this had been neglected when built but there was nevertheless a cavity tray underneath") Now... this seemingly fixed the problem for many months until it was getting warmer and we brought all the slabs back up to terrace. After the first bought of heavy rain we had two massive damp patches on the ceiling but nothing further on the wall this time. I was now convinced it has to be the roof based on location and the amount of water. In the first instance I removed a group of slabs (around 7-8) near the corner of the outlet to take a look but couldn't see anything... It rained long and hard for days and no further leaks; I was perplexed until I remembered I'd moved the slabs. I put them back and the leak returned the next day! I proved this theory several times by placing and removing them. Once again... all slabs came off the roof and I had folks round to look at the roof. All again said it all looks to be fine but clearly accepted there must be an issue. They were puzzled by the removal of slabs stopping the leak and I don't think gave it much credence but I certainly wasn't lying. All of them offered to either do a complete renew or repair (the later would involve overlapping all seams etc.) I was so sick of it that I opted to renew the membrane completely and also replace the old copings with new ones. When it came to doing the job... both parapet cavity's were bone dry before being replaced with new porcelain ones. When the roofer came he was almost laughing and joking saying there is nothing wrong with this roof it must have been the copings etc. etc. then he cut the membrane and saw a huge damp patch. As he cut further and stripped the deck he found the root cause; a bad weld where the membrane meets the up stand. He said this would never have been found without going through the stripping process. I can only suspect that the slabs must have exacerbated this condition further and led to a leak or at least enough water ingress to get through the ceiling. So in short, from my layman's experience, flat roofs and parapets are a nightmare if not constructed and detailed impeccably. I will actively seek to avoid both flat roofs and parapets on any future house I purchase. All of this probably doesn't assist you a great deal but I wanted to share my experience. My advice would be to not rule out anything and try to find a builder / roofer who is meticulous to assist in locating your leak.2 points
-
Don’t underestimate the cost of building a structure from scratch- especially if you are going to dismantle it at the end, I can’t see you building something for less than 7-10k and your return on it at the end will be zero and probably cost you a bit just getting rid of it...... I would go down the static route and add on a lean to to house work ware, washing machine etc.2 points
-
Hi All! Glad to be part of the community, I'm keen to give back just as much as I am to learn from all of you. I've just taken the leap to buy a 1960's 3 bed semi which looks like it hasn't been touched since it was first decorated! I've got a lot of work and a lot of learning ahead of me, and besides my poor Dad, I'll be looking to gain advice from all of you helpful people here too Hope you're all doing well, Cheers, - Harry1 point
-
OK, I'm tired so this might be a bit of a bad explanation, but it all comes down to how electricity is generated. When you move a magnet past a wire, it induces a current in the wire. In practice going in a straight line isn't practical, so you end up with a rotating magnet. This is also why electricity is delivered as a sine wave. Now it's worth noting that electricity is delivered as a current. For a domestic single-phase system, that means it arrives on the Live wire and returns to the grid down the Neutral wire - with both wires carrying the same amount of current: the number of electrons entering and leaving need to match. For a power station and transmission system that's a pain in the backside - only half your wires actually transmit useful power, and with a single phase your generator has got lots of empty space inside which could be used for something different. This is where three-phase is really helpful - as you can see from the .GIF below, the sum of all the three currents in a three-phase system is always zero. That means for instance that you can create a neutral within the generator by tying the three windings together, and the neutral wire on the supergrid pylons is the little thin one at the very top of the pylons, with all the other wires carrying power. This feeds back to why big electrical loads need to be attached to a 3-phase supply: if the loads aren't balanced then either you get a distorted sine wave or more likely you start sending a load of current down the neutral wire. Turning 3-phase into domestic single phase is easy: you send out the three phases plus the neutral wire from the transformer, and each house gets one live phase and a neutral, which brings the voltage down from "415V" (the phase to phase voltage) to "230V" (the phase to neutral voltage).1 point
-
With our network (UKPN) you would just raise a new job for single phase and ignore the 3 phase quote. They cannot cope with amending the quote and prefer to start again.1 point
-
The 11KV is just that, hight voltage 11,000 volts. This is the feed TO the substation, which is the pink rectangle in the bottom right. Your supply comes FROM that substation. For minimum cost to you, you just need to find what you can connect to just by jointing into the cable going past the front of your house. Clearly you cannot get 3 phase that way. What is not clear is for the 3 phase option, do they have to just dig 2 holes and make some joints, or is that a new section of cable to be installed between points C and F? If tat is a new bit of cable tat goes some way to explain the cost. I am near certain a single phase connection, if it is within te existing capacity on the cable going past your front, will be substantially cheaper.1 point
-
WHY did you ask for 3 phase? The first thing that stands out is "Breach joint into 4 core cable as customer wants 3 phase" So choose single phase and that looks like one hole in the road and one junction not needing to be made. 35mm 1 CAL is 1 core concentric aluminium cable. Think of an overgrown super sized coax cable. That is the standard supply cable used mostly. What did the single phase quote say, how much cheaper was that? Post the entire wordy bit of the quote, that will itemise where all the costs are. (anonymise it of course) If you have not asked for the single phase quote, ask for 21KVA. Then show us the exact quote. IF you find they are asking for network upgrade costs, then try a lower rating, our supply is only 12KVA and that is plenty for a low energy house. How are you going to heat the house?1 point
-
I have the same view on future proofing but not sure it's worth paying £8k. I've already paid £5k to UK Power to get power to the plot. Estimated house value will be £750k so it's not a huge %. Still not sure1 point
-
Yep - 3 phase best for “ future proofing “ . Though I can only charge at 7kw it’s not an issue . I “ top up “ frequently; especially when PV output is high . Indeed my EV battery has never been below 50% . Sometimes I adjust so I only charge from PV - which of course may just be 1kw . But it’s free fuel !1 point
-
I *think* it does as max on single phase is 7kw . Someone May correct me ???1 point
-
@nod has forgotten more than I'll ever know about this subject. But I do know a bit about joists (and how to get them wrong) - I put my own POSIs in . A 1 mm gap - locally (Lancashire) known as a gnatt's bollock - is an excellent result. Glued and screwed to 22mm boarding will be fine. I've seen 5mm gaps at POSIs put in at 600mm centres and 17mm boarding. They didn't flex..... Relax. Think of England Harry and St George.1 point
-
You must live somewhere posh - in this area we can only afford one car ?1 point
-
Our permission stipulated 2! Simon1 point
-
Can you get 2 or more 100Amp feeds and split the functions?1 point
-
'3 phase boiler.' from a quick search it seems that for over 15kW, electric boilers need 3 phase. Makes sense, as 220V x 100A is only 22kW.1 point
-
As noted above - I've just had my connection quote from Western Power & it specifies 3-phase. They know I'll be having an ASHP (but no detail as to size); they may also know that my local council mandates installing cabling for an EV charger in all planning permissions. I'm going back to them to ask if single phase is still an option & if so what is the cost difference.1 point
-
An M+E consultant can do an analysis of what you intend to connect to see if 3 phase is necessary. Can't remember for the life of me what they call these - someone will be along before long who does know - but our M+E chappie said we would be fine with a normal single phase supply - 7kW ASHP, 4kW solar PV and standard EV chargers with all the normal ovens, lights, small appliances etc. As @newhome said though big ASHPs need 3 phase - you can see HP requirements if you look up their specs. Simon1 point
-
My 24kw boiler requires three phase so it’s not just machinery. I think at least one supplier (Western Power) is moving to 3 phase for new connections where possible.1 point
-
For years I asked sparkies what was the principle of 3 phase, and they didn't know. This is what I think I now know. 3 phase is necessary for heavy industry. The 3 power supplies are out of phase with each other (peaks and troughs are 1/3 apart) (like pistons in a car, don't all push at once) ) so that the power is smoother as well as more powerful at 440V. Machinery also lasts longer, because of the 'smoothness'. But you can take power off each supply at 230V. I have no idea if fast car battery charging needs 3 phase, but iIdoubt it. So unless you need to operate heavy machinery, then it doesn't need to be 3 phase, and you can have a bigger, single phase supply instead. All gurus: If any of that is wrong, then please do tell.1 point
-
Pros: 3x the electrical power in and out of a single phase system. That's handy for things like faster car chargers, big PV arrays, etc. Some things - basically big motors - need 3-phase to work. If you're planning a big workshop that may help as the bigger tools may need it. Cons Installation cost may be bigger - depends on your circumstances. Smart meters are harder to get for it at present. Not worth spending £££££ to get, but in most cases the difference in cost should basically be down to 4 cores rather than 2 in the cable they lay, which is pretty trivial.1 point
-
I haven't really looked into it, my solar guy just said if you can get 3 phase you should. I guess you're possibly restricted with single phase if you want to consume a lot of power all at once eg car charger, heat pump etc. I don't think there are any cons other than cost.1 point
-
I briefly looked at 3 phase . Saw the ‘estimated’ cost and thought f that . So single phase with PV and EV - it’s all good ?1 point
-
Behind a paywall but you get 2 few articles a week (per email) if you register. https://www.thetimes.co.uk/article/how-to-build-your-own-house-a-beginners-guide-to-self-builds-v6khqxsbd Quite banal really, most of the content from Jason Orme of the Homebuilder magazine and the article has GD style houses featured Usual tips on how to find a plot, work out your budget etc... Does give some details of the newly announced £150m scheme - Details of Help to Build are due in the summer but are expected to mirror the Help to Buy scheme available on homes built by developers. If the same rules apply, the government would lend up to 20 per cent — or 40 per cent in London — interest-free for five years on the land and build cost, capped at £600,000. You would need a 75 per cent specialist mortgage and a deposit of at least 5 per cent for the rest. The initial Help to Build pot of £150 million announced two weeks ago could fund 4,000 to 5,000 homes, says Raymond Connor, the chief executive of BuildStore, a self-build mortgage broker. To be at the front of the queue for the scheme’s expected launch in the autumn, here is how you can prepare now.1 point
-
The final figures: (However, why does this figure never include design or the other project costs? I Believe it is a deliberate, but unofficial, principle of some (mostly) Architects, to avoid analysis of their and other consultants' costs. It encourages the client to proceed at their fee stage. It also helps the project look like better value than it is, after the event (eg on tv and in references) In one such case, I pointed out the difference between what the client was being told, and their stated tight budget (the Architect was not telling him that he was only quoting the 'build' cost, and also not allowing any contingency). The Architect's response was, utterly shockingly, "the client will always find more money". I told the client and declined the project: their problem, not mine. Is there any way to change this?1 point
-
If getting three quotes from builders at this stage definitely don't treat it like a tender and go with the lowest. At this stage you go with the average price or slightly higher to ere on the side of caution. After you get planning and have the detailed drawings and specification done get a QS to do a pre-tender cost estimate. This is a great stage to change the specification of things before sending it out to tender. A good QS will be able to guild you at this stage on what parts are inflating the cost.1 point
-
PV = Photovoltaics = Solar panels (Electricity producing) ?1 point
-
Depends on your situation. Makes connecting 3.68-11.04kW of PV without complications. DNO's do not want heat pumps with an output typically more than 14kW to single phase supplies.1 point
-
Thanks for the suggestions. I will try to get quotes from 2-3 builders and can pay them if required. I understand quotes will vary from builder to builder, my aim is to see what I can fit in my budget of £120K. If it's +20K I can manage but if it's £240, £300 then I will need to cancel the project. In my friend's case they went to Architect with budget X, architect prepared a design they loved. When they went to build it costed 3X. We want to control this aspect as much as possible. I will try to calculate some work scope and post it here to do a basic check if it's realistic to expect so much work in our budget or not.1 point
-
True but we reused the power supply to the van for the garage (put a kiosk in place when we first moved supply from old house pre-demolition) and only had a short run to the caravan from the new fouls which were needed for the new build anyway. Putting those in actually constituted a start on the build and locked in our building regs to older rules. Steps were a stack of staggered pallets, as was the walkway to hard standing. Gas bottles were a faff, especially ensuring they were securely chained to posts and could not topple or get nicked. Agree that you need everything checked out for gas and electrical safety by pros but that would be same for any temp accommodation scenario. If you want to build something semi permanent then there are insulated log cabins that would do the job but they are not cheap. You could also insulate a standard cabin. You'd need to price in the works for the base plus all services as per caravan.1 point
-
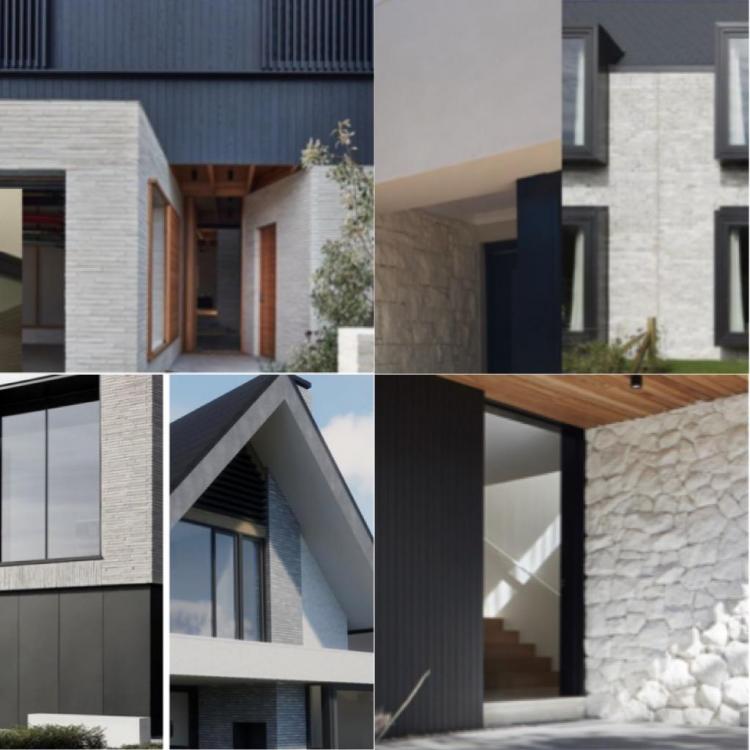
+1 To be fair to the architect, I think the design is very close to your precedent images. It’s just a matter of selecting slightly different materials and textures for the cladding. Also the windows could be changed to something a bit less fussy. The whole facade can be softened with less contrasting colours and textures to make it more subtle, which may not date so quickly. It’s not easy to articulate exactly what you want without asking the architect to produce numerous drawings. Best way is play about with images yourself with a sketching tool, I found PowerPoint quite useful!1 point
-
I don't think the design is a million miles out from your moodboard - the windows/metal cladding looks quite dark but this is probably more to do with the lighting on the render. The biggest difference is the stone/bricks - your mood board uses something similar to this product which I have been looking at ... https://www.wienerberger.be/gevel/productzoeker/wasserstrich-special-grijs.html? My view on selecting external materials is to find something I like and copy! Either that or find a design consultant who can help - but for your average self builder it's probably quite hard to find someone who specialises in this (and who doesn't charge a fortune).1 point
-
Was Devon's planning department, not Cornwall's.1 point
-
More moodboard....
 1 point
 -
I think their choice suits the house design but can understand its not everyone's taste. I once visited an architect designed house that was ultra modern on the outside with large metal windows and modern cladding.... but judging by the interior the owner really wanted a country cottage. It had oak cottage doors and flowery tiles. Can you post some examples from your mood board?1 point
-
Wow, quite a big question! Congrats on getting planning through; that's a big hurdle sorted. I suspect your architects didn't want to change anything drastically to avoid a fresh planning application. Rather than look at individual materials, perhaps find some images of styles of house that appeal, and then consider how that would fit with your location?1 point
-
DONT GET ME STARTED ON PLANNERS DOWN HERE!!!!! But we won on appeal hands down so don’t give up hope.1 point
-
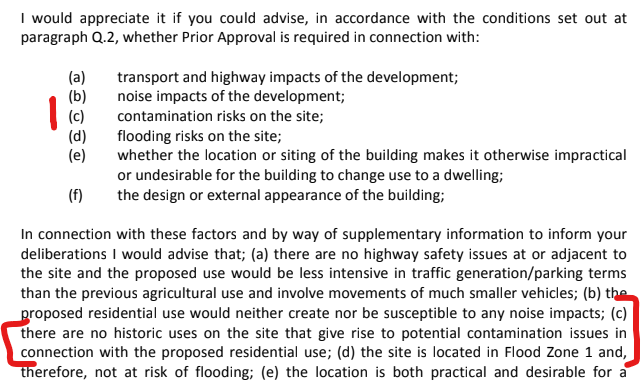
Our LPA takes a very different view on all change of use from non-resi to resi. It requires the Phase 1 to get the history, and a walk-over to determine if there are any potential risks. If any risks are found then a Phase 2 is required. I assumed this was the norm, as every Class MB/Q and "normal" Barn conversions I researched had the same conditions attached.1 point
-
For the Class Q approval I don't recall being required to have a contamination report, and checking now I see the planning consultant addressed this like this: In the planning officer's report they said: "The council's environmental health officers have been consulted and raise no objection. From the planning history there appears to be no historic uses which may give rise to concern'" I suspect a high % of class Q barns involve an asbestos fibre cement roof. Ours had a 385m2 1960s asbestos roof that was removed by a demolition contractor experienced with this, but not a specialist asbestos remover. If you don't know the full history of the property you may want a contamination survey done for your own sake in any case.
 1 point
 -
ToughButtercup - I found it very interesting what you said about consistency. We have currently submitted a pre planning enquiry to demolish our 1970's bungalow and replace it with a new build house. We gained planning permission in 2011 for the construction of 2 new dwellings on the site which has a narrowish entrance. The two houses and bungalow stand in a line to the right of the access road so the bungalow now looks very out of place in this conservation area. In the pre-app response letter from Planning last week, the Highways Officer has said the access road should be 5 metres which is totally impossible as there are old cottages at the entrance. Do you think there is a lack of consistency in approving in 2011 two new dwellings with existing entrance (road does widen further down), but saying it has to be widened for a replacement dwelling. Your thoughts would be appreciated but in any event, I shall investigate what you have said, so thank you.1 point
-
As @IanR says this is a common misunderstanding. You must be billed @ 5% for all eligible labour and supply and fit work, and your supply only materials will be billed to you with standard VAT. When you do your claim you can claim back the 5% billed for labour and supply & fit, and the full 20% paid on materials. Unlike new builds where labour and supply & fit are zero rated, all conversions and properties empty for 2 years are billed @ 5% VAT initially but you can still reclaim this as you are creating a new dwelling (subject to you meeting all of the scheme rules). Not all of the projects billed at 5% will be eligible for a full VAT reclaim and the rules are complex so if all are billed @ 5% it avoids trades having to determine whether to zero rate certain conversion works or not. Have a read of the claim form and notes. You will see that there is a separate section of the form for reclaiming the 5%. https://assets.publishing.service.gov.uk/government/uploads/system/uploads/attachment_data/file/828048/VAT431C_form_and_notes__1_.pdf1 point
-
Hello DHD ? Out of curiosity why 12V 200 Ah rather than 2x 12V 100 Ah in series? Smaller batteries to lug around. Thinner wires / lower I2C losses. A lot of automotive grade stuff takes 12-24v these days (LEDs, USB adapters, laptop adapters) or is available in straight 24v (pumps, motorised valves etc). I'm picking up 20 used 195W panels (£230 the lot...) next week and would like to split these / experiment with running hotel load on PV inc overnight via storage. Somebody was offloading 50 panels the other day for £1200. Cut cables slightly sketchy to rejoin but at that price I was half tempted o use 'em as a ruddy fence!1 point
-
+1 - this will need a SUDS solution which will involve and unrealistic amount of soakaway crates. I am in the same position and, in my case, the whole this is completely unnecessary - the ground make up is 600mm peat over clay so the water goes straight through the peat and washes over the clay until it drains away. They are going to make me put rainwater storage in for a 1 in a 100 year event + 40% addition for 'climate change'. 40 sq. m of crates overall..... All to avoid a puddle in the garden once a century - which would never happen because of the peat! Madness.1 point
-
The usual presumption for rainwater would be a Sustainable Drainage System these days, I think.1 point
-
So the presumption should be that you connect your wastewater from the new builds to the sewer. Unless there are insurmountable obstacles, you're not looking at an off-mains wastewater treatment plant and drainage field. Percolation tests in accordance with BS6297 are required for the design of a drainage field. How is the rainwater from the main house dealt with? If it is to soakaway then that suggests this option could work for the new builds too. Infiltration rate tests in accordance with BRE 365 are used for soakaway design. If these are what you had carried out and gave bad results then I'd be looking at further tests to assess the variability of the soils across the site and with depth before ruling out this option. Alternatively, interception of the rainwater and attenuation before discharge to the ditch could be a reasonable solution. Discharge of combined wastewater and rainwater to a sewer is normally not allowed. I'd have expected your engineers to have put all this in a Foul & Surface Drainage Strategy Report.1 point
-
I made it clear that I was very upset about the mistake, without actually pointing the finger at him. Rather than point the finger and say "you're an idiot, you f***ed up", I tried a more diplomatic tack and said that I wanted to avoid any more mistakes and asked him to work more closely with my architect so that there are no further "miscommunications" and i emphasised that he shouldn't make any assumptions, that if he's in doubt he should call the architect direct and ask. I also showed the builder I was ready to compromise on certain things if he was too. I also insisted that my architect meet with me and the builder at least twice a week, unless both thought it really wasn't necessary. Most weeks we've done two meetings a week and it has helped create a better working relationship. There is still a hell of a lot to do, and the builder has fallen behind a bit, but hopefully things will start to pick up now that the structural works are almost finished. Touch wood!1 point
-
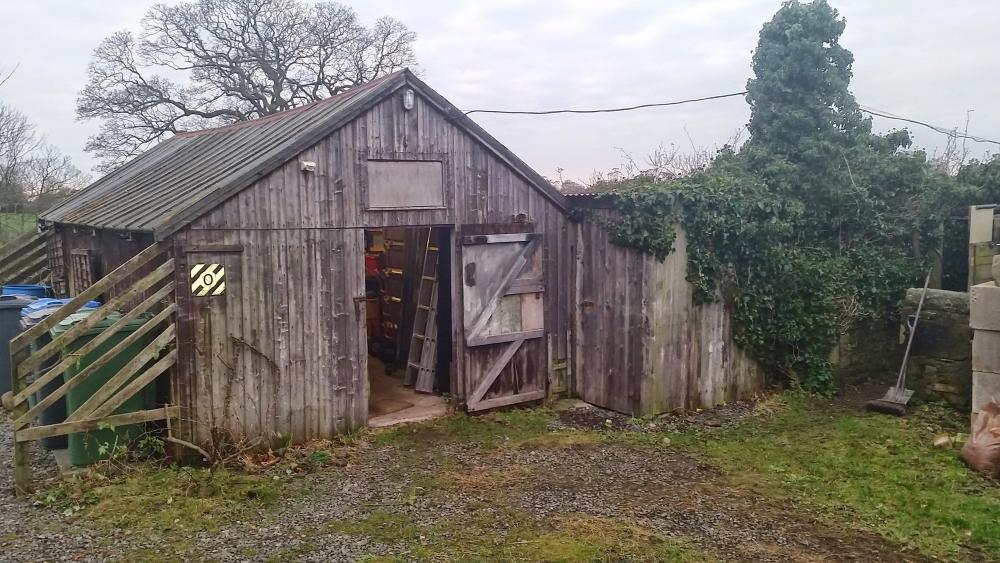
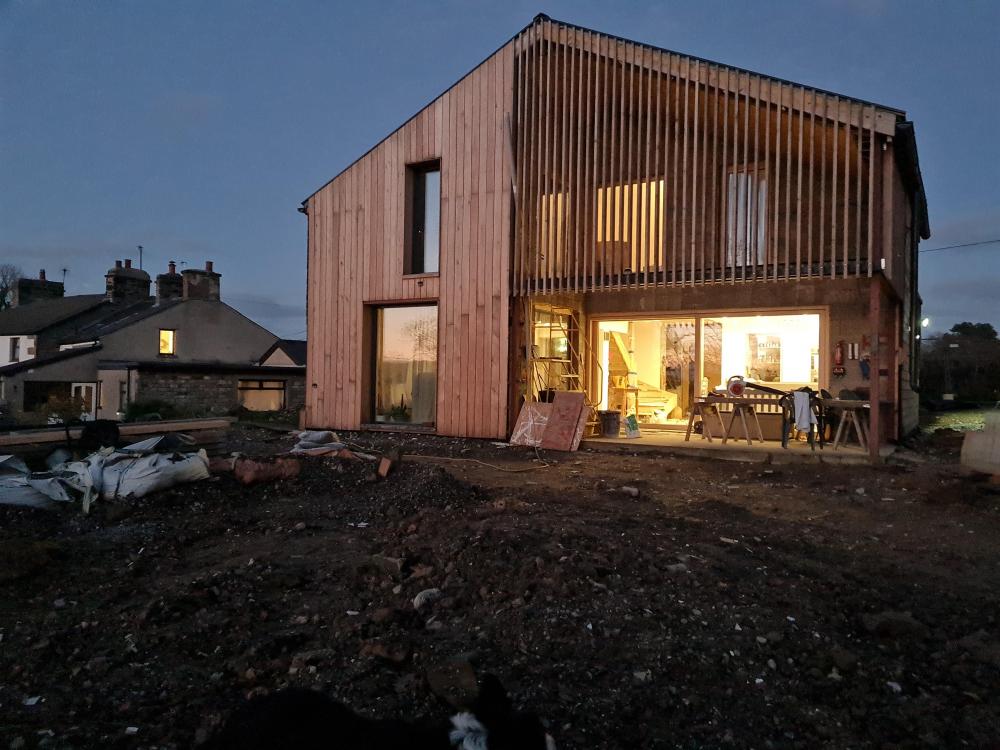
I need a bit of a lift this morning. Knackered, tired, had enough - see all the mistakes: you know the drill. We all suffer from it. The No Mow May thread got me thinking: I certainly dont have to do any mowing any more - and thats excellent. Before building I had about 4 hours mowing a week to do. So, how about a Before and After or From That to This interlude. A bit of time for reflection on achievement rather than the next ten -how-the-hell-do-you-do-thats. What better way than two images one Before 'tother After Before After There. that's a bit better: just a bit better. Show us your before and after photos.....
 1 point
 -
week 2 has finished and the perimeter of our basement has been dug down to the sandstone and it is now obvious how bloody massive this thing is going to be! it really didn't look that big on the plans.....honest! ? we were hoping for more hands and heavy plant on site this week to speed things up but Monday and Tuesday came and went and still the one man and a digger. on Wednesday a second digger came! woo-hoo! but no extra help so we now have one man and two diggers. It seems to have made him more efficient as he doesn't have to get the one digger out of a big hole to load the lorries. Anyway, here's the video of the second week. I hope you enjoy. we did get the 9.5 tonnes of steel delivered for the reinforced concrete and the waterproofing membrane so it gives me confidence that the basement contractors will be starting soon. we just need to get the hole dug and the hardcore/blinding down and the insulation down first. so not much to do then in the 4-day week next week. One thing the video doesn't show is the huge amount of sandstone that has been dug up already and it's only been half the basement. we're hoping to store it all on site and use it to build a stone wall post-build as part of the landscaping. I think it'll be amazing to have a wall built from stone dug from our own land. here's a picture of the current pile of stone excavated. And here's a small piece I have rescued and cleaned up. it is really lovely stone. Anyway, that's about it for this week. fingers crossed this rain that's here as I type doesn't do any damage to our excavations and it clears up for work to start again on Tuesday. As always, thanks for reading.1 point


This leaderboard is set to London/GMT+01:00