Leaderboard
Popular Content
Showing content with the highest reputation on 10/11/22 in all areas
-
Hopefully this helps BH folk get a further insight into the ins and outs. Here a few extra of my own thoughts. Take two cases. Case 1.. a simple ground beam spanning over a drain resting on a couple of pads at each end. Case 2.. say an ICF basement, raft slab with a waterproofing system. In both cases SE say works out the loads and designs the concrete and sizes the rebar. Then often produces a basic reinforcement layout drawing showing bar sizes, concrete cover, durability etc and a few important details; say the lap length, key corners and so on. The SE will usually carry out a review to make sure that what they have designed can be built "somehow?? " (I hear some of you laughing) and markup up the drawings with some CDM notes and so on. This is then passed to the "lucky" Contractor who has to get on with it. The temporary works are delegated to the Contractor as are all the other problems that go with this type of work. The SE may then be engaged to come to site to check the rebar sizes, spacing and so on just before it is all ready to pour. Now that can work ok on large projects where the Contractor maybe has their own in house Engineers who can do all the temporary works design, carefully check the rebar type, spacing, that the bars are all in the right place and has lots of experience. On small domestic projects this often causes problems as smaller contractors / general domestic builders just don't have the breadth and depth of experience or maybe the resources in house. They often need to get someone else in to do the rebar schedule / provide a price so they can tender properly and so on and this comes at a hidden cost, then the need to install all the bars and shuttering and hope for the best. In summary when things don't fit up on site and the concrete is ordered a lot of money can be lost (tempers fray..) usually by the self builder / domestic client. Designing rebar so it fits and the schedule. Once you have done your "SE" bit the next step is look at the bars in detail and start by thinking "what can go wrong here". Extra long bars or bars that are not basically off the shelf at local stockists could come distorted due to bad handling or may be on a longer lead time.. important later if one or two get damaged on site. Cutting and bending rebar is not an exact science, even with modern machinery. All bars have a length cutting tolerance and when you are setting up the bender the first bar may not be quite right, but still in code tolerance. The ones made on a Friday afternoon may not be quite the same as the ones made on a Wednesday at 10.00am. Some can be over bent, some underbent. Also you get what is called spring back, steel is springy so when you put a bend on a bar all bends won't be the same and this can result in quite a difference and this causes problems at corners as for example. You can reduce the concrete cover to the bars. Remember that the bars when they go into the bender may not be perfectly straight to begin with. If that is not bad enough you have to allow for a tolerance on the shuttering. A shutter that is leaning in coupled with a sprung out bar can leave the bar with little of no concrete cover, and as @saveasteading says in cases they just won't fit at all. Bars that lean in can cause bar conjestion and that means that you can have zones where the concrete is not able to be properly compacted.. to be avoided. Often you say to yourself. Hey if I put laps here I can avoid problems with bars fitting over a wide length between two shutter faces. If I'm using cranked bars in say a basement slab with top and bottom bars can I allow the contractor to move the bars a little in case the cranked bars are a little off. If so, how do I convey this "get out of jail free card" to the contractor. Once you have figured this out you go back and check that the SE design has not been compromised. The bar bending schedule is then relatively easy to produce as you have done all the hard work. Then you check it all again! It's not just burning it's white hot! Take case 1. A simple beam. I'll do the schedule just working off my 2D cad drawing. Often I'll do this for a nominal sum (fee) especially if it's for a contractor I work with regularly or just "good" for the job. If I make a pigs ear of it then I would expect to foot the bill, but that is a commercial risk I take and is lumped in with the rest of the SE design. Case 2. Ah! Quite happy to do the schedule.. here I say to myself.. 2D is not enough, the risk is greater. What I do is to use say Tekla detailing and model the rebar in 3D and put in the shuttering lines. Now I can really visualise where the problems lie and work your way round the model fixing problems, thinking about buildability, pour sequence and size, the weather / time of year etc.. while all the time asking.. have I compromised the SE design. Another aspect here is to make sure you have all the other information you need to coodinate any service penetrations, water bar details etc. Once all that is done then the schedule is the easy bit especially as the software does a lot of the hard work. But again once you have the output from the software I would spend at least a day checking it, just counting bars and so on and a few other things. Lastly you need to check you rebar spec and so on. Quite happy to do this, put my head above the parapet.. someone has to so why not me? If I get it wrong the bill will land on my door step. However I charge accordingly to carry this risk and am careful about the contract terms. Am I just liable for the bars that don't fit or am I liable for any project delay for example. One claim could be a few hundred, the other many tens of thousands. That is something I discuss with the client about what level of risk they want to take on and how much I will charge for the various risk levels. Usually a sensible agreement can be reached where the risk is shared in an equitable way. The main thing is to have the discussion: Is my fee going to result in an overall saving to the client and deliver what they think they are paying the contractor for in terms of build quality and so on. If yes.. then cart on. Another option is where the Client novates you to the Contractor to do this. Basically the Contractor employs the SE directly and carries the risk. But on self build this is complex contractually especially when you are trying to nail down prices to get say funding for the build. In summary. If you are self building then the above is worth a look at as an approach. It's a balance. The more you spend on the design information the easier (we hope) it is for builders to deliver. Also less risk at tender stage as contractors if they are unsure at tender stage about something will just add on a big number and think to themselves.. if I get the job I can afford to worry later about how I'm going to do it as I have a big profitable lump sum built into my figures.3 points
-
Been a builder for near on 40 years and done a little bit of everything over the years. Lived around the world a bit, from various countries in East Africa to New Zealand, and now pretty settled in Norway. Favourite work is the restoration of old brickwork using lime mortars, oh and fixing stuff, from cars to boats and everything in between. Was a silver trowel awarded bricklayer at college many moons ago. Love helping folks sort out their stuff, be it repairs, restorations or improvements.2 points
-
2 points
-
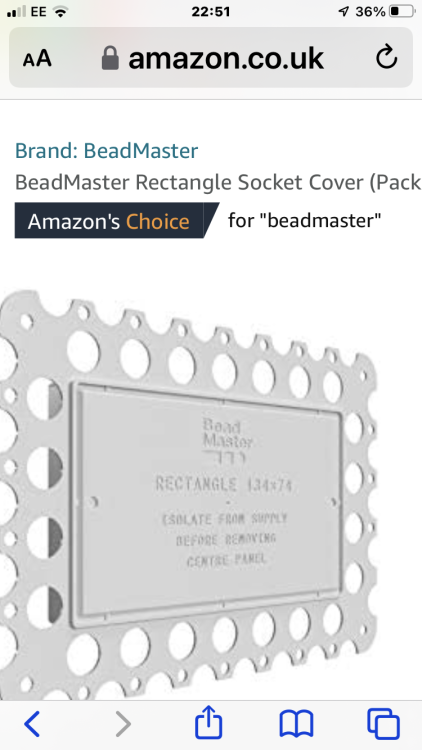
But the holes only have about 10mm of material under to stop it levering off the wall. Send a photo when it is fitted.2 points
-
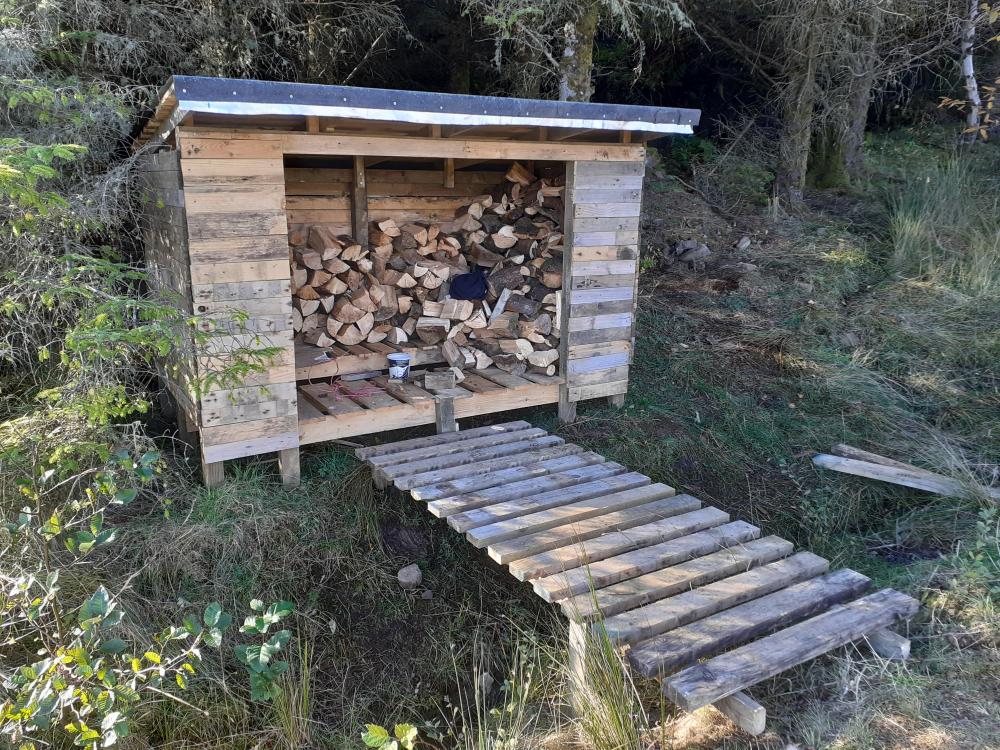
As above; go and have a look around your local garden centre or somewhere that sells sheds etc. Get a feel for how they fit together, take a few pics for reference and give it a go!2 points
-
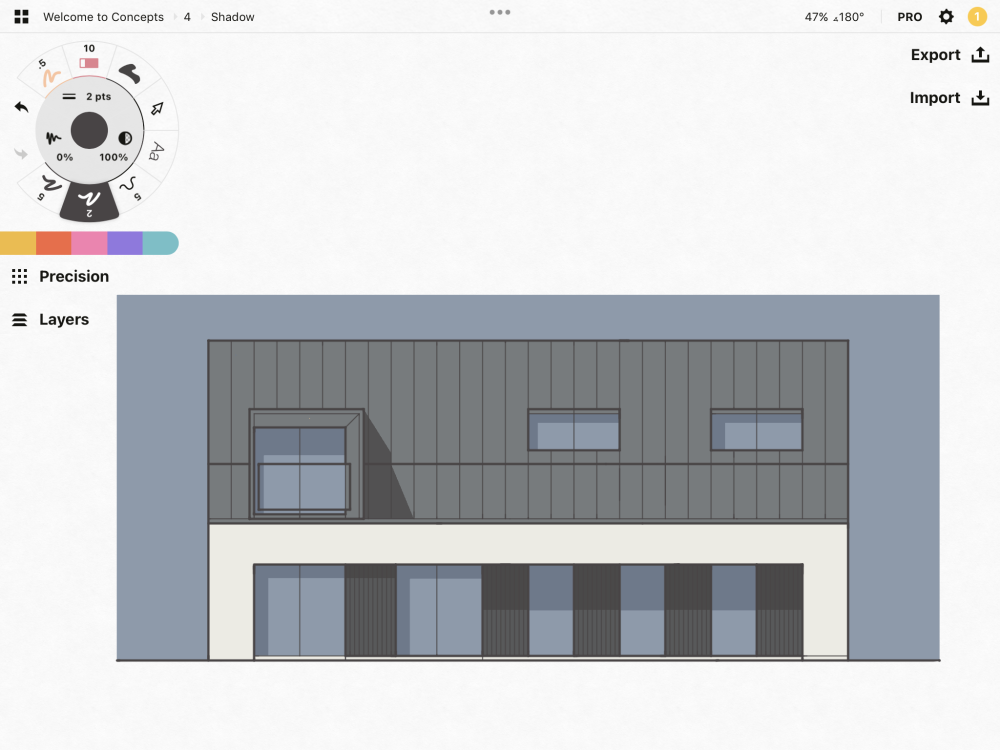
I’d like to offer help to anyone who needs help doing drawings or designing their home or extension. I'm a Registered Architect with some time on my hands. I use my iPad and an app called Concepts to draw and have already helped out a few Forum members.1 point
-
Thought I'd do a short blog on the Polycarbonate tunnel we built. Our big field suffered with no storage, and location meant containers were very expensive to transport. so one option was to build a polytunnel, which we have planning permission for. again due to location, 500m from the coast 73M AMSL I wanted something sturdy. so looked at off the shelf packages. in the Highlands and Islands the PolyCrub is seen as the mecca. Designed in the Shetland isles, guaranteed to withstand 100MPH winds etc etc. due to the ability to get CROFT grant assistance on these, the price is, IMHO, artificially high CIRC 6K for 4M *6M.. this wasn't going to happen, so after looking at many photos I designed my own.. Basic principle is hoops of MDPE pipe secured to posts in the ground, then 3*2 timber used as horizontal support, with Polycarbonate sheets secured to this timber. the bottom sides are then clad. My design was to use 65mm Black MDPE pipe, and secure the timber with coach bolts and penny washers through the pipe. this way I get a guaranteed fixing that won't pull out , and it still allows for flex in the whole structure. 4m wide x 6M long, but this can be extended. My ground has bed rock close to the surface, 300-500mm below ground, so just knocking in post wasn't going to be secure enough to withstand the winds, also where I was sighting the tunnel its on sloping ground, so I couldn't get it level. I cleared the area to removed the top vegetation and a bit of the top soil. and dug 14 holes. then due to rock levels I then core drilled the rock to allow for the post to be deeper. We then set these in concrete, (at the same time as doing the slabs for the cabins.) The next day we had a look and I wasn't too happy with the security of the posts, so slight change of plan, we created a plinth. basically I used some 6x2 either side of the posts, with a slight angle, then filled this with concrete (again we used ready mix at the same time as back filling the treatment plant) this added about 300kg of concrete to each side, and joined all the posts together, and gave us a solid plinth at the side. No Photos of the next stage but we cut 7M lengths of 63mm pipe, this when placed over the posts gives approx. 500mm dwarf walls and a 6M polycarbonate sheet, giving a head height of around 2.3M. we used a plumb bob to get the centre line on each hoop and drilled an 8mm hole through the pipe and secured the top 3x2 treated timber to al the hoops. One thing we found was that the MDPE did not bend uniformly, this may have been due to slight errors with the posts being plumb. The resultant timber (which was not very straight), snaked from hoop to hoop. after head scratching and re thinking. I decided it was a poly tunnel and to get on with it. we used 7 lengths of timber jointed with half lap joints to extend the length to 6.5M. if using a clock analogy the timber was placed at 9,10,11,12,1,2,3 positions, with the 9 & 3 o'clock being 500mm off the ground, also ensuring the 9 & 3 o'clock timbers were approx. 5.8M apart circumferentially. Then it was a case of securing the polycarbonate sheets to the timber. each sheet is joined with some soffit H joint strip. (you can buy a clear joining strip for the sheets but for a 6M length it was around £65. the H strips proved extremely difficult to connect the two sheets together, or should I say impossible. so I cut off the back edge on one side and used some glazing sealant. this way we could attach the strip to the polycarbonate prior to bending over the tunnel. and each sheet 'H' strip basically lapped over the previously installed sheet. day 2 we had the basic structure. It was noticeable that the curve was not symmetrical, so putting the door frame header in by securing to timbers at 11 and 1 o'clock was not level. I overcome this by using a ratchet strap attached to the 11, and 3 o'clock timbers and tightening until timbers at 11&1 o'clock were level. I then put the two door jambs in (concreted at the base) and cut to the length required and secured to the header. This worked and the tunnel was now more cylindrical. I framed the rear by baring 3x2's off the horizontal timbers. Last steps were to clad the base, I used 4*1 treated timbers that were screwed into the MDPE pipe and wooden posts. then used strips of visqueen to create a more sealed dwarf wall, this will help prevent driven rain from the winds getting inside. over this I used Larch timber backs* to create a vertical cladding All in with hardware, polycarbonate, timber, concrete the project cost £1200. not cheap, but its solid as a rock. It withstood the first Autumnal storms this week with winds hitting 50MPH. Its also very warm inside, even now as the temperature is falling. Larch timber backs are the offcuts from the saw mills and are reasonably priced as scrap. we purchased a pack of timber backs, approx.40 lengths of larch timber with bark in 4.8M lengths for £100. these are not uniform and taper etc, but as i only needed 500mm lengths it was straight forward to make it work.1 point
-
Hello Everyone, My name is Mike and I'm supposed to be retired. However, that soon got boring so I bought a house and refurbished it, new kitchen, fitted bedrooms, underfloor heating etc then sold it and bought a small holding on the edge of Dartmoor national park that was pretty derelict with the exception of the house. I'm a reasonably competent DIY type of guy and will turn my hand to most things. Projects completed to date are numerous, but the highlights are:- Heat Recovery and Ventilation system fitted to my bungalow. Now I have two wood burners heating the whole house. LPG usage has fallen by 66% and the gas boiler now only occasionally heats the water. Fitted PV and use excess power generated to heat the water (I hate exporting KWh at 4.3p and buying it at 35p!) Super insulated the bungalow, with 80mm Kingspan on the inside of all external walls and the flat roof ceiling and 300mm in the loft. 175 meters of trenching to link all outbuildings with the house and laying water, armoured cable (10mm) and a ground source heat loop (for future use). Future projects include getting off grid for electricity and water, building a timber and glass conservatory and using the stream that runs the length of the property for a micro hydro system. A post about this will follow. Mike1 point
-
Thank you for your kind words, much appreciated. It took me a bit of time to craft that. It's not perfect but BH is great and nobody jumps down your throat for a typo etc. That said I learn loads here from other folk so for me it's a two way street. You give what you can and your efforts are returned in kind. Hope tomorrow is better.1 point
-
I can vouch for that! I took it apart and it is very smooth. I'll pop out and take a photo.1 point
-
1 point
-
1 point
-
1 point
-
DPM is for rising dampness and not for water proofing, As the window has an aluminium frame, DPM is not necessary as dampness cannot rise into aluminium. Simpler just to move on.1 point
-
We did stick build primarily because the architect and builder were familiar with this approach and due to concerns regarding cost / quality of the factory built frames. We achieved great airtightness results which were better than those I have seen quoted by pre-fabricated frame companies. Stick build is a good approach as long the build team are comfortable with this way of working and it allows you to distribute your payments across multiple suppliers to mitigate risk.1 point
-
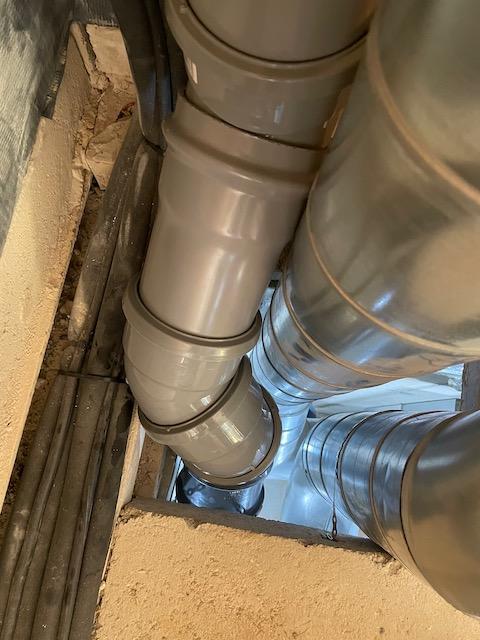
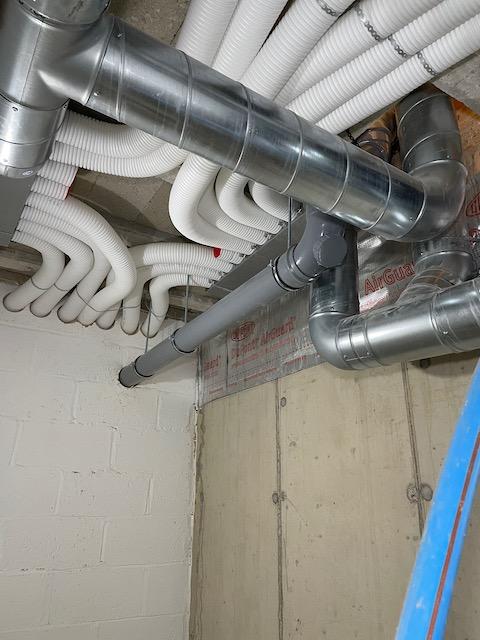
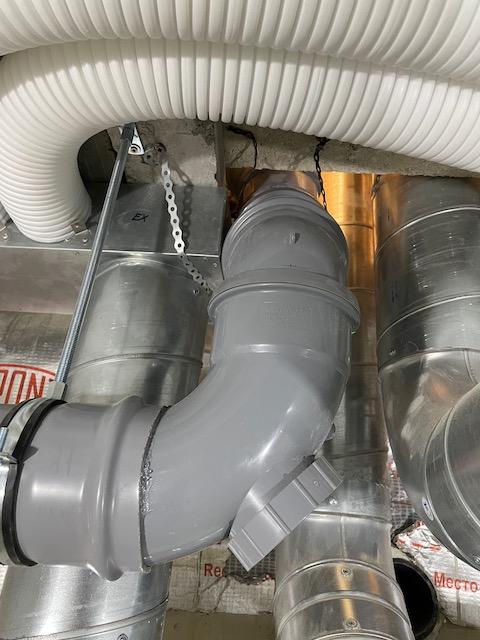
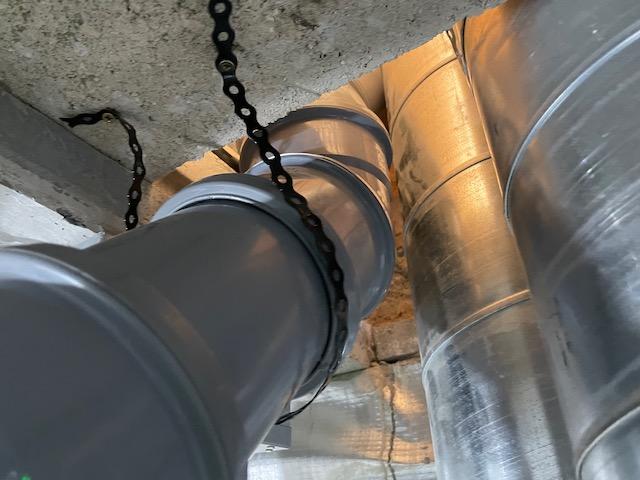
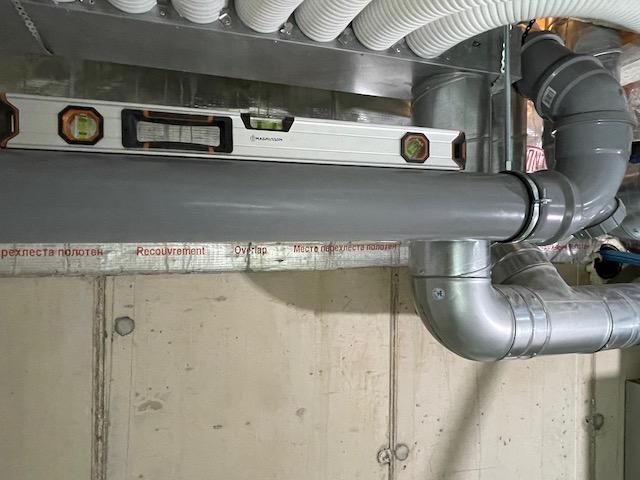
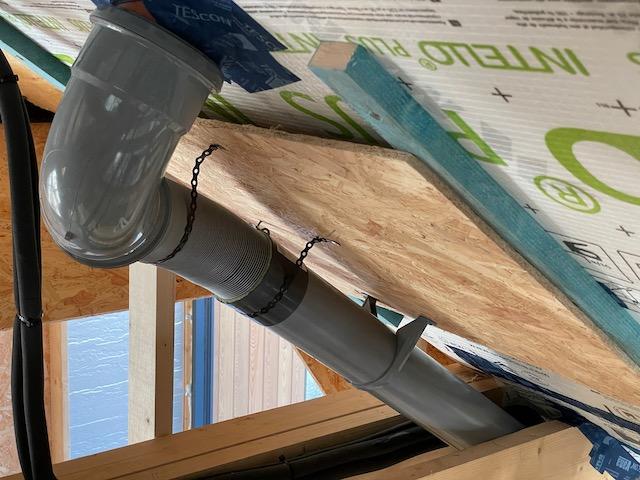
today I also carried on this soil pipe to the basement where it will join up to the pipe going out of the wall and to our STP. I'm REALLY hoping that no one sees an issue with this work as I REALLY don't want to do it again! below photo is from the room above. it's not fugly but I had to skirt around the MVHR ducting and there was no other way of doing it. it looks good to me. 🙂 and for once I'm happy about it not being level! it falls approximately 25mm over 1500mm so roughly 1:60 fall which, I believe, is well within tolerance. I await the criticism!1 point
-
1 point
-
Actually I’ll mount that right bolt . Thread the left ( but no nut ) . Take the tile board down on the left ( corner ) . Fit nogging . Then can have 1 L bracket coming out which will support that side and the front . Think I’ll embed it in the wall before tiling .1 point
-
Yeah I agree . Will do that and a pair of brackets . Really annoys me ! . I expect myself to be wrong ( and fix it ) but when it’s produced like this it’s a joke 😡1 point
-
1 point
-
Or fit a batten across the back (won’t be seen) and a small bracket or batten under the side 👍1 point
-
1 point
-
1 point
-
As i said, if it looks right it normally is, if you walk in and glance at it and go, oh my Lordy WTF is that, it normally needs improvement. Get some strap band like the welsh wally said and you can get all those fittings supported.1 point
-
That sounds far too absolutist. Who published the “guide”? In any case such guides are not legally binding. Only the planning policy documents, planning law and case law interpreting them matter, as far as I know. Can you post a link to the guide please?1 point
-
This is all on the assumption that you aren't looking for crazy high levels of sound insulation. What is it you are trying to reduce the noise from? A standard solid core door (e.g. 44mm) will suffice, where you want to really pay attention to detail is the perimeter of the door at the jambs and threshold. Door jambs are fairly simple, its the threshold which is more tricky, and you will be looking for a threshold plate or a drop down seal Have a look at some of the solutions here https://www.lorientuk.com/acousticsearch/results?drawId=search-product1 point
-
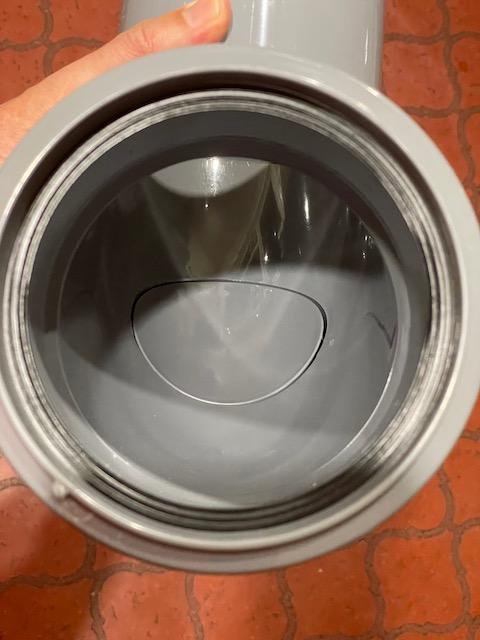
Or if you're tight like me :- Viva Magna Self-Sealing Waste Valve 32mm | Toolstation1 point
-
It doesn't mention it on this listing but afaik this used to be the stuff wrapped in plastic foil. Touted as the perfect mix for loft insulation but the vast majority of the time ended up a sweaty uninsulating mess as it's nowhere near breathable enough for most homes so just pooled water. Used to be many, many reviews with condensation issues that I notice have vanished from that listing...1 point
-
1 point
-
Oh also, as @SteamyTeasaid, triangulation is very useful not just for measuring & setting out but also structurally. Rectangles and squares can very easily skew into different shapes but a bit of timber screwed/nailed tightly along the diagonal can work wonders to make something that feels a bit rickety suddenly a lot more robust.1 point
-
For a shed, nails vs screws probably doesn't matter too much so go with what you're comfortable with / have the tools for. Nails from a nail gun are very fast, fairly idiot proof to use (so long as you follow the instructions and avoid shooting yourself), but of course you need a nail gun. Screws are slower than nails from a nail gun, but probably not nails with a hammer until you're very skilled with the hammer. Screws usually work out a bit more expensive but for a small structure it won't make much difference and it will save your time & thumbs. Screws can be more forgiving for assembly as you can put them almost all the way through the first piece of timber, hold it in position and finish screwing in to secure it, where hammering a nail will make your piece of wood jump around all over the place (at first). Screws can be better at pinching wood tight together over the long term (nails can work loose as wood expands and contracts), but are more likely to snap if they take a sideways load, where nails just bend a bit. But for your product that's unlikely to make much difference. And the shape/thin-ness of nails means you can usually hammer them straight into most timber, where screws may need you to drill a narrow pilot hole first to stop the screw forcing the wood apart and splitting it (especially near the ends/edges of the wood). Good quality self drilling screws reduce that risk but don't eliminate it. But for your project you'll probably get away with a few splits without having to discard the timber - start on a hidden side and patch it up if you make mistakes - until you get a feel for what it will tolerate and what it won't. Definitely go for it, things are not as scary/complex as they seem and that seems like a project you want to get right but can afford to not get perfect, which is a good learning opportunity. Remember to measure things at least twice before cutting any wood, and try to sketch or at least visualise how it will all fit together in 3D, sometimes a joint feels like it will work on paper but doesn't line up the way you thought it would in real life. Again for this that won't be too much of a problem and if you start from the bottom and work upwards you probably can't go far wrong.1 point
-
thanks @Jilly. Yes, it's an older home and all the house in the neighbourhood were built with stone1 point
-
Yes, a half decent drill is well worth considering. I have a cheap Screwfix Titan drill , pretty good for general DIY. https://www.screwfix.com/p/titan-tti886drs-18v-2-x-2-0ah-li-ion-txp-cordless-drill-driver/328PV A tape measure, some sort of straight edge, a set square are also useful, and some drill bits (Middle of Lidl). If you remember your school physics, triangulation is useful.1 point
-
Would you have switched on air con in those rooms if it was there? eg over the recent ( brief ) summer. The only thing rads can do is heat, air con can both heat and cool. @Digger1 FYI, the second I can take some bloody time off work I am going to ‘plumb’ my house for A2A in the 5 bedrooms and the landing, plus my shed ( office / man cave ) for sure. Rads will very likely be removed from those rooms as I can make much better use of the floor space then with the split units up high / over doors etc where that is already dead space. I’d say more ill-informed and a bit long in the tooth Prob saying exactly what I would have said 10 years ago. The other inefficiency that you must factor in, is with gas / rads you;’d need to get the boiler lit / up to temp / heat up all the large bore pipework / and all of that needs adding in. Plus bedrooms will usually only need a whiff of heat, so if they’re calling independently the boiler will prob not spend much time fully condensing. AC is a great place to send any excess PV to, after DHW is satisfied.1 point
-
@Grian go for it! The first thing I ever built was a small wood store with a sloped felt roof. If I managed it, you will be fine. My tip is to go to your local diy store (a big B and Q or Selco for example) and see what outdoor treated timber they supply. Take a note of the lengths available, then plan your wood store accordingly, so that you can minimise the amount of cuts required. And buy self driving wood screws and a decent drill. I think I managed to build mine with only 6 cuts, and is still standing 8 years later. If it is at least a quarter full of wood at all times, it won’t blow away, but if you are worried, make the uprights 20cm longer than they need to be so that they can be buried in the ground and then anchored with diagonal somethings (maybe very long nails?) that are then covered with the ground.1 point
-
If you get it installed by a decent installer, they will use a composite which closely matched the predominant colour of the stone, and give you a 0.6mm join which is hardly noticeable.1 point
-
1 point
-
1 point
-
(I'm assuming a fairly complex extension, since you mentioned the word "wraparound".) No. These are *exactly* the people you should be asking, since there's no existing relationship potentially to distort the perspective, or damage. And they have no bias in your favour, or bias against you, and they do not have a preconceived idea of you and so will not have a notion in their head about what they think you should probably want. And what a fantastic way to meet all your new neighbours on a subject that you will all be interested in. They all have local knowledge, and weather knowledge, and sun direction knowledge, and can tell you what did not work, and you can avoid repeating any mistakes. I'd suggest getting all their plans off the Council website, and studying them. Then coming up with your list of questions, based off your own definition of your own needs / requirements. Then do some chatting over the fence, or some door-knocking. People *love* talking about how clever they have been, and if they did not build it they love talking about how much better they *would* have done it.. Make sure to ask for what worked / what didn't / why they did what they did / is it warm / how are they planning to cope when kids have gone away / what was their best idea. Treat it as narrative market research. If you do that you need to be careful not to unacceptably criticise others' houses, or gossip to neighbour X about what neighbour Y's extension is like and what you think of it; be a sponge and keep shtum. You also need to be sure that you manage the relationship with your immediate neighbours carefully around if they object to what you want to build; that can work well or can be a shark-infested custard. There are people on BH who argue "don't engage at all", and others like me who argue in favour of engagement with neighbours. Then you need to end up in a position where you know enough to be an active client for your architect or architectural technician. Whether you need yourself, an A, or an AT, depends on how much you know your own mind, how complex the job is, and how much help you will need to avoid design or planning elephant traps - for example an A should protect you from being inefficient in use of space, and should guide you to make a space which is more inspirational to live in, whilst an AT will more need you to supply the vision. Your first job is to get to a place where you have the nouse and confidence to make that determination. We can help with a range of opinions, and there are a lot of projects described in the blogs that can broaden your views. One point: on "stone extension on a stone house", there has been a perspective for the last 25 years or so that argues the validity of deliberately making it different in order not to blur the form of the original building - especially in listed building circles. That depends on the circs - if it is a big plot, or if it is a bit extra on the existing. All the best, and remember to enjoy the process. Ferdinand1 point
-
The maths make natural ventilation a non starter as once your insulation is good, the ventilation heat loss becomes huge. The cost of running MVHR compared to heat loss from ventilation is low. Also building regs don't allow natural ventilation, unless you leak like a seize.1 point
-
First - the process overall should be enjoyable Don't get carried away with room sizes - you can end up with a huge houses. Decide things early and documented on the drawings, ideally before getting any pricing. Any change after the contractor has priced is a cost added - in many cases even a simplification of their scope. The more decisions you can make ahead of starting the build, the less stress during the build. Once you make a decision, don't change - it will cause lots of other hidden changes and snow ball, to more cost and delays Keep it simple, often things get way to complex and can ramp up costly quickly. Don't ask forums questions with open questions, as you will get 1001 answers all different, many not relevant. Do insulate way better than you think you need. Consider thermal bridging early on. Go as airtight as possible. Consider cooling if you have large windows, this can be direct aircon or solar shading externally. Question any large windows on the north face of the building as these are just heat losses - min 4x the heat loss of a wall (high performance triple glazed), generally more. Keep heating system as simple as possible. Do not zone the heating system, 1 zone ideally, a max of 2 zones. This will give your heat source an easy time and work better overall. Well insulated houses have very low heat requirements, many builders and heating companies will use generic formulas to size boilers radiators etc, none of which work with low energy housing. So check things yourself and be aware of your requirements, ask for help when needed.1 point
-
Usually a DPC would already exist on properties, although older ones would need to be checked. Technically, not really required for Aluminium windows but you could call it good practice to install with DPC if it doesn't exist.1 point
-
1 point
-
Raised tie trusses might give you a lot of the effect for less cash but won't be truly vaulted. Otherwise you're stuck with collar ties or lots of engineering cals and most lightly steel.1 point
-
1 point
-
No need for it for any type of cylinder, it is a paranoid nonsense. The problem is with unserviced, badly designed and maintained, air conditioning units, not peoples domestic hot water. If it was, we would be reading about thousands of cases every week. The WHO estimates 10 to 15 cases per million of population for Europe, Australia and the USA. About half what road fatalities are in the UK, and a ninth of the USA fatalities. And they are fatalities on the roads, Legionella does not kill everyone that gets it. Or put it this way, have any of us met someone that has had it?1 point
-
Fans enable you to get more heat out of a radiator of a given size. But this is not "free" heat, your boiler or heat pump will have to work harder to supply it. As gas prices are high, this extra heat will be more costly than it used to be.1 point
-
That’s a great sentiment but it can be easier said than done when you are halfway through a job, unhappy, but then struggle to get someone else to pick up a half job. And even when you think you’ve chosen wisely things can go wrong. Self building isn’t for wimps for sure.1 point








.thumb.jpg.0b5a2e594f248269384aaf8c984c71cc.jpg)


