Jump to content

Poly (carbonate) Tunnel


Jenki

3180 views

Thought I'd do a short blog on the Polycarbonate tunnel we built.  

Our big field suffered with no storage, and location meant containers were very expensive to transport.  so one option was to build a polytunnel, which we have planning permission for.  again due to location, 500m from the coast 73M AMSL I wanted something sturdy.  so looked at off the shelf packages.  in the Highlands and Islands the PolyCrub is seen as the mecca. Designed in the Shetland isles, guaranteed to withstand 100MPH winds etc etc.   due to the ability to get CROFT grant assistance on these, the price is, IMHO, artificially high CIRC 6K for 4M *6M.. this wasn't going to happen, so after looking at many photos I designed my own..


Basic principle is hoops of MDPE pipe secured to posts in the ground, then 3*2 timber used as horizontal support, with Polycarbonate sheets secured to this timber. the bottom sides are then clad.


My design was to use 65mm Black MDPE pipe, and secure the timber with coach bolts and penny washers through the pipe. this way I get a guaranteed fixing that won't pull out , and it still allows for flex in the whole structure.

4m wide x 6M long, but this can be extended.

My ground has bed rock close to the surface, 300-500mm below ground, so just knocking in post wasn't going to be secure enough to withstand the winds, also where I was sighting the tunnel its on sloping ground, so I couldn't get it level. 

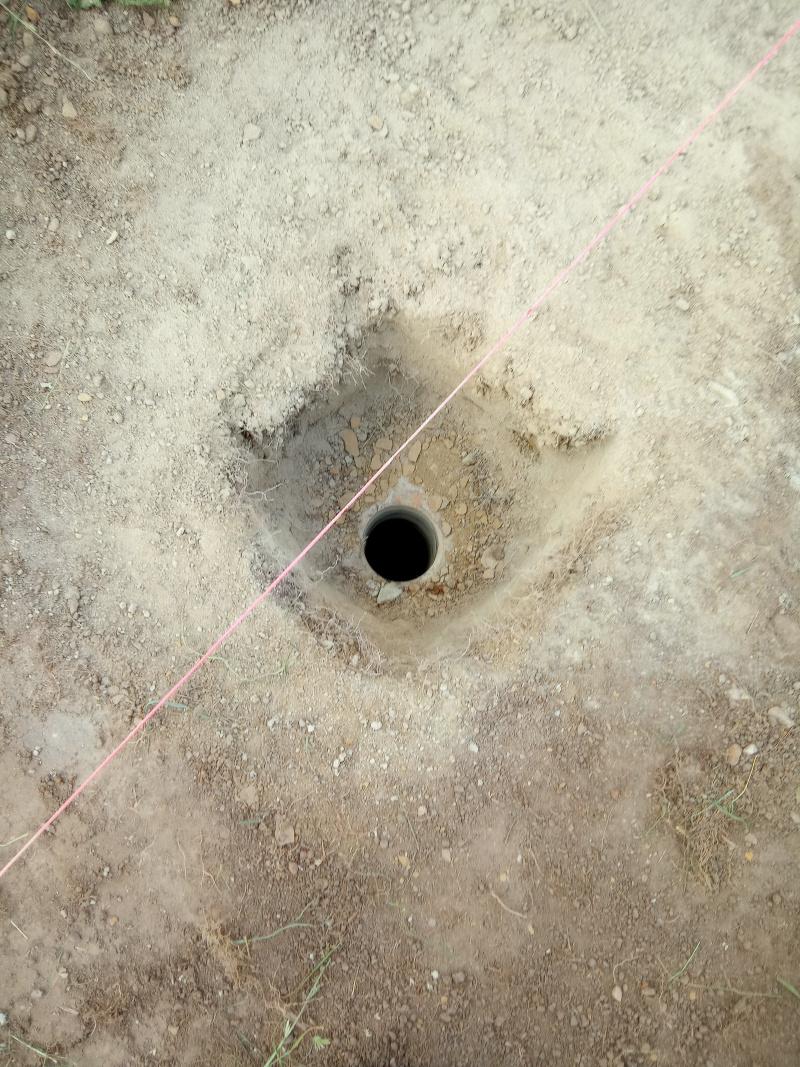
I cleared the area to removed the top vegetation and a bit of the top soil. and dug 14 holes.  then due to rock levels I then core drilled the rock to allow for the post to be deeper.

TWR_POlly3.thumb.jpg.07fb575c23a370618e9bfffe959979e4.jpg  TWR_POlly2.thumb.jpg.74d6ca2967e6a74845b9dc340672986f.jpg  TWR_Polly1.thumb.jpg.5485a705c0f80e4859e94f4eec0e02ac.jpg


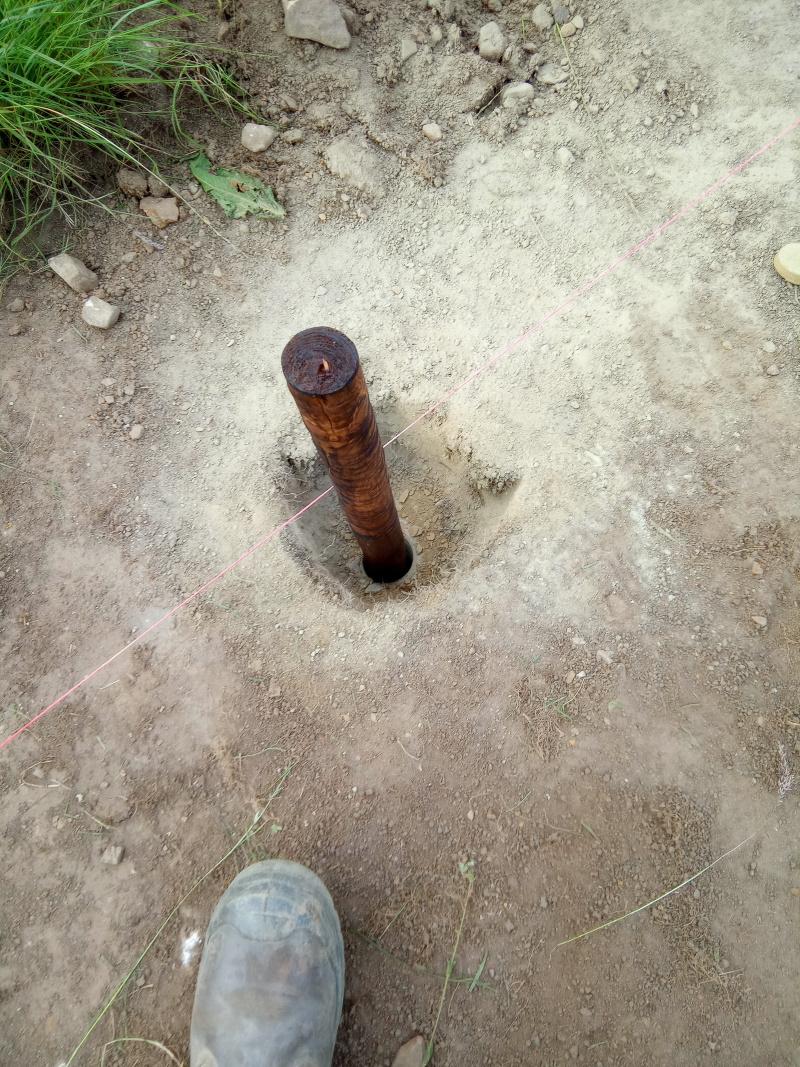
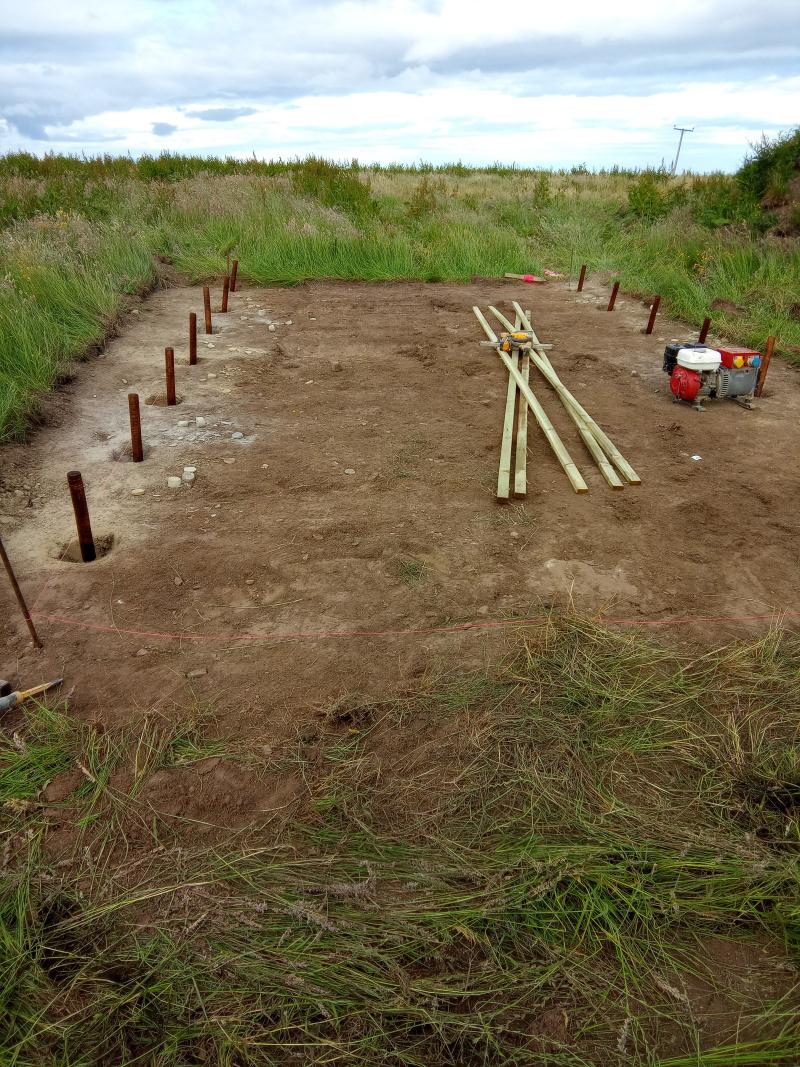
We then set these in concrete, (at the same time as doing the slabs for the cabins.)

The next day we had a look and I wasn't too happy with the security of the posts, so slight change of plan, we created a plinth. basically I used some 6x2 either side of the posts, with a slight angle, then filled this with concrete (again we used ready mix at the same time as back filling the treatment plant)

this added about 300kg of concrete to each side, and joined all the posts together, and gave us a solid plinth at the side.


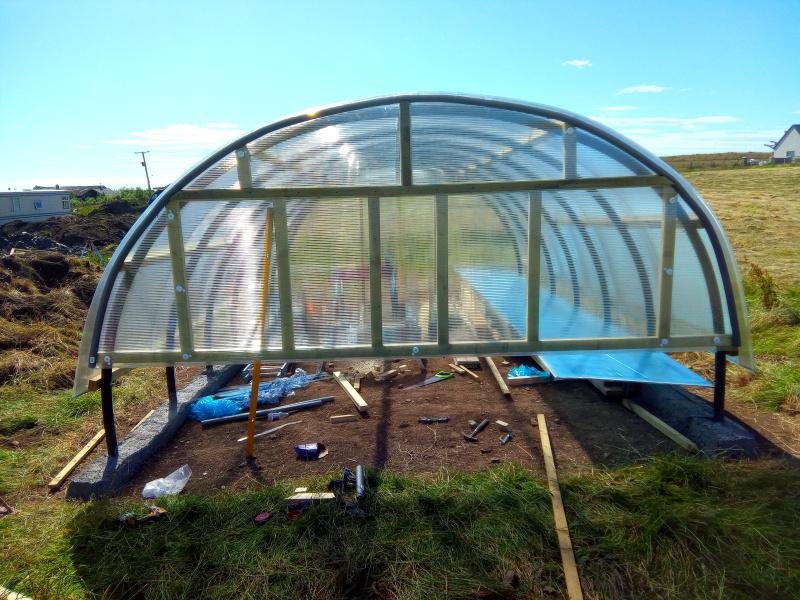
No Photos of the next stage but we cut 7M lengths of 63mm pipe, this when placed over the posts gives approx. 500mm dwarf walls and a 6M polycarbonate sheet, giving a head height of around 2.3M.

we used a plumb bob to get the centre line on each hoop and drilled an 8mm hole through the pipe and secured the top 3x2 treated timber to al the hoops.

One thing we found was that the MDPE  did not bend uniformly, this may have been due to slight errors with the posts being plumb. The resultant timber (which was not very straight), snaked from hoop to hoop.    after head scratching and re thinking. I decided it was a poly tunnel and to get on with it.  we used 7 lengths of timber jointed with half lap joints to extend  the length to 6.5M.  if using a clock analogy the timber was placed at 9,10,11,12,1,2,3 positions, with the 9 & 3 o'clock being 500mm off the ground, also ensuring the 9 & 3 o'clock timbers were approx. 5.8M apart circumferentially.


Then it was a case of securing the polycarbonate sheets to the timber. each sheet is joined with some soffit H joint strip. (you can buy a clear joining strip for the sheets but for a 6M length it was around £65.  the H strips proved extremely difficult to connect the two sheets together, or should I say impossible.  so I cut off the back edge on one side and used some glazing sealant. this way we could attach the strip to the polycarbonate prior to bending over the tunnel. and each sheet 'H' strip basically lapped over the previously installed sheet.  

day 2 we had the basic structure.

TWR_POlly4.thumb.jpg.a4d97e4f03832b74533dd80328bb6f6d.jpg


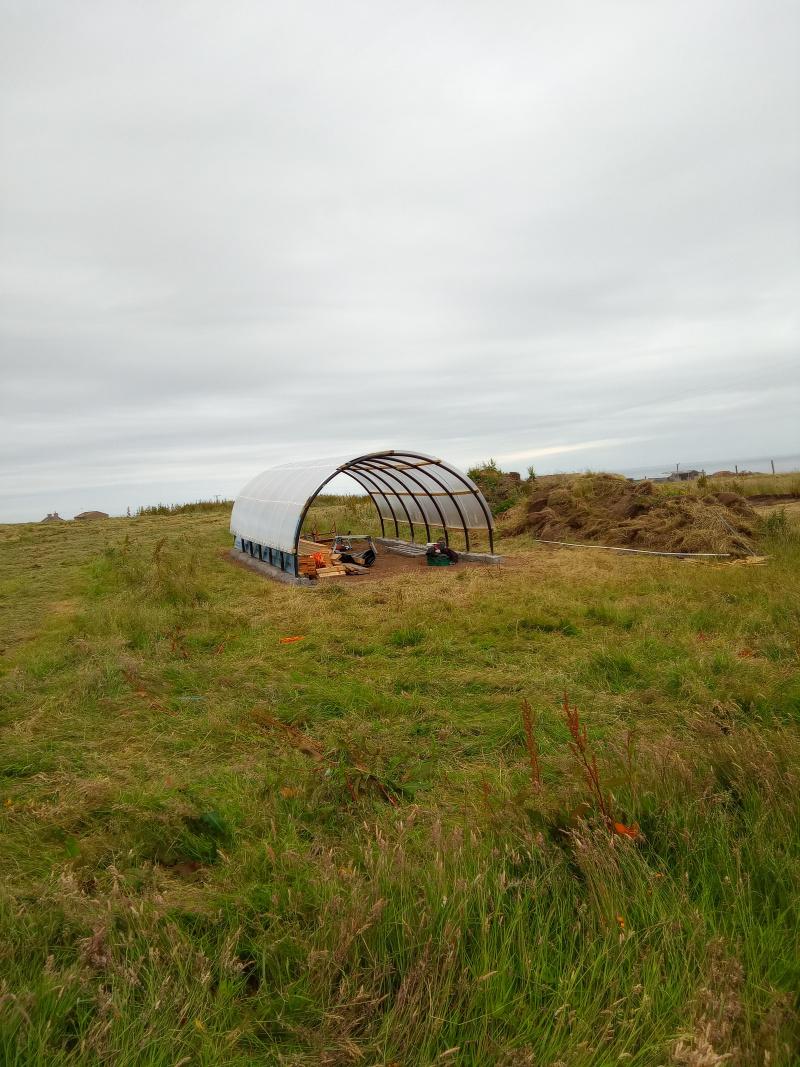
It was noticeable that the curve was not symmetrical, so putting the door frame header in by securing to timbers at 11 and 1 o'clock was not level.  I overcome this by using a ratchet strap attached to the 11, and 3 o'clock  timbers and tightening until timbers at 11&1 o'clock were level. I then put the two door jambs in (concreted at the base) and cut to the length required and secured to the header.  This worked and the tunnel was now more cylindrical.

I framed the rear by baring 3x2's off the horizontal timbers.


poly5.jpg.1145a3c3160df6b279b0df20d4163117.jpg   


Last steps were to clad the base, I used 4*1 treated timbers that were screwed into the MDPE pipe and wooden posts. then used strips of visqueen to create a more sealed dwarf wall, this will help prevent driven rain from the winds getting inside.  over this I used Larch timber backs* to create a vertical cladding    


All in with hardware, polycarbonate, timber, concrete the project cost £1200. not cheap, but its solid as a rock.  It withstood the first Autumnal storms this week with winds hitting 50MPH. 


Its also very warm inside, even now as the temperature is falling.


poly6.jpg.f13fadc6c71ce0b4a8071dde95dc744f.jpg


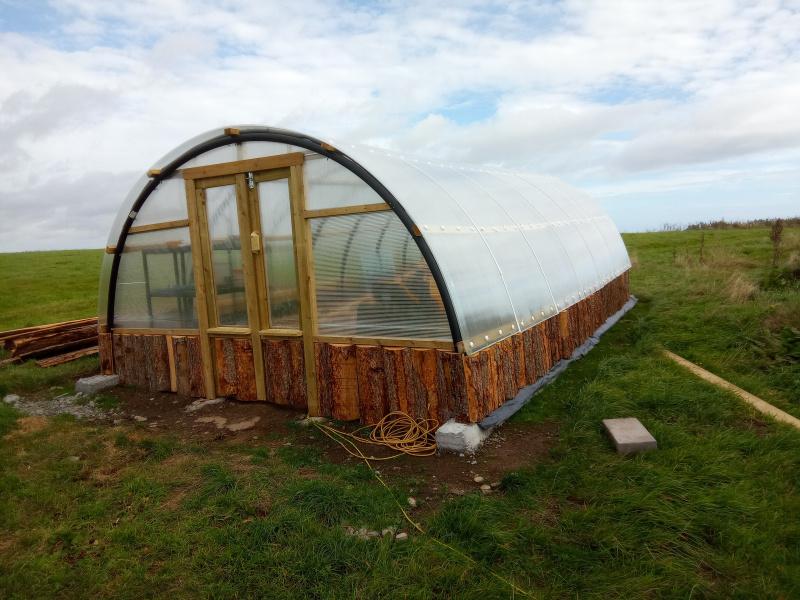
Larch timber backs are the offcuts from the saw mills and are reasonably priced as scrap.  we purchased a pack of timber backs, approx.40 lengths of larch timber with bark in 4.8M lengths for £100. these are not uniform and taper etc, but as i only needed 500mm lengths it was straight forward to make it work.


Edited by Jenki

  • Like 14

18 Comments


Recommended Comments

Looks great. We drove the NC500 this year and saw quite a few of those polytunnels you mentioned and got up close inside one to see how it was done. Yours looks great just like those but at a fraction of the cost. 
next project for you is half cut drain pipes along the 2 long sides to collect all that rain and and an IBC for storage. So jealous, if we ever get planning my veg plot becomes the house and garden and I have to start fresh further in to the field. I’m at the opposite end of the country but high up near the coast and also suffer from the storms so currently have a walled plot and a netted tunnel to keep the birds and butterflies out.  I’d love to suggest this to HWMBO but I know the answer ‘by the time the homes built the last thing you’ll want to do is garden well be too old’


  • Like 1
Link to comment

Well done. I looked at the Polycrub Opyl as a shed but was put off by the price and the fact the walls weren't vertical. You've done a good job, bet you're pleased with that.

  • Thanks 1
Link to comment

A clear explanation - great.


My questions are:


1 - How did you affix the larch offcuts at the bottom, given no wallplate?

2 - How long do round wooden posts in concrete last in that situation? In my area, that would be a recipe for post rot I suspect. Does the wind blow all the rain away 🙂 ?


F

Link to comment
8 hours ago, Ferdinand said:

A clear explanation - great.


My questions are:


1 - How did you affix the larch offcuts at the bottom, given no wallplate?

2 - How long do round wooden posts in concrete last in that situation? In my area, that would be a recipe for post rot I suspect. Does the wind blow all the rain away 🙂 ?


F

1, I used 2 rows of treated 4x1 horizontally screwed into the pipe/ posts. Then from inside used decking screws through the 4*1 into the larch.

2, time will tell. as it's in rock and not soil, and that the water tends to run off the rock I'm hoping a long time😂. Originally wanted to use scaffold pole, but it's too big for 65mm MDPE. On the future  extension  ( for pigs with opal sheets ) I think I'll go one size up in pipe and used scaffold poles. 

  • Like 1
Link to comment
On 10/10/2022 at 22:15, Susie said:


next project for you is half cut drain pipes along the 2 long sides to collect all that rain and and an IBC for storage.


I used Visqueen behind the larch and lapped this onto the ground, so instead of guttering I will use some more Visqueen and create a french drain and collect from there..but it means breaking up rock so it will have to wait.

Edited by Jenki
  • Like 1
Link to comment

Hi Jenki

Great description of Poly carbonate tunnel, I am moving to the Morvern peninsular and want to copy your design, would you be able to tell me where you purchased the 63mm tubing and the polycarbonate sheets, 


Link to comment


21 minutes ago, Billt33 said:

Hi Jenki

Great description of Poly carbonate tunnel, I am moving to the Morvern peninsular and want to copy your design, would you be able to tell me where you purchased the 63mm tubing and the polycarbonate sheets, 


Hi. I dragged the pipe and sheets up from Preston when I moved here, I bought the pipe from sky plastics. 

Poly sheets from Varico ltd, but they wouldn't deliver up here. They deliver to the isle of Lewis (I think there is a company there making a version of the polycrub). So being near Oban they might drop off. 

I'm going to be making another in the future for a weening shed and store so post back here if you get success.


Edited by Jenki
  • Thanks 1
Link to comment
On 12/10/2022 at 22:21, Jenki said:

I used Visqueen behind the larch and lapped this onto the ground, so instead of guttering I will use some more Visqueen and create a french drain and collect from there..but it means breaking up rock so it will have to wait.


Sounds like you need someone with a private explosives licence.

Link to comment
12 hours ago, Jenki said:


Hi. I dragged the pipe and sheets up from Preston when I moved here, I bought the pipe from sky plastics. 

Poly sheets from Varico ltd, but they wouldn't deliver up here. They deliver to the isle of Lewis (I think there is a company there making a version of the polycrub). So being near Oban they might drop off. 

I'm going to be making another in the future for a weening shed and store so post back here if you get success.


Thanks for taking the time to reply, you are obviously very busy, we move up there in early January, will report on progress.

Edited by Billt33
Link to comment

Hi. Thanks for your previous post, have contacted Varico and they will deliver, one more question, did you use screws to connect the timber to the mdpe pipe?

Taken longer to move into new house then expected, will be in 14th April, I have full list of materials ready to order, will report back when I start.

Link to comment
6 hours ago, Billt33 said:

, did you use screws to connect the timber to the mdpe pipe?


M6 roofing bolts, penny washers, M6 Nyloc nuts.

  • Like 1
Link to comment

I am looking to build something similar, what thickness of polycarbonate sheeting did you use?  Was it easy enough to bend it to follow the curve of the design?

Link to comment
5 hours ago, Mootie said:

I am looking to build something similar, what thickness of polycarbonate sheeting did you use?  Was it easy enough to bend it to follow the curve of the design?

10mm polycarbonate, I used 6M long polycrub use 7M

Bends no problem the pain is connecting the joint strips 

  • Like 2
Link to comment

Hello,


Inspirational work. It was finding this information on building polycarbonate polytunnels that brought me to the buildhub site. Now I have joined and plan to build a polycarb at my allotment.


Could I ask what size were the posts you sunk into the ground? Also, whether 63mm yellow gas pipe would perform similarly, if I used it, instead of the blue 63mm to create the hoops?


Kind regards. Stevie

Link to comment
5 hours ago, windaes said:

Hello,


Inspirational work. It was finding this information on building polycarbonate polytunnels that brought me to the buildhub site. Now I have joined and plan to build a polycarb at my allotment.


Could I ask what size were the posts you sunk into the ground? Also, whether 63mm yellow gas pipe would perform similarly, if I used it, instead of the blue 63mm to create the hoops?


Kind regards. Stevie

sent you a pm

Link to comment

Create an account or sign in to comment

You need to be a member in order to leave a comment

Create an account

Sign up for a new account in our community. It's easy!

Register a new account

Sign in

Already have an account? Sign in here.

Sign In Now
×
×
  • Create New...