Leaderboard


Popular Content
Showing content with the highest reputation on 01/20/22 in all areas
-
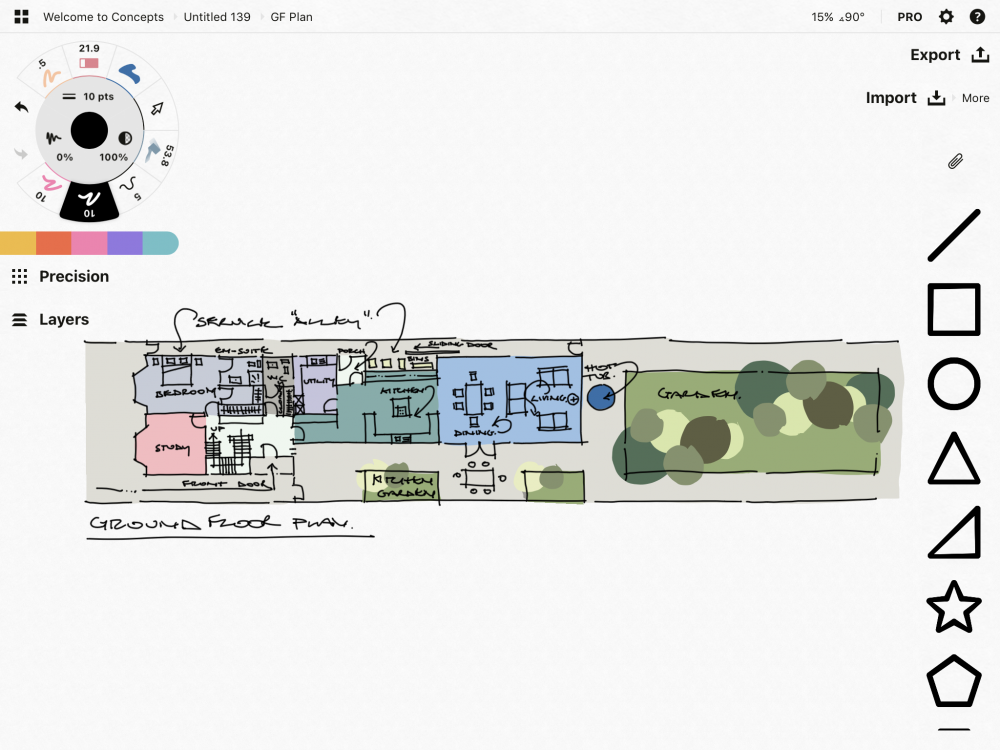
I think you hit the nail on the head there. Even if self builders ask for opinions, they are just the worst for listening! Most are very successful and smart people, maybe they have their own companies. The amount of times I’ve been handed a drawing done by an accountant or manager or similar and expected to just draw it up in CAD is ridiculous. Every time this happens I tell them to take a step back, go through the process. you wouldn’t do the work of any other professional in this way, trust them. I think most complaints about architects have started with the customer giving them a plan to draw up, then claiming it’s over budget and rubbish. If you say to an architect, “I want to make the most of this plot”, you will get a different result to if you draw a big rectangle and fill it yourself. Things that add value to a house, kerb appeal, nice big rooms and spaces with garden and light. It’s really not m2. also I think there’s way too many sinks in this house, you are going to have one per hand. I always wonder what the problem is that people are all washing their hands at the same time that you need two per room.3 points
-
Hi there, I only joined this forum to say thank you to the above member (@Europa) for the walk through! I had been having real trouble trying to get my Wunda underfloor system with Salus ABA's to work. Having read through the above and a couple of other posts, I noted three main things which helped me get the issues sorted: 1. The instructions are wrong (as Europa points out) and the LED's flash rapidly for the first 2 mins in calibration mode 2. You need to do the valves one at a time instead of doing all of them (5 in my case) at once 3. You need to be v patient (which I was not) and not just give up when they initially open and close again within a minute or so I rigged up a simple light switch on the live lead of each actuator and this allowed me to switch them off and on again independently whilst leaving everything else powered on. Honestly, the key is patience as Europa has pointed out. For me, I would say it took 20 / 30 mins + per actuator for it to be calibrated settled and working as expected. Below is what I did to get everything working as it should: 1. Rig up switch on each actuator 2. Set all actuator switches to off (in my case, this left all actuators in the closed position) 3. Get the system to call for heat 4. Make sure your flow has a decent heat (Mine was at about 50 deg) 5. Switch on the first actuator (LED flashes) for about 20 seconds, then off, wait 2 seconds and then switch on again 6. As above, after 2 mins, actuator LED flashing will slow and it will open fully 7. After about a minute, actuator will close (Don't get annoyed at this point) 8. Go away, leave it well alone for 20+ mins 9. When you come back, you should see that there is flow on the circuit 10. Leave the now calibrated actuator on and run through steps 5 to 8 for each of the other actuators in turn, avoiding the temptation to do more than one at a time 11. Leave the system for a couple of hours and you should find that it is then sorted and the valves as opening and closing to moderate flow I was making two main mistakes: 1. Not waiting for long enough and when the valve does it's initial open then close, I was thinking it was not calibrated properly and doing the procedure again 2. By trying to do all circuits at once instead of one at a time, I think I was letting the manifold temp drop too much and therefore messing with the calibration. Thanks very much for your help folks and I hope the above is of some use. I'm off to lie on my nice warm garage floor...2 points
-
Yup Nick, however we've got a largish detached 4 double bedroom + ward storage / drying room which we keep at ~ 22½ °C all day, all year -- this may seem profligate, but we're getting old now and I just like being able to walk around in bare feet and shorts when I want without feeling cold; my wife and son ditto. As we discussed on the forum previously, if you don't have fundamental design flaws in your build (unsealed air-gaps, missing insulation, cold bridges, etc.) then the macro heat-loss is pretty straightforward: just the sum-product of area × U-value × ΔT for external surfaces + the air heating of cold replacement air -- which is basically what JSHs spreadsheet represents. The overall heat-loss is driven by the cost trade-offs on the coefficients in this calculation that you can control. As you and others have shown, it is quite possible to significantly reduce heat losses by retrofit, but in my experience this is a lot easier to achieve in a new self build where the owner has far more control over the design itself and can monitor build quality. In our case the extras incurred for going to passive standard were pretty much offset by savings elsewhere (e.g. no CH system other than the in-slab UFH loops -- my entire heating system cost about £2½K and is pretty much maintenance-free). Even though 90+% of our electric heating is done at off-peak rate E7 tariff, with the expected tariff increases when our fixed price contract finishes, the ~4-5 MWh that I could save by installing an ASHP might just about cover its investment cost so long as I do the install myself. As Joe said on another post, IMO dot&dab boarding out counts as a major design flaw, as this is rarely done as the videos on YouTube demonstrate, and too many internal thermal images of such external walls show that these voids often act as a large plate heat-exchangers dumping heat into void behind the plasterboard where the external draft air circulating here carries it out as convective losses. If you must use a conventional blockwork + insulation + external brick skin, then going for wet plaster on block if a far safer option, as well as making sure that all interfaces are properly taped during 1st fix.2 points
-
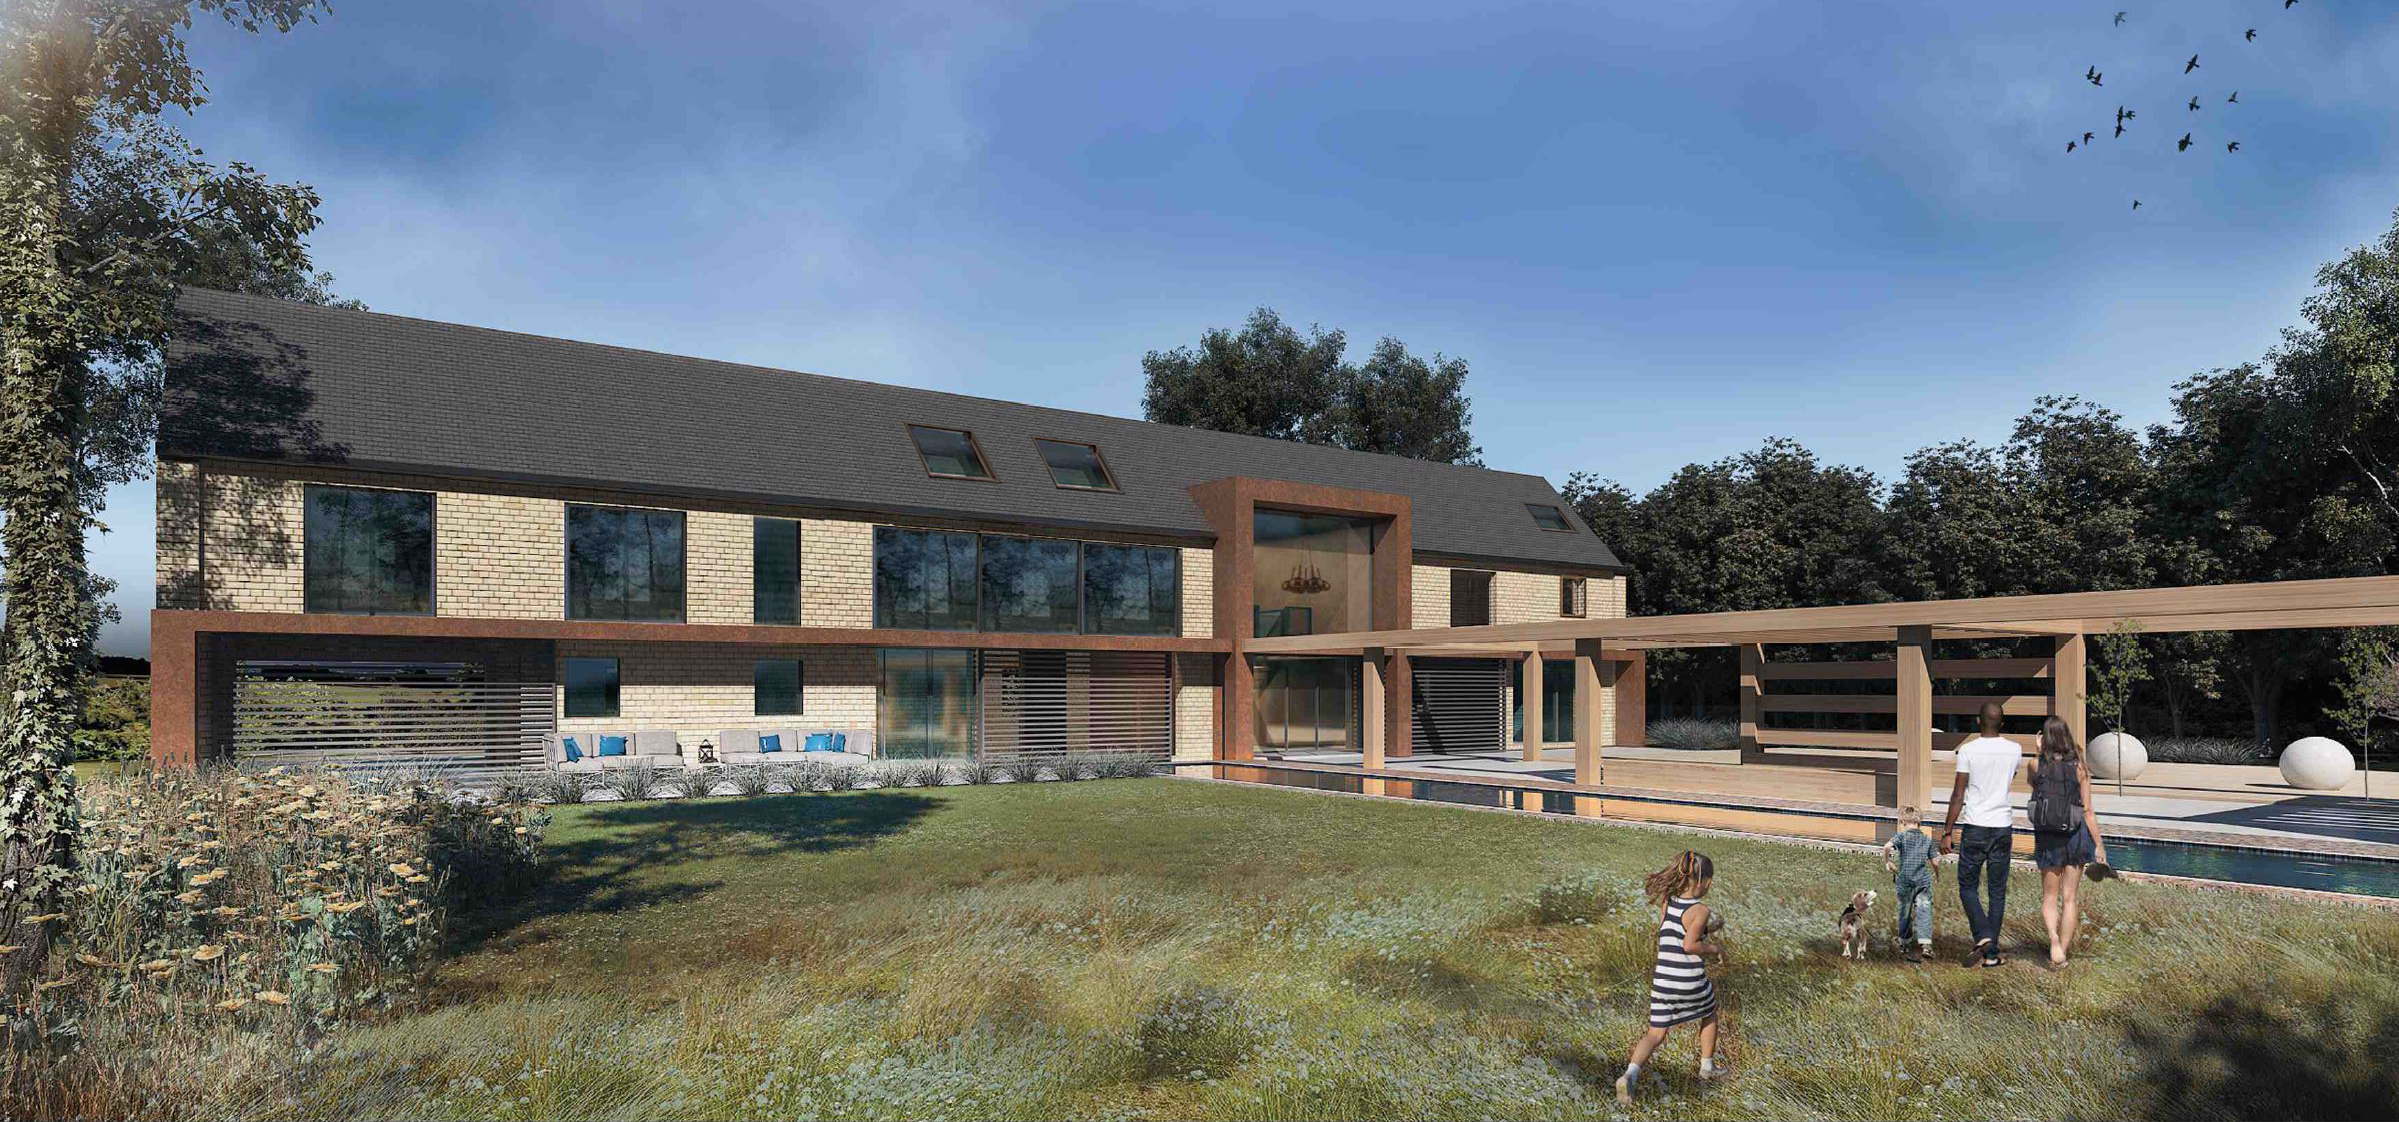
Hi everyone, Just a quick introduction to our project - we're doing our first self build and will be project managing ourselves. We've got lot's to learn as we go, and so would love to connect with others who are also along the journey or recently completed. If you're interested in following our journey, we're documenting everything on instagram which has plans and more; our profile is here: @thefoxesmaltings Below is a 3D render our architect produced of our project. If anyone has questions on any part of our process so far (securing planning in an AONB/Green belt etc.) feel free to ask and we'll help if we can.
 1 point
 -
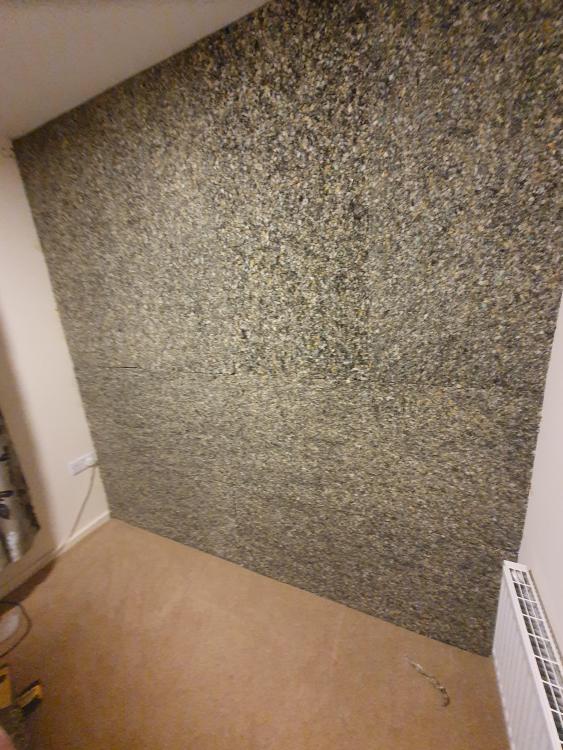
So, for over 1 year (a 2014 new build end terrace) noise levels have been very distressing thanks to ASB neighbours in the adjoining property. Complaint after complaint and eventually being forced to start a 'community trigger' (that's another story). Long story, ASB neighbours moved on after I provided substancial evidence, recordings,CCTV and so on. New neighbours moved in, and guess what? Yep, noise at ridiculous levels. After boring holes here and there and using an inspection cam from Amazon at £50, I noticed there was simply the cavity after a dot and dab to the breeze block in the Party wall. No insulation to be seen. I removed the plasterboard under the stairs to expose breeze block with expanding foam directly from the stairs to the block itself. Small wonder I can hear every step nextdoor thinking its stranger in the house. I would compare this newbuild to a cardboard box. Sick and fed up with noise I decided to do alot of research into building regs, concentrating on Part E. I also researched Soundproofing and in the end have gone it alone. First stop was the carpet shop to buy 3 rolls of foam underlay (£40 roll 30-sqmtrs per roll) then off to BQ and purchased 8 packs of 50mm Soundproof panels at £81 per pack, then spray contact glue at £7 a pop (on 7th can). The whole Party wall has now had the first layer of underlay, then the large foam panels by a final layer of underlay. WOW! It's all hush, no voices bouncing off walls, the odd impact noise muffled. So I have now started under the strairs doing the same. Infact I may have gone a tad far because I have even done the hall ceiling! Pro soundproofing would have hit me around £2500 without the fitting, yes okay, I have spent a bit but not £2500 and the results are amazing. Now the fun part with wall art This time I made a large frame and purchased a large cotton canvas sheet, stretched and staples over the frame to make a huge panel...Now I need an artist... IT CAN BE DONE! Don't let noisy neighbours affect you, have fun soundproofing and enjoy your results because the way I have described works 100% Oh, I just did the box room as well If you want to know how I thrashed the council in a community trigger, just drop me a line.
 1 point
 -
Good prices and good kit the last time I used these people; https://www.heatershop.co.uk/electric-underfloor-heating-uk1 point
-
Given the cumulative diagnostic effort to get @joe90sorted I wonder if there is merit in the collective brains of this forum specifying a BuildHub no-frills UFH reference design? If it was uploaded to GitHub under a creative commons licence then future self builders could ask suppliers to quote for bits to install the reference design.1 point
-
Warmstar https://www.ebay.co.uk/itm/Electric-underfloor-heating-mat-kit-150W-m2-All-Sizes-in-this-Listing-PRO-TRADE-/3247043849421 point
-
I’ve just put mine into estimators online for £192.50. I’ll let you know when I get it… (Surrey)1 point
-
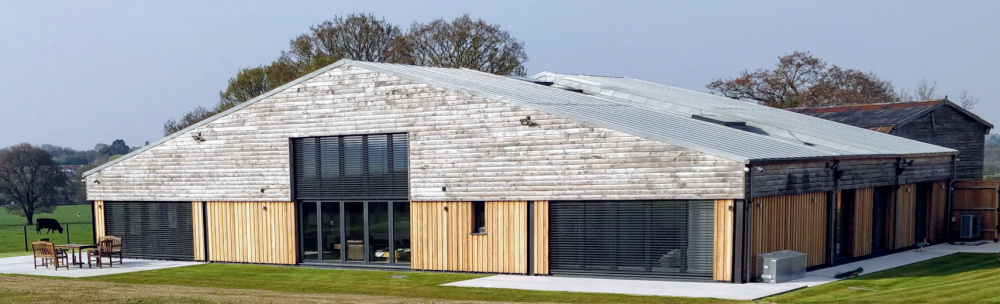
Here's mine. Venetians from Hunter Douglas, automated so the slat angle changes with the sun's position, for max visibility while still stopping the solar gain. When raised, they are out of sight behind the cladding. Congrats on the planning. Looks a great project.
 1 point
 -
Bin the TRV at the return end - horrid things !!1 point
-
What is the difference between Light and Hard? You can sleep with a light on.1 point
-
Our gas pipe runs through insulated Posi rafters and is run in Copper (22mm). New gas boiler circa £500 to £1k, make the heating system low temperature, to future proof. You may need a buffer tank. Combi or system boiler up to you. If you do use a combi, get one that take preheated water such as an Atag, then you can have a cylinder upstream of the DHW that allows to use to solar preheated water later if required.1 point
-
Yes, yellow stuff, just ran it round the house in a Trench, sand and dig tape over the top. Local gas guy connected it up and signed it off.1 point
-
An update. We finally got constant low temperature especially at night so I've been messing around with the parameters. And it keeps getting better consumptions, but it still needs further testing. For the last week or so I've been running it 24/7, limited the max temperature to 55º and minimum to 25º, also disabled "thermostat" and it's now in temperature modulation. It still shuts down for most of the day because of the misplacement of the temperature sensor catching direct sunlight - will fix that shortly, today at luch time we had 12º outside, sensor was measuring 25º ?. And I played with the curve a lot. Last night I was able to get the curve down to 0.9, consuming less than half than the night before ? In nights with 1-3º outside it was consuming average 2kW and it even did several defrost cycles (at least I think that's what I saw in the energy meter), last night it averaged slightly under 1kW . In the morning there was no temperature loss in the room so the low flow temperature is enough. Rads rock ?? For now I just need to get the external temperature sensor's placement fixed and set a higher daytime temperature so that it boosts the house a bit more during the day, while we have sunny days.1 point
-
Ok, I'm blushing, just draw the line somewhere Exactly our scenario also - clay on gravel on chalk. Surprisingly massive variations across the 11m2 footprint (something you can only appreciate when standing in the hole itself). I had a friend back in Ireland get to planning with a design their heart was not into - took guts to rip it up and start again but they love what they have now and realise that they would not have got there without going through the v1 plan.1 point
-
Why a 40kW combi? What is your mains supply, pressure and flow rate? How many bathrooms are you planning? Check all these things first as otherwise you may end up with an oversized boiler - it's worthless if you don't have the mains flow rates to use the boiler capacity. It's worth checking your heat loss calculations to make sure the boiler you've chosen can modulate CH output low enough to prevent cycling. The combination of boiler and cooker you've mentioned will require 35mm pipe but at least the installation volume will be below the commercial threshold at 20m length assuming it's a standard U6 type meter. Have you considered an induction hob instead of gas cooker?1 point
-
I believe we have a big problem in our heads about u value. The standard Nudura blocks on paper look terrible, but combine that with good build quality and an airtight building and it’s all you need. In my humble opinion.1 point
-
If it’s doesn’t compress, fit the foam expansion skirting afaic. It’s an expensive mistake if you find it was needed.1 point
-
Plus one We had this to decide on our previous build Gas all day long Much cheaper to install Cheaper to run1 point
-
Whatever boiler you use insulate as much as possible, you only buy insulation once. My other half insisted on gas for the hob, 19kg bottle lasts nearly a year. Instal a large DHW tank and PV ready for an ASHP if you decide on gas for the short term.1 point
-
You can build a small single storey building under the "caravan" regulations. To legally be a caravan it does not need to be on wheels but needs to me moveable in some way that can include picking it up with a crane and lifting it onto a low loader. Such a building is exempt from building control except for any drainage system that it is connected to. It might still need planning permission, that is separate.1 point
-
It'd be Option 1 for me, or option 2 if you have more showers in the new second story and think multiple showers need to run at the same time, or the DHW runs will be very long to those showers (a UVC allows for secondary circ) Presumably you don't have a working boiler already that could just be moved? Can you get any EWI onto the downstairs walls now? (or as a separate job in future, which maybe VAT 5% if not done as part of the larger works). It'd make the ASHP future that much more attractive, and reduce running costs/impact of staying on gas. And, if at least designed into the profile of the new upstairs wall the EWI can be done in a less obtrusive way.1 point
-
Only if it is sized I correctly. Put a gas boiler in that is too small and you would have the same problems. It really is time we stopped thinking that say an 8 kW HP is a direct replacement for a 24 kW gas boiler. Are you having PV fitted. That would change the economics of running a heat pump.1 point
-
Passivhaus Principle is a fabric first approach (insulation, airtightness, triple glazing and MVHR are the main four) and this is where your design time and money should be spend. PHPP is essential to confirm (and tweak) that your design works.1 point
-
Hi @SuperPav Sadly +1 to temp's suggestions above. ASHP is good if you have great thermal resistance and airtightness because its strength is being able to keep the temperature stable. But if you have heavy thermal loss the ASHP has to work much harder (less efficiently) to raise the temperature. Put as much insulation in the loft as you can. We have about 100m2 bungalow with the combo of an ASHP, MVHR, PV and an EV. This works very well. But we have a timber framed 1970 renovated and greatly insulated building with about 200mm rigid insulation in the floor, 150mm insulation in the walls and 400mm fluffy in the loft, no trickle vents, no cat flap and reasonable airtightness. Good Luck M1 point
-
Perhaps but they're the same bricks I used in the boundary wall (already built) which did not have to be approved, just 'in keeping with the neighbouring property' which is somewhat subjective. I submitted that wall as the sample panel for the house but afaik the PO has not been out to look at it, so if she rejects them after the 8 week period is up surely that's too late. I know it's irrelevant in planning terms but several neighbours have stopped by to say how much they like the bricks in the new wall!1 point
-
Solid uninsulated walls on ground floor ? Stick with mains gas.1 point
-
I can't say I read it word for word .... I did have a good flip through though, was VERY helpful, so thank again @Marvin for sharing it1 point
-
You need to notify the planning officer by means of a formal "deemed discharge notice". Then after 2 weeks if there is no response, the deemed discharge will automatically come into effect. Usually you will get approval (or at least a decision) before the 2 weeks are up. One notice for each condition (ie. if 7 conditions remain to be discharged then 7 notices) Preliminary text on the foll lines: Purpose of current “deemed discharge notice”: To invoke article 28 of the Town and Country Planning (Development Management Procedure) (England) Order 2015 and related procedures so as to “avoid unacceptable delays and costs at a stage in the development process where applicants are close to starting on site or where development is under way” (ref PPG Paragraph: 041 Reference ID: 21a-041-20190723) Then include the formal requirements: Details of the Discharge of Conditions Application (eg reference number) Identify the planning condition to which it relates Confirm that no appeal has been made under s 78 of the 1990 Act Specify the date on which deemed discharge is to take effect (normally 2 weeks from the date that you send this notice to the planning officer) Good luck1 point
-
Yes you can take the render all the way to the ground but as Prodave says the issue would be that the render material bridges the horizontal DPC. Therefore you need to introduce a horizontal movement joist at DPC level that will separate below DPC render form the above DPC render. Something similar to below would work.1 point
-
In my humble opinion... Sometimes these walls are rendered over because of the effort involved in repositioning and pointing around each stone. Its unlikely that render will stop any serious structural problems already there, but it will stop the stones from loosening and falling out, causing a serious problem.1 point
-
Have you considered a basement? We built a 120m2 one to match the footprint of the house above and it's added valuable space such as teenager dens (x2) a gym, a plant room and a large general purpose room, currently still filled with boxes External staircase for access to garden for regs and convenience. All rooms are flooded with natural light and are a constant temp year round (20oc) without any heating or cooling. We're in Berkshire and it made good use of the expensive plot plus planners did not bat an eyelid even though it increased the internal space by about 50%. Regarding cost - it was additive but replaced any foundation system and is essentially a big waterproof concrete box in the ground so not that complex to build - especially if you're starting with a cleared plot. Ground conditions will dictate final cost (as they will your foundations) but if you're clear of groundwater then should not need complex waterproofing systems etc. Just a thought ! I will say architect was dead against it but since ate his chapeau and said it's some of the best space in the house.1 point
-
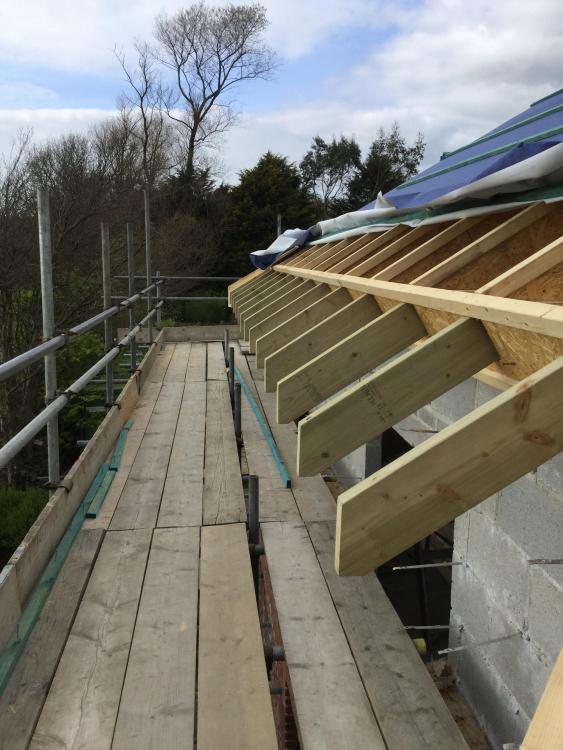
I did similar, 6 x 2 rafter tails (bolted to my i joists) with tongue and groove above to look like an old roof structure, 150mm facia looks fine.
 1 point
 -
Hooray, it’s fixed. As I suspected the “bypass valve” built into the manifold is pants, it allowed way too much cold so the loops never got up to temp and it’s not adjustable. I have blocked the internal bypass and installed a separate blending valve and it all works. All I have to do now is play with the flows and temps. Many thanks chaps ?1 point
-
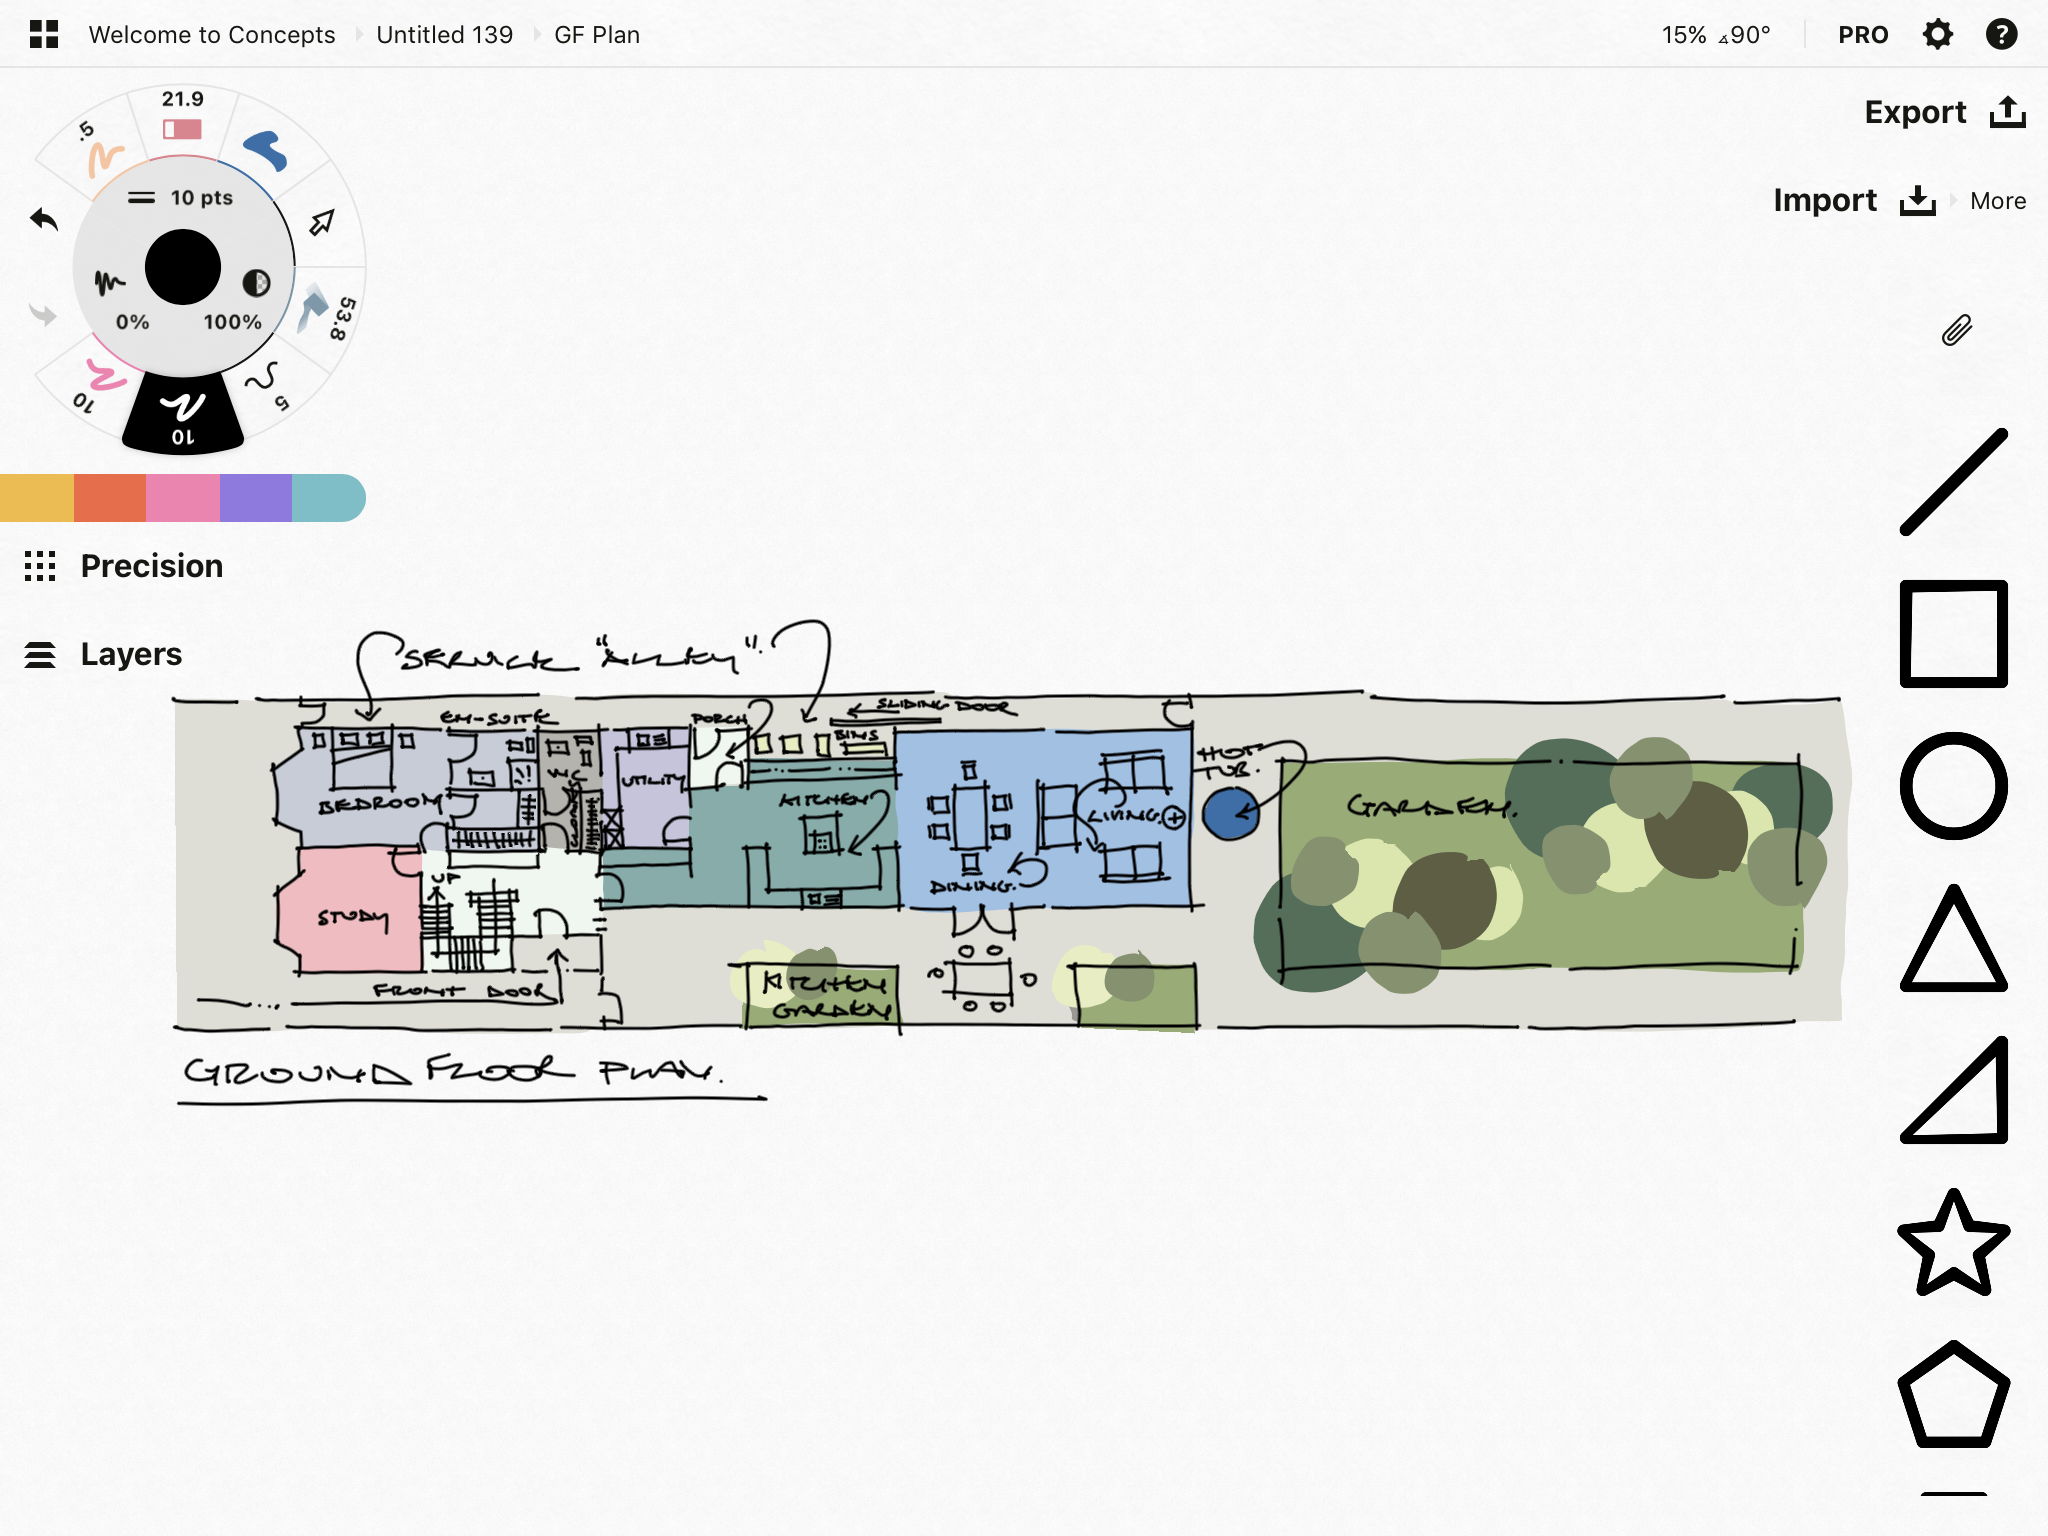
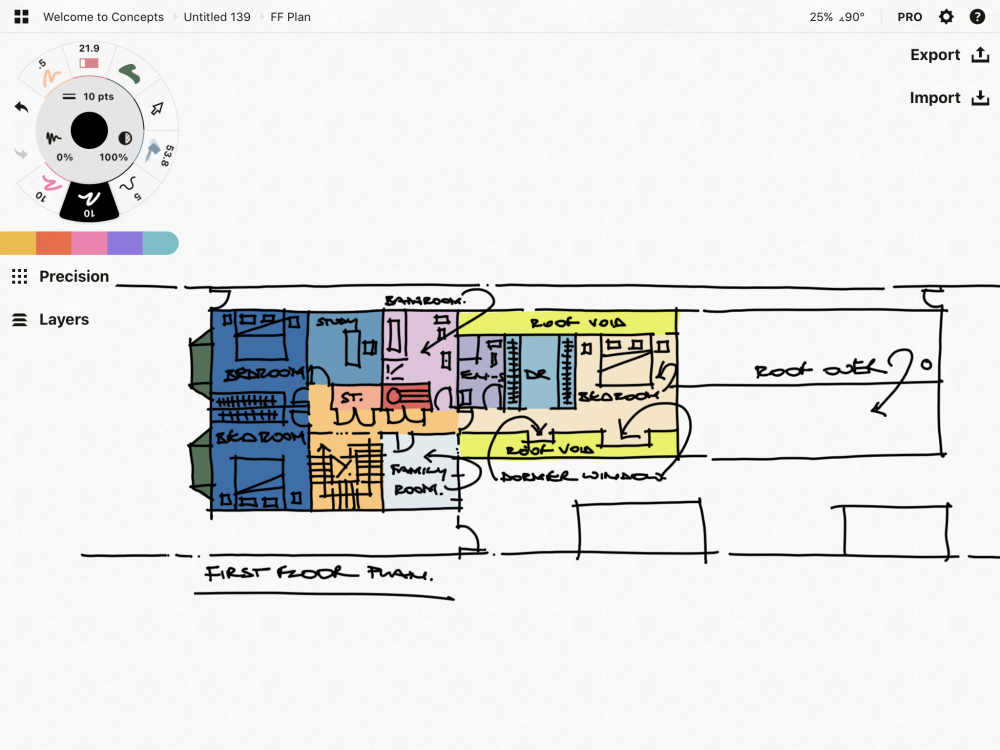
I see a lot of designs like this in self build, just not following the proper design process and ‘filling the plot’ up. I would imagine the brief you gave the designer (architect?) was possibly too prescriptive, or lacked them asking the *right* kind of questions. If you look at the quick sketch that ETC did, you can tell they have put thought into creating ‘breathing’ spaces into the garden, breaking up the bulk of the house, making the entrance and stairs more open and light. This is where you needed to start off from. The front elevation is cramped and although it’s symmetrical, it’s not well proportioned and the windows look cross-eyed. That’s why the solution where ETC has moved it is better. You’d get bigger rooms and a less fussy front street view. The windows are also the wrong proportions and clearly just inserted from a block library. They don’t fit the elevation at all. Why is there stone cil where there is no room for it? What style is this house. I also think the view from the snug is either overlooking or onto a wall or something, it needs to look down the garden, again where ETC has put it now I look… he’s really solved all the things I think are problems with your layout well. What you should have done, is take examples of styles of houses you liked, photos from the area, and then asked the designer to worry about the layout and create spaces to your requirements. I know there’s a ridge limit, but I don’t think it excuses the roof being like that, if it’s copying what is there already, I’d encourage you to move away from that as it’s limiting you.1 point
-
If you take the approach that the policy is necessary for future lending against the property for the 10 years from completion and potentially for any sale then you'll be fine. The policies are very carefully worded to give very narrow exposure to the insurer and minimal benefit to the policy holder. Most have a general 2 year exclusion at the start which states that any fault arising or first noticed in this period (even if a related more serious issue is not apparent until later) is for the relevant contractor to fix - unless they have ceased trading within that two year period. If the contractor does not want to fix it then you need to sue them, the insurance is not relevant. If they go bust after the two years, tough luck. Post 2 years, the scope of what is covered is narrow and I expect will be just as tricky to claim on and you may need to spend your own funds to prove that it's a genuine latent defect.1 point
-
Yes it is condensation. Moist air from the warmer ground rising to hit the freezing underside of the OSB, condensing and freezing. Flat roof will tend to suffer more than pitched. No wind currently, so the ventilation is not doing much.1 point
-
What a nice project. I'm optimistic about keeping it for 3 reasons. 1. It's pretty and appears to be well kept. 2. It was never altered meaning it must function well and also doesn't suffer from conflicting build methods of different eras. 3. The builder was unlikely to make a hash of their own house. Might you perhaps be able to sketch a cut through of the wall please with dimensions.1 point
-
Wedge boards as tightly together as possible, foam any gap that won’t close up. small differences in level at joints is normal and these will squash down and everything settles with some load on. tape every joint if you can, costs very little and is worth it for piece of mind.1 point
-
Thank you.1 point
-
Welcome to the forum. House looks good.1 point
-
@IndyAnother option with a symmetrical front.
 1 point
 -
Norn Iron all the way!1 point
-
Oi Ferd. I like the Northern Irish geezer. The other One is so predictable.1 point
-
Come on guys, everyone deserves a lunch break! I wouldn’t want to work for some of you, standing over the shoulder ensuring you start at 8am. what about when they are thinking about your job at night, ordering material, picking up before you get on site. too many spreadsheet warriors!1 point
-
Just to throw something in here for anyone who finds this. These prices are crazy, I jad a soil survey done for 350,.paid a jcb driver 100 quid to turn up an dig 5 holes for 2 hours and backfill. Full soil investigation survey supplied in a couple of days. Unless you're needing ti do boreholes for whatever reason it's crazy money.1 point
-
Just a quick update. I was successful with all new (uncalibrated) actuators using the above procedure. However, i have so far been unable to recalibrate a previously-calibrated actuator. The reason i know this (and the easiest way to tell its in calibration mode) is that after the initial charging, open and close valve procedure (complete in just under 4mins from power on), there should be a long period of the actuator doing nothing - c. f. point 6 above. If, instead, the actuator reopens the valve fairly quickly (as is the case for me when trying to recalibrate), it is not in calibration mode. Clearly the instructions for recalibration are innacurate. I will have to call Salus again to find out if there is any other way to force the actuator to forget the original calibration. But if anyone has any ideas (or has successfully recalibrated one of these), do please let me know.1 point
-
Well, it's been like watching paint dry today, but, with just one loop left, i think it's safe to say i have finally succeeded! WF did send me a new batch of actuators (and it's those that ive been using), but i don't think its that that's made the difference. I think the key is simply patience! But, for anyone who's interested, here's the procedure ive used: 1.Switch off flow to all loops. Then, attach and calibrate one actuator at a time, as below. 2. Attach the temp probes onto flow and return pipes 10cm from the manifold (as per instructions) and screw on actuators finger tight. 3. Power up actuators and the LED should then rapidly flash at ca. 4Hz (not 0.25Hz as stated in the instructions). 4. After just under two minutes, the LED will change to a slow blink and the actuator motor can be heard moving its pin to open the valve if its not already open. 5. After a short pause, the actuator motor will reverse to fully close the valve. 6. This is where the patience comes in. Next it opens the valve at tiny increments (not perceivable) to find the point of min flow in the flow pipe. This can easily take another 20+ mins, and its easy to think that the actuator is stuck, but don't give up! Eventually, the actuator will kick back into life and, with a slow flashing LED, reopen the valve fully. 7. Shortly after this it will move to stable operation and calibration will be complete. You can then switch off the actuator and it should close the valve fully. 8. To be on the safe side, i waited 40+ mins before switching off. Hope this helps others.1 point