Leaderboard


Popular Content
Showing content with the highest reputation on 02/09/21 in all areas
-
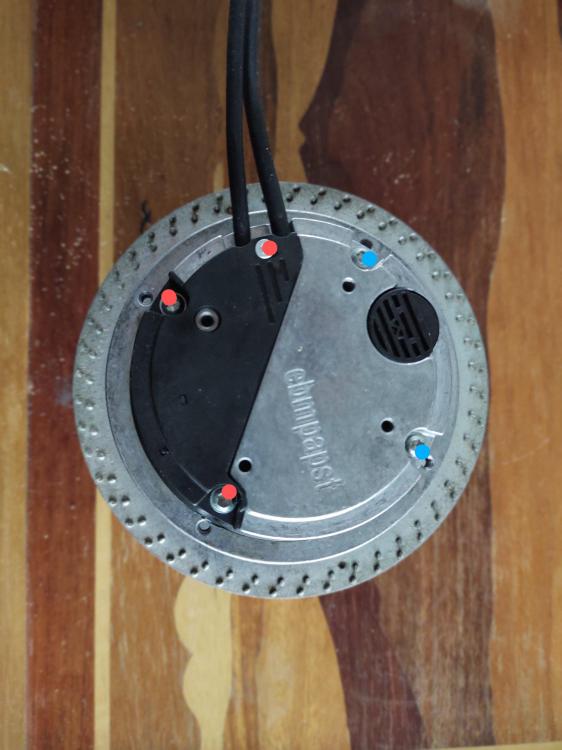
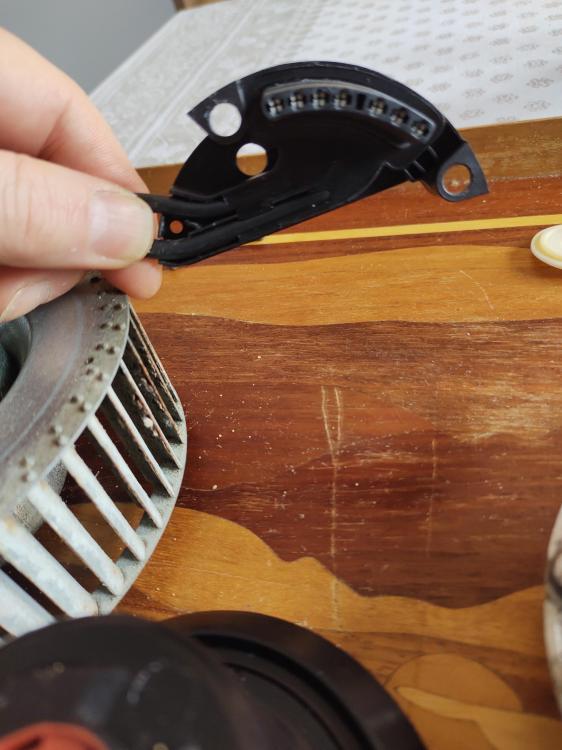
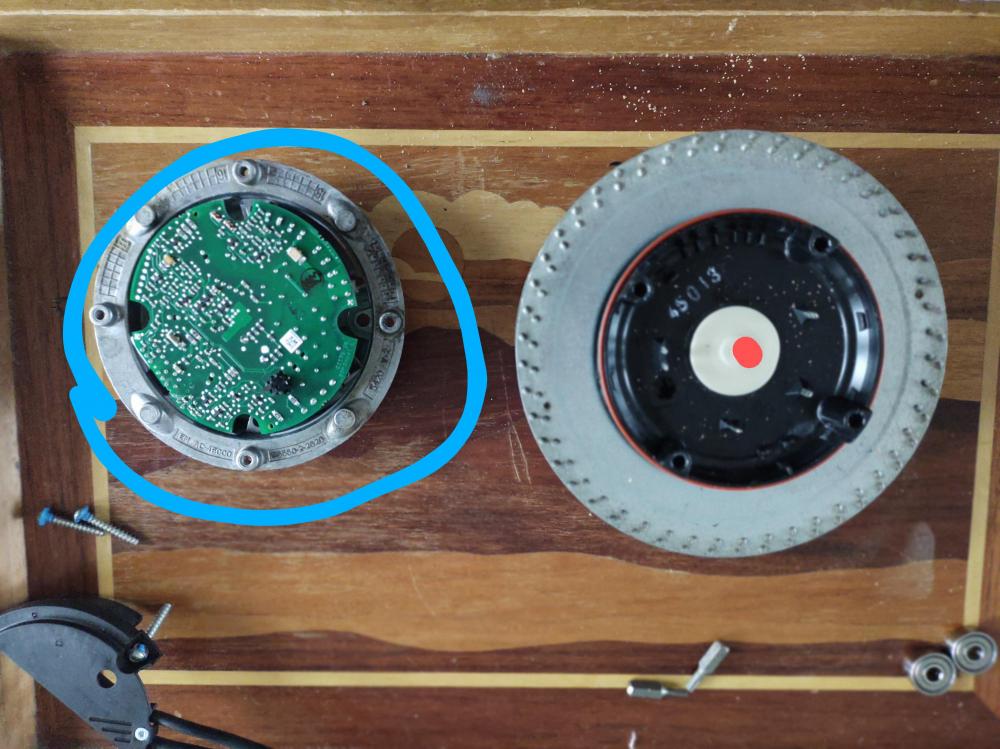
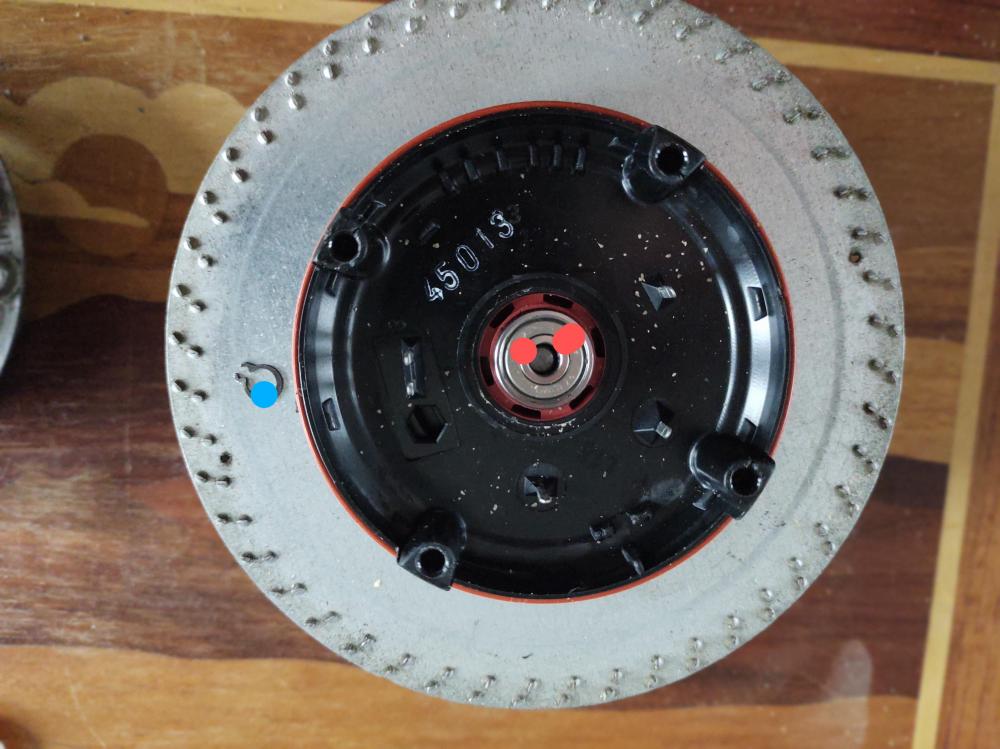
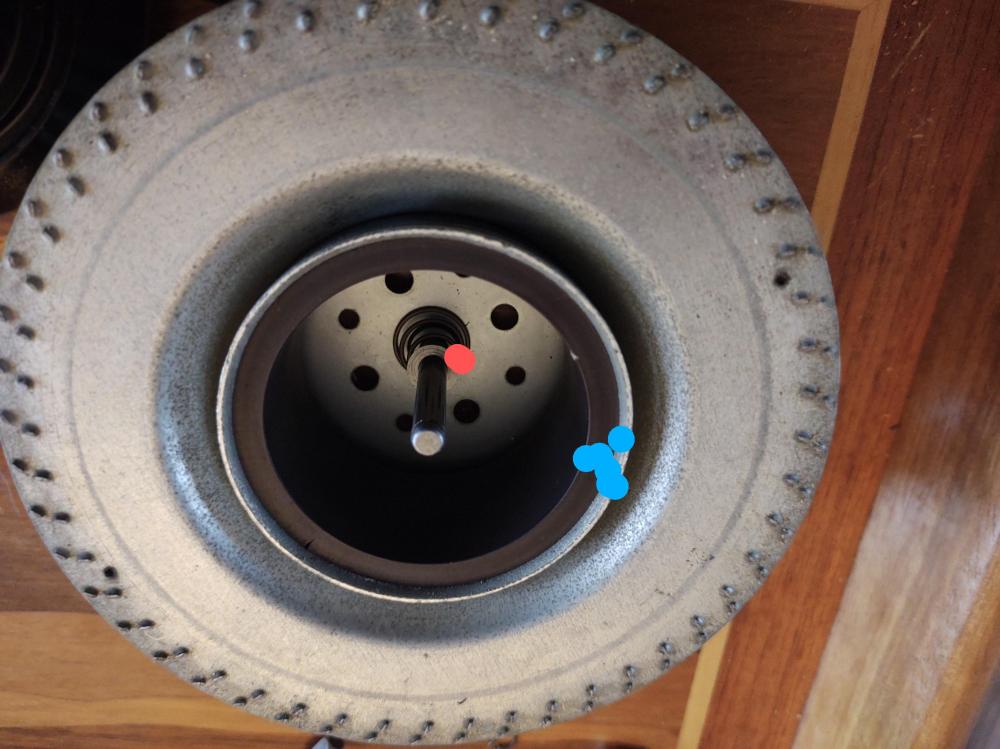
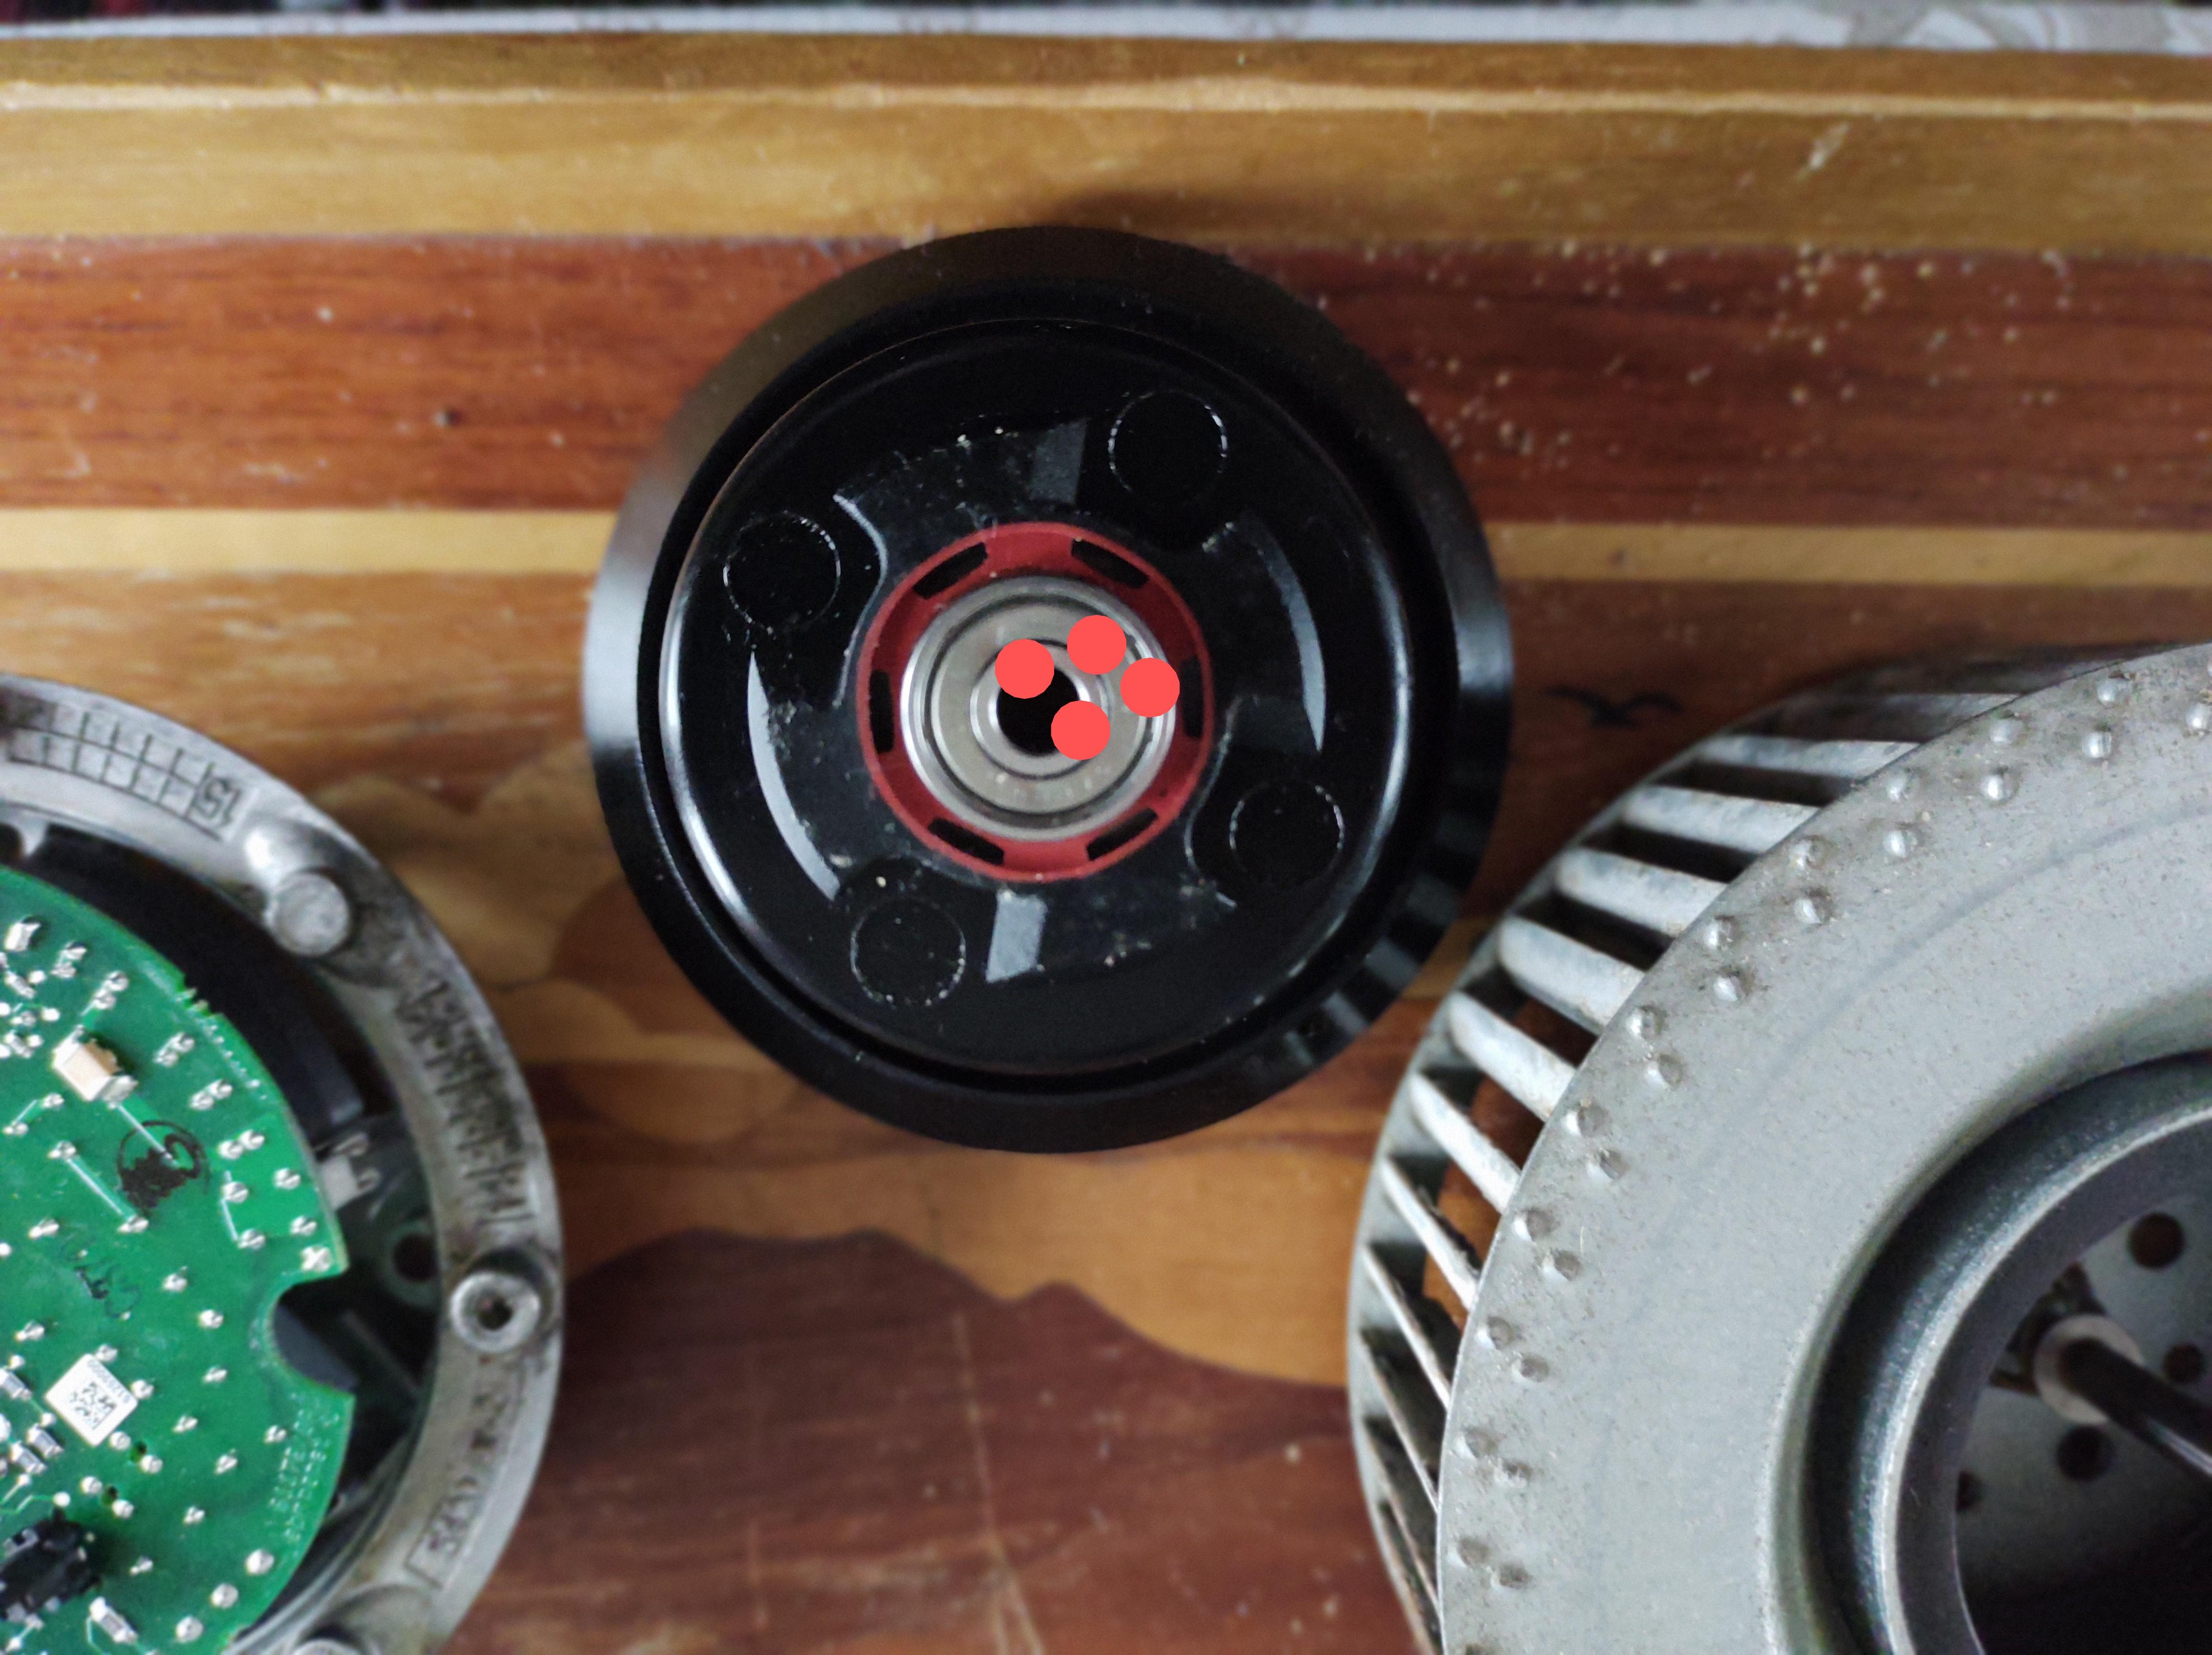
Hi All, Hopefully this will help someone as I could not find anything online. I was about to pull the trigger on a new fan which is really limited as to where you can get them and expensive. A new fan from Vent Axia is £280 I sourced bearings from Amazon for £7. Below is a series of pictures showing the fan in various states of disassembly. To remove the fans from the unit requires a full strip down of the unit unfortunately, this is not difficult just a pain, especially if your unit is in the loft like mine. Picture 1 This shows the fan body from the top, first remove the 3 screws in red, gently pry off this black housing, this houses the contacts so go easy, it does lift off without any resistance. Now remove the other two screws in blue. Picture 2 The contacts mentioned above that you will not want to damage. Picture 3 This show the fan in two main parts, the upper with the circuit board and the body that houses the bearings. You can remove the circuit board but I would advise against it, no reason to unless you think it is faulty. Lift off the white rubber cap (red dot) to reveal the upper bearing. Picture 4 This shows the upper bearing already removed with the retaining clip (blue dot). The clip is really small and a bit fiddly, if you push down on the hub assembly if will give a little space between the clip and bearing, this will allow you to get a plain bladed screwdriver into the clip and spread it slightly to remove it. Once the clip is off just lift the whole hub assembly out, it is not stuck or tight but held in magnetically so just pull up. ;Picture 5 This shows the underside of the hub with the bearing already removed, the bearings are easily remove as they are not tight inside the hub, just gently tap them using a long screwdriver from inside the spindle shaft hole, you will see them move out. Picture 6 This just shows a spring with a flat washer on top of it, just in case it drops out when you are lifting the hub etc, just leave it in place. The blue dot shows the magnet Re-assembly is just the reverse when you put the new bearings in. The bearings are marked 626-2Z, these are the one I got from Amazon. https://www.amazon.co.uk/gp/product/B07FMV2ZHR/ref=ppx_yo_dt_b_asin_title_o00_s00?ie=UTF8&psc=1 Hope this is useful to someone.

 1 point
 -
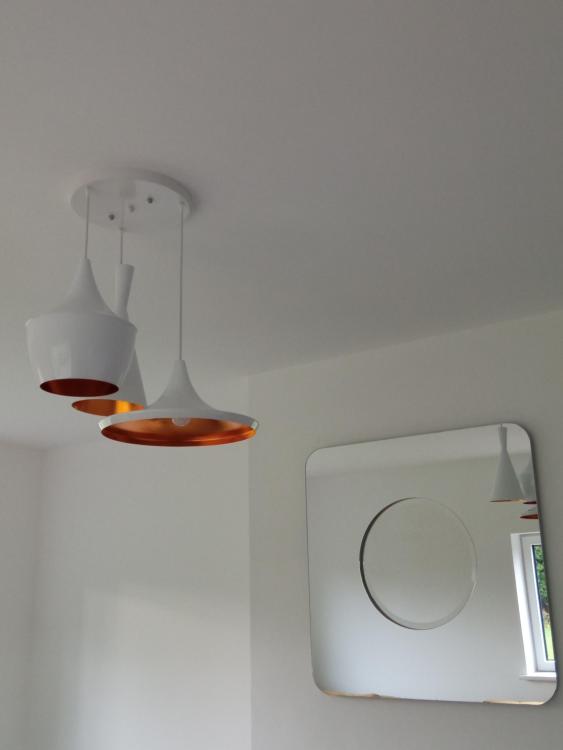
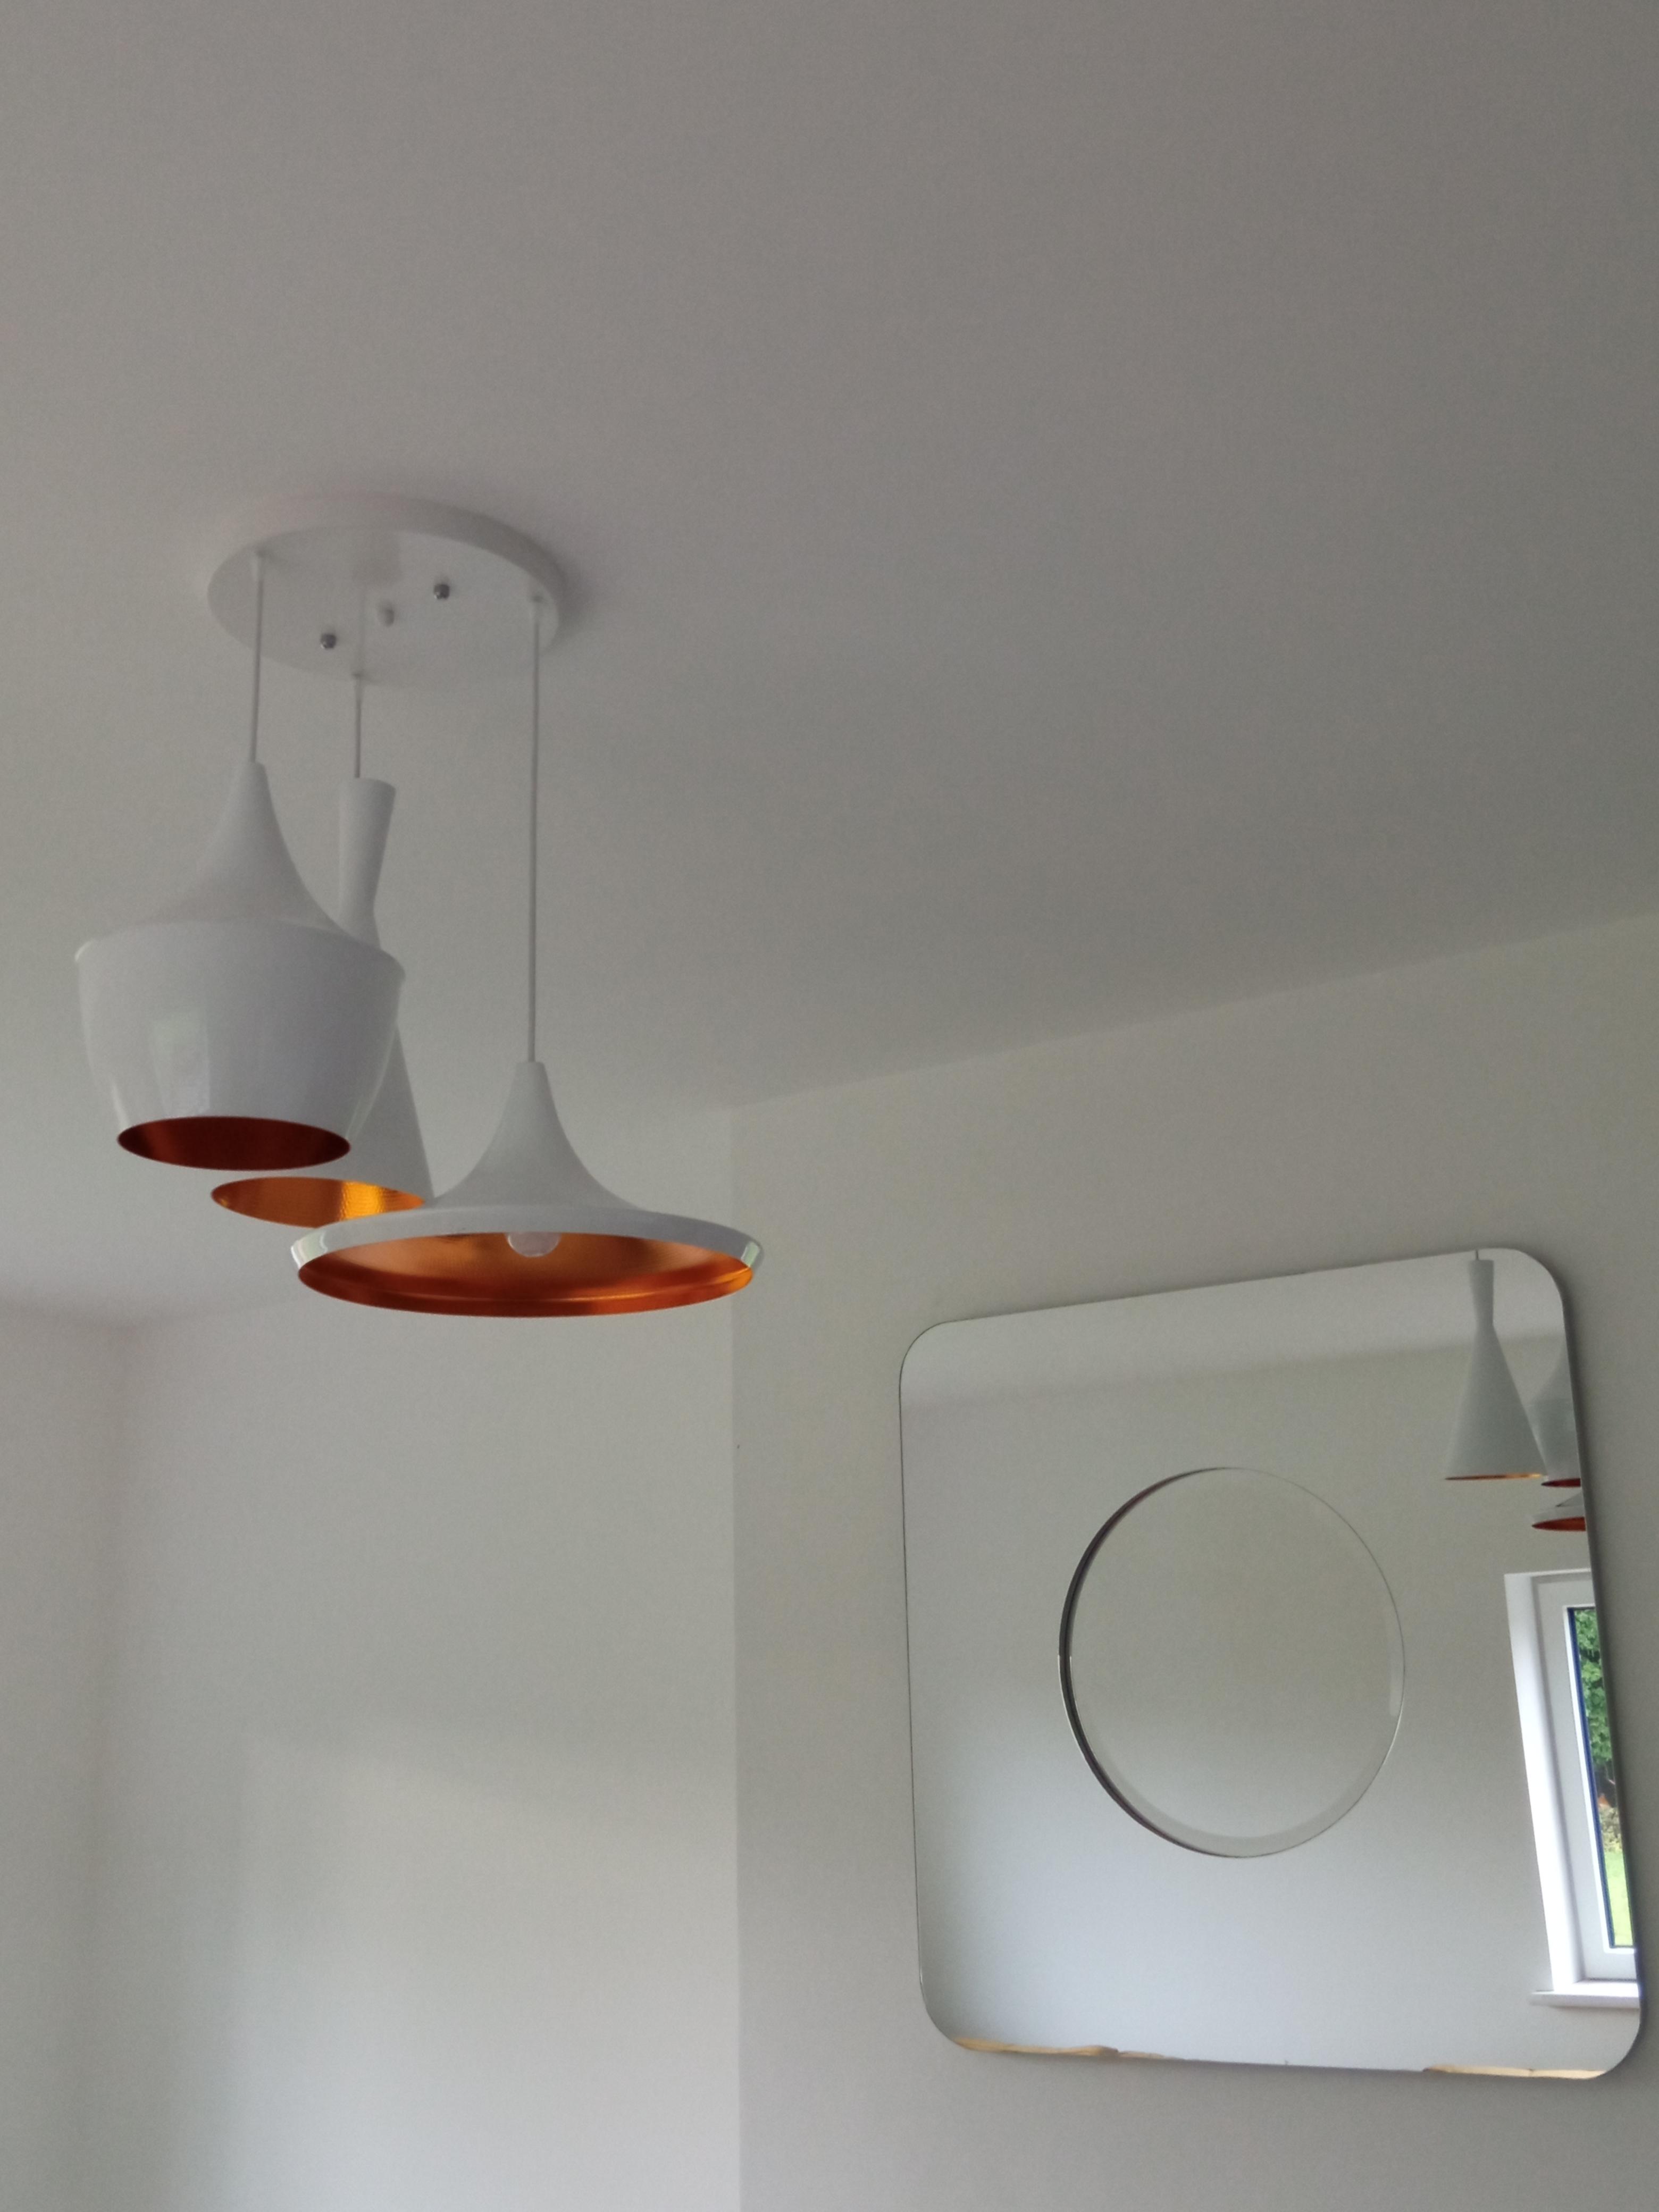
Have to say I'm pleasantly surprised. It took about 3 months to arrive but we got this for our living room after I saw the Tom Dixon 'Beat' ones. Looks pretty smart. Got some dimmable filament bulbs and it has a nice orange glow from the bronze.

 1 point
 -
yes, it says at the top to use ph1 if single phase. This is the bumph I found Actually that must be a later one dated 2019 ? GROWA_00749_200713073708-1.pdf1 point
-
There should be, but I think they are so small that we cannot really feel them, so as you say, a perception thing.1 point
-
I'm sure there're higher radiative losses via glass (less with low-e coatings) than walls, but I believe the perception of cold is partly convection-based drafts and partly the colder surface not reflecting back as much of your body heat as the warmer surface of a wall.1 point
-
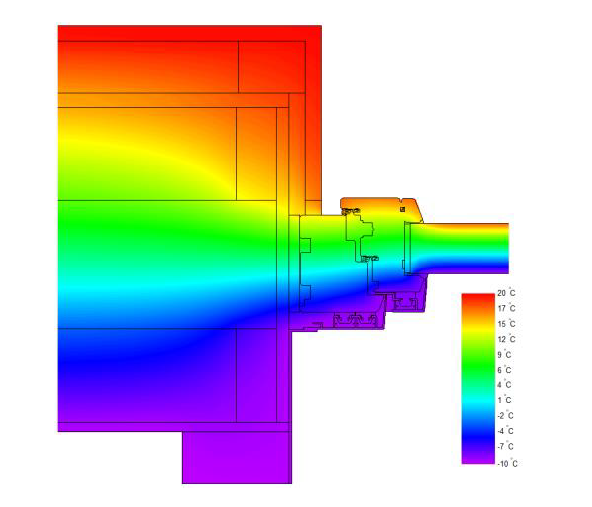
Do you have a detail? Snapshot of this would be great. Optimal is within the insulation layer. Edited to add thermal modelling of a detail we are currently working on.
 1 point
 -
If you want more detail and some history get an emonPi from the open energy crew in Wales - great kit. You can set up as many dashboards as you want and also measure temperatures. https://shop.openenergymonitor.com/emonpi/ I should add I'm nothing to do with them, except from being a member of the forum there. It's all open source, so we set up our own system on a spare Rasp Pi and also built a Solar PV diverter following guides. There's a huge amount of info on the forum. Simon1 point
-
Hahaha nope! The wife did.... though she is more familiar with railway signalling and electronics I have more faith in her skills . . .1 point
-
Something like this to monitor one appliance at a time https://www.ebay.co.uk/itm/UK-Plug-in-Electricity-Power-Consumption-Meter-Energy-Monitor-Watt-Kwh-Analyzer/333855058767?hash=item4dbb4feb4f:g:36kAAOSwL0Nf~Xn7 One day I will buy one and get to the bottom of our "other stuff" energy usage. Plug each appliance into it for a day or a week and see how much everything is using.1 point
-
Have you DIY rigged a blower door fan? For less than £50 it's like a 6th sence when you're draft hunting. We had an airtightness test done and spent a couple of hours looking for issues. Tbh a lot of them were places I had guessed were going to be an issue. What was surprising though was how much air was coming through some of them. I am hoping that half a dozen large holes and issue areas were the majority of the problem. Sadly I think it was correct. I did notice he had missed one or two of the mvhr vents afterwards though. That's interesting. There is a school of thought that is convinced that there are huge radiative losses via glazed areas, "because it radiates to space". Our hall is almost entirely glazed to the north side and double height. It doesn’t seem to take any more heating than other parts of the house (suggesting it is fact the air leakage that is the problem in the WC) I think that the benefit of triple glazing is larger than the u-values suggest. It may simply be that it removes cold areas and people end up over heating their houses to compensate for the coldest spots. I might get the IR camera out later this week when it is forecast to be -7/-8 as it will be interesting to see the impact.1 point
-
Probably sold now. Search eBay for CurrentCost energy meter. For your monitoring you need a clamp on type (CT) and not the optical one. Here is one. https://www.ebay.co.uk/itm/Current-Cost-Monitor/293993103408?hash=item44735ac030:g:bxQAAOSwnEJgCbZA1 point
-
£300 for a frigging set of Lego!!1 point
-
Spray it with glyphosate a couple of weeks before you want to seed it, rake it off and sow the seed.1 point
-
I bought the comfotube first actually before I was committed to installing MVHR straight away and didn’t want to be left with loads of pipe, I needed some to use as airtight underfloor conduit for electric cables. in the end I ended up doing the mvhr install and needed another 50m and went with quiet vent thinking there couldn’t be much difference but there certainly was. I think price difference was about the same when I bought. If I was buying more pipe I’d stick with the comfotube over other products for ease of use and also a better fit into the terminals1 point
-
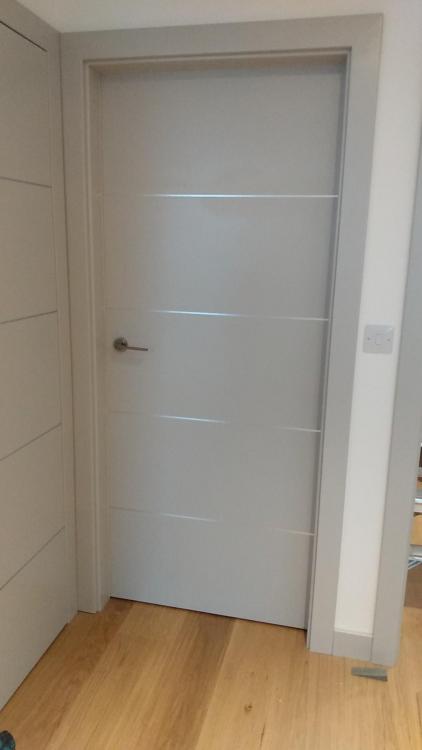
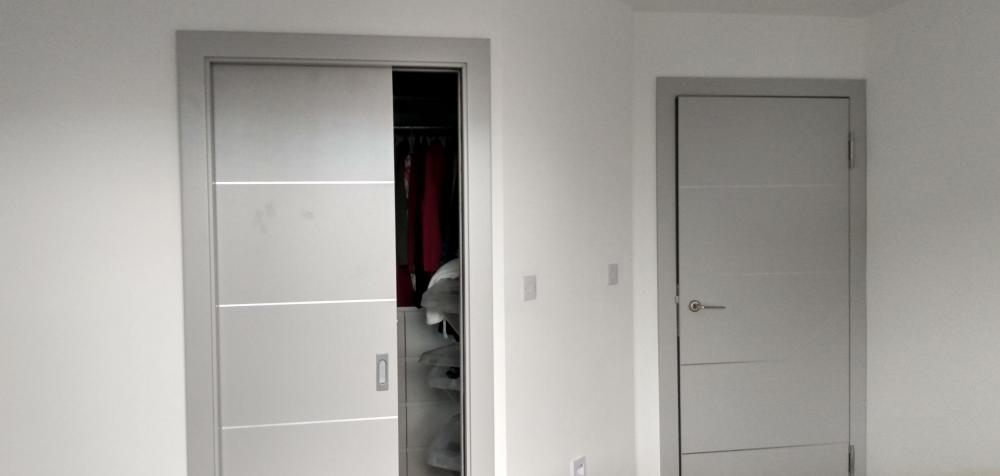
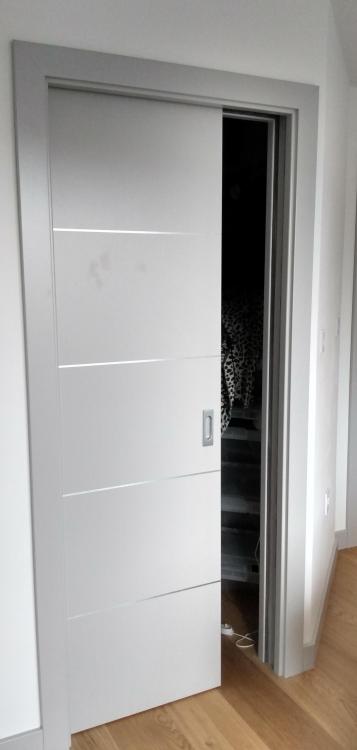
I think they are Porta Line in grey Euroinvest1 point
-
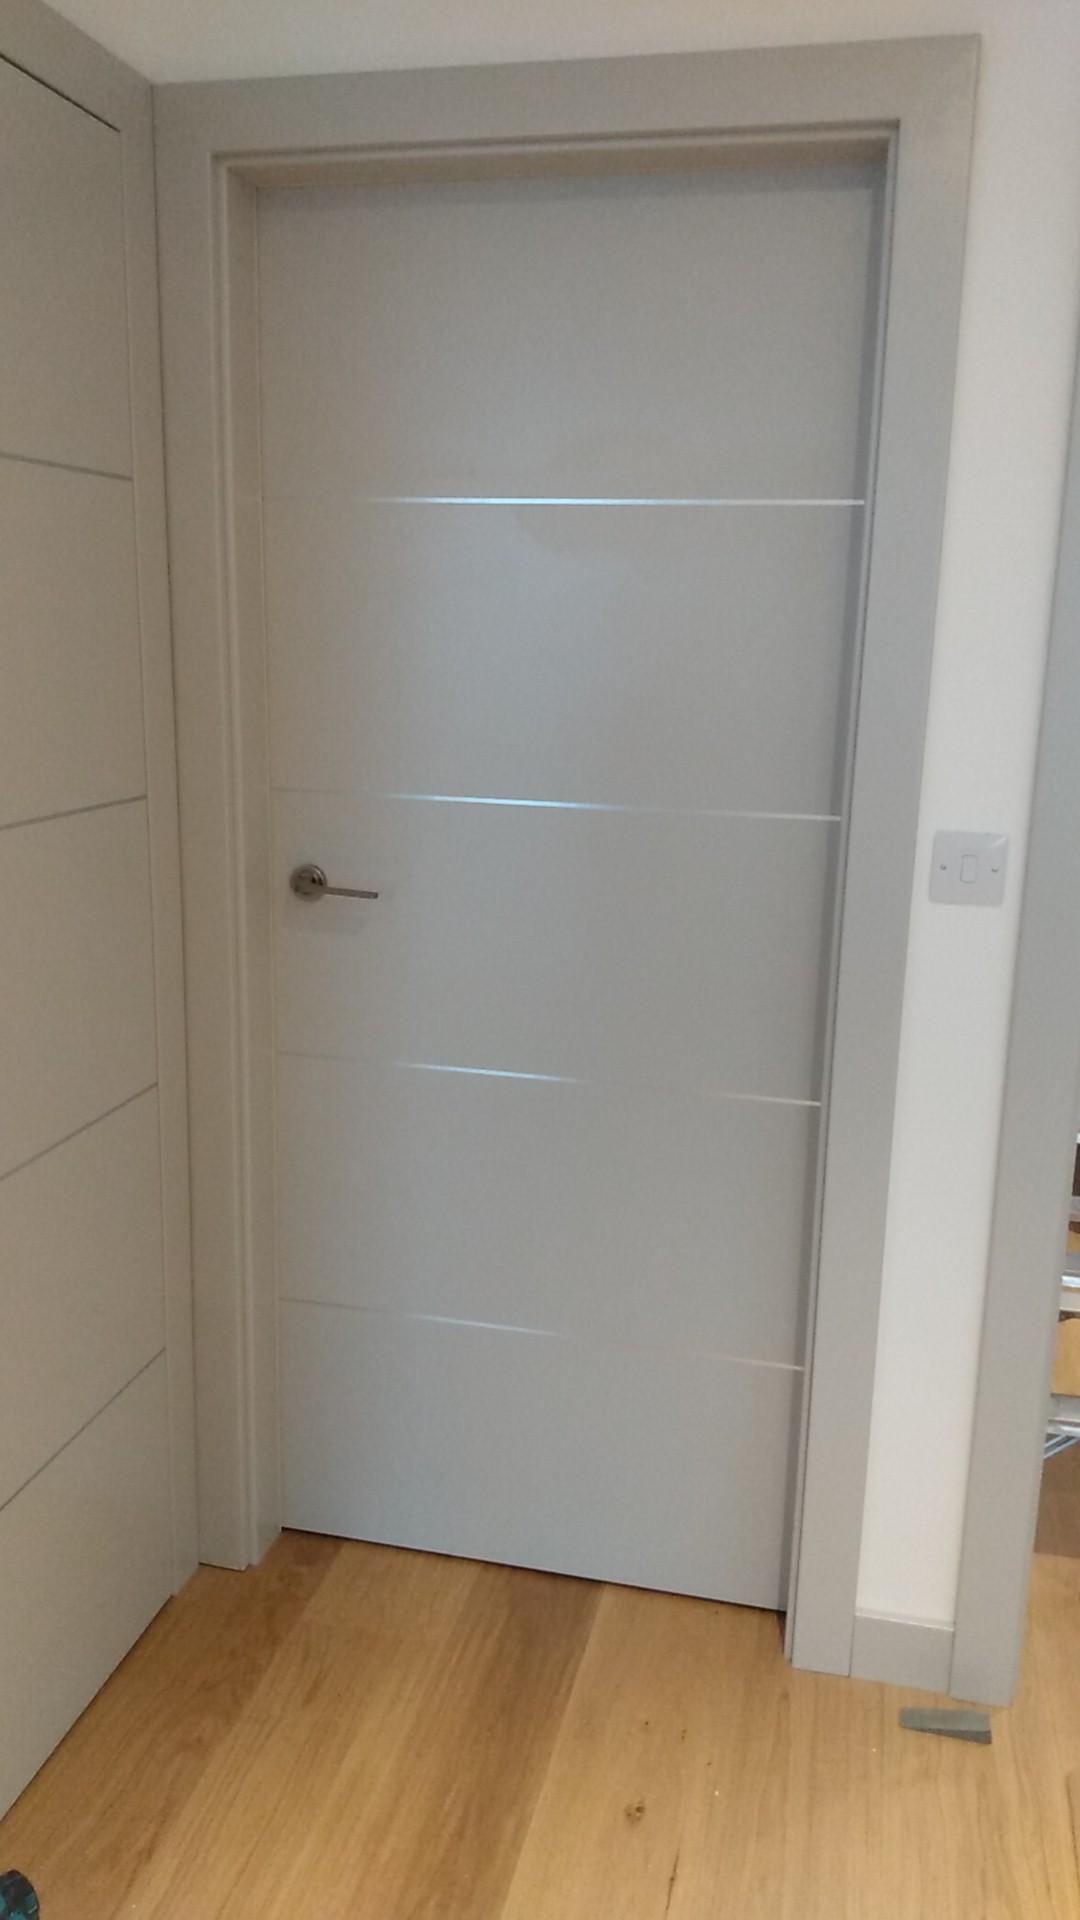
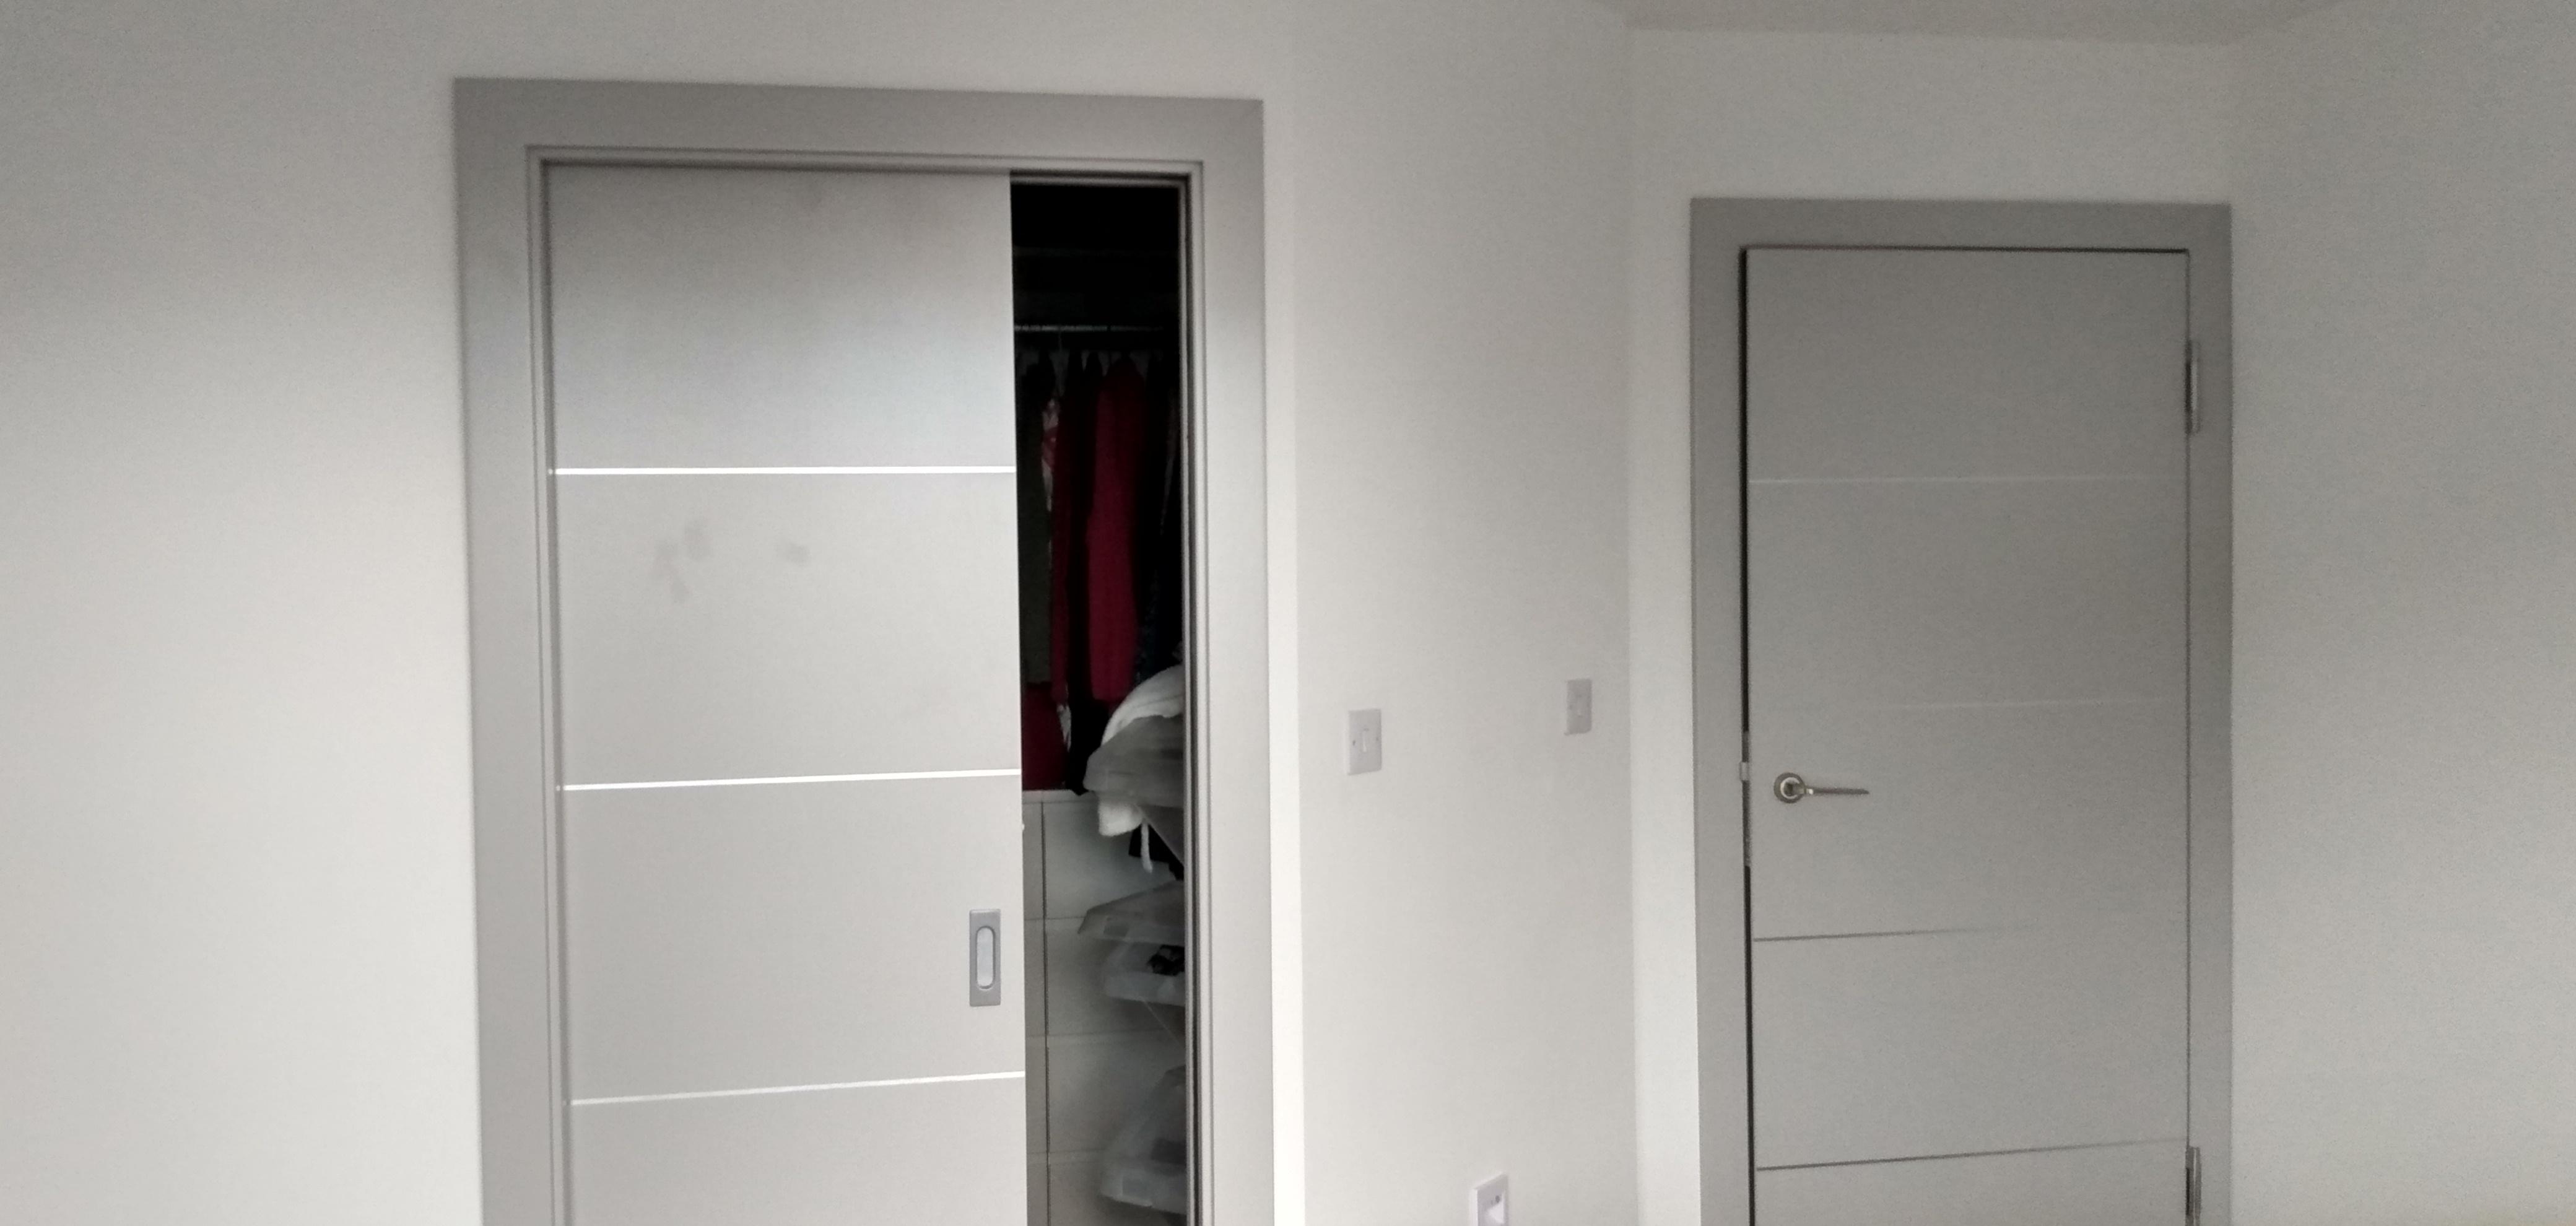
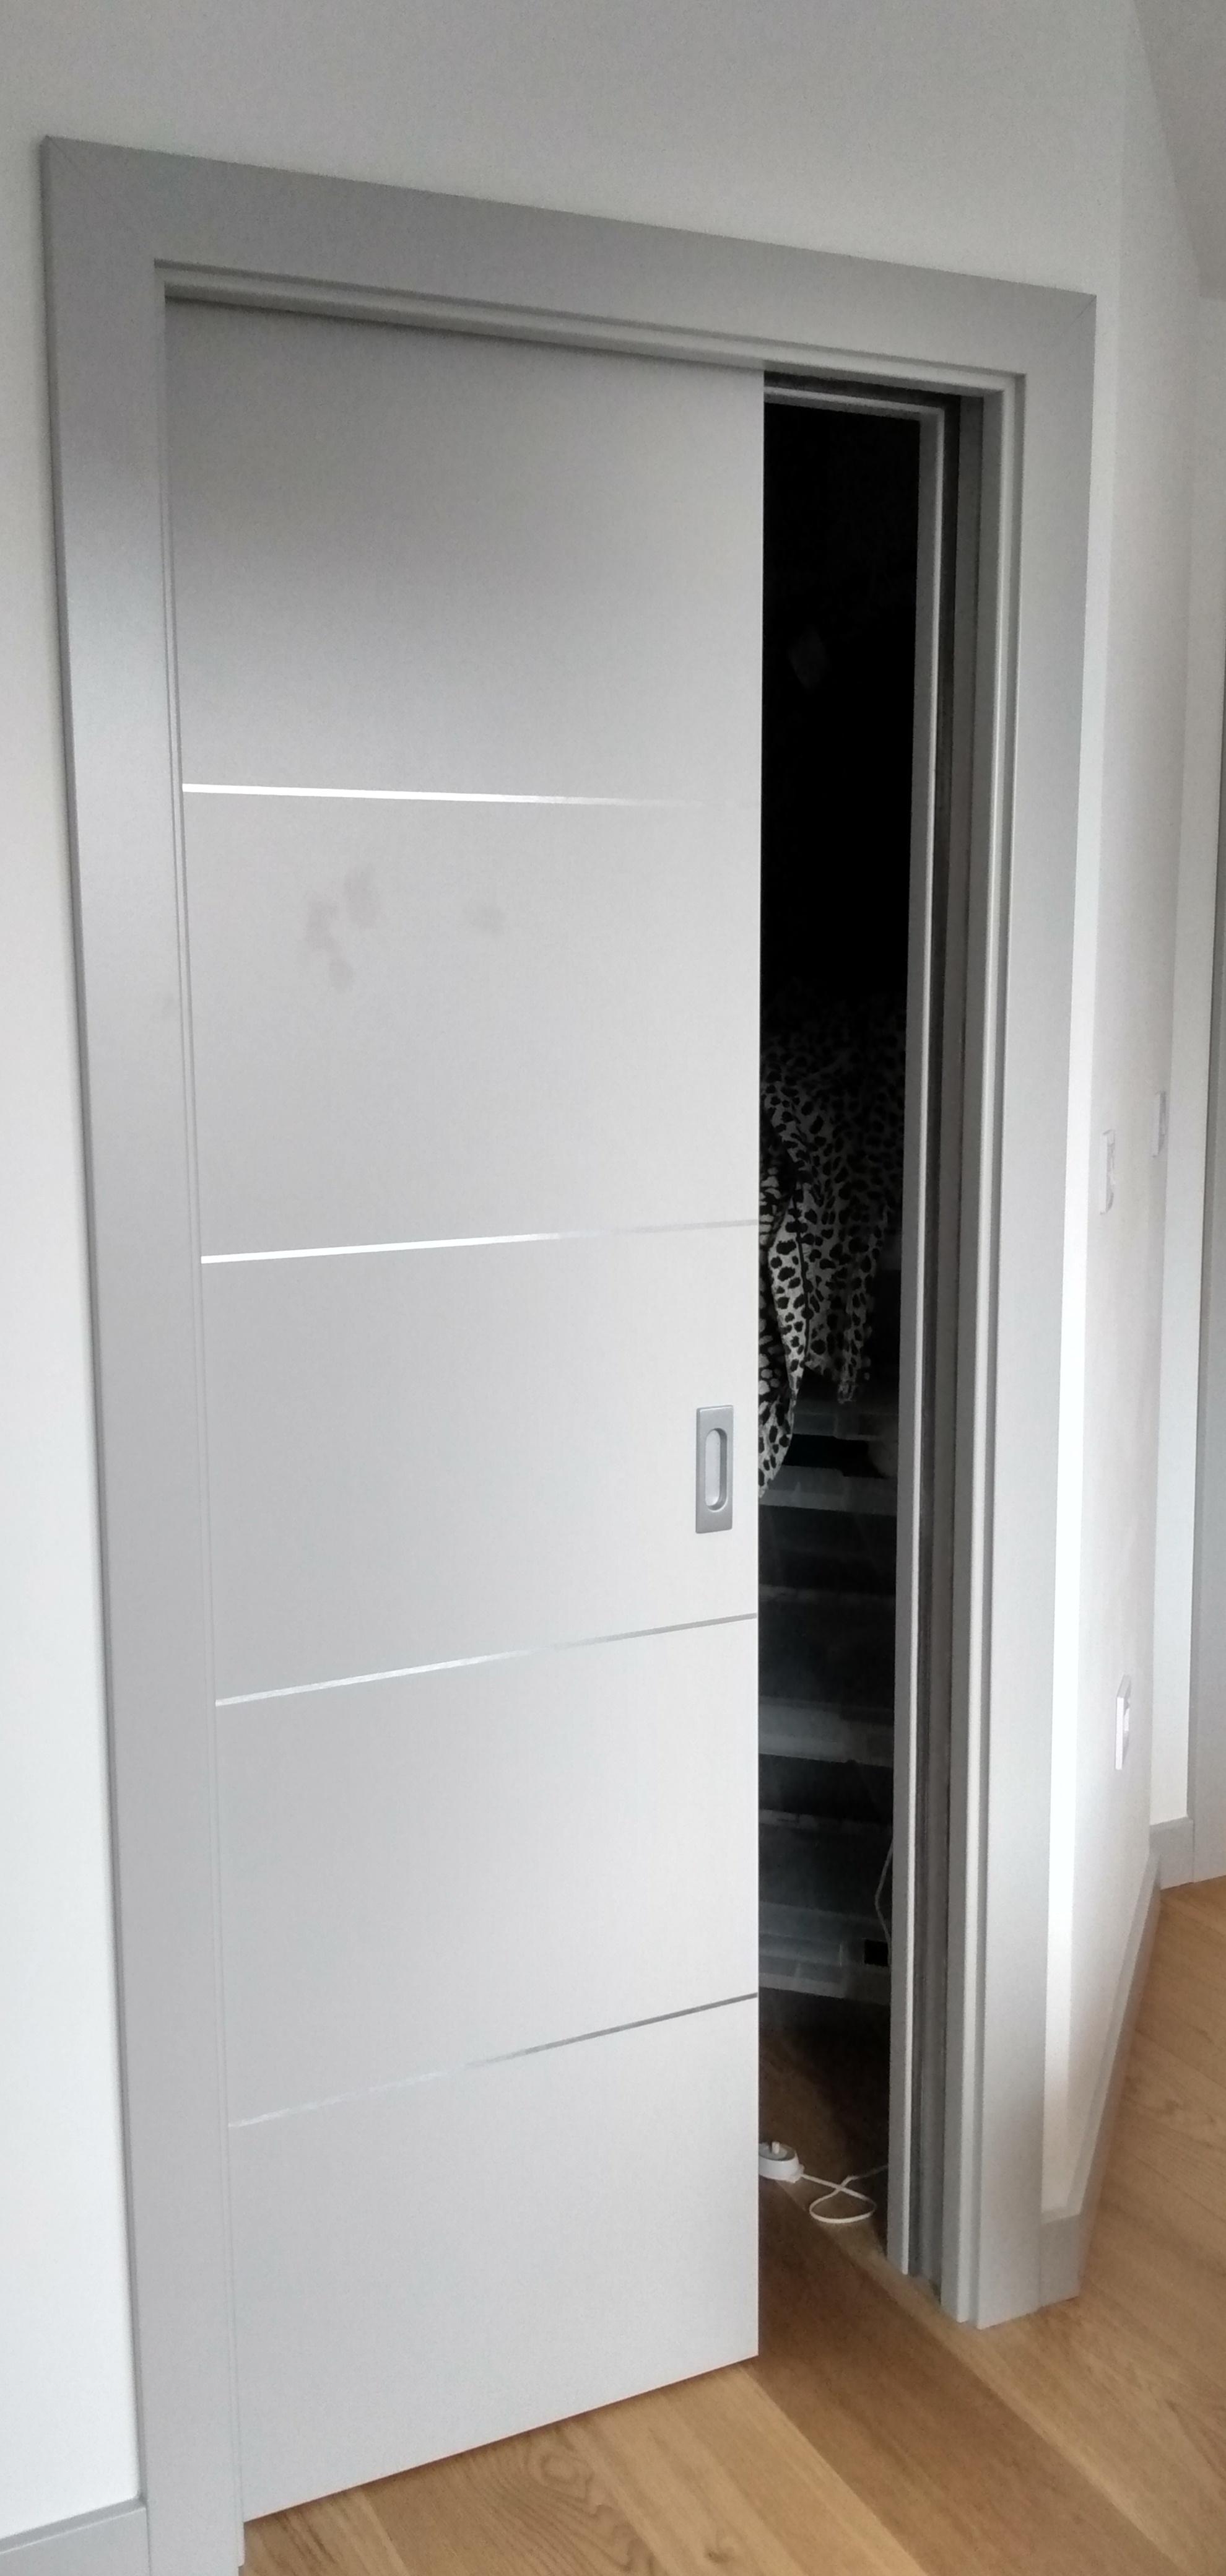
We are fitting them at the moment !! We had one pocket door fitted into an Eclise frame as it was already fitted. That worked really well . We have a mixture of non FD and fd30 - the fire doors are really heavy ! Generally the fitting has been fine- we are not expert carpenters. A couple needed a small trim off the bottom. Hinges and handles are great. the TEV team have been very helpful on the phone if we had any questions We also got the skirting board to match from them it is slightly shorter lengths 2.4 metres .
 1 point
 -
That would use electricity, and then we would have to explain, to the quantum level, how it works. Then we would have to explain the two quantum theories. And the room would still be cold and damp. Set fire to the place and claim on insurance, at least it will be warm enough to drive the damp away.1 point
-
Why..?? Hep20 is quicker and cheaper and needs less joins and is much easier to install. It also has less impact on flow and pressure reduction.1 point
-
We have engineered wood in all the upstairs and it's rock solid. Decent quality obviously.1 point
-
Our main room is open plan & the original intention was to have engineered boards in the living area & tiles in the kitchen. We were told by the retailer (waxed floors) that he had customers with his flooring in kitchens for over 10 years. 2 1/2 months in & ours is still looking good, I’ll give you a definitive opinion in 9 1/2 years! Ours was factory sealed, laid & then I put another 2 coats of osmo on it.1 point
-
What do you think will cause your wood flooring to warp / peel / rot or otherwise fail? Are you concerned about wet areas (kitchen) or the UFH? We have engineered Oak wood flooring throughout the living room, part of the entrance hall, and the kitchen / diner. When choosing it, we specifically said to the supplier recommend a product that will work with UFH and they came up with the large format planks we have, 180mm wide and up to 2.1M long. In the kitchen we just have a mat in front of the sink and hob area to protect the floor from spillages. So far (2 years in) it is all very stable with no issues.1 point
-
I'm getting a big "Account Suspended" error when going to the touch wand site, and the product is listed as not available on Amazon. Are you sure it is still available? I'm looking for something similar but have not found anything that meets the wife-aeshetics-approval rating yet :.1 point
-
Sory missed this first time around. Look in the instruction manual for the inverter. there should be a G98 conformance certificate from the manufacturer and you want the details from that, or just send a copy of that certificate. If you don't have one, contact the supplier and ask for the manufacturers G98 compliance certificate. Our DNO got a bit shirty because my inverter had "4000" in it's part number and they did not believe it was limited to 3.68kW until I forwarded the manufacturers declaration to say it was.1 point
-
Well, no one seems to have replied, so this is what I'd put, assuming youi have the 3.6kW Growatt inverter.. Growatt, yesterday ish,1, Growatt3600MTLS2018, 3.6kW, 1.1 point
-
We also bought Siematic after having one before. Yes they are expensive but they last for years and are top quality. You get what you pay for and in our case we decided to go Siematic again.1 point
-
I "feel" you still gotta read up on dewpoints and condensing surfaces.1 point
-
Welcome Sounds nice Not to far from us on the outskirts of Preston1 point
-
Also consider egger protect / D4 joins, my floor was a padling pool at times but it seems to have survived.1 point
-
With the blocks laid flat you gain nothing structurally or thermally. You have an extra £1,200 in materials and £2,000 in labour plus additional time. You also lose 9m2 of floor space, which at £3,000 per metre would be £27,000. Not the way I would chose to drop thirty grand!1 point
-
Keep the coil of SWA in the house next to a radiator for 24hours before you try to use it, cold SWA is horrible to work with warm SWA is a dream.1 point
-
Firstly, welcome. Your question is one of compliance with the regulations. Locally ( the Wild Wild Lancastrian North) compliance is called Enforcement. Talk to your local Enforcement (Compliance) Officer. Please remember we are not legal experts here, we are merely interested (nosey) reasonably well- informed busybodies. I say that because I would not want you to embark on a project just because we seem to be in favour of an argument you advance. Give 'em a ring. Whats to lose?1 point
-
I've not used this specific product, but i did use two types on my install. I used Zhender Comfotube and QuietVent, both 75mm, both antibac and antistatic, and found the zhender stuff a lot nicer to work with, didn't fight with me as much during install.1 point
-
https://www.starlink.com/ Very very good according to people who are trying it in Cornwall.1 point
-
use 22mm tongue and groove, glue every joint and screw not nail. You can get it that wiill withstand weather for 6 weeks if your not watertight. Once you've used the expanding glue in every joint and screwed it at 150 centres it is solid. not worth skimping on as a bouncy squeeky floor will be with you forever.1 point
-
I just went with their cheapest blue stuff and couldn't fault it, tbh.1 point
-
both diesel and 2T are designed to be burned and do so with as little residue as possible. 2T is formulated to disperse in the base to lubricate, diesel's additives protect sensitive injection equipment at speeds and loads far in excess of your burner's capabilities. Engine oil, unless it's one of the latest formulations for cars with Particle filters creates a fair bit of metallic ash when burnt...1 point
-
pointless. thermolite and if you want to lose more floor space for a large reveal and window seat more insulation and stud it.1 point
-
I think concrete lintels on the outside skin would be ok though I would prefer to see 140mm ones rather than 65mm ones, on the inner skin where concrete planks are bearing on them definitely steel beams or channels every time need to keep wind out of hollow cores especially cross draughts. Tony tray does it bit I foam filled the ends too. service holes should not be core drilled out but designed and performed in !1 point
-
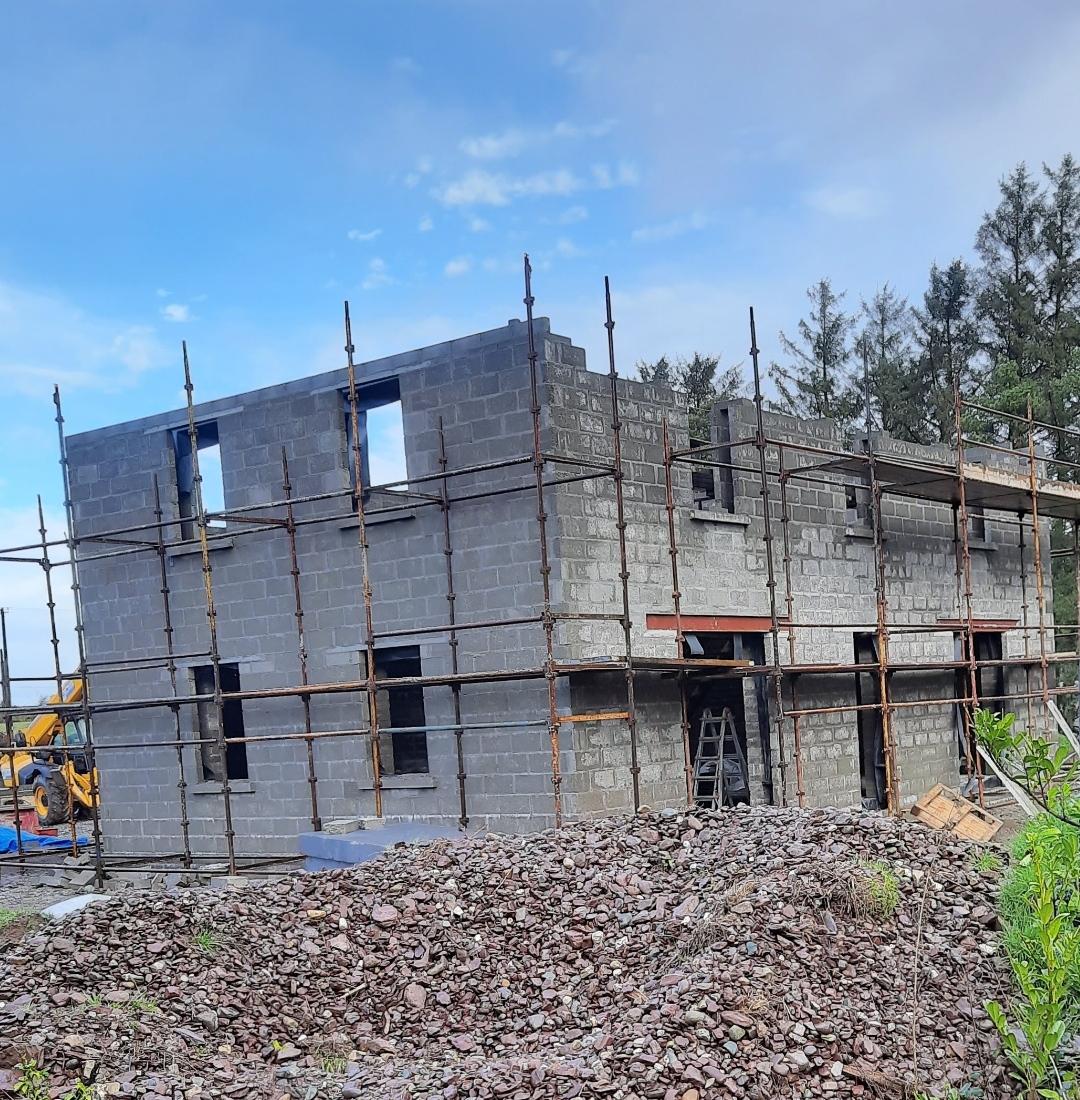
Thanks @Iceverge. Your build is similar to mine except for urs is a full 2 storey. I think i will go block on flat, even tho posters, who are probably right!, say it is over the top. It is an extra 900 to 1000 blocks. The 6 inch block is not popular to lay where i am from and the blocklayer said it would they would charge me alot more to lay a 27kg block that a 20kg block so i dont think the cost difference with be prohibitive. My engineer was on to me about widening the internal wall so i think i will. The benefits are very wide window reveals which we like ie window seats and peace of mind with the Hollow Core sitting on something a bit wider. 'As you can see we used steel lintels for the wide openings (2m) on the external leaf.' - Was this 2 steel beams ie one wide steel beam(215mm) on wide inner leaf and another beam approx 100mm on outer. 'All The narrower ones (1m) were standard 100x50 precast lintels' - Was this 2 No.100mm lintels side by side on the inner leaf and 1 No 100mm lintel on the outer leaf?. In relation to Hollowcore, i have 2 quotes.. Clare and Limerick.. I take what you are saying , the first floor at 450mm is deep and I havent started think about services yet!! For those wondering, even tho I am building in Ireland, I like the UK forums because I find the feedback frequent and inciteful and we are not all that different! Thanks1 point
-
You do not need planning permission for dormers on the rear or side of a property, it needs to abide by building regulations however. I am not up to speed on permitted development regarding garden buildings.1 point
-
The things that affect the deflection of the floor are about in order) joist span, joist depth, joist spacing and joist width. If the span is less than 3m, do whatever you like. More than 5m and the choices are limited. Do not accept the minimum allowable deflection, as it will feel crappy. Specify that you require maximum deflection of 8mm or 0.002 x span (whichever is least). That will always feel nice and solid. The decking does not make much difference to deflection. 22mm chipboard is standard and works fine.1 point
-
Funnily enough (but not funny) my stove does not draw well, I never have to throttle it back. My air feed is 100mm pipe under the concrete floor but I had to make a manifold to bring it up to the stove with two tight 90’ bends. The back of hand test feels a good draught but I am not convinced it’s enough as the stove has a good rep. I am tempted to take the stove out and create a long 180’ bend so there is no restriction. It’s on my “to do” list.1 point
-
As you can see we used steel lintels for the wide openings (2m) on the external leaf. All The narrower ones (1m) were standard 100x50 precast lintels. This really is a question for your structural engineer though. If I had my time again I'd avoid precast floors. You end up with a very thick floor ~450mm, the added expense of including a suspended metal ceiling. They're a PITA to core through for services. Installing them without guys making ribbons of any airtightness tray is nearly impossible. Despite requests and being on site they still crowbar the slabs back and forward over the plastic membrane.
 1 point
 -
For a stove that only needs a 12mm hearth, I would insulate under it and put exactly the same floor finish as the rest of the room and just put the glass hearth on top. It is okay to draw combustion air from a ventilated under floor space it does not need any form of fan. Assuming you are not getting a glass hearth with a hole in it for the air duct, it is best to build a length of duct into the wall behind the stove to draw it's air from below.1 point
-
https://www.self-build.co.uk/build-cost-calculator/build-cost-calculator-house-page/ Using all the same parameters ICF comes out higher than block work. Doesn’t appear to be taking into account time saved on labour?1 point
-
German kitchens are manufactured in large highly automated factories and like most German product, the product quality, detailing and finishing is generally higher. Like car manufacturing, the manufacturing is customised and made to order (which explains the longer lead time) but German manufacturers dont have factories full of ready to ship good. This provides flexibility in manufacturing and customisation. This said, German kitchens are just kitchens in Germany so like all products there is grades of products, some entry level, some mid market and some high end. The main differences between there are quality/grade of chipboard used, flexibility and degree of customisation offered, degree of 'bespokeness' available and quality of components used. As a blanket statement, I would say the stuff sold by British sheds would have no market in Europe. The quality is just not acceptable. As an anecdote, Howdens attended a trade fair in Germany in 2018 and it became an object of curiosity. As a retailer I have tried to work with British made products and my experience was typical of British manufacturing - that will do. Sloppy detailing, chronic underinvestment in machinery and technology etc. To the point where it didnt remain economically viable to buy locally manufactured product and cheaper to ship a truck full or mostly air from Germany and still it at lower or very similar prices to German products. The exception to this are the high end bespoke products that are British. Beautiful craftsman but expensive. Lots of comparable parallels exist between British car brands such as JLR or the top end ones like RR and Bentley. Capable of making great products but quality can be patchy and they are expensive. Watch out for smoke and mirrors. Lots of entry level German products get sold as high end ones with German being the selling factor. After nearly 15 years in the business, I closed my doors to British kitchens. It doesnt help me run an efficient operation and I am not interested in creating work for myself.1 point
-
I left the site in November 2019 with the two trees felled, and we had decided that the design and approved planning application were not quote to our liking, so we took the decision to put in a variation of condition which went in for consideration in December 2019?. Little did we know what this would mean to progress; as we are building very much at the DIY end of the self build spectrum, and not living close to site, by the time we had the go-ahead we were in Lockdown 1.0 and unable to get to site until July 2020. But before that, I'd already started the applications to install water and electricity, so in the first few months of 2020, I had lined up the water installation and had most of the things in place for the electricity connection. The water was due to go in at the end of March, and as you can expect, this was postponed. However, by keeping in touch with my local ground worker, the two neighbours and hte water and electricity folks, we were able to get things lined up to get both connected in the same week in July. Also, our local ground worker convinced us to push an access straight from the lane down to where we were building - I recommend listening to the experienced ? As well as getting things in place for our return to site, we took the opportunity to source a caravan that we could put onsite in order to make it easier to be able to travel straight to site and not have to rely on being able to use the local TravelLodge - little did we know how useful that was going to be. So, in June and early July a couple of short preparatory trips moving the caravan to site and setting up, connecting the water standing pipe, installing meter boxes, then in July - October, we made several trips to clear and burn vegetation, feed and water the water and electricity teams, have meals with our "to be" neighbours, take delivery of a septic tank dig a lot of holes lay drainage pipes fit a septic tank fill holes with stone fill holes with spoil and finally start digging a very large foundation hole for the insulated raft foundation 20201012_094541.mp4 And then we hit Lockdown 2.0 - another month of enforced "stay away from site", then in early December, I returned for two short visits to finish off concreting in the drainage pipes that will end up feeding through the insulated raft. And so we find ourselves in Lockdown 3.0 during which we are sorting out re-mortgaging to a lower fixed interest rate, which we always knew we would do, but we had hoped to be a lot further along ? choosing insulated raft supplier determining steel re-inforcement requirements and, due to delays, considering moving slightly along the self build spectrum towards more use of subcontractors ? And so as I write this with the Calcutta Cup on in the background wondering how long it will be before the travel restrictions are lifted, but planning for a late March trip West.1 point
-
+1. Invest in a decent strimmer with a brush cutter blade for the first trim, then you should be able to keep on top of new growth with a line head. I bought a Tanaka (for less than £250 iirc) to clear our site of head-height brambles and thistles; great bit of kit that has easily paid for itself many times over. Not easy work but quite rewarding, and it gives wildlife more of a chance to vacate than a tractor or digger.1 point
-
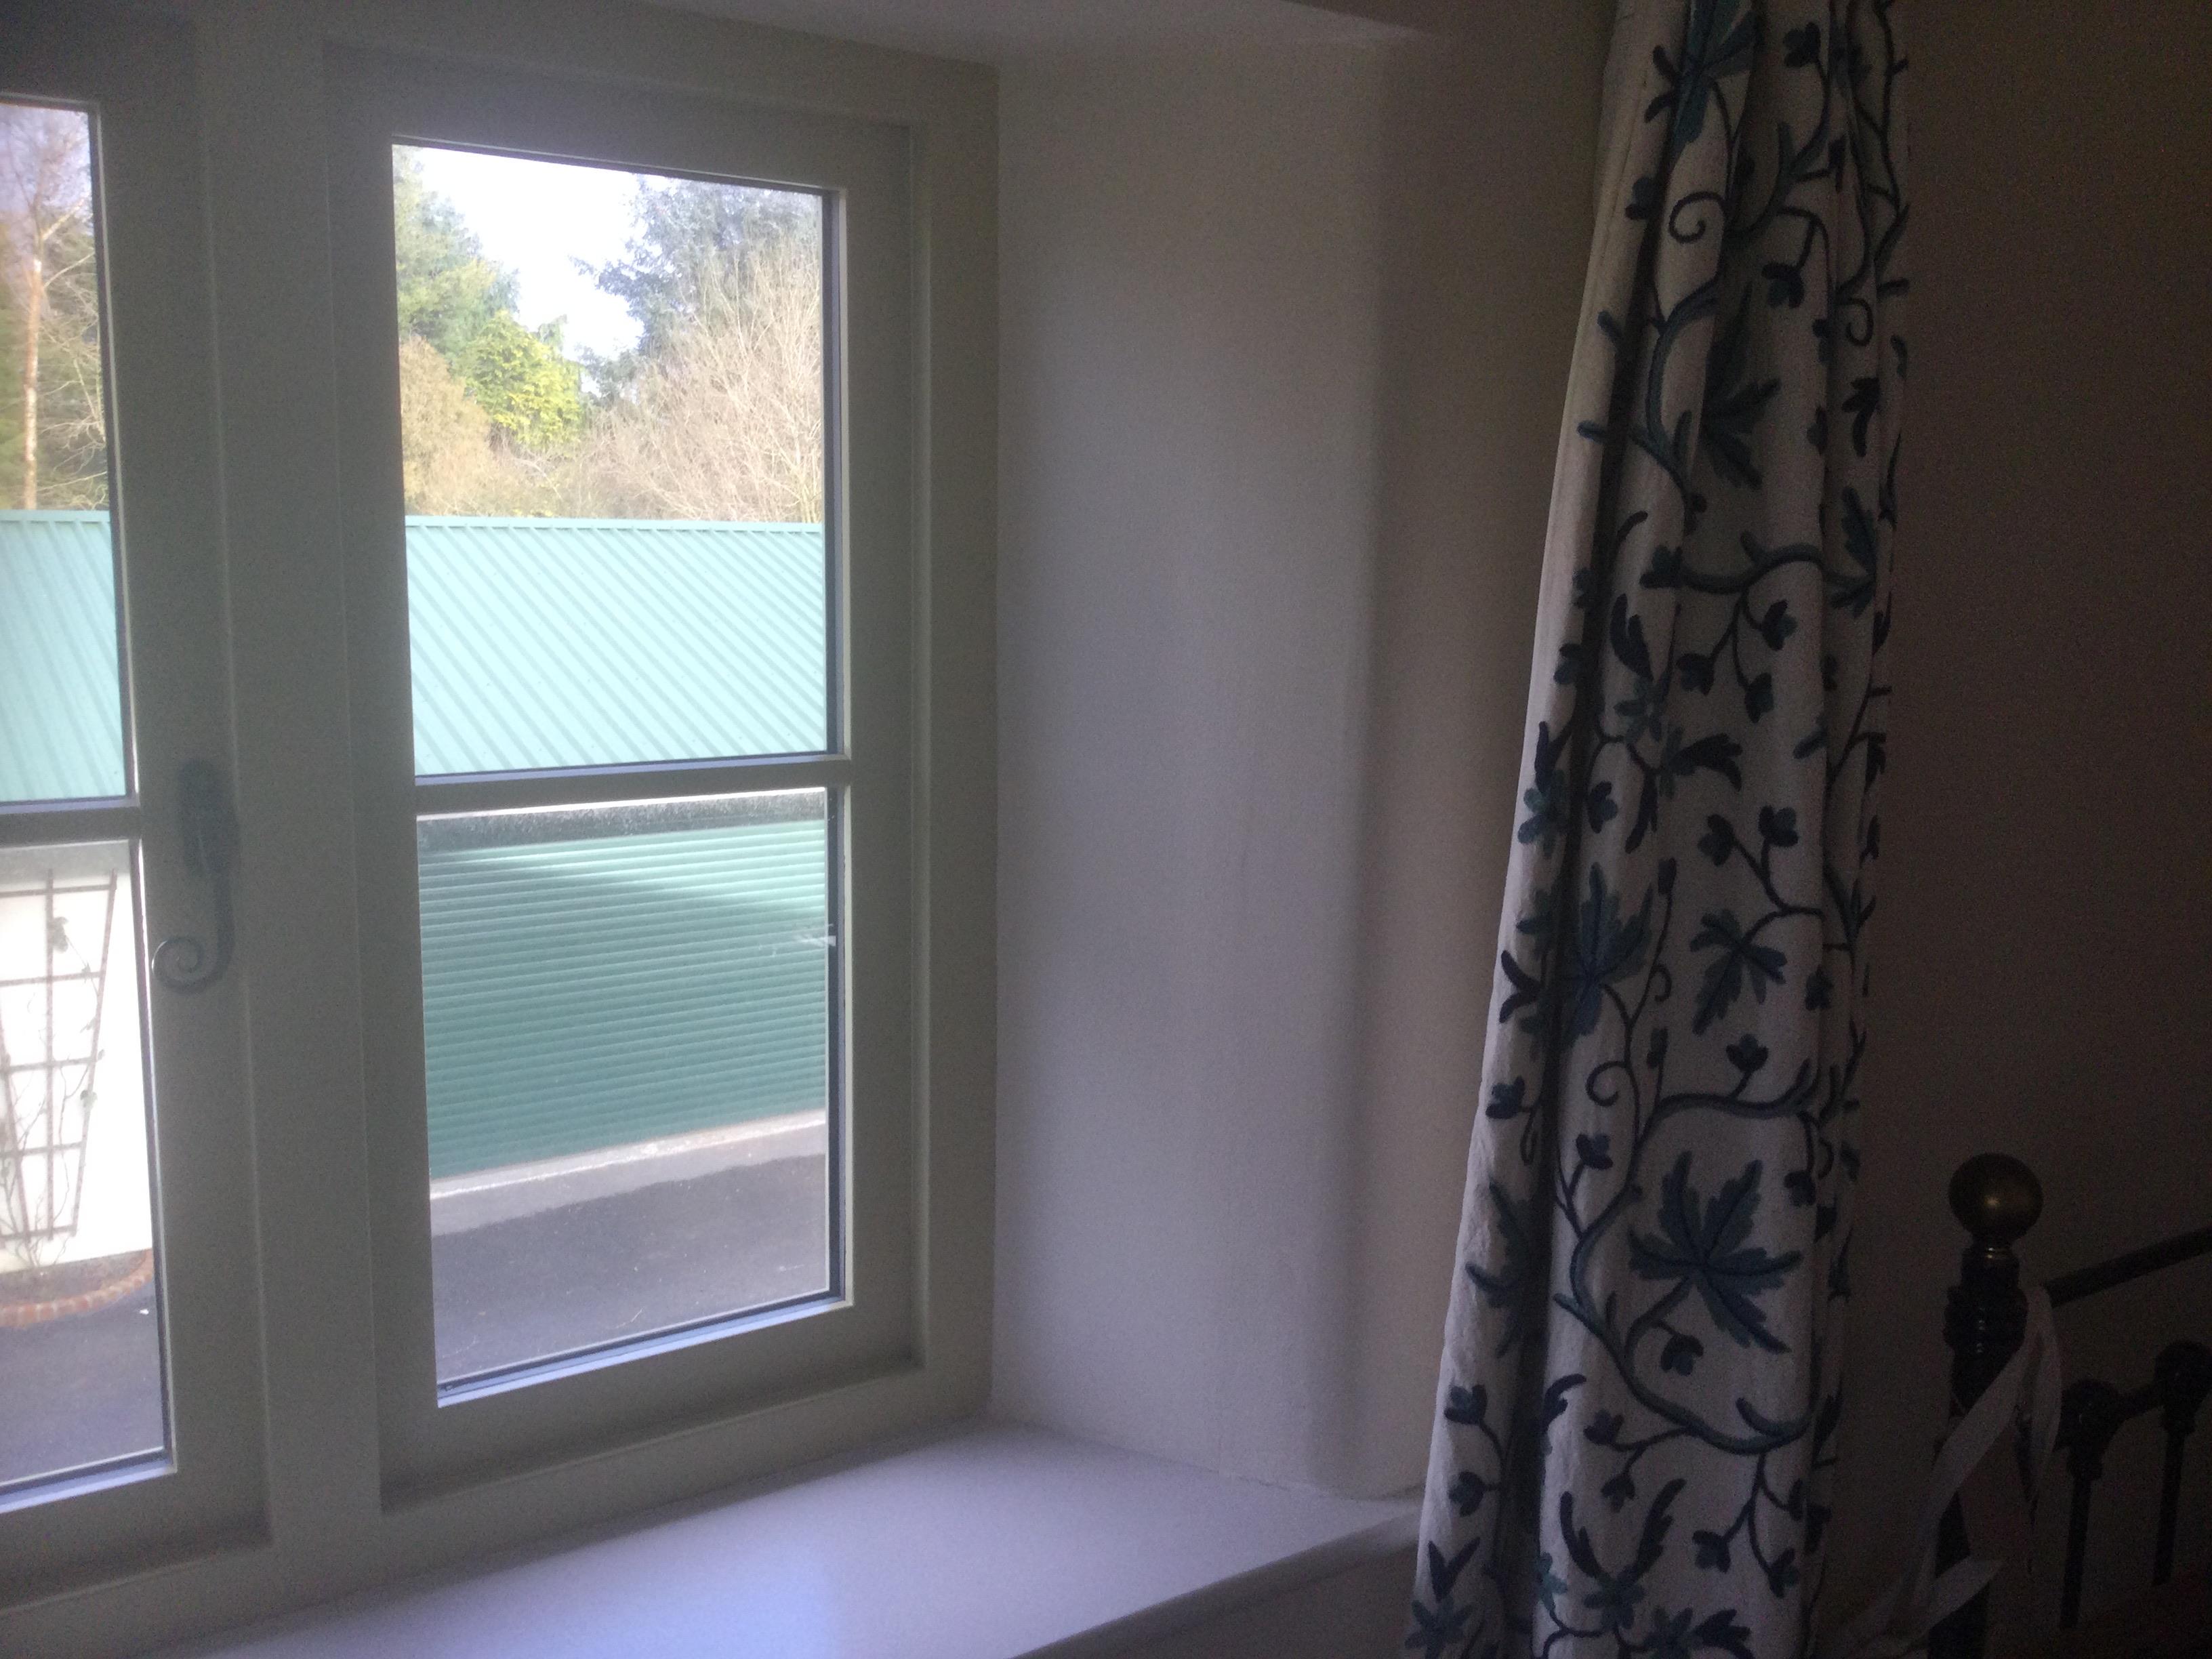
Dont be, that’s what the forum is for. Being a bit OCD, I asked the bricklayer to make my windows openings to a whole brick or half brick as I hate slivers of bricks, the wooden windows were hand made to fit the openings. To show off the windows and ease fitting, also to put the windows in the insulation layer check reveals work well IMO. I cut the blocks inner skin at an angle, fitted angle timbers to window sides and fitted plasterboard screwed to these timbers and plasterboard adhesive to the blocks. The window was foamed to the brickwork before topping up the insulation and fitting sides etc.
 1 point
 -
We’d just like to say a great big thank you !! With all of your kind and generous donations, we can keep BuildHub advert free and continue operating for the benefit of all of the members. Your financial support is gratefully received and we would like to thank you for supporting us in continuing to grow and develop the forum. Financial support is not the only way that you can help us - if you can offer any skills that may assist with the support of the forum, please contact any of the FMG for details about how you can help with forum supporting services. BuildHub and the FMG would like to take this opportunity to say thank you for your ongoing help and support. Without your participation, this forum simply wouldn't exist. Thank you.1 point


.jpg.c21f3ac78c9b7efd90cbdcb312744dc5.thumb.jpg.7adcad4c0e384f5ecd7d56b0618df6e5.jpg)