Leaderboard


Popular Content
Showing content with the highest reputation on 02/06/21 in all areas
-
I have finished crawling round on the roof so my attention turns to finishing off a few bits of fascia, then battening, fire breaks and cladding. I left most of the battening to Jeff while I put in the first few bits of wiring for the (almost Blackpool level of ?) outside lights and made the last cuts in the fascia ends so they meet the soffits nicely. This ended up as several hours of work, making what felt like tiny progress while the battening seemed to fly along. This is the fire break and battening surrounding on of the gable end arch windows. Next job here is to install the insect mesh over the top vents and I'm not looking forward to that much because the mesh is marginally more vicious than the autumn insect population and likes to tie itself into gordian knots. We have had more than our fair share of wind and rain over the last fortnight, so I quickly gave up on the fascia trims because the scaffolding was slippery and I didn't like the idea of gluing plastics when it is likely to be very wet, so I opted to start cladding on the finished battening - it all needs doing! This is the first corner near the front door prior to cutting the excess lengths off. A bit more cladding done. The priority is to get the gables completed, then we can think about getting the scaffolding down because it's at the point where it is hindering almost as much as it is helping. We now have a scaffold tower to finish off the last few jobs when the time comes. It's beginning to feel like a house now. I needed to attend work for a lot of this week but was able to escape when I got a phone call out of the blue from my window supplier. I was in there the previous weekend for something else and they had no news, but by Wendesday my windows were in their yard and they wondered if I would mind awfully taking delivery fairly quickly because they could hardly move. They agreed to my timescale of "Now is a good time" very quickly. Three round trips later and I had 48 pieces of glass and 15 frames. We opted for aluminium framed windows so that we could get away with very thin frame sections as well as having a reasonable performance. They aren't the best performing window on the market, but they are pretty good and the cost difference would never be recovered in efficiency savings. Besides, there are easier and cheaper ways to claw back the "lost" performance should it be required. We elected to store the frames near the apartures they are supposed to fill. The old bed frame and furniture is there to try to get some engagement from my not quite teenage daughter about room layouts and colours. It was partially sucessful. My first attempt at window fitting. I have put in wedges to hold the windows at the right position on the outside of the building and another to stop the frames tipping back so that I can see how the windows are going to fit before I drill holes and get out the expanding foam, in case I need to change anything with my plans. So far, so good... ... Apart from the scaffolding being in the way again. Only 12 more to go.6 points
-
There's so much sensible input here already on this so I'll likely duplicate much of what has already been said, but here are some of the things I've learned. Know your area - by this I mean build somewhere you know already people or know people who know people. We moved regions, away from a network of trades and contacts to somewhere we didn't. None of the trades/contractors knew me and this really made things difficult and time consuming because I had to find people, or as what has happened, do it all myself. If trades know you, that you won't waste their time, you make decisions and stick to them, treat them with respect and you pay on time, they'll come back. If they're busy, don't know you, and don't know if you have the experience to manage them, you're less likely to get them. Design your build to use squares and triangles. A square shape is more space efficient than even a rectangle. Triangles, as in on the roof are well understood, simple and cheap to build. Avoid things like dormer windows etc. Not only do they add complexity, they're more difficult to detail for energy efficiency, for example. Avoid large spans as this requires extra structural design and materials. Keep materials and build method standard. For example, use standard sized windows & door so you can get them off the shelf. Design according to material sizes - 8' x 4' (2440 x 1220 or 2400 x 1200) sheet materials and as close to standard lengths for carcassing timber etc. The easiest place to spend a lot of money is the bling that lots of self-build magazines will try to sell you - high tech stuff, home automation, network cabling, even the type of light fittings. Really consider how much you really need all this stuff as much of it will be obsolete in a rather short period of time. My electrician has, for example, suggested using standard GU fittings for downlighters and using replacable LED bulbs - far cheaper than your LED units (I think there's already lot of discussion about this on this forum). When buying materials, go to the supplier with a large order quantity, this will get you a better discount and potentially reduce your delivery costs. Get multiple quotes and play suppliers off against each other if you can. A minor thing, but over the course of the project which can really help is to phone online trade suppliers. For example, I saved £200 on my framing nailer and received and automatic 20% discount on all fixings from one supplier compared to if I'd bought online from them, all with next day delivery. An alternative option for some purchases is to use your architect or someone else in the trade - this way the supplier thinks they may be in for repeat business and may be more helpful. There's also a couple of items here that I think is the most important, but often overlooked - also contrary to what many people might say! Give yourself time to think things through when you need to. The building schedule can often be very intense and trades, if they come up against an issue, will want an immediate decision on a solution or diffierent way to do something. Don't fall into this trap and instead seek to understand all the implications and take time to think through all the alternatives - but when you make your decision stick with it. Do not be afraid to change your mind and stick to your guns! This is your house and your money. I don't think there is any way you can really know what your house design is going to look and feel like on paper so I personally think you need to give yourself leeway should you feel you need it - if you include this in your plan and design it will save you money. The building trade is notorius for given advice that suits them, not you. They'll almost always tell you that anything you ask, that's different from what they have in mind is going to cost you loads of extra money. This is not born out of truth, more a trade culture in the UK. If something doesn't feel right, stop what's going on, think it through and take a different direction. I've found that having thought something through and then explaing it well to the trades can often overome this problem. Sometimes this may end in a builder or tradesman walking off site, but if that happens you may just be better off anyway. Finally, do as much as you feel you can and want to do.4 points
-
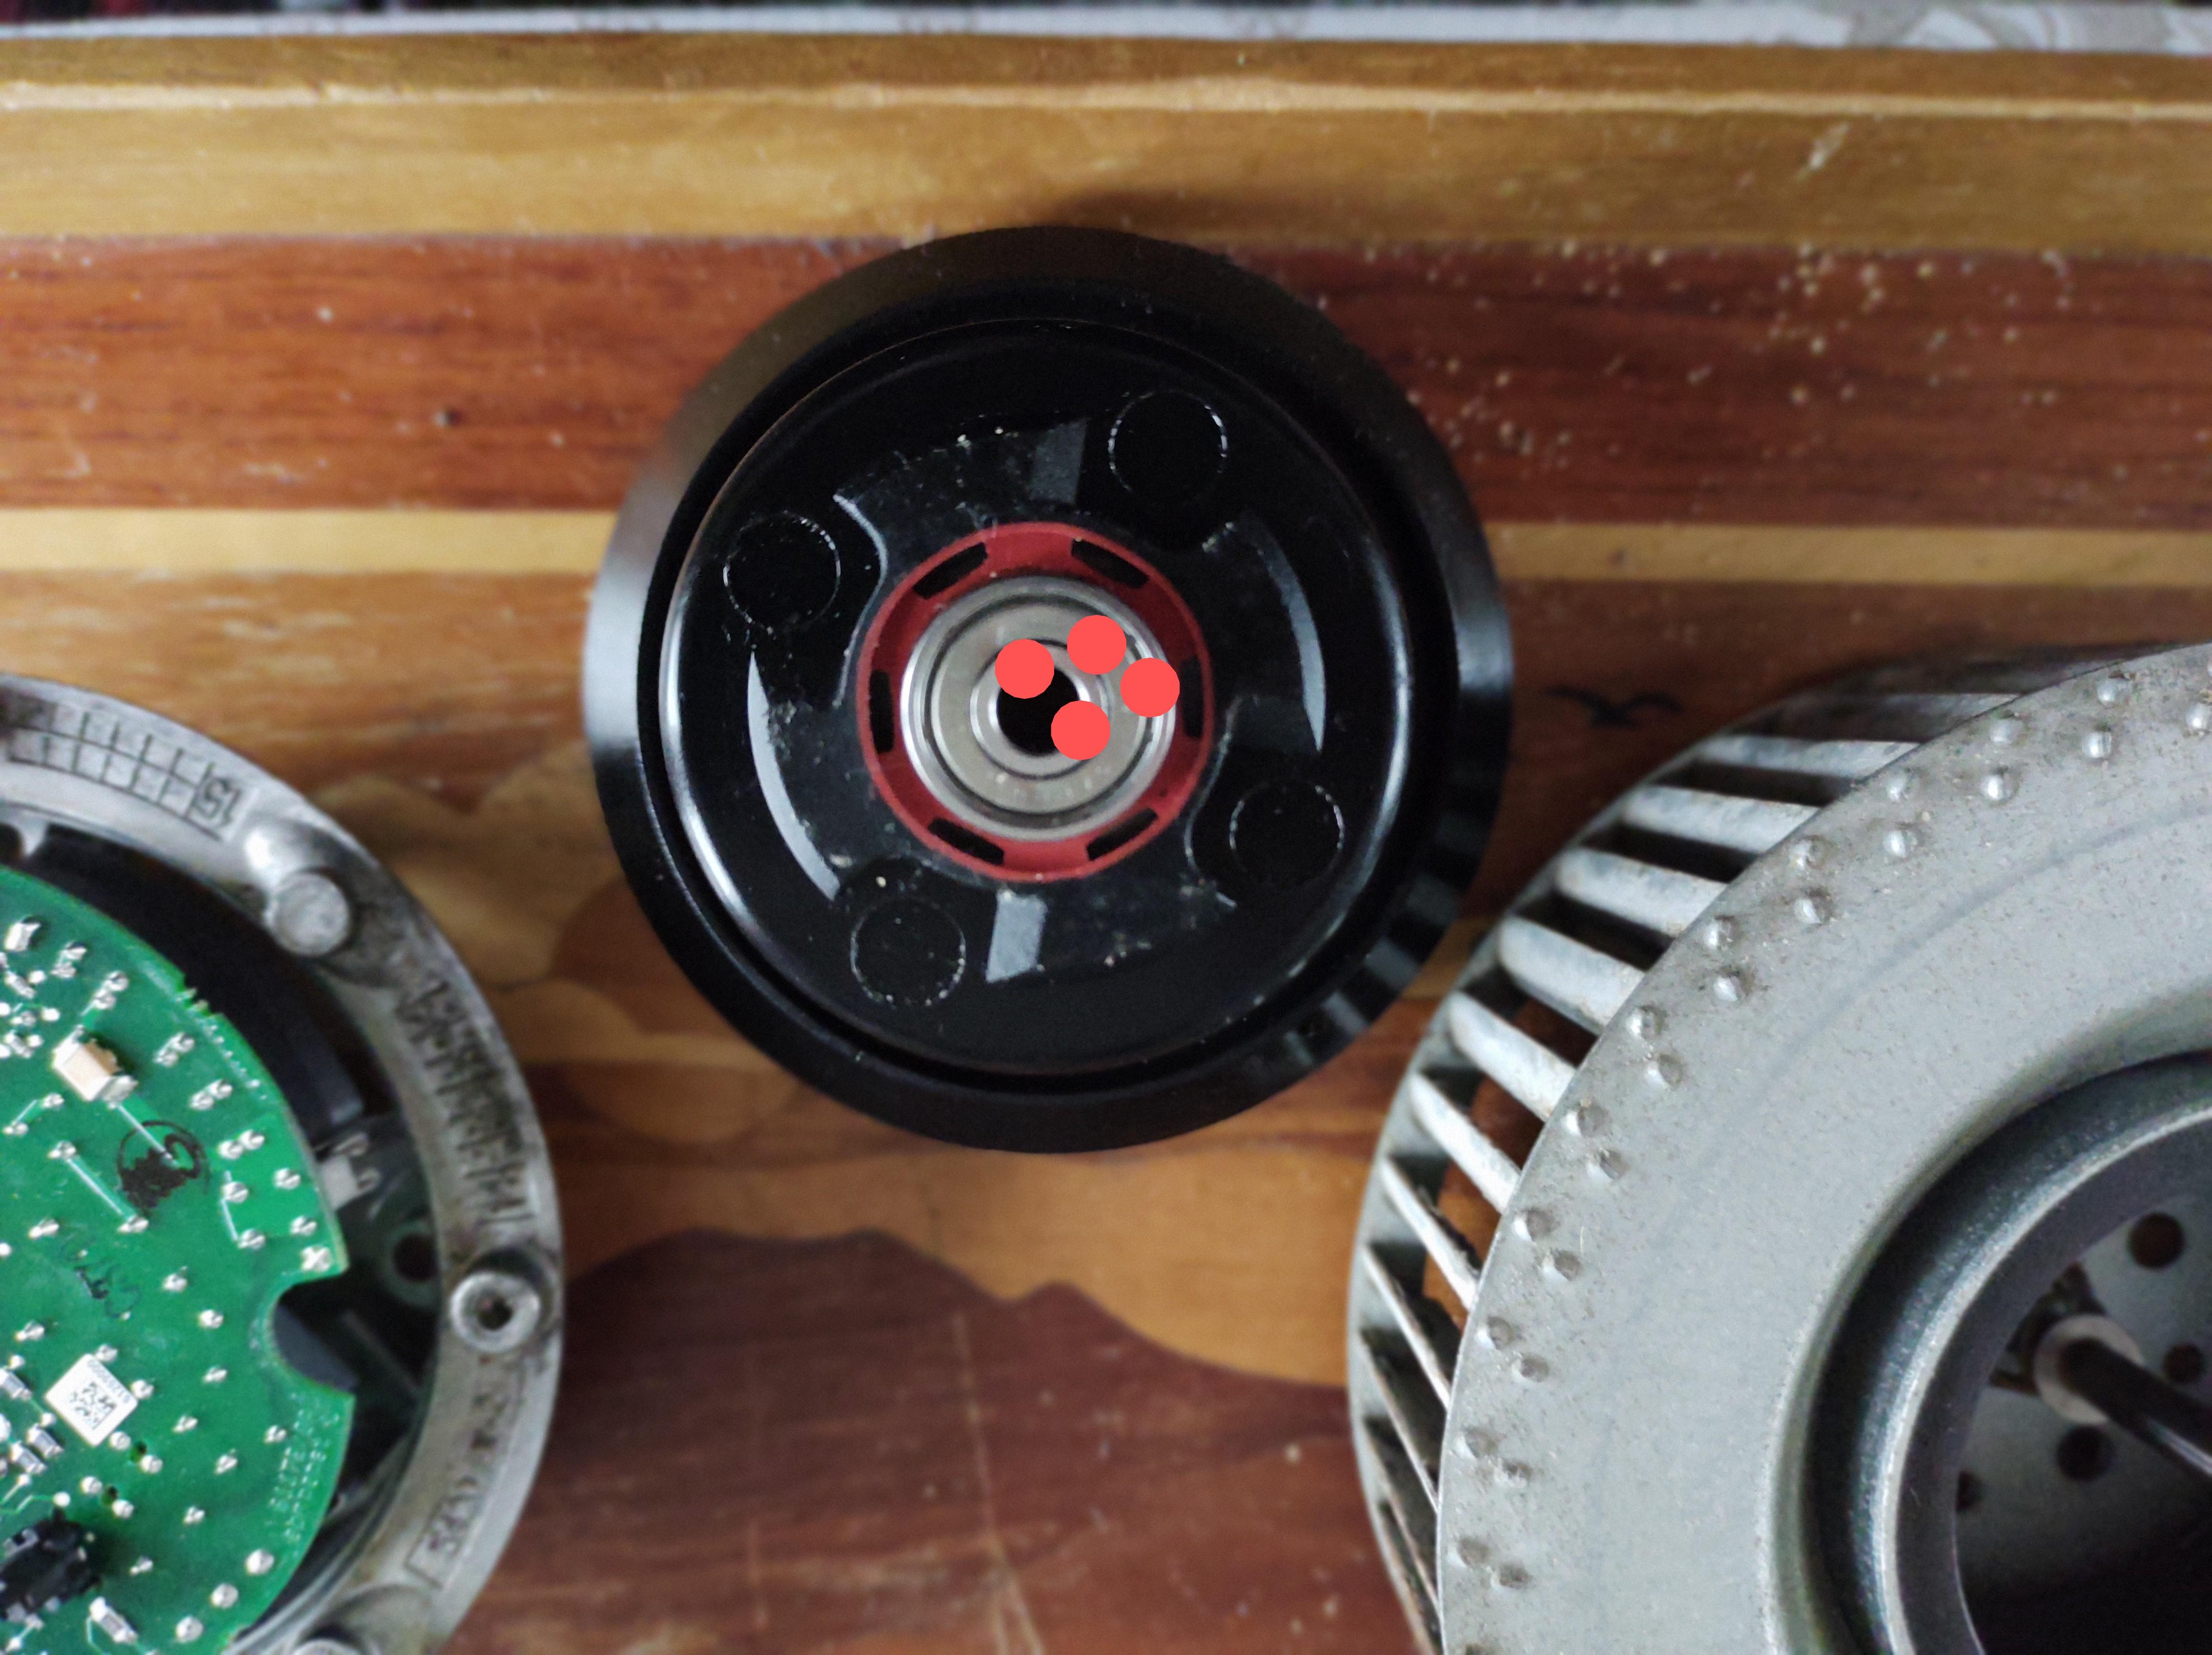
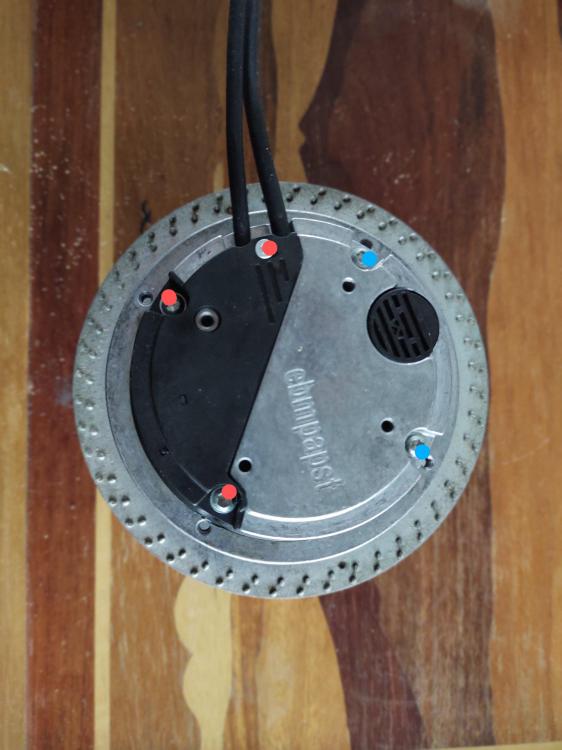
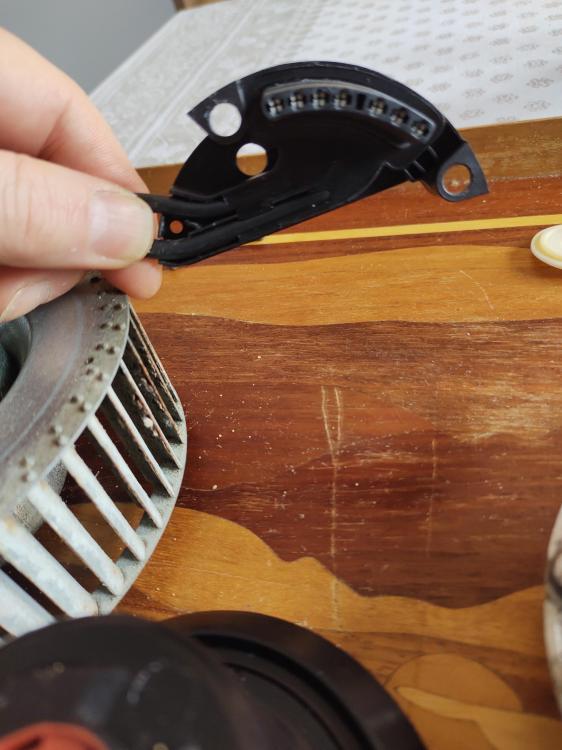
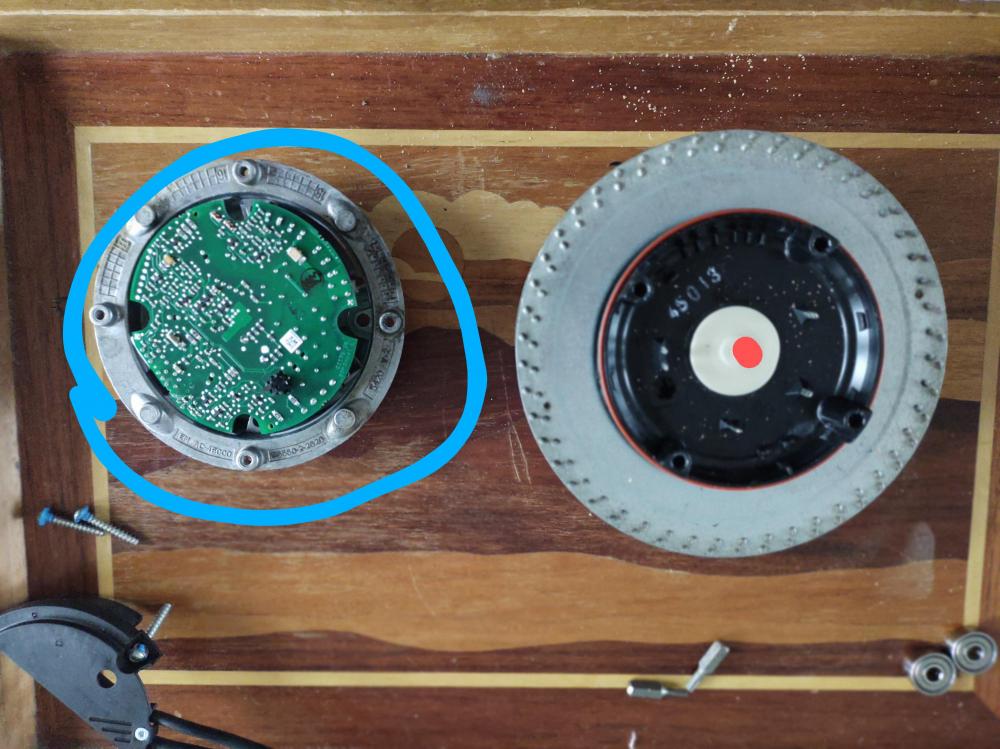
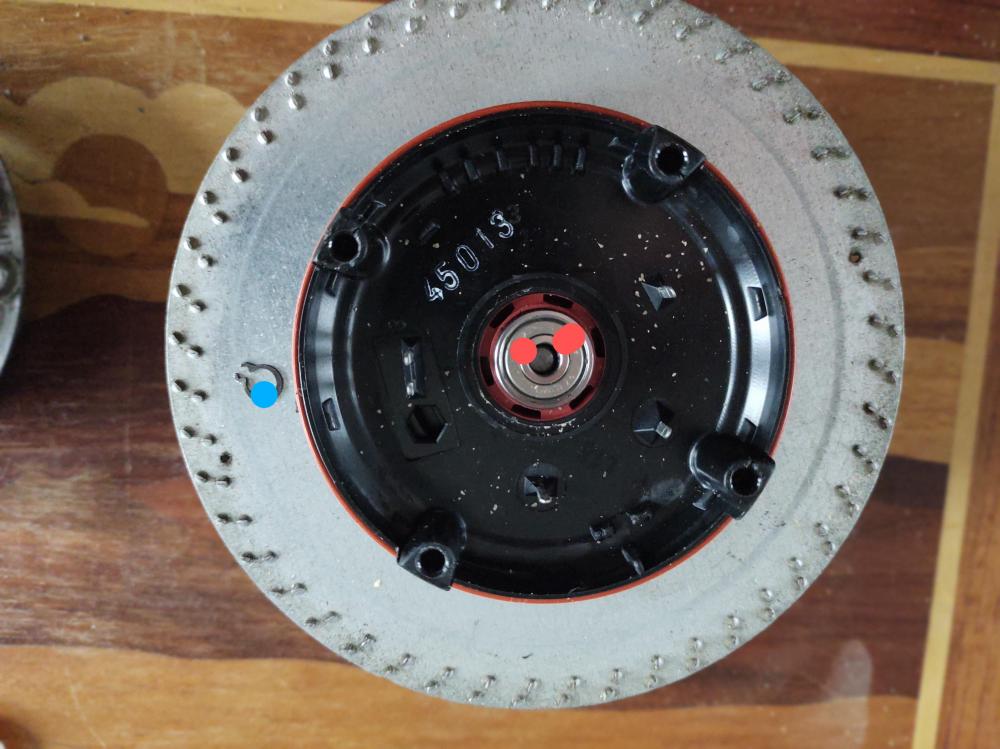
Hi All, Hopefully this will help someone as I could not find anything online. I was about to pull the trigger on a new fan which is really limited as to where you can get them and expensive. A new fan from Vent Axia is £280 I sourced bearings from Amazon for £7. Below is a series of pictures showing the fan in various states of disassembly. To remove the fans from the unit requires a full strip down of the unit unfortunately, this is not difficult just a pain, especially if your unit is in the loft like mine. Picture 1 This shows the fan body from the top, first remove the 3 screws in red, gently pry off this black housing, this houses the contacts so go easy, it does lift off without any resistance. Now remove the other two screws in blue. Picture 2 The contacts mentioned above that you will not want to damage. Picture 3 This show the fan in two main parts, the upper with the circuit board and the body that houses the bearings. You can remove the circuit board but I would advise against it, no reason to unless you think it is faulty. Lift off the white rubber cap (red dot) to reveal the upper bearing. Picture 4 This shows the upper bearing already removed with the retaining clip (blue dot). The clip is really small and a bit fiddly, if you push down on the hub assembly if will give a little space between the clip and bearing, this will allow you to get a plain bladed screwdriver into the clip and spread it slightly to remove it. Once the clip is off just lift the whole hub assembly out, it is not stuck or tight but held in magnetically so just pull up. ;Picture 5 This shows the underside of the hub with the bearing already removed, the bearings are easily remove as they are not tight inside the hub, just gently tap them using a long screwdriver from inside the spindle shaft hole, you will see them move out. Picture 6 This just shows a spring with a flat washer on top of it, just in case it drops out when you are lifting the hub etc, just leave it in place. The blue dot shows the magnet Re-assembly is just the reverse when you put the new bearings in. The bearings are marked 626-2Z, these are the one I got from Amazon. https://www.amazon.co.uk/gp/product/B07FMV2ZHR/ref=ppx_yo_dt_b_asin_title_o00_s00?ie=UTF8&psc=1 Hope this is useful to someone.

 3 points
 -
Have a friend, or partner who is just as engaged on the build as you are. Self-build requires relentless attention to detail : and - for us - over four years becomes very wearing. Given the points made by @nod and @PeterW above (skill set and DIY labour as much as possible) there will always be something to distract from focus on cost : its what Toolstation, Amazon and Screwfix depend on. I just need [... ] click > click >buy. Shoo shoo, could have got it cheaper at [...] If you just have a mate whose job it is to look at prices and availability, it'll repay the effort over time.3 points
-
In a good way If you have to be in by a certain unrealistic date It will cost If you can be relaxed a about things being done You will get a better finish and more cost effective Builders are in the same position as all of us They use who ever is available2 points
-
Speed =££££££2 points
-
You're right - and embarassingly enough I hadn't noticed it (yet). It's one of the very few slip ups stemming from someone else helping. All the others have a gap! At least it won't be hard to put right with a correctly set up circular saw.2 points
-
Start on the drawing board. Keep the design square and as small as practicable. Most semi detached houses are less than 100m2 and people survive just fine. We ended up at about 180m2 but 150m2 wouldn't have made much difference. I spent a lot of time designing to make it super simple to install services etc. The trouble was that the benefit of this all seemed to be soaked up by trades finishing the job by Thursday and taking Friday off. There was no reduction in price as people seem to quote by looking at the footprint area and multiplying it by a figure. Mind you it's our builder who probably missed out here as we were a fixed price contract.2 points
-
We both worked full time jobs while we were building But also worked lots of hours on the build I haven’t included any borrowing or extra accommodation Because there wasn’t any You have to enjoy the process to put the hours in I brought a plumber friend in to fit The boiler and an electrician to test and wire the mains Both agreed that the time I’d spent plumbing and wiring I could have got a job in Aldi and paid them Slowwwww but enjoyable We’ve around a 100 down lights Saxby £7 each Really easy to fit for those with fat fingers ?2 points
-
Or any other build system that can give you a fixed cost for the same thing which meets the budget ?2 points
-
Good progress. I could be wrong as I've never done it. But for the vertical battening above the arch window I think there should be a gap to allow and water to free drain down the sides of the windows. Just now as the vertical battens are tight up against the window fire break if water gets in there it can't get out. Sure this is what my render supplier told me and what I'd read on here somewhere too. Worth double checking I think.2 points
-
Go with a timberframe manufacturer who will deliver a guaranteed airtight structure, you will have this at a fixed cost. Then the only variation will be the fit out, no surprises that your build method suddenly isn’t as good as you wanted with expensive additional stuff needed.2 points
-
We came in at 820m2 and expect to be under 1000m2 on the next one While we kept professional fees to a minimum Doing as much of the labour yourself is the key Even something like loading plasterboards in will cost you £300 plus on a average house2 points
-
I left the site in November 2019 with the two trees felled, and we had decided that the design and approved planning application were not quote to our liking, so we took the decision to put in a variation of condition which went in for consideration in December 2019?. Little did we know what this would mean to progress; as we are building very much at the DIY end of the self build spectrum, and not living close to site, by the time we had the go-ahead we were in Lockdown 1.0 and unable to get to site until July 2020. But before that, I'd already started the applications to install water and electricity, so in the first few months of 2020, I had lined up the water installation and had most of the things in place for the electricity connection. The water was due to go in at the end of March, and as you can expect, this was postponed. However, by keeping in touch with my local ground worker, the two neighbours and hte water and electricity folks, we were able to get things lined up to get both connected in the same week in July. Also, our local ground worker convinced us to push an access straight from the lane down to where we were building - I recommend listening to the experienced ? As well as getting things in place for our return to site, we took the opportunity to source a caravan that we could put onsite in order to make it easier to be able to travel straight to site and not have to rely on being able to use the local TravelLodge - little did we know how useful that was going to be. So, in June and early July a couple of short preparatory trips moving the caravan to site and setting up, connecting the water standing pipe, installing meter boxes, then in July - October, we made several trips to clear and burn vegetation, feed and water the water and electricity teams, have meals with our "to be" neighbours, take delivery of a septic tank dig a lot of holes lay drainage pipes fit a septic tank fill holes with stone fill holes with spoil and finally start digging a very large foundation hole for the insulated raft foundation 20201012_094541.mp4 And then we hit Lockdown 2.0 - another month of enforced "stay away from site", then in early December, I returned for two short visits to finish off concreting in the drainage pipes that will end up feeding through the insulated raft. And so we find ourselves in Lockdown 3.0 during which we are sorting out re-mortgaging to a lower fixed interest rate, which we always knew we would do, but we had hoped to be a lot further along ? choosing insulated raft supplier determining steel re-inforcement requirements and, due to delays, considering moving slightly along the self build spectrum towards more use of subcontractors ? And so as I write this with the Calcutta Cup on in the background wondering how long it will be before the travel restrictions are lifted, but planning for a late March trip West.1 point
-
We use a bit of 4x4 timber cut 2 inches tall with a strip of felt glued on the sides. Placed on the floor, it can be moved for easy cleaning and is very unobtrusive. Also suggest looking at beanbag door stops too.1 point
-
The fact that the upstairs rads don't come on often is a good sign that you don't need much heat upstairs. So start progressively reducing the temperature from the ASHP and see how it goes. While it is cold like now is the best time to experiment.1 point
-
Have a good nosey at mass housing developments near you. The build method they are using is likely to be the cheapest and well known to local trades. Copy everything from the foundation to the windows to the roof covering and you won't go far wrong. Avoid buying strange and exotic materials that can't be picked up from your builders merchants. The ability to pick up a few more joists from if you break one or drop back a few unused roof tiles for a refund will save money and heaps of time.1 point
-
Thanks nod.1 point
-
Yes it is Tyroleon finish As above The Baton to form the bell cast is old school Better to fit the baton and sit a bell cast bead on top Then remove the baton the following day Waterproofer in the top coat is a bad idea as the Tyrolean will run Amit the waterproofer from the top coat and add a spade of hydrated lime This will add suction and give the Tyrolean something to grip onto1 point
-
https://www.knaufinsulation.co.uk/products/glass-mineral-wool/earthwool-dritherm-32-ultimate "Knauf Insulation DriTherm 32 Cavity Slabs are non-combustible, Glass Mineral Wool cavity wall insulation slabs. "1 point
-
Been playing a bit with the defrost settings on mine- the start of the week was socked-in-cloud wet and around +2c for a few days. Probably about as bad as it gets... But i was able to reduce the duration and end temp a fair bit and still get a good defrost and clearance of water. The steamy puff is much reduced.1 point
-
You can also either put a stick-on rubber nipple or two on the point where it connects with door. eg https://www.amazon.co.uk/gp/product/6040143746/ or a buffered door stop if it could mount on the plinth. These are spring buffered and magnetic so they hold it open until you jerk the door. I have them on all my commonly used doors. You can calibrate the strength by putting it closer to the hinge. https://www.amazon.co.uk/gp/product/B07CLWN3CS/ or a sleeve of some sort on the handle of the latch, as you say. Thoughts are the sponge tape you get for table tennis bats or tennis rackets, or perhaps even a piece of cable heat-shrink. Or can you just make a door stop? eg material sown around one of your leftover bricks.1 point
-
Shop around for your Compriband as it is very expensive. The genuine stuff is sadly the best. I have bought from ebay in the past. If is is warm out, keep it in the fridge.1 point
-
A soft floor-fitted door stop? https://www.screwfix.com/c/security-ironmongery/door-stops/cat8403201 point
-
Your dewpoint temperature is now at 3°C, your outdoor conditions are 6°C and 81% RH, so a while to go.1 point
-
Pull out larders are a problem just waiting to happen, they get overloaded and door misalignment happens as soon as you load them. Avoid.1 point
-
In a good way or a bad way? The company I work for undertakes ICF shells on a fixed fee basis and because of the market, delivering on schedule is the only way to be profitable. Day rate might seem a good option but all delays will be paid for, rain days, material wastage, broken plant etc etc. A well specified job for us is a dream to work on, it's our responsibility to minimise wastage, supply the kit, wear a wetsuit and the build quality. We take those risks on. I think that if you are in a hurry, picking some major phases to be undertaken by contractors could save you money in the long run. If time isn't a factor, take it on yourself. And only day rate trusted, referenced individuals. A block layer on £2 per block can earn £300+ per day or be on day rate, £150, and take twice as long. Same amount of money but how much is the time worth to you? Blockies around me do day rate in winter and price in summer....they're not daft!1 point
-
Not really, they draw in lots of air, not sunshine. So while it may feel, to a person, hot in the sun and cold in the shade, the air is at the same temperature.1 point
-
Ours was 280m2 over two floors Your right in pointing out that a little extra m2 doesn’t make much difference Your fees and services charges are pretty much the same regardless The problem with quotes for a one off build using individual trades They don’t base the quote on anything other than how busy they are at that moment Most haven’t heard of Spons Let alone refer to it as a guide My wife wants me to get a company in to supply and fit the windows and frames this time But the prices quoted for fitting can be ridiculous We had a glass lantern from Eurocell The price quoted for fitting was £1300 Ridiculous Everybody has to eat It took myself and my wife 3 hours to fit and so on and so on Every trade that visits a self build thinks we have money to burn The prices that are quoted have no baring on site prices1 point
-
you started by talking about building one -- now you are looking at a prefab --so you are paying for someone to make it and its more like a cave than an office they are really somewhere you go to sleep and don,t spend time inside no toilet no sink or water --just a wooden cave with minature window at one end If 5m x 3m is big enough --then at a rough guess to make same in sips panels It would half of that or less -find a nice s/h double glazed door and maybe a s/h small bifold or patio window set and your done wrap sips then add finish of choice - corrugated colour tin or felt roof and wood cladding for sides It will not be 10k lt will about half or less and some simple graft1 point
-
@nod that's good going but difficult to reproduce everywhere and without a very good network. If you're borrowing money, time is a serious factor. Interest payments and time between draw downs can make a huge difference to your bottom line. The guys who we come across that are on site a stupid amount of time and involved throughout, every screw, do get the "best" return providing the admin is done. Others, seem to like a particular phase but then lose interest, change the plan, tinker without being immediately useful, see their budget creep. A personal shocker is spotlights. We fitted 185 downlights in a place, the specified lights were £50 ish each. He'll of a lot to spend on downlights versus a pendant or lower "quality" downlight.1 point
-
It gives you a baseline. When the condensation returns you can compare the readings and see what's different - higher RH? Lower internal temp? Lower external temp?1 point
-
Firstly, being your own project manager can increase the costs if you’re not experienced. As @TonyT said, get it all on paper, work through it again and again, every socket and every switch, the location of taps and doors and then move nothing. It isn’t hard to do, volume housebuilders do it all the time. It just takes the ability to say “No” when your other half wants to change something mid build. And shop around. Buy in the sales, get showroom kitchens, and pick up a bargain or two but make sure it’s all there when you do..! And finally, keep it standard. Your 650mm wide worktops may look nice with that “designer overhang” but was it really worth the £500 extra..?? Do you need shadow gaps, or bespoke architraves ..?? Was that £1000 lighting controller really needed..?? Spend the extra money on the things you touch such as door handles and taps, that is where an extra £20 a door makes a difference.1 point
-
I've used this in the past https://shop.vitcas.com/vitcas-heatproof-mortar-10kg.html and they'll probably do everything you need https://shop.vitcas.com/products/heat-resistant-materials.html Or you could try this stuff too https://www.toolstation.com/fire-cement/p38992?store=BK&utm_source=googleshopping&utm_medium=feed&utm_campaign=googleshoppingfeed&gclid=CjwKCAiA9vOABhBfEiwATCi7GPGty09XagmrIofU8n7Gb4XofRaM92-FlJ-29R3vL9ubhYcVIk1eehoCAVcQAvD_BwE You could then try spraying the bricks with a high temp rattle can of spray paint1 point
-
I’d happily chuck any mortar in those holes. Think about what’s already there... has that been “approved” for use... worst case is it dries out and falls out again. I wouldn’t paint it, leave it as is.. it has character. If you really want to paint it, I’d use some garage floor paint. Hardy stuff.1 point
-
The long thermal time constant is down to using insulation with a long decrement delay, generally more dense materials like wood fibre, celulose, mineral wool etc will have a longer decrement delay than lightweight materials like kingspan etc. There are various on line tools you can use to look up the themal time constant of different wall build ups. Mine has a time lag of something line 13 hours. I recall someone modeling a wall on here with the same insulation U value but kingspan type insulation and it had a thermal log of just a few hours.1 point
-
We’re getting there! flooring, kitchen and stairs, just bathrooms to go. It’s great to see it all taking shape as the finishing jobs get done. Not that it’s all gone to plan. The first job we tackled was to get the floor down. We wanted to get it done before installing the kitchen rather than having to work around the units. As the kitchen is part of the open plan living area on the first floor it meant doing the whole area some 70m2. It’s a lot of flooring and we needed something that was easy care and tough. After a fair bit of looking at the options, we opted for lose lay vinyl. There seem to be three vinyl options, adhesive plank, click and loose lay. I didn’t fancy sticking down such a large area and we have a couple of floor access panels that I wanted to keep access to. The click version is not dimensionally stable and requires an expansion gap and it’s not designed to have heavy objects such a kitchen units on it. Loose lay ticked the boxes, dimensionally stable, OK with heavy objects and as it turns out the simplest to lay. Karndean and Amtico both have loose lay options but they come in at £30-£40 per square metre. By lucky chance we found a commercial flooring supplier Quadrant who have a loose lay flooring system Salto with a spec pretty much identical to Amtico Access but at £22 per square meter. The planks get laid onto a three metre grid of tackifier, a non setting glue that just stops the tiles from sliding rather than actually gluing them down. If a plank gets damaged you can simply lift it out and replace it. Laying the floor could not have been simpler. In a couple of places we found that the tackifier was just not enough and we ended up fixing one or two end of row planks with a patch contact adhesive. With the floor down we could then start on the kitchen. With no stairs in place we used our electric winch to get the cabinets and appliances to the first floor. We bought the winch to get the 80kg MVHR unit onto the second floor and it has been invaluable in getting flooring, doors and many other heavy bits safely upstairs. With the units all upstairs we made a start putting the kitchen together. We had gone through a couple of design iterations and of course the one we settled on meant that the electrical sockets we put in when plaster boarding required moving to meet the 300mm minimum distance requirement. It’s easily fixed with a splash back so not a real problem. Our appliances are built in, a first for us. So we started out by getting the fridge freezer into its tall unit. There certainly is not much clearance, having carefully got the fridge correctly located I discovered I could not fit the hinges with the fridge in situ, so had to drag it out of the unit. Unit doors fitted and fridge shoe horned back into the unit. You then have to connect the fridge doors to the unit door, a bit fiddly but it all working nicely. Pushed the unit into place only to find the lead was a couple of centre metres short of the spur socket installed for it. Dragged the fridge out, made another hole in the carcase and re-routed the cabling, put fridge back in unit, push unit back into place only to remember the unit had not been secured to the wall after the second cable hole had been made…needless to say there was a bit of cursing as the fridge was dragged out again! A least if we ever have to fit another we’ll know how to set about it. The kitchen has a long set of linear units, which should have been a doddle to install against a nice straight wall. Unfortunately the wall they were getting installed against was the one that didn’t get braced properly on the final pour. Needless to say the units all required spacing out from the wall to form a line. A task not made simpler by the design which has two rows of bridging units over the hob. These are mounted on a wood frame constructed to fill the gap, which of course I cut before remembering the wall was not true. It didn’t take much work to re-jig it thank goodness. We also had to construct the shelving unit as this was a bespoke piece, to make the position of the boiler housing correct. With the linear section of the kitchen built, it was time to build the island. As it turned out this was a much more straight forward proposition as it didn’t involve and dodgy walls. It did involve cutting down a unit by half and cutting the composite worktop. We discounted doing an under-mount sink as we were cutting the worktop and any router chatter would ruin the worktop look. In any event the island went together nicely and the kitchen looks the part. One by-product of having the kitchen done was the completion of the electrical circuits. We duly called back in our electrician to do the final checks. With a couple of minor changes it was all passed. A significant mile stone to pass regarding building controls. Our electrician has been brilliant and supported our work through the build. Not something that all electricians are prepared to do and we were fortunate to find such a good one. It’s been cold and despite the high level of insulation in the house we were getting uncomfortably cool and decided it was time to get the gas boiler connected. We calculated our structure requires about 68w/degree input so very minimal heating should be required, making heat pumps not cost or energy efficient, hence the gas boiler. The boiler feeds two towel rails, no radiators. All the pipes had been put in place long ago before plastering and painting. A bit of a risk but we pressure tested everything before we put the plaster board up. When we finally got round to filling the system and pressurising it we found we had a leak and water was running down behind a radiator. Careful removal of plaster board revealed the cause, I had put a plaster board screw straight through the pipe! With the damaged pipe cut out and fixed, plasterboard and plaster re-done. I put the radiator back up and pressurised the system again only to find another leak. This one took a little longer to find. Again it turned out to be pipe damage, this time on the other radiator, and was one of the radiator mounting screws. Not impressive and something we’ll conveniently forget. At this point the system was holding pressure and all looked good, time to call in a gas safe man to commission the boiler. Called a couple of local gas fitters only to discover they were not prepared to commission a boiler they had not installed. Tried “check a trade” and one of the gas fitters replied saying he wanted to see the installation before taking the job on which is fair enough. Well, he turned up looked at the installation and said he was prepared to do the commissioning, he also pointed out that pipes within 1M of the boiler should be copper and not push fit fittings. We’ve been reciting building regs in our sleep since starting this project and had completely missed this requirement. We had done the gas pipe in copper of course, but why the water pipes? Still no point in arguing….so out comes the carefully installed kitchen cupboard and pipes replaced. Pressurised the system and guess what a leak, this time in a push fit with the new copper pipe. The pipe had caught the o-ring and cut it in two. Easily fixed but none the less annoying when you can’t see any benefit from changing the last meter of pipe to copper. All fixed time to call the gas man in, only to discover his colleague had a covid contact and they were all waiting on test results. Two weeks elapsed before he could come back and the boiler was commissioned at last. Bliss watching the room thermometer slowly creep from 9C to 18C. It certainly makes turning up on site a lot more welcoming. Last but not least we got our stairs in. We had bought the stairs from Fontanot last year and had agreed that the manufacturer would store them until we could take delivery. So they had been sitting in packing crates in Italy since last June and we didn’t get them delivered until October. They were well packed and all we did at the time was a superficial check of the contents, no damage, all present and correct. The stairs are modular and very minimalist, they give the impression of floating in air. Each stair tread support is connected to the next with an M20 bolt through the steel tread supports and spacing shims. It gets built from the top, so you start by installing the head bracket, then each tread until you get to the bottom step where another bracket secures the foot. On the ground floor this is fine, on the first to second floor it isn’t as the stairs don’t terminate on a horizontal floor. The manufactures representative had been on site so was well aware of this, the drawings also showed this but the stair kit shipped was identical to the lower stair. We contacted the supplier who was very responsive and would get back to me with a solution. Time ticked by with no word, so we contacted them again. They rather sheepishly admitted they had no “stock” solution and would have to make up a special bracket. Time ticked by again and we contacted them for progress. What they came back with was not elegant to say the least and would have spoilt the line of the stairs which are a feature of the build. We took a look at alternatives and realised that modifying one of the standard head brackets and mounting it inverted would provide a much better looking solution. New head bracket ordered from Italy along with a tread support. The tread support was modified to bolt directly to the head bracket. Progress at last. Modified bits arrived and unpacked, modifications just perfect, but they were the wrong colour...doh! So we are not out of the woods yet. It will get resolved just it is proving a rather painful process. Back to installing the ground floor stair. Working from the top, the steps adding one at a time using hand rails rods to maintain positioning. The bolts get torqued to 140nm, even so the stairs moved around rather worryingly. Every third step we put a wooden prop to support the construction. By the time you get the bottom step there is a LOT of weight in the structure and it did not feel at all firm. The bottom tread support bolts in to the floor. In our case this is an insulated concrete raft, which is fine as it is strong and plenty deep enough. However it does have a lot of re-enforcing rod, needless to say we found it on two of the four holes. Drilling through with a masonry drill should be possible, but we didn’t manage it and ended up ruining two good quality 12mm HSS bits to get through it. I’m sure there are better ways to do it, over an hour per hole. At last we could bolt down the bottom step. With all the steps secured we left the props in and installed the had rails and four stabiliser brackets. With some trepidation the supports were removed and a tentative test at climbing them was made. They were solid as a rock! Result.1 point
-
You will still end up with a 300mm facia trim the 200x50 down to 100 at the end. So you will have 100 timber 18 osb 150 insulation 18 osb1 point
-
Thanks, we've benefited immensely from the build hub ourselves, don't think we would have got this far without all the help and advice members have provided.1 point
-
Saw @PeterW had replied earlier and didn’t need to anything further ?1 point
-
In the summer of 2020, having no building or home improvement experience to my name I decided to do some home improvements. With a friends son I put in some new garden fencing, repointed the stone driveway and refurbished the woodwork of the garden bench and table. Emboldend by these accomplishments I felt ready for a much bigger challenge; the construction of a building at the bottom of the garden to provide me with a workshop, gymnasium and bike storage facility. This to be done with my own hands and those of my friends son! There were 3 obstacles in the way - 2 trees and my lack of knowledge / experience. One of the trees was a large Bay leaf tree, located where I wanted to build and the other a more substantial Ash tree located next to where the building foundations would be. to be continued!1 point
-
Yes you can. From the government guidance: Flooring materials (except carpets and carpet tiles) https://www.gov.uk/guidance/goods-and-services-you-can-claim-for-under-the-vat-diy-scheme1 point
-
PS. Never pay VAT on labour as you cannot claim it back from HMRC. If HMRC spot the mistake they will refer you back to the company and good luck getting it back from them. There are exceptions: Consultants like Architects - their services are standard rated. You have to pay VAT and can't reclaim it either. Likewise tool hire 8s standard rated and can't be reclaimed.1 point
-
I've finally got around to starting this blog. I'm hoping that it'll be easily updated and I'll provide lots of good pictures and info...we'll see how that goes. I'm at the point now where we have just taken our first big delivery, which is our insulated foundation system from Kore, this morning. So albeit, this process of building a house has been ongoing for some time, it has just become real that we are at the beginning of the build phase, which is very exciting. Some light background info - I've always wanted to build a house for the last 5-10 years, but it was a distant dream and wasn't quite sure how feasible it would be. I grew up in a rural house, my parents bought in 1983, modernised and updated over the years. It was a great childhood and spent many hours in the fields and in our garden, even just cutting the grass was fun (1 acre and a ride on mower). We sold that when I was 21 and ever since I've wanted to return to that life. I have two young kids of my own now and hence the want to return to the countryside to give them what I had was strong. I was always keen on building, swmbo, wasn't as such. So we searched and searched, but mostly the houses we could find that suited our needs were out of league (price!) and even if they were to be in our league there were things we would change or in the end it would be expensive to run. And hence that search helped my other half make the realisation that self build was our only option. My dad died in 2017 after a long illness with Dementia, a relief for him and for everyone else involved. We were very close and I took care of him day in and out, until he was in care. He was an engineer and had owned his own business since I was a child, albeit he lived a pretty simple life and was happy being at home in the garden he made and house he had renovated. Riding around on the ride on mower enjoying a quiet life...and now I guess that's exactly where I want to be. His passing left us with a little inheritance which has allowed this dream of self building to become a reality, I'm very thankful for this. I know it is something he would have been very excited to be part of and watch us do. So after messing around since 2017 and not being able to negotiate a plot or find one that was suitable (there's a lengthy thread on this!) I'd finally identified 4 acres in July 2019. It took a bit of time ( I had to confirm services and remove an Agricultural tie) but completed purchase in Jan 2020. I'll not cover the planning process in detail, but the plot had legacy planning permission which was 24 years old, but at that time the development had commenced and hence it was a straightforward change and submission of our designs. Building warrant was granted a week ago, with very little hassle really. I joined Buildhub in September 2019 or thereabouts. It's been a wealth of information that has helped me shape the design of the house and provided no end of guidance which I am very thankful for. It has allowed me to validate my opinions and approaches and learn from others to ensure i am following the right path. I started out prior to buildhub wanting a SIPS house, in fact googling that may have made me find my way here. Quickly I decided I wanted an insulated foundation too, I went around in circles a little bit with both of these decisions and reading others opinions on here. I even thought at one point they would both be too expensive for me , however I sit here writing this first post having taken delivery of my insulated foundation today and my SIPS kit is on order and due sometime in February. I don't actually need the insulated foundation till mid-late January but made a decision to get it in the country before Brexit issues occur and tariffs are possibly applied in January (rumoured at 6%). I'm very glad I made that decision as today our new strain of COVID has caused everyone to close the doors to us here in the UK, another couple of days and god knows when I would have gotten it. There is lots of other decisions and stuff has gone on in the background with planning and mortgages and budgets to get here, but that is mostly done and hence I feel this is the end of the beginning and now we can enter the start of the middle.... I'm very pleased and excited for the road ahead. I like pictures in blogs....here's a few of the Insulated foundation delivery today. Stored at a friends farm for the time being. It's being stored outside, has a few tractor tyres on it now to stop it blowing away and the main pallets are all strapped down. That's me standing on top.......1 point
-
20201216_081946.mp4 December work so far about 12 hours 20201216_081946.mp4 20201216_082241.mp41 point
-
Only a short update for now and a distinct lack of photos. I'll put something more interesting up in the next week or so. Suffice to say that combining work with trying to get to completion has been quite difficult. Throw into the mix that my other half is shortly due to have twins and you understand why I'm often getting comments like 'do you ever think you've maybe bitten off a bit more than you can chew?'. One milestone recently was getting our air test done. I've decided to write a bit about this as a) There seems to be a fair bit of interest in this on buildhub and b) our result is not quite as I'd hoped and so I thought a few musings on this might help others. I haven't had the actual test report through, but from the results I saw on the screen, we ended up with a value (no laughing please from the passivhaus crowd) of around 3.4 m3/m2/hr. This is fair bit higher than I'd hoped for, but as I'll explain below, maybe not too surprising. The guys who ran the test spent a bit of time wandering round trying to find leaks and allowed me to do the same. There were no areas of the house where they could find significant leakage, but one or two small leaks easily dealt with. This obviously leads to the question of where it's all going. For reminders, our house is built from 300mm I-beams, filled with cellulose and then boarded with OSB on the inside, with all joints taped. All the services are ducted in and the ducts sealed. Windows have expanding foam strips around them and are taped. I don't think I'll ever know where the weaknesses are, but my suspicion is now around either 1) the OSB itself and 2) Where the 1st floor joists meet the outer rim board (a detail I failed to think through before it was too late). If I look back on some of the build, I think that I probably didn't spend enough time figuring out some of the detail earlier on. That said, I had a distinct lack of housebuilding experience when we started, and so I spent a lot of time trying to figure out the basics of drainage, roofing, cladding etc etc... It's now quite clear to me that if I was to have done better on some of these small airtightness details, then I'd have had to either take a lot longer on the build or go down another route (perhaps buying a kit with a minimum guaranteed airtightness?). Anyway, disappointing thought it is, we're in November, it's about 2 degrees outside and the house is toasty and will keep its heat well into tomorrow. While there would have undoubtedly been some benefit in getting it more airtight, it's a lot better than anywhere else we've lived. Frankly, my disappointment was pretty short-lived as we have more important things to worry about. Final bits before I can apply for completion are the access ramp and some outside drainage. Oh, and then the twins might arrive...1 point
-
Having eventually found our plot in episode one, and worked out where the plans had the house to be built we found that a walnut tree had to make way. A second tree, a horse chestnut was also badly diseases with a split trunk and as we didn't want that falling on the newly built house in the Autumn of 2019 (or Fall for our American cousins as I am writing this on Thanksgiving Day 2020) I headed off with equipment in hand to so some tree felling. First some photos of entrance to site (now wider!) and then some of the felling and of course the obligatory fire, and a beautiful sunset as my reward at the end of the first day1 point
-
So, I have told this story to quite a few family members, friends and colleagues over the last few years, and thought I will record it here so that other new members might learn about the patience and surprises that can occur in this phase of the self build adventure ⛺ It all started when I was 14. I blame my stepfather. He made me dig ♠️ foundations by hand ?️ OK, it was only for an extension, but they didn't tell me about the concrete encased foul and storm water drains we would find. Digging to depths of 10ft by hand should have left severe scars to put me off this self build lark for life. But, hey, I got a new stereo ? for all of my hard graft [For you youngsters, a stereo was the way we played music ? back in the day]. Anyway, many years later, the wife and I are in the Lake District and see a barn ripe for conversion, and the timing must have been right - you know, the stars in alignment ⭐ ⭐, and the phase of the moon? augered well, or some other psychological/astronomical claptrap - and we both said "time to get out of the South East". Well, that was about 5 years ago, and we are still in the South East. Lesson 1 for all new south builders - Tip 1: patience my friends!! Tip 2 - unless you are lucky enough to have been handed a plot of land on which to build, start searching where the wife would like to start, followed closely by Tip 3: using subtle hints and prods in order to expand or direct the search appropriately, always with the mantra (Tip 4) "we need some money left over to build the damn thing!" (Note: some forum members may say that doing that doesn't make for enough of an adventure ? ), we started in the North Devon area, a place where my wife had spent time holidaying as a child with her family, which is as good a reason as any to choose a starting point. We (I) trawled the usual sites for plots (estate agents, land agents, auction sites etc.), we trawled the lanes and byways of North Devon on a number of visits, propping up the local hospitality businesses along the way, I got so bored at one point I went trawling (OK, sea fishing from a trawler ?️ but go with it, for the sake of the story!). Having searched for about 18 months and found nothing, I expanded the search outside N Devon and we started seeing results in East Devon and on the outskirts of Exmoor and Dartmoor. 6 months later and we were looking at plots in the South Hams (S Devon). We saw scrub covered plots, plots with dense woodland ? ? , people looking for a swift profit by selling their back gardens (soon avoided forever after seeing two such postage stamps ? ), old industrial sites, then we went to see two modern(ish) barn conversions and decided to make an offer (below asking price ? of course!). Herein lies a conundrum I have never quite got my head around - asking price £200,000, Offer £165,000, offer refused. OK Offer £175,000. Offer refused. I'll leave the offer there if you change you mind. 2 months later same property on the market for £170,000!!! Offer £150,000, then £160,000, both refused. 2 months later same property on market for £150,000 and marked as SOLD!! The only reason I can fathom is that they wanted someone particular to buy it. After I had calmed down, 6 months later (yes I had been really annoyed) we renewed our search and found an abandoned ex-SW Water above ground reservoir with FPP and amazing views. Problem, it was above our plot buying budget (refer to Tip 4) and the seller refused to move an inch on the price. So, the searches started again. This time, the wife was now quite pliable about the distance from where we currently live and the areas we should look. This is were I have to admit that I had seen a plot with FPP and plans I liked the look of probably about 9 months before the fluidly priced barn fiasco. And, the distance was about 1 mile less than to the old reservoir. So, off I trotted ?♂️ one day.....to CORNWALL. Another visit with the wife, a coffee ☕ with the sellers (neighbours to be) to discuss the plans that had been approved and a re-mortgage later, and we became the proud owners of about 1/2 acre of Cornwall just on the edge of an AONB. Just a word of warning - this "plot" did not have its own title deed, and it has taken nearly 18 months for the Land Registry to finalise the new title for us. This in itself has probably given me more grey hair so far than any other aspect of the build so far.1 point
-
Welcome, there are a few NI self builders on here including myself1 point
-
Nice one. Will be very impressed if you get FPP for that in Glenarm! Who's your architect?1 point