
Leaderboard


Popular Content
Showing content with the highest reputation on 07/25/22 in all areas
-
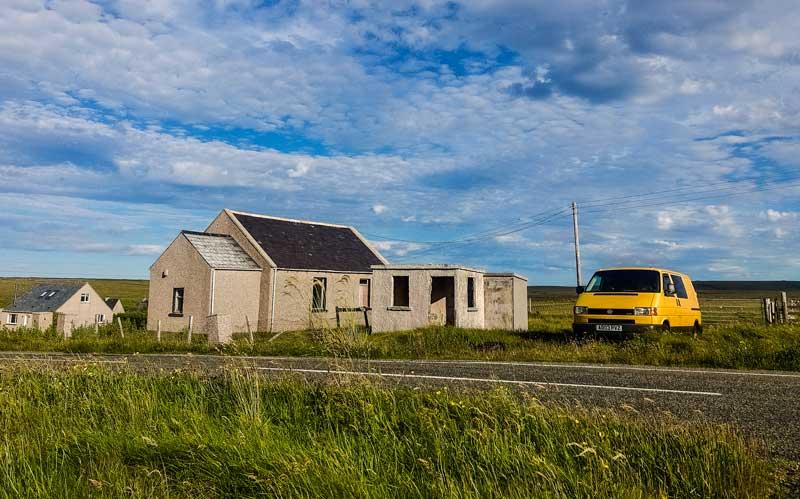
Been meaning to do this for a while, but I thought I’d better wait until the sale was actually complete. Well, that took around 18 months, so that’s my excuse! 😂 This is something I’ve been meaning/wanting to do for a number of years. One positive thing about lockdown was that it brought into sharp focus that tomorrow is never certain, so no point putting things off that you really want to do. Rather than build from scratch, I wanted to take on the challenge of repurposing/reimagining what could be done with a small abandoned existing building or structure. Narrowing my search down from Europe to the UK, I found the building I wanted. At least I had seen a couple of low res pics and a basic floor plan of said building! It just happened to be 750 miles away from where I live, in another country, on an island that I had never been to. Still, it seemed like a good idea at the time. Only time will tell if that works out to be true…
 7 points
 -
Is this still being discussed!?! 😳 @Al1son The PO has stated the situation along with the LPA’s position. Some of us have had a lot of experience with this and our advice in this instance sides with the PO/LPA. It appears you know better so Appeal the LDC application and see what the outcome is. When it is dismissed and on the assumption you still want to progress it, submit a Full application and see what the outcome is. When it is refused, Appeal that. If that Appeal also comes back dismissed, you know you’ve tried and explored all possible options. Then draw a line under it.3 points
-
The concept of land use is separate from the concept of land ownership. Often supervening usage rights are held by third parties, such as Govt Departments. For example, in many places the plot boundaries extend up to the middle of the road. So the land under the road is owned by the householder, but the road and the pavement have a supervening right to exist on it as a public use, and you will not get away with fencing in your portion of the road. Similarly for a public footpath across a farmer's field, or a private ROW to access a mid-terrace via the back garden of the end terrace. When I did a PP I proposed a road widening to accommodate a junction, and that required the land between people's fences across the road and the edge of the pavement. There was a great kerfuffle about "butbutbutbutbutthat'smygarden", but it had been "highway land' for at least half a century designated for a future widening of the A38 - which was exactly why the fences were set back a little - and the Highways Department of the CC were able to provide a map. I had a hell of a problem once when the buyer for our family's house of 38 years refused to believe we had a right to drive into our drive because the carriageway had been moved a few feet further away when they built the M1 as it was realigned in 196x. And documentation was light about who owned the bit of land where it had been moved. I think in the present case the Council are going to insist on their amenity land unless you find a loophole that sticks, and have gone quite a long way in allowing even a 1m fence, as the character of the estate is fairly clearly designed to be open and a garden fence will disrupt that. And it is prominent. I would go for a 2m fence around the side of the house to enclose a front to back private footpath, which route I do not think the OP has.2 points
-
Got a bean.
 2 points
 -
Do you mean 'unfinishable'? 😉2 points
-
Having your panels facing different directions gives a longer spread of generation which could be more useful than a massive peak depending on your motivation for installing PV Whether 15kwp is "too much" depends on your motives and set up. In the summer youll likely have too much for self use but in the winter you could cover much of your usage if you have a battery bank. Batteries come with a big environmental footprint, so a consideration if one of your motives is environmental. A long spread of generation may negate the need for batteries or allow a smaller battery pack. If youre happy for excess to go to the grid, and the grid can handle it, then youll never have too much and a gas power station can throttle back a bit on sunny days. On the flip side, if you want to keep everything yourself youll likely need batteries, PV diverters, an EV etc to grab as much as you can2 points
-
Yes but as I am trying to say (obviously not very clearly) the planners are regarding the path as "the highway" and saying a 2M fence cannot be adjacent to that. So my suggestion is a 1M fence adjacent to the path, which is allowed, and then a 2M fence a short distance back from the footpath so they cannot say it is "adjacent" and fill the gap with some shrubs.2 points
-
How about building a large timber pergola. Sheet the roof with polycarb sheets and sides for now with tarps. Later on, revert to a pergola. Though the price of timber.... 😬2 points
-
That is good, can use both sides. Not by much, maybe 0.5% a year, and that is probably down to better manufacturing that chemistry. There is a theoretical limit to what basic silicon can deliver, think it is 29%. So not worth delaying installation. Is there a decent stream on the grounds?1 point
-
Looks like a good roof for PV. Which way does it face?1 point
-
How many MWhs did they buy, and how does it compare in price to all the extra PV generation. Small part of a big story.1 point
-
Thanks for those thoughts....as you say a much bigger question for another time......I did get my i3 rex in 2015 as an early adopter and haven't regretted it (and it regularly travels from Dundee to Skye and Raasay) but as you say it is risky. Good Luck with it all and look forward to seeing progress.1 point
-
Haven't done it yet, but start in the next week or so. Fundamentally we are using the properties of the wall. It is made of inner and outer granite masonry and a central core of rubble and mortar. Very little dampness gets through all that, according to numerous studies. The little damp that inevitably exists can be dealt with by 3 methods. 1. waterproof the inside face...not a good idea because it will come off in time. 2. build inner insulated wall with a cavity, and ventilate it. This is a common solution, but in my opinion, defeats the insulating benefit of the thick wall. 3. ditto but not ventilated. There will always be some ventilation through the wall anyway, especially along the core.. The bottom metre is the only part which has significant damp so we are tanking that, and allowing the rest to breathe. (I borrowed this from another project which had a blog. Also it fits with technical info on tested buildings. come back if this works for you, but await other comments that number 2 is the only way. Our steading has similarities. Although it is big, the individual wings are narrow, so we had the same concerns about losing room width. We have dug out the floors (the ground is sand) and will put in 125mm of PIR. Walls we are thinking 50mm PIR and 50mm rockwool. attic spaces Fibreglass quilt. Exposed roof tried some PIR, and now changing to cavity batt. Insulation levels will exceed new-build requirements. You urgently need to know the wall construction. I am anticipating the end extension is modern and block.1 point
-
isn't that just a particular phase of a project? 🤣1 point
-
Just done mine last week, put it in the insulation. Also put a waste pipe in case any change of plan, like a sink is suddenly needed! @LA3222, gave me the idea 😃1 point
-
Good luck mate . Do the improbable. Do the enviable. Do the impossible. No point doing anything if it’s easy .1 point
-
It gets you the security. To convert it to garden space would require a planning application for change of use from Amenity land to Residential Garden which they are likely to refuse.1 point
-
Pretty much a waste of time, any soil will be full of weed seeds anyway. You are best to get top soil down raked and level, compact, re raked and level. Leave a few weeks for the weeds to grow, then kill them. Then look to do your lawn.1 point
-
That looks like a mission...1 point
-
Brilliant. Very Exciting. My initial thoughts. Obviously the damp bit to be dealt with. Not high enough for 2 storey (?) although could get a gallery perhaps. The walls are very thick, and provide a lot more insulation than the calculation programmes allow. You will be converting so do not have to reach any specific standard for insulation. However it is in your own interests to do what you can. Therefore I would put high quality but skinny insulation and stud on the walls, and make up for it in the floor and ceiling/roof. If the floor is concrete or stone, you can keep that in place and insulate/screed over it. I suggest UFH and Air source. This also avoids undermining the walls, which may be very shallow. You will be living within a plastic tent, with no draughts, which is possibly more important than insulation levels. Dampness from the walls has to be dealt with. I am happy with our solution for 600mm solid granite, although one or two other BH members disagree. Later. You have to look properly at the roof timbers. Prepare for bad news, although the roof doesn't seem much out of shape. External insulation would mess with the geometry, hence my suggestion above. I think you need to sacrifice 125mm on each wall. perhaps 100. Try to add a porch as it will be a heat buffer when the winter winds blow. No reason why planning shouldn't allow that. Apart from the roof, it seems to be an inside job, with a few service holes. So if you are into DIY this looks promising.1 point
-
I have been paying £17.63 for Hunter ones from the local BM. I needed them because it is a combined sewer.1 point
-
How are you keeping leaves out of the system …? Shoe/grill can be used as can inline filters at each gully, essential really if you have trees around.1 point
-
Preference really I'd suppose for aesthetics. As long as you leave a gap at the bottom from leaving them straight to get access to anything that ends up stopped by grating on the bottle gully. Bottle gullys are very expensive also, FYI. Mine currently are sitting in below the ground level. I am going to add runner boots to the bottom of mine then just link up some field drain wavin coil and drop them into my perimeter drain which is twinwall drainage. Which then discharges into the burn. I'd originally planned 110mm soil.pipes with fittings but the groundworkers were like...that will be mega hard.and Cost a fortune.1 point
-
I used about 3000 of the tongue tite 45mm screws on siberian larch a couple of years ago. No issues with pull through or movement, so you should be OK with lost heads.1 point
-
got our tongue-tites from https://tradefixdirect.com/stainless-steel-screws/tongue-tite-plus-stainless-steel-flooring-screws-35-x-45mm. bulk buying works out at about 4p per screw1 point
-
Lovely neat job! I chuckled at 6 weeks though. While it does take 7 days for concrete to reach a decent proportion of it's design (28 day) strength, you'd have been OK just leaving 48 hours between working on adjacent pins, and you could have done hit & miss pins at each end, so long as 25% of the length wall wasn't simultaneously undermined.1 point
-
No I will try one more time, don't have time to do a drawing. 1M fence all the way along adjacent to the footpath, that we have established is allowed. Then next to and parallel with that a short distance away from the footpath, a 2M fence all the way. That cannot then be described as "adjacent" Suggestion to fill the gap with shrubs was an alternative to having a little strip of grass to keep mowing.1 point
-
Look around at different plastic crates, the thinner ones crack after a year or too, but my thick sturdy (and more expensive ones) are still going strong, if you'll excuse the pun.1 point
-
Hi all, thanks very much for the responses thus far, it’s much appreciated. That’s a really handy bit of info regarding a Lawful Development Certificate and I’ll definitely explore this route. As regards complying with the rules, I believe I have albeit there does seem to be a caveat regarding privacy which is “The decking must not affect the ability of neighbours to enjoy their own gardens, or risk any intrusion to their privacy – for example, by being high enough to see over their fences” As it is a sloped garden, if I was that way inclined I could stand at the edge of the decking and look over their fences. This is why I mention erecting privacy screening at the far end of the deck to effectively counteract this argument and, provided this screening isn’t taller than 2m (is this measured from ground level?) I can’t see I’d need permission from the neighbours despite their protests.1 point
-
I am suggesting a 1M fence adjacent to the footpath and a 2M fence a short distance in. That won't enclose all of your garden for your use but most of it. but the planners would have a hard time saying the 2M fence is "adjacent" to any highway or footpath.1 point
-
In this case it's a straight couple connected to the pipe, so the plug required will be the OD of the pipe. If you can uncouple the straight coupling (push the end in and it should release the barb) then take the fitting with you to get the right sized plug.1 point
-
If you meet the PD guidelines, then you have nothing to worry about. Neighbours can comment/object all they want. If you want that added piece of mind if it is PD, then you can submit a Lawful Development Certificate application to the Council. It'll cost you £103.00 plus the PP service charge and the application would also need to be accompanied by the relevant drawings. I wouldn't read too much into that decking link. It seems they have extracted certain parts from the GPDO and made up the rest.1 point
-
It doesn't matter if cyclists use it or not (in trying to argue cyclists should not ride on footpaths). That will not wash. What is the view with mobility scooters because after all... they are motorised and do provide a means for a rider to travel? So under the PI's view, the use of that footpath for scooters would also amount to vehicular traffic. In Planning/PD terms, the footpath is seen as a highway so anything erected above 1m adjacent to it, would require Planning. It's that simple. You can choose to Appeal your LDC application, which will be dismissed or submit a full Planning application. Those are your only two options. They may not refuse the full Planning application on the basis of there being a 2m high fence, but as they have mentioned before, it seems the use of this land would be enough to warrant a refusal. This "pink" land must be represented somewhere and if not readily available, ask the Council for a copy of the mentioned plan.1 point
-
If you have abided by the rules then I don’t believe they have a leg to stand on.1 point
-
Pipes are generally known by their outside diameter, same for the fittings.1 point
-
if it's 8mm pipe, then either an 8mm stop end for the pipe or a plug for the pushfit. If in doubt, remove the pushfit installed for a closer look at it, just in case an 8-6 reducer has been fitted. It's definitely metric tho, as imperial JG fittings are beige.1 point
-
Sorry if I’m being thick. But what does it matter if cycles use a footpath or road that deems it as a highway? Does it have anything to do with the links you or the PO had provided? The definition of a highway (as mentioned) includes a public footpath. So under PD, you cannot erect a 2m high fence in that position. That is what the PO has stated. Anything above 1m would require full Planning. As for the amenity land, that would usually be tied to the original Planning approval for your property/development. How old is it?1 point
-
I usually just say facing brick/render/tile hanging/slates/tiles, etc… to match existing. If you’re in a conservation area, is a listed building or are dramatically changing the external finish, the LPA may ask that you provide details and/or samples of the proposed finishes post Planning approval.1 point
-
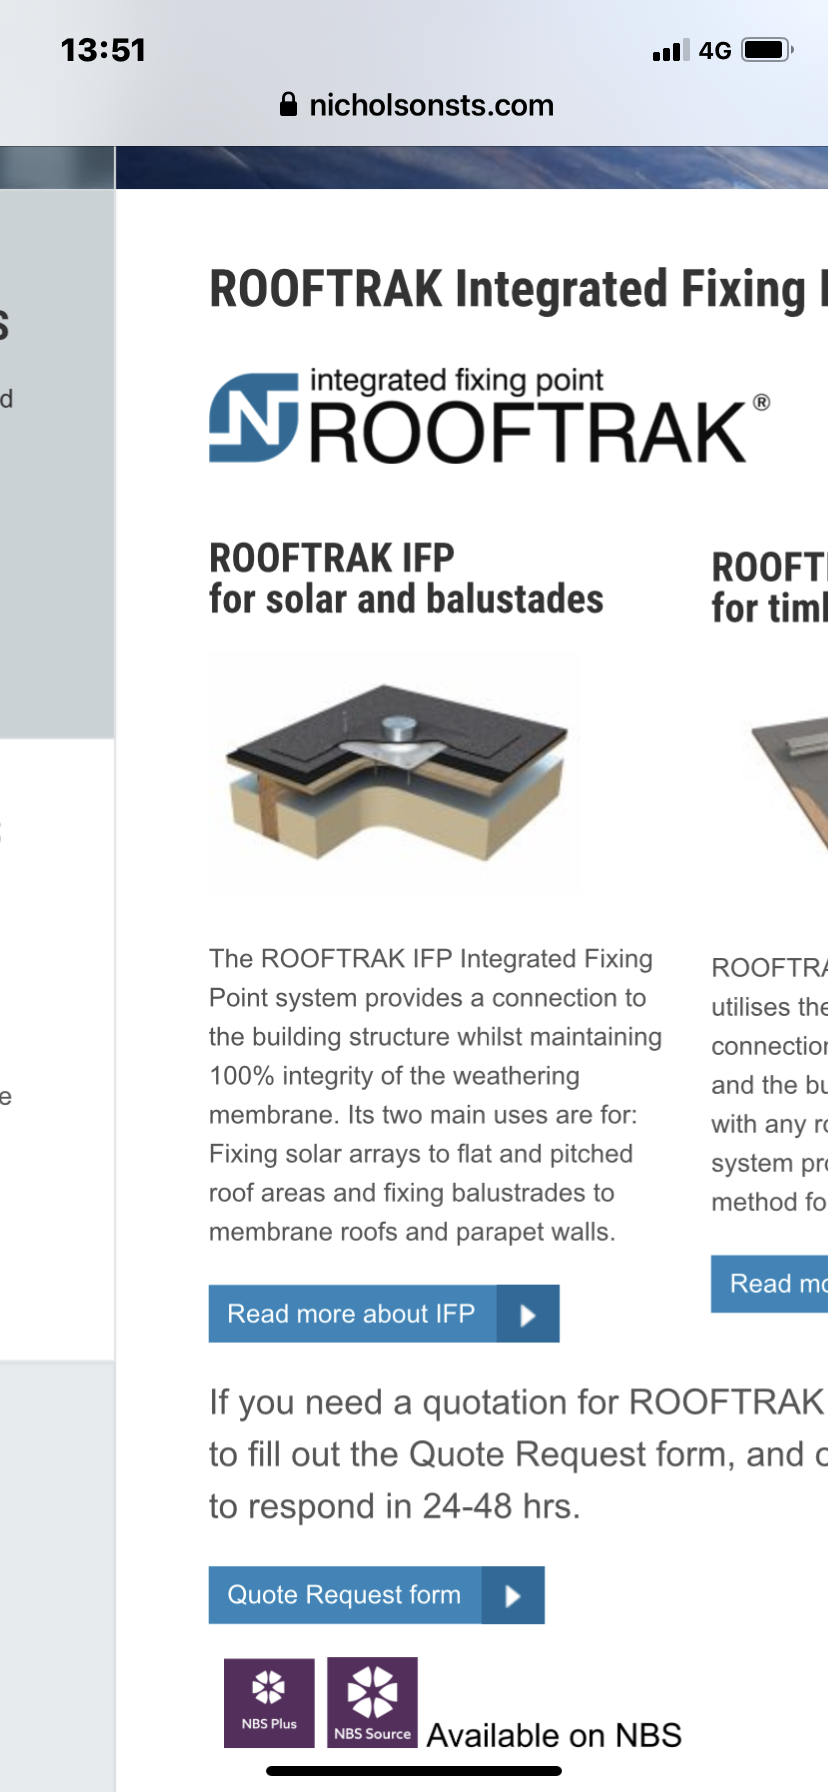
Nothing to worry about. These joints are pretty much bombproof when sealed as per the manufacturer’s installation instructions. There are instances where skylights etc have external corners / up-stands etc, and we install PV with plates which have the welded edges 4 sides around. Upstands also occur at the bottom of flat roof areas, so all the water hits that uphill-facing edge too with zero detriment. It’s all good.
 1 point
 -
Get house insurance quotes for the various types of build, that will give you an indication of “risk”.1 point
-
We fill our homes with flammable things, the structure is worth protecting, but only for as long as it takes to escape. The only other approach is a sprinkler or misting suppression system, but you will be looking at substantial investment and ongoing maintenance costs - likely more than decent insurance.1 point
-
I look forward to pictures too, if possible. This will make it all so much clearer to respond usefully.1 point
-
Hi @Chris HB That sounds great. My Sister lives on Tiree. Questions.. What kind of stone do you have. Is it granite / imported stone from the mainland or local stone off the beach? What are the walls founded on? sand or rock? Wall construction? Have you exposed what is under the roughcast? Is the outer leaf dressed but just weathered hence the render? inner core of random rubble and rough stone on the inside? What is the roof made of, construction and how does it sit on the walls? Lastly don't go hacking off the render before you have fully understood how the walls / their bearing (hesitant to say founds) are constructed and their condition. Post more if you can.. photos would be great and anything else you can think of.1 point
-
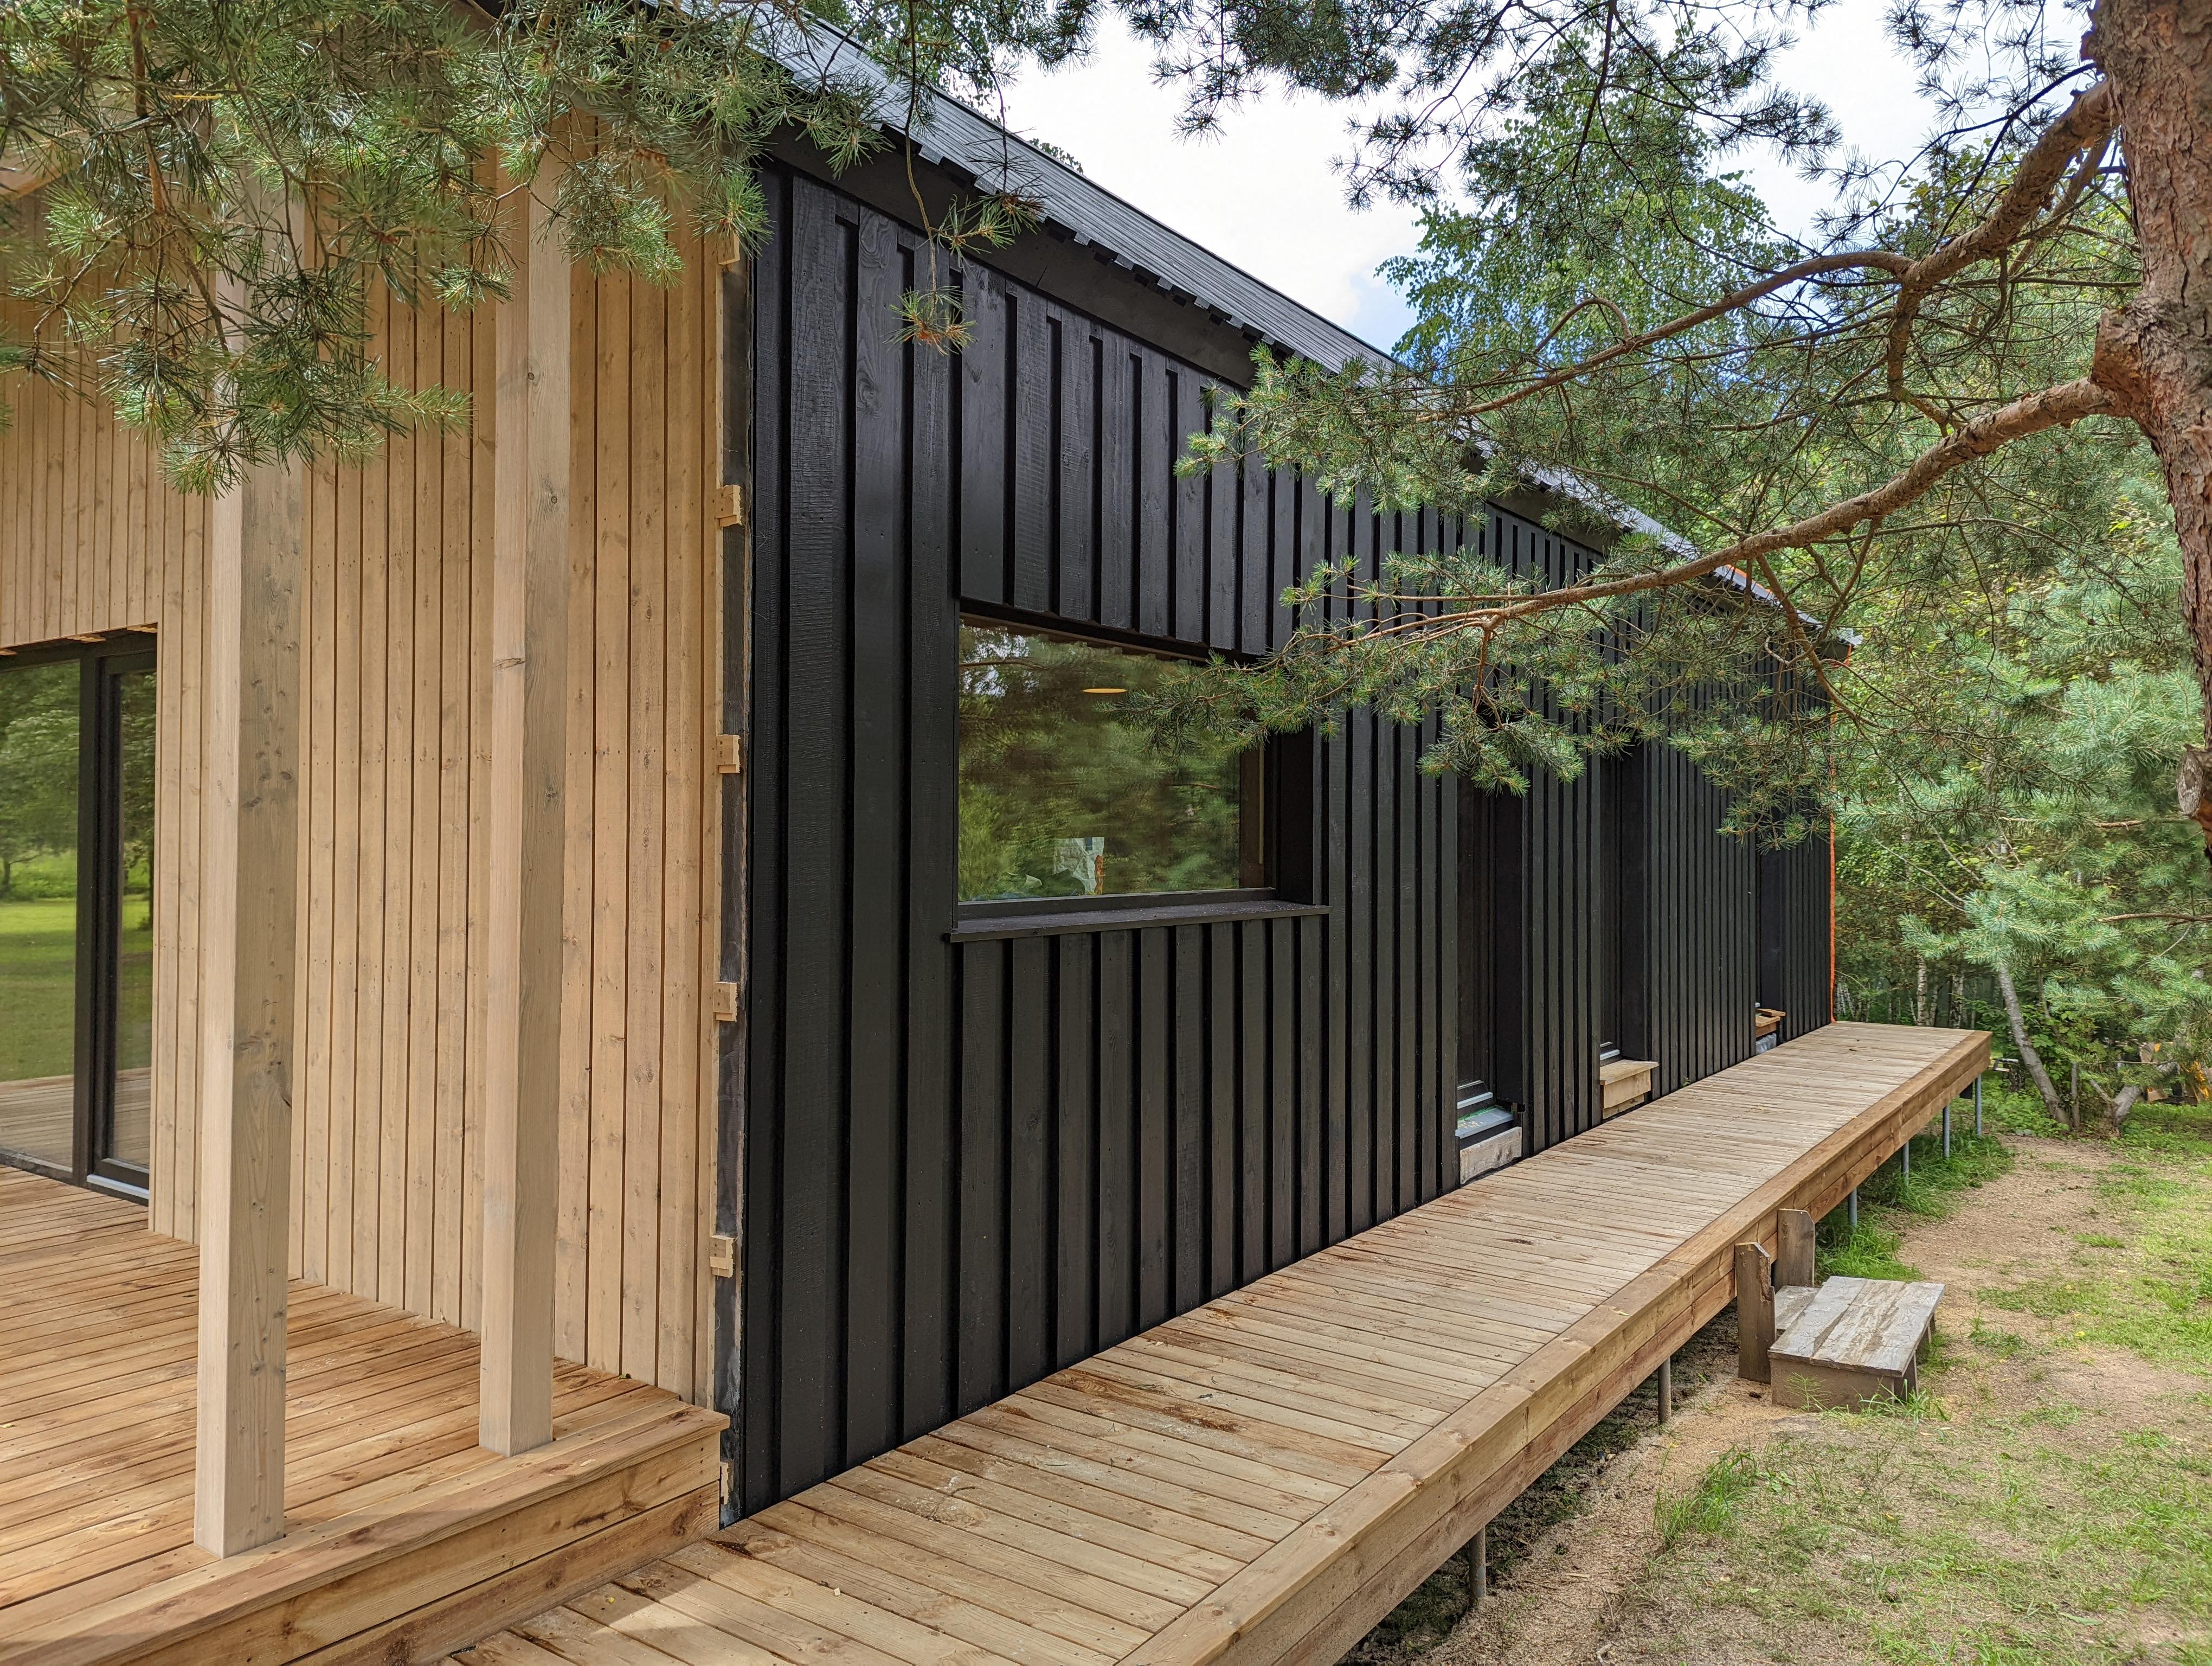
Subject close to my heart! What you have won't work. UV will kill it. I'll dig out some local samples from the Baltic coast... Insects will too in time IMO though this is debatated and depends on location and appetite of insects etc. If you wanted to have open rainscreen cladding then you're going to need something insect and UV proof under it IMO. You can't throw a non breathable membrane (e.g. EPDM) over the top of what you have without there being a ventilated rainscreen behind that non breathable membrane. When we looked at the UV proof and breathable membranes these cost a lot of limbs. They were the only option that let you "just throw a layer on" without materially changing the design though. I'd also consider: Shadow gap - though in pure black I don't think this is as effective as in lighter colours at creating shadows. Board on board - create deeper shadow gaps by putting your boards on top of.some other boards such that the gaps are full depth (e.g. decking board type deep) but there's still closure behind them. Board on tin - Use black wriggly tin / corrugated steel on top of your battens and fix through this into the battens. There world still be a ventilation gap behind this to let the house breathe...and it would look like there's nothing stuck immediately behind the boards...and it'd be black unlike your battens...and prevent insects uv and rain getting to your membrane. Gunned nails or self drilling wood screws will go through tin. We ended up using board on board and shadow gap to get the look that she wanted:
 1 point
 -
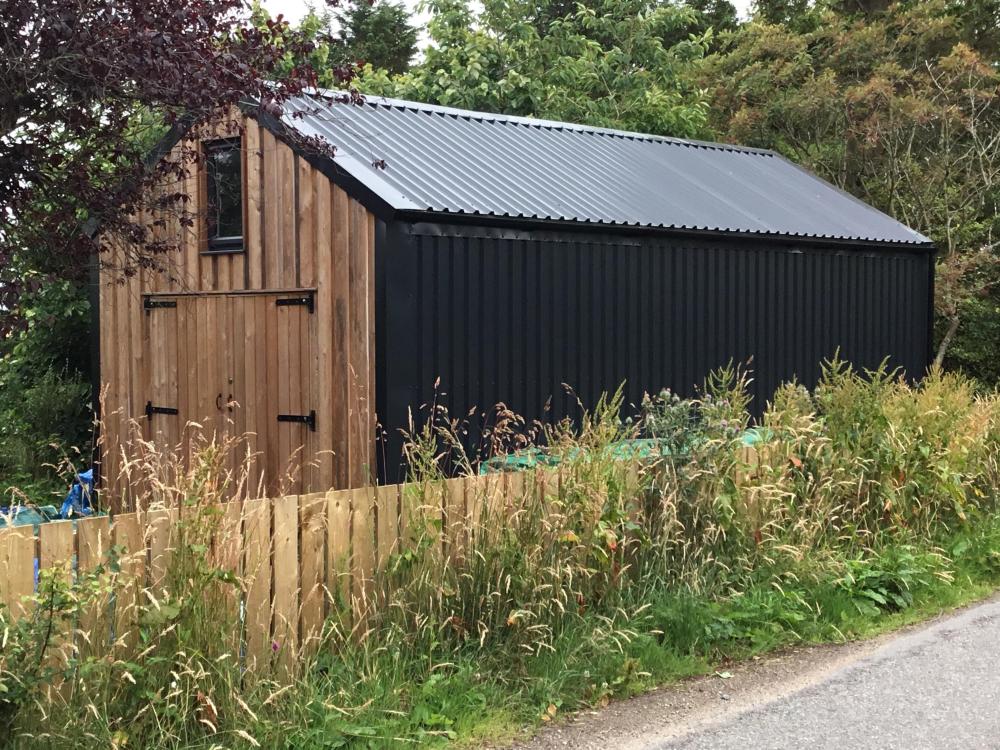
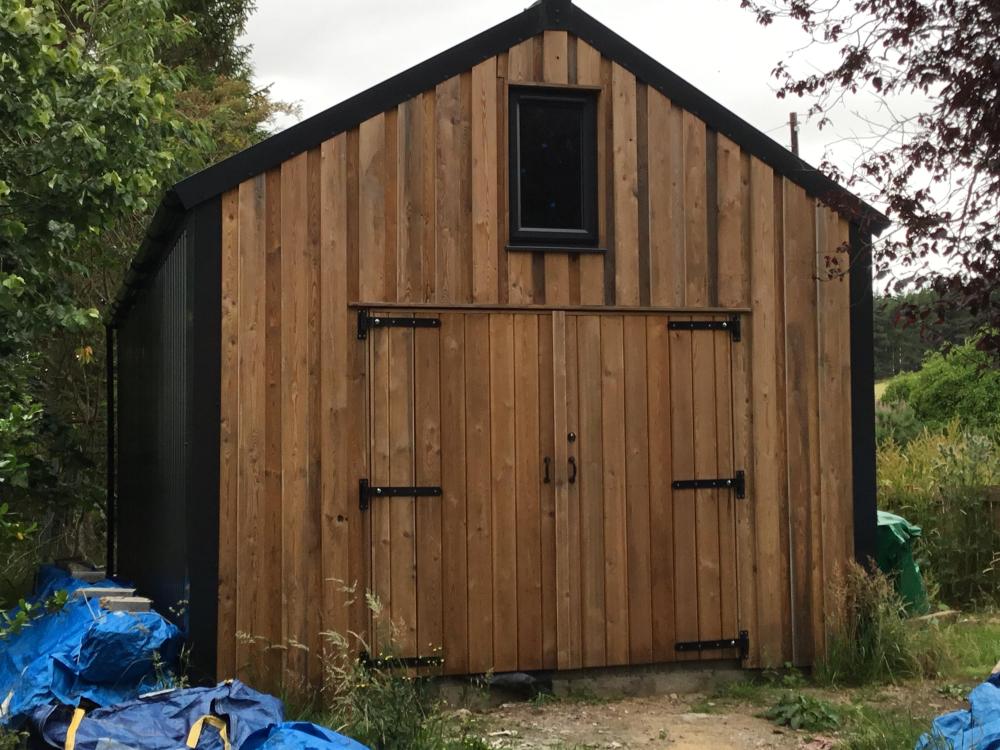
I built (not yet finished) this thing. It’s timber framed and clad in steel and leftover larch. Has a concrete floor. Due to budget restrictions I hand built it myself, and I’m not a tradesman but ok with joinery & diy. It’s 8m x 4m x 3.9m high. I had pp for garage so got the vat back on materials. Inside the rear half has a loft space - storage and the front half is a vaulted ceiling, for a workshop area. Never built a building before, so I followed building standards for a dwellinghouse and tried to copy what my proper builders did in our actual house. Idea being if I built it like a house it would take me way beyond min standards for an outbuilding. So it has DPCs, breathable membranes etc etc. it’s even plaster-boarded inside. I bought heaps of 4x2 in a builders material auction and built modular 2.4x 2.4m osb clad frame panels for the walls. Shopped around for everything to cut costs. My budget was as cheap as I could do it to the best possible standard. I didn’t keep a running total but think I’ve spent around £5-6k on it that being current lockdown/covid costs. I think I’ve ended up with a circa £15-20k building. It was hard work but good fun learning new skills etc eg building the roof. I did consider buying a metal frame to be installed but by the time I factored in everything it was obviously more expensive. We were hit hard by Storm Erwin etc but the building was unaffected. Which was reassuring. Hope this helps for ideas.
 1 point
 -
Many materials are fire retardant but not fire proof, in that they will resist ignition from a small flame. A raging fire and/or intense heat changes the way fire behaves and it’s rate of spread. I do worry about the new housing estates with properties so close together and the semi detached or terrace types with a single roof structure where fire can jump between property easily. a good few years ago we worked on a factory producing beds, a big pile of foam marked fire retardant went up alarmingly quickly when we (I) dropped a spark on it.1 point
-
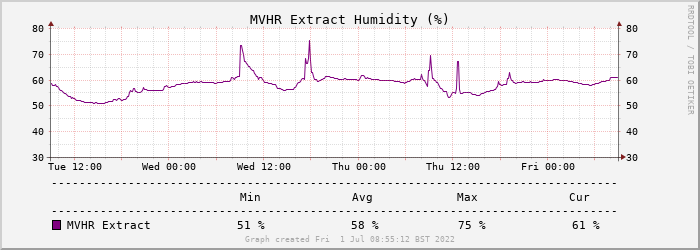
For what it's worth I've been using a duct-mounted DHT22 humidity sensor to detect a >5% rate-of-rise in humidity (over five minutes, measured across the whole house extraction) and in the few years we've had it running not observed a single false positive or negative. The 5% was intended just to be a starting point but it's turned out to be perfect. You can see from the graphs how prominent the spikes are (the first three are showers, the fourth a pan of boiling water) and so quite easy to detect without being triggered by more gradual variations:
 1 point
 -
1 point
-
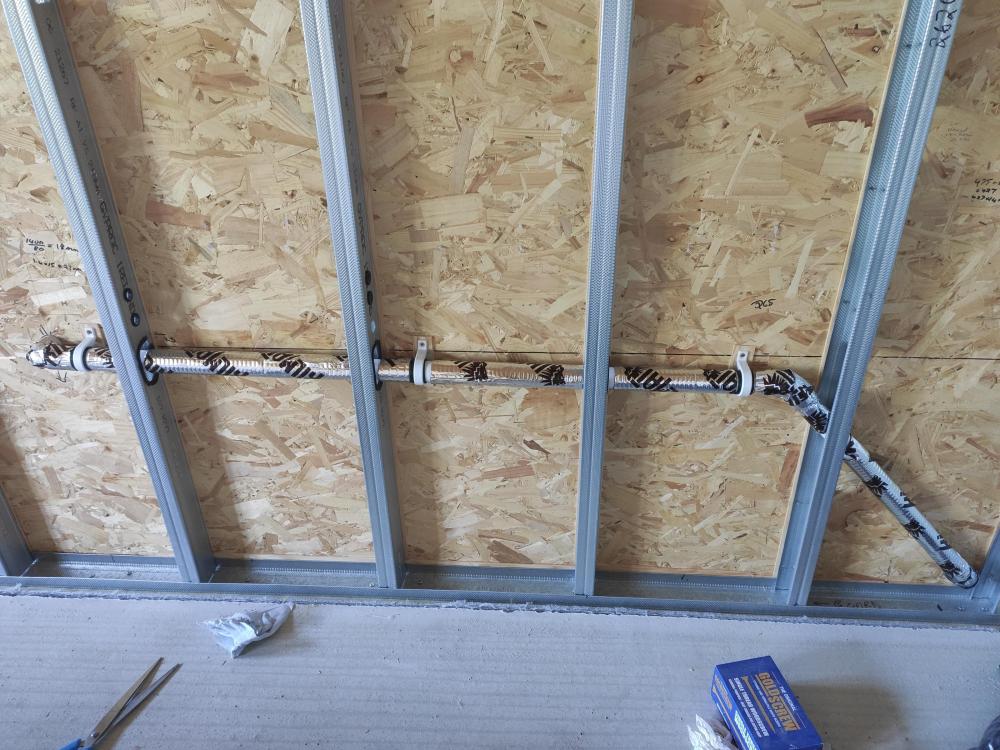
Almost ready to cover up with APR and plasterboard. I used Kilmat as @Nickfromwales suggested to help with any noise. The clips are 40mm clips used on 32mm pipe with foam tape wrapped around to reduce noise transfer. The pipe exits the wall within a 100mm square from the floor and the wall. At the other end you can see the pipe exit at around 500mm from the floor and with H and C written just above where I am going to send the water feeds through. I think those holes are 60mm higher than the waste hole and 80mm apart. The plan is for the feeds to then split inside the room to feed the two basins as that puts fewer fittings in the wall. I'll need to use elbows on the feed pipes as the wall cavity is only 70mm and the bend radius is 120mm/80mm for 15mm/10mm pipe. I could exit the wall at an angle but I think that could look bad.
 1 point
 -
@MortarThePoint why are you avoiding using expanding foam ?? i use it absolutely everywhere.1 point


This leaderboard is set to London/GMT+01:00