Leaderboard


Popular Content
Showing content with the highest reputation on 03/29/22 in all areas
-
Edit: I used 12mm OSB in most other rooms as much, much cheaper but still strong enough to mount sinks, rads, etc.2 points
-
I can highly recommend 70mm metal studs. We have 70mm wall with 50mm accoustic insulation, 18mm ply lined on one side and 12.5mm plasterboard on each side. We have this between our two offices and you can't hear a thing through it.2 points
-
You should calculate the cost in labour and materials and stress of retiling the cracked area and weigh it up against the membrane cost. May well be worth you getting a few extra tiles in as they may not make them in a few months time1 point
-
I think you are missing a lot. We used Thermohouse. https://icfa.org.uk/association-membership/1 point
-
I have an extension with a liquid screed pour which has cracked in the same way. I've just given up worrying about it now. I want to it be right and perfect, but in the end I just want it done and without burning a bigger hole in my pocket than I already have. Do everything possible to minimise the chances of it cracking the tiles by using a decoupling mat, flexible adhesive and grout and then live knowing that you did everything possible without spending another fortune. I've used tile masters ultra flex s2 adhesive and anti fracture matting on a bathroom timber floor with UFH and I'm amazed that the builders didn't crack it when the fitted in a RSJ below it. So personally I have a lot of confidence in these products now.1 point
-
That is good news. You really don't want to be messing around with stuff that has already been fitted.1 point
-
spoke to UKPN and they said new G99 application. guess I'll Google how to do that (after searching on here first of course. 😉 )1 point
-
don't forget the emotional cost of going for a flooring that you don't really want! if you'd wanted LVT then you'd have specified it to start with, right? so ditching the tiles (which is what you wanted) for LVT (which you didn't)* will have an emotional cost and impact. you might forever be thinking you really wished you had tiles? not sure you can put a financial cost on that. * assumed due to original decisions made about floor coverings1 point
-
Timber is rubbish for sound transmission We have two 70 mil mf studs between two bathrooms Both have a loo on each side You cant here either loo flush makeup 70 mil mf studs x 2 100 mill cavity 25 mil acoustic insulation 1 sheet x 2 of 15 mil moister soundblock PB Tiled on either side1 point
-
Yep.. you created the issue ..!! Drop it back to 35°C and it will be fine and not move. That crack is tiny and using proper flexible adhesive it won’t move at normal temperatures.1 point
-
No. It was to preempt lots of shelf fitting in the office! We did this in bathrooms etc as well. Can't objectively say if it's quieter than just plasterboard. But compared to my parents house that is timber stud, it's night and day.1 point
-
Nor me I’d just ring the DNO and ask . In theory it shouldn’t matter as you are removing something rather than adding . But you know it could come back and bite you …1 point
-
can't you just ask the tiler to install them and tell him you accept any risk in 'that area'?1 point
-
Was there an edge insulation/expansion strip installed around all the walls? Usually a light strip of foam that's stapled or glued to all the walls before the screed is poured. Also along the edge of your patio doors. It's there to allow the screed to expand and contract without being constrained by the walls.1 point
-
We have a wall between two bathrooms. Its got 100mm studs and both sides clad with 12mm Hardi Backer board (heavier then normal plasterboard). One side is also covered with 15mm limestone tiles. The stud work is filled with sound insulation but the studs bypass this. Right now you can hear someone talking to themselves in the shower through the wall. I'm thinking you definitely want staggered studs each supporting just one side with sound insulation woven between.1 point
-
Use some sort of decoupling mat. eg Ditra and a flexible adhesive (but you were probably using flexible anyway). Still a slight risk but not sure what choice you have.1 point
-
Exactly. And those are the skills that I have (since my experience is mostly in renovations and extensions etc). I also do cabinet making so will be making my own kitchen and bedroom furniture from local raw materials, and anything to do with joinery, plumbing, and electrical I'm good with (my formal training back in the day was electrical engineering). I'm planning to do a 20ft container from the UK in a few weeks time with bathrooms, kitchen worktop, etc so I have everything ready.1 point
-
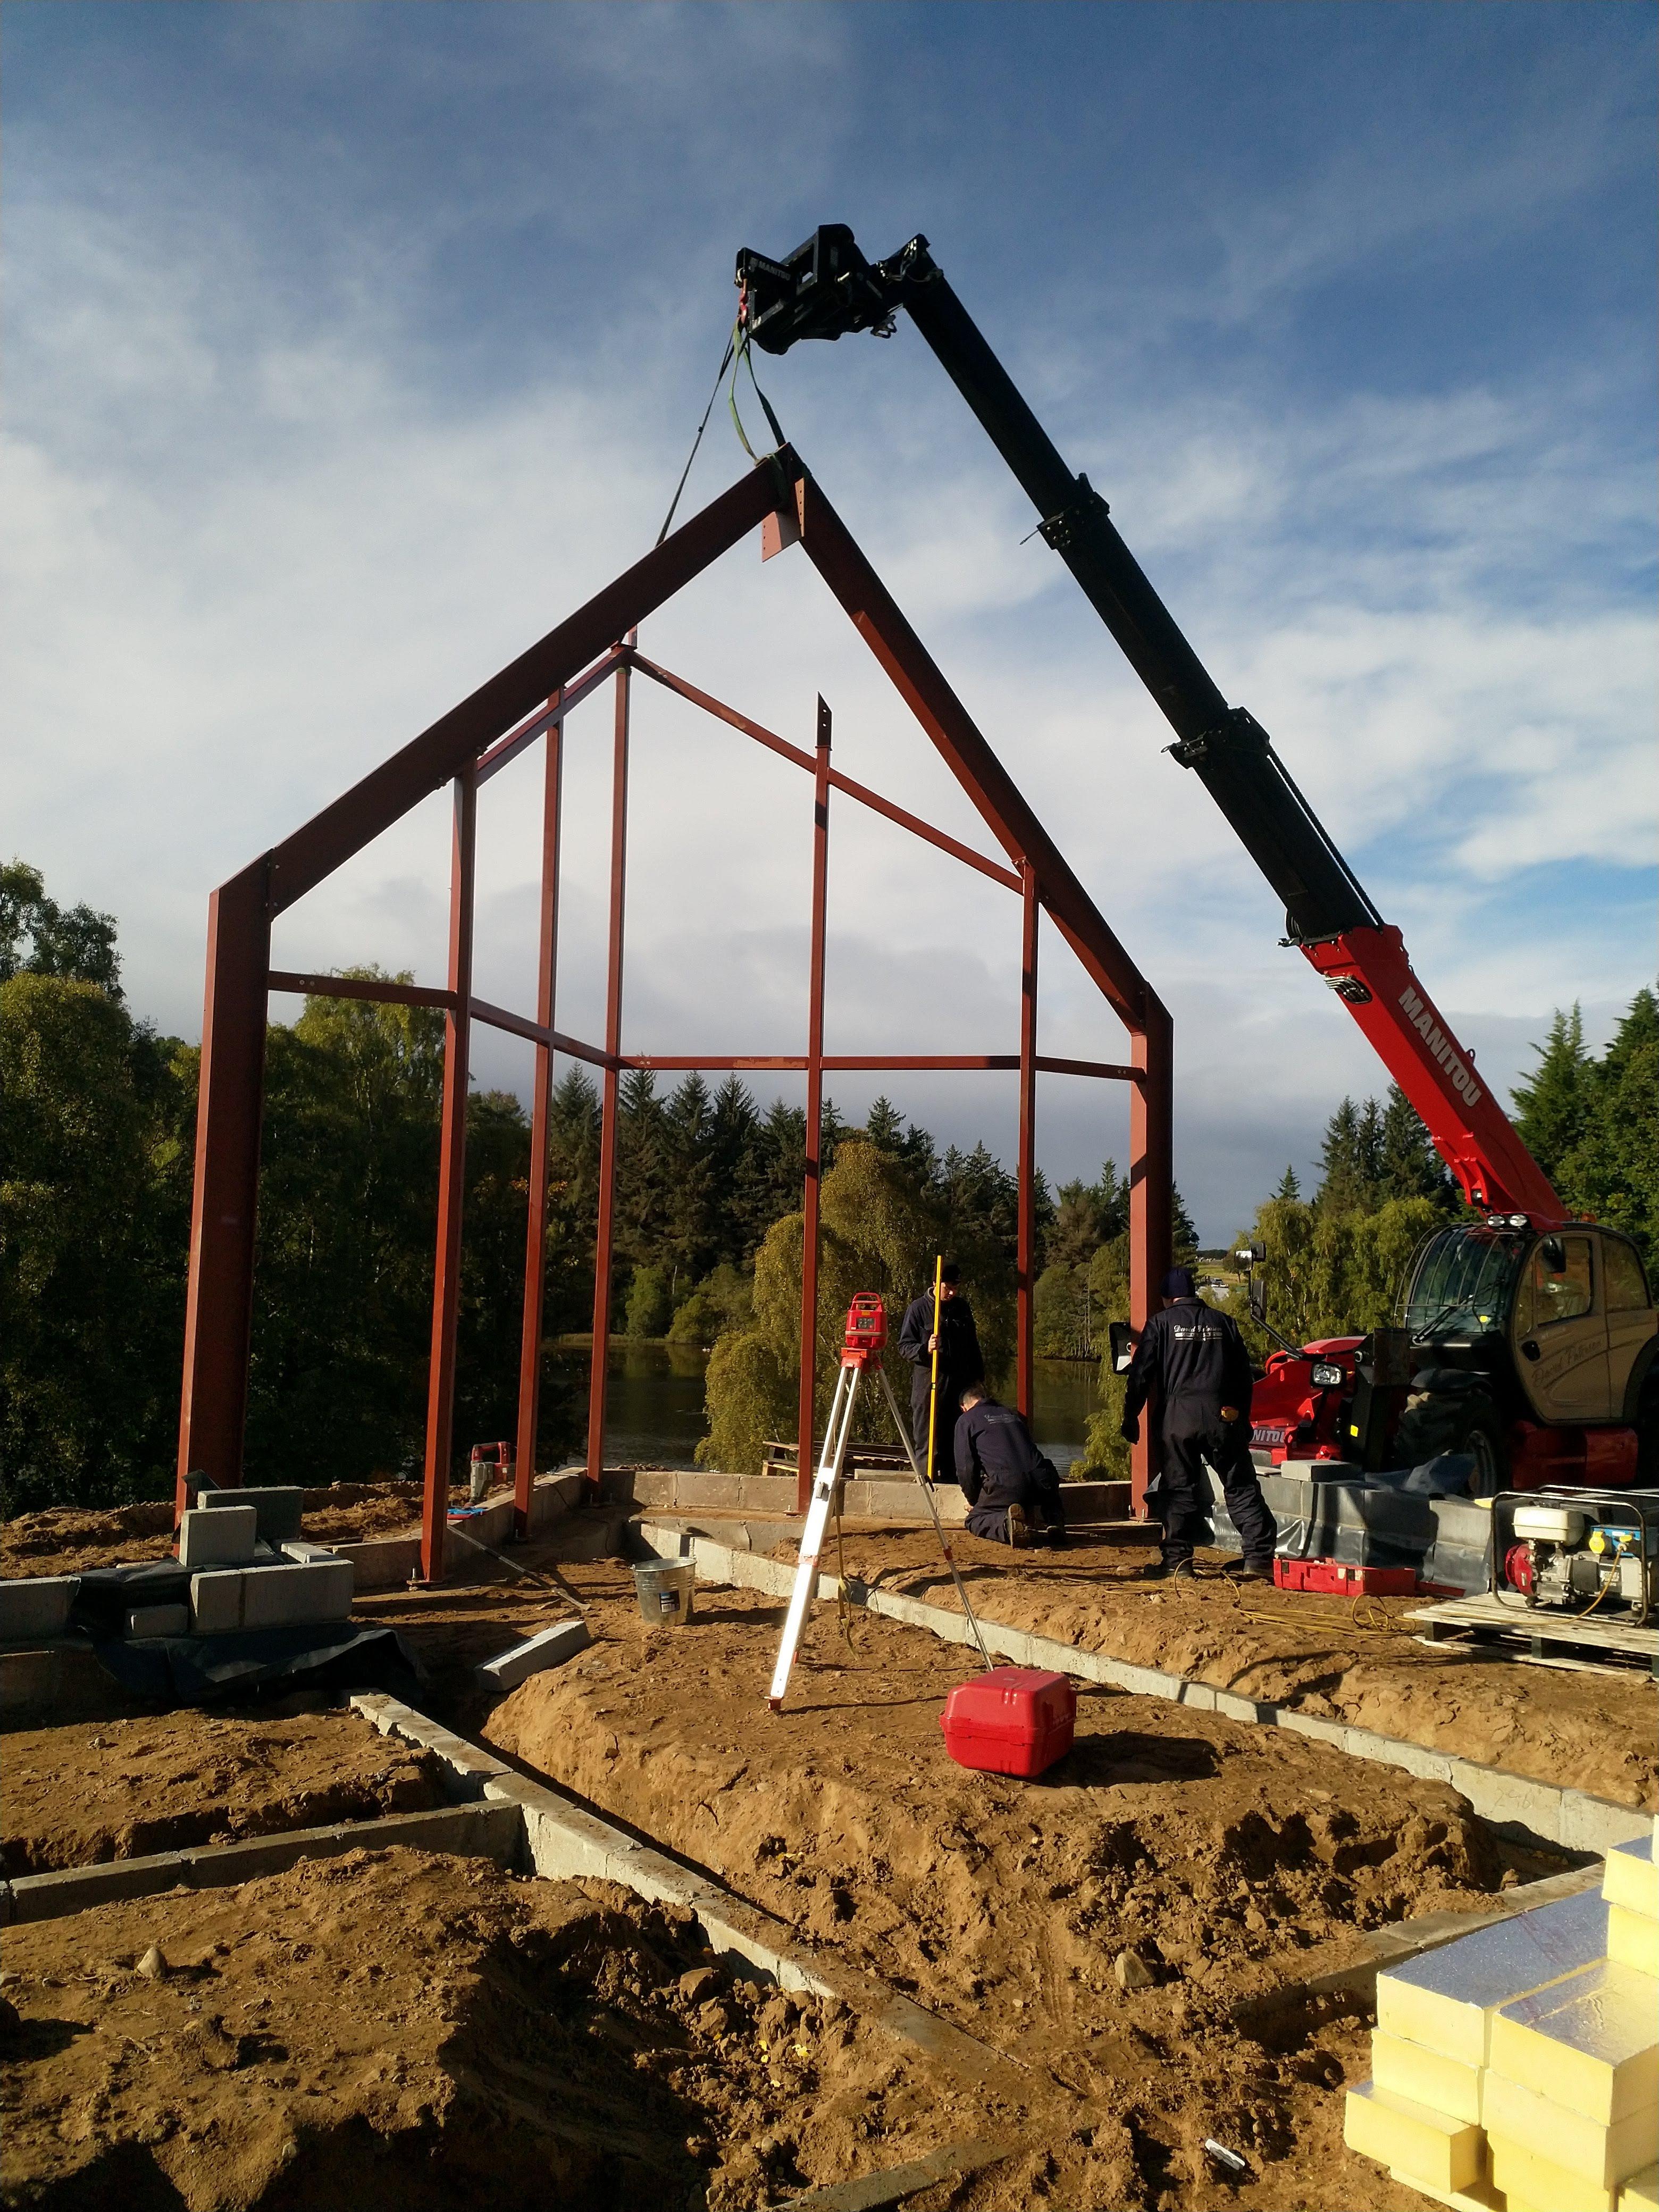
Assumed wrong! 😂 I've done about 50% of what you see so far in the pics (very very tough going in this heat). But I've got local guys in now to get me to roof level. I'm estimating a total of £70k pounds for all my outsourced labour. My own labour costs...priceless!1 point
-
On an ordinary browser use Ctrl+a to select everything in the text box, the del to get rid of it. Not found a way to do it in my Android phone except by closing the thread, then going back to it and starting a new reply. The misquote will appear with the option to clear the editor.
 1 point
 -
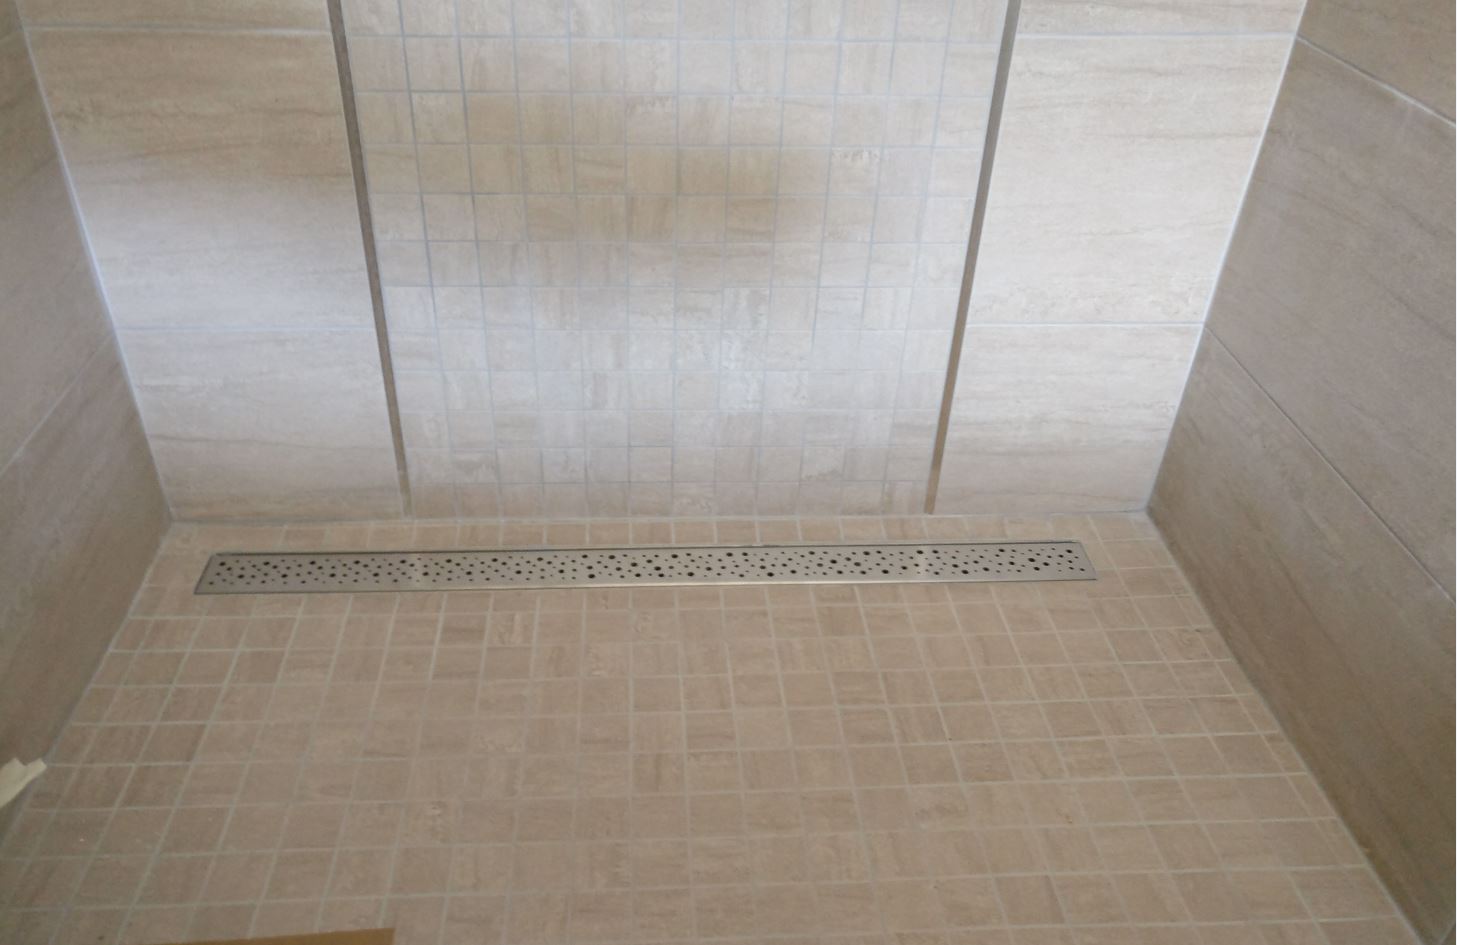
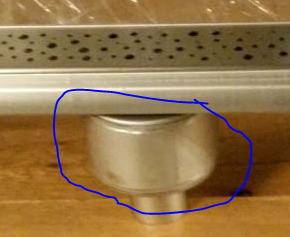
The linear drain has an integral bottle trap, so no U bend required.
 1 point
 -
After pondering battery storage for many years, and then the energy prices rocketing this last year, i finally decided to give energy storage a shot, working out how it would sit financially was extremely difficult, and a little bit of a finger in the wind, but as the batteries have a designed lifetime of 15years now, and energy prices rarely go down, I figured it would pay for itself with some profit over the long term, whilst also reducing my carbon emissions and reliance on the grid. As i'm just dipping my toe in, i've decided to just get a single US3000C Pylontech Battery for now, meaning that the max discharge W is around 1.8kW. I will see how this fits in, which will cover most of my loads, and if I see fit I can add a US2000C later on to give the full 3kW discharge. Went for a Solis AC Coupled 5th Generation Inverter, the graphs it produces are really informative. Will get round to taking the rackmount bits off at some point. Example of the graphs available: I will add bits to this thread over time about electric consumption. My annual consumption at the moment is looking to be around 1200-1300kWh before the battery, Export sitting around 2400kWh as excess from the solar farm, so be interesting to see what these figures do over the next 12 months. Cost so far £2450 including installation which was £650. An additional US2000C will be £748 if i decide to go ahead.1 point
-
I'm not going to lie to you, my arms hurt! I did the final 9 holes this morning which took about 90mins and by the end of it I was covered in dust and could barely lift the core drill. but it's done now and I have lovely pretty round holes. 🙂1 point
-
Kindness, yes, consideration, yes, and a number of other important social behaviours, yes (but with some caveats in what the children actually end up experiencing socially and culturally within the education system, which is in many ways at odds with this in terms of what actually gets valued and thus modelled). Emotional intelligence, however, it is not. Please forgive my cynicism here. I work with people psychologically as my main profession. I first trained as a youth counsellor in the early 1990s and a lot of my work is related to mental health. I've spent a lot of time teaching and training clients in EI, especially in organisational contexts. I think there are serious questions as to whether the term EI has any real meaning or validity at all, other than being another means to derive better work productivity, and thus economic performace from individuals - which is really where EI as we know it today came from. It is more or less a tool for manipulating productivity rather than a tool for helping people to learn how to navigate a complex world and being able to effectively deal with the emotions associated with doing that - in this sense, children are not being taught EI. The rise in young persons' mental health problems is an indicator that there is something wrong here and that what is being taught may not be of any practical use, rather like a number of things being taught within today's curriculum.1 point
-
Torx all the way for me. I hate PZ with a vengeance even with functioning hands. I've been using the Torx screws from Forgefast all the way through my build. Good price and work just as well as spax IMHO. Honestly, I don't think the schools or the teachers are equiped in any way to teach emotional intelligence properly. They have neither the resources, time, nor the necessary training to do it. And that's not to criticise them, they've got enough crap on their plate and don't get sufficient reward or funding for what they do as it is. The construction industry has a culture problem in this regard too as it's 'too soft' which is shown by how high the figures are for those in the construction industry suffering mental health problems - unfortunately under the radar for the most part. But as for the basics of communication and listening to the customer, there's just no excuse there!1 point
-
This is interesting we just did a refurbishment with slightly higher insulation on walls than BR & nothing on slab, use radiators throughout. We have used 1684kWh on ASHP in 10 months on heating & hot water. I’m expecting it to hit 1750kWh worst by year end. I initially thought the meters were wrong but actually our entire 2adult 1toddler household is averaging 11kWh a day all in. 245sqm… what are we doing that’s so phenomenal or does Eastern uk bask in way more sunshine which makes a large enough difference for a comparatively poor performing house that hasn’t been air tested?1 point
-
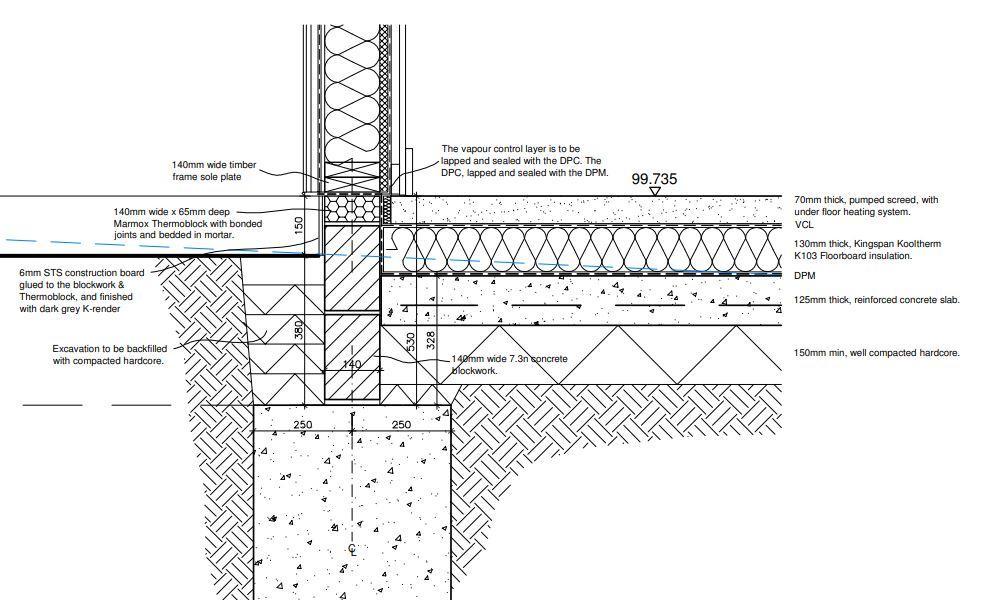
What did you use as inspiration for your detail there? Is that recommended by the people providing your wall cassette (what even is that). I assume you’re using a timber frame. Just make sure you’re using enough insulation to fulfil the new part L. I also think you might have a warranty problem. Shouldn’t it look something like this:
 1 point
 -
It may be, but you need a tool and extra spend on clips. Also it would have to be planned carefully to not to collide with the chairs for rebar, so I think tying to the mesh is the way to go. Not sure about your shoe size, but 15cm between the bars is enough to put a foot on 2 adjacent, you can easily go forwards and sideways, bigger issue is reversing and not stepping on the pipes Irrelevant, flow temperatures are the same. Saying that, my thinking is that rebar would help to transfer heat from the pipes attached to it initially. Mind that with pipes at insulation level, the same will happen once the heat reaches the mesh above, and considering UFH heating is all about slow and steady, it should not matter in the end. Also my thinking is that UFH pipes at mesh level should result with slightly lower losses: at 35°C flow temperature I get 25°C surface temperature. With pipes roughly in the middle of the slab I'd expect bottom of it (where it touches insulation) will also be at ~ 25°C. Pipes attached directly to the insulation means something close to the flow temperature is reached there, and so higher heat flow happens downwards. You need another layer of membrane (thinnest DPM you can find) on Celotex to stop reaction of aluminium facing with concrete, also prevent any leaks between the panels (just in case, even if foamed). As mentioned earlier, apart from compression lagging around, do install perimeter insulation to prevent bridging to the walls. Put it between DPM and the 2nd membrane, otherwise it will float away. I've seen opinions that EPS is 'soft' enough to act as both, though PIR will have better properties. Also all the services going through the slab will benefit from being wrapped in lagging And last but not least make expansion joint in any doorways, otherwise they'll form naturally. Through those places make sure UFH pipes are bent (even forcing S shape) and covered in pipe insulation, so they can move a bit within once the slab is settling.1 point
-
I think it’s a general arrogance of trades that they know better. Some always learn, go on courses and improve knowledge and skills. Others use the same attitude and approach they learned as an apprentice ( assuming they did an apprenticeship of course) and come away with the infamous lines,, it’s always the way I do things, even though you issued a specification, drawing and they quoted on that, 9/10 the guy doin the work isn’t privy to that info and just does what he/she feels is correct…..1 point
-
Best revenge is a life well lived. Be prepared for Mr N to tell you what a great house you have in a few years when it's all done (what happened to us).1 point
-
I would use a pu adhesive, the problem with the illbruck stuff is it’s not designed to be left as a finished surface, as in it needs a covering to protect it from uv and other things like ants or anything else that might chew at it. so you would need to do two lines of pu adhesive with the expanding foam line down the middle. so you might as well just use the adhesive. will be expensive doing it with tubes, so the sausage type gun will be the cheapest method. If your buying it by the box you should get it for £5 a sausage.1 point
-
Welocme I am a bit late to this beach party. Used to live about 550 miles SW of Antigua. Only got the tail end of one small hurricane when I was there. All the cast concrete house had no real problems, Tin Town was not very pretty, but rebuilt within a week. I have often wondered how easy it would be to build in the Caribbean as all the island I have been to have felt like home to me.1 point
-
I Personally don't see this as a last resort. My intention is to use J bolts cast into the insulated slab, the stick made panels will have the hold down holes drilled, then when lifting the panel into place, three beads of quality low expanding foam construction foam (ILLBRUCK FM310) applied to the slab, then the panel lowered down into place, lined up with chalk lines. The adhesive will expand and fill any deviations in the surface and also stick the frame to the slab. Any movement will be accommodated by the foam. I will be using radon barrier, so this will be lapped up the external Wood fibre insulation. I think the problems of using a membrane is you introduce 2 joins. Also the gap will be Plus and Minus X mm, so the membrane/ joint strip will have to take care of deviations both ways.1 point
-
I would just trim it flush.1 point
-
Pretty cool and what a view. Can feel the cool sea breeze just looking at the pic...1 point
-
Yep, I've heard similar, I think this applies to wood frame houses. The spec with concrete (with wood roof) is having a concrete ring beam all along the top of the walls 16" deep x 8" wide with 4 x 5/8" longitudal rebar & 3/8" stirrups (like a wall plate but much much stronger!) and you have 2 lots of 1/2" rebar coming up through the cinder block wall all the way from the foundation, bent and wrapped over every 3x6 rafter and back down into the cast beam... So you build up the wall, fabricate all the steel work and form work for the 16x8 RCC beam, built the roof frame, and finally cast in the concrete (which also fills up the cinder blocks with concrete all the way down). That way you could virtually pick up the house by the rafters (and certainly if the roof is coming off it won't be due to the wall connection). Here is the drawing:
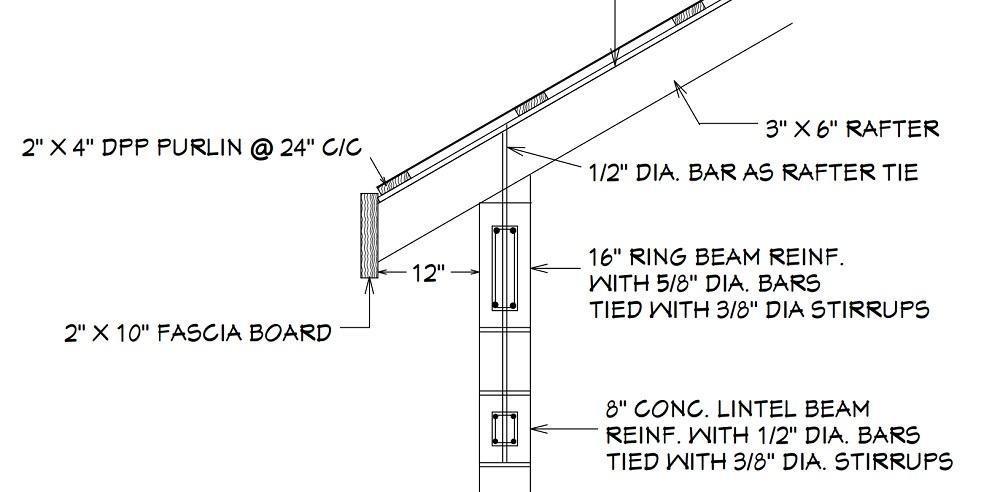 1 point
 -
I always did this, seemed a no brainer.1 point
-
Having won at Appeal myself against a particular neighbour (and the council), just wearing a smug grin whenever I met them was enough for me.1 point
-
The best way to annoy him is to ignore him and get on with building the house. Pleased it's ended well for you.1 point
-
Did you plan for any walk on glazing? Asking for a friend ( @pocster)1 point
-
Been on the forum barely 5 minutes and already the guy wearing nothing but an acid smiley face and a bag of crisps wants to travel half way across the world and meet me in person...what could possibly go wrong?! Joking aside, yes of course with pleasure. If you book then let me know and I'll share my local whatsapp number. Budget USD, I paid 200k for the plot. I originally had a build budget of 450k, but funnily enough I've spent the day on excel as I've been getting more firm numbers back in...think I was too optimistic, but not only that I'm finding a lot of material costs (and shipping, given that everything is imported) has gone up since I started planning. It might end up closer to 600-650 for build so absolute max 850 all-in with the plot. That's all in USD, so divide by 1.3 for sterling.1 point
-
Just been looking at our photos and there was a week between the final measurements and them being on site to install.
 1 point
 -
That is not acceptable. You cannot have the timber below ground. Why not raise it up on blockwork? You can still achieve a level threshold at the entrance(s).1 point
-
Who designed that? It just looks wrong to me, you are effectively putting a timber cassette down into a trench below ground level, relying entirely on that red board to keep water out, and no way for it to drain if any does get in?1 point
-
Well, not so sure about that... This is a real risk - friends built a basement near us and found an underground Thames feeder stream running through their plot during survey. Had to de-water during build (expensive) and SE designed a very meaty slab to prevent the hydrostatic pressure pushing the basement out of the ground. As it was their rainwater harvesting tank popped out twice during the build. I can see the logic here, we had a small area where our external basement stairs come to ground level and while it made sense for the excavation & retaining wall to follow the line of the stairs, was much simpler to just chop out and cast a square box, what you loose on the additional muck away and concrete you gain on speed and simplicity of construction. From their data sheet, https://www.recticelinsulation.com/sites/default/files/downloads/Eurothane GP Technical Datasheet.pdf the compressive strength of 150mm board is 140KPa for 10% deflection, so almost equivalent to EPS 150 grade. By comparison EPS 200 which our SE specced has a strength of 200KPa for 10% deflection. EPS 250 and 300 is often specced for sub slab applications also. The calculation will depend on the weight of the whole structure above the insulation and point loads will factor also - one for your SE. WRT insulation thickness, you need a thicker EPS sheet than PIR to get the same R Value - we used 300mm for under the slab and 200mm (of EPS 70 grade) for the outside basement walls - so the trade off is more excavation & muck away vs cost of PIR / cost of EPS. You can obviously stack up individual thinner sheets of insulation to get the thickness you need or buy as a single block.1 point
-
I dig out a keyhole shaped trough in the concrete and terminate with a flexible hose if it's a real difficult install. If it's more straightforward I will set the tray into its final position with packers and work out the height from the base to the top of the trap. I'll then make all the pipework up ( in the same keyhole ) dry, eg not glued, and put everything into its final position, resting the tray back over to check all is 'good'. I then lift the tray off and mark 3 or 4 lines across each junction of pipe and fitting, numbering and marking which way it top / arrow to show direction etc and disassemble. I start gluing it all together using the marks for confirmation that it's all going back in exactly as it was mocked up at the dry fit. Then I will chase a small channel out from the head of the keyhole to just outside the outer edge of the tray as a kind of funnel. If the pipework goes to an outside wall or disappears down through the slab, make sure you use a few hand fulls of dry tile adhesive powder to fill up all those gaps so the pipe is completely sealed. You'll realise why shortly..... Then mix up a wedge of rapid set flexible tile adhesive, mixed so it doesn't slump. Use that to prep / clean the underside of the tray by putting some adhesive on a cotton dishcloth so you can scour it and remove any contaminants from manufacture. Then you can set the tray down on big piers of adhesive, aiming for around 70-80% coverage is ample, staying away from the area immediately where the trap / waste will sit. Put some CT1 around the underside of the hole in the tray where the seal of the trap will make contact, not going mad with it. Once the tray has been set in place, and whilst the tile adhesive is still wet, screw the waste into the trap sealing up as the underside of the waste so you have wet CT1 from under to over. The fittings will displace what it doesn't need, but you need to be sure the rubber seal under the tray doesn't skate off centre whilst lining the waste up with the trap and screwing it in. Once tight, clean all excess CT1 away with baby wipes ( lots of them ). Check the levels one last time, and leave the tray to set for a couple of hours. Then comes the magic bit Make a continuous line of sand about 6" deep 10mm higher than finished floor level like a dam in front of / around the tray, with the end of the funnel inside the dam eg so the sand will 'belly out' at that point. You then mix some self-levelling compound and pour it SLOWLY into the 'funnel' where it then flows towards the keyhole, thus filling it with SLC like filling a mould. Eventually the SLC will fill the trough / keyhole, will rise up to finished floor level, where you can then stop mixing and pouring. Job done. That process fully encapsulates the trap and pipework so you can stand on the trap whilst showering without any risk of it pushing down / through the thin part of the tray,plus this also fills in between all of the piers of tile adhesive that you used to set the tray on. You pour the SLC until it comes up and out of the funnel, and rises about 3-4mm above FFL. That way you know the underside of the tray is full of the SLC and zero voids. Tres bien.1 point
-
The drain can be moved a certain amount within the footprint of the tray. Perhaps just not right where the pipe enters. I fitted a very shallow tray then had a change of mind and decided to fit a deeper one as we like high flow rate showers. The waste moved from the corner to the middle of one side. Just had to rip out the supporting frame and rebuild it to suit the new waste position. I can imagine it isn't always that easy.1 point
-
I went with 110mm pipe coming up under the slab, directly to where I wanted the shower drain, but then used a 110mm to 50mm offset connector that allowed me to rotate the connector to get a +/-50mm tolerance in all directions. I didn't use a shower tray, just set a linear drain like this: into the slab, sloped the slab itself and tanked it before tiling I did all my showers the same.
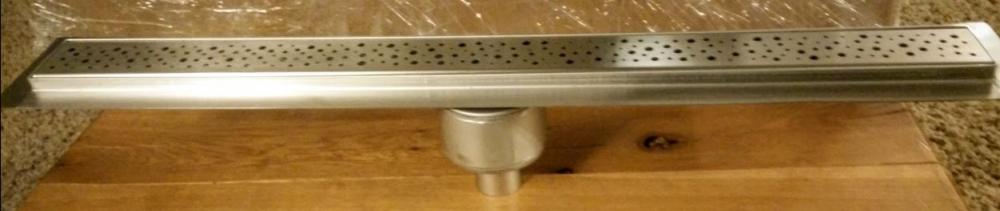
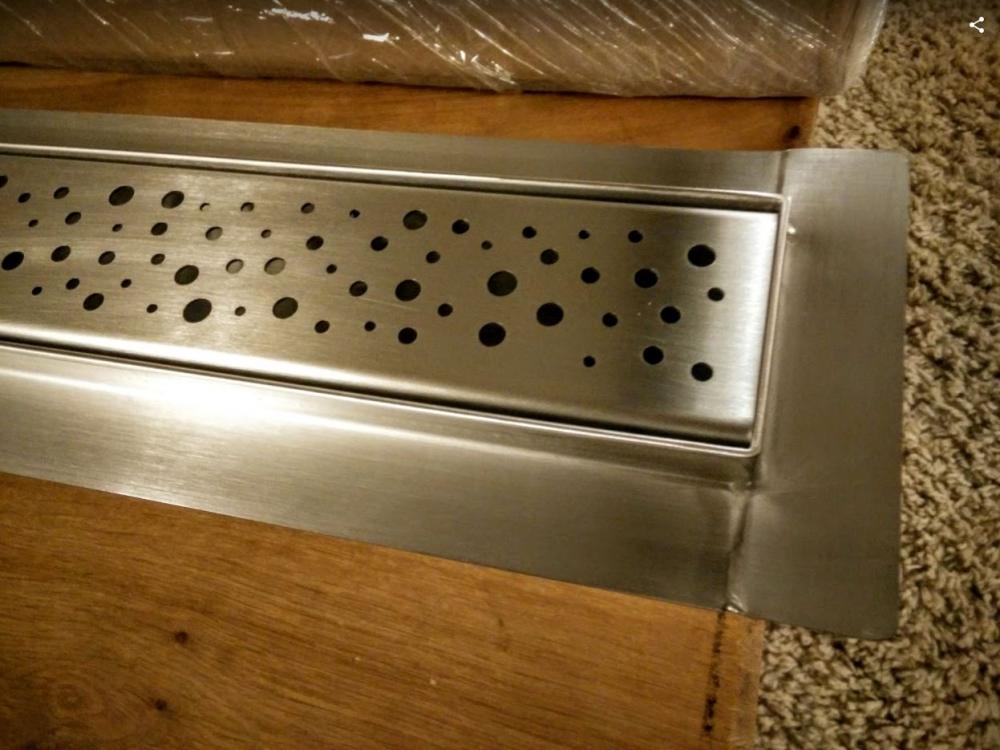
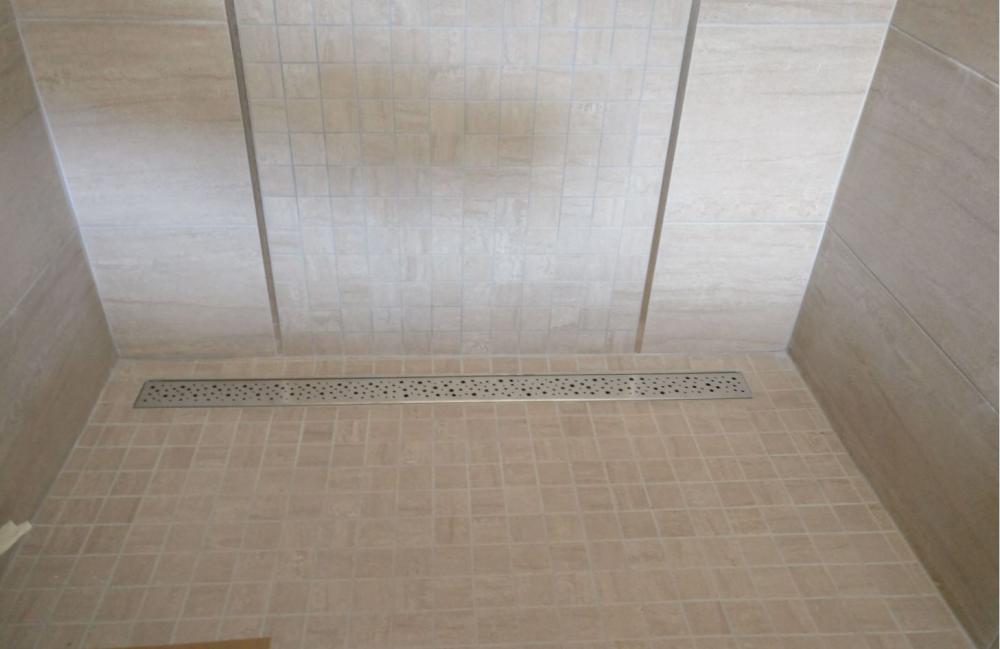 1 point
 -
How about a Geberit wall drain?1 point
-
I've been getting my head around Partition duty and I think I'll be happy as long as it is Severe duty in certain places. BG Habito is expensive (£20) and only available to me in Pallet quantities (38 @ 2.7m). It's good stuff though and the BG System Selector says a sheet of Habito either side of a 70 S 50 C-Stud is Severe duty rating with Sound Insulation of 38dB. That's with no insulation and they don't give a value with insulation. However, I can deduce from page C04.S02.P04 of the White Book that adding 25mm of acoustic insulation adds 6dB, so would make that combination 44dB. Given the incremental cost, I think I'll go with the Acoustud and SoundBloc upgrades which give Severe duty and 58dB sound insulation, the same as insulation + 2x SoundBloc each side. That gives me some combinations that all have 58dB: Habito + Soundbloc both sides £65/lm Habito + SoundBloc one side, 2x SoundBloc the other side £57/lm 2x SoundBloc both sides £49/lm In less sound and duty sensitive locations, I can go single skin with 50dB: Habito both sides £47/lm Habito one side, SoundBloc the other side £39/lm SoundBloc both sides £31/lm Future proofing with Habito is going to cost me a fair bit, but not as much as if I was to put Plywood or OSB in at their current prices. I may end up with some Habito sheets left over though. I can do this as I don't have many metres of partition to address. For reference, a 40dB 70 S 50 wall (with insulation) would be around about £18/lm I think. On this, SoundBloc each side adds about £8/lm and the Acoustud adds about £5/lm. I don't have any fire requirements above 30 minutes.


 1 point
 -
Ditto. That was my reason for going all metal. 70mm track, 50mm staggered I studs. 15mm soundbloc both sides. Ply lined for landing cupboards and walk in wardrobes.1 point


.jpg.c21f3ac78c9b7efd90cbdcb312744dc5.thumb.jpg.7adcad4c0e384f5ecd7d56b0618df6e5.jpg)