
Leaderboard


Popular Content
Showing content with the highest reputation on 03/25/22 in all areas
-
Second idea. How about creating a new facia that runs the full width, and a bit deeper. Use that to cover the existing gutter, 3 short downpipes going into a larger pipe (that is hidden behind the false facia), then to a popper downpipe at one end.
 2 points
 -
Haha. Thanks for the sketch Peter.. Onoff skills there/ really helps this eejet. NOW Im on board, now I understand flue figures refer to the - internal- flue width. I was only ever thinking outer width! Great. Im also thinking once I get this in, could I maybe decamp into cabin for 6 months & give my house ( mostly) to ukrainians..? A long way west tho. But a whole family could have it. Me scrimp for 6 months.. nothing to endure compared to their plight. Fab thanks. Zoot.2 points
-
£300 per plus god knows how much fuel But does the work of several excavators Im burying the clay on the field Probably 1000 tons I was going to use a local farmer who’s been taking the muck from another site for the last 12 months But both he and the builder are going to be fined next month For not having a permit
 1 point
 -
1 cement 2 sand 4 aggregate1 point
-
Looks the boy.1 point
-
What a beast!1 point
-
Absolutely Looks fantastic once oiled1 point
-
Probably into the arena of diminishing returns, plus you want to keep the thermal mass (I know, I know) of the blockwork exposed to the internal environment.1 point
-
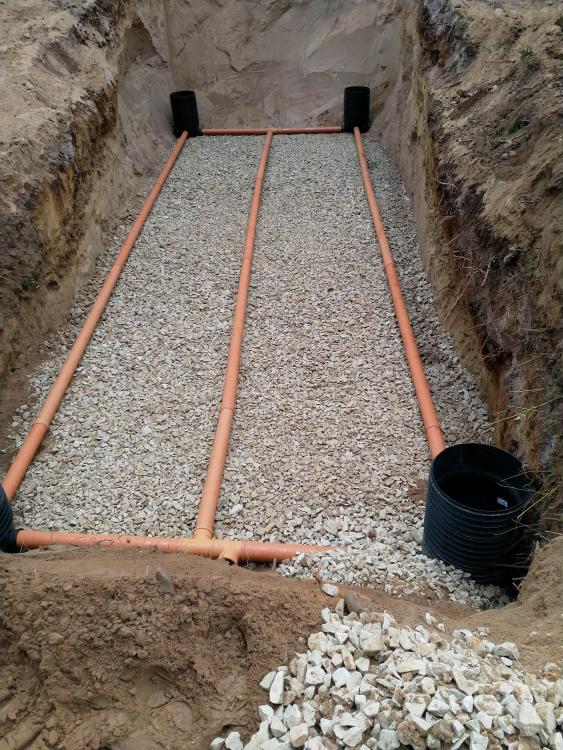
Or drain to a ditch that’s wet some of the year (depending on type, mine is a vortex and is allowed to do this). And it’s a lot less work that a leach field.1 point
-
Works outside of the demised premises are not allowed - this would even include fixings into the external walls. In the real world, get the License and chance it.1 point
-
Yet another example, I'm afraid, of a headline grabbing announcement which fails to deliver when you look closer into the detail.1 point
-
I lined my inital ones with DPM, but found it just sits with water and you end up getting soil down it that you can't get rid of. Needless to say the wood didn't last very long. I've re-done them, this time without plastic, only a year in so can't comment on longevity, but hoping it'll be much better, certainly didn't gain anything from using the DPM. Make sure you double coat with a good fence paint on the side you won't see, and that should help more.1 point
-
We are using a Lowara Ecocirc pro. Has an integrated timer, so just needs power. Runs near silent.1 point
-
Sand and cement Unless it’s Accrington brick Mastic and linseed oil1 point
-
3 bed. The stupidity of the SEPA rules. They have a limit high/low for the water to soakaway during the test. Above or below that limit is classed as fail. So if you are on bedrock or sand you end up with a huge over sized soakaway. Good thing is it should never clog up. Doesn't look quite so bad with the piping and the lower stone bed.
 1 point
 -
@Onoff this is a good guide https://www.gardenforumhorticulture.co.uk/gyo/Square-Foot-Gardening.pdf1 point
-
Should be fine as I have heard of them often enough. You don't ever have to buy a packet again because you just let the last few pods grow to maturity and harvest the fat beans for next year. The beans I grow with most success have reddish brown beans with grey specks. I have no idea of the name as they are on 15th generation now.1 point
-
As predicted, progress has been a bit slow. We've been working away on internal joinery/finishing and a bit of outdoor landscaping when the weather allows (in-between baby-management and working). We got our building warrant completion cert. and VAT reclaim back about a month ago which has also helped. Costs For reference, our finalised costs were just shy of £1300/sqm including all professional fees/admin, site setup, construction and fitting out costs. I think this is a fair reflection of the amount of work put in by us vs labour bought in. We had some fairly labour intensive jobs, such as trenching the water pipe ~300m through the woodland that, while they took us quite a while, we would have paid a lot of money (and likely had a lot more destruction) if we'd paid someone else to do it. We did spend quite a bit on labour for the groundworks/founds, framing, plasterboarding, electrics and plumbing, insulation and some finishing joinery. The bulk of the spend was prior to the significant materials price rises. Knocking all the labour costs out and it becomes possible to see where you get closer to £1000/sqm. It's been tricky enough juggling work, looking after small children and trying to finish building and so while reducing the costs might be feasible I hate to think what situation we might be in now if we had tried to do everything ourselves (add in the materials price rises recently and I'm also more relaxed about not drawing it out). The house We've now spent a good chunk of our first winter in the house. Our main heating is a woodburner, with a few direct electric radiators as a backup. We light the stove for a few hours in the evening most days when it's cold (say 0 and below) and every other day for an hour or so if it's milder (~5 degrees ish outside). We've used a small wood store's worth of timber. Despite a relatively poor airtightness test result compared to some others on here the house seems to hold heat well and is fairly comfortable. Finishing off We're now mostly in the realms of landscaping. We're not a massive fan of patio slabs, but wanted somewhere to sit outside. In the end we got hold of a load of broken bits of caithness sandstone, bought by the pallet from stonesource in Inverness. Quite heavy and time-consuming to work with but very solid and the variation in the stone gives a nice finish.1 point
-
this one https://www.jewson.co.uk/p/hand-held-diamond-drill-JTH3063A has a built in water feed. I could just hire it for a week, stick it on my account and be done with it. thanks for all the answers, I'll have a think about it all and work something out. going to leave this job until next week now as well so I'm not rushing to do it.1 point
-
We had to do the same. SEPA in Scotland seem less keen on draining to a watercourse and only allowed that for us after rejecting a different proposal. But insisted the discharge pipe pass through a small partial soakaway first (same as a rumble drain, different name) so when the water table is low, some will soak into the ground and reduce the discharge into the burn. I think it is to do with dilution rates, in the summer when it is dry the flow rate in the burn drops, so if you can discharge some locally and reduce the discharge in dry conditions, you maintain a good dilution rate.1 point
-
Env regulators prefer there to be some dilution for direct discharge to surface water.1 point
-
Or just clad the front in downpipes in a herringbone pattern.1 point
-
I drilled dozens of big holes with my titan sds drill. The slip clutch is essential. Also borrowed sparks core drill. Not a whole load of difference tbh. It's really tough work. Set yourself up on a proper platform so you can keep the drill level and your weight behind it. Ladder is no use. Oh the dust. The dust. Wear all the masks. For the holes through the 200mm RC walls I hired a guy... Best money spent!!!1 point
-
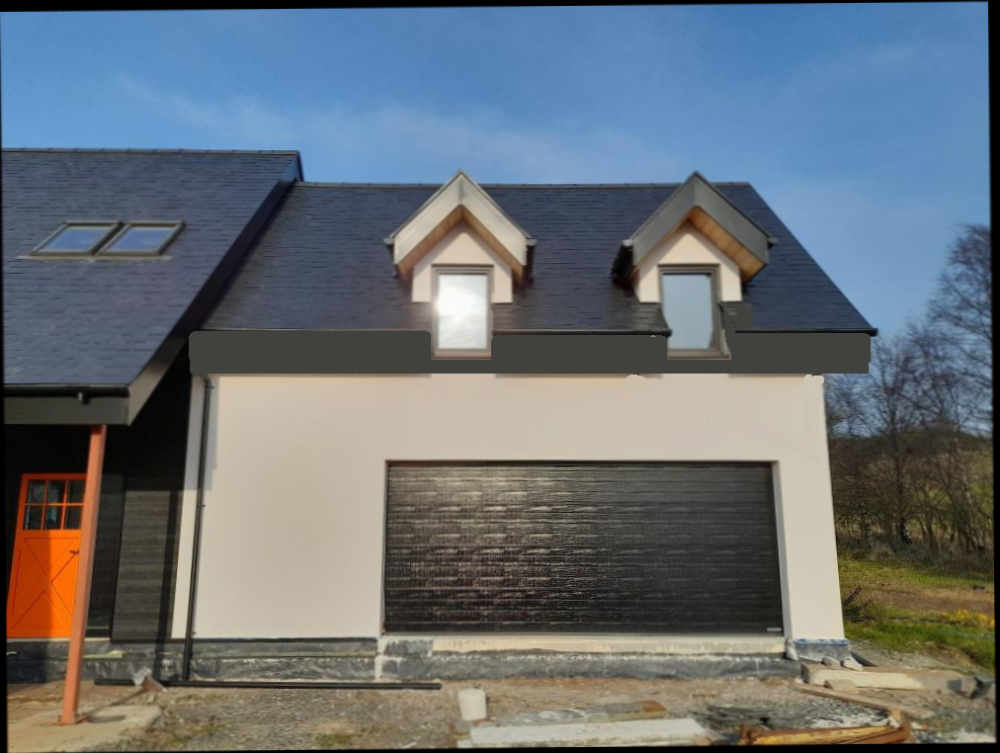
What about another black diagonal on the left to balance things up?
 1 point
 -
Yep . If storage is ‘an island ‘ and restricted export then you are sorted . I went with pw2 originally as that was the main ( if not only choice ) . Also my original aim was to export as much as possible. But it became clear the last thing I want to do is export ! . I want to store as much as possible and when no sunshine fill storage as much as possible at tou cheap rate .1 point
-
all sorted1 point
-
It is obviously NOT about maximising the amount of green energy products installed but all about prolonging schemes like MCS etc and trying to make it so DIY is impossible.1 point
-
If the 2006 face out happens Which I ver much doubt You will still be able to replace like for like Long after we have all perished From the inquiry's we made 12 months ago Price looks ok1 point
-
I have just had a look at a site for panels, and they claim it is on full systems only?!? So if I wanted to top up with 4-5 panels, I won't get the 5% break, however, I think all the companies will just bump up their price 5% and leave it as was claiming "rising costs" prices never come down!1 point
-
Have you thought about LPG also, you get a modulating boiler that way. You can get it to do low flow temperature for CH. I would consider a hybrid system, ASHP and boiler. Combi boiler (oil or LPG) provides DHW and suppliments ASHP in really cold weather. ASHP does the rest. You should be able to this for a similar price. Or just ASHP and get a few grand from the government. You really need to future proof the system what ever you do. Specify oversized radiators so they work at low temperature flows, get the right sized piping also for the distribution system.1 point
-
+1 to all the above, because we are on clay we run our outlet to a ditch but because it’s dry part of the year it needs to use a rumble drain (this is a perforated pipe buried in drainage stone) between unit and ditch. Our is a Vortex and yes I buried the air pump in the ground to subdue the noise. You don’t need a second pump in my opinion, it’s only the diaphragms that breakdown and I have a spare set in the pump housing ready. The advantage of using a ditch is it saves the cost of burying a drainage field which can clog over the years. Also the Vortex has a collection box at its input, this allows “illegal” items to be collected and not clog up the works. (We had had visitors that have forgotten the rules). Mine has been in three years and not needed emptying yet.1 point
-
I'm using a Harlequin Hydroclear 6, been running for about 6 months no issue. No moving parts except compressor. As mentioned, in the plastic box they are make more noise than they could. You can hear ours from about 6m away after you can't, will be planting around the compressor box to dampen down the noise further. You shouldn't put baby wipes etc in any toilet! They are plastic and don't decompose. All treatment plants rely on bugs to breakdown the waste in the treatment plant. Bleach (chlorine) kills them. You can use it sparingly, we do one toilet at a time and leave in the toilet for as long as possible before flushing.1 point
-
Have you considered the impact of the phasing out of off-gas-grid fossil fuel heating installations for all domestic and non-domestic buildings from 2026? I've not looked at the detail, but assume you won't be able to buy a replacement oil boiler from that date.1 point
-
Minimum number of moving parts Bury the air blower ( in a ventilated container ) Buy two air pumps (keep one spare - breakdown; replace (£186) and send the other for maintenance: zero down-time.) For us Bio Pure works a treat. Ticks the boxes above. Self installed: 3tonne digger, level, a tonne or so of concrete. Run from a fused switched spur on armoured cable. Loads of similar threads on BH. Here's an evening's quiet fire-side reading And here's a two minute laugh - it is Friday after all.1 point
-
From my short experience with this, our written description of current flora and fauna on site plus our plans to introduce specific varieties of plants for nesting birds and insects and wasn’t well received. They wanted to know a number. I’ve sent the completed matrix which puts a huge percentage gain on the site. It doesn’t go far in representing the original layman’s description of habitats we aim to increase. It looks and acts more like an agricultural claim form for subsidies. arbtech will do your survey, starting at £496. As you would expect. My planning officer admits he doesn’t know what this should look like. I guess a headed letter with 15 pages of descriptions and small graphs would no doubt tick their box.1 point
-
@Iceverge I saw your original message in my email notification. Yes fully agree with everything you say. If only I could do it all again = It's a very long story (won't bore you). Airtightness should be excellent at the boundary. Am adding insulation inside to lessen cold bridge effect. Again it's a very long story...!1 point
-
And Marsh Industries In theory it can be much longer. It depends on what people have been eating, and if the tank was the right spec. They are designed for a house being fully occupied, so a lower occupancy will not stretch it and there won't be much crud. I have been down in our 'country cess tank' after desludging to repair the pipes. What a lot of interesting things have been flushed over the years. Plus a load of timber and tile waste that a roofer had decided were easier chucked in there than in the van.1 point
-
Ahhh, I don't think it is quite that simple. It is that word 'always'. I would agree with nearly always. For a conventionally designed house yes. When open plan or large rooms are designed then that changes because everything gets technical and heavy. Plus when you allow for the loss of useful space for the stair and the stair approaches x both floors, the useful space is reduced. This applies much more proportionally to a small house. For non-domestic, which is my thing, I would tell a client at first meeting that it was much the same cost £m2 of useful space, and the use of valuable ground might be more important. Lifts also add to the cost and loss of space. Single storey easier and safer too, as there are no holes in the floor and don't have to carry plasterboard up.1 point
-
I know it is not to your liking but I think a single continuous run, with a single downpipe on the left, fixed to the dark cladding instead of the render would look cleanest.1 point
-
I have done lots of cored holes in concrete blocks with a Makita and a Dewalt SDS drill. I did do plenty of wrist strengthening exercises over the years and these must have paid off... Easy 2 per block. 3 would be fine, but not more than half the block removed horizontally over, say, 3 blocks.1 point
-
It would be a good thing to do a room by room assessment of the heating requirement to be sure before you get the alterations done.1 point
-
This is what we did on a beam and block floor. Same would work on yours I think. Basically you run the waste pipe in the insulation. UFH in the screed. Tray can be recessed or above the screed. Use a "top access, top fitting" waste trap. These have a part that goes through the tray and screws into the part below the tray. Trap can be removed for cleaning from above through the drain hole. No need for access below. Example.. https://mcalpineplumbing.com/traps/shower-traps-accessories/st90cp10-hpc-2-90mm-hi-flow-shower-trap I would use a 50mm/2" waste pipe not 40mm. Procedure.. Lay concrete slab. Construct timber support platform where tray will go at the right height. We used pressure treated frame with WBP on top. WBP has hole for trap in it. If the tray is being recessed into the screed you need shuttering as well. This can be temporarily screwd to the support frame. Trap and pipe should be installed before adding the WPB top to the frame. Support the waste and pipe but don't fix it down. It's best if it can move a bit (including vertically so it can be pulled up to the hottom of the tray later). The frame can be partly filled with insulation if you like. Temporarily position tray to check location of trap. Test waste for leaks. Lay insulation, ,membrane, UFH and screed. Remove any shuttering when set. To fit tray.. Mortar on WPB Lower tray into place, check level Fit sealer around waste, screw top of waste through tray into trap. Tile down to top of tray. Etc If you recess the tray best leave the top about 5mm above the floor tiles. That way the door seal doesn't rub on the tiles. If you need a drawing let me know.1 point
-
Yes I think almost everyone would advise against a treatment plant with moving mechanical parts such as the one you mentioned. There are many on here with different variations on the air blower treatment plants and I think most are happy with them. From memory the plants used by forum members are Vortex, Conder (me) Graff and Bio Pure. The manufacturers all seem to be a little lacking with quietness and tend to put the air blower in a plastic box that can often act like a drum and make the noise worse. In those cases people have had good results taking the blower out of the unit and building a brick or concrete box to house it instead. You don't want to be putting baby wipes, cotton buds certain womens products etc into a treatment plant. The old saying is don't put anything into it that you have not eaten first. And avoid bleach and use more friendly cleaning products. All treatment plants need emptying (desludging) every couple of years.1 point
-
No bother. Btw, I've a LOAD of ventilation, plumbing, screws, etc left over that will be going on gumtree very soon. Let me know of you're interested in anything.1 point
-
try other architects. some charge a percentage and some charge a flat fee for each RIBA stage. we chose one that charged a flat fee and think we got very good value for money.1 point
-
Yes,I said grey but the right kind of black is fine too. UV resistant....ask to make sure.1 point
-
Sorry, terminology borrowed from my industry. You need one of these, ideally sitting on a bit of cement. https://www.diy.com/departments/floplast-underground-drainage-rest-bend-285123-dia-110mm-l-132mm/81473_BQ.prd Everything before this bend should be black. I'd highly advise adding a soil vent pipe up the side of the house. You'd connect to a T piece coming out of the wall and up to a suitable height away from Windows and openings.1 point
-
Agreed as all above. It is an easy enough job to change these. have your replacement grey parts ready before you take the brown ones off. Put an obvious marker, even sign, on the wc or you may get a nasty surprise. change the two bends and the vertical as they are all in the daylight and probably inferior, plus, it will be easier to persuade these off and on with that arrangement. You might need someone in the house to push back and prevent the pipe in the wall going in, or damaging the internal fittings ...but maybe not. Expose the remaining ends in the ground before you dismantle it and clean very thoroughly or you might leave muck in the seal, and the smells will continue. Grey pipe is more expensive than brown, but it is the right thing to do.1 point
-
The problem with opening windows (if the house is ~airtight you will need to open at least 2) is that that heat will escape. UPS is the best and cheapest solution and could power MVHR and broadband.1 point
-
Here's my golden rule of sockets (which I managed to forget myself). Any wall that is bounded by a door or full size window etc should have a pair of 13A sockets and a Cat6 connection. Where you expect a higher concentration of equipment (such as TVs & consoles, or PCs and printers) double or triple up. Sods law states that just where you want to put something, the nearest socket is on the opposite wall - I have this problem with our office printer it can only go against the one wall that has no cat6 and the supplied wifi module is unreliable. Think also about using mobile appliances like vacuum cleaners etc and make sure you have enough hall sockets so you're not stretching the cable to it's max all the time. Sockets in hall cupboards are also useful for charging battery appliances like cleaners, or drills, garden tools etc. We recently upgraded to use the BT wifi discs and they work well (other access points are available) however they work best when connected to a wired cat6 and not trying to reach the router via WiFi themselves - these ones also need adjacent 13A power supply but there are PoE alternatives. I thought we had more than enough 13A sockets during the build but am still reliant on multi gang extension leads here and there to get what we need. Big fan also of switched 5a lamp sockets, especially with a switch by the door.1 point


