Leaderboard


Popular Content
Showing content with the highest reputation on 03/21/22 in all areas
-
Well, it’s been quite a while since my last blog post but we’ve not been idle but I do admit to having been slack in updating the blog. At the end of the last blog we had a superstructure and the roofer was about to begin his journey up the scaffolding. This is where that tale begins….. ’Twas a sunny November morning when all was quiet that a white van man arrived at our site to felt, batten and slate our sloping roofs. And he wasted no time at all in cracking on with it after the site orientation was complete. With his dad along to help with the battening it didn’t take long for the membrane (or ‘felt’ if you’re a roofer) and battens and counter battens to be done. After discussions with our BCO it was decided that we would fully fill our rafters and use a breathable membrane (Proctor Roofshield) attached to the roof trusses and then 25mm x 50mm counter battens and then slate battens which gave us 50mm ventilation. This allows us to not need soffit vents (or indeed soffits) which fitted in to the design of the house better and also meant we don’t have to worry about creepy crawlies living in the soffits. We started with the southern elevation so that the solar PV array could be installed and the roofer (Chris) fitted the first few rows of slates and some flashing leaving it ready for the solar team to arrive before moving on to the northern elevation So while Chris was busy working on the north side of the house the solar installers arrived and fitted our GSE trays. Once done they started to fit the panels. But it was then discovered that the company who did the ordering ordered the wrong size GSE trays and the panels wouldn’t fit. So the solar installers took all the trays down and left site after wasting a day’s work. Meanwhile the flat roofers attended site to single-ply membrane our flat roofs and balcony. A great bunch of guys from a company recommended to me by Chris so I had every confidence of them doing a great job, and they didn’t disappoint. DPM, PIR, OSB then single-ply membrane. First roof which will have a wildflower green roof being overlooked by our bedroom balcony Second roof above our utility room which links the house to the garage which will have a sedum roof They will return a little later on in the blog to install the green roofs. Meanwhile the solar installers returned after the correctly sized GSE trays had been delivered and managed to fit it all in a day. We think it looks brilliant. 28 x 375W LG panels, each with Solaredge optimisers as we have lots of trees around us. And when they’d finished each panel was giving out 1V and was confirmed each was working by being shown the 14V on each string in the loft. Job done for now until we get electrics first fix done and they can come back and fit the inverter. The only real issue we had with the solar is that the panels were resting on the slates making them lift up in places. I created a thread about them (https://forum.buildhub.org.uk/topic/24530-slate-tiles-lifted/) and after much discussion and deliberation I decided to simply use black CT1 to stick them down which worked nicely. A bit of a bodge but you can’t tell from the ground and a lot less disruption to timelines than other solutions. While all of that was going on Chris was busy slating the northern elevation and it was all coming along nicely. During that I had another discussion with the BCO about vent pipes. I asked if I could have one by the STP but she was adamant that I had to have one through the roof. When I mentioned I didn’t want a pipe sticking out the top of the roof she said that they do slate vents. A quick google search revealed what she was talking about and I purchased the item and it was installed. Looks fab and from the ground you can barely notice it which is just what I wanted. And now the solar PV install was finished he could move on to the southern elevation. But while he was doing that the flat roofers came back and installed our green roofs. The wildflower material So that’s those finished although we were still waiting on a Velux roof light for one of the roofs which was delayed but the flat roofers came back to install that for me and finish off that roof a bit later. They also installed our patio paving slabs which we think look ace. So, back to Chris and he’d now finished the main house roof slating and it finished off around the PV panels nicely. He did make a start on the garage roof but as we were still waiting on Velux windows he couldn’t finish that so he left site and would return once the Velux’s were delivered. During that period our windows and doors arrived! We used Norrsken for these and went for alu-clad triple glazed windows and sliders. The majority of our windows are fixed and we had quite a small profile for the frame which means more glass. The installers, Elite Installations Nationwide (https://www.eliteinstalls.co.uk) were brilliant and Jim and his team were a joy to have on site. They brought their spider crane with them which made lifting our windows up to the first floor a breeze for them. We decided to be bold and went for a red front door. We love it. As the window install was done the week of Christmas the installers couldn’t finish them all in time before the Christmas break so we wished them a safe trip back to York and would see them in the new year. Happy new year!! (Belated). With the new year came the return of Jim and his team to finish off all our windows and doors. Once they were installed it made the house feel so much more like a house. Closing the front door had a feel of shutting out the outside world and we were (almost) water tight at last. We also eventually received our Velux roof light and sloping and vertical windows. So the flat roof was finally completed and so was the garage roof. So we are very nicely watertight at this point. All that’s left now is the time-lapse video for this period of time. Sadly our camera only shows the south side of the building so we only get footage for stuff that happens on that side but it still makes for an interesting watch and I hope you enjoy it. Until next time.2 points
-
Roofers doing exactly this now. Dropped batten gauge to min allowed with Cambrian, 210mm (90mm headlap). Architect's verdict worked well.2 points
-
@Stones as @joe90 said, SKF are a good brand and they come with decent longevity. This is your same bearing in a sealed for life unit but £2.35 each https://www.bearing-king.co.uk/bearing/626-2z-skf-shielded-deep-groove-ball-bearing-6mm-bore/2 points
-
You want to forget any type of lightweight thermal block if you are using stone slips, the adhesive will not like the thermal blocks, you will end up using so much primer and additives, much better of with an aggregate block.2 points
-
Having just installed one for a client, I can confirm that they are VERY quiet indeed. When commissioning it I was getting frustrated with the controller as I couldn't get the thing to kick into life. Stuck my head out the front door, nothing, back and forth and so on for a good couple of hours. Then the client said "but Nick, the pipes are all hot?" I walked up to it and was met with a breeze of Baltic cold air coming from the fan, and a very faint whirr. It was indeed up and running, and had been for some time, I just genuinely couldn't hear it running from the front door. Unit was the opposite corner of the driveway at the front of the property. Client and neighbour able to have a polite conversation whilst it was running under their noses, with no mention of nuisance noise from the neighbour. Design and foresight is paramount to success here, but it would be fair to say that was in a 'low energy-highly insulated' dwelling vs what we have here. That said, it would be realistic to assume any heat pump for this ( @gdal's ) application would not be anywhere near as quiet when the depths of winter descend, so some serious thought needs to go into this decision for sure. For my current clients I have designed a "fence" which is a) a visual barrier, and b) an effective acoustic baffle, plus that promotes near-free airflow ( my design has been accepted by the manufacturer so the warranty is still good, even though it is closer to the front of the HP than the MI's would suggest is permissible ) so indeed this is a good option to 'direct' any identified nuisance sound to where it is not going to be problematic. For another, I have suggested a galv 'cage' with planters at the base, which will then become a living acoustic barrier, spaced accordingly so it can be maintained from both sides for trimming. The noisy ones have just been installed in ignorance AFAIC, and some just shouldn't have been an option at all, eg as they were simply unsuitable due to the ( expected ) unacceptable levels of noise pollution. This isn't just a client consideration, as most do not want to piss their neighbours off either. Measure twice......2 points
-
Ah, I would encourage rigging a diy blower door to try source as many of the holes as you can. It'll be a real pain once you're moved in to do anything about it. Its about your house being as comfortable as possible at the end of the day, not a test result. Even patching up a hole the size of a credit card reduced our test by 0.1 ACH.2 points
-
Today I acquired: 4 bags of manure free from here: Kent Equine Facilitated Learning CIC A greenhouse frame with no glass from my brother. A frame for growing runner beans made from galv CHS Tubeclamp and fittings. I made it for my Dad 20+ years ago but he can no longer garden. I'm planning on "growing things"! At 55 I'm a later starter. Next to get a bean trench dug in a sunny bit of the garden.2 points
-
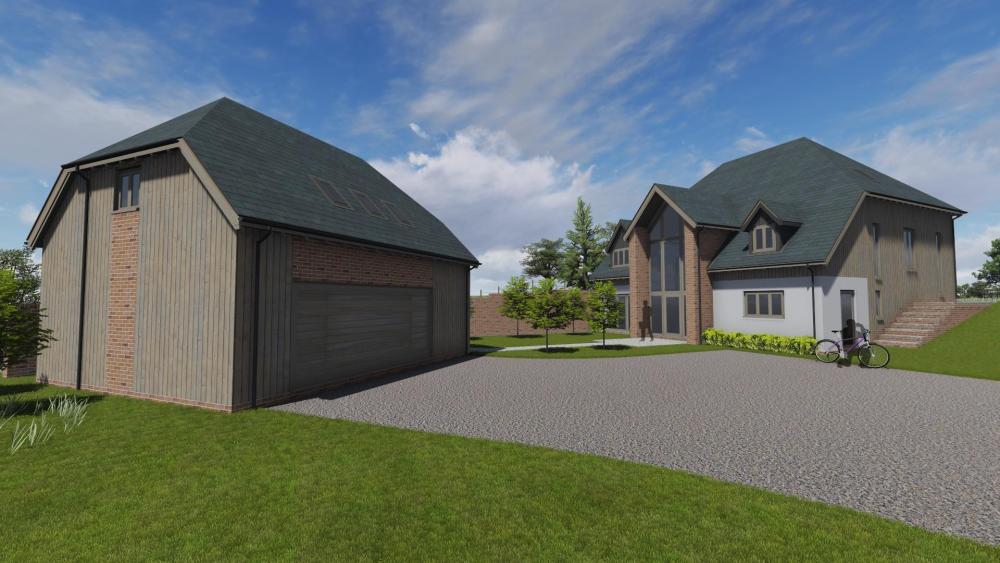
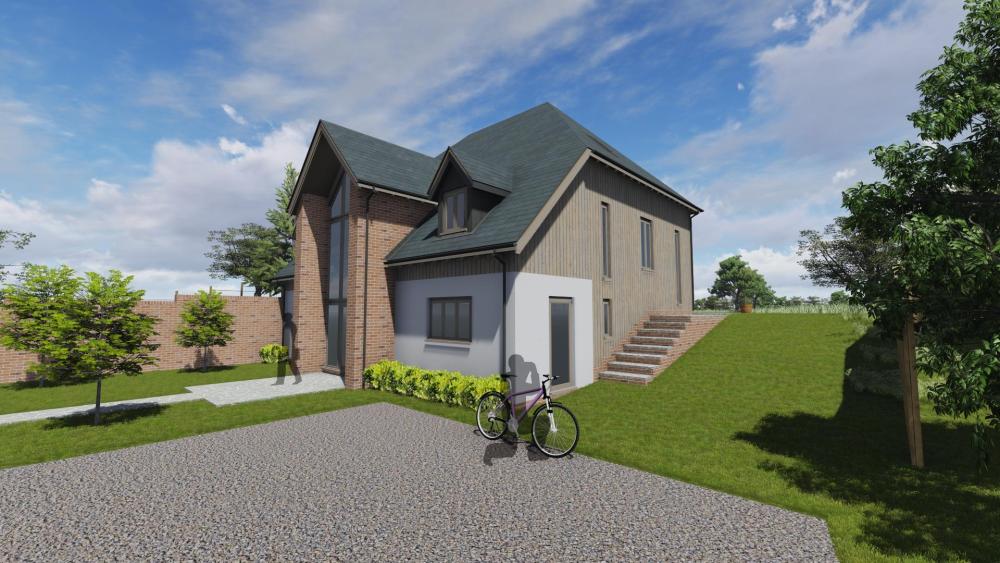
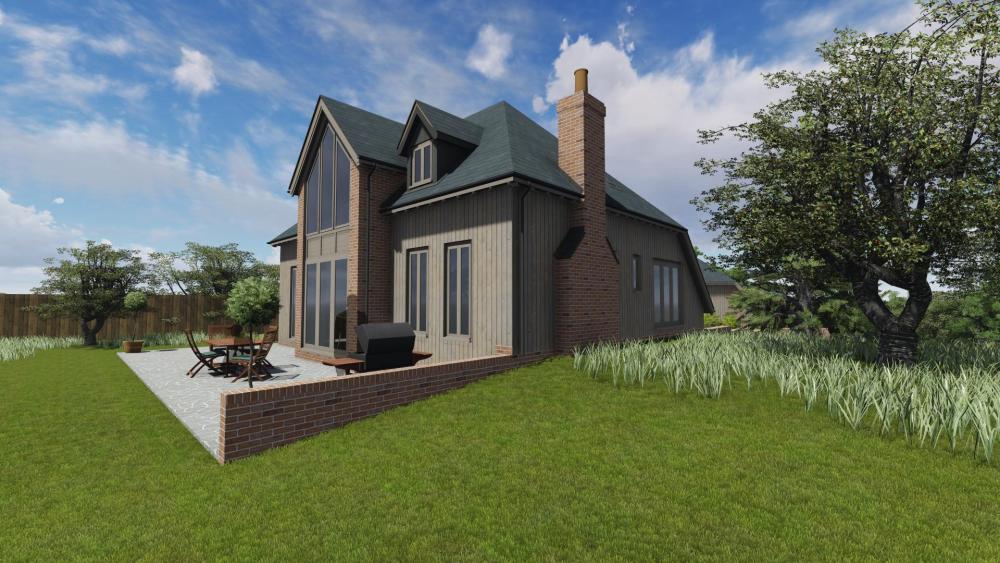
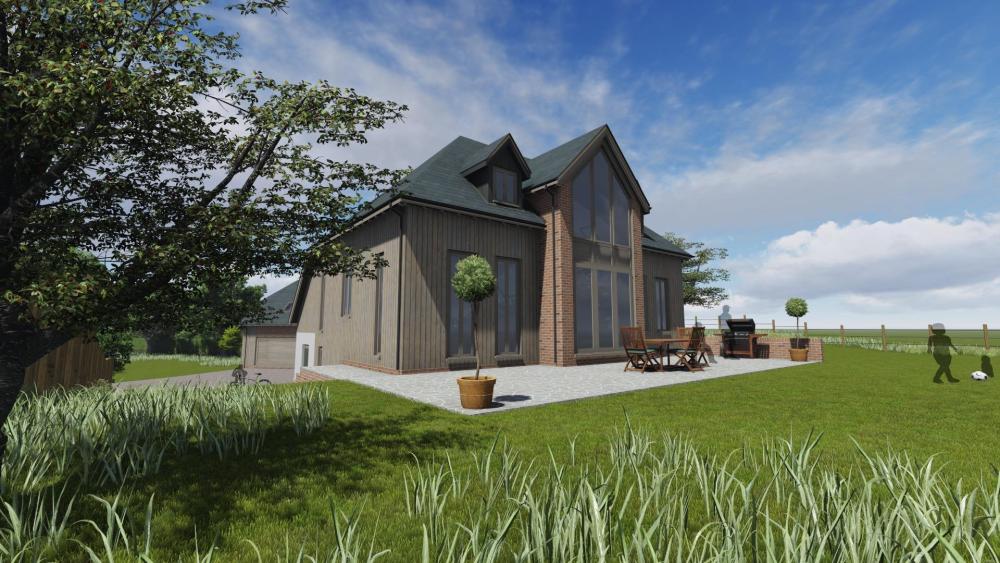
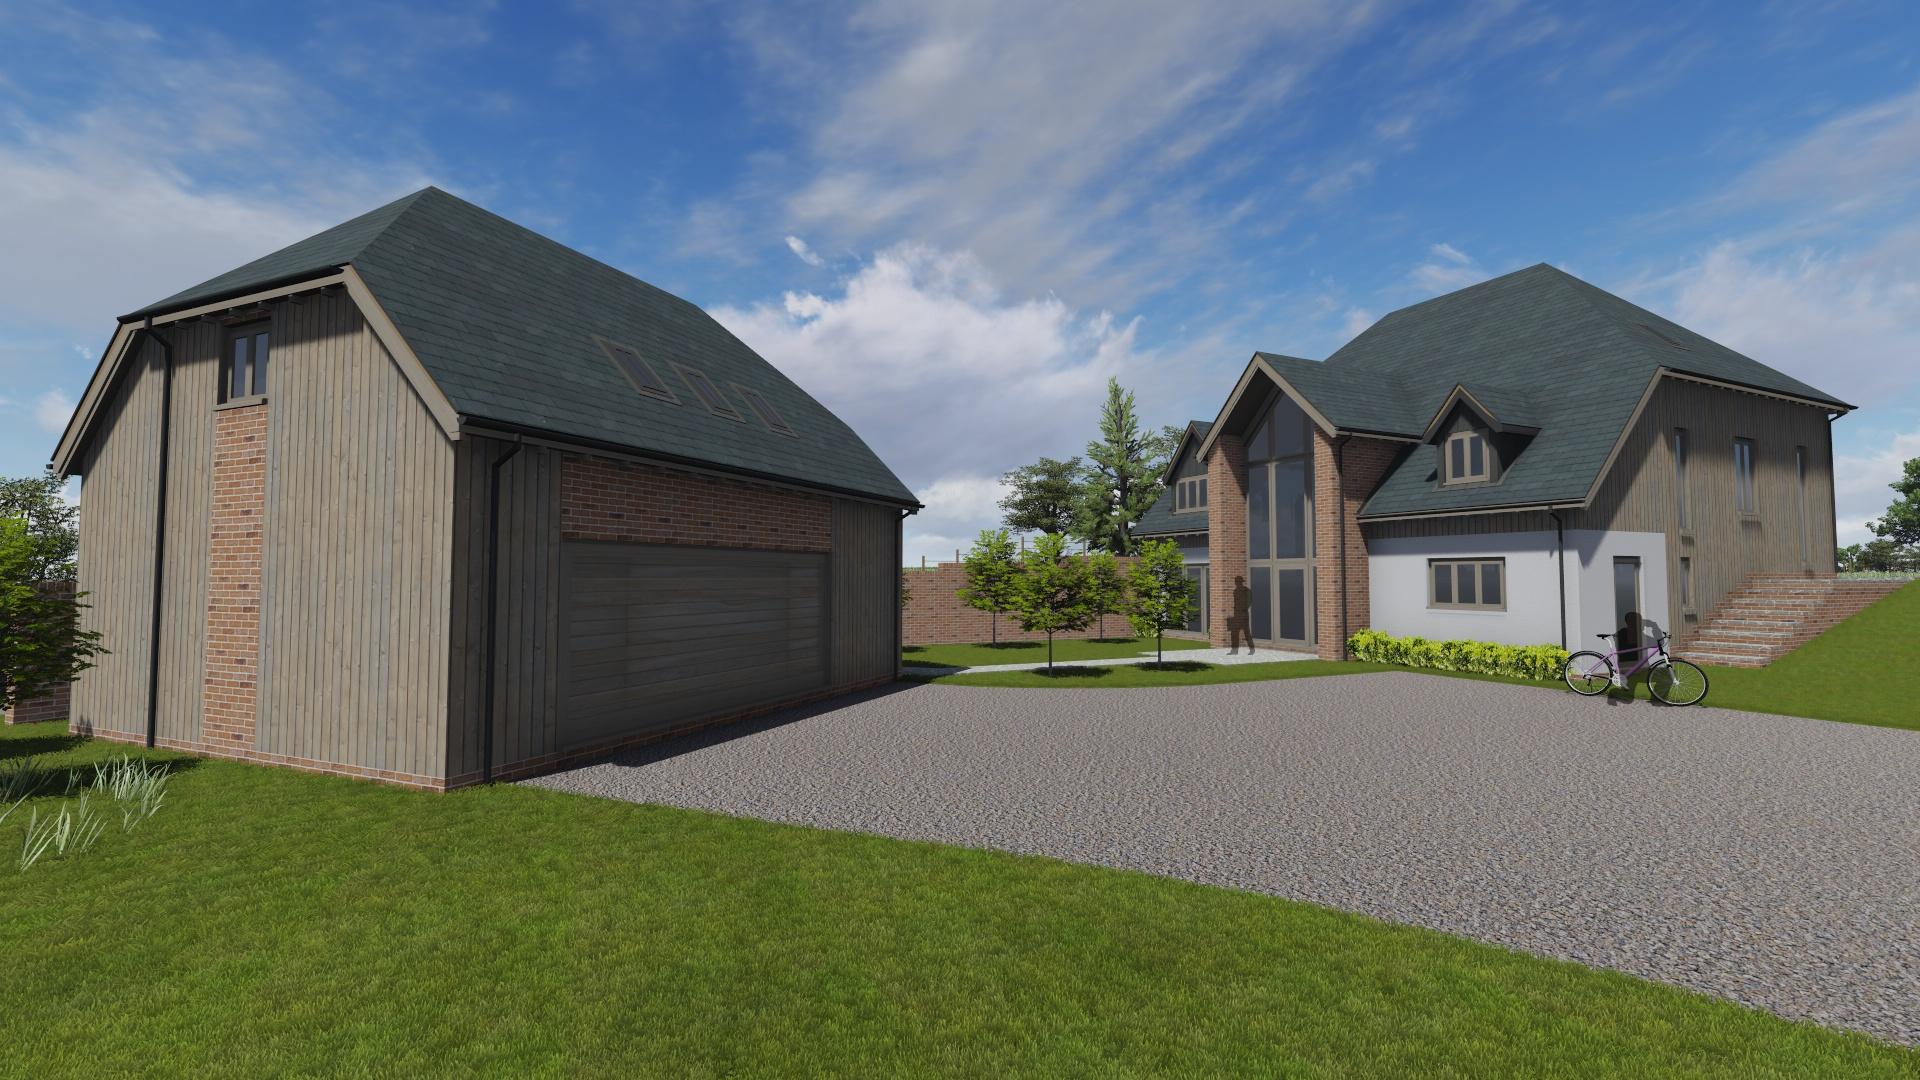
Hi all, I can’t believe I’ve only just stumbled upon this fabulous resource! A bit of background in terms of our journey so far… my wife and I are embarking on a self build project in Hertfordshire for our family of four. We currently reside in our hotch potch bungalow on site, it’s had various extensions bolted on over the years and an adjoining garage, there is a fair bit of land that we are looking to make the most of. We’ve lived here for 5 years now and the building is crumbling at the seams so we’ll be waving goodbye to it and knocking it down, eventually! We have planning permission for our new dwelling and are at building regs stage now, there is still a fair amount of cost uncertainty given recent price escalations and we’ve not quite yet got to a reliable figure in terms of the build costs, we have a budget of around £500k + contingency for the build. We feel like we’re at a bit of a junction in terms of our build approach, we’ve always assumed timer frame but since the design has been refined and some feedback we’ve had from the main contractors we’ve approached we are now having a few doubts, I’m hoping you guys maybe able to allay our concerns and offer some valuable guidance. I will post up a separate thread in the appropriate section with a bit more detail of where we stand currently but in the meantime here’s a few 3Ds of our dream self build home we are looking to make reality! Thanks
 1 point
 -
ok, a few of us here are as well, a 350mm I beam kit wall, 600mm c/c studs, mdf outer skin (breathable), osb internal with service cavity and blown cellulose is the way i've built as well as @Patrick and possibly a few others with variations and can be stick built on site. would seem to be a lot easier than your method. keep it simple1 point
-
Siberian, that won't be in sale for quite a while, as it come from Russia. Keep your money in the UK, plenty of good woods from here.1 point
-
My stoves have sliding openings at the bottom front, into the ash pan. No fancy sliders or pivots, just air in at the hole in the front. This then comes up through the grille unless covered in ash, and round the back of the fire bricks and out of numerous holes into the fire box. Works fine as long as the ash pan is not full. Wood needs to sit on ash (or a solid bottom) but mine seems to work when air comes from under just as well. I noticed that some modern fires don't have ash pans, yet some do.1 point
-
I concede. Lettuce seeds would germinate on the back of a wet sheep. If the sheep remains wet for 3 weeks then there might be edible lettuces, and an interesting root system in the fleece. And no slugs. A useful by-product for the farmer, provided that other sheep, caterpillars or greenfly don't eat the lettuce first.1 point
-
Primary is air in at the bottom of the firebox, for coal. Secondary is air in at the top of the firebox for wood. Some stoves only take the bottom primary air from the duct and simply open vents on the door to take the top secondary air from the room.1 point
-
Most decent bearing suppliers can supply good ones, I once replaced my motorcycle wheel bearings (with decent ones ) for a tenth of the cost of BMW ones. SKF and Timken are the two top bearing manufacturers.1 point
-
Quick update with what I hope is a useful tip. In the end I went for simple mechanical removal with a Stanley blade scraper. To reduce friction and prevent the blade digging into the shower tray, I used a little lightly diluted washing up liquid to wipe over the silicone and the blade. This worked brilliantly and let the blade glide on the shower tray and easily break the bond of the silicone for removal. First time I've tried it but worked a treat. Likewise having cleaned off the old silicone I used wet wipes to remove any final residue (when you see what they do to your hands I can't fathom why you would want to use them on a baby!), I did a final clean / degrease with meths before applying the new silicone, finished as suggested with profile tool.1 point
-
1 point
-
@AccidentalSkydiver out of interest if you google youtube MBC timber, then you'll get lots of examples. Here is one example which shows their warmslab and Larson struct cassette builds. In terms of your profile a few thoughts: You only need one racking layer and also a vapour barrier on the inner surface of the TF. You can use something like 12 mm OSB3 for this. If your verticals are at 40mm centres then you can join the OBS on every 3rd upright (or 2nd if you use 60mm centres). (These would need tweaked so save a lot of OSB ripping, if you are buying in 1220 OSB rather than 1200s.) We then had 44×25 battens oner-pinned on the vertical upright lines after taping up the OSB butt joints, to create a service cavity. This made first-fit a doddle. (Your SE would need to sign-off on 40 vs 60, racking, etc.) I can't see any advantage in having an outer OSB layer between the main TF verticals and the standoff fill section. In terms of the stand-off, remember that you need to tie this structurally to the outer blockwork leaf. The ties need to anchor to something in the TF. This will require some decent uprights that are tied to the main TF uprights, say 38 x 63 CLS minimum and made up a frame to mirror the main TF. You would need some structural spacer noggins to stand the outer TF from the inner say 60 × 89 × 38 if you want a 300mm fill void, but you could easily up the 60 to fit whatever you paln as the profile. You'd want some form of through anchor to fix the two frame; probably the simplest method would be to use 200mm timber fixing to drive through the out CLS, the standoff and into the inner TF. The vapour breather (panelvent + membrane) layer goes on the outside of the outer TF. Mark the upright lines so you know where to fix the ties. Remember that you want the frame to breath outwards, not inwards. Put in through-pipes for any services that you need to take through the frame. These pipe exteriors can be sealed to the frame for air tightness and the the pipes themselves foamed and sealed once the services has been pulled. You can leave the cellulose blowing until before 1st fit. (Our guys just cut a 100mm hole at the top of each panel section and pumped the stuff in section by section, then taped up the hole.)1 point
-
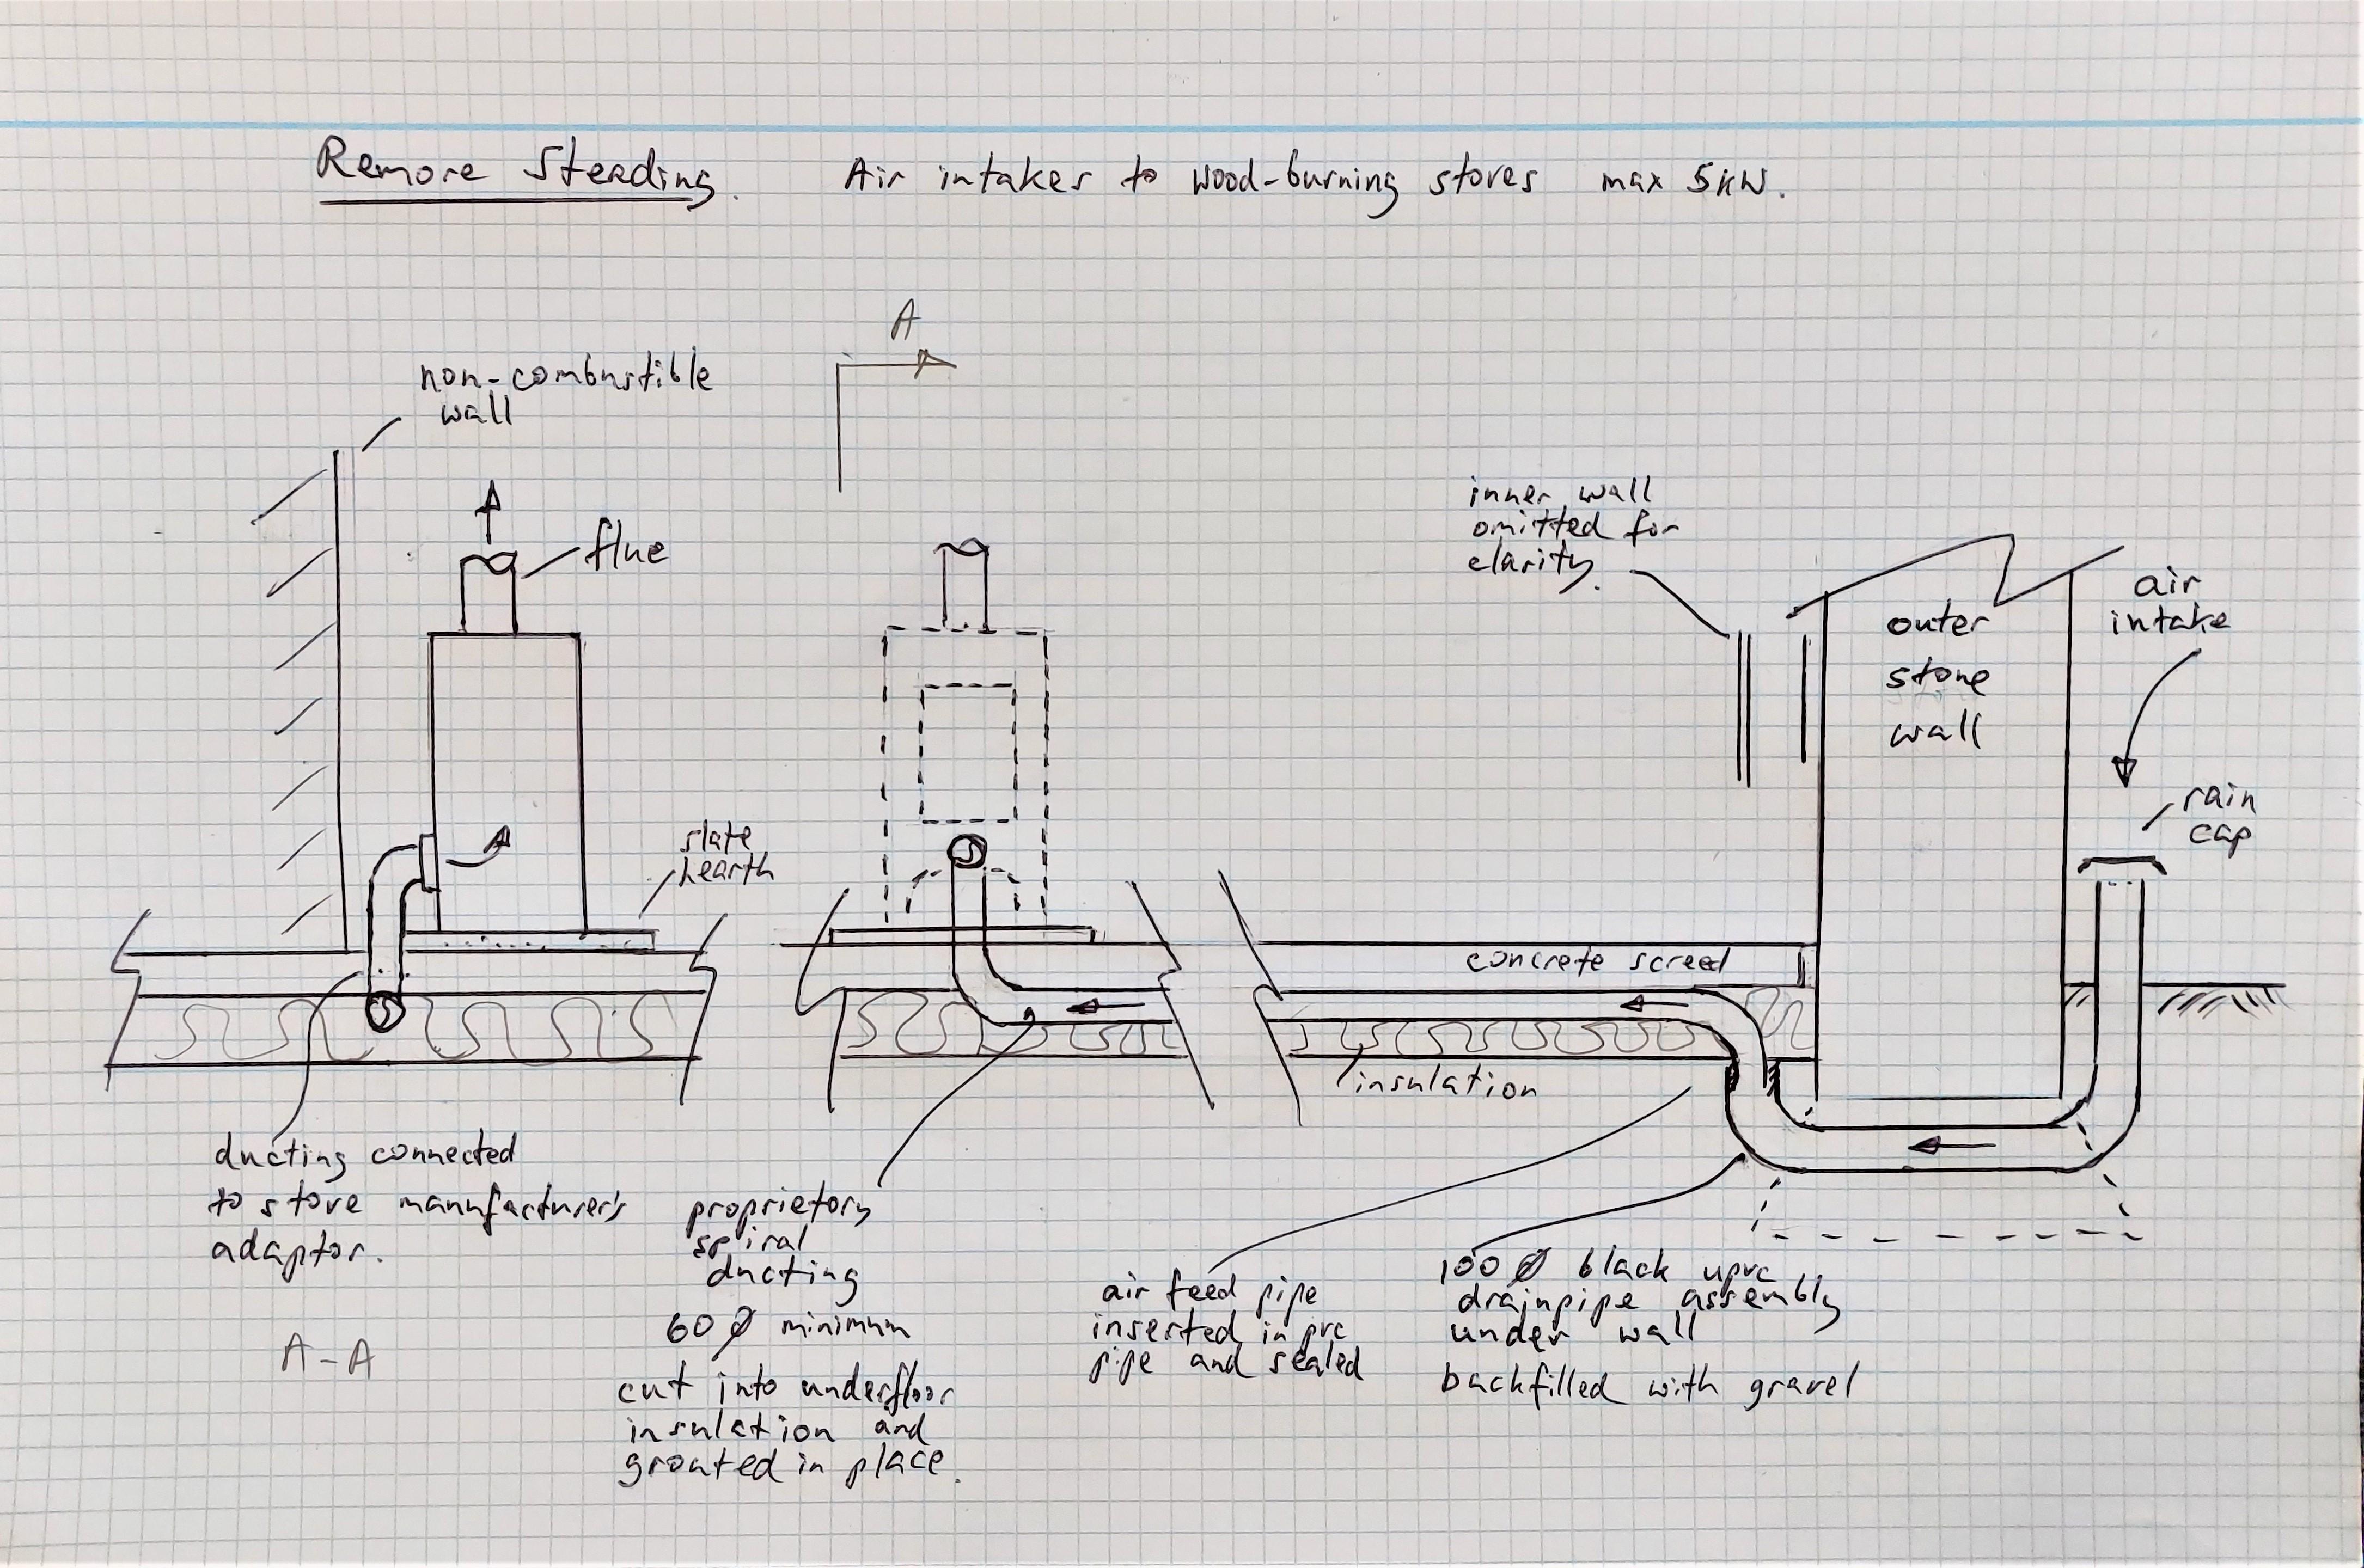
Log burners: Building inspector has asked for more detail, so for anyone who doesn't know, as I have just learnt.... As earlier discussion, the air intake is needed and mandatory for a modern (airtight) house. It can be an inlet placed near the stove, but I have gone off that idea, as most stoves now seem to have rear inlets for direct air. A 5kW burner needs a 60mm piped supply. There is no mention of length of pipe, and any friction losses along the way. The manufacturers seem to only provide an adaptor to the back, where I had expected an optional kit for appearances and strength. The utilitarian spiral bendy pipe seems to be the standard solution but will look horrible behind the stove, and I wonder about cleaning damage. I have come up with a solution for our circumstances. The feed needs to be brought in early so have allowed for pvc drain solution under the wall, and then the slinky pipe can go in, just in time. Needs something better at the back of the stove but this will do for now. Not a pvc pipe obviously, but perhaps keep our eyes open for something sturdy to replace or enclose it. For example if KeeKlamp made 60mm or greater id (their biggest is 60od). My sketch is attached.....I am no draughtsman. Not looking for comments although they are welcome of course. This is simply for the greater good.
 1 point
 -
After this was brought up last week I looked into it more, decided I like the material but if I do use it in a build I will be using a bandsaw to cut it, probably with I slicing blade instead of a toothed blade.1 point
-
I like to plant 2 or 3 bean types.. runner, french, and yellow french because they come at different times, and the yellow ones are easy to find. Also plant a traditional sweet pea in among them as it attracts the pollinating insects much better, then they do your beans as well.1 point
-
Once again a lot of sense from @Nickfromwales 👏 Our ASHP was installed on the flat roof about 8 month ago. Neighbours noticed box but no noise issue, not even over the winter when its supposed to be noisiest as the ASHP works hardest to heat the property. If there is a lot of noise there has to be something wrong with the sizing or positioning of the ASHP or the actual ASHP, or the way it's being used. Stick a car in second gear and do 50mph and that makes noise and eat fuel, so it the car crap? However, its worth considering all the AIM and APE elements before making decisions. That is Airtightness, Insulation, Mechanical Ventilation with Heat Recovery, and Air Source Heat Pump, Photovoltaics and Electric Vehicle. Some of these will not work properly without the others: A MVHR will not work properly without Airtightness. An Air Source Heat Pump will have to compensate for the lack of Airtightness and Insulation to the degree that the benefits become questionable, especially during winter, without them. An ASHP uses electricity and Photovoltaics can supply a little during winter and a lot during summer when cooling can be a problem and an ASHP can supply cooling. PV can supply a little to an Electric Vehicle during winter and plenty during summer if your vehicle is at home during sunny days. Extending a property and only doing AIM works to the extension will be no good, you have to do all the property within the thermal envelope. So if finances cause you to have to consider only a few in my humble opinion AIM first and go APE later. (but prepare the property for the APE works as much as you can). There are exceptions to properties which have AIM whereby the insulation is so thick that heating becomes a minor issue! Best of Luck Marvin1 point
-
Pretty much any system can work with any shape / size. When you have below ground elements then timber is out for that part but IFC would be appropriate, or even a block or cast concrete system, with appropriate waterproofing (SE specced) for your ground conditions. The MBC passive slab is not that complex and we replicated it for our basement and ensured that when we got to ground level, the profile matched what their timber frame would have required with their own system - i.e. an EPS insulated perimeter of sufficient thickness to meet the outer leaf (we used 200mm) and a 300mm thick concrete wall (they needed less) to take the soleplate for the load bearing inner leaf - plus structural support for other point loads inside the envelope. Best way to figure that out was to get MBC to design the frame sans slab and hand that design to a SE (or use theirs) to design the sub ground structure. Few home truths here - whatever you think, you will be very involved in the build. Unless you have very deep pockets and very, very detailed drawings speccing the location of every switch, socket etc, you won't just be handing off to a MC and coming back 9 month later to a completed house. There will be a multitude of decisions to be made, some time critical, and some way ahead of when you think (i.e. what's your flooring finish - needed to set ffl through etc.) Many of these will need you on site to make a final call and many won't be obvious until the structure is up around you and you finally see what you're building. There will be alterations, deviations and mistakes (yours and theirs) to deal with. We project managed with all of your constraints above and it's not that hard. 1) you know what you want (mostly) or will know when you see it. 2) you know what you can and can't afford. Your contractors will deliver the build but as PM you select them (and you may well use very few in the end) and you tell them what you want. You will likely want to source specific items (sanitary ware, tiles, kitchen, doors, handles, stairs etc) and get the quality / cost you want. I doubt you will just leave it to the GC to use bog standard off the shelf items - you just need to be able to use the internet and pick up the phone now and again. You will not be ordering general building materials - most contractors are supply and fit anyway which is good for your cashflow, VAT reclaim and their sanity). You'll be doing the VAT reclaim at the end as it's inevitable that you'll be buying some bits and pieces. Adding all that up, you're effectively already the PM. Add a bit of tidying up and prep at the weekends and you're there. More or less what we did but we just used subs rather than a GC for post frame - what we did was this... 1) arrange site toilet, water & power for trades - latter will require an electrician and maybe your DNO if you need to move meter to a temps supply ahead of pulling down bungalow. Are you planning to live on site in a van (or the bungalow) we did the van and it saved a fortune and kept us close to the action, which helps. 2) one contract to prepare site (demolish existing) excavate and build basement, in ground services (water, power, gas, rainwater) and leave site ready for MBC 3) arrange scaffolding & skips to MBC spec. 4) MBC come and erect frame on prepared site - on a standard build they would do the slab also, maybe be a bit of a hybrid approach for you if some is sub ground and other areas at ground level. 5) Roofer, window supplier & installer and external facade (render in our case) come and do their bit. Guttering / soffit / fascia firm did their bit next and scaff came down (in our case while guttering man was still on roof but that's another story). From the outside it looks like a finished house but internally just a shell. 6) Electrician & plumber get us to first fix. I do the MVHR as no-one will ever see it and it saves a few £k, but maybe you do supply & fit for this also. 7) Joiner comes to box out around services and put in door linings etc 8)) Plastering firm comes to insulate the stud walls and ceilings, 'tack ' (i.e. apply plasterboard) and skim (3mm cost of wet finish plaster to board). 9) Tiler tiles bathrooms and other areas, painters paint, flooring goes down. 10) plumber and electrician come back for second fix (sockets, switches & sanitary ware) 11) joiner returns to hang doors and fix skirting & architrave etc 12) last thing we did was install stairs (used temp MDF ones provided by MBC up to this point) to avoid damage. 13) external landscaping, this tends to be the bare minimum to get BR sign off as funds tend to be low at this point but probably grading organic areas, laying turf and dressing the driveway etc You may well get a contractor to take everything post shell on as a package but you don't need to. They will only do the flat slab but their SE can spec adjacent works for others and ensure it all ties together. We did 400m2 solo, tbh it's not that much more effort just bigger quotes1 point
-
For air to be extracted, the equal amount of infiltration must be allowed ( inputted ). Either from your house being a colander like mine, or through strategically positioned trickle vents ( eg in each room ).1 point
-
Noted. Hoping that humidity will be controlled with constant background extraction (heat exchange extractors, non adjustable). Will have to see also how well the aritightness implementation goes.1 point
-
I like that.1 point
-
I like cellulose too. Having used cellulose, sheepswool and woodfibre, I like them all. Just the experience of working with them makes it a whole load more comfortable and pleasant. I've used one small sheet of PIR in my built at a point where I needed to reduce coldbridging near some steel and I hated it. I've got some papers somewhere re the natural insulation - I have to admit, my management of references has been useless while I've been building so it's a bit haphazardous - I'll have a look to see if I can find something. It might take a few days or so. Yes, agree in good airtightness - totally essential - I just left those parts out as I assumed it was covered already and not the point in question. I'll be more thorough next time 😊1 point
-
Yikes, can you super insulate? £5k of extra insulation will last forever. £5k of oil will dissappear very quickly. At the very least price triple glazing. €800 to go from 2g to 3g for my neighbours bungalow. The UFH is your issue here. Slow responce time as it heats the structure and in a high heat loss house it'll use a lot of energy. Get a split A2A heat pump to heat just the air quickly when you need it. ( small outdoor unit, can be wall mounted) .You can get through the wall ones but the COP isn't as good. Consider an exhaust source heat pump all in one unit for DHW. Is solar PV a choice? You could run the UFH on a willis heater to a much lower temp just to make it more comfortable underfoot but not really to heat the house.1 point
-
Yes and it becomes less efficient so you have to size accordingly. Some manufacturers also give you the maximum run from the hood and every elbow adds something like 0.5m effective length. Yes but you’ll need to somehow convert back to round / airbrick when you get to the wall but not an issue however long runs can collect grease so make sure you have decent filters at the extractor end.1 point
-
Yes. Brain freeze, fingers did not type what i was thinking. You are clearly the first person to actually read it and correct me.1 point
-
I always plaster all the way, makes fitting the kitchen units easier, you could always tell the plasterer to make it flat there but not polished!!!1 point
-
We're putting lino (vinyl) down. £10m². No more effort than painting the floor.1 point
-
Yep, and don't forgot that you also have to dilute the paint to get good flow rates, but this is down to the area to be covered. spraying gives a better finish than a roller, especially for the mist / base coat IMHO. If you've got one room then not sure its worth it, the whole house is different, you only have to mask the windows / floor if the trim work is not in place, then blast the lot.1 point
-
Don’t forget the drainage, this can be more difficult than water and electric. Again, pipe work can run behind units but you need to make sure there is enough fall. If you are having an island, run all the services to it, whether you think you need it or not ...1 point
-
Yes, I think so. discuss what you might want to do 1/2 hour get the file out and review. 1/2 hour discuss with you or architect, then personal review after the meeting, 1 hour admin re agreeing what to do and the cost 1 hour hour do the new design 2 hours draw the new proposal, check, sign off, 2 hours admin in sending 1/2 hour admin in invoicing 1/2 hour allow for interim discussions 1/2 hour that comes to 8.5. If it is a bigger practice then some of that is done by admin/draughtsperson1 point
-
We put ply on our walls and painted. Floor we just tiled as realised needed doing quite early in the overall plan as has uvc etc to be installed. Ceiling is not done yet but I expect plasterboard and painted.1 point
-
Correct - it is per metre.1 point
-
It’s all been said already…. Get it redone properly.1 point
-
If you're intent on using the flex woodfibre between your rafters then I'd suggest it would be really useful to consider if you can increase the height of your roof buildup over the rafters. This is because if you're looking to maximise heat decrement delay then using the woodfibre sarking boards on top of the rafters is a better solution and is the typical detail for woodfibre roof buildups. Because the sarking board is denser and it sits outside the rafters it is more beneficial for reducing cold bridging as well as improving decrement delay than having insulation to the inside of your rafters within your service void. In this sense, I'd recommend you seriously consider this buildup from the outside: 1, standing seam 2, iso-mat membrane 3, plywood (I'm not suggesting sarking board but if you prefer them, for a standing seam roof they should be between 18 -25mm thickness and fitted with a gap of between 3-5mm between) 4, battens to create ventilation space minimum 50mm 5, woodfibre sarking - you can opt for anything between 25 - 60mm, but if you full fill your rafters then about 40mm would be fine 6, rafters full fill with insulation 7, internals and you can then decide if you want a service void or additional woodfibre sheathing boards and then your plasterboard etc. etc. With this buildup, you'll be around the 0.16 ish on your u-value with about 260 depth in. The important thing to consider with woodfribre is that natural insulation materials often perform much better in the real world than theoretical calcs and certain woodfibre builts benefit from improved reduction of thermal bridging and can therefore be designed slightly thinner than a basic u-value calculation might indicate. This buildup is likely to give you a comfortable indoor environment and if you make sure you use all breathable paints etc. it'll be even better.1 point
-
It stops rotation and allows you to use the torsional strength of the thinner profile. See it quite a lot and they usually also specify whether spacer tubes are required or if the flanges need to touch. In reality they are acting as Channel sections with an overlap into the cavity which won’t cause any issues.1 point
-
OK, you win. 😫 Except, of course, I heat the house with gas. The only electric heating is in the theatre room (2kW resistive convector) which blips away night and day keeping it from going below 17C. I should try that. Wondering if an inverse log scale for the Y axis might be useful?1 point
-
+1 We were 200W pre-renovation, but the Ubiquiti gear and some CCTV (and, the Virgin Media router, no less) have added at least 100W. And working from home means more laptops & monitors on charge/standby which never seem to get to low power sleep as well as you imagine they should. I need to re-audit everything and find out where it's really all going. A good spring-summer time project, when incidental heating is much less desirable! The heating has just stopped coming on, so now is the time.1 point
-
Hi, would agree to add later, even later in the design process will cost you. Once wall and roof thickness is set so is the installation depth to a large degree. Don't think of passivhaus a distant unachievable thing, a normal build can't do. Some aspects you may not do, but it worth reading up on, as most things make really good sense and can be added to a design for little or no cost at the design stage. Building regulations insulation is far from ideal and so is their airtightness. Would look to have a minimum of a 0.15 u value, for walls floor and roof. If you have UFH go to about 0.1, to save too much downwards heat loss. From your design be wary of overheating from your glazed gable ends. Extending your roof and walls out similar to the rear, could give some shading, when the sun is low in the west can be as much of a problem as midday sun. The architect should be able to model it, you need to know what spring, autumn and summer will do to your internal temperature.1 point
-
I think you will find we, on this forum, think current regulations are dire which is why most of us instal much more. Who knows where fuel costs are going, the one thing is they will not come down. My build is near passive standards and my heating rarely comes on and the house is very comfortable. I disagree that adding insulation later is easy, far better to plan it from day one.1 point
-
Hi and welcome. The NSBRC have some good seminars / webinars etc on finding ( and appraising ) plots. May be worth a look on their website for more info1 point
-
Do yourself a favour and get bigger rads.1 point
-
The initial passion will always fade : thats normal. Seeing other builds go up, owners move in - and in one case (for us) sell up and move while we're still building was hard- at the time. But slowly, the hiccups and disasters have faded into the background. More and more I'm starting to enjoy the process; I now know that feeling of almost controlled terror about doing something for the first time , will fade if I just-bloody-do-it. And if we cannot afford it, there's always a way round the problem. It just needs research. There must have been 20 or 30 instances of that process. To address the OP, I now don't really care when it will end. The only thing that matters is having the guts to put my Head-Down-Arse-Up-Go no matter how I feel 5 days a week. 6 years in, I think I've just about got the T shirt.1 point
-
Anyone trying to buy Siberian Larch then? Or was my build one of the last to be supplied?1 point
-
Real problem for me Ian Ive two Ukrainian brothers that do my taping Both are going back to fight Fiercely patriotic and get really upset when people refer to them as Russians Its a very bad situation Boris and Joe at the helm doesn’t inspire confidence Where is Donald1 point
-
AND to start drilling CAMBO. Yes we need to move away from fossil fuel, but to not drill our own and instead buy from "abroad" is not proving to be such a good idea is it? I note many of the mothballed drilling rigs that have been in storage in the Cromarty Firth for years have departed. Have they actually gone out to do some drilling? Nothing would give me more pleasure right now than if we (the whole of Europe) were able to say no we don't need Russian oil or gas any more.1 point
-
Yep we have a price from them and Core Edge too which is similar. Core Edge is cheaper as their packs are larger as they account for the overlap of joining where Everedge doesn't so you need more packs.1 point


.thumb.jpg.bac90f3bbf6868cf2118d010d936c99d.jpg)