Leaderboard
Popular Content
Showing content with the highest reputation on 01/22/22 in all areas
-
We moved into our new build mid-December 2017 in time to host an extended family Christmas. We are now over 4 years into living in our new home. We have lots of accumulated experience and made a few small tweaks. However, we are delighted about how the house has turned out, and we love living here. There were no material cock-ups, or regrets on design decisions, so we have probably fared a lot better than most new purchasers or self-builders. Maybe a general experiences post should be on the to do list, but what I want to focus on here, and a couple of follow-ups, is a general topic that others on the forum have asked about over the years: that is how our central heating system works in practice, and how I control it. The system as currently implemented is still largely the same as when I first commissioned it, that is a now 5 year-old RPi-based custom control system directly controlling the CH and DHW subsystems. This is a pretty minimal headless system running Node-RED, MySQL and MQTT client for control. The three material changes that I've made since moving in are: I have followed my son and son-in-law in using Home Assistant (HA) for general Home Automation. My server (an RPi4 in an Argon One case) uses an attached Zigbee gateway, and I have a lot of Zigbee devices around the house: switches, relays, light sensors, etc. and I do the typical home automation stuff with these. There are loads of YouTube videos and web articles covering how to implement HA, so please refer to these if you want to learn more. My HA installation includes an MQTT service for use as a connection hub for these IoT devices. I also have another RPi4 acting as an Internet-connected portal / Wireguard gateway/ file-server for caching video snippets from my PoE security cameras. Note that none of my IoT devices directly access the internet, and the only in-bound access into my LAN is via Wireguard tunnelled VPN, and my HTTPS-only blog. All other ports are blocked at the router. Before moving in, we assumed a target internal temperature of 20°C. In practice, we have found this too cold for our (fairly inactive OAP) preference and so we have settled on a minimum control threshold of 22.3°C. As you will see below, because we largely heat during the E7 off-peak window the actual room temperatures have a ~1°C cycle over the day, so the average temperature is about 22.8°C. This hike of 2.8°C increases the number of net heating days since my design heating calcs and the increased delta against external temperatures in turn increases our forecast heating requirement by roughly 18% over our initial 2017 heating estimate. Because our UFH is only in the ground-floor slab, we found that our upper floors were typically 1-2°C cooler than the ground floor in the winter months. We also need more than the 7 off-peak hours of heating in the coldest months, so I have added an electric oil-filled radiator on our 1st-floor landing; HA controls this through a Zigbee smart plug that also reports back on actual energy drawn during the on-time. HA uses MQTT to pass the actual daily energy draw back to the CH control system. This radiator provides enough upper-floor top-up heat, and does so using cheap rate electricity. Note that all servers are directly connected to my Ethernet switch, and the CH/DHW system has all of its critical sensors and output controls directly attached. It can continue to control the CH and DHW subsystems even if the HA system or Internet is offline. There is also no direct user interface to the system, with all logging data is exported to MQTT, and key CH/CHW set-points and configuration are imported likewise. This integration with MQTT, enables user interfacing to be done through the HA Lovelace interface. If there is sufficient interest I can do follow-up posts on some more of the "Boffins Corner" type details on these implementations, or if this turns out to be more of a discussion then it might be better to move this stuff to its own BC topic. However, for the rest of this post I want to focus on the algorithmic and control aspects of the heating system. In terms of inputs and outputs to the control system, these are: There are ~20 DS18B20 1-Wire attached digital thermometers used to instrument pretty much all aspects of the CH / DHW systems. Few are actively used in the control algorithms but were rather added for initial commission, design verification and health checking. Some are also used to monitor and to trip alarms; for example, there is a temperature sensor on the out and return feed for each UFH pipe loop. These were used to do the initial zone balancing. However, the average of the return feeds is used as a good estimate of the aggregate slab temperature. One of the temperature sensors is also embedded in the central hall stud wall to act as a measure of average internal house temperature. There are two flow sensors on the cold feed to my 2 SunAmp DHW storage units to monitor DHW use and to help automate during-day DHW boost. There are 4 240V/20A SSRs used to switch the power to my (2-off) SunAmps, my (1-off) Willis heater, and my (1-off) circulation pump. These and the rest of my 240V household system were wired up and Part P certified by my electrician. These SSRs are switched by a 5V 50mA digital input, and so can be driven from an RPi or similar. (I used a I²C attached MCP23008A multi-port driver to do this, as this can drive 5V 50mA digital inputs, but its input I²C side is compatible with RPi GPIO specs.) There are many ways to "skin this cat", but whichever you choose for your control implementation your system will need to control some 240V/12A devices and take some input temperature sensors. My preference was to directly attach all such critical sensors and outputs. My heating algorithm calculates a daily heating budget in kWh (each midnight) as a simple linear function of the delta between average local forecast temperature for the next 24 hrs and the average hall temperature for the previous 24 hrs. This budget is then adjusted by the following to give an overall daily target which is converted in minutes of Willis on time. heat input from the heater mentioned above. a simple linear function of the delta average hall temperature and the target set-point (currently 22.3°C). This is a feedback term to compensate for systematic over or under heating. I initially calculated the 4 coefficients of the two functions using my design heating calcs and an estimate of the thermal capacity of the interior house fabric within the warm space. After collecting the first year's actual day, I then did a regression fit based on logged actual data to replace the design estimates by empirical values. This was about a 10% adjustment, but to be quite honest the initial values gave quite stable control because of the feedback compensation. The control system runs in one of three modes: No heating is required. Up to 420 mins of heating is required. The start time is set so that heating ends at 7 AM, and the slab is continuously heated during this window. More than 420 mins of heating is required. 420 mins of heating is carried out in the off-peak window. On each hour from 8 AM to 10 PM, if the hall temperature is below the set-point (22.3°C), then an N-minute heating boost is applied, where N is calculated by dividing the surplus heating into the 1-hour heating slots remaining. Here are two history outputs from HA showing some of the logged results. The LH graph is the slab temperature over the last 7 days. The general saw-tooth is identical from my 3-D heat flow modelling discussed in my earlier topic, Modelling the "Chunk" Heating of a Passive Slab. The 7 hr off-peak heating raises overall slab temperature by ~4-5 °C; well within UFH design tolerances, and no need for any HW buffer tank: the slab is the buffer. The RH graph is the hall temperature. Note the days where on-hour boosts were needed. (Also note that the CH system only updates the MQTT temperature data half-hourly, hence the stepped curves.) So the approach is fairly simple, and the system works robustly. ? And here is a screenshot of my HA summary interface, which gives Jan the ability to control everything she needs from her mobile phone or tablet.5 points
-
3 points
-
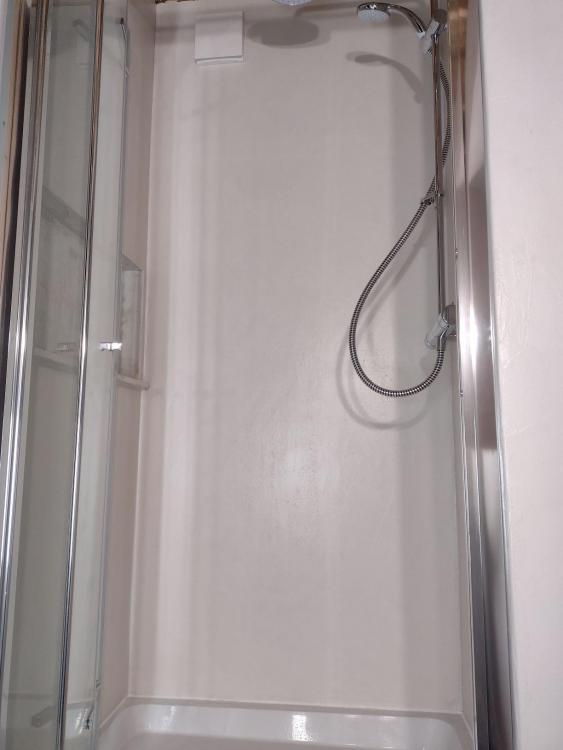
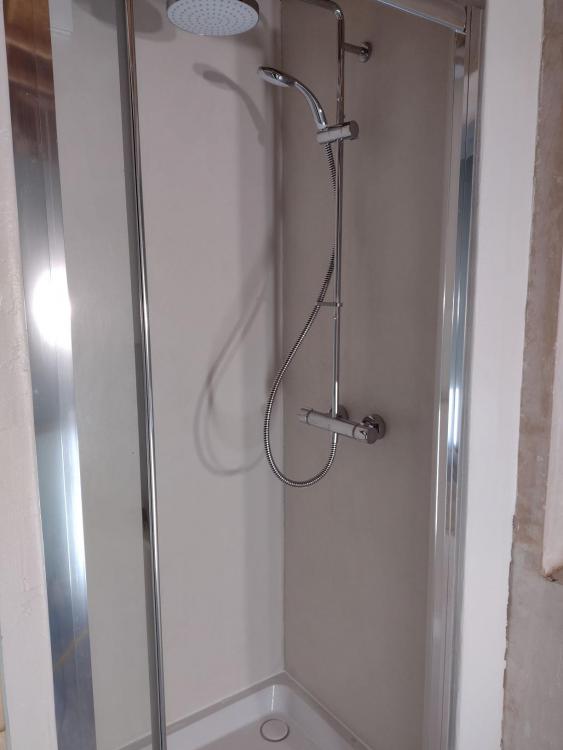
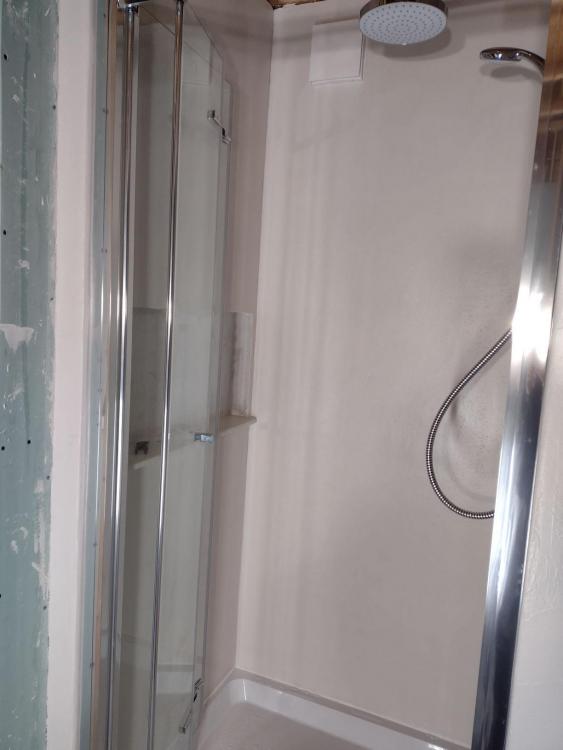
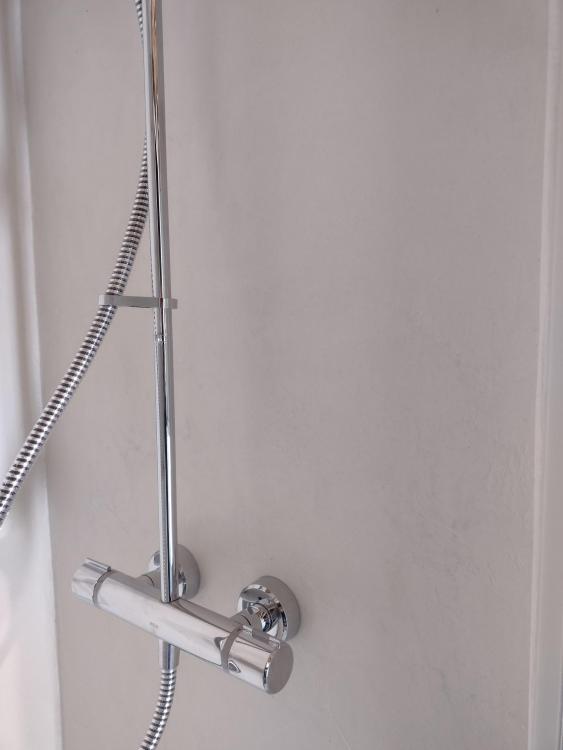
Okay, I've done the shower enclosure now. In total 4 coats of finishing resin since my last post, two coats each of a different type. Each coat sanded with 400 grit paper. I'm ever so slightly worried about the final coat as I was slightly short on hardener for this coat so I hoping it is hardy enough. However, if it isn't I can always get some of the same 2 part resin and re-coat. I've also put in the shower, shower door etc. but just waiting for tiles to put into the back and side of the built-in shelf. I'm very happy with how it's turned out. I like both the look and the colour (Montblanc White). Now we just have to see how it stands up to some abuse and I'll report back over time. Below are final photos where I've added a couple in the hope it shows the colour and texture in close up, but may not work. Hopefully this may help anybody looking at microcement in their shower.2 points
-
Take a read of this blog He did it all himself, design and build. That is a build complying with the definition of a "caravan" so only needed building control for the drainage connection.2 points
-
Dan, TL;DR it continues to work extremely well albeit with a few tweaks. I have been meaning to do an update for some time. Let me put together an update post. I'll do it later today, and ping you back to let you know when I've posted it. ?2 points
-
Not sure why I made the switch to a bean to cup machine. My parents had a Nespresso machine before, and it made good coffee but not great In comparison to a freshly ground cup. My biggest gripe with the capsules is the waste. I hate the idea of something that can't be recycled or composted without work. Atleast the "biscuits" of used/compressed coffee grounds compost well. (Keep the dog away from the compost though) I never considered the cost saving as a factor of purchasing the machine.2 points
-
Please go and beat your plumber to a soggy death with his blowtorch. You can ask a lot of people on here about the difference and why you need pumps at every manifold along with a blending valve. The buffer will soon deplete and you won’t have 35°C water in it so you need to heat slightly higher and then let the valves do the work.2 points
-
Just a dissenting perspective for anyone considering a Loxone route. You are looking at something like £10K +/- a factor of 2 for this route, and building, configuring and maintaining this type of system will either require a lot of expertise on your part or having to pay pretty high unit-rate Loxone certified engineer time to do this. Yes, this type of system might be sensible if you want a 100% automated house, but IMO if you are a more typical builder then an approach of only automating stuff where there is a good reason to do so means that you can sensibly look at options which will cost £100s rather than £1000s. If you have basic IT literacy and any basic programming skills then such more budget route is to use low cost server modules (such as PRi4s) and open-source components such are Home Assistant (HA) and Node RED. I spent 35 years in the IT industry from engineer through to CTO and there is nothing "cheap and cheerful" about these H/W and S/W components. The build quality and documentation are absolutely 1st rate. I use one RPi4 to run control my CH + DHW, another for HA doing general home automation, and a third as a gateway / general Docker host. I have around 50 Zigbee devices controlled by HA, plus a few Sonoff and Shelley devices running Tasmota and controlled through MQTT. The CH system has ~20 directly connected sensors and controls 4 directly connected power relays. This give me precise control of CH, DHW, various lights and external systems, etc. all for around £500.1 point
-
Did you mean can't get under the insulation? If so I thought a second membrane over the insulation prevented this? Does pouring screed with the UFH pipes filled help prevent lifting? Are these "knock ins" a type of intersheet jointing fixture?1 point
-
Plus one 40 is to thin Liquid pros Flatter Drys quicker Conns 20-30% more expensive You need to make sure the LS can get under the insulation Ive seen a couple lift Worth putting a handful of knock ins in each sheet of insulation1 point
-
1 point
-
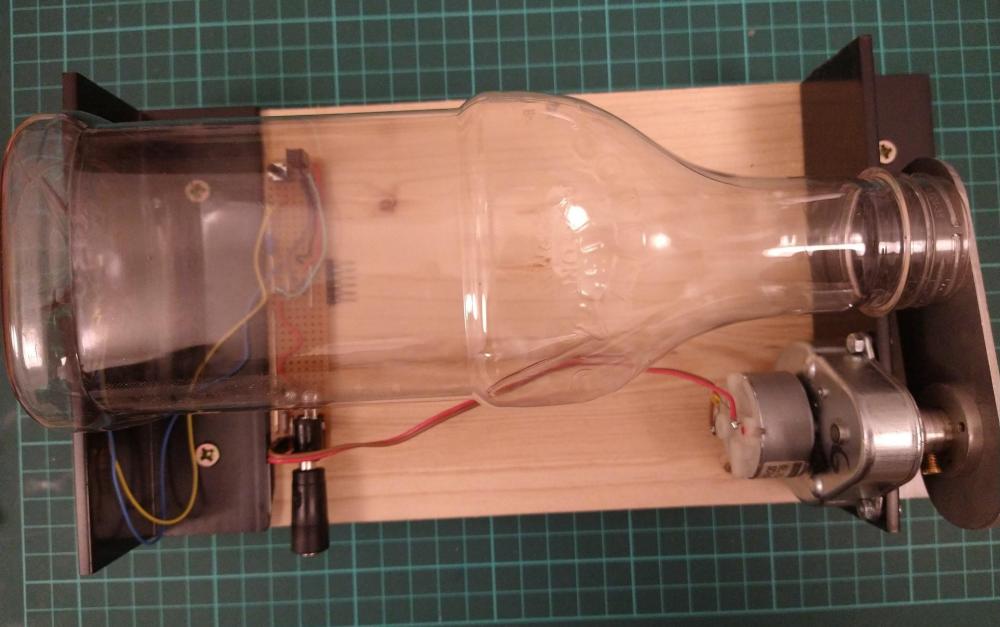
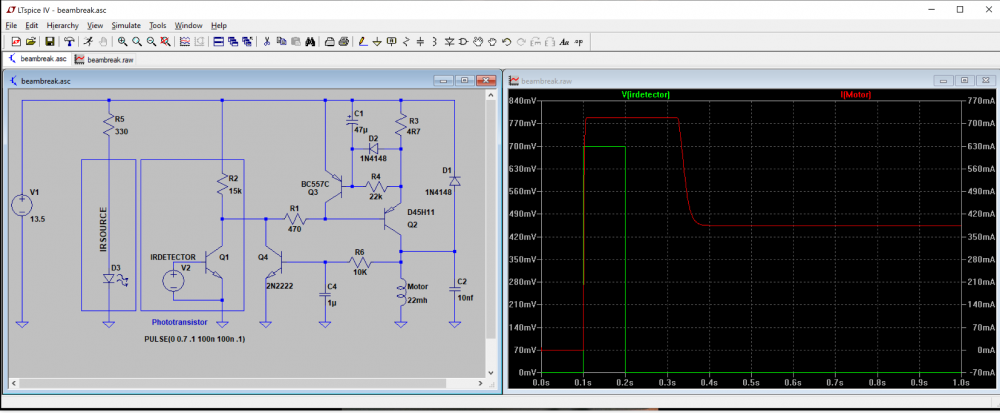
Finally got the electronics wired up to the motor on the new mousetrap... The circuit board has an IR LED and IR Phototransistor on opposite sides at the end of the bottle, at about half the height of a mouse. These are connected to a transistor circuit which latches on the power to the shutter motor at full current for 250ms, the instant the mouse breaks the beam, then backs off the motor current to hold it down in stall indefinitely. The latch is reset by lifting the shutter via the back EMF from the motor.1 point
-
Seem to remember learning about that. Cathetderal builders put heavy statues on the wall tops to help stabilizer the structure. Suppose it works the same a pre stressed concrete. Does it increase the risk of buckling if the mass is too great.1 point
-
1 point
-
Hello Grian. You could have great fun with this. I've been lucky enough to have dabled in this on the structures side on and off over the years; light weight cold formed steel / TFstructures, high end man caves etc, it's enjoyable. In terms of proving it is "movable" then if you made the main section no wider than 2.9m then this would fit on the back of a low loader without being classed as an abnormal load as I understand? I wonder if you could also build it with extra modules, like those mobile homes that once parked the sides extend out. This would allow you to detach the side modules. Yes, you would need more trips to shift it you started with two modules that are a similar size to a 40 container you could then add bits to provide an improved layout, less corridor and more living space? In terms of how you build something like this.. it looks like you are near a sea loch. I would explore doing it as a TF. You could do it as metal stud ..dry wall idea or thicker cold formed steel sections both with limited life expectancy but TF is more suited to a local builder, (or say a joiner) and more survivable in a marine type environment as it does not corrode. Also, easier to insulate. You could almost panelise it so rather than transporting the modules you diassemble and transport it flat pack style, like a fully serviced module construction. Ideally you want to see if you can keep some residual value in it in case you later want to flog it (to say a self builder here as temporary accommodation! and do something else.. at least any residual value should cover the cost of getting rid of it or upgrading? I'm not a guru on the caravan regs but as I understand it so long as the structure is capable of being moved from one place to another then you are on the right lines. I don't think it's a massive engineering challenge to do TF modules that you shove lifting beams under and crane onto a low loader. If flat pack then four folk can man handle them on and stack. In terms of structural wind loading with a bit of thought you can design and build a strong TF easily capable of standing up in the wind. The big thing is you need it to be light weight so you can man handle it.. but then it wants to fly away in the wind! Also for simplicity and to keep the cost down you probably want to put a flat roof on it.. which is hard to insulate and ventilate. But.. the roof can be an inverted warm roof. Here you have a roof as follows;.. could be exposed timber on the underside (saves the cost of the ceiling) , then say 18mm marine ply, the water proof layer (say EPDM single ply membrane a pondliner almost), then the insulation and say paving slabs on top. The paving slabs act as the sound proofing so folk don't get woken up with the hail, the rain and birds tramping about on the roof at 5.00 am in the summer. The slabs also help act as ballast to stop the whole thing lifting in the wind and the insulation flying away. When you want to move it you take off the slabs, recycle.. either flog the insulation or recycle.1 point
-
Have a look at Rinnai https://www.rinnai-uk.co.uk/products/1 point
-
Congratulations joe90 for providing my 400th 'like'. There is no prize for me or you, other than the satisfaction of knowing we are helping people, and learning a bit as we go.1 point
-
Ok so the buffer will never be at a static 36°C as it will get cold water from every return so your idea of the feed being always at a constant temperature won’t work. This is why you need the blending valve.1 point
-
Thanks for that link, it is a splendid achievement and an interesting situation re planning. If it lifts with a theoretical crane, is it heavy enough to sit tight in a gale? For that size of building, the steep roof and the void under, there could be a lot of uplift. Not likely to blow away but could move on the plinths. I think I would provide ties down to the footings, just in case.1 point
-
Completely normal for a bathroom with no heat in - or a warmish bathroom where the cleaner (me) consistently misses a bit . Dilute bleach and a scrub once a week will do fine.1 point
-
I think the theory is the stilts it sits on are not part of the building. He discussed it with his BC and agreed if you got a big enough crane and a big enough low loader, you could pick the whole thing up in one piece and put it on the low loader. The low loader would never get up the slope and out of the gate but that didn't seem to bother anyone.1 point
-
I have no actuators, one zone and 5 loops, just increased flow in the lounge that we want a tad warmer .1 point
-
Bean to cup is definitely cheaper to run. I buy my beans in 5kg bags which I share with my parents, and at that size it works out about £13.60 a kilo for very high grade beans, like Monsoon Malabar that normally cost £19 a kilo. Bean to cup is also more environmentally friendly.1 point
-
The panels with small arrow like openings are used to join pieces of timber together. They are punched through so the missing bits act like nails and hold it all nice and tight. If your really bored and don't like your wrists try and batter one of. You will get tired, sore and bored very quick.1 point
-
We have this one, also 7kW. Next size up is 10kW. We have it set up with the Vailant Hydraulic Unit (3-port valve, controller, diverter, backup heater) and a 25L non-vaillant buffer tank. They do also quote some COP figures in manual/literature, but I agree it is limited compared to other manufactuers. I have all the very detailed COP and power ouput data I found if you need it. The 7kW aroTherm gives you - A7/W35: COP 3.9 at 100% compressor providing 12.3kW output, COP 4.8 at 50% compressor providing 6.3kW output. - A2/W35: COP 3.3 at 100% compressor providing 10.4kW output, COP 4.1 at 50% compressor providing 5.4kW output. (No manufacturs quote COP at max compressor though, as the idea is that ASHP is sized to not need to run at full-filt.) Various other great manufactuers out there, but R290 does have some advantages in terms of range of operating temperatures and max flow temp.1 point
-
Soffit at window head is a standard detail on a lot of single storey builds.1 point
-
something like this I believe https://www.toolstation.com/tooth-plate-connector/p44246?store=SE&utm_source=googleshopping&utm_medium=feed&utm_campaign=googleshoppingfeed&mkwid=_dc&pcrid=558033462390&pkw=&pmt=&gclid=EAIaIQobChMI08z1wKjF9QIVc4BQBh2JzAMnEAQYAiABEgK1n_D_BwE&gclsrc=aw.ds1 point
-
I have those on my roof trusses and, afaik, they hold the joined timbers together. they have lots of spikes on the back and when two pieces of wood are put next to each other they bang one of those in and it holds them together. or summink like that. so, no nails required in those1 point
-
I would say no hardstanding has been installed. The only hardstanding is the tarmac which was existing. Hardstanding is for parking motor vehicles. DON'T go down the planning consent route.1 point
-
From memory theres no (or minimal charge) to get it inspected, you can then take or leave the quoted repair fee and they just keep the unit. Mine came back with a logbook detailing the number of coffees made, descaling cycles etc.1 point
-
I have Grohe, but only because I got them as a job lot at bargain prices. They do come with a good first fix kit, second fix is a fairy simple screw together once tiling is complete. The first fix allows you flush and leak test prior to plastering or plasterboard1 point
-
Having been inside a few now, I think Delonghi add "improvements" per model step-up rather than time. The infusers are all the same, the pumps are the same, the transmission is the same. But the top spec machines can have quieter grinders, silencers on the pump outlet, better temperature control etc1 point
-
If it were me I would ignore it and do nothing. If a buyer is going to make a fuss because of a path like that, they are not the buyer you want. If that is all that is wrong with the house then that is good and it should sell easily. I would read the "hard standing" question as have you made additional vehicle parking space and answer no.1 point
-
My UFH heating started without blending valve, and without pump on the UFH manifold, had issues getting to work consistently well. So added pump and mixer at the UFH manifold and it then worked well all the time. Having the blending valve at each manifold allows you to fine tune the flow temperature to the least temperature overshoot. For what it saves you now to do without blending valves, I would just install for the added ease of tuning.1 point
-
@Adam2 Not sure on whether one is better then the other but I've just fitted the same shower set up you're after. I went with a Hansgrohe ceiling mounted shower head (but sunk this into the ceiling) and Crosswater's Crossbox valves and a Crosswater shower handset. The Crosswater valve was easy to fit and most importantly, to test, before tiling all round it. Would definitely recommend the valve.1 point
-
Maybe bump the curve to 1.0. Yes it will increase the flow temp as the deviation gets further away, but 0.6° is not very much. Increasing the radiator circuit pump speed will reduce the dT across them. If it's somewhere near 5° as it is then it's probably about right.1 point
-
I have a DeLonghi Prima Donna that I bought back in 2008 after getting a windfall from work also (rest went into the build fund). When we started the build it moved into the site office (too big for the caravan) and was lovingly tended to by one of the Romanian concrete workers who had the same machine at home Moved back into the new house and soldiered on but a couple of years ago started to struggle to make decent coffee. I called DeLonghi, expecting nothing (it was about 11 years old at that point) , but they have an excellent fixed price repair service. Sent a courier to collect it and within a few days identified the work out bits (grinder, pump and a few sensors) and gave a very reasonable quote to fix - less than £200 from memory. Arrived back by courier and has worked flawlessly since. Based on the customer service alone, never mind the very decent coffee, I'd recommend them!1 point
-
Not what you want to hear, but the answer is likely: No. You have worked out that the answer is likely to be based on guess work: I agree. Years of dealing with complaints about student noise (in student houses and their Lancastrian neighbours), and working with both parties to try and resolve the issues raised makes me very sympathetic ideed to your problem. People - on both sides of a dividing wall - often simply don't realise how the noise they make transmits into their neighbours' properties. One thing I did that seemed to help was to get one person from each house / room/ flat / to visit the others' home and listen. Not an easy task to co-ordinate, but it worked - sometimes. Students would realise how noisy they sometimes were, and ordinary folk who happened to live next door would be surprised at the way (for example) a baby's cries were easily picked up in the student abode. In other words noise - if there is any- travels both ways. Its people's reaction to the same noise that differs - greatly. Lancaster has some large hospitals : night shift nurses need their sleep during the day. According to some nurses, students by all accounts being reasonably quiet were not seen as quiet by the nurses. The key thing to do is to keep working together to solve the problem. And that is very a challenging thing to do. Good luck. Ian1 point
-
The guy from the screed company is here today laying the polythene and taping a 25x100mm expansion strip around all the walls.1 point
-
1 point
-
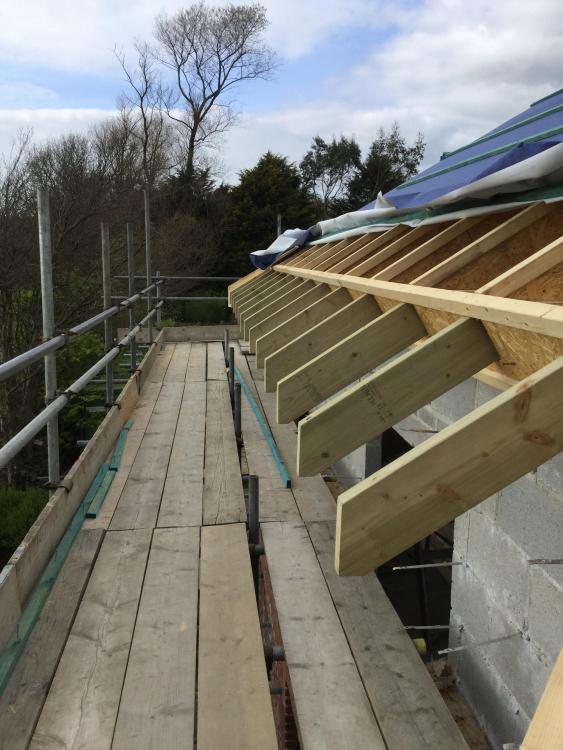
Fit 6x2 rafter tails to the existing and drop a row of bricks off to give you a decent soffit and fascia.1 point
-
Fit your firring strips 60mm to 0mm 750mm long ontop of your rafters and you have a bit more meat1 point
-
1 point
-
I've a small desk fan running 24x7 in my shipping container to keep condensation at bay, works really well when it's weather like this.1 point
-
my husband uses the tool your talking about he got his from https://roofscraper.co.uk/, hes a window cleaner that also does roof and pressure washing. I did ask him why he doesnt pressure wash roofs as i think they look like brand new but he says pressure washing can cause some serious leaks and thats why he only scrapes the moss off not sure what he does after but i know he brushes on a chemical i think its biocide? it takes a while to change the colour of the tile from what ive seen and some just look ugly afterwards?1 point
-
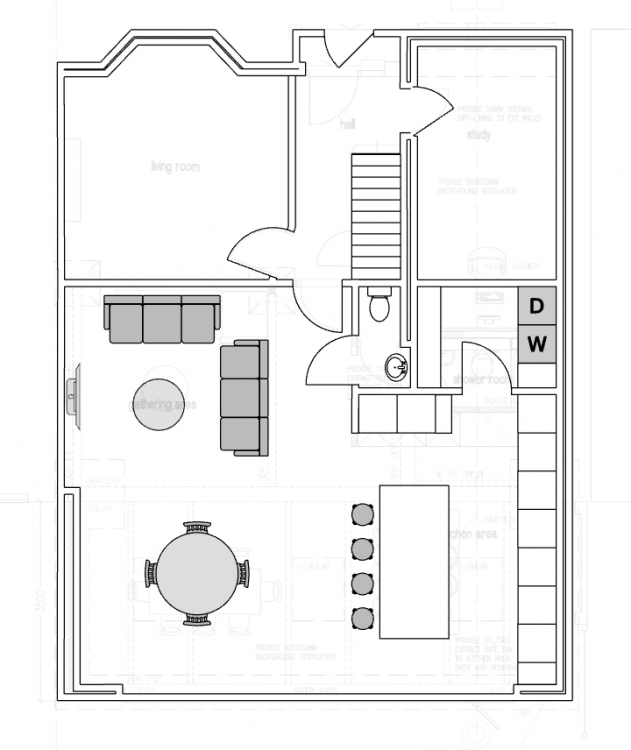
Thanks for all your suggestions everyone! Looks like the common recommendation is having a utility room and cutting back on the garage. I've never had a utility room before so this isn't something I'm familiar with. What's a sufficient size for the utility room (my boiler system will be in the loft)? I've made some quick changes to the layout which includes a utility room from the kitchen and removing the shower. The garage space has also been cut back though I'm reluctant to cut anymore since we want the flexibility to turn this into a decent sized bedroom. Dimensions of the utility room are roughly 2.3m x 2m and the kitchen 5m x 3.5m (wall to wall excl. units). Is something along the lines of what you're suggesting?1 point
-
I don’t understand that, a leaky house is only leaky when it is windy or very windy. A balanced heat recovery ventilation system will work relying on draughts for ventilation doesn’t work when it is calm and works progressively better til it becomes insanely wasteful as the wind speed increases1 point
-
Sounds very much like you have a ventilation issue. I take you sleep with the windows and vent strip closed? Without cross flow ventilation, your breath moisture is condensing on the cold areas around the windows. Would also guess the CO reading in your bedrooms are very high, not good for your health. Where you have mold clean off with a weak bleach solution. Your closed off fire places should have a ventilator grid in them, this can be internal or external. First things to do. Do your windows have vent strips, if so open them all, if you don't you will need to open the window slightly. You need extractors in your wet rooms, I would go with dMev, these are quite and run all the time, get ones with humidity detection so they boost only when needed, not every time you switch the light on or walk into the room. Or the other option would be dMVHR, but you need them installed in most room to be effective, quite like Prana units https://ecostream.org.uk/d-mvhr/ You can do all the above quite easily, mvhr will need you rip the house apart to install.1 point
-
our heating isn't on yet bit In a couple months I'll get some thermal imaging photos for you. But in short, the non-heated areas of screed sit at a reasonably steady 20°C same as the room temperature, but the heated areas go to flow temp, 25°C for us but obviously higher for people that run higher flow temperatures. And varies in temperature more. So personally I don't want that under anywhere I might stood fresh food or my wine stash. The cat litter tray also sits on a non-heated section as no one wants that warmer than strictly necessary I do agree if you want to maximize the thermal store potential of the screed, maximizing the UFH loop area does make sense.1 point
-
Stick to the knitting. The house. You are building in a period of significant organisational change. Prices are not stable. Put plenty of ducting in (with pull throughs) so that you can network anything you're going to need1 point


