Leaderboard
Popular Content
Showing content with the highest reputation on 03/22/21 in all areas
-
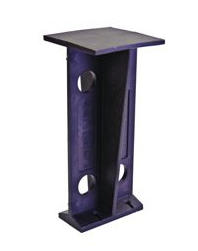
In at last! Building controls came out and checked the site and have issued a “temporary habitation certificate”. Big sigh of relief especially for a self build where you’ve been the main contractor. Lots of bits and pieces jobs, as you would expect at this stage of the project. Adding stairs to second floor, making lights work, finishing off bathrooms, the last bits of flooring etc… it’s a long list but getting shorter by the day helped by being on site. The stairs are a feature of the build and getting them right was a tricky path between the minimalist look we wanted and compliance with building controls. The main problem we faced was that the kit stairs we used from Fontanot did not have a stock solution for stairs installed in a void rather than from a solid floor. A modified mounting was ordered. When it arrived it was the wrong colour! And of course the colour was not RAL. Getting it re-manufactured was an option but it would have taken a couple of weeks. Fortunately we have a local powder coating firm K and N we have used in the past. They were incredibly helpful, managed to get a powder coating that matched for the manufactures copper-black. Two days later we had our newly powder coated bracket and we could start the installation. Working from a staircase is a little more tricky than working from a solid floor, a case of don’t look down. Again we started from the top of the flight and worked down. On the first flight we supported the assembly with props from the floor. This time we needed to support the second flight from the first flight. The lower stairs are rock solid, all the same we added supports to it to transfer all load to the concrete floor. This being our second installation it went fairly quickly. It proved more difficult to keep the structure square with no walls to gauge from. With the last tread in place and all bolts torqued up we removed the props. The stairs promptly sagged a good 20mm, some of this was due to the temporary supports being to long, but not all of it. After a bit of head scratching it appeared that it was down to flex in the modified bracket. Walking up the stairs showed another problem, the lateral stability was not brilliant. On the lower stair this was taken care of by stabilising brackets attached to the walls, not an option on a staircase with no walls. The stair kit comes with a very heavy duty mid-flight support bracket made to either attach to the floor or the wall behind the stairs. In our case, the wall is a window. The window is however flanked with 150mm of concrete inside the ICF. Plenty of structural strength to stabilise the stairs. More calcs and a design for a suitable structure was drawn up. Luckily for us one of our daughters is an artist blacksmith with more than adequate welding skills, steel was ordered, bracket constructed. We did a test fit before getting it powder coated. All looked good so it was off to the powder coaters. Installing the bracket was a three man job due to it’s weight and the need to get the position spot on. High tensile studs resin fixed into the concrete and left to cure. The stairs had been supported during this process and I must confess I held my breath as the supports were removed. I need not have been worried though, it didn’t move a bit or drop and lateral stability concerns resolved. Result! In addition to the internal staircase we also have an external spiral staircase. We had poured a footing for the stairs when the concrete pumps were being purged after the ICF pours, so the prep was done. Assembling the stairs was very straight forward, a central boss fixed to the concrete, onto which an armature is bolted. The steps then get added. Once all the stairs are on the armature the top platform is added and bolted to the wall. So that the bolts didn’t form a thermal bridge we anchored glass fibre rods into the concrete. The rods were tapped to take 8mm threaded rod. With the platform bolted in place the steps get rotated to form the staircase and are held in place by rods through the stairs. The whole armature is then put under compression by a large nut. All very neat and simple unlike the internal stairs. With the stairs done, it was back to work on the bathrooms. Before the covid outbreak we had stayed at Centre Parcs and rather liked the woodland pictures they use in their showers. After some research Pat found a company Reco Surfaces who manufacture them. We contacted them and decided they were a good option for providing an alternative to the run of the mill shower finishes. Interestingly it reduces the cost if you supply your own image. In hind sight we would have gone for this option, the only reason we didn’t was image size. The resolution needs to be a minimum of 300dpi to avoid pixalation. In our case a three panel screen would require a 48 megapixels image. Sounds a big image, but it’s not exceptional and even available from some phones. In any event we went with stock images. We decided on the images we would use to brighten up the showers and also one for the kitchen splash back. The panels were ordered and arrived in three days, really good support from the guys at Reco. The panels are easy to instal on a flat surface. We put ours on 11mm water resistant MDF. The track saw paid for itself again making accurate cutting of the panels possible. All in all the panels are a great way to add interest to an area, at around the £120 mark for a 2400 by 1200 panel much more affordable than glass. The pictures really don't do them justice they are very eye catching and with the option of using your own images very versatile, a real find. Next on our list was lighting. We’ve installed some lights during the build but not implemented switching or dimming. Lights get pretty complex, not in technical terms, but just what you want ,where and from where do you want to switch it. Lots and lots of decisions very early in the build when you have more important things like walls and roof to do. Our lighting very simple. All our lights originate from a single point allowing the switching to be changed at some later date should we need to or want to go to an automated solution. All lights are wired with a combination of remote controlled dimmers and battery powered touch sensitive wall switches. It’s a simple system that means the lights can get turned on from the wall switches or the remote. The dimmers retain there last level setting so come on at last setting when the wall switches are used.3 points
-
Things I'd definitely do again. Airtightness. insulation, 3g and MVHR. Amtico glue down tiles. Nice villeroy and boch porcelain and German taps. 100% wool carpets. 2 dishwashers. One clean one dirty at all times. French drain and gravel between footpaths and house wall. Splayed window reveals. uPVC windows. Plain laminate kitchen worktops. Things I wouldn't bother with. Ensuite. 3 baths in 3 beds are wasted. Floating LVT floor. It's not near as nice as the glue down one. Slate shower tray. Expensive and makes the shower dark. Precast concrete first floor. Things I'd do differently. Timber frame rather than block built. Dedicated office space or alcove. Insist on warm LEDs for fixed lights rather than the cool ones the electrician installed. Make all plumbing accessable.2 points
-
1 point
-
1 point
-
1 point
-
Hmmm... unusual. I’ve only seen them fail if they have been incorrectly fitted or over tightened. But I can understand your dislike of them if you have experienced an accidental waterpark ?1 point
-
1 point
-
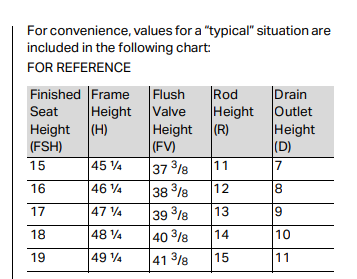
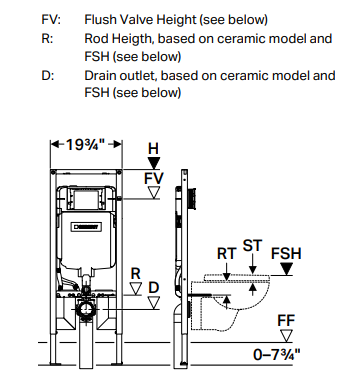
You could fit a geberit wall mounted WC/Frame and adjust the feet so its a bit on the high side. The outlet pipe from those has a 90 degree bend which can be turned "horizontally". There is a table of outlet height vs seat height in some of the installation manuals (this one from the USA).. https://www.geberitnorthamerica.com/local-media/instructions/968-075-00-0-sigma2x4-install.pdf1 point
-
1 point
-
We use the bi-folds a lot (open wide). The problem is they let a lot of heat in! Can't win.1 point
-
1 point
-
Bifolds are interesting - I think the amount of times that people would do the full wiiiiiiiide open thing that real estate agents love to show off are perhaps 4 times per year. But, I'm not sure I agree with the statement that sliders are more practical. All sliders I've encountered are *slow* so they will halt a smooth flow when you're walking at speed. Instead a bifold does have a normal door at the end which is efficient, in & out. IMO bifold is best of both worlds but I would expect the "standard door mode" to be used 99% of the time.1 point
-
1 point
-
The good building guide suggests such a wall should be a one brick wall, using the bricks sideways to be 215mm thick. I cannot find any specific guidance on piers. Usually they are used to build garage walls and these receive considerable support from the roof. This provides some guidance and suggests that a staggered wall is a better solution than piers. Or that to be effective piers need to be on both sides of the wall. https://www.mbhplc.co.uk/bda/Structure-Free-Standing-Walls.pdf A 1m wall does not require BC approval. However, there is considerable guidance that they should be 215mm thick. I would be worried about my liability if I did not show I tried to comply in some way. Once my wife caught a local teenager walking along the top of our garden fence. This is the kind of situation that someone will bring up if you ask an SE for advice. Looking at the above document and considering the wall is only 1m high the stagger looks like it might be an attractive solution.1 point
-
Many garages are single skin brick but they have piers every ?? meters. In the past curved or zigzag walls have been used to aid stability and these can create sheltered areas for exotic plants or humans...but obviously increase the number of bricks needed.1 point
-
Just to say from my own experience of recently completed the VAT reclaim. I had just the one rejection and now resubmitted this invoice and will obtain back every penny due. The building merchant did not put sufficient information on a VAT invoice provided. This was for velux windows and was recorded as an individual line 'velux windows' on the invoice but the HMRC wanted to see the individual items listed for each velux window ordered on the invoice. This was oversight by me as I should have gone back to them then, but it was the busy point of the build and I had loads of invoices. They were pretty quick at come back to me when I explained the problem and provided the revised invoice. Just for reference here is what your invoices should show. https://www.gov.uk/vat-record-keeping/vat-invoices1 point
-
Can I see a picture of the 32mm pipe trying to fit into what is left of the fitting after cutting the bit off? The bit that has been cut off would have been for a smaller pipe, which is why you cut it off if using 32mm, so of course the cut off bit won't fit onto a 32mm pipe.1 point
-
Precisely my MMP ( MondayMorningPanic .... there's always one) The confusion / panic / misunderstanding / question seems to center on the words receipt and invoice My reading is as follows Where there is a properly completed invoice That invoice needs to be provided. No receipt is required. Where a receipt is the only evidence of a purchase That original receipt needs to be provided. This is why I think that.... Here's the online form. https://assets.publishing.service.gov.uk/government/uploads/system/uploads/attachment_data/file/828048/VAT431C_form_and_notes__1_.pdf1 point
-
Although on further reflection, isn't the fact that it was an advert trying to sell air freshener enough to know that it's unlikely to be an accurate portrayal of the movement of air particles (which ironically is known as Brownian motion).1 point
-
The stairs are really important, especially when they are in a windowed void. The price of bespoke stairs tends to be very high, so it's nice when you can get a kit that looks the part and does not cost an arm and a leg. Our three stair cases came in at 8k(not including VAT) which makes them a bargain.1 point
-
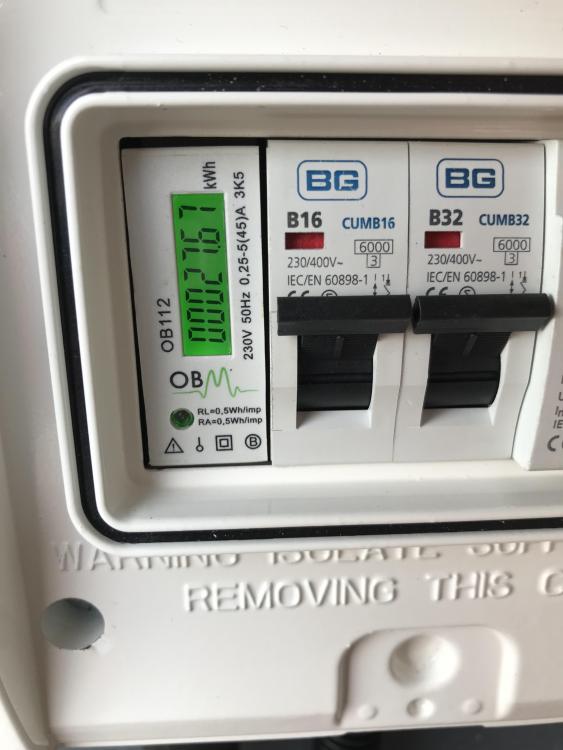
Yes there will be some form of control cable as well that will go directly, and not through the isolator.1 point
-
1 point
-
1 point
-
The through sheet fixings were not a requirement of the manufacturer, except in the eaves fixings. More a case of of our belt and braces approach in a coastal area were we get some serious winds.1 point
-
Thanks, it's all to easy to forget to stand back and look. Sometimes it feels like everything takes forever, at others you can't believe how much has got done.1 point
-
Good point and we did think about it, site safety can't be ignored and we do take it very seriously. I must confess I overplayed the drop, the distance between the two sets of stairs is pretty much a constant at 2.7M so I was never far from the lower steps. The other problem was the need to put in timber supports as we went. Having considered our options, working from a small set of steps properly supported was the best.1 point
-
Depends if you want a warm loft or cold loft. Mine is warm (insulation under slates), My whole roof structure is made of I beams instead of rafters, the depth, 400mm, gives me 400mm for rockwall insulation.1 point
-
Interesting, I was hoping PIR sheets between the ceiling and attic floor boards would equal 250mm of regular loft insulation but was worried this could be a moisture trap and be a concern with insulated wires. Am I picturing the I beans correctly, do they sit inline and on top of the truss joists or are they laid across the truss direction?1 point
-
1 point
-
You're not being stupid, yes, the arrangement you have is similar to mine, except I only have two toilets connected. The Floplast double branch you linked to is the one I used.1 point
-
I am part way through installing my first floor ufh now @Colin Shaw. I put 32mm battens along the joists and then a sand/cement (8:1) dry mix down. I mixed the pug screed in an electric mixer and it mixed fine. The floor is now rock solid, harder than I thought it would be with a weak mix. Waiting for the floor to dry out enough before I put 22mm norboard floor deck over the top. Loads of people on here will say you probably won't need it. I get that, I don't anticipate mine being on most of the year, but for the colder days it's there if I need it. What I did do though was put all of the upstairs bathrooms/ensuites on their own loops and I have put floor probes in too. I intend to set these off the floor temp rather than air so that the tiled floors will all be warm and not feel cold when walking bare foot.1 point
-
As it's a new build your heating demand should be pretty low. You may find all your demand can be satisfied by the UFH on the ground floor. This is the case in my place but I still put UFH on the first floor. Just because I don't like the idea of having to dig out electric heaters for that extreme beast from the east scenario. And I can imagine the moaning from Mrs and kids about me having built them a cold house! I chose aluminium spreader plates because although they don't perform as well as a screed but they are cheaper and easier to install and for a first floor new build you shouldn't need the superior performance.1 point
-
The "screed" idea is often known as a pug mix, It's a sand / cement screed laid dry. It has little strength, it is there as a heat distribution medium. Use structural floor boards that are supported on the battens not actually supported by the screed. Don't forget to size the joists to allow for the extra dead load of the screed.1 point
-
1 point
-
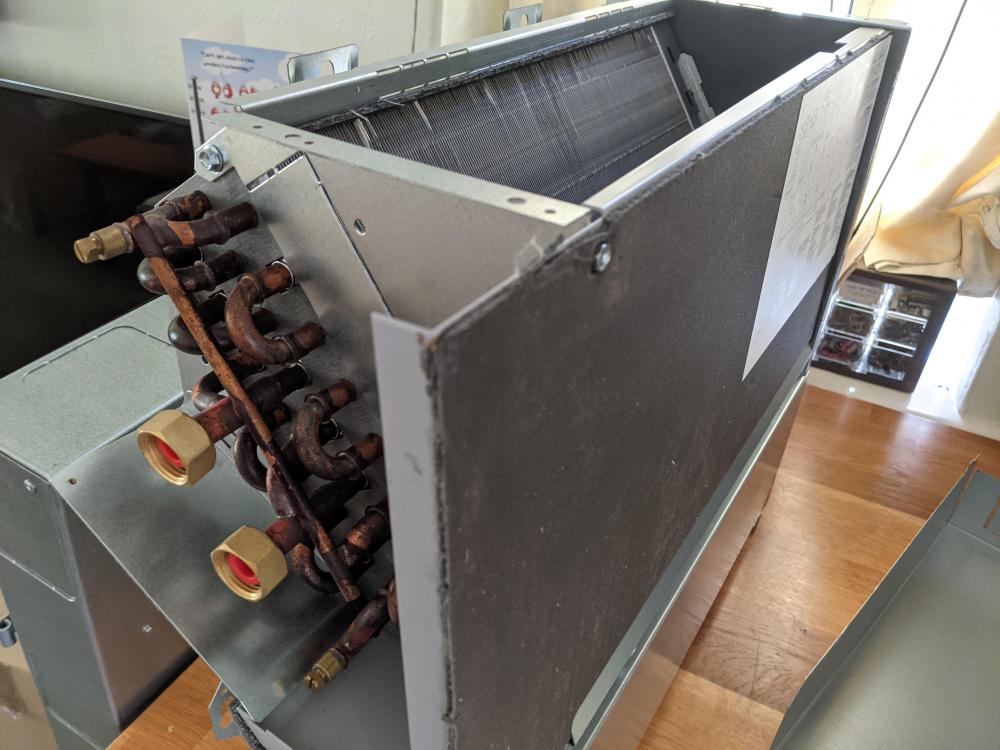
Well 6 months on we finally got this working! I won't quite say commissioned yet, as we're still running the FTC6 in single zone for fan coil + ufh, but now the plumbing is all complete I can think about getting the control systems properly working. (I say plumbing is complete, there's still a broken flow sensor to replace) Progress has been so slow with our MCS installer I actually got my main contractors plumber to help me debug the fan coil yesterday. The issue was obvious, looking at that photo above the red things in the threaded connectors are bungs. Kinda important you remove those before hooking it up, else no water ain't flowing anywhere. Would have been nice if the MIs has mentioned that! Being in the loft, this is obviously the highest point in the system by quite some way, so bleeding the system has to happen here. It has manual air release vents but it'd be nice to have automatic ones (or a system fill point up there next to it) to allow single person system pressurisation. Anyway, bit of a faff but I think this is really going to pay off come summer. It's amazing how no one at all on our build has ever seen anything like it. Thanks RHI random restrictions. They're so common on the continent. Glad I read about it here. In a pinch a plinth heater would also have worked I think, but for cooling we'd have to DIY build a condensation tray and ensure it doesn't get into the electrics.1 point
-
1 point
-
Timber shrinks a lot across the width, so sole plates, top plates, locating plates and top and bottom of frame sections, together with floor joists, mean you need to allow for about 5mm for the ground floor plus 10-15mm for each additional floor. This can impact cills, heads, soffits, roof, and soil pipes. Compriband (Illbruck) is often used to seal around windows. Just bear in mind the direction of shrinkage when making the allowances.1 point
-
I've never used a product like the one you've linked above which looks more like an acoustic product designed to reduce impact noise through intermediate floors. How this might work to get rid of squeeking noises I have no idea I'm afraid. TG floors will provide an excellent floor free of squeaks. In your current situation, as previously suggested you've already added fixings, I guess at minimum 150mm intervals around the edges and 300mm in between but even better if it's 'shit loads' ?. You've also added noggings and you've checked as best as you can to see if there are any obvious gaps between joists and subfloor. The next options really are to either add a floating floor on top of the existing installation and see if that works, or take up the existing chipboard, check joist installation and then re-install an alternative subfloor, probably plywood to see if this rectifies things. I'd say that in the first instance it might be worth laying a large 8 x 4 sheet of plywood on top of the existing floor in the area you've gots squeaks to see if this helps. If this works you can then proceed with installing a floating floor otherwise do the drastic. It's really difficult to say exactly what would work without seeing it all in situ1 point
-
I worked with a chap on site in London in the late 80s. He was welding lead covers for us on equipment plinths on the roofs. Bloke was mustard. I asked for his contact details and he just said "Ted The Lead, everyone knows me!" By now I'm guessing Ted The Lead...is dead.0 points
-
So true, our previous conservation officer instilled a degree of fear in the freeholders of the village not seen in England since Marcher Barons were overlords of the Welsh boarder counties in the medieval period.0 points
-
In laws had one of these sh*t munchers (incorrectly) installed installed a few years ago. The plumbers ran the waste pipe up into the attic then along before dropping back down the other side of the house. The pipe came adrift halfway up, inside an internal wall. The mess was epic.0 points
-
0 points
-
0 points
-
0 points
-
Ignore @jack - use my method instead. 1) Get a big shoebox - I used one that my rigger boots came in. 2) Put everything that looks like a receipt, including delivery notes and the odd instruction booklet, in the shoebox. 3) Do not print out email invoices, just leave them on email. 4) Now and again plan to sort through the box. Do not sort through the box. 5) Keep the box in a safe place. Occasionally forget where the safe place is and have a massive panic attack. Find shoebox and consider step 4) above. 6) Finish your build, get BCO sign off and feel smug. Realise that you now have 3 months left to deal with the shoebox. 7) Open box, riffle thought it, close box. 8 Open box, and sort into invoices and non receipt chaff. Feel a bit queasy that the invoice pile is smaller than you imagined. 9) Realise that most of your receipts are on email and spend the next month tracking them down. Using a hypnotherapist to aid recall is not mandatory but will help. 10) Wake up at 4am remembering a purchase that you have not found - get up and search email for it before you forget. Go back to bed at 6am happy that you've found another £3.75 11) Find the BH VAT thread, download the forms and start to fill out the spreadsheet. Realise that the two months you have left will not be long enough. 12) Familiarise yourself with the scanner you last used eight months ago. Allow at least 1 day to find and update scanner s/w on your computer. 13) Start scanning, printing and typing. Repeat for an eternity. 14) Realise you don't have a hole punch, card sleeves or treasury ties - spend £15 acquiring and debate of you can claim the VAT for these. 15) With about a week to go, finish the whole lot and feel smug at the neat bundle of filed receipts. Last time you felt this good about paperwork was a school project on volcanoes in yr 6. 16) Discover the back up shoe box with more invoices. Panic. 17) Take your VAT reclaim baby to the post office. Hope that the claim amount is enough to cover the postage. 18) Wait. 19) Panic again. 20) Get confirmation of claim success and receive funds. Entertain momentary fantasy about what you could spend it on before reality bites. Easy...0 points


