Leaderboard

.jpg.c21f3ac78c9b7efd90cbdcb312744dc5.thumb.jpg.7adcad4c0e384f5ecd7d56b0618df6e5.jpg)


Popular Content
Showing content with the highest reputation on 02/21/21 in all areas
-
I fit inline silencers ( attenuators ) between the unit and the manifold boxes. Excellent results, and about £150-£200 for the 1000mm long ones, with the 500mm ones annoyingly close to that price. Last install I put 3x 500mm ones in, and reports are of it being graveyard quiet. 3rd one went on the exhaust duct to atmosphere, to ensure that there was no nuisance noise to the adjoining neighbours property. The flexi duct attenuator option is the cheap seats, but does start to alleviate the issue at least somewhat, however I do not bother with those now as there are better options for not much money. I would not be in the cheap seats for the one device that is running 24/7/365 and which could annoy me whilst I slept. I often get those delivered by mistake, but never fit them. More filters, more points of maintenance, and additional resistance where I would not welcome it. Just fit 1x decent inline attenuator on the supply air prior to the manifold if you wish to save money, but one on each is my entry level offering. Too little money to split hairs over IMO.2 points
-
Improving the airtightness is probably the best bang for your buck. Good details don’t cost much, £5-600 in tape and membranes is a good insurance policy for a better house.2 points
-
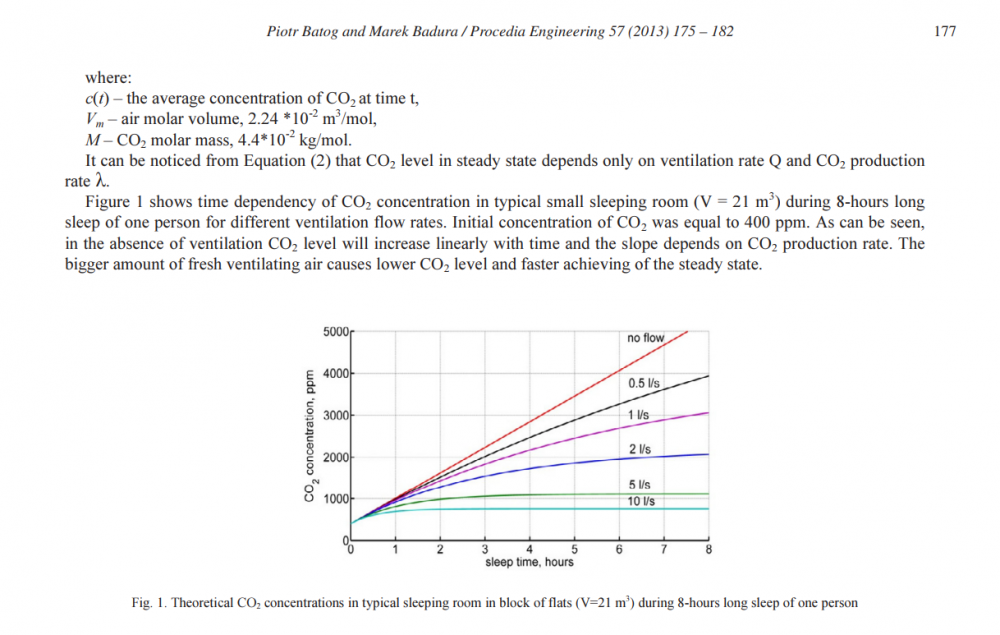
Start your design at your bedrooms. Bedrooms are the most limiting rooms for ventilation for 2 reasons. 1.They are the most noise sensitive 2. When occupied the doors are closed and air mixing with other rooms is limited. CO2 levels need to be controlled to ensure good health. As per the above graph 5l/s per person will keep CO2 levels acceptable. I worked on the principle that maximum bedroom occupancy would be 2 individuals or 10l/s. Every meter of 75/63mm ducting contains 3.12 litres of air so at 10l/s in our master bedroom our design velocity is 3.2m/s. It is above the recommended 2.5m/s but I followed Jeremy Harris's notes about noise where he suggested that it was almost exclusively caused by the MVHR unit itself and the room terminals. From my experience I would agree. Even at boost (4.5m/s) there is little duct noise. As long as you take care to have straight duct runs in the vicinity of bedrooms 2.5m/s is very conservative. More important is to consider your choice of MVHR unit. The passivhaus component database is the only independent comparison of noise I could find. https://database.passivehouse.com/en/components/list/ventilation_small Important also is how the unit is mounted. If it is in the attic it needs to be physically isolated from lightweight structures like ceiling joists. Either by hanging form the rafters or using acoustic mounts. Alternatively mount it on an external wall or on the floor of a plant room. Another thing to consider is the location of external vents. Don't put them near bedroom windows. I used flexible acoustic silencers from BPC ventilation on both the extract and supply sides of the unit. They were cheap and cheerful and I don't know how well they perform. @joe90 diy foam lined distribution boxes may well outperform them. I only doubled up on the 75/63mm ducting for the kitchen extract. Through experimentation i found that the maximum a 63mm duct could transfer without restricting any other outlets was about 5.1m/s or 16l/s. Again just using this trial case the noise was primarily from the terminal and the MVHR unit. TLDR. I used 75/63mm everywhere. Only doubling up for the kitchen. We have no issued with duct noise or air volume restrictions but were careful to have straight short duct runs and shallow bends only. If I was to reduce noise further I would probably install a larger volume acoustic silencer first. Then possible upgrade the MVHR unit to a quieter model. P.S on positioning rooms terminals. Aim to have them: 1.Across the room from the door. ( not vital if you can't manage it ) 2. Where high furniture won't obstruct them ( over a window works well) 3. Not over a bed or other occupied area where drafts might be noticed.

 2 points
 -
Hello I had the Viessmann 200w installed recently and, as I wasn't able to find out loads from the forums in advance, thought I'd post a few initial impressions and 'gotchas' here that tripped up the installers a little as part of the installation. This was the most recent version of this boiler with the colour touch-screen (B2HF/B2KF). First gotcha, it doesn't come with a 'fittings pack' - there are several types you can get and whilst it states this clearly on the Veissmann direct website, this seemed to be news to the installers, and also the merchants who supplied the boiler. So our first install left us with a boiler hung on the wall but not connected whilst we waited for the fittings pack to arrive and then be installed. Second gotcha, it doesn't come with opentherm. I thought this was surprising as I believe the 100-w does, and I was hoping to use this with the Drayton Wiser system that we have installed (which I think is excellent, also). Third gothcha, there are three 'modes' of operation that have to be set during the commissioning process, and if you want to change the mode you have to recommission the boiler. However, you can do this fairly easily with the app (ViStart for the installer, and ViCare for the user - you can download both from the Google Play store). The three modes are 'weather compensation' mode, 'continuous operation' mode and 'room temperature dependent' operation. The second and third modes don't seem to make any use of weather compensation - and if you set it up in weather comp mode and then connect a stat, the stat won't talk to the boiler at all (lots of head scratching here from our installer). So, to get this to work with our Drayton Wiser system we currently have it connected on 'continuous operation' mode; there is then a setting to turn off continuous pump operation when there is not a call for heat, though oddly in this mode even if there isn't a call for heat there is a minimum flow temperature setting (default at 20'c). I am going to try and switch it over to room temperature dependent operation at some point to see what this does (my guess is it'll only work with a Viessman stat), but for now it is working fine - the boiler is firing when there is a call for heat and not where there isn't. Fourth gotcha, we've got a fairly large detached house and had previously had an older Baxi boiler which clearly had the pump turned right up to maximum. The Viessman has a variable speed pump, but I found that I had to adjust the minimum pump speed setting upwards somewhat to get the far-out radiators warm at the same time as the rest of the house. Fifth gotcha, Viessmann had apparently specified not to use inhibitor with the boiler at all. Our installer thought it was something to do with rubber hoses perishing. At first I was so surprised at this (as was he) that I checked with Viessman technical who confirmed this was the case. Apart from this, it seems a good boiler so far - it is keeping us warm, seems pretty quiet, and the App has a few nice settings e.g. being able to see exactly how much gas (in cubic metres) you use on any given day. Quite astonishing seeing this over the recent snowy weather we've had over the last couple of weeks. It's also nice seeing the modulation stats, as that was the main draw for us for this boiler, that it modulates very low. An interesting setting seems to allow you to limit the amount of time the hot water runs before cutting off (and then I think set a minimum wait period).... potentially handy for anybody with teenage daughters?!!1 point
-
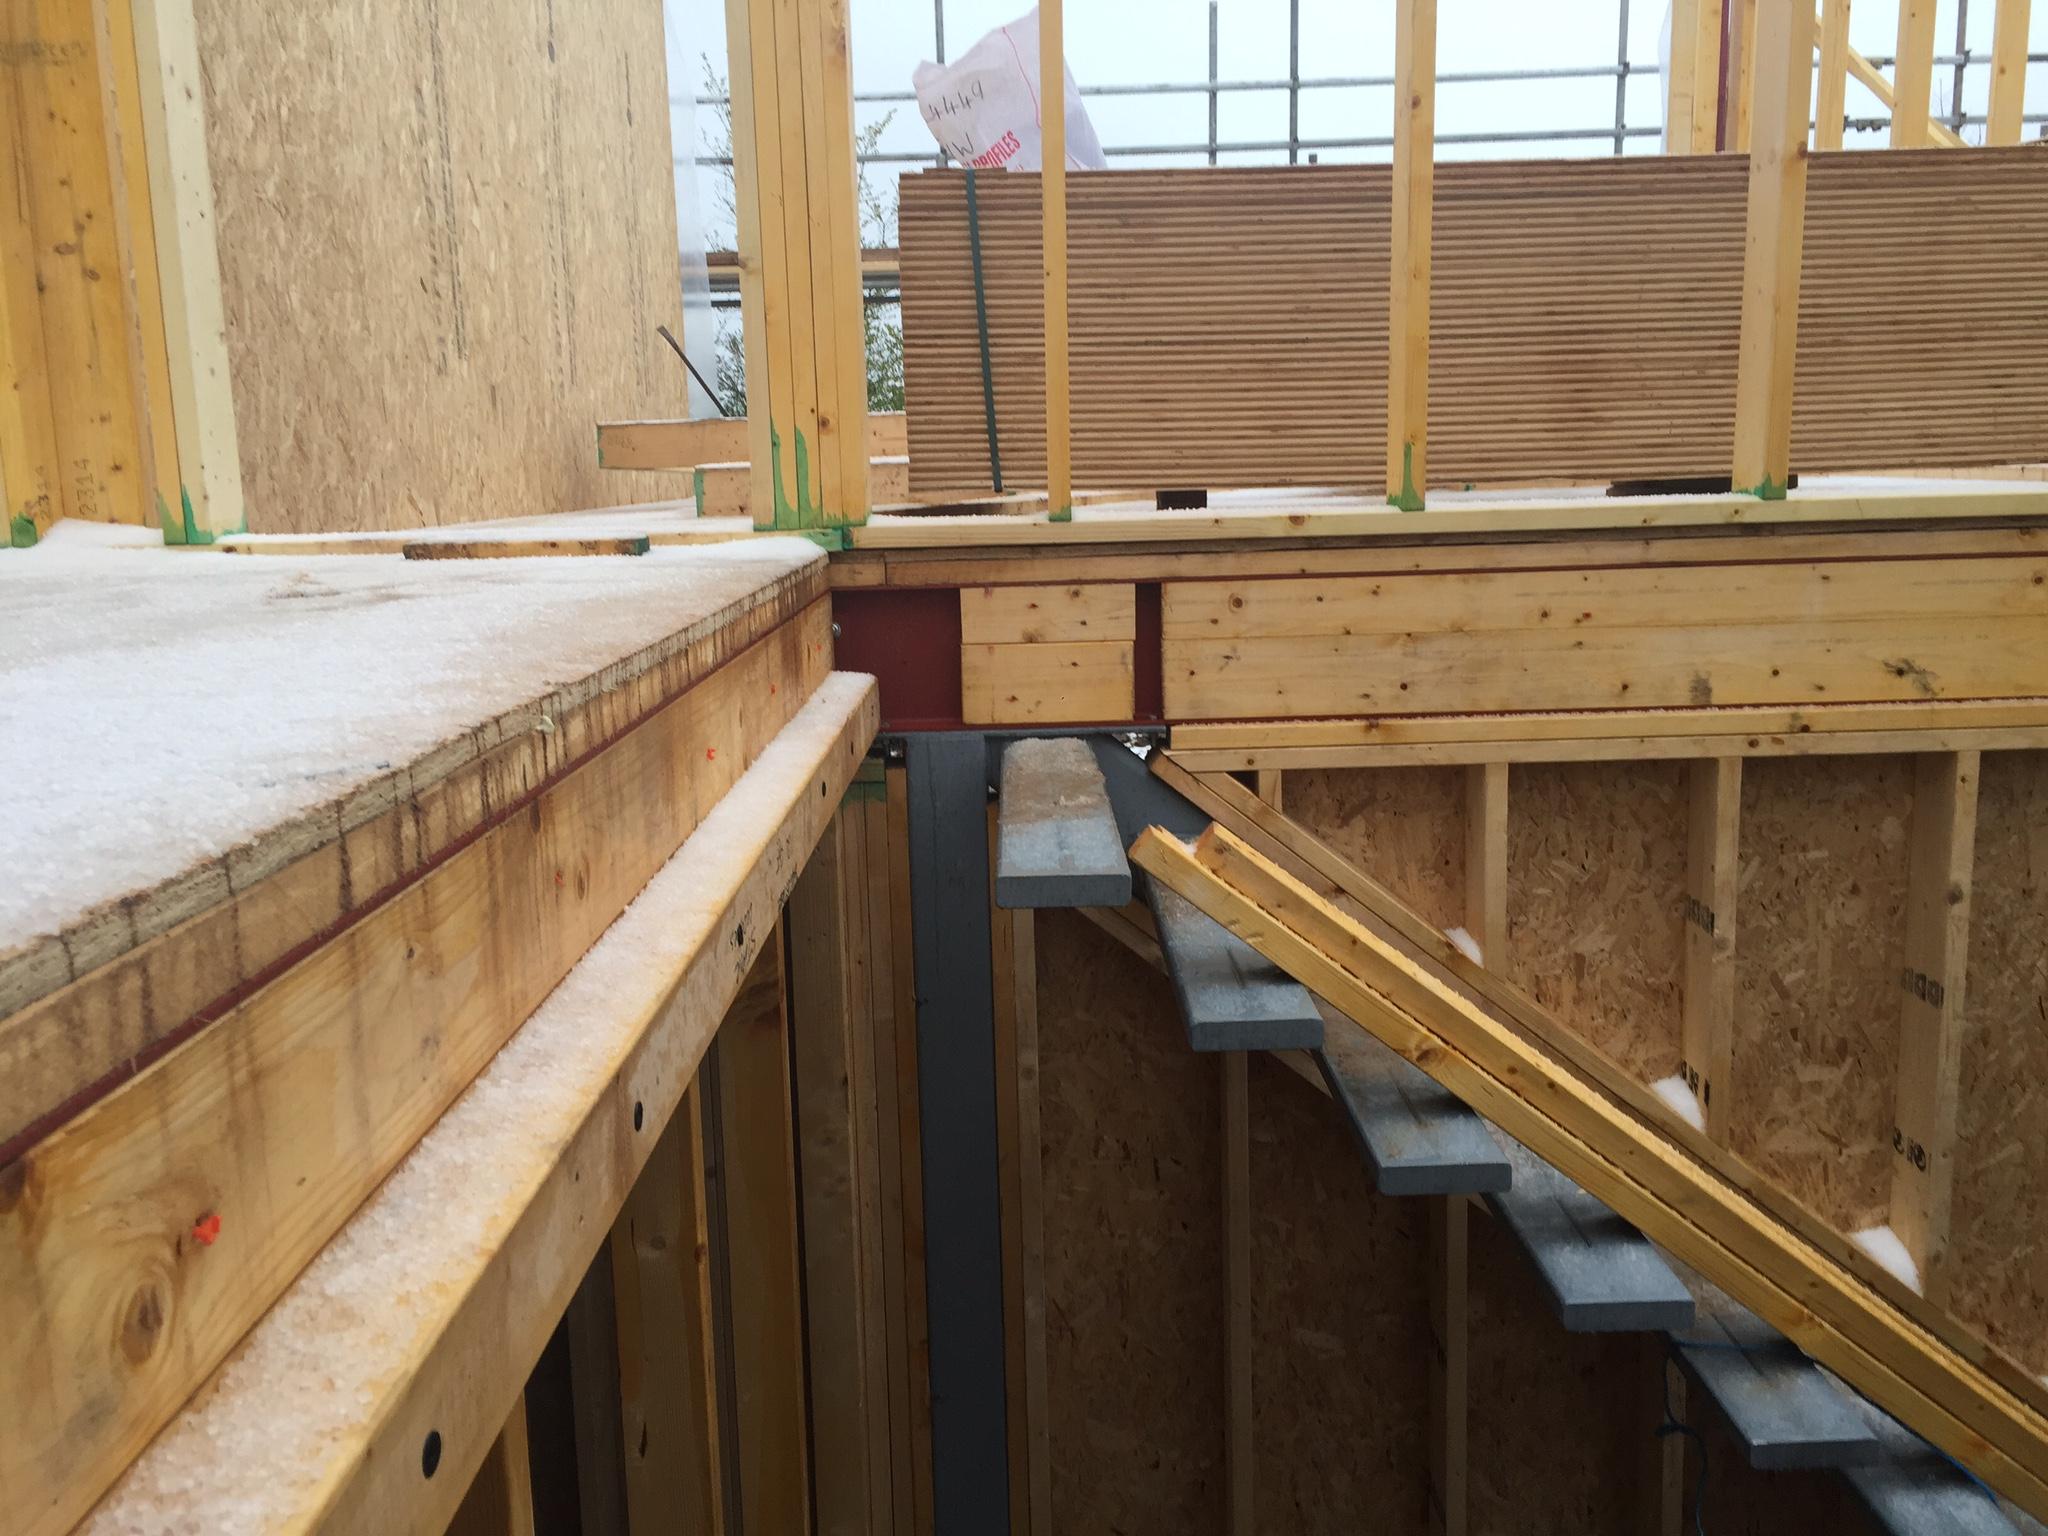
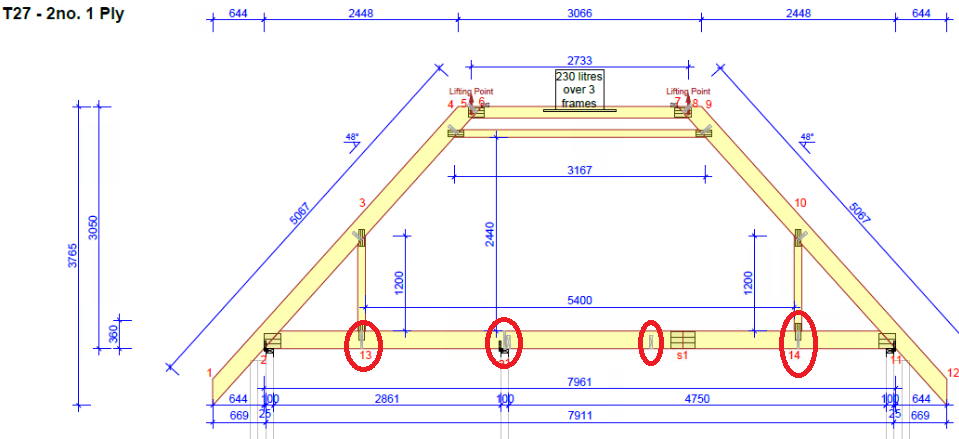
Like @pocster I'm messing about with Noggins, but mine are structural rather than for the plasterboard so I thought I'd start a different thread. We've got attic trusses and the roof designer said to put noggins in at the base of each side wall and then two noggins spaced in between that. I've circled what this ends up as below and the designer has shown some noggins 172mm aligned with the bottom of the bottom chord (222mm). Is that alignment the best choice (compared to flush with top of bottom chord or in the middle)? One run of noggins is basically along the support wall near where there look to be clips. Does it make sense to have them so close to anchors?
 1 point
 -
Perfect timing for thread as been sketching different options tonight. We are thinking on a open wardrobe dressing room. I have been trying to utilise kitchen larder units and handless doors for drawers from diykitchens. Its working out very cost effective. Approx 8 linear meter of half height and 2 linear meter of full height rails. 1.5m3 of drawer space and plenty of shelves. Hopefully correct side of £3k. Not inc worktop for dressing table.1 point
-
You'd be better off in a consumer rights or diy type forum. I'm sure someone will come along and help but it's quite a long winded post. Sorry to be blunt.1 point
-
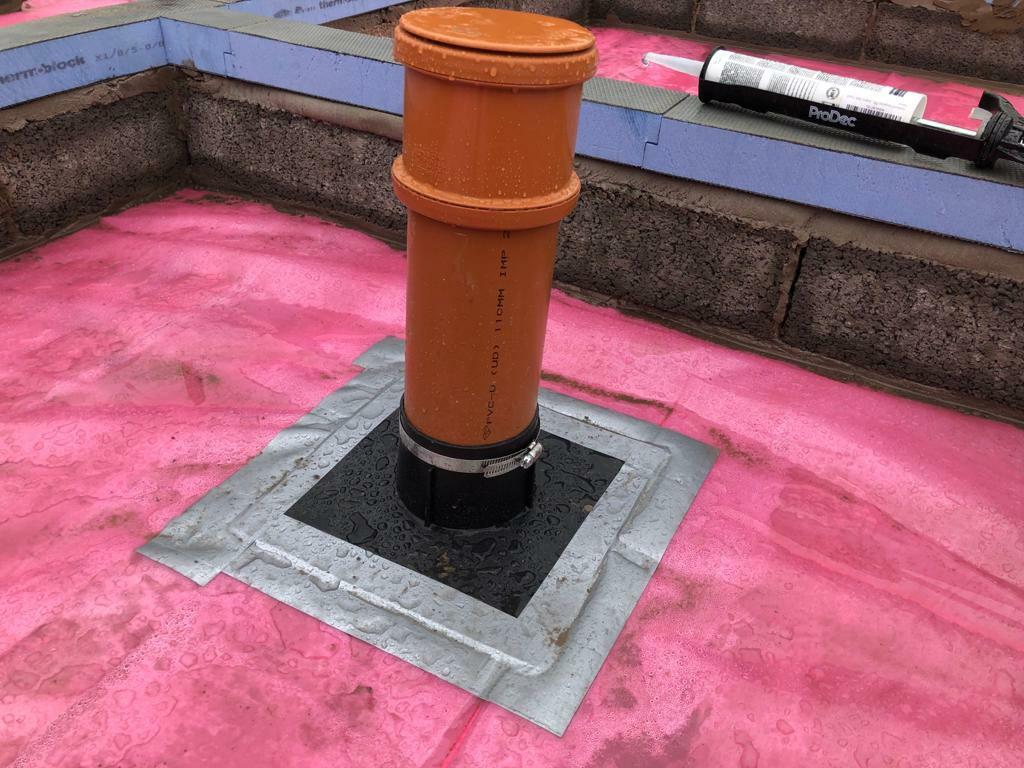
For a 160mm duct ( penetration ) you mark a 300mm square, with a pilot hole, drilled from indide to out, as the centre point. Cut down the two sides and along the bottom to create a ‘cat flap’ of membrane. Cut the 165mm hole out with a jigsaw, or recip saw if you’re brave, and then foam the duct into the hole. The remaining flap can then be cut into 30mm fingers and shortened, and then air tightness taped to the duct and to the membrane. Use A/T tape to seal the open end of the duct ready for the blower test ( if not yet done ) otherwise just use a bag and some gaffs tape to stave off wind-driven rain.1 point
-
If your not beam filling the blockwork or fixing trusses on that spine wall surely the noggins are doing a job. I'd bring them maybe an inch or so away from the wall can double up as plasterboard perimeter nogs then.1 point
-
BCO needs to answer that.1 point
-
Some people on here have gone for things like water bore holes because the price is less than connecting to mains £10k was a figure that comes to mind. Getting a sewage treatment plant is not too bad and a lot on here have them. I think the real problem is power. Even supplementary solar can take a long time to recoup costs. Some of the issues we hit: We have a water main running through our plot and it still cost £4k just to connect because it's a massive pipe and high pressure, 15bar or something. We have trenching on top of that. Electricity started out at £16k because they tried to get us to pay for a new pole and transformer. We argues that right down. Some on here have had massive connection costs. With groundworks we found an old river bed that test digs had missed. It would have added £50k to the foundation costs to build there so we moved the house and garage over a bit. Still glad I started all this though!1 point
-
I’ll pm you1 point
-
Yep got it in one.1 point
-
We have 2 cars - in 40 years of car and home ownership I have never kept a car in a garage ?1 point
-
Makita can’t do this .....
 1 point
 -
In honesty, I used to be 100% DeWalt, then they went to a place where a combi drill wouldn't last me 18 months.... utter shite. My very first DeWalt combi is still up my attic and still works, after 9 years of taking it all over the world and giving it a proper beating. I have the DeWalt 780 XPS shadowline and that is an awesome bit of kit, but the oil-filled gearbox of my Makita BL impact, which is deliciously quiet for an impact drill, is my favourite. If DeWalt do something similar I could be tempted to jump back as DeWAlt actually do some nice gear again, now. Shame I had to leave that camp due to the then offerings just being complete and total shite.1 point
-
You tuck the next board into the previous and THEN screw the leading edge of the previous board, not before. To be done with the glue wet, not left an then 'come back to it'.1 point
-
yes, less restriction means less fan power to get the required flow1 point
-
Some humans do in error ?1 point
-
But they are Chinese crap. At least buy European crap.1 point
-
Price per m2 is a rough guide at best and it can be heavily weighted by finish ie 2 exact same houses of 100m2 and someone puts in a 10k kitchen and someone puts in a 50k kitchen there you have a £400 per m2 difference alone. It's also relative to how much work you're going to do yourself. I am building a 320m2 house in northern Ireland and expect to be in it minus landscaping at circa £650per m2 after my future brother in law completing a similar sized house for circa £550 per m2 last year.1 point
-
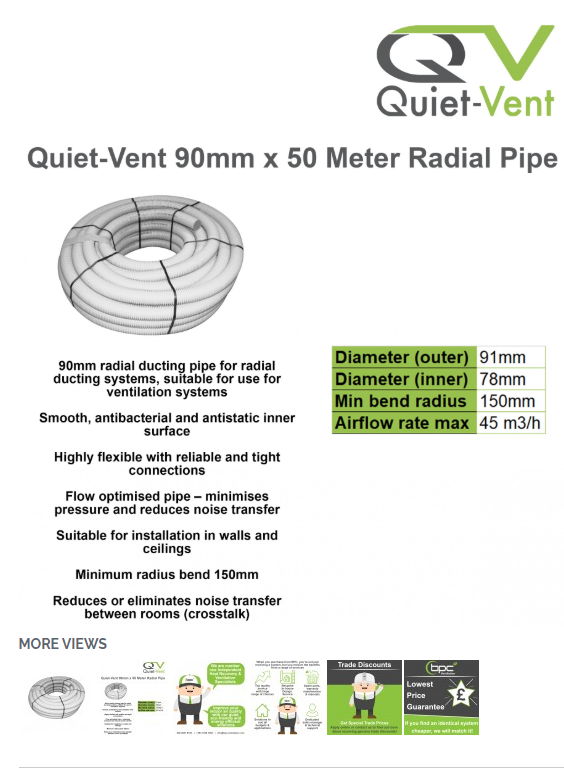
@Dreadnaught check prices carefully, the funny rectangular duct is painfully expensive compared to round. Also read the adverts carefully some prices look similar but the rectangular comes in 25m rolls and the round in 50m i bet a few people have been caught out with that one.1 point
-
It looks a lovely location. The planners bizarre decade by decade approach to building aesthetics isn't isolated it seems. Nonetheless the pictures give some clues as to what they might find acceptable. @joe90 I agree about the garage. However the project of building a garden wall from stone is wonderful. Undertaking a slow manual project by the roadside is just about the best way of meeting all your neighbours. Right I'll get to work!1 point
-
I empathise with your concerns as I'm in the process of buying a plot for my 2nd self build (see my previous post for details). I'm currently considering removing the attached garage, which is perpendicular to the main structure, in order to help the budget. I'm budgeting for £1400 psm including fees, prelims & landscaping - self-managing but not labouring. Build will be timber frame, facing walls in brick, upvc windows & concrete roof tiles - so nothing fancy. Mains gas available near edge of plot along with other services. So I feel it's doable but time will tell!1 point
-
What Dave says I used 35mm thick timber as I needed 47mm deep boxes for cooker points and data points.1 point
-
Dewalt has two gods. The pro and the consumer. Did you choose the right one, grasshopper?1 point
-
For services, forget dot and dab. Fix an airtight membrane to the wall with 25 by 50mm battens vertically every 400mm. Run all pipes and cables in that service void created by the battens then screw plasterboard to the battens.1 point
-
No Mando ! Makita is the way into darkness and despair !1 point
-
Catnics is basically a Tata Steel clipped standing seam roof (Tata steel product for selfbuilders is called Colourcoat Urban). If you're looking at coated steel roof, @Kevin J will I'm sure be along shortly re the product Metal Solutions supply which is also pre formed with clip together seams but made from SSAB Greencoat PLX. The minimum pitch for these roofs is usually 5 degree although with some standing seam products you can get away with 3 degrees.1 point
-
Congrats on approval! Lesson 1: someone else's common sense is not your common sense. Lesson 2: spend as much time on site as possible and do not let anyone stand between you and your build. Our Builder-1 and PM tried to pull it off, with dire consequences. Lesson 3: you will know your design and your plans by heart. You are the one who knows 100% what does where. Do not expect your builders know it that well, they will sometime consult plans, but often ignore them. Unless you check and make sure this / that outlet/feature etc etc goes in this/that particular place, it won't happen. Lesson 4: confirm everything in writing, no matter how small. If you discuss putting niche recesses in your bathroom with your tiler on site, do not presume that he'll remember what you both have just agreed. I would sneak onto site once the team left for the day and leave A4 size sticky notes in key places with large letters "NICHE 300x400 HERE" etc etc - that was the only way I ended up with the exact thing I wanted. Lesson 5: talk to this Forum, this is an bottomless well of construction wisdom and real-life experience. We'll cheer you up / knock you on the head / give you a magic kick or just have a virtual drink with you - this place is truly blessed :))) Lesson 6: no matter how stressful the process, enjoy it - you'll miss it once you're done!1 point
-
Wow. My input having done a 5 bed MVHR DIY a few years back... Firstly, I can't help but think most people *grossly* over-engineer the design of these things. You *can* spend hours and hours designing the b-jesus out of a MVHR system - 'meeting the regs', sound-proofing etc, etc... but, in reality, ultimately you will not be changing the air at anywhere near what the regs say you 'should' and duct noise really is not going to be an issue at the air speeds involved (assuming you avoid rigid ducts - see late and even balancing is more art than science). For an average 3/4 bed house, just stick to 4" ducting between the heat-exchanger box and vents (and use insulated flexible ducting as it is very cheap and easy to use and you won't get condensation issues that you may with rigid, uninsulated ducting). Use round, plastic ceiling vents/diffusers with adjustable flow rates which are dead simple to install, clean and balance (if you feel the need). NOTE: Get a ventilation unit with summer by-pass facility - I can't believe these things are sold without this facility as otherwise, in summer, you either have to have all the windows open all the time or the house becomes unbearably hot due to the heat recovery thing still going on. You also would have to deal with bathroom/kitchen extracting being operational without any way to stop the house warming up, again, without opening the windows. Bear in mind I was doing a new-build with a central services area and so all my ducting runs were kept to a minimum length and were easy to integrate. If you are retrofitting then rigid ducts may make much more sense.1 point
-
As you are getting on, make sure that the stairs are shallow in gradient. Say 35 degrees rather than the 42 allowed. My mum reckoned this gave her about 5-10 years extra where she could comfortably cope with walking upstairs.1 point
-
That would be such a shame to demolish that garage, can you not create a drive around it?. I am a fan of the look of dormers but they are difficult to insulate properly without looking overly chunky. I would try to loose them.1 point
-
How about stacking a couple of pallets of lightweight concrete blocks in a ramp shape then covering in concrete to form the slope? As @nod said, cover the top of the blocks in a sheet of DPM. You could break it off later and sell / reuse the blocks. As for handrail...3x3 timber posts banged in the ground?1 point
-
Lay down hardcore, cover with plastic, 50mm thick concrete ramp to correct specifications. Get it signed off then smash the ramp up with a sledge hammer and turn it into a bit more hardcore, the plastic prevents it sticking to the hardcore so it breaks up easily.1 point
-
Kitchen tap on 10mm will be acceptable, but won’t jetwash the plates. Done that a few times so deffo will work.1 point
-
Lol. If it was 20 posts back I’d let you off the hook, but all you had to do was look up1 point
-
Try doing litres per minute flow at the outside tap, Link Then pressure; static ( with all taps shut first ) then dynamic ( with the kitchen sink tap going flat out ). Link Let us know the results. If the results come back poor, then you will need to eliminate the possibility of a compromised mains pipe, so you’d then need to dig down by the street connection ( external stop tap in the ground ) where it enters at your boundary and connect to that temporarily and re-perform the survey.1 point
-
It's a Rapier...1 point
-
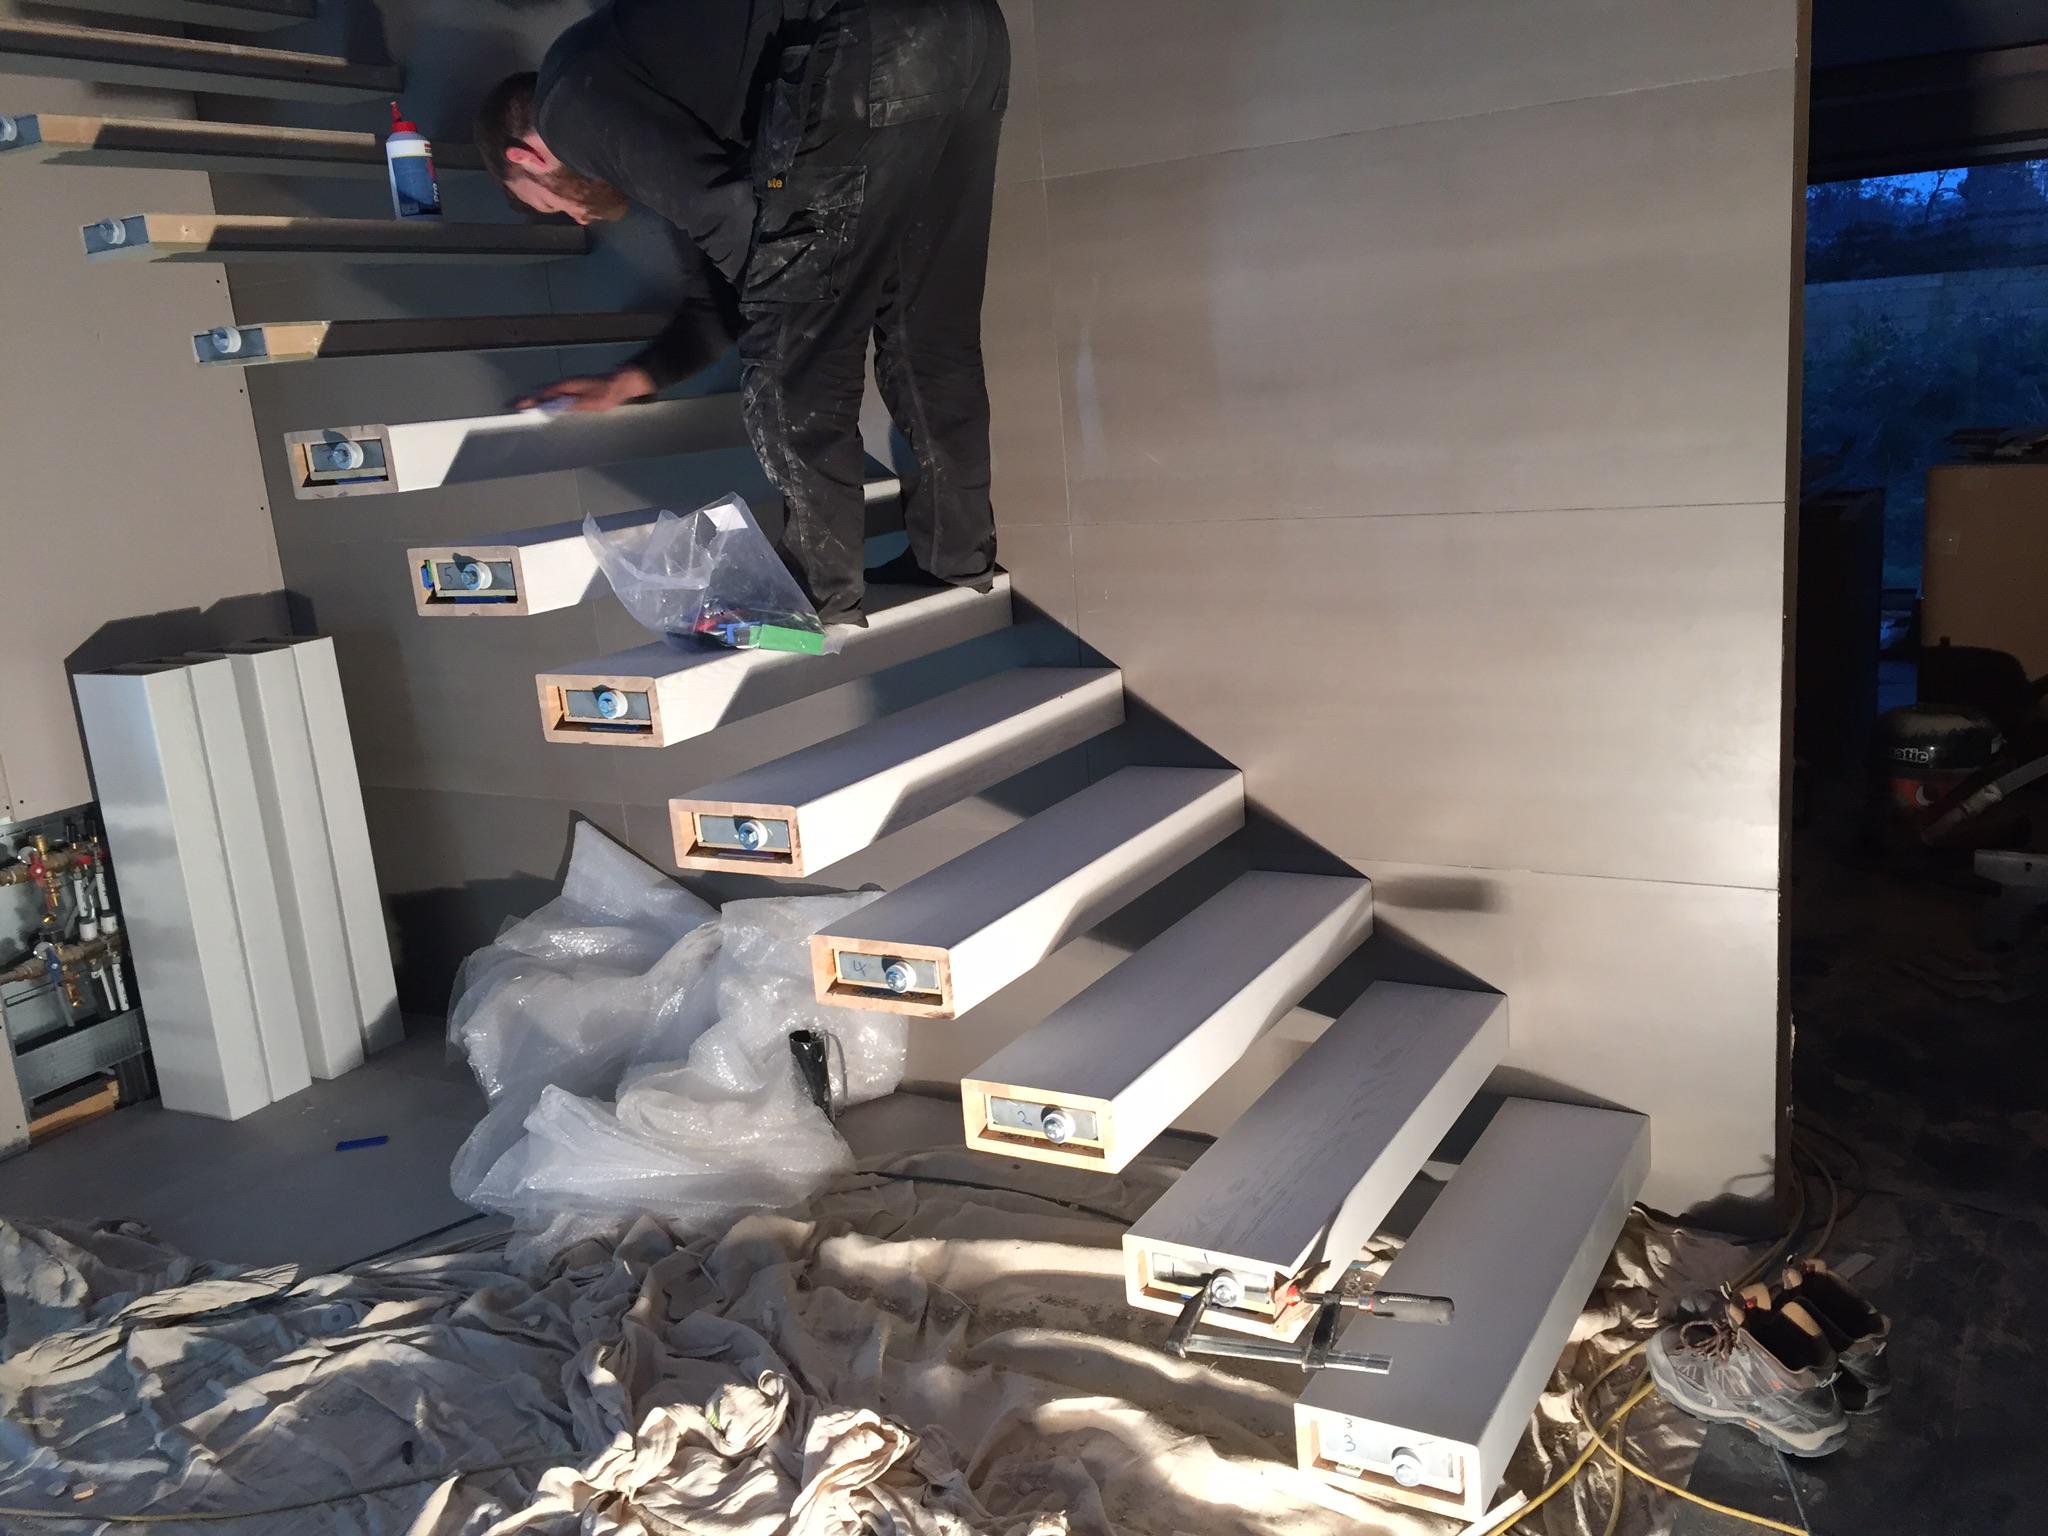
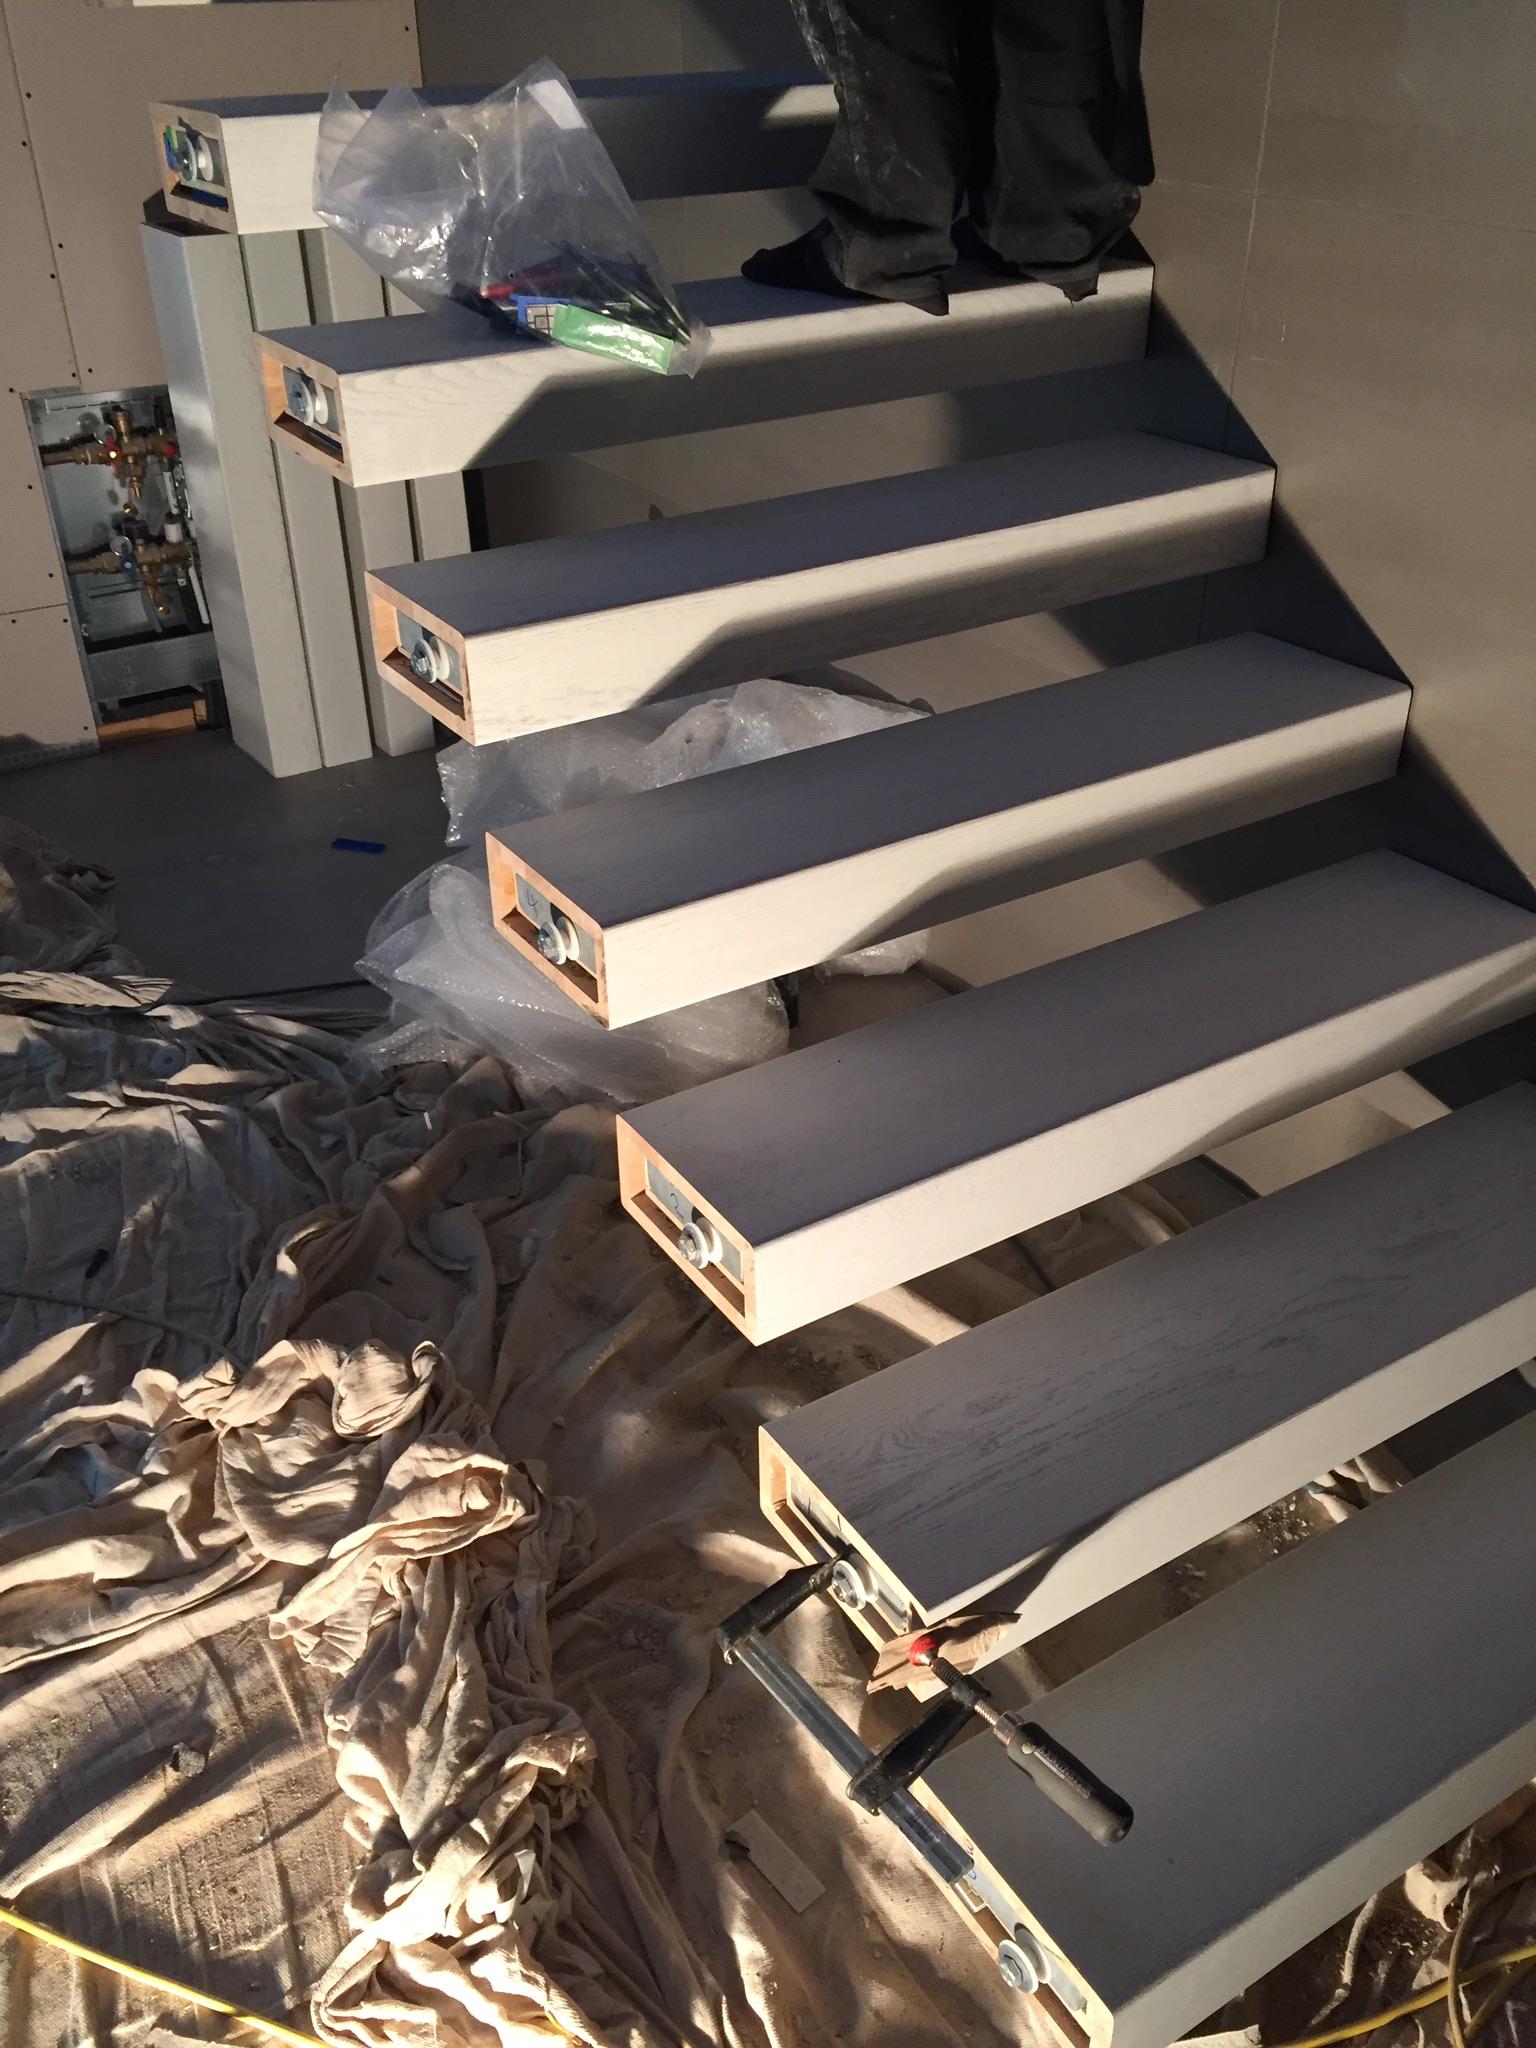
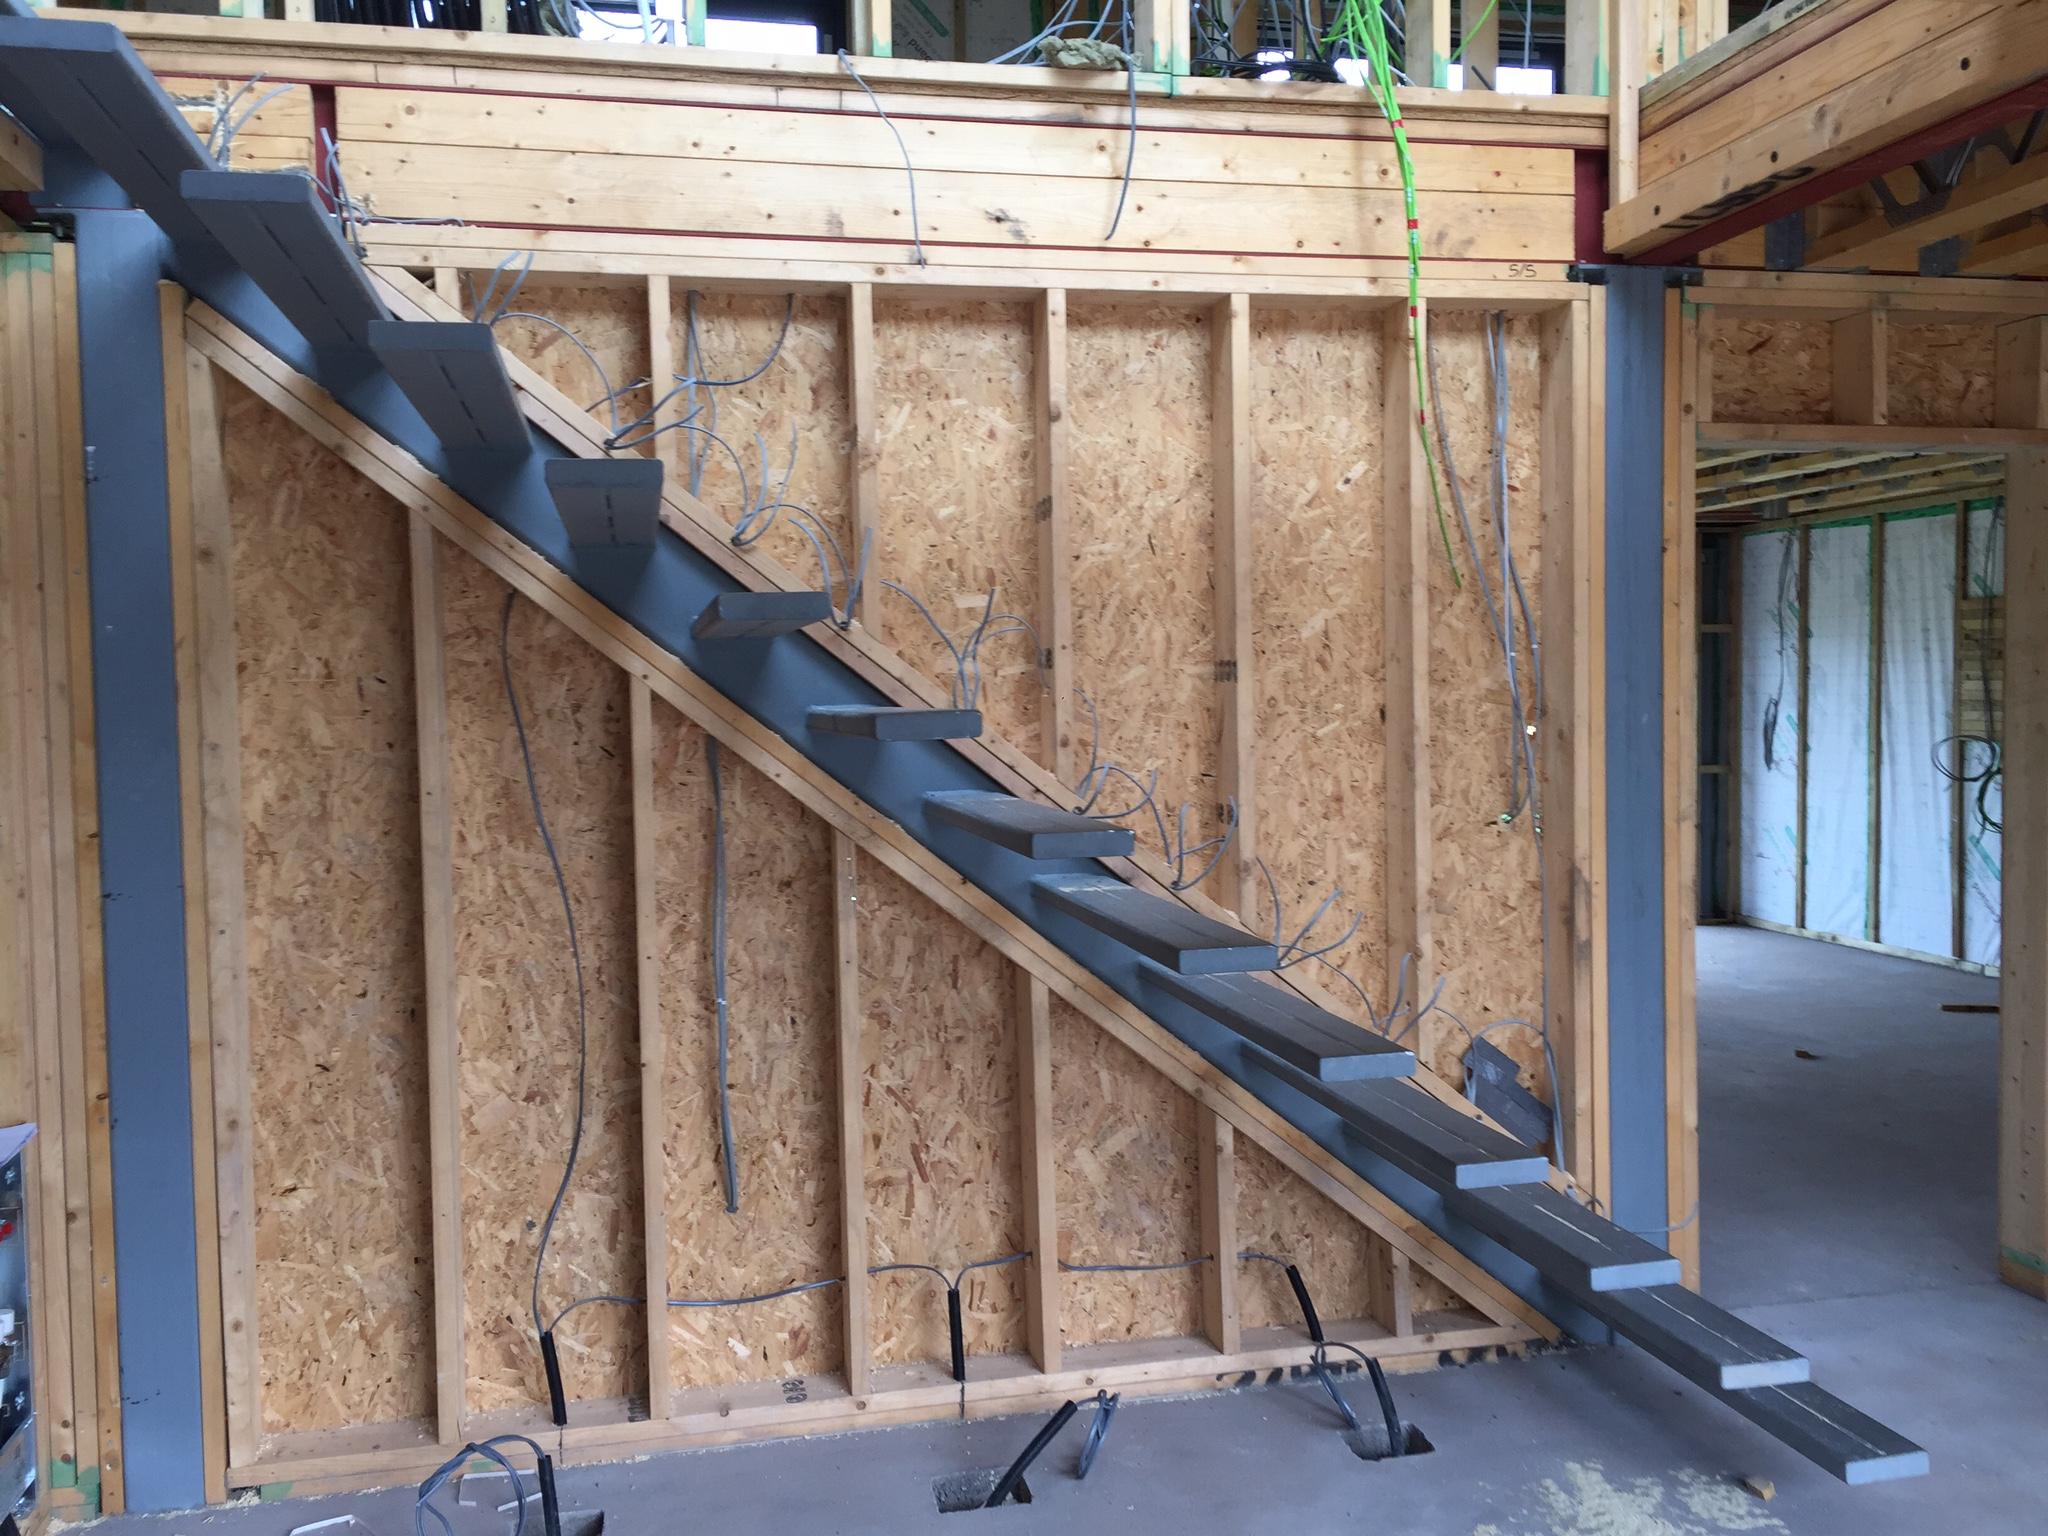
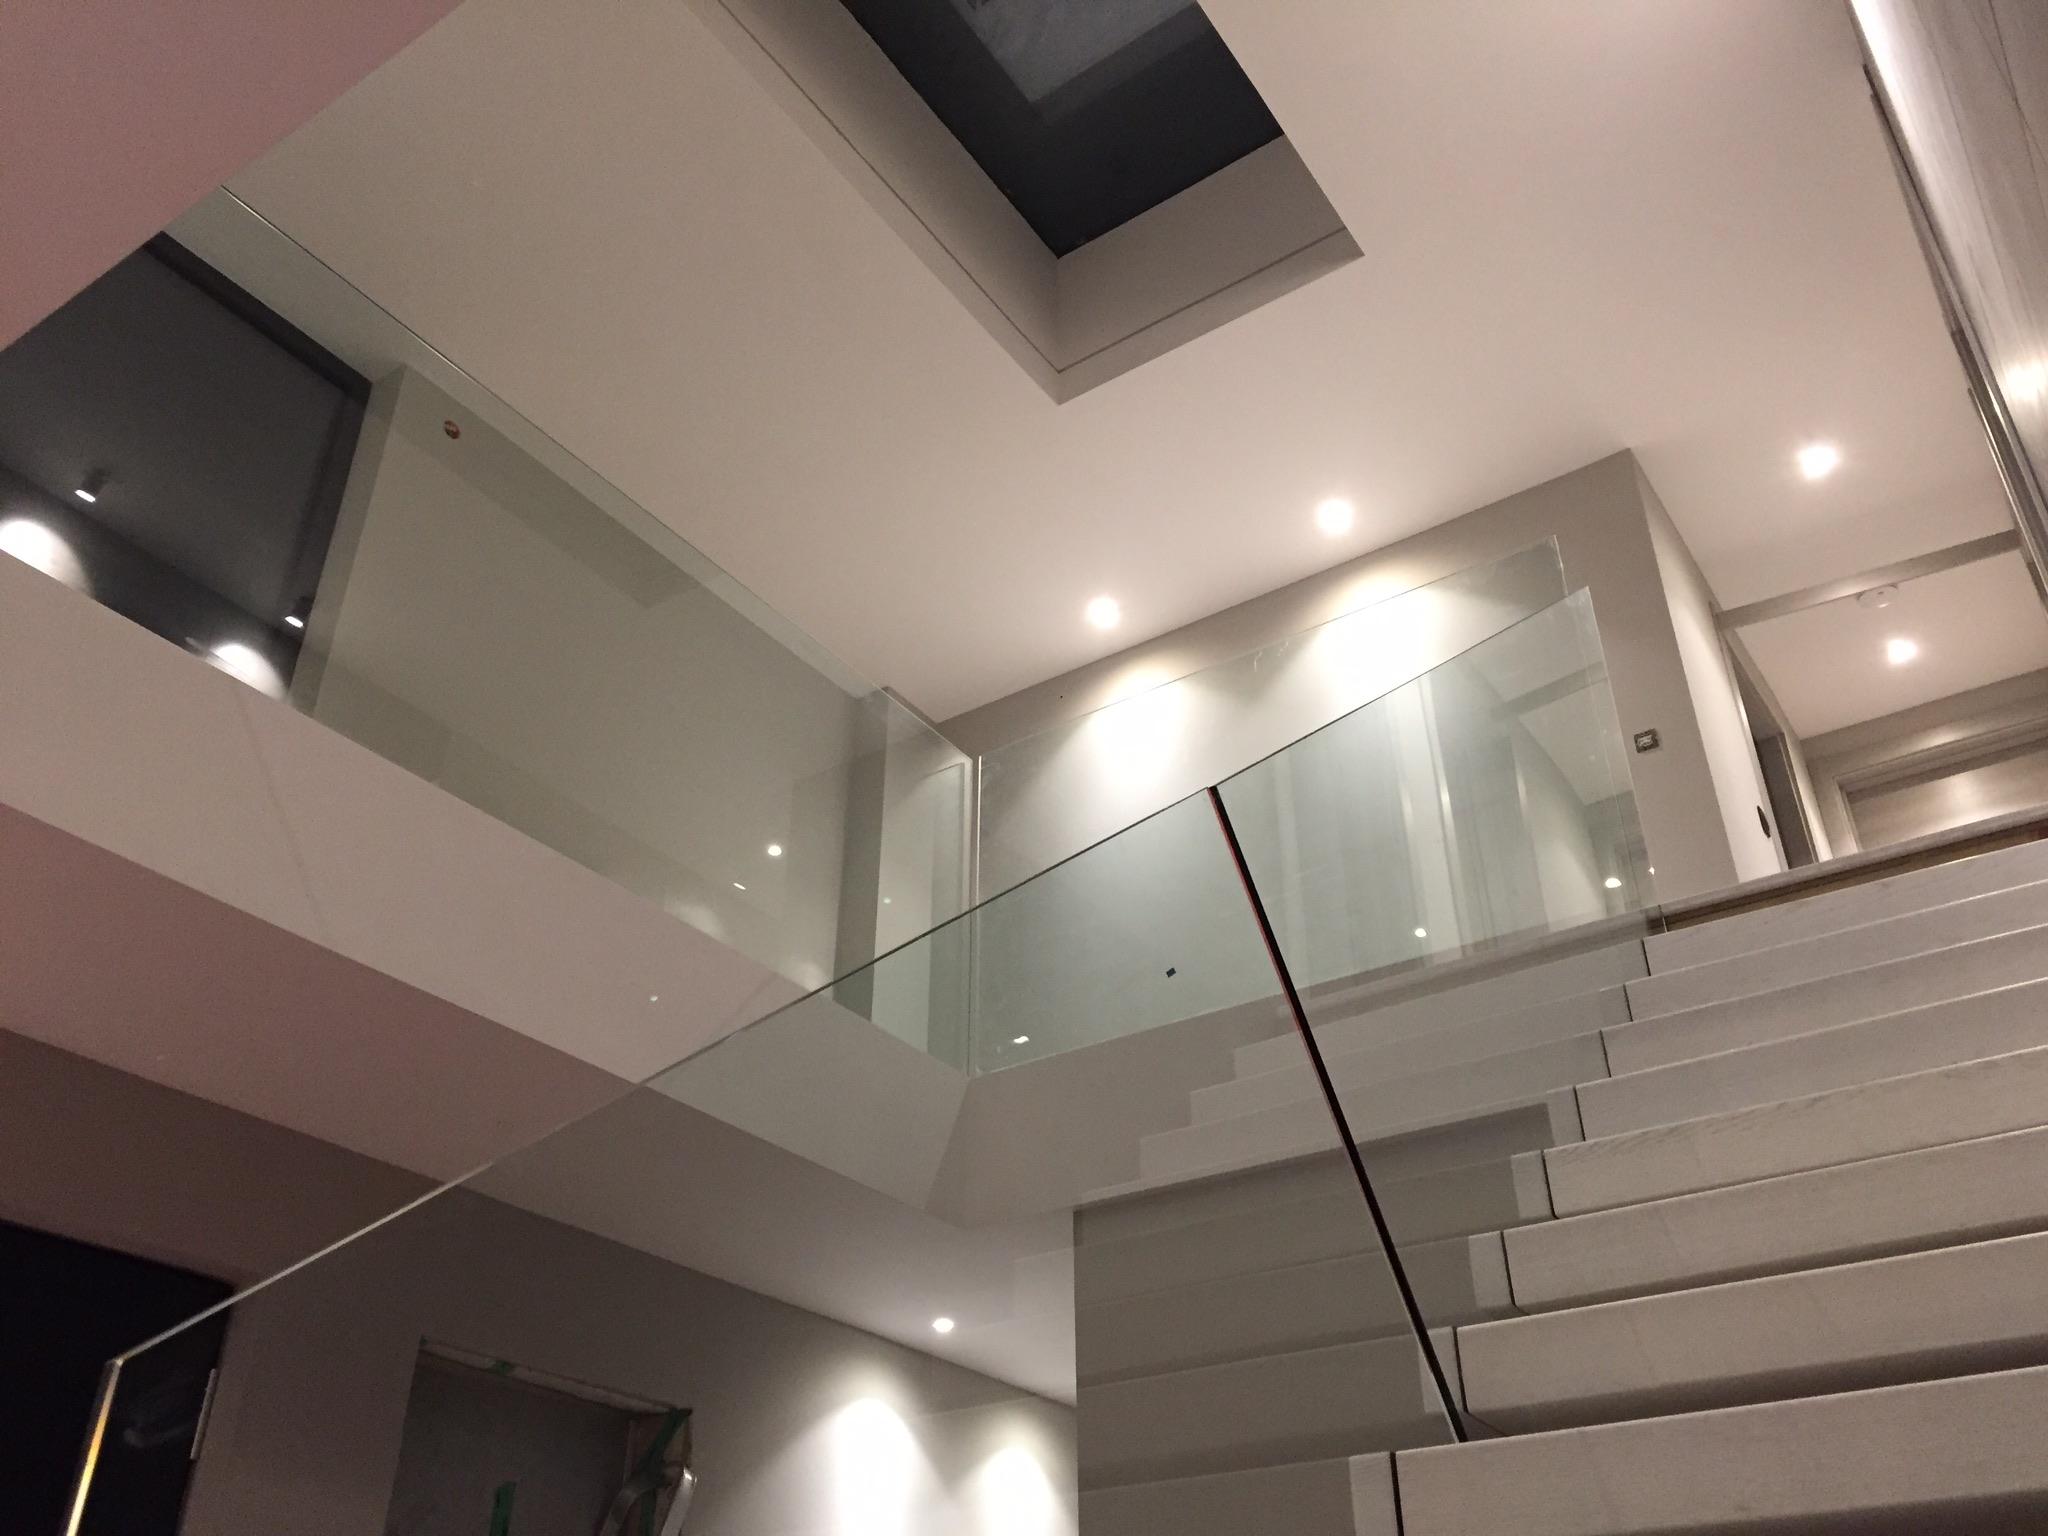
Finished view with the tread ends. Originally they were glued to the glass fixings, but I found they would rotate with the vibrations as you couldn't necessarily fix them tight enough. Instead I ended up pulling them off the fixing nuts and simply siliconing onto the glass separately.
 1 point
 -
1 point
-
We have installed cantilever stairs. In our case we had a steel frame and steps made by the timber frame company (as we needed some supporting steel work anyway), so I can't help with that bit. The treads were made as a wooden sleeve slid over the steels and glued in place. Glass then screwed into the end of the steel box section, followed by an end piece of wood to hide the fixings. I believe I posted pics on here at the time (4 years ago ish) but can probably find them again if there is anything you wanted to see1 point
-
We have a walk-through wardrobes area (3300 x 3300mm), stuffed with IKEA PAXs. I hate open wardrobes as the amount of dust they gather is phenomenal, and I can't be bothered to keep dusting all the shelves and clothing. So we went with doors. Overall, I love this area, it is so convenient to have all clothing etc in one place, thus I have NO wardrobes in my bedroom and it is soo much better so! With regards to the width of your walk-in area, make sure you can comfortably pull out a drawer whilst standing in front of it (not being squashed against the opposite wall).
 1 point
 -
Yes, they work in any orientation. Only two mirrors directing the light after all. You can get posh and incorporate some lensing by distorting the mirrors.1 point
-
Timber frame is very attractive due to the speed of getting a weather tight structure erected on site (a few weeks). It can also go up in pretty much any conditions (barring high winds) - mine was built in driving rain in November but 8 weeks from the start, scaff was down and the house appeared finished from the outside. For the novice builder (like me) it also means that you have all of the structural considerations, roof, internal walls & floors, temp stairs etc taken care of by one contractor (some even include the slab foundation). You can order windows and doors in advance off-plan and have delivered to site as the frame is completed plus TF can be a bit easier to adjust (within reason). You can then crack on with first fix in short order. However, airtightness requires the same attention to detail as above, there is nothing inherently airtight about a timber frame. Some contractors will include an airtightness guarantee in their contract. You also need to ensure that follow on trades understand and respect the airtightness layer (not to say it can't be penetrated when required, just needs done with consideration. Cost is the main drawback - TF is always more expensive up front and sometimes overall but I've not seen any analysis though that breaks down how the cost compares over the duration of an equivalent block build - I suppose the key variable there is time and what that is worth to you. I'd say the second consideration is the exterior skin - as mentioned above, anything load bearing (brick or stone) will require its own foundation and you won't get the same speed of completion. Render, timber cladding, brick slips etc would fix directly to the frame itself or to an outer skin of cement board on battens. From a mortgage and insurance pov, you should have no issues with TF.1 point
-
I thought I would update this with some pics. We pretty much have done it as the above drawing. Engineers drawing is attached too if it helps anyone else.

 1 point
 -
In response to @Russell griffiths post about blogs, here goes. It is still 2018. I finished the Tata Colorcoat Urban roof, tricky around the Velux windows and fitting the ridge trying not to get sealant everywhere. No leaks 2 years later. Kwikstage very useful, heavy but a worthy purchase on a long self build. I made up one of the roof trusses for the garage and thats where it sat for another year. Back inside and started to put down 150 Celotex on the ground floor, taped and polyethened ready for the screeders. All UFH supplied by Wunda, about 1200m of 16mm pipe on the ground floor for 14 ports from 2 manifolds. All cliptrack and staples. Take care not to kink the pipe and take photos and measurements if you might be fixing anything to the floor. The electrician arrived and made great progress and then the screeders in early December 2018, 200sqm of 45mm anhydrite down in 2-3 hours. Once the electrician had finished first fix I started battening the OSB ready for the plasterboard, I notched out around the wiring. I fitted some resilient bars to all the ground floor ceilings, little cost apart from fitting time. It's now 2019.1 point
-
A quick photo update, I will do proper blog posts over the next few days...... The ground works were started back in August, however there was a long delay with the timber frame being manufactured (partly due the the first floor layout changes), which meant that the TF kit wasn't delivered until November the 18th. Last week the house was made wind and watertight. This week the ground floor UFH was laid and the screed poured. We are hoping that the steel for the cantilevered stair will be fabricated and installed over the next 2 weeks.1 point
-
In this entry I'm going to discuss in more detail how I came to choose our heating and hot water system, and how it has performed to date. As other forum members have found, deciding which fuel source and type of technology to use in a low energy house, is a challenge given the different requirements each of us has. We had three stipulations – low running costs, hot water available on tap 24/7 and maintenance of the whole house at an even and constant temperature 24/7. Having calculated our heating demand, taking the impact of solar gain, incidental household gain, human occupancy and wind speed into account, I was confident that I had a good indication of the amount of heating I would need. I was also confident, based on historical use, of the amount of hot water we as a family use. Living in an area without mains gas, my options were somewhat limited to using either oil or electricity as my fuel source. LPG was initially considered but discounted due to the lack of availability in my location. As part of the decision making process, I spent a fair amount of time carrying out a cost comparison of both oil and electricity based heating and hot water systems, using 500kWh increments from 2500kWh to 5000kWh. I considered direct electric of various type, oil and air source heat pumps, both air to water and air to air. Solar PV was also considered and costed in terms of each method of heat and hot water delivery. In line with previous cost comparisons that I had carried out, I found direct electric to be the most cost effective in terms of capital outlay and running costs when both heating and hot water demand were less than 2500 kilowatt hours each year. As heating requirement and hot water requirement increases so the balance began to tip in favour of other technologies. Oil was quickly dropped from the list as it became apparent that any rise in fuel prices over then then low point, would significantly increase running costs. Having conducted significant investigation in respect of the viability of Sunamp units, although attractive in many ways, I found that the capital outlay and running cost was simply too high to be able to justify, given that the main benefit (low heat losses) were not as critical for me as they have been for others. Part of that decision was also driven by the cost of fitting Solar PV, which in our remote location was extortionate. I looked into a non MCS DIY install, but couldn’t make the figures stack up, the break-even point being around 17 years. Much as I wanted to install PV, it didn't make any sense financially. In time, I hope to revisit PV, if and when battery storage reduces the break-even point to a more realistic timescale. A wind turbine, given our location and the virtually constant presence of wind, would have been an ideal energy source and paired with Sunamp technology, probably unbeatable. The proximity of nearby houses ruled out that option in terms of planning permission. Air to Air heat pumps were ruled out based on my own experience of them and a road test at a friends house. Neither myself or my good lady found them particularly pleasant as a heat source. Having gone through the list of options, an air to water air source heat pump, paired with a large UVC and UFH for the distribution of heat, represented the best balance in terms of capital outlay, running costs and crucially, comfort and convenience. We opted for a package from Mitsubishi Ecodan, an 8.5kW heat pump and 300 litre pre-plumbed cylinder fitted with the Mitsubishi FTC5 control panel. Given our location, we opted for the coastal model, which is treated with acrylic resin for enhanced corrosion resistance. Whilst a pre-plumbed cylinder is more expensive than a bare cylinder and associated parts, after taking labour (plumber and electrician) into account, I found there was very little difference in cost. I sourced the package from a trade supplier, Secon Solar. I found their price list while searching online and having phoned the company, and perhaps fortuitously speaking to the managing director of the firm, found they were quite happy to sell me package at trade / installer price, the bonus being that delivery to my location was free. The package is configured for the UK market, the only difference to the system as sold in the rest of Europe (AFAIK) being that the cooling function of the heat pump is disabled so that the product complies with MCS approval for claiming RHI. It is however a simple task to activate the cooling function, by flipping a dip switch in the control module on the cylinder. Cooling can then be controlled from the master controller. As stated in an earlier blog entry, the heat pump and cylinder were fitted very quickly with simple connections on the plumbing side – flow and return from the ASHP, cold water, hot water and flow and return to the underfloor heating manifold. Electrical connections consisted of power to the ASHP, a cable from the ASHP to the control module and a plug-in controller. I had initially planned to have the cylinder in the utility room close to the ASHP Monobloc, but changed the location to a service cupboard in the middle of the house, to reduce internal DHW pipe runs. This does mean a 15 metre pipe run for flow and return to the ASHP, but as virtually all is within the insulated envelope, it doesn’t represent much of an issue, and does not appear to be having an adverse effect on performance. The ASHP Monobloc itself is located beside our back door, open to the elements. It seems happy enough where it is, despite the wind that traverses the space between house and garage walls. Locating the ASHP within the garage itself was an option but one I decided against simply on the grounds that I didn’t want to give up floor space within the garage. A timber housing for the ASHP is something we may look at in the future. We opted to fit individual room thermostats to all 3 bedrooms, to give us the option of being able to reduce the bedroom temperatures if we so wished. We have not used these and keep the whole house at one temperature 24/7, treating the underfloor heating as a single zone. At present I only have limited data as to how the heat pump has performed since moving in. On board energy metering (energy consumed and energy produced) shows the CoP for heating has ranged between 3.5 and 4. DHW is maintained at 47C-50C in the cylinder, boosted every fortnight to 60 degrees by the immersion on an anti-legionella cycle. To date the CoP for DHW is 2.4 As members know, heat pumps are best suited to the production of low temperature heat as opposed to the higher temperatures required for domestic hot water. Whilst the CoP for DHW is lower than that for heating, the cost per kWh of our DHW, based on a CoP of 2.4, is 5p, which is significantly better than an E7 electricity tariff. We may be taking a hit on efficiency, but in reality all of the other options would have cost us more. The 300 litre capacity of the cylinder means that we have plenty of hot water on tap and can comfortably run a full bath and still have sufficient left over for another person to shower. The ASHP is currently operating on a 24/7 basis, providing heat input to the UFH and topping off the DHW as and when it determines it needs to, at whatever flow temperature it determines. Whilst that does sound like a recipe for high bills and high flow temperatures, in practice, the heat pump delivers the lowest flow temp it can get away with to maintain our set temperature. If I so choose, the controller lets me set various parameters such as heating curves or set flow temperatures, or indeed a timed schedule for heating and DHW. However,as the system is operating efficiently on its auto setting, and providing the level of comfort we want, I see very little reason to mess around and create my own settings. If say electricity tariffs were to change from a single tariff to a dynamic tariff, then I would have the option of timing the heat pump operation to coincide with lower rate tariffs. After much thought, and indeed discussion on this forum, I opted for an 8.5 kWh ASHP over a 5 kWh ASHP, as I felt happier running a larger unit more gently than pushing a smaller capacity unit harder. A 5 kWh unit would probably have sufficed, and in time, may be what the current unit is replaced with when it reaches the end of its life. We haven’t yet had to activate the cooling function as any overheating (defined as internal temperatures over 23C) caused by solar gain, can, as modeled, be managed by natural cross ventilation. Neither have we found it necessary to constantly circulate the UFH to even out the house temperature / redistribute solar gain from one part of the house to the other. In the heating season, we found that there was sufficient circulation of the UFH during the heating cycle to maintain the house at an even temperature. Outwith the heating season, when solar gain is at its peak, the house zones itself, the bedroom section remaining slightly cooler than the public areas, very useful on a warm summers day. Overall I’m very happy and impressed with our system. It has, so far, delivered everything we have asked of it in terms of comfort and convenience, and the running costs are low. I have the capability to cool the house (via slab cooling) if I so wish, and the option to bolt on a second zone pack onto the pre-plumb cylinder if I ever found it necessary to install a second heating / cooling function – i.e. fan coil or duct heater / cooler. The one criticism that I have is about the controller thermostat function and its hysteresis - 1C increments only. A finer degree of control would have been preferable. Our installation was recently inspected by an MCS accreditor (our plumber is going through the accreditation process). In due course that will give us the option to apply for RHI, although that will be very much dependant on whether the figures stack up.1 point