Leaderboard


Popular Content
Showing content with the highest reputation on 01/15/20 in all areas
-
Do it yourself and pay £250 to the council for building control2 points
-
Carrying on. More pipes, more cables, more plasterboard. Howdens stock door linings for CLS-sized studwork so gave them a try and have to say, pleasantly surprised with the quality and service. Got a door to go with, to square things up easily. Had a plasterer down to price some bits and bobs. Waiting for another crew to offer costings now. Plan is, to get the ensuite skimmed out so we can get a working bathroom and get shot of the portaloo. I won't miss the rental going out every month... Which leaves today. Loos don't work without drains, and we'd never got a final scheme together for the BCO. And based on the limited height we have between the current level, the FFL and the FGL I didn't want any nasty surprises re. pipe cover etc. So, called in to request a visit just to thrash out what works and suits. BCO arrives, makes approving noises about progress, doesn't care to look at any internal drainage and agrees to all the points of my (minimal) scheme. I asked if there's anything else he wants to see or check on before I start covering the GF ceilings and...no. Just a look at the safety glass in the french doors. So we're clear to complete the surface water drainage with no inspection required and he just wants a call to pop out and view the foul pipework once bedded. Onwards!1 point
-
So the mains stopcock should really be where the MDPE joins the house pipework, doesn’t mean you can’t have two, one in the garage and one somewhere more accessible.1 point
-
I only run mine at 1 bar, but the PRV is still 3 bar Everything will take 3 bar, so is that wrong?1 point
-
I've no practical idea but it seems to me that it ought not to work for the inlet/supply path as the units are not supposed to mix the incoming and outgoing air.1 point
-
This is a fairly good video which shows the whole process (if I recall correctly).1 point
-
Total rip off. Where are you? Friend had a stove installed for £2200 including the stove, liner the works. Guy is fully HETAS registered pucka guy. My installer took £1500 and I supplied the stove, he had to break out the old fireplace to expose builders box, clean chimney, fit 904-316 liner (around 7.5m of it), line the builders box, fit a register plate, fit sandstone hearth, black metal bezel and a chunky oak mantle, chimney back filled with vermiculite and cowl fitted.1 point
-
Good advice @Nickfromwales. Thankfully the resilience bars are on their way so we will hopefully avoid that fate too!1 point
-
You choose your stove to match your heating needs, then choose the flue to match the stove.1 point
-
Go with the mfrs recommendations on the vent area needed, that should know best. If there is a condensate drain on the unit then can't see an issue with s fall that goes either away from or to the unit, or a combination, what you don't want is anywhere water can gather, so no U-bend scenarios.1 point
-
I got all mine from here https://www.flue-pipes.com/ IT cost over £1K for all my flue pipe, more than the stove. What size stove? I used 5" for a 4.5kW stove.1 point
-
I don't think that HETAS registration is mandatory, just a way of showing compliance. I have done a metal flue in the past as part of a new build house, all to spec and Building Inspector was fine with it.1 point
-
If that’s £2750 plus VAT.......... I am fairly astonished. Just buy the stuff and do it yourself..... forgot you can’t because you need the HETAS registration, any way round this ?1 point
-
£300 worth of bits there ...1 point
-
I know nothing, but that sounds like a fortune.1 point
-
DriTherm 37 is the industry standard hence why it’s cheaper. 260sqm is 60 packs and I’ve just been quoted £1180 delivered plus VAT for DriTherm 371 point
-
Seems ok to me, I’ve been paying £6.10 + VAT per m2 for DriTherm 32.1 point
-
V = 1/3π.r^2.h Assume an angle of 30°1 point
-
You can work it out from the angle of repose ( https://en.wikipedia.org/wiki/Angle_of_repose ). For fine, dry, sand this is around 34°, for wet sand it's about 45°. I'd aim at about 30°, determine the volume (density of dry sand is about 1.6 tonnes/m³), work out the size of the cone from the angle of repose and the volume, then use that to determine the diameter of the base.1 point
-
Hi all, I originally started just researching on here for self build related information, which I have found an absolute wealth of. But struggled to be able to easily find pictures , with the exception of the Blog's which are really helpful. But more recently I've found Instagram to be extremely helpful and full of brilliant self build accounts which document peoples journeys, mistakes, advice and it's been really helpful finding suppliers, architects, sureveys, contractors etc to see their work beforehand. It really helps provide confidence selecting people and also to see who has done what before and see their work beforehand and also see others journeys, mistakes etc. I have also now started a self build account on there to document ours. Was wondering who else uses instagram for this and also has a self build account? Hopefully this helps others to find more information on self building1 point
-
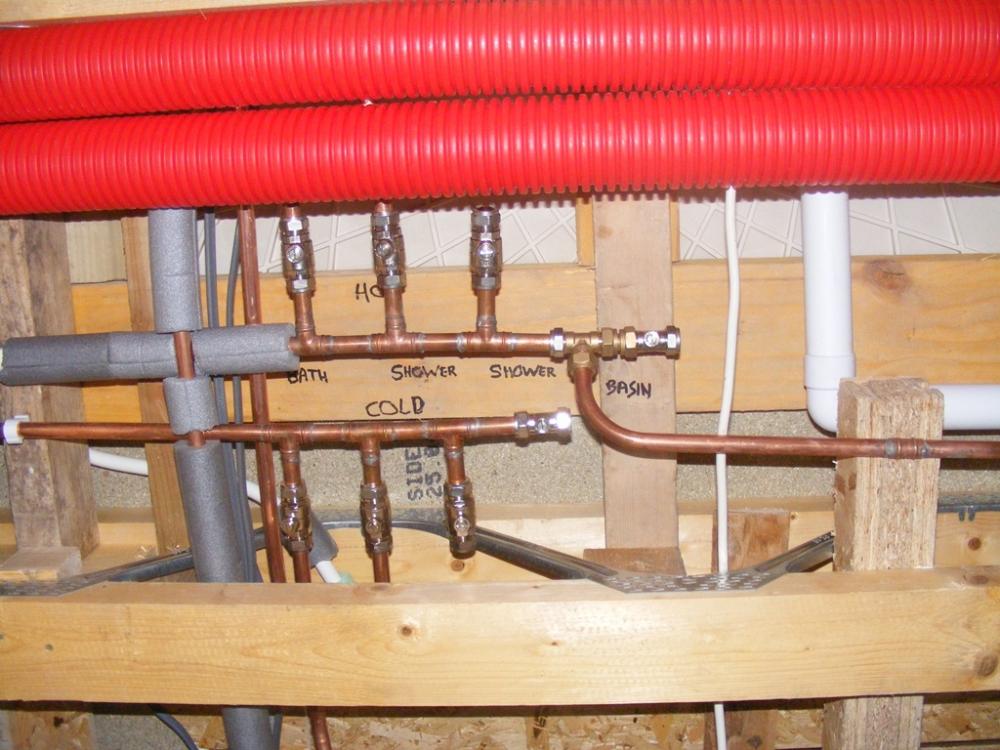
Yes It just feeds a bath, 2 showers and a basin (the other basin tees off straight from the airing cupboard. This is in the void between the utility room ceiling and bathroom floor. The location was chosen as it was the most logical place to branch off for all the destinations, without making any of the pipe runs any longer than necessary. It is now accessed by a mini loft hatch in the utility room ceiling.
 1 point
 -
exception on one of the two houses proposed no work started and pre-commencement conditions not applied for discharge, i could apply for exception on one of the two proposed plots. I have highlighted this to the architect and politely stated his error and for him to get it sorted, speaking to him he is going to get in contact with the council. Hopefully the legal route is not required, and can get sorted by other means1 point
-
https://www.amazon.co.uk/NICEYRIG-Thread-Adapter-Microphone-Female/dp/B07646GV3W Difficult to be sure from the photo if you need a 5/8th male or female. I assume female but if male then there are probably more adapters available.1 point
-
Low grade chipboard, Poor quality hinges, and runners, and dont even go near the high gloss doors. You get what you pay for with Wren, cheap, built to a price. All of the manufacturers that i used to deal with do not supply to the public im afraid. There is no longer any money in appliances, so you might be advised to just buy those from somebody like A.O. The only one who held out, atleast untill a couple of years ago was Miele. You had to have an account with them, and were not allowed to be a re-seller. If a kitchen co appear to be giving you a deal on appliances, it is only because they are overcharging you for cabinets, and making you think you are getting a great deal on the appliances. I've not looked recently at the sheds etc, so could'nt tell you who is good at the moment,1 point
-
As I have previously posted, I think Fermacell is a right bugger to cut and fix. Very clever marketing.1 point
-
See this Topic in which I give details of the way that my high volume MVHR system design was resolved. My system volume calculations, detailed by my MVHR designer, are included for reference. Looking at your volumes, I think my volumes are much higher and I have a single 450m3 MVHR which normally runs at less than 40% capacity. I hope it helps.......1 point
-
So that will be, 1 [kg.s-1] x 9.81 [m.s-2] x 1 [m] x 0.95 [eff] 9.3 W Run it for a year 81,639 Wh = 9.3 [W] x 8760 [h] Call it 82 kWh1 point
-
I’m putting a DIY kitchen in my self build. It will be my second kitchen from them. Avoid Wren my parents kitchen was from them despite my advice. It’s rubbish and overpriced. My mate got a DIY kitchen after my recommendation he’s was / is very happy with it.1 point
-
I was in the bespoke kitchen biz for 20 years. Don't be fooled Wren kitchens are crap.1 point
-
I have one, fitted last year, and I'm very pleased with it. A friend put one her place after a kitchen exrension late last year and was equally pleased.1 point
-
Yep and have recommended to a couple of others and also know a few on here that have gone the same route. very high quality units and doors - customer service is very good too. Wait til May and they have their annual sale ....1 point
-
PDF-Xchange viewer, it allows you to comment on the PDF (a white box) then print it off to PDF again to make it permanent. or just send it to me via PM and i can do it.1 point
-
That could be a good approach. If you built one for yourself and another for a relative and both of you move in and live there for three years then with care you could escape the CIL, VAT and CGT on both plots. The downside is that self building can be quite stressful and many a relationship has failed the test.1 point
-
Not unless the pressure is very high. Should really do a static pressure and flow rate test before deciding what sort of plumbing and heating system to install - just in case its too low for a mains pressure system.1 point
-
It would if you had "dwangs" across the upright studs at 500mm centers and lots more screws than a 1200x2400 single sheet suppose it depends how cheap is cheap by the time you add up the extra framing and screws and time . you would still need building wrap on outside to be sure and inner vcl as that would also be your air tightness layer.1 point
-
There's pretty much no disadvantage to using 32mm over 25mm. Simply put, the larger the pipe diameter, the lower the fluid velocity, the lower the friction/turbulence between the fluid and pipe wall and therefore lower pressure loss. The fact that there will only be a 20 or 25mm pipe from the main to the boundary box isn't a huge issue, as it will be a short length and pressure drop will be low. Obviously, having 32mm from tapping to tap is best, but unless you're filling a swimming pool, won't be an issue. Easier way to step down diameters is to bring the 32mm pipe in to the house, reduce down to 25mm PE, fit a 25mm stop tap, then taper down to 22mm copper or PEX.1 point
-
Whereabouts is your racking strength coming from? Inner skin or outer, you would need to check with your frame designer as I don’t believe it will give you the racking strength you need in those small sizes.1 point
-
Mine comes in as 32mm mdpe, then to a 28mm compression into which goes a 28mm/22mm fitting reducer followed by a short section of copper to a brass stop-tap, then a Tee to take an un-regulated feed to garden tap, where you might want the full mains pressure. The house run is 22mm into a 3bar regulator, similar to @Neil above, then splits for cold and unvented cylinder. I was wary of using plastic stop-tap, which based on @AnonymousBosch's experience seems to have been a wise choice, also insist on an isolation point outside the property for the same reason if you're going to have an unvented cylinder then it will most likely come with a regulator which you put before the cylinder to keep both hot and cold at the same pressure, this is for two reasons, to protect the cylinder from running at too high a pressure but also so if you have mixer taps there isn't a higher pressure at the cold trying to back-feed the cylinder and again over pressurising it. Oh and don't forget the drain cock, which I think I've recently boxed into the wall - doh!1 point
-
Do you think pressure regulator nessecary?1 point
-
I went with a 32mm stop tap in MDPE then reduced down to 28mm and into a pressure gauge / regulator. Then reduced down to 22mm before heading off to kitchen, hot water cylinder, bathroom etc.1 point
-
also i've been quoted based on 32mm connection which I think incorporates a larger meter feed. iirc someone on this forum had a 32mm feed connected with a smaller meter on the boundary, had photo evidence and got a substantial discount after the works had finished1 point
-
what did you all do for stop taps? I've gone 32mm to 28mm convertor, 28mm stopgap then will probably step down to 22mm to feed a manifold1 point
-
You would really be well advised to talk it over with an accountant. Professional fees can give pause for thought, but really this would be a couple of hundred pounds well spent if you're serious - even if it means you decide against doing anything. To progress with a plan, and then find, too late that you are crushed by bad tax planning would be worse.1 point
-
@PeterW I was hoping you'd be there Peter ? And the answer is 'B' bloody glad I asked the question! I was going to plough headlong into 'A'. I've got the cheap router and probably a bearing bit (what ever that is) but how exactly do I run the router over the face? Attach a temporary batten to the face first?? I think I've just learnt about 'bearing bits'.1 point
-
B is correct in your picture. Cut the Fermacell slightly over sized and finish with a bearing bit in a cheap router running over the face. You may need a small fine tooth saw to square off the corner. You can snap and score the reveal boards to fit with the rough edge on the inside of the routed edge, then just fill any gaps. Leave a 2mm gap from a factory edge to the frame and FST and paint the boards then finish with a bead of decent sealant between the board and the frame of the window.1 point
-
Progress on site has been a bit slow so we have combined the last two weeks together, and also the guys packed up early on Friday for their long and well earned Christmas break. Over the last two weeks you can see them taking down the last of the shuttering and getting it off site. So that is the end of the poured concrete for us which is a big milestone and you can now see the full extent of the basement / foundations. The next step was to put a fillet of mortar all around the outside of the kicker to get a smooth edge for the membrane, and then prime the outside of the concrete in black. Then they have started to put on the external tanking membrane which has been a real challenge in the wet and cold. At one point they resorted to putting the membrane in the digger cab and running the heater to get it flexible and warm. They managed to get the left hand side wall completed and the first job next year will be to put the French drain around that side and backfill with clean stone so they can get around to the back and continue the tanking. They then need to build the internal walls out of blockwork and then the beam and block floor ready for the Timber Frame. So given a really wet autumn progress is pretty good; the guys have worked really hard and though it has taken longer than we thought, we are pretty happy. Now it all depends on the weather in January! The waterproofing guys inspected the concrete and declared it 'near perfect' so looking good for the warranty. Also the BCO and Structural Warranty folks all seem happy so that is comforting. They seem impressed, as we are, with the quality of the work and the attention to detail - which, given the weather, is a huge credit to the guys on site. And whatever the weather they are cheerful and work really hard. Are there any convention out there on how you treat your contractors? - we make sure to drop off cake or cookies to them about once a week, and even mince pies for Christmas! It also looks like we have finally got some drawings to sign off from the TF company so just waiting on our SE to agree and we can push the button to get it into production - so likely to see it in Feb. Similarly with the windows - we have a complete schedule that looks good and though it has taken ages the window supplier, the TF supplier and our Architect all see to be in agreement - fingers crossed they all fit!!!! And they are on 12 - 14 weeks lead time so likely in March! So wishing all of you following our build a Happy Christmas and we are looking forward to further progress and an exciting New Year! On the video front see https://www.dropbox.com/sh/th9f6e3cel5dm1q/AAAfsWdAH184J75bCNUUtzVra?dl=0 for the weekly videos (Week 12 & Week 13 just added - but not too exciting). And as an extra special Christmas treat the entire 13 weeks of 2019 Groundworks videos are compacted down to a 3 minute video summary named 2019 ( https://www.dropbox.com/s/jbvjhdxn1dyrufm/2019.mp4?dl=0 ) Its much too quick to capture the detail but it give a really rapid view of the progress we have made this year - starting after the demolition in October. So still a way to go - but moving forward is so much better than having your soul ever so slowly destroyed by the Planning process! So From This To This1 point
-
For those of us, who like a bit of ? in our lives, who's purchased a stove fan, worth splashing £30?1 point
-
On the roof, I think there is a difference between accessible, and intended for daily use. I mean make it such that pros who need to access the roof can put a ladder against your skylight. Rather than needing to put a 3 storey ladder or a cherry picker outside. So stuff like make it big enough to climb through, putting it over the landing not the stairs so that the ladder has somewhere to stand, and any falls are only one storey not three. Providing a base point for a safety rope sounds good, as does perhaps providing a mounting point for a winch. Perhaps also are sure that anything on the roof smaller than the aperture :-). I do not see why a secure, well designed skylight needing a ladder should require H&S interventions as if it were a roof garden. F1 point
-
A very very long and difficult history to our self-build that we will compact into as short a space as possible to save readers much of the grief we have been through. We have always lived in (and renovated) old, cold, draughty and character-full houses, and our last house (a Victorian vicarage) had lots of glass and double aspect rooms and was full of light. We wanted to downsize but couldn’t find anything with similar light and space, and some of the new build ones we looked at were really poor quality. So we decided to self-build and started to look for land – and as some of you already know it’s not an easy task. Then we came across a tired 60’s bungalow on a 1/3rd acre plot about 2 miles from where we were living – perfect location. All the other bungalows on our side of the street had been developed to reasonably dense new build developments with a real mix of styles and sizes, and outside the conservation area – perfect for knock down and rebuild. Piece of cake we thought – how hard could it be to get Planning (little did we know!!!! and if only we had known then what we know now ....). So after a small round of bidding, that was won; not on the highest bid, but with our throw away line ‘offer not subject to anything’. We won the day, we were the proud owners of a somewhat tired bungalow, and then the fun started! First problem was selling the Victorian vicarage in a downturning market which took about 3 years. So finally sold, and knowing how much cash we had, we moved in and started on the long winding road to PP and self-build nirvana. We started with the German kit houses – fantastic quality and build process, and after a few trips to Germany we decided we really liked the modern sharp style that typifies much of new European houses today (or, rather, doesn’t in the UK). As a tip if you want to see literally dozens of show homes visit one (or more) of the (19) Fertighauswelt (think this translates approximately to “ready built house world”) sites in Germany (https://www.fertighauswelt.de/ ) – the best 5 Euros you can spend if you want to look for design ideas. Sadly over time and a Pound sinking against the Euro the German kit house was never going to work. And also working with the site and the budget it really started to make sense to build two houses and sell one to subsidise the one we wanted to live in. Unknowingly we had just created the perfect anti-PP scenario:- cutting edge modern design in a street of pastiche estate type houses; being greedy enough to want to want to build two; and being the last bungalow standing and surrounded by FD&H NIMBY neighbours. Rather than taking you through the gruesome blow by blow story here are the statistics:- Total time from first App to final Appeal decision:- 4yrs and 10months 1 Pre-App – which was a total waste of time and money 7 Planning Applications (inc 3 CofL/ PD apps) - 2 Approved 6 (or perhaps 7) different Planning Officers 3 Committee decisions:- 2 Refuse & 1 Approve, all with prior Officer Approval 2 Appeals:- 1 Refuse & 1 Approve (sadly we didn’t win costs) 105 letters of objection & 1 of support (from a London Architect who loved the design – bless him for that ray of sunshine It was a dreadful process and the main reason for the time and grief we suffered seems to be that we are surrounded by vile neighbours who have friends in high places. The public comments generally had very little planning relevance but included phrases like ‘peeping toms’, ‘covert surveillance’ and even likening our design to ‘Grenfell Tower’. We were stoic and kept turning the other cheek but we sent this last one back to the Chief Planning Officer as ‘offensive and defamatory’ – he said it was perfectly acceptable (to quote Joe Walsh ‘You Can’t Argue with a Sick Mind’)! If we thought the public comments (sometimes called ‘solicited hate mail’) phase was bad then let’s say the Committee phase was much worse. Firstly it seems that the decision is made before you even walk into the room, and that nothing you say will make any difference, or even be listened to. Then the Committee infringed our copyright, accused us of greed and telling lies, and told us that they didn’t care at all that we were planning to build low energy houses. If we had any faith in local democracy and politics we have much less than none now. We are certain that the only reason we got one through the Committee is that one of the esteemed Councillors really upset/insulted the Chair (we decided we really shouldn’t print the exact comment); at which point the discussion divided on party lines and incidentally we won! As mentioned the Pre App Advice was a complete waste of time and money (for us). We offered the Officer 3 options and he agreed what he thought the ‘best’. He also gave us a lot of ‘advice’ which we incorporated to the letter in the Application. He then proceeded to keep changing his mind and we did 3 major re-designs over 12 months until he ‘approved’. It finally went to Committee and was refused. The subsequent Appeal which we lost was true goldmine as it contained real data on what was acceptable and what wasn’t. We then built the subsequent Apps on this and the Officer(s) really couldn’t disagree with the previous Appeal comments. Also in the second Appeal we seriously questioned some of the proposed Conditions and the Appeal Officer took out most of them. A real win and we saved our Planning Consultants fee in having a really onerous Design and Methods condition removed. Certainly worth a shot if you ever go to Appeal. If any of you have been through this sort of process then you will know how personally depressing and demoralising it can be – and we have heard worse war stories! We had great and very patient designers and a superb planning consultant and some amazingly supportive friends and family. Also after the initial setbacks we did have a very focused plan on how to get to where we wanted to be in incremental steps, with a workable Plan B. However our advice would be: only ever buy a plot that has PP for something you want to build (unless you have lots of time, very deep pockets and skin much much thicker than a rhino). So finally we won at Appeal, and we are staring to build two really interesting low energy houses – more in future posts. We will try and keep up a Blog as best we can, and having got that backstory out of the way everything should be easy from now on!!!!!!1 point
-
That sounds horrendous. We bought a plot with PP but it didn’t stop all of the nonsense with the ‘neighbours’. The plot is outside of the village so doesn’t impact anyone in the village at all. It stands as one of 4 only houses in this location, one of those being another new build as the plot was split. Our direct neighbours who lived here at the time in a listed cottage said that they were delighted that 2 houses were going to be built here as the plot was an eyesore and a dumping ground for rubbish. The community (village) council had been against houses being built here but they were overruled and the plot got PP for 2 houses (we bought one of the plots when it was split). During the course of the build we ended up in the community council minutes as a pretty much standing agenda item with various misdemeanours being minuted and reported to the planning officers. It became a standing joke to read the minutes and see what we had apparently done that month. We had the main council out here on a few occasions, letters from the community council, and on one occasion the police. And everything was complete nonsense. Anything from complaining that my neighbour was leaving his bins in a place they didn’t like on collection day (outside his house like everyone else), to us being reported when we built the detached garage here (allowed under permitted development). After about 3 years they got fed up and unleashed their wrath on some other poor soul but some people are pathetic (at best) or simply vile individuals, especially as the houses here affect them not one bit. I avoid the village totally and only go up there to vote or to post a letter.1 point