
Leaderboard


Popular Content
Showing content with the highest reputation on 12/30/22 in all areas
-
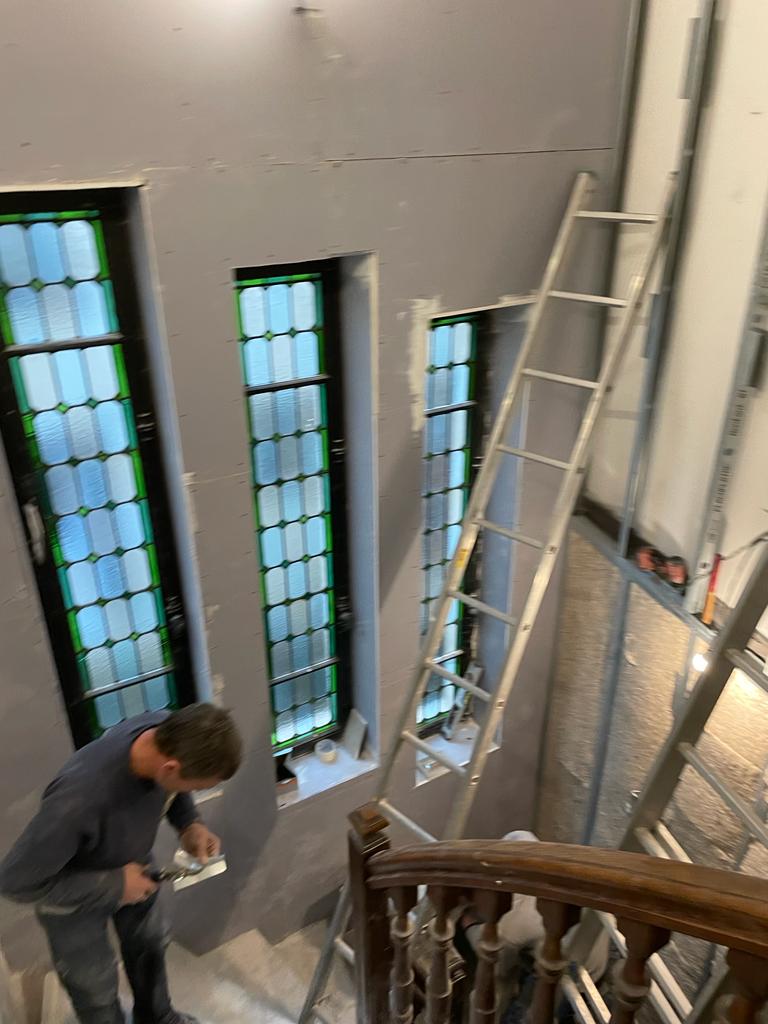
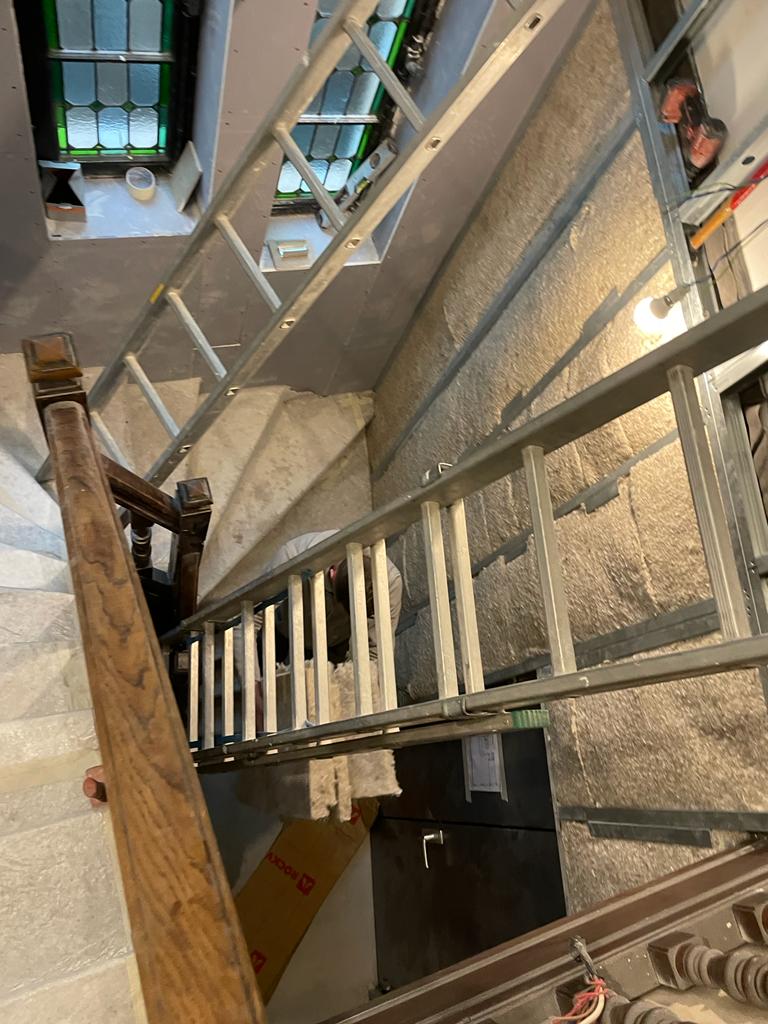
Since the last blog, a lot has happened in a relatively short time. The last blog was Stage 1 of the Amenity block, needing cladding and the roof, and as I'm sat here early in the morning , with the wind constantly blowing 20MPH, 2mm rain p/h. and a toasty 8 deg. inside the static, which is our home now - yey. The Cabins are complete. A lot of work and a move thrown in to the mix since the middle of August. The cabins are stick built on site, under the supervision of Building control, this means that the insulation and detailing falls within the small building regulations and thus U values are quite tight. The positive is that they will be relatively cheap to heat year round. The downside was we spent a lot more on insulation. The process was the same as the amenity block, the foundation slab was cast, and the floor insulation (120mm PIR) was sat on top of this and a radon barrier with floating chipboard on top. 6inch walls with glass wool insulation. Due to the extreme cost variations and difficulty getting hold of Frame therm 32, the walls were filled with a mixture of Frame therm 32 & 40, I managed to get some at £18/ roll in Bradford and dragged it up with me, collecting some over ordered frame therm40, from Stirling on the way (thanks Market place). The bottom line was that I needed to add 25mm PIR inside to get the 0.21U required. The Roof was 120mm fibre glass coated PIR, with Firestone rubber bonded direct. The original plans was to clad the pods in Black Metal, but after some thoughts through BH (Salt in the air etc, we changed to Scottish Larch. We had 300, 4.8M lengths delivered from Huntly area. Mandy spent around 2 weeks solid staining these both sides and edges black. she was amazing, this was not an easy task. I think I painted 3/4 of 1 plank before I was off doing something else. The Orange look would have been too harsh, so we decided to stain them , and hopefully as the Larch ages and the stain fades they will eventually take on the natural look of Larch. Another tweak to the design was to cut the corner off the bathroom. allowing for 2 double beds, thinking that as our customers will in the main be only staying for a day or two, the bed was more important than sitting areas. My biggest concern was heating and hot water. I've asked on here before, and was thinking of using a 300l UVC, but was never happy this would supply enough hot water for two cabins and up to 10 people. - so either the expense of a Heat pump or direct immersion. I had laid 20mm MDPE pipe x 2 to each cabin from the amenity block. for the H&C supply. We bit the bullet and decided to supply the hot water via 2 off Cointra CPA11 open flue caravan heaters (LPG), I was concerned if the temperature would be ok, especially as the water travels between 3 & 6M underground . This was compounded further, later on, as we started having problems with the same heater in out static. Low temperature HW and problems when the wind picked up over 15MPH. Too late to worry, money was spent and It was suck it and see. Fitting the Open Flue heaters in the Amenity block created another issue, so we have ended up with a little extension on the side of amenity block that houses the two heater, basically its like they are outside, but inside. I have insulated them, but I will have to add a small heater with PID control (Job to do) to ensure the water does not freeze inside the boilers. For the hot water I fed 10mm PB pipe inside the MDPE pipe and hope the flow rates and temperature would work.... (I thought about asking on here, but sometimes you have to bite the bullet and see) We have installed UPVC DG windows, and I created MDF reveal liners, this allowed for the plaster boards to be fitted flush to the liners, with face mouldings to finish. I taped and jointed the PB, but to be honest it was a pain, due to the number of butt joints, on a couple of occasions I nearly went and bought some Multi finish. In general were happy with the finish, but it has confirmed that this WONT be happening on the house build. Mandy wanted a feature wall (interior design is where I stop), and the en-suite seemed to be a good place for this. We had just enough Larch left over, so Mandy cut and ripped this down, sanded one face and painted in various contrasting (I think that is what she said) colours. I helped a little with the first row or two install, as it does have some 22.55deg bevels, then I was back to to the other cabin sanding and filling. Due to the success of the Air to Air HP in the static, we decided to install the same in the cabins, this way we know the heat all year round will work. As this was a little after thought - external cladding was complete, I had to be creative with the internal pipe run, I created a box / shelf which can be seen in the photos below, this now acts as a cup holder with some cup hooks. The Bathrooms were clad with shower wall cladding. a Boxed in WC allows for all the utilities to enter and also houses the Wireless access point, which is powered POE. from the amenity block. Once the bathrooms were fitted, it was time to see if the HW works. Its a resounding yes. we had -4deg (This is how I know I need to stop the boilers freezing). but once I'd managed to thaw the boiler out, we were getting 40Deg in the cabins. The showers are not power showers, but they work really well, better than an electric shower. and heat up time is around 35 - 40 sec. The boilers have worked in 30MPH winds, so the issues with our static are just that and I'm still exploring the why. As we stand today 1 cabin is ready to let, and we are waiting delivery of 2 beds for the other cabin. 200m of livestock fencing in the new year will see this side of the project complete.3 points
-
So by the time you’ve finished it’s £4K, plus internal filters and other bits. That’s about 20 years payback assuming you don’t have to replace any parts. £4K gets you pretty much a full 4kWp solar system that pays back in 5 years at todays electricity rates. I have a pair of buried IBCs, total system cost of about £150 with the jet pump and that’s for garden only.2 points
-
Keep meaning to come back to this thread….15 months later.. Build is close to completion..but definitely taken 3 months longer than I expected. Will end up as a 16 month build 🤞. We did go with a single unit MVHR..sourced from BPC Ventilation.waiting for final commissioning of MVHR and at the stage of accumulating various certifications and calculations for BC. We were not expecting to be able to but we eventually upped our spec to include ASHP, 3G,Solar PV and battery storage fast EV charging and a few other “nice to haves” Final costs working out at about £1900 per square metre which is respectable for a turnkey build. We would use our main contractor again in a heartbeat …not sure our main contractor would want us again though! Lessons learnt - Pick a contractor you can maintain a respectful and cordial relationship with. Our builder was nobody’s fool but he had a great habit of really listening which was really good for us all. -Have a look at their previous projects, in person if possible. -20 percent contingency is more likely than the oft quoted 10. -Pop something in your contract about targets, nothing massively punitive but something that keeps the focus on your job..We knew we were in good hands but tradesmen and builders are busy (maybe less so post trussonomic mortgage disaster) and so the focus was not always on our job. -Be as specific as you can be about the spec and make as many decisions as you can well beforehand..I found having as many 3D renders of the project super useful for visualising key spaces and thus was able to answer some super specific questions that invariably arrived by text in the middle of my work day -Have a detailed landscaping plan..I didn’t and on a sloping plot.. that was a very expensive omission. - Clear Detailed schemes are your friend….detailed lighting schemes, painting schemes, tiling schemes..Clear and easy to understand for all involved. -Don’t be afraid to ask the builder or the other trades for their opinion..they usually have tonnes of experience and sometimes the best decisions were made by saying “ what do you think?” - If you are buying any items yourself such as tiles, decorative light fittings built in appliances etc..Negotiate with your builder before commencement if possible so that they purchase the items and you reimburse them promptly perhaps with a small handling fee to save you having to pay and reclaim vat. - Additional costs should be clear and agreed by all parties, - stuff will go wrong, people will make mistakes, hopefully nothing too damaging, ours included a smashed up neighbours car ( by Building merchants vehicle) and a landscape designer that couldn’t design amongst other minor mishaps..you live and learn This forum has been a brilliant resource for staying calm and carrying on ..even for members like me who aren’t physically doing the building2 points
-
Sure but that’s something that will happen relatively quickly. If it lasts 10 years (length of warranty) it should last decades. It would also affect timber framed buildings and there are thousands of those being built and most new houses in Scotland are timber frame. It is possible to add EPS on the outside of the SIP panel above and below the sole plate and affix the sole plate to a foamglass type product.1 point
-
My static caravan sits on 12 pillars of concrete blocks, so a well spread load, but it is only about 2 tons of caravan son not a lot of weight. I don't use the puny wind down legs at all. For a more substantial build I would probably do a number of concrete pads a decent depth.1 point
-
59dbA (or 60dBA if I go for the MCS option): Mitsubishi 11.2kW or Samsung 12kW (the new 'quiet' one) 30- 35dbA 6m to the neighbours wall, 7m to the nearest window none respectively. 1 reflective surface within 1m Meets MCS specs (roughly speaking 3dB below an assumed ambient of 40dbA) but not LPA spec (25 dBA ie 10 dB below actual ambient) Would need another 12-17dB attenuation plus to meet the LPA specs. No chance.1 point
-
If it is to sit on the metal jack legs alone, then they put a very concentrated load down. They will indent , or even break into, the surface you describe. But spread by blocks or timber baulks it should be fine. Bigger 'caravans' have bigger jack legs. presumably more of them too. Tell us more and we can answer better.1 point
-
I think it depends of it is literally a static caravan, which tend to be quite lightweight, or are you building a properly engineered well built well insulated "house" that happens to fit the legal definition of a "caravan" (it does not need to be on wheels to legally be a "caravan") which might be very much more substantial and heavier?1 point
-
Just type “rainwater” and “RWH” into the search engine and there’s loads to read here about this subject As said, by myself and others, buy more PV!! In 10 years time you’ll be kicking yourself that you didn’t. Cost of electricity then will be the concern, plus guess what the RWH pump runs on……1 point
-
We looked at it as other half was keen (I wasn’t) We eventually crossed it off the list for all the reasons mentioned plus the added complexity in your plumbing system.1 point
-
My experience is so far is mixed. With the new Part L we're technically only required to design to 55C flow temps where there is a new heating system installation. When it comes to replacing a boiler, it's about ensuring that the new one doesn't perform any worse than the one you're replacing and then that controls are installed that provide either weather/load compensation, or automisation/optomisation, or flue gas heat recovery. There is also a requirement that if you install a new boiler you should also install trvs if there aren't any. The part that does get a bit messy is where you rightly point out that in order to make the system efficient, you ideally need different dhw and ch flow temps. In my experience in many instances it's the boiler rather than the controller that causes the problem, simply because it cannot deal with this difference - it beggars belief the number of installers around me chucking in a certain model Worcester Bosch boiler despite this problem, for example. However, you can find the ones that do, even if the manufacturers might not explicitly tell you about this. I've personally gravitated towards Ideal boilers because they have a separate switched live for dhw that gives a flow temp of up to 80C and a normal switched live that can be set to 55C or lower for CH. Even better, I can install an opentherm controller to the boiler to modulate the ch but still use the 80C sl2 for hot water (it's also possible on some models to set a max boiler water temp to bring down the dhw to whatever you like, if you want). What I've been doing with system and heat only installations is reconfiguring to PDHW using a combination of normally open and normally closed diverter valves that make this system work properly, even in multi-zone installations - basically the normally open valve is used on the ch side and normally closed on dhw and when the cylinder stat calls for dhw heat, it opens the normally closed at the same to as closing the normally open. For controllers I've been using either the Ideal own systems (Ideal Heat & System Halo does support priority hot water, which is good) or Honeywell, but have done and will be doing installs using Nest/Hive/Tado, usually specifically down to customer specifically asking for them. With Tado, I'm still very unhappy with how they've dealt with Opentherm here in the Uk and when I explained what was needed now - a wired unit + wireless extension, a recent customer wasn't too happy either, asking me if I couldn't just get an EU version for them.... Problem is that most customers have no idea how each individual controller works and it's difficult even as an installer to know these things properly. More widely it's a total mess, a lot of installers are ignoring these new controller requirements so they're quite happy to bung in a new boiler and wire it up to existing controls and don't seem to know about modulation. I suspect it's the same for new whole system installations where it'll be rule of thumb. From a customer perspective, feedback has been quite interesting. Only very recently are they asking about flow temperatures and how to best set them up, so the message is starting to get out there. I've just read this. I understand the rationale behind the idea but I think they've missed a number of critical elements and is a bit misleading. For example, you won't get a replacement boiler in just 2-3 days as there's a serious shortage of installers across the whole country, and according to recent industry research only about 1/3 of existing gas engineers are planning to train to do heatpumps, leaving us in a very dire situation for resources. Yes, the boilers are most often distress decisions, but I don't think the library idea necessarily works. If a customer is going to be asked to pay £1500 for the installation of a new boiler that is expected to last for 10 years, it's a bit steep to ask them to front this cost for a leased boiler, for potentially a year or so, something that will impact poorer purchasers much more. I also think they've got to reconsider the reality of making the home heatpump ready. In many instances I think it'll take a good 10 years for this to happen and by then they're better off just purchasing a replacement boiler (from a convenience, cost and function perspective). The one thing that doesn't get much air time, but has been making the rounds much more in the industry press is the hybrid heatpump/boiler, contained within a casing about the same size as your typical boiler. As a transitional idea, this is making more and more sense to me, simply because of the problems we've got with our housing stock and existing boiler install base of combis. It would also help in respect of making the boiler much better at modulating output through the year.1 point
-
They are offering you a size they have in stock, not a deal. Payback on a RWH system is really dependant in how much you pay for your water and waste, I pay the most for it the country, and it is a poor service. Had more water disconnections than electricity ones. Anyway, no one looks at payback on kitchens or bathrooms. RWH should be thought of as 'doing the right thing' rather than a monetary gain. £4k in a £400k house is 1% of the value, so keep the price in perspective.1 point
-
Tell the ‘committee’ that she doesn’t know what she’s on about. it will look great 😃1 point
-
The other tack would be go direct to your MP, if that fails direct to the press and social media. State the clauses are impossible to reach and effectively your local council is banning ASHPs, then state all the environmental reason why the government says we must all install heat pumps to save the planet. Name and shame the council.1 point
-
If you don’t want to cut out a bit of PB which would still work how about making a painted plinth (MDF) for the light to stand on? Bigger than the light base and hollow so you can dig holes all over the ceiling to fix the wiring and then the painted plinth will hide the carnage and the light fitting fits over the plinth.1 point
-
Well done for getting this far and providing your insightful advice.1 point
-
But the exhaust vents to the outside and it is the exhaust that makes the most noise. I had an external oil boiler before I replaced it with a heat pump and my next-door neighbour still has one, although it's inside a little brick-built boiler house.1 point
-
You might be better off with a trailer. It would be cheaper and there's less risk of problems. I've been thinking about getting an 8ft twin axle one with a load capacity of about 2 t.1 point
-
+1 for Back to Earth. They will do a WUFI assessment.1 point
-
The Period Property website might help, and Chris at Back to Earth1 point
-
Or just wire it as a standard W-Plan with a diverter valve (not a mid position) and use the satisfied connection on the tank to trip back across to heating. No need for relays as this is all standard stuff. Used to be used a lot but not as popular now since multi zone S Plan has been used.1 point
-
Used the recharge time calculator here.. https://myboiler.com/calculators/hot-water-recovery-time-calculator/ 30kW boiler, 250L tank. Time to raise temperature from 35 to 60C worked out at 15 mins which isnt too bad.1 point
-
Top tip. When you have finished using the bath, don't empty it until the water until it has cooled to room temperature.1 point
-
Yes on the last two builds I laid the beams on a 600 mil dpc Then folded it over the ends onto the slip blocks and laid my first course of block on it1 point
-
If you get in touch with Brendon Uys of Heacol (Google will help you find his details), he has just removed a kingspan aeromax that had hydronic failure. Apparently the electronics were ok. Might be of use.1 point
-
We had 25-45mph winds yesterday and they were hitting out house front-on. You could hear the wind rushing through the warm-roof sections. This gave me an idea... would opening a window on the back of the house depressurise it like a blower test? The answer was a resounding "Yes". I have no idea what pressure difference that created (anyone want to guess?) but it revealed air leaks I didn't know about. I wish I had a way to quantify the flow. While each draught was small, the flow under the shut door of each room was sizeable, and was the way I measured the relative draughtiness of each. Some highlights starting upstairs: Front bedroom Coming up under the flooring in the bay window and at the flooring cutbacks in the corner of the bay window My wife says her feet get freezing sitting there Through the crack in the ceiling direct from the loft (less than 0.5mm wide) Plug sockets Suspect the "strips of shame" round the double glazing are all leaking through hairline gaps around the frame. Caulked a lot of them but... For the size of flow under the door, must be more leaks (under the floor?) Bathroom No unknowns here, extractor fan, waste pipes under the floor, and a little from the aging double glazing Bedroom in the newest extension I thought I'd got this pretty airtight but opening a Velux in the room showed leaks under the skirting board all round the room (starts to explain why in windy weather dust blows across the laminate flooring towards the middle of the room) plug sockets eaves storage (these leaks were known; I've foamed everything but can't get it airtight. The garage is also underneath) A room at the back that spans the 1920s house and the first extension via a gap knocked in the old rear wall When opening the Velux window in this room... Enough coming in from the eaves storage (which I lovingly taped and foamed in 2020) to make the loose MDF board move back and forth!! Under the floor around radiator pipes and cracks between flooring and walls. Significant volume of air. With the cracks I couldn't feel with my hand, but a flame would flicker every time a gust passed over the house Plug sockets Heading downstairs, I taped the cloakroom extractor fan shut and then went straight to the dining room which is hard to get warm. I shut the doors into the hallway and lounge, and taped a dust sheet over the opening into the kitchen. To create the pressure difference I opened an 80cm x 55cm window. The results: Masses of air from kitchen Much air under door into hallway Bigger Much around doors lounge (but didn't block under lounge door into hallway, so skewed test) A little coming out under skirting boards - I've sealed some already It was impossible to keep the dust sheet taped over the kitchen entrance. Here's a picture of it filling like a sail with the draught coming in via the kitchen. The kitchen has a concrete floor and no heating built in and is always cold. I found a few air leaks: Kitchen extractor fan. A massive known problem. The louvred vent outside does nothing to stop air blowing in Door to garage. It's got a brush strip at the bottom and is not sealing well Minor (in comparison) leak near the hinges of the UPVC side door. Most annoyingly, a stream of air from behind the kickboards under the fitted units. I found one airbrick; need to see if there's others. I taped up the extractor fan (a balancing act on steps as the wind whistled up the narrow gap between us and the next house) and it reduced the flow from the kitchen to dining room maybe by half. Dust sheet still filled like a sail but not as much. So... we got a few heat retention problems. Plug sockets and skirting boards are easy wins. I don't know where to start with the wind blowing through the first floor floor void. I'm guessing t's going to need floors up or ceilings down, and then taping joist ends and insulation adding to slow down whatever wind still gets in? All in all I had MASSIVE fun doing this testing 😀
 1 point
 -
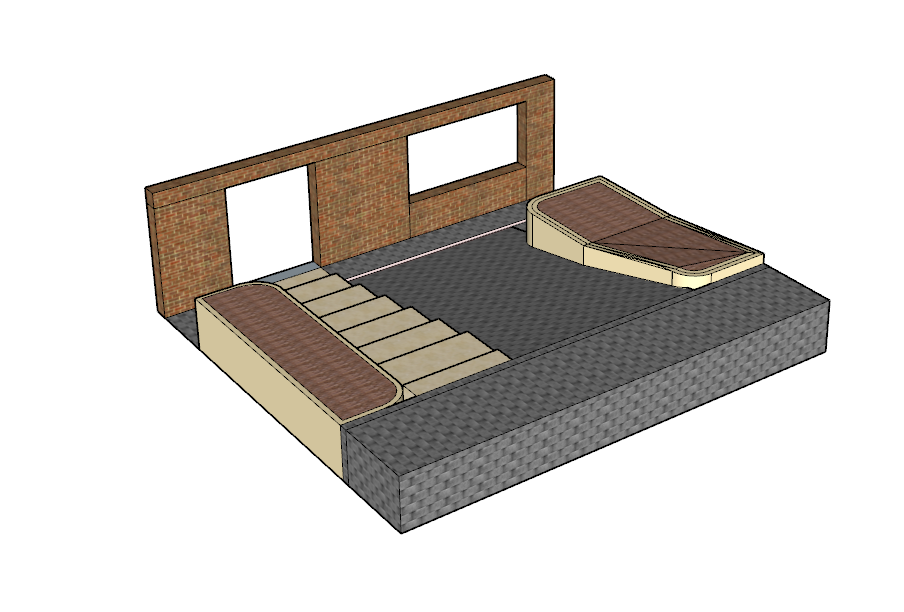
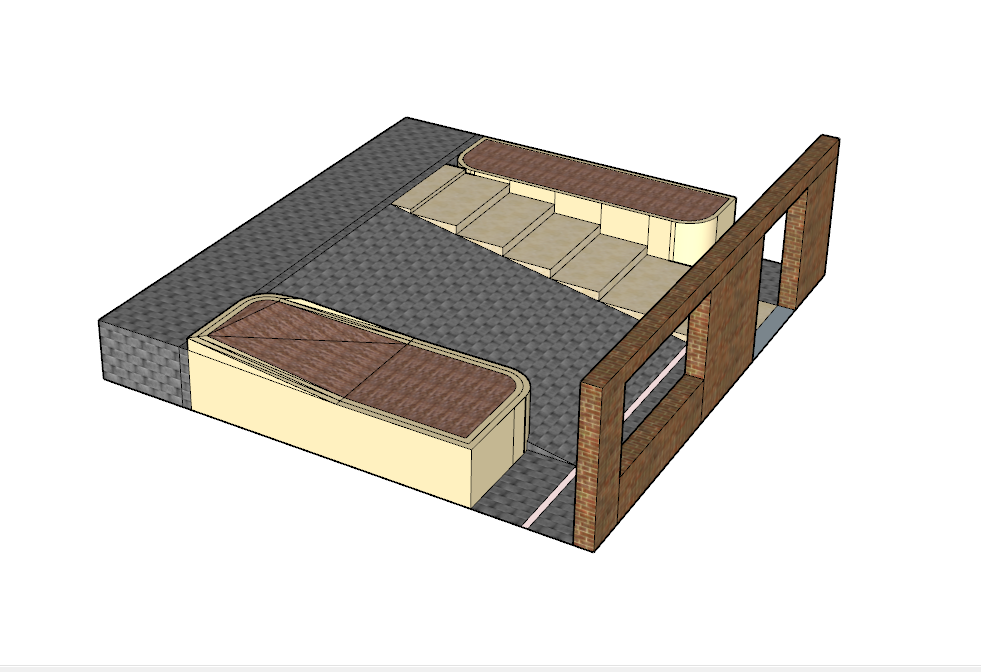
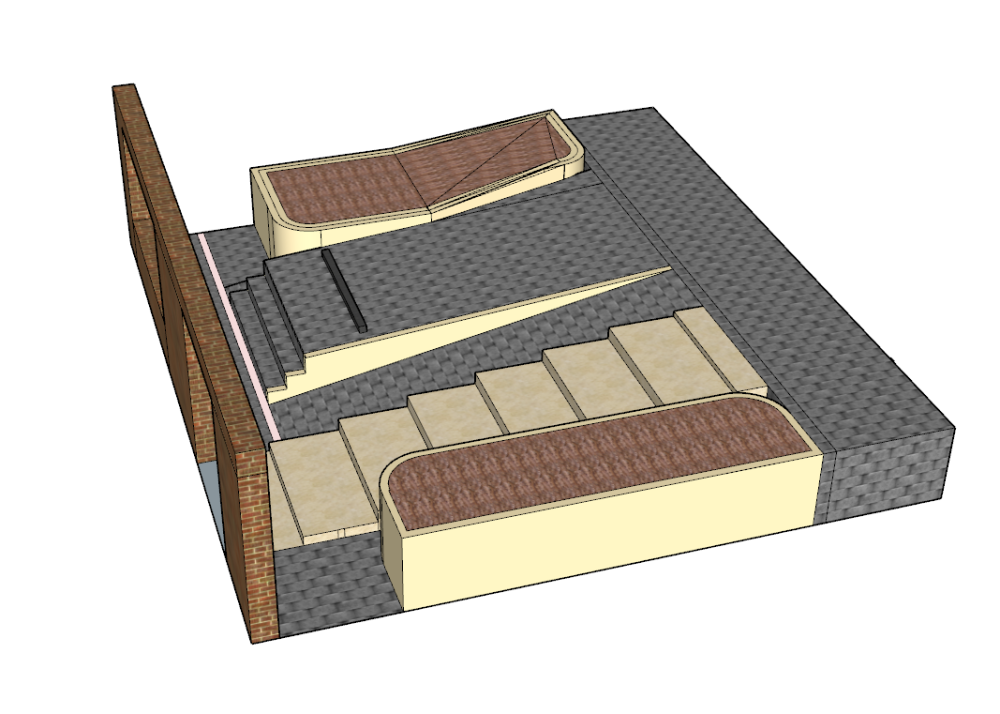
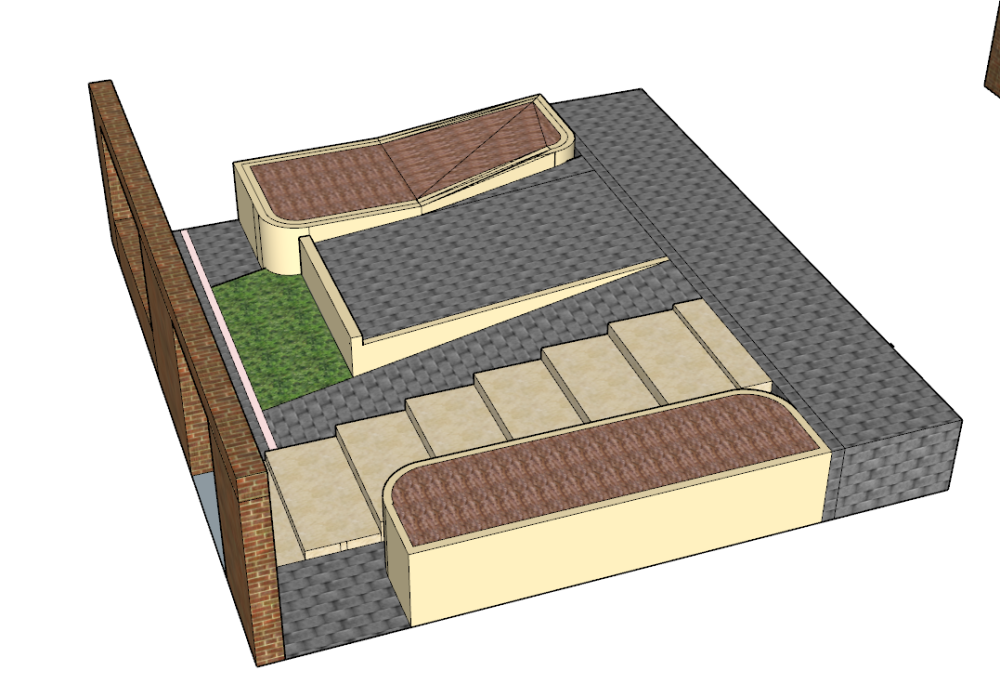
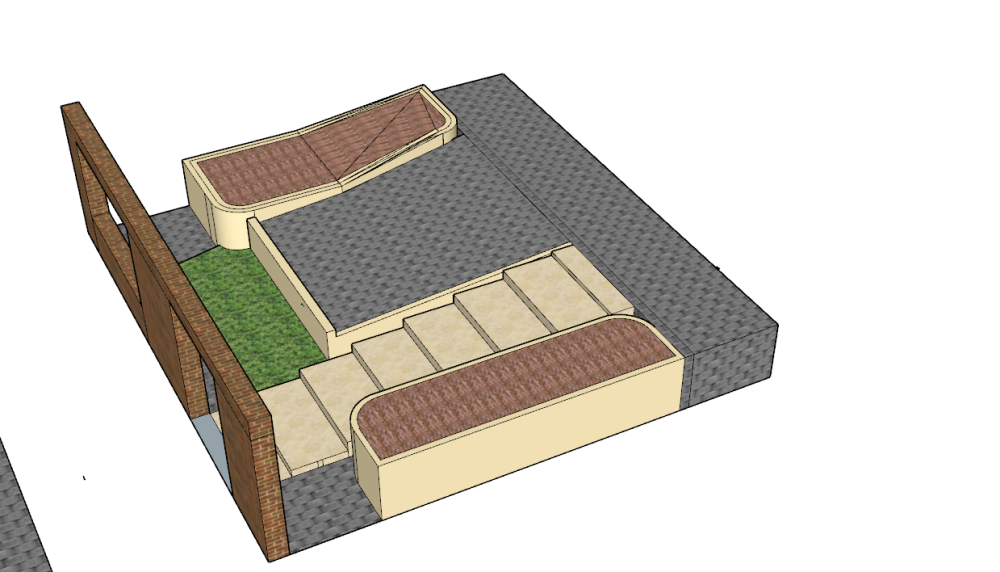
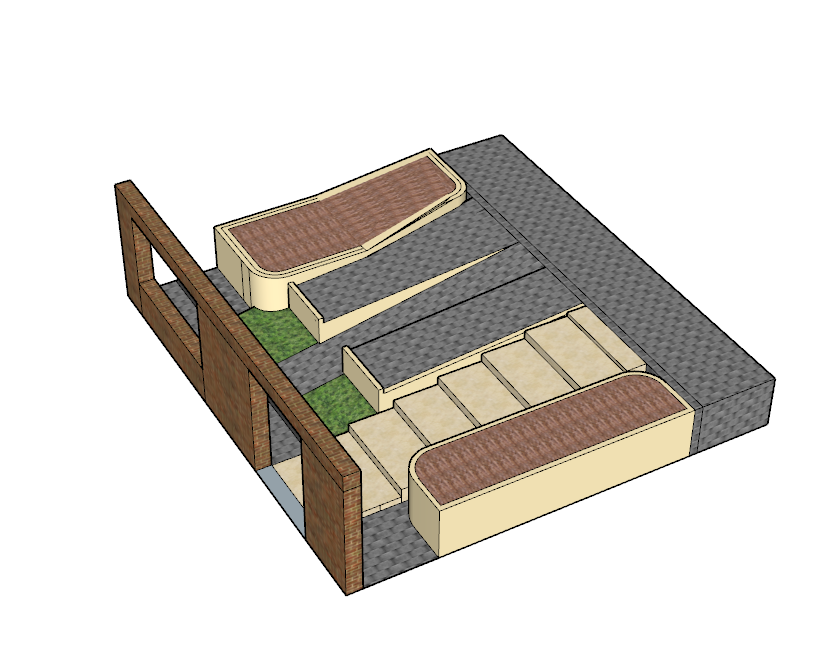
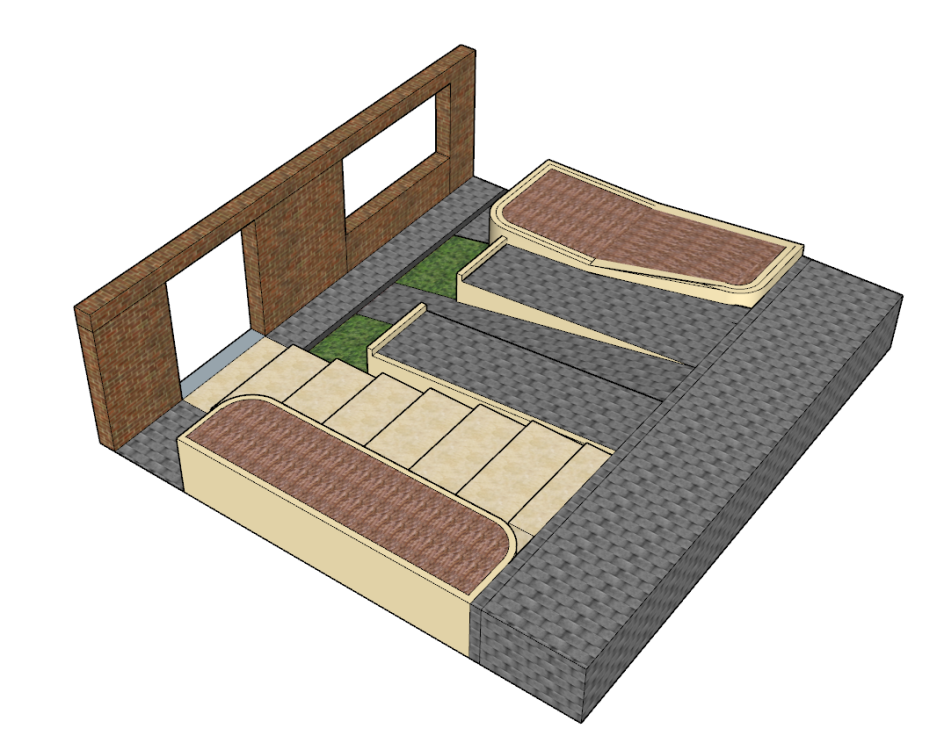
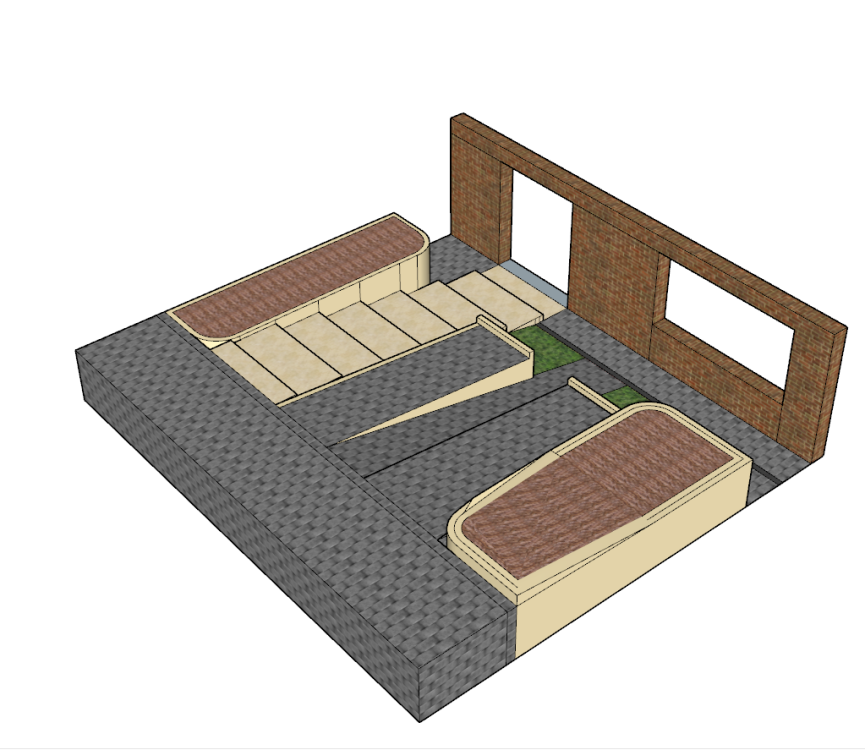
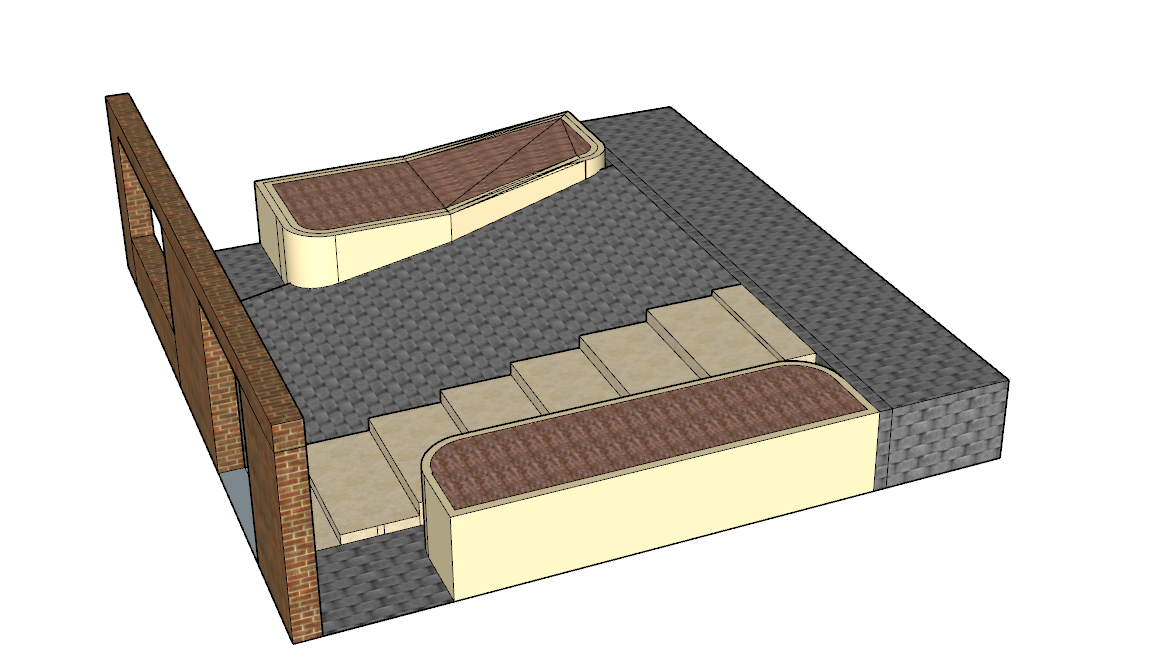
Now on to the 3D views. I'm doing my best guesses re some of the dimentions but it should give an impression. The Origional The parking space with bike/bin ramp and bump stop. Passengers would be in danger of stepping off the ledge and a drive may accidentally get a wheel on the bike ramp. The same as above but with the steps removed and replaced with a retaining wall and some greenery. This wall would probably need to be poured concrete to be strong enough to take the bump of car tyres. The logical solution. You'll need to lug the bins up the steps but it'll be easy to park and egress the car without falling to your death. Finally, my favourite. "The Oil Change". Uninhibited access to your wife's sump plug. ( No giggling at the back @pocster) Bins and bike access A-OK. Safe getting in and out of your car. Added greenery for a nicer house front.

 1 point
 -
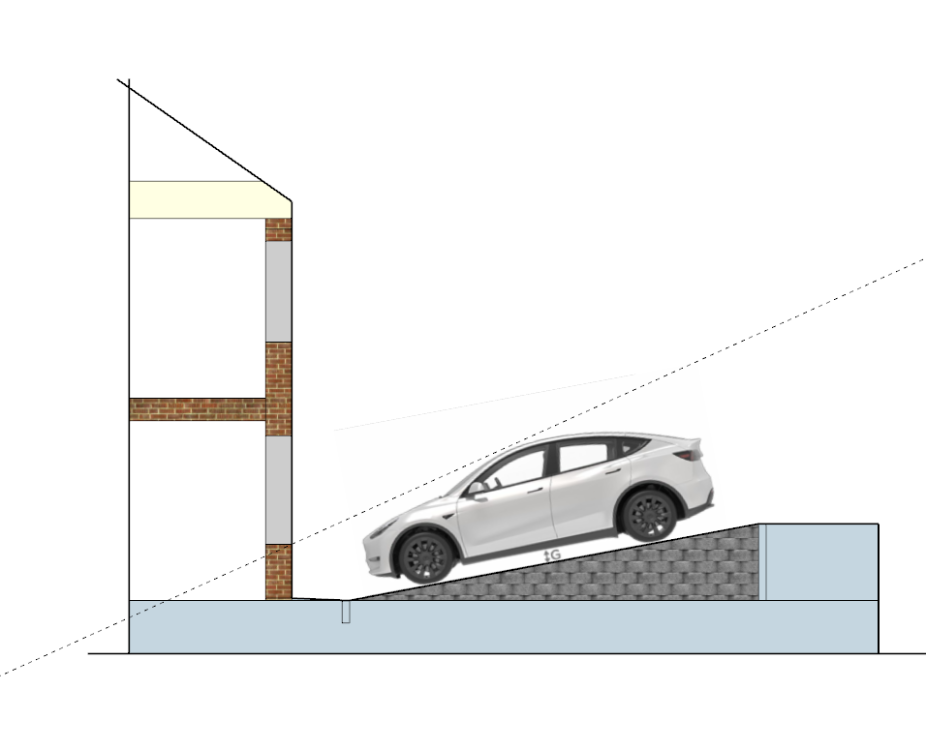
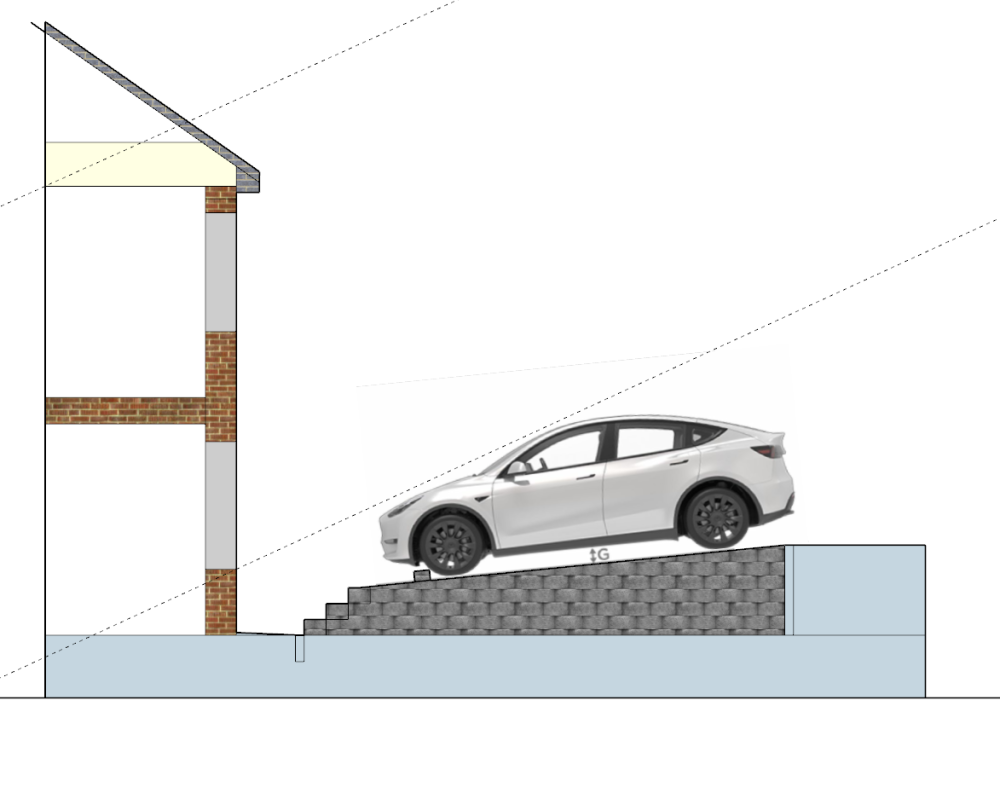
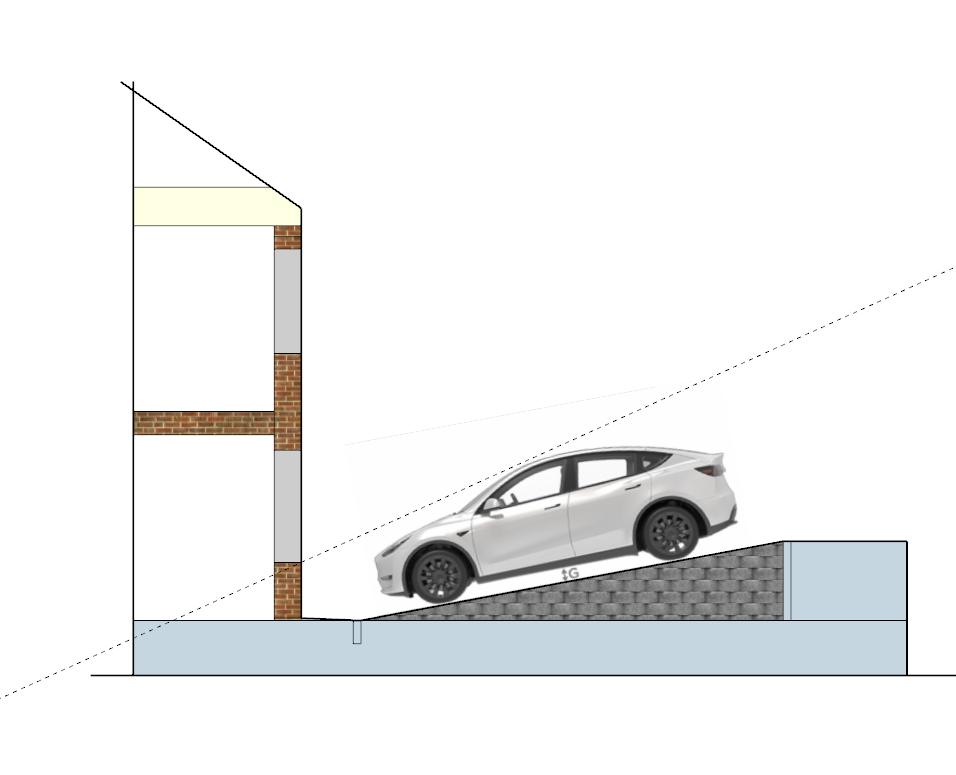
Right ho, here we go. This is your current situation. 1:5.33 slope. Very steep. Assuming a 750mm windowsill in the house a 24 deg view from the horizon of the sky and a view of the car bonnet. Here's what it would look like level. A 35 deg cut of the sky and a view of the car underside. not ideal. I tried various other styles and compound slopes etc but here's the one I settled on. It's 1:12 which is the max recommended for wheelchairs AFAIK. By shoving the car towards the road a little more ( tesla model Y is 725mm longer than your wife's Fiesta) I was able to keep a 26 deg view of the sky. You'll still be looking at the number plate but compromises need to be made somewhere.

 1 point
 -
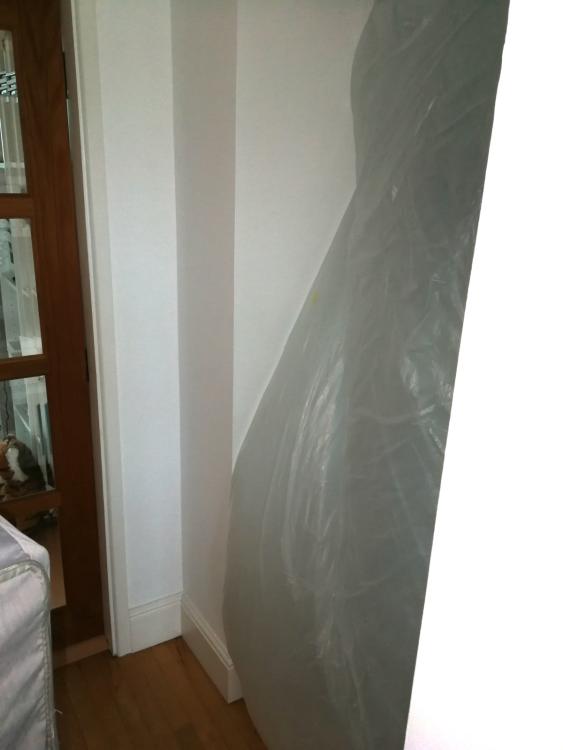
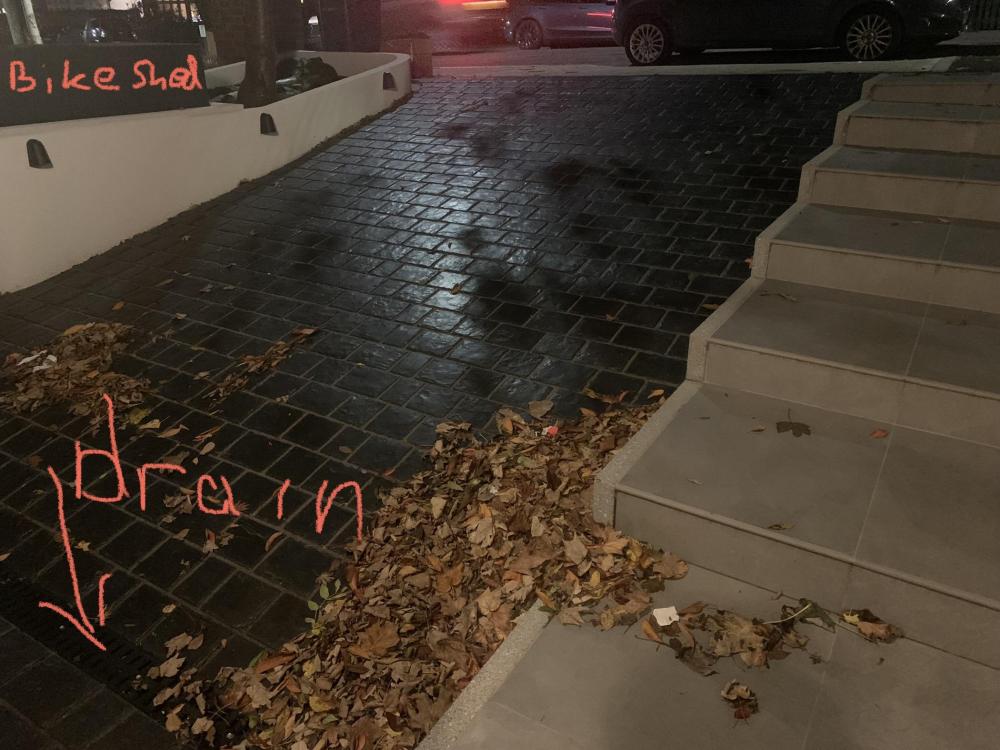
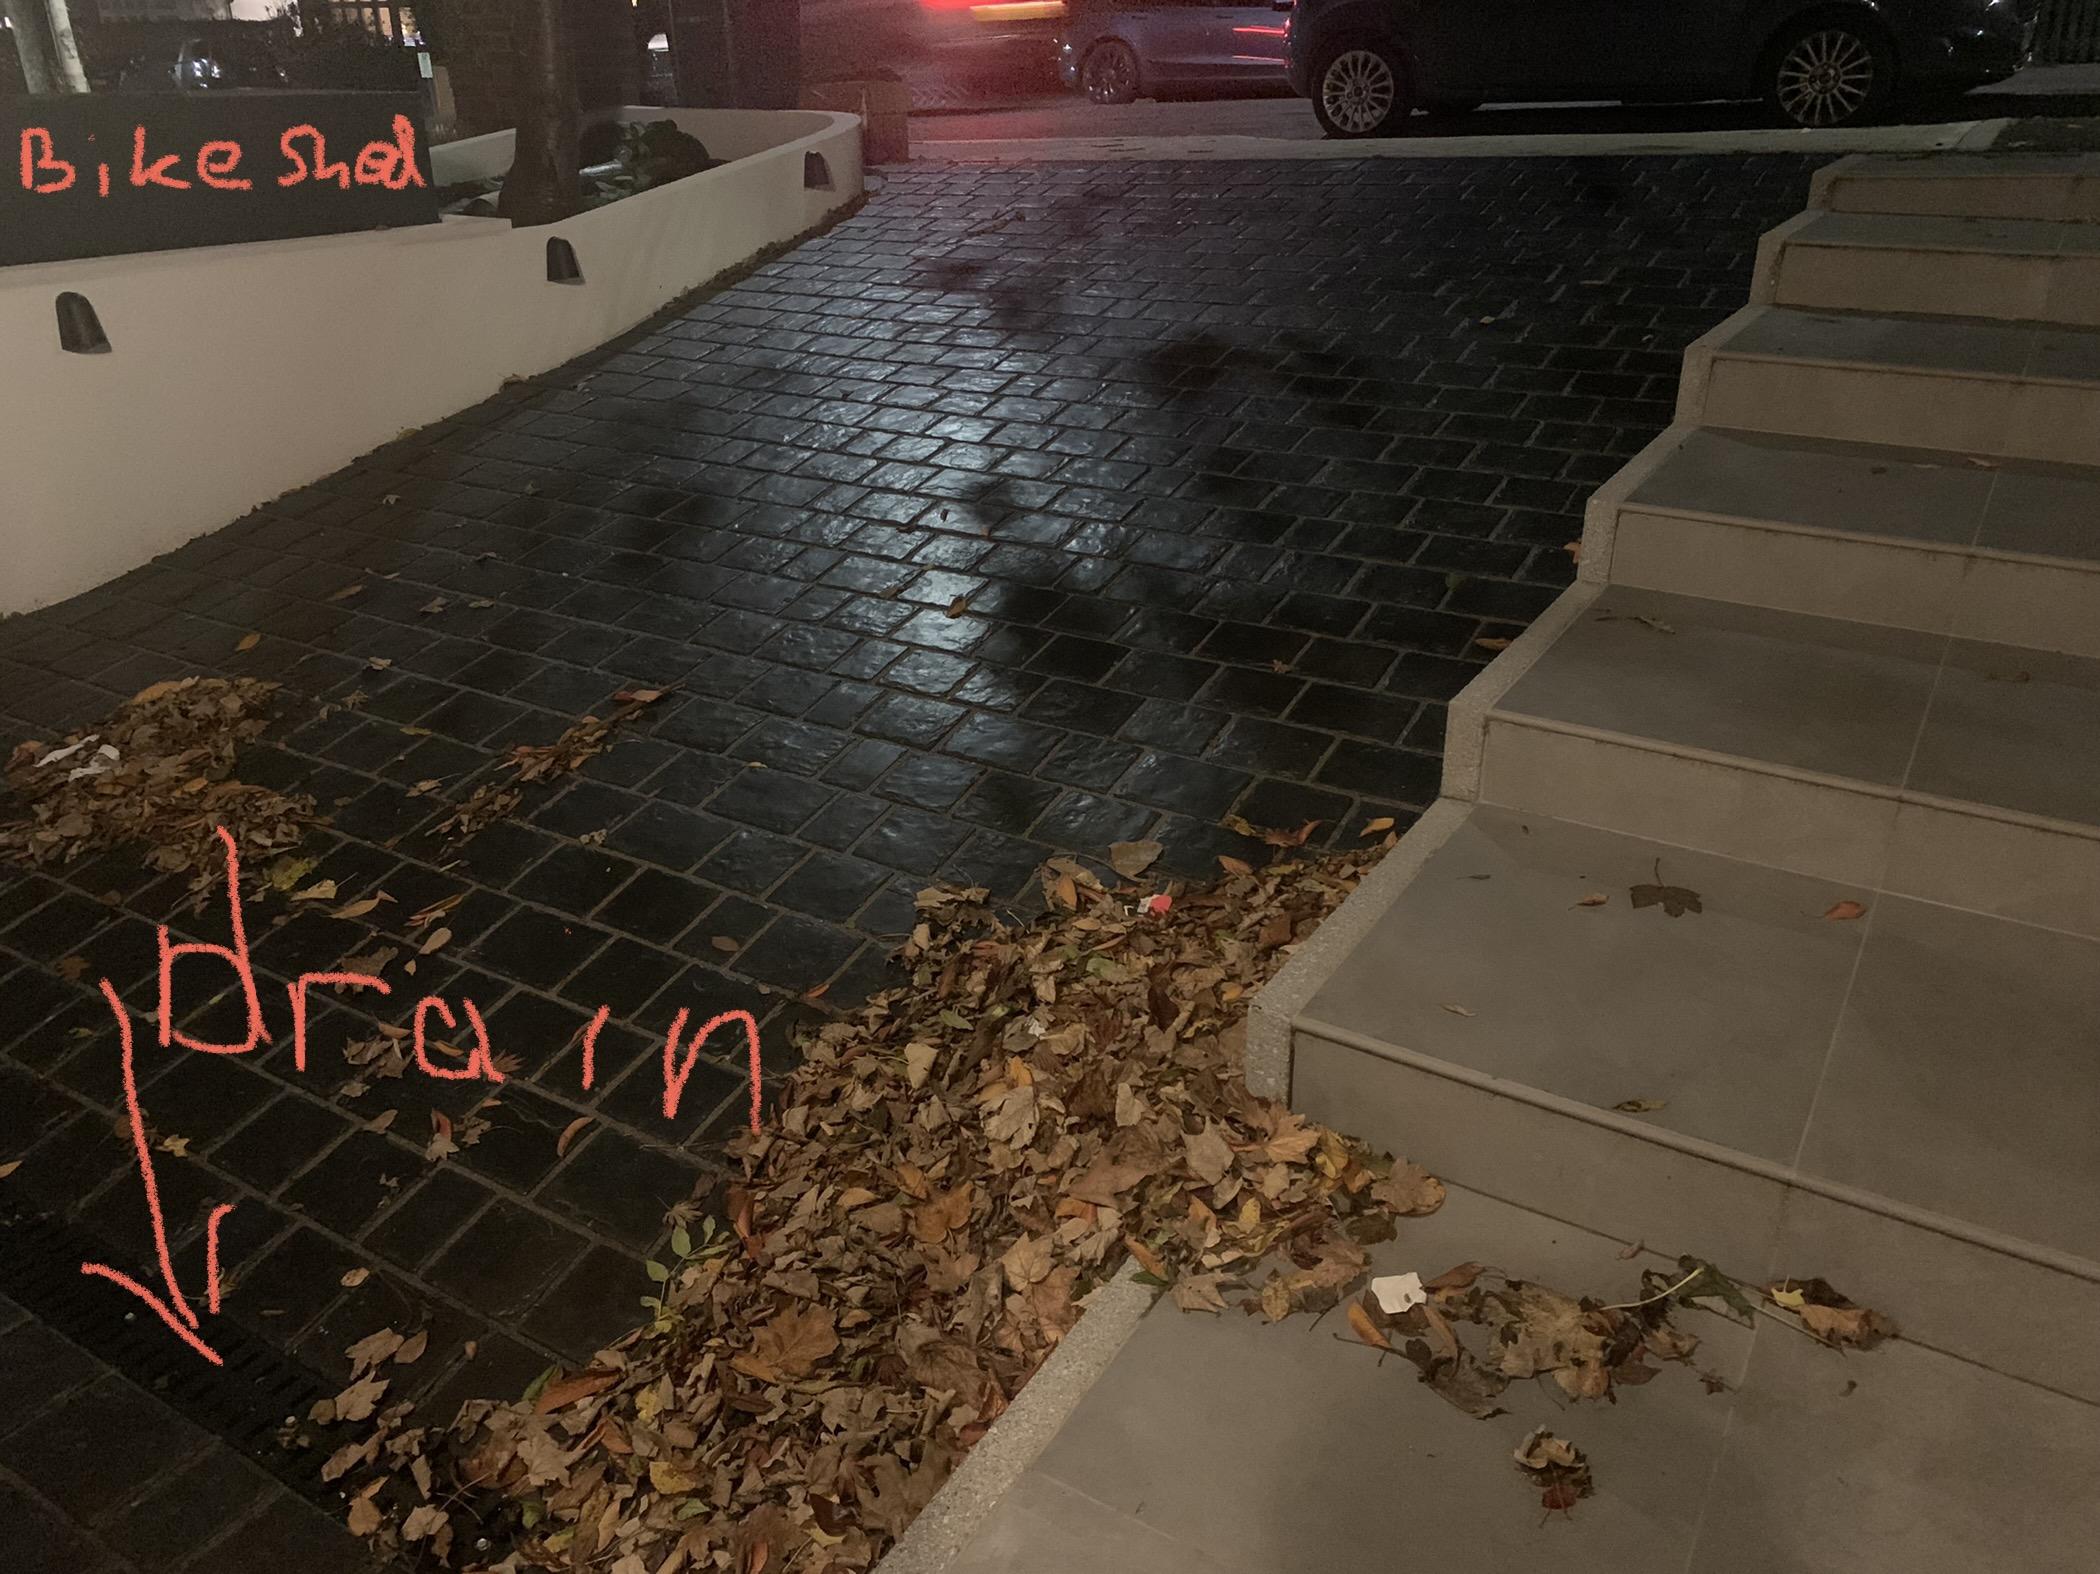
the drain is an aco drain which runs the whole width of the driveway at the bottom of the slope. (we have one at the top as well). The bike shed is accessed in the bottom right hand corner of this image, which the camera shot has chopped off. That’s relevant because the access to the bike shed is fairly flat and level, so reducing the slope of the driveway will either leave a massive step up from the area of ground outside the bike shed door or we need to remove the bike shed, pour quite a bit of screed/concrete and then reinstall bike shed so that it will be level. There are 6 steps up to the street from the floor immediately outside our front door. Each one is about 76cm deep. From that floor, there is also a step down to the bottom of the driveway (which partly explains why you can see a bunch of leaves which have collected there in the image). Current rise over run of driveway is 1/5.33. I will post another photo in a minute showing other side of aco drain. Those three black things are wall lights and the white wall is a planter that houses the bike shed and one day will house soil and plants to partly conceal the bike shed.
 1 point
 -
Yes, rigid insulation board stripes do the job. Also for the reveal you can use XPS tile backer boards instead of plasterboard: that removes thermal bridging through the surface. I would strongly recommend sandwiching an airtight layer under the surface board (regardless whether you choose xps or plasterboard), taped to the window on one end and sealed to inner skin - that way any microcracks caused by opening/closing of the window or structure movement won't rob you of warm air later. For such small area nothing fancy is needed, even stripe of DPC/DPM will do. Saying that, what is your airtightness strategy for the walls? With them stripped, now this is the right time to make it right.1 point
-
Our driveway rises 2m over approximately 18m before flattening off in front of the house. That is about half as steep as yours at 6 degrees. I find it quite steep and slippery and worry about liability when it is wet or there is snow/ice. It only snows two or three times a year here and the first time it snowed just a few millimetres the car slid straight out onto the road before it stopped. Non 4wd cars struggle to get up the driveway if there is any snow on it at all. It may not snow much but with that steep a slope I would just be worried about it being wet. I would be quite concerned about a delivery person or visitor slipping on such a steep drive. How does it affect the accessibility of the main entrance? Is it flat at that point? I would be curious as to what building control had to say. The car issue is easily fixed by buying an automatic or EV which we'll all have eventually.1 point
-
I was a bit worried about mine, although not as worried as the neighbours 😅 . The calculations snuck in at 42 dB(A), and in practice it's fine - if I go to either side of the garden, it's barely audible. Haven't caught the neighbours yet, but I assume they'll be compelled to agree. * It's a 65dB(A) heat pump (grant 6kW) * "two reflective surfaces" * "Partial barrier" (scratty garden fence) * "Assessment position" 8 metres (somehow - it's in the middle of a 9M wide garden with neighbours on both sides, detached in name only) A mid-terrace from the same developers would probably not come in under the limit. Really, it's a bit weird to have one per house. It's a shame district heating isn't more widespread.1 point
-
For the benefit of the search: Vaillant controls calculate energy integral from a starting point of -180° minutes. As each minute passes, the average °C that the flow temperature deviates from the target for that minute is added to the running total, subject to a floor of -180° minutes. i.e. once the target flow is reached, and the HP starts to overshoot, it it were 1°C above the target for 1 minute, the energy integral would then read -179° minutes. Therefore the set range controls the cycle length mid-season, where the ASHP minimum output exceeds thermal load. The default is to turn on compressor at -60° minutes and off at 0° minutes. If that were to be changed to say -90° minutes, then the HP will allow the circuit to cool more leading to a longer cycle period.1 point
-
That’s what I thought. But actually the caravan compliant builds can look pretty substantial.0 points
-
For a caravan?0 points
-
Anyone else been stung? Paid 90% with installation meant to start in a few weeks time and have just found out they went into liquidation yesterday. Been to the yard and there is barely a thing there. So despite one of my payments being entitled "Materials" and another "Manufacture" they have neither got my materials nor have they manufactured anything of my house. Anyone else been in a similar position? The more I speak to other trades and my architect the web of people they have let down is getting ever larger. The liquidator has informed me it'll be a week or more to get letters to all the creditors and then maybe a month or more before they know if there are any assets to liquidate. Feeling more than a little disappointed and have no recourse against them. More than that I now have foundations for a house I cannot afford to build.0 points
-
I think it's in the terms of his release, to keep the urges under control...0 points
-
Hi Will, I support a sea cadet charity for disadvantaged young people aged 10-18 years who is building a new centre due to the decay of our existing building . Flight Timber were storing our frame - fully paid with a vesting certificate - on their site until it could be installed and it has now disappeared. No one can tell us where it is. We have not heard not one single word about any of this from the company or the liquidators. We are devastated the frame wasn't theirs and yet our property has gone0 points
-
Best way to keep your bath warm is finish the (expletive deleted)ing ufh 😎0 points
-
Make sure you give clear instructions.0 points
-
Well it was either that or ask her to get out of the car (in the rain) and make her watch me do it. Luckily after she tried to accelerate more gradually, she was about to get out (although there was still some sliding about). What a disaster.0 points


This leaderboard is set to London/GMT+01:00