
Leaderboard


Popular Content
Showing content with the highest reputation on 02/06/19 in all areas
-
When I saw the title of those two pictures, I had to scroll down oh so carefully in fear of what I might see.3 points
-
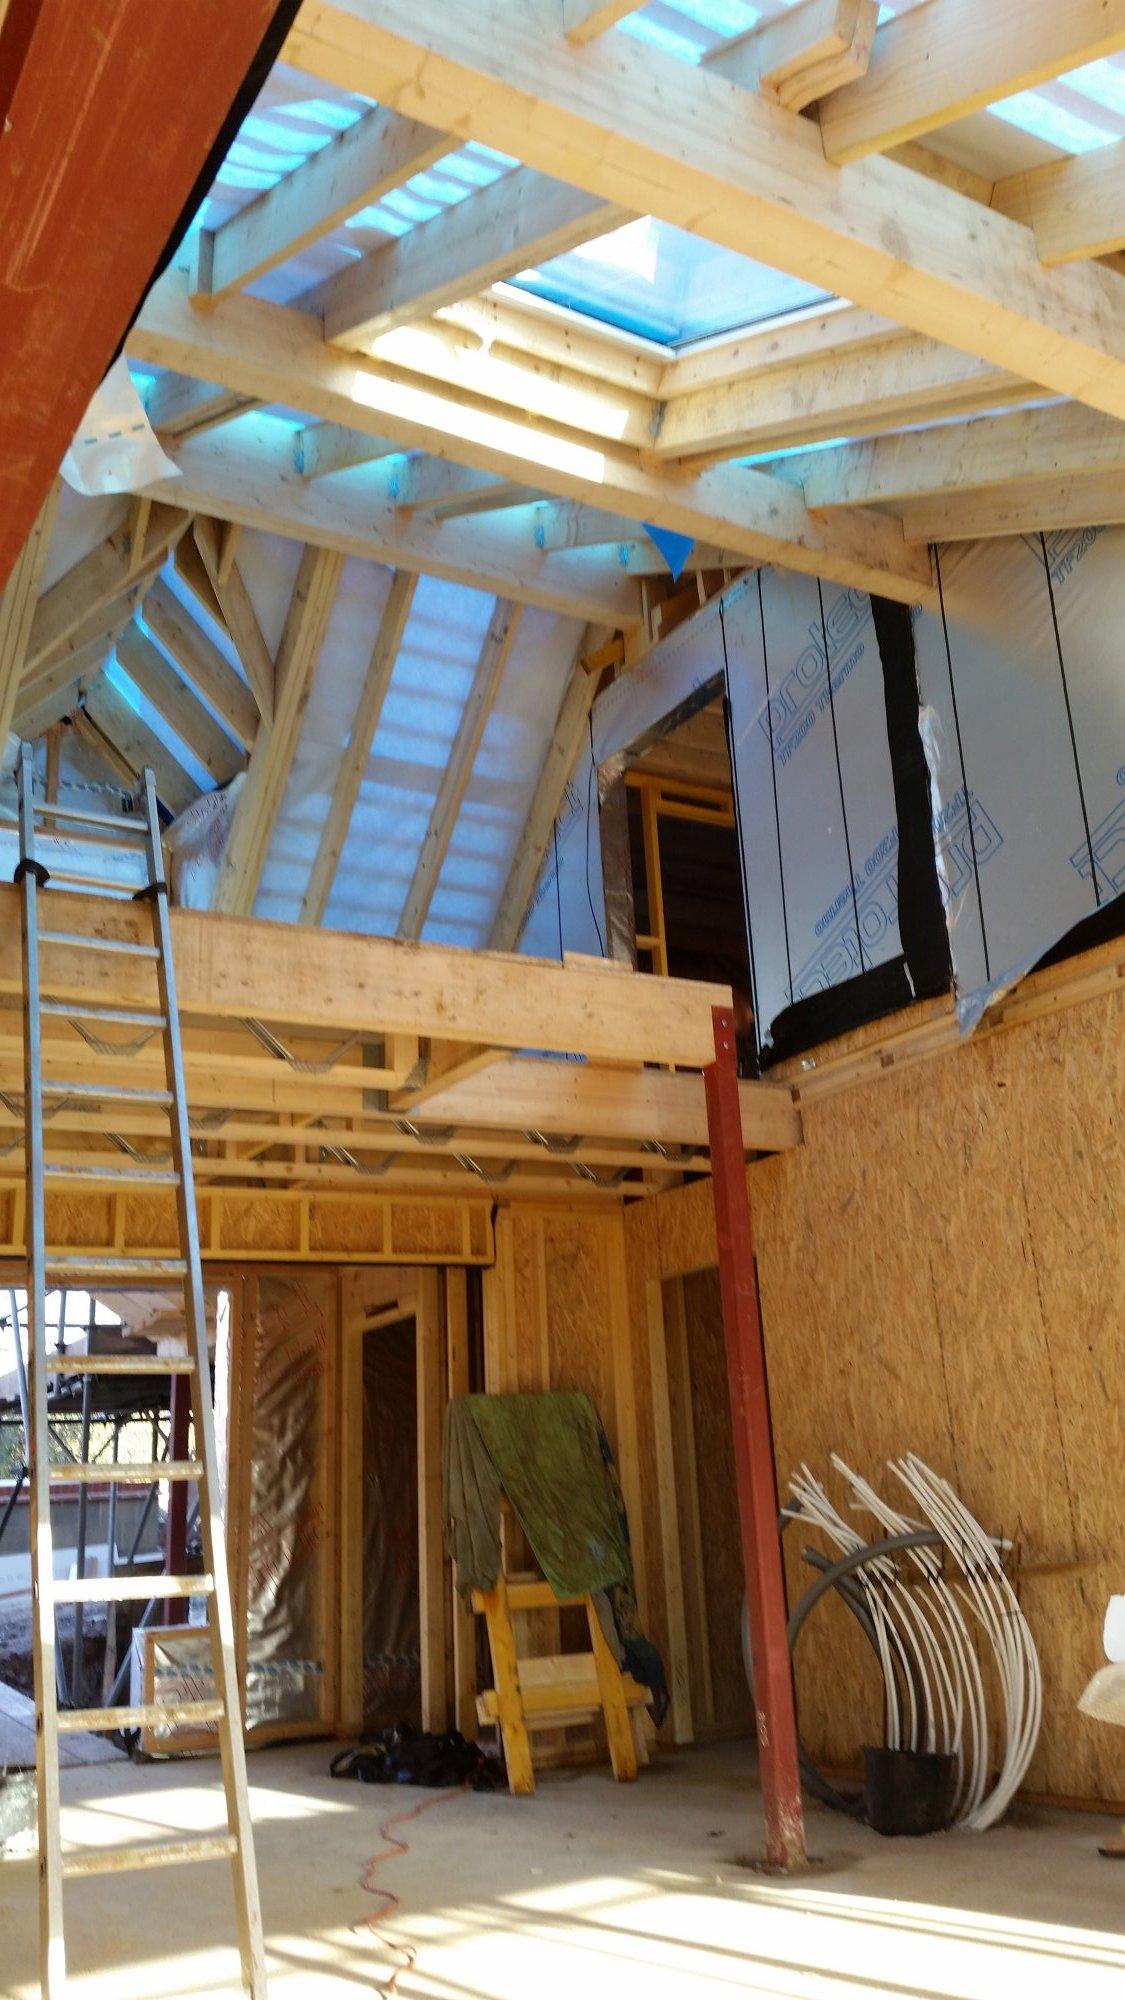
So, our ground floor walls are up, and ready for a concrete pour... almost! Despite our use of Logix ICF blocks, I had fallen in love with the simplicity of the joist hangers used by NUDURA. Essentially, all you do is slot metal plates through slits in the ICF blocks, hook them onto a bit of rebar in the wall, and pour the concrete. Then you wrap the end of your joists in a folded metal U-plate, and put tek-screws through the metal plates, through the U plate and into the joist. The shear strength of the metal plates and the tek-screws is what holds the joists up. So, before the pour, you end up with this: Some people choose to put battens under the joist hanger plates before the pour to stop them moving during. We didn't bother, because the steel rebar was holding them fairly well anyway, although most of them were also screwed to the blocks (we'd finagled the joist spacing to fit the stupid imperial measurements of the Logix blocks, which meant at least one plate for each joist was able to be screwed to a web in the ICF. So, the pour was uneventful in the end, apart from one tiny issue. Under that lovely 45-degree wall at the back of the garage, the block and beam floor was running under the angled wall. Which should be fine, but there must have been a small gap between the blocks somehow. After about 5 minutes of pouring concrete into the internal wall, we were getting a bit confused as to why the concrete level wasn't rising... ... It transpired that a 7N concrete block was now floating inside the wall, and the concrete was pouring through the resulting gap and under the block & beam floor in the garage, filling the void beneath. ? We only realised how far it had flowed under the garage when we started lifting floor blocks. In total, in those 5 minutes, we'd poured just under 3m3 of concrete into the void beneath the garage floor - the void had reduced from an average 750mm height to under 150mm in places! On the plus side, at least it didn't fill the void completely, given we still have to run services under there! Here's a photo showing how much it filled up: Still, the garage walls aren't going to shift anywhere now! And it only cost £300 in spilt concrete... Anyway, the rest of the pour went really well - no big bows (that we could see) and no bursts, despite all of the silly joints we had. Even little bits of PU foam seemed to withhold the weight of the concrete: (No, the string isn't supposed to be tight to the blocks - it was set so that a piece of CLS fit perfectly behind. And yes, that upright should have been screwed to the ICF blocks... except the observant among you will have noticed the webs don't line up between the courses. This was a deliberate decision made by me because of an alignment problem with the joist hangers above the bifold opening, and this seemed to fix it) So, concrete poured, and walls looking good: The internal walls (garage, kitchen and stairwell) were kept 1 course lower so that they could act as a bearing surface for our upstairs floor joists. Seemed like a good idea to me, anyway! Time for another ICF delivery... The big RSJ is for the 6m span between kitchen wall and garage wall, and will carry the load of the first floor joists in the middle 1/3 of the house. All well and good, but the massive trees at the front meant that getting a crane on site wasn't going to happen, and the cost of a crane that could clear the trees from the street was more than a little prohibitive... Time for some back-breaking lifting, because that beam weighs more than 1/4 of a tonne! Some swearing, and the death of a couple of ratchet straps, and the beam was lifted up into place... And the length was perfect - we had less than 10mm tolerance once you allow for the required bearing on the concrete walls! Timbers sailed past the end at the garage - I was too lazy to cut them at the time (and that came laziness back to bite me on the ar$e later in the build!) Say hello to the front of the house! Hallway window, nice doorway and the integral garage all present and correct Before we can carry on building the walls, we need to put the floor joists up and get a floor deck down: And time to start boarding it out: Which would have been easy if it weren't for the fact that the tolerances on the board joints wasn't so woeful: These boards were in the same pack, and the tongues varied by over 3mm. Biggest tongue we found across the lot was 20mm, and the smallest was 12mm. This meant we had to try mix-and-match for the floorboards, which took days longer than it should have... ? Nevertheless, 7 days later, and we had the floor down, and were building walls again. 3 more days, and we were cooking on gas - first floor walls were 2/3 up and we were erecting the bracing again: Time to put some lintels in for the windows (you can see the ICF cavity closer under the rebar links): It was at this point that we realised we had a bit of a problem... our house was too tall! Our planning permission showed a street scene, which had the ridge line of our house lower than next door's house. The drawing had been produced by asking the neighbour to measure the height of his eaves when he was clearing out a gutter - he'd used a tape measure, so I had no reason to doubt his figures... ...But we were out by nearly 600mm on the height. I had to go back one night, and put a laser on a staff, just to see how bad it was. Here's the picture, showing the laser line from the top of a 2.4m staff, shining on the neighbour's chimney: The upshot of this was a third planning application, and lots of sleepless nights, because we had to get a height increase approved (we first tried to use a minor non-material amendment, only to be told by the LPA Planning Services Manager that "a minor non-material amendment was not appropriate for securing an increase in height"... only to find out that the same Planning Services Manager had personally approved an increase in height on Chorley Nissan's planning application using a MNMA only 10 months prior! I wonder who had a nice Christmas present from Chorley Nissan that year?) Still, while we waited for approval (so that we could order the roof trusses) we could crack on with bracing up the first floor openings. And we had a ground floor that was giving us a sense of what it'd be like when it was finished: We were old hands at bracing openings now, having done it for the previous 2 floors of the house! Anyone else think it looks like something from an early 80s arcade game?2 points
-
Minecraft?2 points
-
Ta. Found this off cut of 22mm twin wall tube. If I leave the clear tube on and slip it over the top it should equate to the thickness of the plastic insert:2 points
-
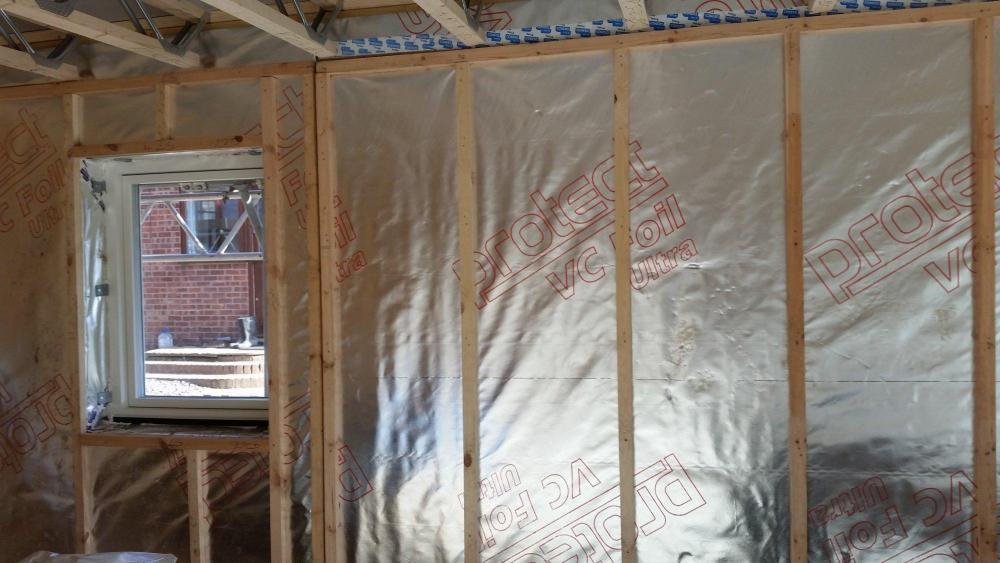
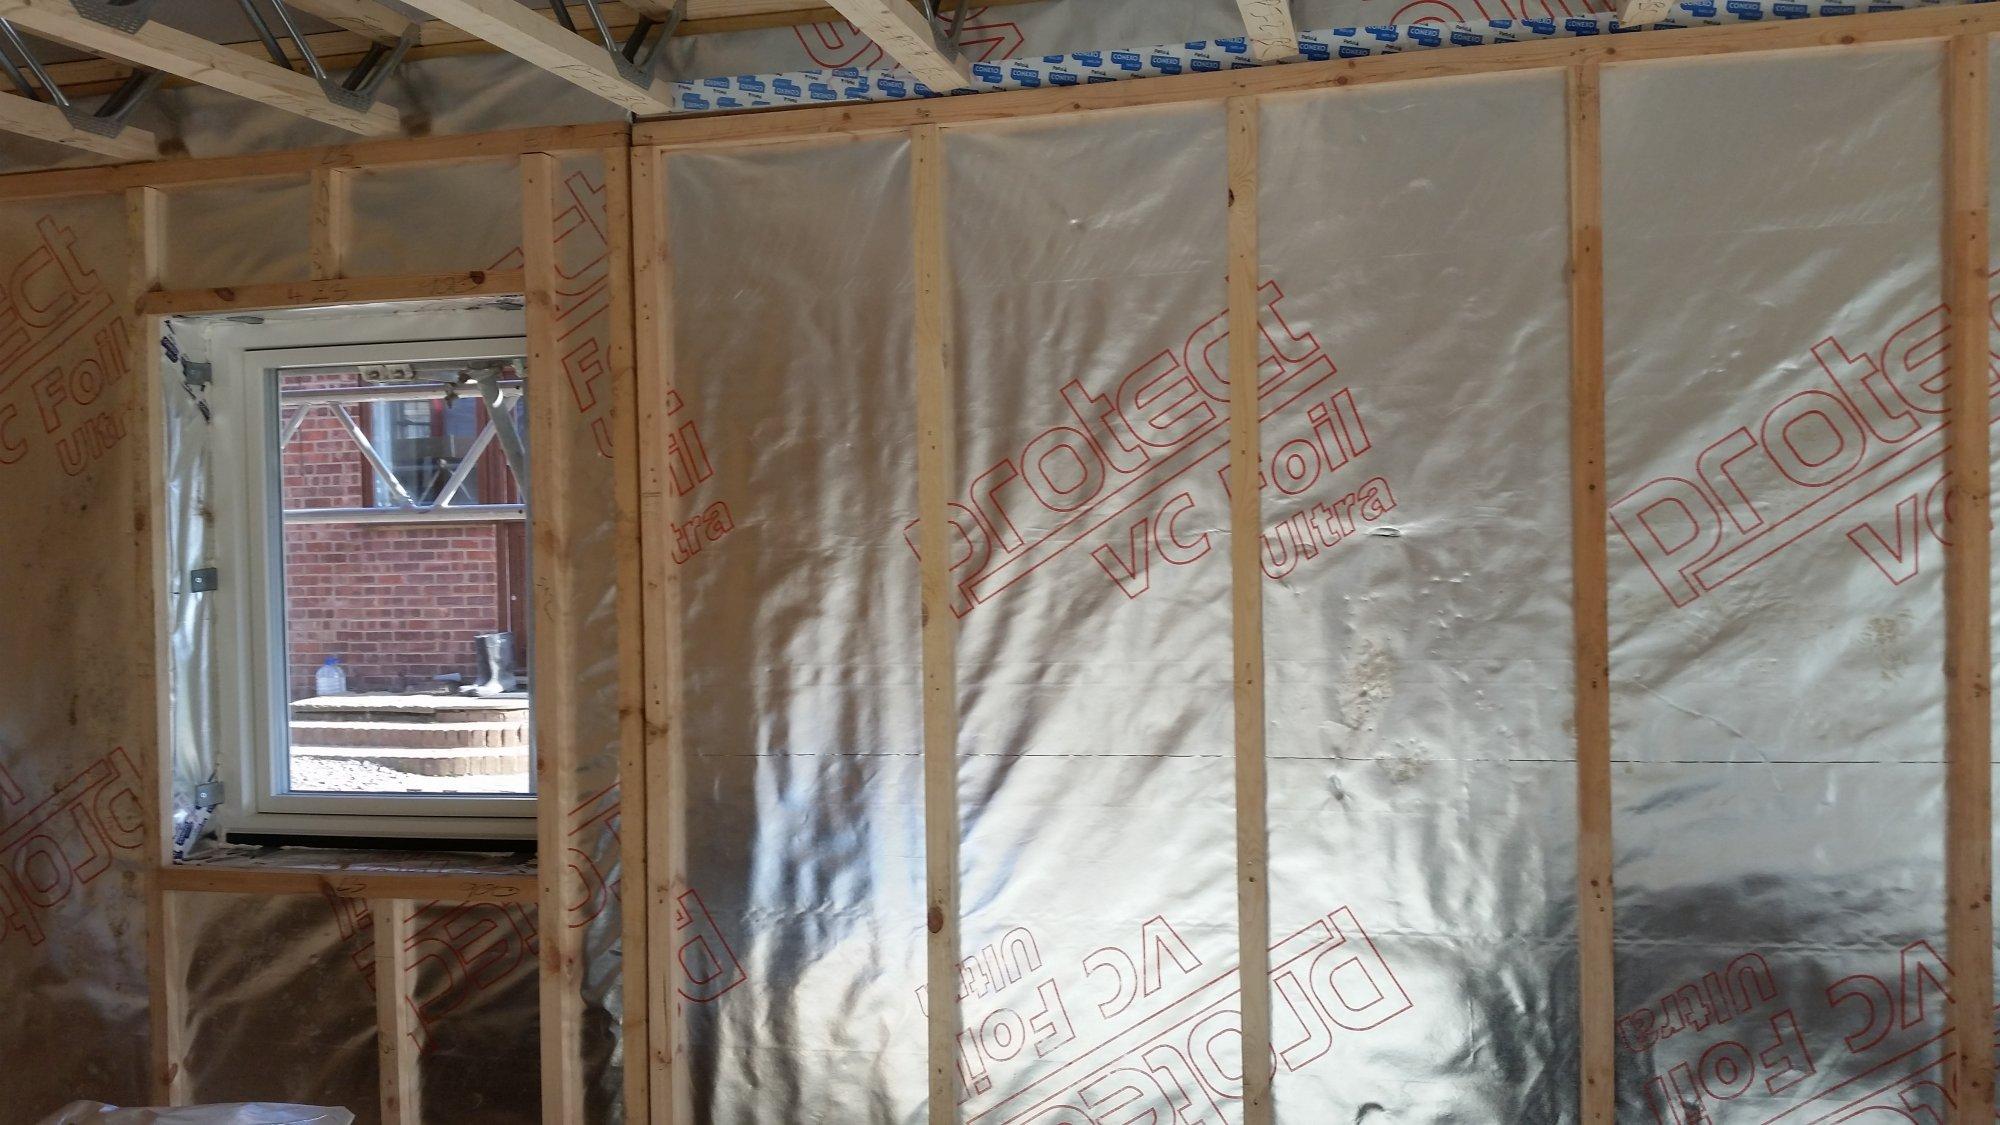
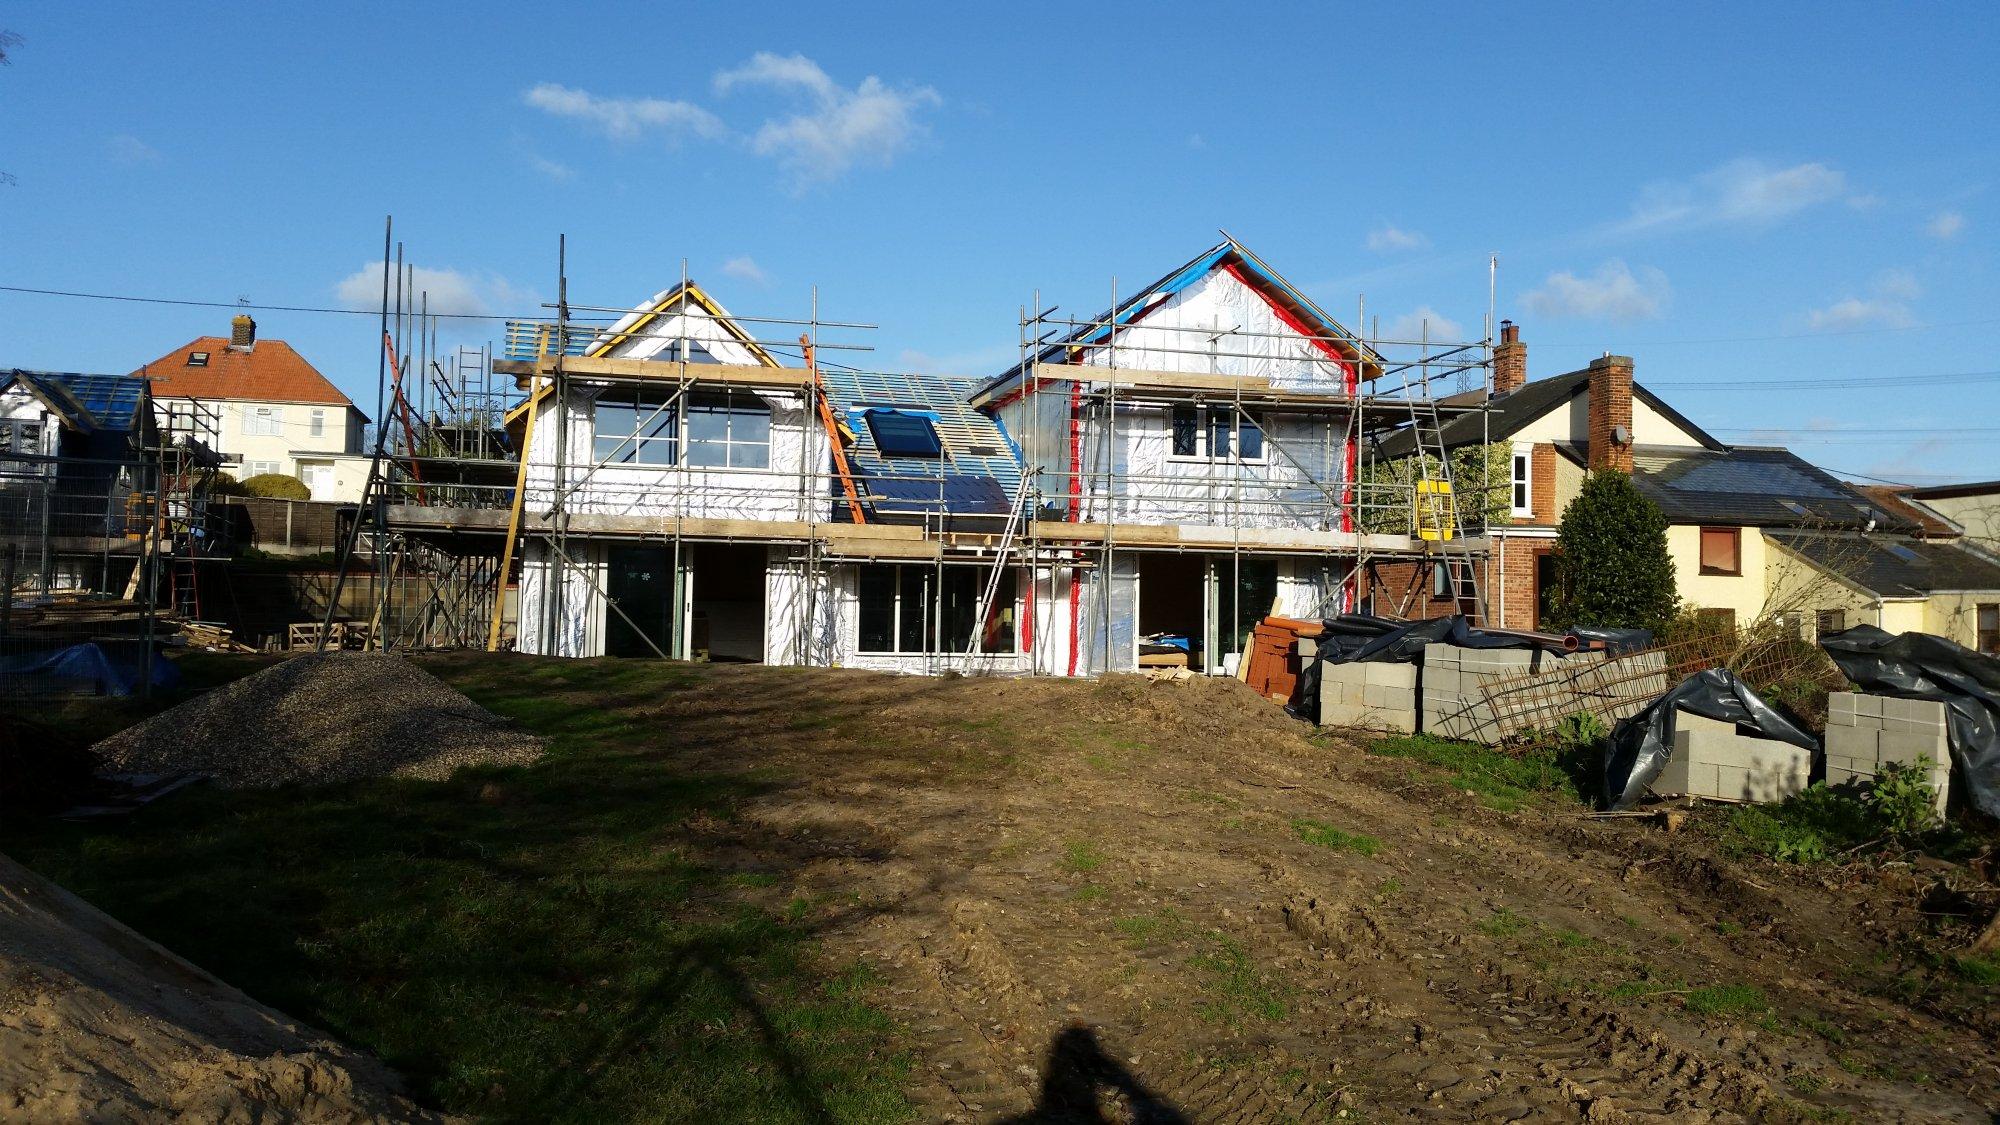
Following the example of @Weebles last year who we visited, we would like to invite fellow Buildhubbers who would like to come and see our MBC 140mm frame to get in touch and make arrangements to visit. We are located in North Essex about 8 miles west of Colchester. We briefly met @Dreadnaught and @vivienz when visiting @Weebles and we all agreed that seeing a real project was extremely useful. See photos below of the house from the rear + central section - taken just after MBC had completed frame erection and gone home for Christmas (the rooflight is 2m x 1m, triple glazed and weighs just over 180kg - we had fun getting that in place ?). The photo is a bit deceptive in that the ground does not slope as steeply as it seems, the house is set down in the ground - we had to dig out over 1,500 tonnes of soil due to the constraints those nice planners put on us ? - and there is more to come out once we start landscaping: At the moment we are reaching major milestones every month or so. November 2018 saw the slab poured, December 2018 the frame was erected and (most) windows/doors installed and PV array on roof, January 2019 the slate roof was nearly completed (slating should be finished this week). About half the house has a brick skin and brickwork starts tomorrow (weather permitting) and they are expecting to take about 5/6 weeks (weather permitting – I think I shall be saying that a lot in the coming weeks). The other half is rendered and the rendering team should start preparations within the next couple of weeks. We also have a couple of areas with brick slips, just to keep us on our toes (but that's another story for another day). MBC are due back during the second half of February to install the insulation in the roof and then make the building airtight. All the above means that there is plenty to see in terms of how the house is constructed. We have lots of lessons to share as well. We have contracted with MBC for them to deliver wall & roof u-values of 0.14 W/m2.K (achieved using Knauf Earthwool + PIR for the walls and similar for the roof) and the slab of 0.105 W/m2.K. I also have a belated apology to make to @Dreadnaught for not responding on his previous thread about the 140mm system – we have been distracted by non-build related issues in recent weeks as well as having plenty of build related issues to deal with. @Dreadnaught - see the photo below of the panels in situ (struggled a bit with the light I am afraid)

 2 points
 -
Hi, we have just obtained Planning Permission for 2 houses and were looking to build both simultaneously and sell one and live in the other. As this is somewhat unusual we thought others might like to know what we discovered when we did some research and we talked in general terms to our accountant. Obviously it depends on individual circumstances and the following does not constitute any form of advice - and there may be other ways to look at it and we are no experts and we haven't investigated the details fully yet. CIL - if you self build and live in the house for 3 years you can (if you get the paperwork right) be treated as exempt from CIL. If you build two then you are a developer and CIL is payable. If you are demolishing then you can subtract the GIA of the old building from the total new build GIA to reduce the bill. You MAY be able to negotiate which new build house gets its CIL gets reduced. VAT - if you self build then you are exempt (either at point of purchase or in a retrospective reclaim) from much of the VAT. If you build 2 or more no such rules apply so you would need to be VAT registered to reclaim the VAT. VAT is likely the largest single tax hit you will take so its important to get this one right. There may be some cashflow benefits from getting vat back during the build rather than waiting to do a reclaim - but offset is the 'pain' of vat registration. Not sure but you may be able to reclaim the vat paid on 'services' etc. which you can't as a self builder. CGT / IT - this is where it gets tricky - if you self build one house and live in it for an (unspecified) period of time as you primary residence then when you sell you are usually exempt from CGT on any gain. If you build 2 or more then you are a developer and its very likely that any profit you make will be subject to Income Tax at your marginal rate. It seems rules have changed here as CGT might have applied to this case its not often true any more. It seems that much of the interpretation of this depends on your 'intent' - is your plan to build 2 and sell 1 as a developer? If so this is viewed as your occupation and profits are taxed as income not capital gains. There 'may' be some scope to develop the first house, live in it, establish it as your primary residence, then build the 2nd, sell the 1st, and move into the 2nd as your primary residence i.e. two sequential self builds. However you need to be very careful that your 'intent' was not to act as a developer! In our case the fact that our PP is for two houses from the start is a bit of a giveaway - you 'might' get PP for the first house alone and then subsequently (after living in the first house) realise that there is scope for a second house on the plot and subsequently build something more suited to your needs. There may be some scope (say you own the entire plot) to sell a portion of the plot to a development 'vehicle' run by you - perhaps as maybe sole trader, LLP or limited company. You would need to sell the land at 'market value' as this is an obvious area for scrutiny. You 'should' (not actually testing this theory yet so beware) be able to retain the land and build the house you plan to live in as an individual 'self build' exempt from CIL and VAT etc. exactly as any single self build does. You 'should' also be able to develop the 2nd house within the development vehicle as a separate entity and be taxed on that separately for VAT (you would VAT register the vehicle) and IT, Corporation Tax etc. You do have some scope and flexibility to pay yourself as a director / shareholder of the 'vehicle' but this is getting pretty complex pretty fast! For any shared costs you need to be very careful that they are apportioned on a 'fair' basis and not as a deliberate means to reduce the 'profit' on the resale unit. SDLT - if a development 'vehicle' buys the land then it will need to pay Stamp Duty on this but the rate is less than an individual will pay - need to check this. Also be careful about second home SDLT if you are an individual - again not looked at in detail but there are some rules about reclaiming 2nd home SDLT (if you own one home buy a plot you pay 2nd home SDLT. If you sell the first home within a period of time you can reclaim the 2nd home SDLT) that may fall apart in the 2 house picture. Funding You also need to give some serious thought to your funding if you build two. Self build (regulated) mortgages do not seem to work for this scenario and you need to start looking at (unregulated) developer finance and this is not a cheap source on money - start thinking 1% per month interest! plus a 2% setup fee! Now you may be able to offset these costs against any profit but its still expensive. It seems that if you can get to 'wind and watertight' before taking on any developer borrowing then the rate drops to only say 0.5% per month (plus setup etc) with 'refurbishment' loans. Construction Industry Scheme & Health and Safety - if you are deemed a developer and building more than one house (and are paying subcontractors) it seems you need to register for CIS and comply with H&S as a developer. Both of these appear pretty onerous and costly. CIS seems to be another of those schemes where you act as an unpaid tax collector and have to submit quarterly returns. Not exactly sure what is involved but it would need some research to make sure you are compliant. Well that's what we discovered - bottom line is that building two is tricky and we would recommend you take professional advice early on from a tax accountant who understands this stuff (not all accountants will!). You will need to be very CAREFUL in what you do and it seems that some poor decisions early on may bite you later on so BEWARE! And the last caveat - as with all taxation the landscape can change overnight - so even if you have it all mapped out the taxation rules could change and you could be much worse off. There may be others out there who have done something similar and know much more than we do, so we would love to hear sage advice and hard won experience. Though there is a school of thought that you are daft to even consider one self build - you must be totally insane to even think about two! Hope that helps!!!! We will let you know how this pans out as we learn more.1 point
-
Ola. Damn, hours in the day are getting bloody well thin. Apologies. Something rigid like pvc tube over the thread would be better than anything soft tbh. Strange the pan didn’t come with captive nylon ‘sleeves’ tbh, but at the end of the day as long as metal and porcelain never meet it’ll be chips ‘n’ gravy Bob. The fact it’s bonded to the wall will stop movement eroding the sleeve so “carry on”. ??1 point
-
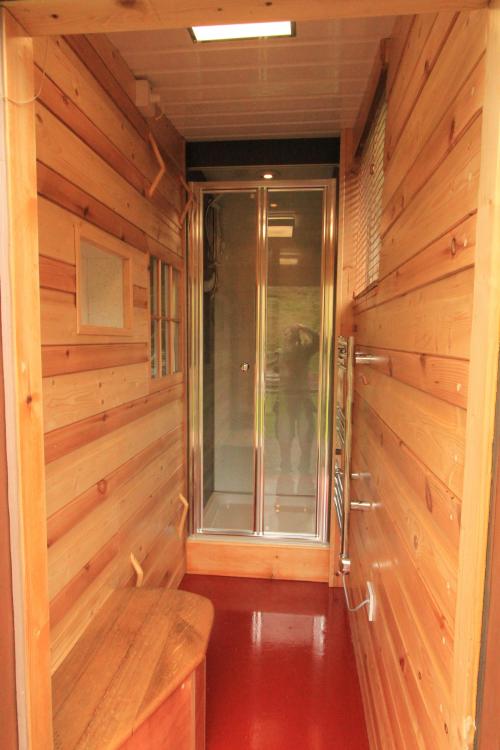
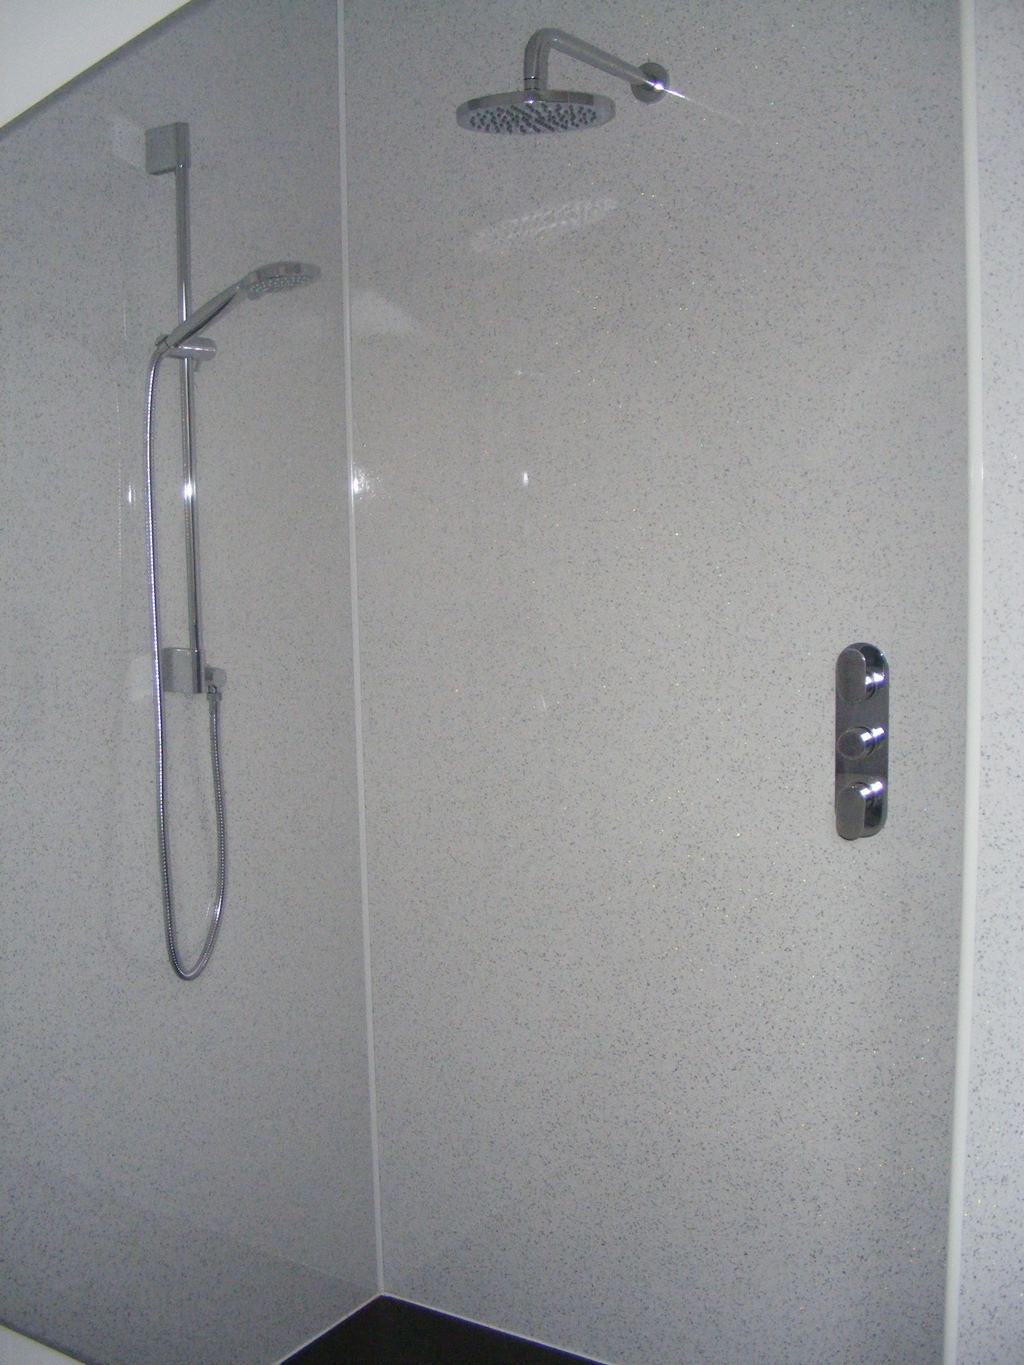
I understand this concern but went around it a slightly different way as I wanted to avoid any silicone on show.. I used the trim but I covered every internal surface with clear CT1 and then compressed the board down into the trim, there is just no way water is getting in ! I then used a shower tray with upstands and the wall board came down over these upstands with a gap at the bottom. It was fully bonded to the wall behind including tanking the lower section like @ProDave did. It works very well and no problem so far (2 years) The only improvement I would make would be to have made the gap / drip line at the bottom very slightly bigger for ease of cleaning, say 10mm as I only left about 5mm and it’s a faff to clean. This is in my cabin and used by geusts who all like my quirky shower room! Not main stream but just another option on the use of trims. Not a great photo of the detail but just one I had to hand.

 1 point
 -
Just ensure that your surname is on there I reckon.1 point
-
That seems ok but ensure that your name is on the invoice. The address they invoice doesn’t matter to a degree (I had 3 addresses during the build). Showing the VAT separately is easier to deal with on the claim form in section D but if it’s not there are separate sections for standard rated (E) and reduced (F). You just have to work the figure out. Most invoices you receive will likely show the vat separately. I only had a handful where it wasn’t separated out.1 point
-
It could be likened to it - maybe even could be the next model, I hadn't heard of him though..., thanks for bringing it to my attention. - From the beginning of the project I've refurbished existing building work to get the height and pitch right [these brick outbuildings were originally intended for animals, more often too low to stand up in], and left a wall out so I can use the panels in this way as I span the adjacent concrete footing and may want to use that as the same indoor space, or section it off, same thing happens at the opposite end of the footing so the panels go around that footing and allow for multiple configurations with ample overhead storage on site for any removed panels.1 point
-
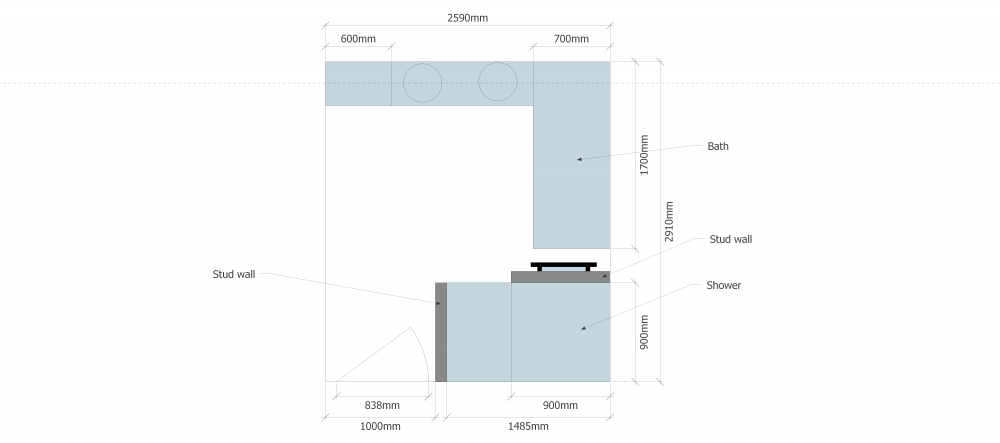
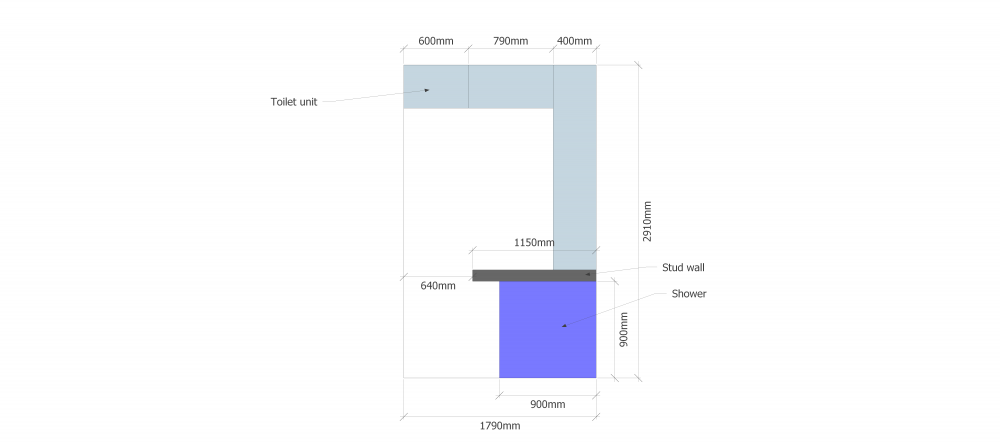
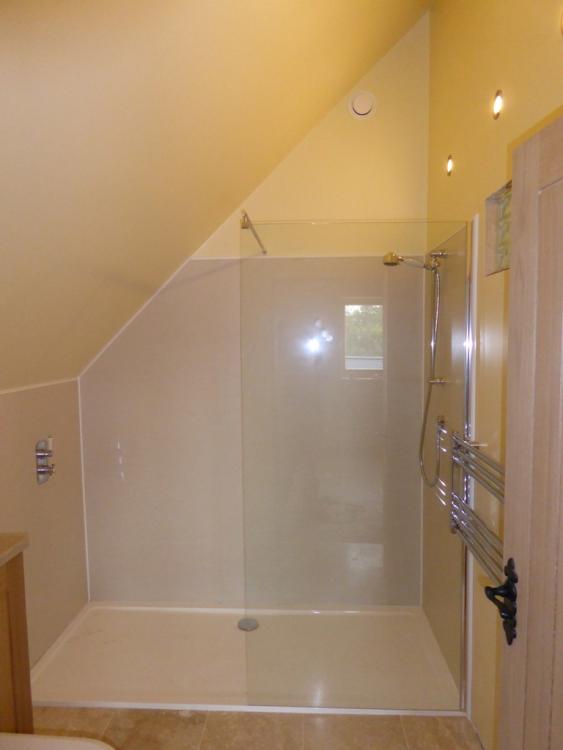
Thanks for all the tips so far. Time to dig a little deeper! Here are the room layouts... Main bathroom first: If I had the danglies for it, I'd have followed @Onoff's fantastic bathroom build... but time and money constraints mean this will be a "for now" job, rather than a "forever" job. The 600mm unit top-left is the toilet cistern cupboard, then 2 sinks (our girls fight over the single sink in the main bathroom here -this is my attempt to alleviate stress in the mornings!). I'm tempted to build out the wall between the bath and shower, and build in storage for shampoo etc, and also an access panel for the shower controls / mixer. That would push the towel rail up above the end of the bath, which isn't really a problem. The en-suite is similar, albeit no bath and it is serviced by a pocket door in the middle of the left-hand wall: (Kim and I don't fight over sinks, but we'll still probably put 2 in - they're going in/on the long cupboard run "above" the shower area.) I would like the shower area to span the full 1790mm (yes - it should have been 1800mm, but I put the pocket door wall in the wrong place because I hadn't allowed for the MR plasterboard - the perils of trying to do too many jobs at the same time!). But SWMBO is "suggesting" (read "demanding upon pain of death") that we have some special former that works well with microcement and only comes in a few sizes... ? The fact that we will be sunken in should allow us to not have to worry about any fall on the rest of the floor - it makes the shower area fully contained at floor level. It's just how best to make sure we don't get leaks, and we don't get mould. Oh, and on the mould front... I've been assuming that it is exacerbated by having the shower area closed off and getting standing water. The stud walls that close off the shower area are going to be stopped at 2m high, so that air will circulate above them (and hopefully the MVHR extract vents being above the shower areas will help). Anything else I can do (as part of the construction) to prevent the mould from appearing in the first place?
 1 point
 -
Most will order the boards in But if you have a ring round Someone May have a part pack in stock If you ask for gypsum backer boards They are bright yellow in colour Hope this helps1 point
-
This is from VAT Notice 708 that the builders should be more familiar with: 11.2 Goods ‘incorporated’ by a builder If you are a builder, the rate of VAT you charge for your work normally determines the rate of VAT you charge on any goods you ‘incorporate’ in the building (or its site) - see paragraph 13.3 - whilst carrying out that work. So, if your work is zero-rated or reduced-rated, then so are the goods. https://www.gov.uk/government/publications/vat-notice-708-buildings-and-construction/vat-notice-708-buildings-and-construction#reduced-rating-the-renovation-or-alteration-of-empty-residential-premises1 point
-
From the ‘renovation / conversion’ claim form: Eligible building materials that a business both supplies and installs follow the same VAT liability as the service. This means that if the service is reduced-rated then the building materials will be too. The Scheme will only refund the correct amount of VAT (that is the VAT that was properly chargeable). If you have been charged VAT at the wrong rate (for example, because VAT was shown as standard-rated, rather than reduced-rated) your claim will be rejected. If the builder or contractor has charged the wrong rate of VAT on their services and materials that they installed, they should correct the liability. You will need to ask them to provide you with an invoice showing the VAT that has been correctly charged. But do not leave it too late. They have a limited amount of time to correct their VAT account with us, and are likely to refuse to make a correction if it is out of time. If you re-present the claim with an invoice showing the correct rate of VAT, we will make a refund to the extent that other aspects of the claim are satisfactory.1 point
-
Yes both labour and materials should be 5%. You can claim the 5% back if your conversion qualifies for a reclaim under the DIY Housebuilders scheme.1 point
-
GD on the telly an BH on the laptop; shout at the telly (well, Kevin), sneer privately at the participants ("Oh that extra £100K arrived quite unexpecredly"), snigger at @Onoff , suck your teeth at the hasty internet searches, plan tomorrows cock-up in waiting, spill your beer on the cat. Nowt better of an evenin'1 point
-
Just like us.... until it came to emptying the crud that had accumulated in the garage the rest of the year. Can of de-icer costs nowt. It started with the kids insistence that we keep their A Level notes, favourite dolls, smelly fishing gear ..... toe-rags. The mere memory annoys me....1 point
-
We rent a villa in Portugal and they have used this extensively. It has discoloured and some areas have lifted. It was apparently very expensive.1 point
-
ice cubes make good sealer bead shaping tool--make your own shape used to use them for sealing on doorskin replacement--don,t stick to anything loads of tile levelling systems example https://www.vitrex.co.uk/products/lash-tile-levelling-system/ loads of similar systems -- u tube even has videos comparing different systems1 point
-
Or a small batten screwed to the floor for the tyres to touch when parked correctly.1 point
-
Gyproc Joint filler. Unfortunately you only seem able to buy it in large tubs. It takes ages to dry if you put it on too thick, so think several small layers with time to dry. When dry it sands beautifully to get a nice finish. Must be sanded dry with a very fine paper. Take a sharp stanley knife and go round the hole to cut the paper and taper the hole inwards (think countersinking it) so you don't have flappy paper edges to worry about, I have a large tub at present. If you bring a suitable air tight vessel you are welcome to a few scoops of that when I see you shortly.1 point
-
I have heard this done with a tennis ball / swingball.1 point
-
Look ! https://funlink.store/products/tile-leveling-system1 point
-
I used to have a spoon hanging up which just touched windscreen on drivers side when in far enough to shut door1 point
-
I will study the remake of the Dambusters for tips on optical parking guidance.1 point
-
Sounds a bit like you are thinking along the lines of the Walter Segal ??? principal ? Internal walls that you can move around as required. ie, Three smaller bedrooms that you can turn into Two larger rooms when you can finally get rid of one of the kids ??? Or am i missing the point? I've only been on the site for a couple of days, but welcome. The site makes great reading, and is much more interesting than the telly.1 point
-
You are correct about the length constraint. I just have to accept this is how things landed after a contentious planning cycle with 60 neighbour comments lodged on the original application. A Ford Focus is 4.4m long which suits current our requirements.1 point
-
Just fitted a 2440 clear opening size seems wide enough. Keep in mind I'd want to leave at least 600mm nibs internally so you don't kill the side storage on yours1 point
-
Ive lagged the lot. Not that expensive or time consuming so why not.1 point
-
Then you will need to get a roofing square and cut a 3ft bit of timber to suit your pitch. You will then be able to see where a plumb line from the outerskin meets the timber. That's your height. Or you leave it down and let the roofers do there bit and get the brickie back to put on what ever is needed before you felt and lath it.1 point
-
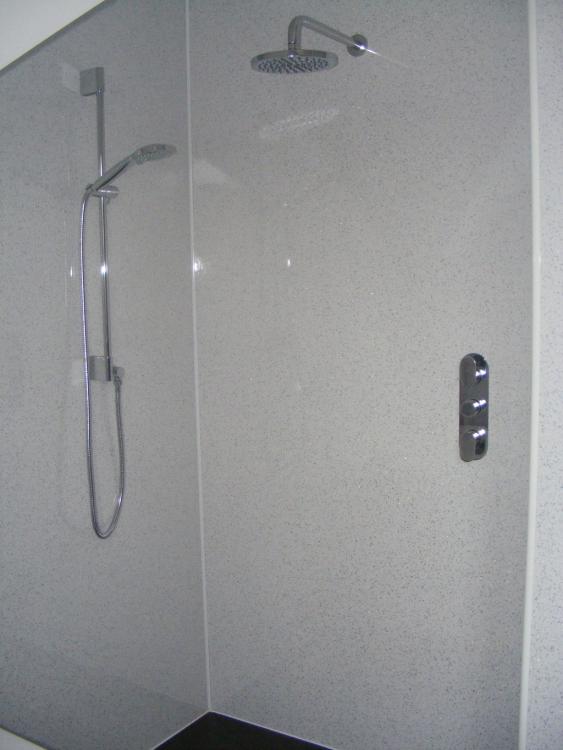
We've also used Multipanel boards. I first used them when refurbishing the bathroom/shower in our old house, well over 10 years ago now. We were so impressed with them that we've used them in both bathrooms in the new house. The bottom junction with the shower/bath is best done by ignoring the bloody awful trim/seal (which doesn't) that they recommend, as it works like a gutter to trap moisture at the bottom of the panel. Instead I packed the panels up above the shower with bits of 4mm to 5mm ply, then removed these packers once the panels were bonded tight to the wall. It was pretty easy to just run sealant in the gap to seal the lower edge properly. I chose to bond on (with sealant) a PVC trim at the bottom edge, just because I don't like cleaning sealant that goes mouldy. This covers up all the sealant and gives a wipe-clean surface, just like the panels themselves.
 1 point
 -
2.8m is a nice size and not hugely expensive. The issue becomes garage door lintels that start to get expensive above that size and also the twist you get with only small amounts of brickwork on a lintel flange.1 point
-
@bikerchris I would second the suggestion of a Willis heater paired with a UFH circuit. Ideally you would run that to provide the basic background level of heating required (which, if well insulated, shouldn't be much given you are planning something smaller than a standard double garage). Incidental gains from human activity, lighting, PC's etc would do the rest. You could of course just opt for plug in heaters but I think the UFH would give you a much better level of 'comfort'. Are you planning a WC and need hot water?1 point
-
Agreed. It s much better to watch those fights on the big screen downstairs ??1 point
-
I would second the wall board panels. They look great in my opinion, and no grout to either go Black, or leak. Used them on my Daughters last year.1 point
-
The floor is tanked (wet room) and the tanking goes a little way up the wall. The floor was then tiled. Then the wall board applied. Clear sealant (I used stixall) to seal the bottom edge, wiped clean so it does not protrude, then when that has dried a bead of white sealant as a decorative finish. I used the plain boards that have a vertical joint, as it happens there is only one such joint. Theu also do a version where the panels interlock to the next one making an invisible joint. About £100 per sheet from Jewsons They do sell an edge bead to seal the bottom joint but aparently it is very poor and leaves the bottom of the panel sitting in a channel of water. Avoid using that.1 point
-
No, I am a SunAMp man with central storage, 4 units, SunAmp is not designed as a point of use system but as a replacement for cylinders.1 point
-
A lot to be said for the panels plus you can get some that are tile effect.1 point
-
I will comment on the tiles. Don;t. Use a waterproof wall board such as Multipanel instead. No joints, no grout, totally waterproof.
 1 point
 -
Glad that’s not gone ahead, estuary mud flats are a critical habitat for many bird species and under massive threat globally already. There are better solutions out there that don’t devastate such habitats ?1 point
-
Ahem. DependEnt. (/pedent) . Since he has balls of steel, @Onoff will need three of those things. Let's hope he never has an accident with all those electromagnets in his shed.1 point
-
The toilet humour seems appropriate!1 point
-
Sorry mine was a typo meant to say dettol - bloody auto correct1 point
-
This thread brings up many interesting issues. We weren't in last winter, so the recent cold spell has been the first time that we have been able to test out the heating, check for cold draughts etc.I think we will need this winter to get things properly set up, maybe even another winter. It is almost impossible to do when it is warmer as you don't need much heating at all then. I went round the house looking for draughts when the temperature got below zero and it was windy. @Jude1234 seems to be in this boat. Unfortunately it sounds like a lot of the spec was done by the builder. They don't normally know much about this stuff. Clearly they are talking through a hole in their head. The slab won't still be heating up, the heating has been on for months. Heat rising upstairs will not make the ground floor cold and certainly not with the top floor also cold. I did consider an ASHP for my house, eventually I went with gas as it is as cheap or cheaper. One key consideration for me is that I was worried that the ASHP performs least well exactly when you need most heat, i.e. below 0 outside. Anyway the real issue seems to be the house is using more heat than expected. An ASHP will be fine if the heating load is as expected. Breaking down your 1300kwh a month electricity usage. Most families will use around 3-400 kwh a month of electricity before heating, especially in winter when it is darker. Your MVHR and UFH pumps could be using up to another 100kwh. So you are probably using around 800-900 kwh a month for heating and hot water. Assuming a conservative COP of 3 when it is cold, this means around 2500 kwh of heating load or 85kwh per day. I use roughly 3x this in a house almost 5x the size and I am disappointed at my current performance. So some suggestions- 1. Is the ASHP providing hot water also. What hot water temperature is set? If it is asked for too high a temperature is an immersion heater kicking in and using a lot of electricity? 2. MVHR - How aggressively is it running? Can you see what the temperature of the supply air is? I found that as commissioned our MVHR kicked up at 45% Relative Humidity. This had it running fast a lot of the time and changed the setting to 53%. I also set it to run on the lowest speed during the night. Below freezing outside, the supply air may be at around 15. Indeed if the house is too cold, the exhaust air won't be warm enough to heat up the supply air and it may be only 13-14C. If so, with no heating upstairs the MVHR will cool it to this temperature. I worry that unheated rooms and MVHR are a dangerous combination unless the house is very well insulated. 2. Draughts/Air tightness - This seems to be the big issue. Indeed I thought you weren't supposed to use MVHR if the air tightness is above 3. There are probably dozens of these leaks that can be cheaply fixed. As that air tightness level it is probably accounting for around half the heating cost. I have not had an airtightness test yet, but two weeks ago I went around finding leaks. When it is cold and windy outside you can feel them with your hand. I would go around the house feeling things such as the bottom edge of skirting boards, pipes through the walls, around doors and windows, sockets in outside walls. Basically anywhere that an air leak is likely. For example I knew that my french had not been sealed up along the bottom edges. They were lifted off the slab to be level with the floor. They have just put mastic and compriband on the outside, but there was still a draught. I have foamed under them and now they will have silicone seal along the inside edge. My front door is well insulated and triple sealed everywhere except the bottom edge. A little thin strip of draught excluder fixed this. I have steel beams in the roof with air tightness membrane. I have just discovered that the membrane has been stuck to the beam not around them and there is a two inch gap that I hadn't noticed underneath. 3. Check the loft. In my old house when we had work done someone moved the insulation around and left some areas doubled up and some with no insulation. Is it insulted as expected, 3-400mm of rockwool or 200mm of PIR. Again are there draughts below the insulation? 4. Floor finishes make a big difference to how the UFH works. Our double height hall with tiles still heats up faster than bedrooms with wooden floors. You have to fiddle a bit with the flow temperature to get a good balance between heating time and efficiency. But at the moment you will need more heat than your ASHP can supply.1 point
-
Yes it is, and can cause noise issues, I was involved with a project where noise from high pressure pumps were causing issues due to pump pressure pulsations propagating along long runs of hydraulic pipe work that ran through noise sensitive areas. Water is a pretty incompressible fluid and energy transfer though this medium is efficient. What the circulating pump is doing, is every time there is a fluid compression from the pump it gets sent down the fluid in the pipe. Say the pump has a operation speed of 1200 RPM (20 Hz) and 6 pumping element (lobes / vanes), it will create a 120 Hz pressure pulsation down the pipe and make the pipe and anything that its fixed to vibrate and create noise. In your ASHP, it seems that the circulating pump and system is creating large pressure pulses. So how to stop it? Try another circulating pump that creates a reduced magnitude of pressure pulses, as @ProDave seems to have found. Fit a hydraulic noise suppressor / pulsation dampener (though I doubt there there are any specific for ASHP's, as one looked at were in the 3000psi range) Make sure that the pipe work is not touching building elements, especially if they are lightweight (e.g. plasterboard). Use resilient pipe mounts. if sound is still propagating from the pipe, lag with a product such as Soundlag 4525C.1 point
-
You are confusing water vapour permeability with liquid water permeability. The membranes won't let liquid water through (in either direction) but they do allow water vapour through (in both directions).1 point
-
It depends on the local conditions, as water vapour migrates in to the cooler outer layers of the structure from outside when the outside air is warm and moist, and then migrates out again when the conditions reverse. This can be quite a dynamic process (hence my concerns about the validity of steady-state condensation risk analysis) as conditions can change very quickly over the course of a few hours. For example a wet night that soaks the outer surface and ground, followed by a sunny morning with little wind that then tends to create warm, high humidity conditions in any external ventilated cavity, may cause water vapour to migrate inwards towards the cooler layers on the outside of the structure (cooled by lower temperatures the previous night, perhaps). As the humidity outside drops, this water vapour should be able to move back out again before the outer layers of the structure cool again. The trick is to ensure two things; that water vapour doesn't condense inside the structure (as the phase change energy needed to get liquid water back to vapour is high), and to ensure that water vapour can always move outwards through the structure quickly enough through the day to deal with the dynamic changes in outside temperature and humidity.1 point
-
ROFL. I strongly suggest you wind your neck in a little there. Jeremy is just stating that concrete isn't always as perfect as you may like to think. Let's all play nicely shall we ?1 point
-
Yes, I did! I stupidly ignored the manufacturers installation instructions, as it was neater to fit 300mm full bore flexis. There was massive amount of noise transmission into the house, so I swapped them out for two 900mm full bore flexis arranged in a U shaped loop, as per the manufacturers instructions, and this completely removed the transmitted noise. I can't now tell when the ASHP is on unless I either go outside or look at the control panel.1 point


This leaderboard is set to London/GMT+01:00