
Leaderboard

.jpg.c21f3ac78c9b7efd90cbdcb312744dc5.thumb.jpg.7adcad4c0e384f5ecd7d56b0618df6e5.jpg)


Popular Content
Showing content with the highest reputation on 06/07/23 in all areas
-
I'll come at this from the practical installation / designer side. Start with the beam and block flooring. See manufacture's literature.. the beams tend to be bowed upwards as they are pre stressed concrete. That is your starting datum. The thin point is in the middle. beam and block floors are not flat! Next is the PIR. Often you find the PIR sheets have a bit of a bow.. they should be flatish but you get sheets that are definitly not when they turn up on site, but you are buying a small quantity as a one off.. so you lack clout to some extent.. you have two possible obvious choices.. have a barny with the PIR supplier or live with what you have... a barny will cost time on site, and you have to know your stuff about tolerances to be in a position to reject material. You need a bit of weight to bend the sheets back flat. Pipe congestion. There is software that you can use to lay out your UF pipes.. looks great.. but all the pipes coalesce as you near the boiler / manifold.. that is the bit where the softare falls down. Also you may have to get around structural components, things the SE / Architect / you are not keen on you altering. For me I would go for a 90mm to 100 mm screed. The cost lies not so much in the thickness but good preparation. Setting plenty level datums and so on and making sure you can get back in to polish the odd rough spot. Now you want an engineered wood floor. Have you looked at the warranty on this? The wood floor folk make it REALLY difficult to stick within the temparature range.. and that includes areas where there are conjested pipes. If you want to stick the rules re not eceeding surface temprature.. hard to do at times.. that little bit of congestion can drive the design if you want to comply with the flooring warranty. This leads to a thicker slab / screed to try and comply with the flooring warranty. Next is do you glue the flooring to the screed or float it? I've tried various options over the years tackling UF.. I'm kind of.. if you don't like my opinions.. I have others. At the moment I'm experimenting on my own house. I have floated an engineered floor on a 2.0mm foam layer on a structural 100 mm thick concrete slab with A142 mesh and some movement joints on PIR. Yes I know it is an insulating layer.. but I made the insulation under the floor a bit thicker.. so far been working great for the last three years. The big thing here is that the UF tends to go off in the summer. Funnily that is when the moisture content in the floor rises so swelling occurs in the timber flooring, sounds odd that the moisture content in a timber floor rises in the summer with UF! I decided to float as opposed to glue as I have one floor that is big but about half is over a timber suspended floor , the other over a slab / PIR. At the back of my mind is this. If something goes wrong if floated more easily fixed. Also one part is the kitchen area. If I get a flood maybe easier to fix than if fully glued. But another big thing for me is how I want to live. My wife (a buddingdesigner also) likes rugs (our spaces for example change from season to season) and the things that make a home a home.. for both of us. We have eye to the future.. we want to be able to sell the house to someone who may want to live differently from us. If you don't want a sterile environment .. be able to put down rugs, bean bags, large sofas that insulate the floor that act as an insulator then I have found that embedding the UF pipes in about 90-100 mm of concrete material provides room for pipe congestion, accounts for tolerances in the substrate below and distributes the heat more than a thinner screed / slab. We have a few rugs that insulate the floor but eventually the heat gets out.. yes I know not perfect.. but we have a house that is designed to be flexible and easily adapted... depending on our mood. My advise is .. go for a thicker screed as it will mitigate hot spots and make on site construction much easier. The game changes a lot if we are doing this at first floor level for example as we are adding weight to a structural floor spanning between say walls C.f a ground bearing slab arrangement. In terms of overall cost I think that a thicker screed distributes the heat more eavenly but the big thing is that it cuts all the trades folk /PIR / flooring supplier and even the SE a bit more slack and that will drive the cost down much more than say reducing the screed thickness. Ask builders to work to tighter tolerances costs a lot more than making say a screed a bit thicker for ground bearing UF applications. Compare the extra cost say between making the screed 30mm thicker.. 70 - up to100 mm . Now take a tradepersons rate ( a good one) at £250 - 300 per day. Work out how much extra time it will take the trades folk to work within a 70mm screed and for the flooring to work. Then compare with the extra cost 30mm of concrete. I think once you look at this holistically and talk to your builder you may find that the simple stupid thicker screed is the way to go. In summary if you are thinking about this sort of stuff and it's new to you then always think.. yes I can see that folk say on the internet that they can supply a thinner / stronger product.. but look at the knock on effect in terms of the other trades that have to work around that and how used to it they are. You local builder can be great value if you play to their strengths. Lastly if this is your forever home.. always think about.. what if there is water ingress, what if say in ten years time we want to lay tiles.. in the round you may regret not just putting in a thicker screed.. the extra concrete is not that much.. the cost lies in the preparation, the laying squad coming to site, the plumber having to get all the pipes so they have cover and so on. It's like baking some cakes (so I'm told).. sometimes heating the oven cost more than the ingredients.3 points
-
How odd. My missus was exactly the same. I had firm opinions on nearly every detail of the house (admittedly mainly what I didn't want rather than what I wanted!), but aesthetically I couldn't have cared less whether there was a bar there or not. The screen does wobble a bit if you catch it on the way out of the shower. Not ideal, but none of the three shower screens set up like this has broken yet.2 points
-
Round over bit, if you want full bullnose then it’s a 12.5mm radius. but I would probably go with a 10mm radius with guide bearing on the end to make life easier2 points
-
Good stuff Joe. Now get it done.2 points
-
IMHO it looks a bit tight. Think circulation space around your table, do people need to squeeze past the window or planter side when those chairs are occupied? I would add another 1m to the width.2 points
-
6 months is excessive2 points
-
So - Attempt #1 of trying to build my house failed - Made Ground (Poor soil bearing), a buyer who wouldn't grant me legal permission to access the mains water after I sold and changed their mind after I'd let go all the builders, and my planning permission extension was refused. Attempt #2: Re-Applied for Planning permission from scratch - preliminary decision due July, final decision August 2023. Place my house back on the market in the meantime somewhere between those two dates. Finally I need to find a solution for the poor soil / made ground. Today was that day! The Structural Engineer got the Ground Screw company to come onsite and put a 1.5 meter screw into the ground in 5 different places and do a pull test against each one. They each held over 4 tonnes of pull pressure which is good and the results will inform the Raft Design so I can get it priced. It was all done with hand tools with a motor assisting the Screw insertion / extraction running on 240v via an Extension lead. Then they put a tripod above the screw and a measurement device to determine the force trying to pull it out. Probably looking at 30 or so Ground Screws and a number of Screw Piles for point loads & using a laser level. Had a good chat with the team and they have 5 years of experience and have been to Holland where they source their system from. Due to the coastal conditions there they typically use 6 meter screws! Some soil conditions eat away at screws over time 30-40 microns per year which gives you 50 years guarantee on a 3mm thick screw to allow up to 1500 microns to be eroded. They had heard about some cheaper Chinese screws that were pulled after 3-4 months for a different reason and they had started to rust as their galvanisation was not thick enough. Very bad if that happens! The team do a lot of extensions, shipping containers and garden rooms but houses too. If the screw is exposed more than 500mm you need bracing - this can happen if the ground is sloped. The system should save on soil muck away and concrete costs hopefully. Cost wise I'm looking at @ 5K for the ground screws vs digging 2.2 meter strip foundations and muck away costs / concrete as the alternative. You can sit a foundation on top of the screws and this may mean you don't need a Radon barrier as there is airflow underneath? I'll go with whatever the Structural Engineer recommends though. Anyway, thought I'd have a big JCB onsite but this took about 4 hours with powered hand tools and gave me confidence in the system and the team behind it which helps. Educational Day all in all!!1 point
-
Hi everyone Just joined this forum although we were on self-build forums way back in the 1990s when we started our self-build on the outskirts of Brighton. We are now at the stage when all sorts of things need re-doing on the house, this time usually working with builders rather than entirely with our own hands as before. We were early adopters of all sorts of technology, and have learnt the hard way. We are on our second photovoltaic roof for example. We have some possibly quite obscure questions about heat pumps that we will ask separately. Graham was originally a carpenter many years ago, but most of his career was in teaching. Now both retired. Thanks to all who keep the forum going. Judith and Graham1 point
-
Fiver it does.... Ever tried to wipe with wet toilet roll🤔1 point
-
😁 water over floor water over toilet1 point
-
Door = good No door = (expletive deleted)ing water everywhere1 point
-
I agree with a lot of what you say and particularly the issue with a bias against A2A. Having said that self-install single a2a units are available for not a lot of money and to be honest if 1 or 2 is all you need, then its still going to be comparable with a gas boiler without the grant. This being the case I can see an argument for not subsidising them. Making gas more expensive is political suicide of course, which is why the Government wont do it. If it were smart, what it would do is not allow gas prices to drop from their current elevated level as much as they otherwise would do. A judiciously timed shift of the green taxes, which currently fall on electricity, to gas, would not be noticed in the general falling market price. But that requires rapid, intelligent action with a laser focus on the (purported) end objective. I'm not holding my breath!. Much of the current problem, in my humble opinion (based on lots of reading and 2 years of trying to get a sensible proposal out of 'the industry') is down to the grant harvesting industry and their partners in crime, MCS. The (almost) rigid rules imposed by the (almost) unavoidable requirement to have MCS certification (even if you don't want the grant) inhibit the innovation in installation practice which is needed to slash the total install costs and associated disruption. From the point of view of the grant harvesters this is OK - so long as they follow the 'painting by numbers' recipe they are protected from any claim even though the result may be total cr*p. Since many of them doubtless plan to go bust as soon as the grants dry up (as happened in the early days of solar), their reputation doesn't matter to them so long as they are protected from claims. A very small number of installers/specifiers seem to be emerging who are finding innovative ways to comply with MCS but at the same time deliver a cost effective and technically sane solution, however they are currently few and (literally far) between. Octopus are also challenging the model, but focussing it seems solely on a particular class of property.1 point
-
I recommend Mira Ascend shower enclosures. Very good quality1 point
-
For anyone who is wondering I have used LTP Forrex diluted 1/3 and it's has removed the stains within 2 hrs 👍👍👍🎉🎉🎉🎉1 point
-
I prefer to use language that infers death as the outcome to let her come to the conclusion. I find it has more of an impact as the ramifications slowly dawn on her. I'm just not a sledgehammer in the face kinda guy.1 point
-
just showed her a ceiling pole and she agrees that they don't look good. I showed her thinner bars and she's ok with them now. I also played the 'safety' card and we don't want screens wobbling or falling on the kids in the shower and she has agreed to use bars now! 👍 is that enough hair for you?1 point
-
https://www.drench.co.uk/p/harbour-frameless-10mm-wetroom-panel-pv We fitted these 2 small brackets on the wall and one across the top .1 point
-
sage words of wisdom as always. she is happy with ceiling support and I've found some screens that have optional vertical support to attach to ceiling so that might be an option. the research continues.....1 point
-
I'll check tonight and get back to you.1 point
-
Marsh Industries are delivered direct from the factory, on a trailer and the driver can manhandle it off, tho welcomes help. 4 of us then trundled it out of the way. Into the hole is by digger of course usss you ramp it down.1 point
-
I have 10mm thick screen 1200 wide and held with 2 clamps on the bottom and two on one vertical. Few weeks ago I ran into the bathroom, tripped and hit the glass very hard without bothering it1 point
-
Gripfil is pretty much instant unless you are holding a lot of weight, 30mins should be more than enough1 point
-
Yes. Lift floor boards. Drape a breather membrane between the joists, tape diligently to all walls. Fill with batt insulation. Airtight membrane over the top. Replace floorboards. Don't worry too much about getting extremely low U values. The windtightness (breather membrane) and Airtightness ( airtight membrane) will stop the bulk of the heat losses.
 1 point
 -
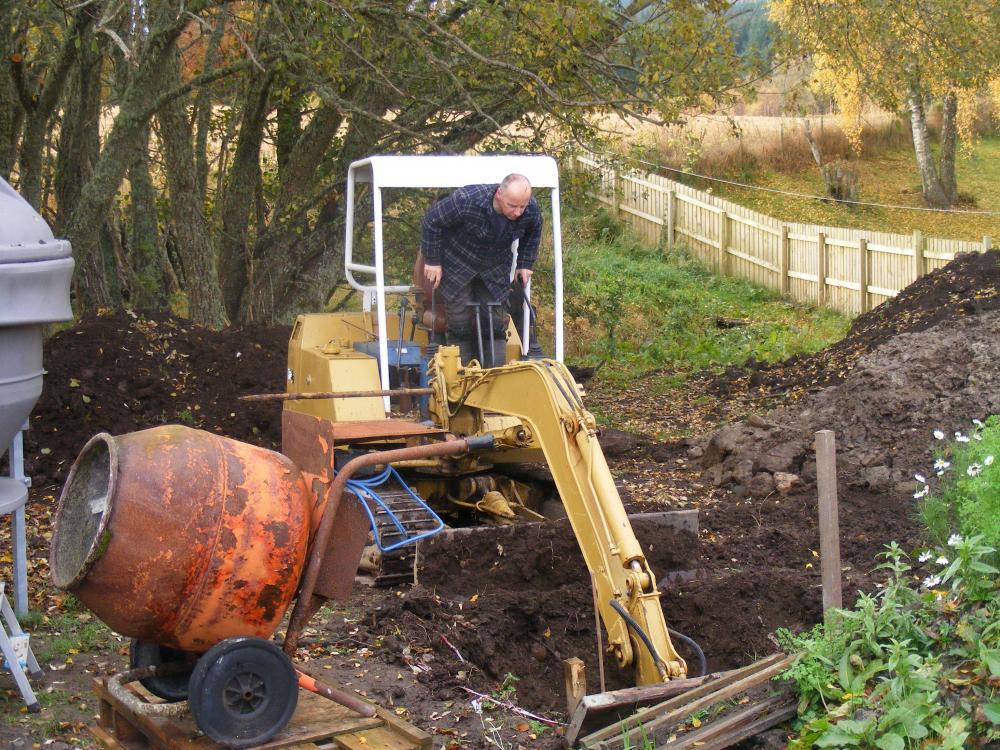
MY very old 3t digger was almost at full reach down digging the hole for the treatment plant. And when lifting the unit, it would not lift it very far off the ground.
 1 point
 -
You’ll be ok . You’ve got someone to blame …1 point
-
have discussed this with SWMBO and we both agree on the 1100mm former with the flat entrance area. only time will tell if we made the right choice!1 point
-
Most of these routers will have a 1/4" collet in the box - I think this one does, as well as a 6mm collet.1 point
-
That will do what you want and loads more.1 point
-
Yes, it's come about not through design but by accident really. The house is about 450-500 above the surrounding ground level, so I'm building the area up around it. The back at 3.5*13 was always going to be because it's where the back doors are, but is north westish facing so shadows and no sun in the evening. Was sat in the garden late evening last week with the bbq on and the sun beating down on the side of the house thinking might be nice to have a seating area there. We got to 5m because I've got some pipework and an inspection chamber on the way to the soon to be treatment plant and I thought I'd have that with the area as at ground level the pipework didn't have too much cover... Long way away yet though!1 point
-
I would have dug it down another 3 metres - but that’s me ….. 😎1 point
-
I'd encase the whole thing in lean mix concrete. 100mm type 1 on top isn't near enough.1 point
-
Right, thanks guys for your suggestions, finally found local builder to lay the slab( for a resonable price ), thanks to @Gus Potter for his suggestions (he is an S.E.), steel ordered and boarding for shuttering, hoping to lay in a couple of weeks (I work very slowly now I am ancient 🙄). On another note, i downsized the garage, I was being greedy and left it tight to park my car alongside it so now 6m long by 4m wide, big enough for my toys!., pics to follow.1 point
-
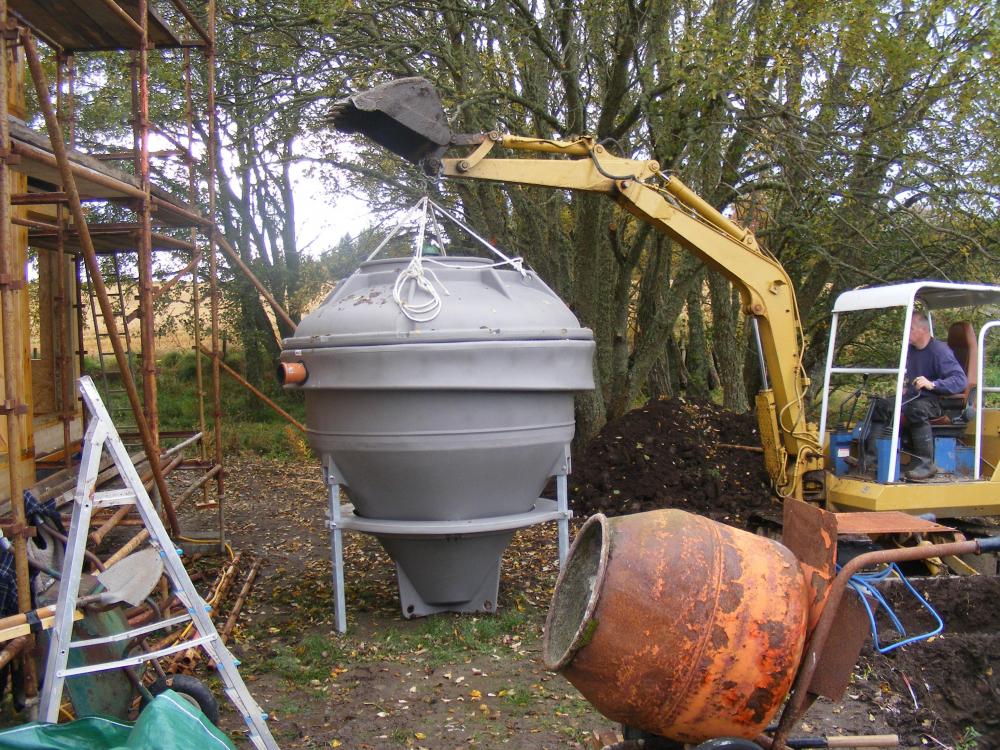
As others have said, a 5t would be best for the job. I got the Solido Smart 2-8 which came on a low trailer behind a van. Since the unit is round the driver just rolled it off the side, but doubt you have this option. I had a 3t for the digging as was in a tight space which would have made using a 5t tricky. The 3t just managed to dig the hole (2m x 3m and 2m deep), but was pretty close to the limit for depth. Also, as mentioned, the arm wasn't long enough to lift the unit much off the ground, so woudn't have been much use for offloading.1 point
-
When we were designing our house we were faffing around with room and spaces sizes. Our architect gave us som basic guidence for min spaces for different uses, we followed them and it's worked out brilliantly. The min comfortable width of a dining / socialising space with enough for circulation is 3.2m (1m table, 0.6 each side for chairs, 1m for circulation). You've got it bang on.1 point
-
Argh the concrete is due today and en route, mesh all being done now 😕 but actually the width is slightly more than 3.3m at 3.6m as the porcelain will be slightly overhanging than the soil end. It's not a metre more but it's almost a chair width more. I'm hoping it will be ok. We are going to make the other patio area slightly larger than originally planned so there is additional options here - the gazebo and extra space for table chairs at the side.1 point
-
Decision made - when the builders get here we are going to ask them to extend it by 1metre width and hope this will be doable. That should give us enough space to comfortably walk around the table. I think that extra metre will make all the difference and look more proportional. In fairness this is what we had marked initially (around 4.3m plus the planter not including the planters)!1 point
-
Agreed. 5 ton is the one to have. I did mine with a 3 ton digger and there were one or two moments in the job where things felt a bit too close to the limit.1 point
-
Hi @canalsiderenovation IMHO the patio size will be too narrow to have people comfortably around the table. I personally don't like the thought of a chair backing on to a window! .Would you design this inside - to have a chair backing on to a full height window? Even your soft sofa chair in the picture is further away. You could extend only the patio area for the table as a compremise? Good luck M1 point
-
5 ton machine lift it easy. 3 ton while being able to lift 250g no issue hasn't the reach to get it off the lorry.1 point
-
Was just going to say that, look's lovely. Bet the chook's love the freshly dug soil! In terms of patio, I'm going with about the same at the back of ours, so 3 - 3.5 * 13m and down the side where the evening sun hits, will be 5*10m.1 point
-
I installed a 12p Tricel Nova, the instructions were very specific, "the unit must be lifted of the lorry via 2 shackles connected to the eyebolts and sling of not less the x M long... So I bought shackles and slings ready for the big day. Unfortunately the unit arrived on a curtain sider on pallets so lifted it off with forks on the backhoe. All the preparation in the world only counts when you have full control of the process.1 point
-
Thanks for the very useful advice. I have looked at the old Google street views and the extension was done apparently around 11 years ago. It would still be covered by Building control though. I will dig holes at the weekend to check foundation details. The planning decision is due next week as well. Fingers crossed.1 point
-
A busy couple of weeks and favourable weather has seen some progress at The Windy Roost. When in use the word I, or we, I mean Mandy my wife, and me. So far that's the only labour on the build. Mandy has worked office based for 40 years before we moved here, so this is an all new world for her, and although she regularly tells me she's older than me, and she's needs a day off, I can't be more proud... It seems that the engineers really worry about the wind here, which is fair enough, but you would think no house has ever stood the test of time. The 40M perimeter of the house required 288 H10 starter bars, after installing the radon barrier inside the shuttering, I used some 8x2 timber, (that will later be used to frame the gables), and drilled lots of holes and feed the L bars though. These were spaced as per spec and to suit the poly steel blocks. Checking the dimensions, diagonals and rechecking this was all secured in place. The 8x2 timber made pouring the shuttering difficult. I made some pour boxes, but this had limited success, so ended up using the 7 ton 360 & bucket method, a Caithness speciality, and the bonus was the concrete truck driver is also a very skilled 360 operator, which speeded up the pour. I think Stuart now counts as the 3rd bit of labour on the build. Rebar work in progress. 4 cube of concrete and all dimensions still bang on. Next day stripping the 8x2 was to be honest, a pain in the ass. But a few hours later all the shuttering was removed and we were ready to install the radon barrier over the sub slab joining it to the previously installed barrier now under the footing. Sand blinded, and then added 20 ton of 40mm be to dust in preparation for the slab after the foundation block pour. Installing the poly block we loosely set all four corner blocks, leveled them using plastic folding wedges, and measured the lengths, widths, and diagonals. We strung string lines around the blocks to ensure the corner blocks were in line. We sprayed the footing with marker paint, and then marked the blocks in position onto the footing. Then one by one we set the blocks in position and fixed in place with fire rated expanding foam. Checking the level with a laser level and double check with a dumpy level. Next day we filled in between the corners, gluing the blocks in place and ensuring the blocks are straight level, again using the string lines and levels. We cut holes for drains, ducts, and sealed the gaps with foam. The poly steel block are t&g and also come with clips that lock the blocks together. Before we closed the sides we needed to feed in horizontal H10 rebar🙈. We tied the horizontal and starter bars together, and also tried the rebar to the metal grids in the blocks. To close the runs the blocks needed cutting, luckily our cuts didn't cross the metal firings in the block, so it was simply cut with a hot knife. Then glued (foamed) in place. These cuts were braced with 4x1 screwed into the metal firings with bay pole screws. Foundation course in place. Mandy starting to tie the bars, you can also see the clip between two blocks. Concrete day. 3 cube. Concrete pumps don't exist up here, I was quoted 2k to bring one up from Inverness. I fabricated two 1200mm OSB form boxes, which sat between the top of the ICF block and formed a funnel, and used the 360 and Stuart to pour the concrete into the forms. We had two pokers on the go and filled one funnel, and while the bucket was being re filled, vibrated and leveled the concrete, filling the forms alternatively, and moving the empty form along. Mandy was a demon and just got in with it. The whole 3 cube took one hour to place. So paid £15, waiting time and a drink for the 360 operator. It went really well. We cleaned up the top of the forms, then checked the walls. We didn't prop the forms before, and used the rebar to be sure it wasn't going anywhere. Inspection showed there was some movement especially in the areas where a I removed one side of the ICF for door ways. This was easily rectified with some timber wedged and screwed in place. About 15 props in total were required. I was really impressed with the strength and quality of the poly steel blocks, only slight issue is they do have a slight wave along the block, but screwing timber to the metal firings lessons this and over all after the pour the walls are straight. Next slab prep, drainage, and lots of insulation.1 point
-
Can't you just switch to economy 7, electrician to make a few changes to consumer unit - job done. British Gas offered me economy 7 the other week, so it's an available option. Your other options are ASHP, with big radiators run on weather compensation. Multi room a2a heat pump. Both multiple thousand pound options 'v' a couple of hundred for E7.1 point
-
Welcome. MVHR is ventilation. By definition the mass flow rate of the air in it is quite small. A few kilograms a minute. The specific heat capacity of air is also very low, 1 kJ/kg.K. There are 3,600 kJ in a kWh, or 10p worth of mains gas. So to get a meaningful rise in temperature, you either have to pump a lot of warm air in i.e. larger ducts, or have a high temperature (think a fan heater). So either noisy, or smelly.1 point
-
Hi and welcome. I would take the manufacturer blurb with a pinch of salt. If you base your ventilation rates on passivhaus then heating via the ventilation system is limited to 10W/m2, otherwise the dust in the air starts to give off a burning smell. So basically a really well designed and built house would be ok, but I wouldn't design a house with all my eggs in one manufacturers basket. If you embed UFH pipes, they cost very little and gives you somewhere to move to if things aren't quite what you expect.1 point
-
no I mean search for a property, so you drive past a house like the look of the work, find the drawing online and use that as a starting point for your drawing. like below http://planning.northamptonboroughcouncil.com/civica/Resource/Civica/Handler.ashx/doc/pagestream?DocNo=10971130&pdf=true&filename=Plans - M00521-100-01 Structural Plans %26 Details.pdf1 point
-
Myson ivector2. Reading the spec again it's unclear whether this offers above dew point cooling or not. I can't see a condensate drain so I think it probably does. Also I then its stelrad that offer a variation of a normal radiator with the fins cut along the middle so they can insert computer fans in a line. I have no idea of any of these work, they are all expensive.1 point
-
Yes, if the beasties are in the shower head then “hot” water in the tank won’t effect it, plus, who gets under a shower when the cold water is still flowing?, you wait till the “clean” hot water is flowing.1 point
-
When faced with an extortionate demand for an extension to our site insurance, I found a broker who went through exactly what sort of cover we really needed. As there was no more "building site" as such, no scaffolding and none of the outdoor risks normally associated with building (diggers, other plant moving around etc), and as the house and garage was secure and almost complete, they found an insurer who was prepared to provide unoccupied buildings cover that met our needs and was around 1/3rd the cost of a normal site policy. I took great delight in telling Buildstore to stuff it. Their fees are so extortionate that I'm surprised no one has come along to seriously undercut them, as they don't seem to add any more value than a good broker.1 point


This leaderboard is set to London/GMT+01:00