Leaderboard


Popular Content
Showing content with the highest reputation on 02/03/23 in all areas
-
why is everyone so obsessed with what's fashionable? are you building for them or for yourselves? choose a colour that YOU like and that works. don't worry about what 'fashion' dictates. the beauty of self-building is you can be as individualistic as you like (within the limits of the planning department of course!)2 points
-
4.94 x 2.925 with a 2 x 1 m lantern in the middle £10502 points
-
Better to flush salt into the sewer than all the extra cleaning products that would be needed to clean off the limescale… At least that is what a salesman would say.1 point
-
For belt and braces I put two seal img rings on any join (I only had the beginnings and ends). Almost certainly not necessary but for pennies per seal I figured why not.1 point
-
Just an FYI vouchers don’t have to be issued prior to work commencing the guide states this at point 100: “Installers can make voucher applications retrospectively after the installation has commissioned, but they will still need to apply for a voucher before they can redeem it.” I think this is how our installer is doing it.1 point
-
The way it works behind the scenes is that a "voucher" is generated prior to the install, and redeemed once the install is completed - as long as it's completed to standard. The voucher has a limited valiidity period and must be redeemed within that. https://www.ofgem.gov.uk/sites/default/files/2022-11/FINAL Installer guidance V2_0.pdf has the full deets - section 5 for vouchers. Self-builds don't need to submit an EPC, per figure 3. Companies vary on whether they want the full amount upfront or not, and it seems to vary based on circumstances with a single company as well. At one, I was asked to pay upfront and get the 5K back as a refund; a friend who got a quote from the same company was assured he'd only pay the net amount. The main difference between the two was that I was paying outright and he was looking at their finance. Definitely cheaper to buy and fit one yourself, but the degree of rip-off varies considerably among MCS installers. I had quotes (before taking BUS into account) ranging from 12K to 21K (including full install, new UVC, and replacing 4? radiators), bless 'em. Permitted development requires MCS install, but I suppose that's not really an issue if you're self-building.1 point
-
Hi, I’ve got a grant aerona3 10kw on my garage roof. It’s actually bolted to the house on an air conditioning bracket off eBay. I can hear it when’s it’s freezing cold outside and it’s doing hot water in my son’s room but I just leave it in quiet mode seems to do the trick. I have the older generation of aerona3 not the r32 which are supposed to be more quiet.1 point
-
pretty much but obviously not the header/lintel as its structural. depending on the frame of course but as much as you can inside the now insulated box. wouldn't worry about extending the lintel for a single brick as its still sitting on 2 more personally but you can if you want.1 point
-
It would be nice if they inverter provided a set of contacts to signal when the batteries were full and then a relay could be used for the iboost.1 point
-
Spoke to my plumber (who is very thorough in everything he does). Never used sand and cement. It used to be tile adhesive but now it’s the cheapest mastic on the shelf (No nails, silicone or even caulk). It’s just a bed to prevent concentrated loading1 point
-
You'll have a job on getting the pipe plus rubber seal into the fitting, which will show just how well they seal. Shouldn't be any need for anything else. Make sure you clip the retaining ring into the fitting too. No need for duct wrap tape around the semi rigid stuff. As long as its decent quality kit, it should perform as designed with no worries.1 point
-
Thanks. Turned them around and they work perfectly without any leaks.1 point
-
Thickness depends on support spacing, and what you want to use it for but if for walking on and storage I would be using caberdeck or OSB.1 point
-
@patp A few pointers for you. UKPN are unlikely to be interested in how many panels or the panels output youve got. What they are interested in is what your inverter can export onto the grid and thats not necessarily the capacity of your panels. Without getting permission you can export 3.68kw per phase so with your 3 phase inverter youre limited to 11kw, unless you have permission to export more. If you already have an 11kw inverter and its being replaced with a bigger one, you need permission from UKPN. If youre not bothered about that its fine, but the concern could be that your questionable installation company maybe steaming ahead with something that is technically illegal. If thats what they are doing then you might want to consider their credentials. Maybe worth finding out what they're up to as ultimately its your responsibility.1 point
-
Just an update and close to this if anyone else finds they are in the same boat. I purchased an endoscope from AMZN and used it to view the inside of the ducting but I could see no breaks in the ducting. I cut a hole in the plasterboard ceiling and stuck my head up to have a look. About 4 feet from where I cut I could see a "junction box" where the supply spilt off into 4 different ducts. The bottom of this junction box had been dislodged and the air wasnt going anywhere. I had to cut a second hole to access and glue the bottom lid back on. In the picture the 2 pieces of timber are holding the lid up to let the glue dry after repair. I will also use airtight tape as a backup to the ducting glue. This job was a right pain in the ass to locate fix and repair the ceiling. I did it myself but Im sure it would have cost a good bit if I had to call in an expert. The crowd that put in the ducting weren't great and in the end all we had them do was the ducting. I did a diy on the purchase and installation of the actual MVHR and vents, which turned out to be a good decision based on this junction box failing only 2 years of use by shoddy workmanship. Hopefully this can help someone if they run into the same problem.
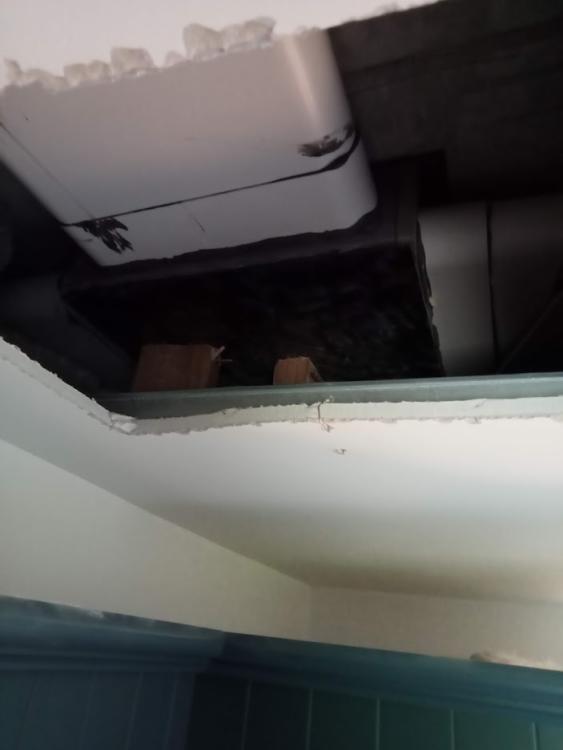 1 point
 -
That is fair. It hasn't been capped, just got a mesh covering on it. It definitely had prior evidence of mortar erosion as I could see it from the stone when I looked up, and there was a ton of dust that needed to be shovelled and bagged up before laying down the blocks, even if it was bone dry (and still dry during the periods of rain while doing all this we had). Will leave it at the 6 holes drilled then.1 point
-
great thanks, so much useful info Yes I do have the regular manual - only query was the existence of something else that would, for example, have explained that putting the fan mode into Low Speed would have an impact on the temp setpoints as this is not logical (to me at least) Have changed fan mode to Day and brought down the heating set point and increased the overshoot as suggested. Essentially the blending valves won't be doing much unless there's an issue with the ashp overheating the buffer With the buffer tank and my smallest zone being 35m then I don't think we have a high probability for any short-cycle issue but not sure how to easily monitor that aside from watching what happens on the app for a while1 point
-
I mustn't raise false hopes: but I wish I had a quid for every time I've heard or read that. Given the pre-app advice, you've got little to worry about. Someone somewhere has an axe to grind, and they're doing it because they can do so but hide from scrutiny. That said, a great deal depends on the micropolitics of the Planning Department . Have a read of this .... The second paragraph bears committing to memory Vintage Martin Goodhall. Shame he's retired now. I'm not saying that this is - for sure - happening in your case, but what I am saying is that the planning system is so unprofessionally run that there's always a significant element of chance in any application. Here is one of his gems: 30 minutes fire-side reading for all who want to submit a planning application. Top advice from @Dave Jones , but read it in context of what Martin Goodhall says above: beware micropolitics1 point
-
a decent planning specialist will know exactly what to do, sometimes they word it ready for the appeal from the get go. Sounds positive that the planning droid says its ok that means it meets the planning requirements that the council has set. Very good news for you when it comes to appeal. downside is all this burns a lot of time. Have you got your own councillor on the case ? Get the deadhead on the job finding out what the problem is, if it comes to a vote you want your member to vote for it.1 point
-
Thanks everyone for the feedback & comments, very helpful indeed! We haven't actually bought any vehicle chargers, but all the cabling has been installed. We have 4 x cabled in for, with 1 x cable future proofing a battery but using same high gauge cable. Certainly wouldn't say builder or electrician are forcing our hands here, but we are guilty of massive scope creep/future proofing which has come back to force our hands. The only other area we got carried away was Insulation (!) but with the electrics. Even without the Car chargers & patio haters I think we are too far gone for single phase. Its a large bungalow with 6 bedrooms, 2 studies then the normal assortment of rooms. We also have an existing single garage & new external garage that are wired in, then 3 x large external AC units. The Electrician gave me a verbal run down of this and we quickly blew through 80amps. Waiting for pricing from DNO which worries me (ben chasing them daily), and also further feedback from Builder/Electrician on what could be done to bring us down to 80 - 100amp loads. Ill keep the thread updated!1 point
-
A few questions 1.Do you have any cross section sketches of the building? Showing the DPC etc. as built. Maybe some pics of the wall where it meets the base inside and outside. 2.Where does the ground level sit in relation to the rest of the building? 3.Is this going to be inspected be a building control inspector? 4.Have you any insulation in the slab? 5.How much head room have you allowed for internally? 6. Are you limited by the ridge height?1 point
-
This is a symptom of the UFH being too hot so the room is warming too quickly, and the excess heat in the slab continues warming the room. If you have reached they physical stop on the blending valve and it won't go any lower, try removing the knob and seeing if the splined shaft will rotate a little more beyond what the stop (usually part of the knob mechanism) will allow to get the temperature lower.1 point
-
Another option Adam that I've considered is to add a delay timer into the thermostat circuits. These are the kind of things that keep a bathroom fan running when you've turned off the light. Although we've mostly overcome the cycling caused by the thermostats turning on and off too much/quickly with the way we're scheduling them if we had a delay time in the circuit, then it would prevent the call for heat being switched off by the thermostat after a few minutes. For your situation, you could maybe lower the target temperature and make sure with the delay that the ASHP runs for at least say 30 minutes. So ensuring the HP runs more efficiently. Simon1 point
-
It might, but it's well within the maximum load spec if I use the back to back channel so unlikely. If it does then an additional foot resting on the deck might be necessary, but it seems unlikely. Indeed. Ironically it might be safer _not_ to provide a balustrade and just ensure one of the many removable balustrade systems can be used. PD specs require at least 1m between unit and edge of flat roof, presumably for this reason. Heat pumps on flat roofs, or high up on walls, are pretty much the norm in the commercial world (just wander down the back of your local high street/industrial estate. The ones high up on walls in particular seem precarious, yet somehow they manage.1 point
-
Thanks all - I got this oer last night, 100% guided by advice here - every day english and covers the areas in the templates suggested, all in 3/4 of a page, emailed last night. TY1 point
-
Dryfix foam and something like Rawl multiplugs every 4-600mm will be fine.1 point
-
WHEN they stop burning mostly imported wood on an industrial scale at DRAX and telling us it is carbon neutral and green, then I might, just might, start thinking about my own use of a small wood burning stove occasionally in the middle of nowhere.1 point
-
*Sigh* No, with a polyphase smart meter, it will net across phases so export on one will reduce the metered import on another phase. Does the smart meter have a indoor display of real time usage? This would be the quickest way to confirm what's going on. If it doesn't, maybe it's not a smart meter at all. Maybe share a photo of the meter.1 point
-
@Andehh thinking about it a bit more and assuming your 3 car chargers are ~7kW each rather than 22 (and given I think you said you've already bought them): If going 3ph now isn't feasible, another short-term option might be to fit a manual 3-way changeover switch beside the consumer unit - something like this https://uk.rs-online.com/web/p/cam-switches/2937156 in a suitable enclosure, or may be possible to find IP rated ones, that was just a quick Google. Then take a single supply from the CU to that switch, then your separate supplies from the switch to each charger. Fit a 3-phase-ready CU with two spare ways. That would guarantee the total load on that circuit could only ever be a single charger but allow your current electrician to commission & certify all 3 - avoiding any issues about asking a later electrician to certify a concealed supply cable that was installed by someone else but left dormant. Then in future when you actually have any EVs to charge you have options: * Upgrade the supply to 3ph and take charger 2&3 to the spare ways on the CU, removing the switch. So basically what you'd otherwise do now, but later. * Leave the supply as 1ph and fit some as-yet-to-be-determined smart tech to balance demand across the three chargers instead of the manual switch. * keep the manual switch till you figure out something better, you'll still have to turn it at some point in the evening but at least you don't have to go out in the rain to unplug & replug each car 🤣1 point
-
If were me and I am no electrician Budget stretched 3x car chargers, you don't have a car requiring charging, pre run cable, both ends not connected. Outside end in a small waterproof box - all ready for later installation. Outside garden stuff, same as above. Ditch patio heaters as a waste of good electric Find out why a new build needs a 12kW ASHP - use all the money you save on the above fantasies on decent insulation and air tight measures, so are installing a sensible ASHP. No 3 phase required, to run a single phase house!1 point
-
We are at the end of our 350m2 build and we went for 3 phase.. it was a touch expensive at an initial quote of 5.6k from UK power networks but apparently this was before they realised the buried supply was much closer than they expected and we got a refund of 2k plus.. I grew up in a developing country where the housing stock is much “younger” than the UK housing stock and three phase was/is standard for average homes so that was my natural preference I guess but also wanted to have the facility for a 22kW EV charger in future and I had a pretty demanding lighting plan, plus similar to @Andehh 12kW Heat pump etc The actual 3 phase install wasn’t too bad ( done in a day ) but before they realised the supply was outside our property, they had put flyers through the neighbours’ letter boxes warning of road closure and road digging etc Add this to your building noise and building traffic and peed off neighbour x multiples is guaranteed. Getting British gas to install our 3 Phase meter was a little tricky..delays of 3 weeks. They did not fit a smart meter so still waiting to see if I can get the SMETS2 3 phase smart meter. This matters especially if you have solar panels and plan to take advantage of some of the more interesting energy tariffs from providers like Octopus etc ..You can buy the smart three phase meters but not sure how that works in terms of responsibility etc.. 3 phase electricity means Heat pump is three phase, Hybrid inverter for Solar array is three phase, if we decided to go for battery storage ..it would be 3phase ..The inverter was really difficult to obtain I was led to believe due to scarcity but maybe better availability in the winter?. That said I am still really pleased that we went for it but it was a rather convoluted process. Unconnected to this .I have had to contact UK Power networks for some electrical upgrade work at a different location and they do seem really keen on pushing the 3 phase electric upgrade ( they called it their preferred option) but because it is a busy fully functional location..the potential disruption means I went for a 100 amp fuse upgrade only . I think there is a big push to upgrade more sites to three phase as well as smart metering with a view to future proofing the functionality of the power grid as we move forward and so the cost of the three phase upgrade may well be subsidised in the near future . Also I’m reliably informed that due to power grid constraints..having a fast ev charger doesn’t necessarily always mean a “fast” charge…..1 point
-
We went with RAL 9006 White Aluminium and love it. Grey is yesterday.1 point
-
The mould spores penetrate the plaster surface to the extent that even bleach cleaning may not eradicate it entirely. It then regrows when fed with damp. Which is why it comes back if just painted over with ordinary emulsion which remains vapour permeable. Vinyl emulsion is better at sealing the surface but the Zinsser products are far better. There's two applicable products: Zinsser 123 which is what @Temp has used as a base coat, or Zinsser BIN which is has a shellac base. This one is the harder to apply but gives an impenetrable coat if the mould has really got a hold. You're probably going to find Zinsser 123 base coat and Perma-White the best option if the mould isn't too bad. A wipe down with a mild bleach mould removing cleaning agent to begin with followed by base then top coat.1 point
-
Prompted by @haddock's query here: and my few charts to show what has happened in my house, I have finally got all my data together and after looking at dozens of charts, have reduced it to two that show the most useful information about my house cooling, or heating. Initially thinking that the difference between internal and external temperatures was the best base to chart against, I soon realised that it shows hard to understand results i.e. a larger number, the colder it is. Then it struck me that as I was looking at the slope of the data points for °C/hour change in internal temperature, temperature difference was built in i.e. colder outside, the faster the house cools. Real scientists would be talking about 'energy forcing' which cover all energy inputs because of the Conservation of Energy: Energy cannot be created, only change its form. But enough of that, the rest is statistics. Without going into too much detail about data error checking, rounding and discarding data, the data points for the last 4 years were reduced to about 500,000 from about 300,000,000. Or basically data collected every 6 seconds reduced to data for every hour. The data eventually used was Year, Month, Hour, External Temperature, Internal Temperature, Power and Zero Power. Other fields were created i.e. Week Number and Maximum Power, but these remain unused at the moment. From that data it was quite easy to create hourly temperature slopes [°C/h], just take the last hours temperature away from the current hours temperature. If it is positive, it has got warmer, negative, colder. Power data was averaged (mean) over each hour. If there was an error because of missing data, or misreported data, then that was filtered out and will show up in a lower data point count but can be corrected with the Standard Error of the Mean. This left 139,165 usable data point out of 140,268, not perfect, but quite usable. There was one other set of derived data that was discarded, and this was extreme temperature slope values. Generally, the majority of the data points for the temperature slope was between -0.4°C/h and 0.4°C/h. Occasionally a slope that was into the major integers appeared. Now it is very possible to get cooling of 2°C/hour by leaving the window open, similarly a large increase in room temperature could be caused by letting a cake cool under the temperature data collector (I actually did this and wondered why the room temperature was reported as 27°C, in November). This data was therefore filtered to exclude anything outside of the range of >=-0.5°C/h and <=0.5°C/h. Again, this can be justified as the Sample Count and the Standard Error can be used to adjust the results. Other descriptive statistics were used to help explain what is happening. Minimums, Maximums, Standard Deviation, Skew and Slope were calculated on the relevant data ranges. External Temperature Distribution, as a percentage, was calculated as a Normal Distribution as well as empirically from the data. This was done as a data check but also highlights the variations in the temperatures and the associated skew i.e. long tail to the left [negative skew], the modelled data shows no skew. Now that the dull bit is over, some charts. The first chart is all months and all hours for the years 2019, 2020, 2021 and 2022. As expected, the mean slope, the actual change in rate of the house warming up and cooling down, is very close to 0°C/h. It also shows that at very low external temperatures, the house cools faster i.e. -0.3°C/hour when it is -3°C outside. Around the mean external temperature of 12°C there is house cooling of -0.06°C/h, which is basically no change. The house does not start to warm up, until the external temperature is 23°C, but as the Temperature Distributions show, that does not happen very often down here in Cornwall, less than 1% of the time after rounding. This does not mean that the house does not get hot, at one stage, it was at 29.43°C, a proper temperature and one I can easily get used. Taking the internal temperature standard deviation into account, 90% of the time, the house temperature is 20°C ±4°C. Lower temperatures were probably when I was away, higher temperatures were probably during the two severe heat warnings we have had down here. Power usage, which is a bit peculiar in a house with storage heaters, often show a warmer temperature in the mornings and it being cooler in the evenings. As the data can be filtered by hour, the next three charts will show all times over the last four years, then after the heating has finished during the first two months of the year, up to near enough local noon, then local 14:00 to 19:00. The x-axis is Internal Temperature Slope, the °C/h. The above chart shows that as the internal temperature change reduces, less overall energy is needed to keep the house a a stable temperature. This is backed up by the times the house is using Zero Energy. The Zero Power outlier on the left corresponds with an almost zero energy usage, and a greater temperature drop of just over -0.3°C/h, so the house was probably empty then. The 7AM up to 1PM [6 hours] chart during January and February which are known heating months. This shows a very different picture. The mean power is now 0.1 kW [100W], down from 0.5 kW [500W] because there is no heating input, but the house is hardly changing in temperature with most of the data points clustered between -0.02 to 0.05°C/h. The outliers on the right are probably oven usage. The 2PM to 7PM [6 hours] chart for the same period. As the storage heaters have now not been recharged for at least 8 Hours and up to 14 hours, it is unsurprising that the house is starting to cool a bit more, with the energy inputs stretched out a bit more between -0.28 to 0.2°C/h, clustering between -0.18 to 0.07°C/h. This is highlighted better on the next two charts which cover the same time periods. 7AM to 1PM [6 hours] chart. As the temperature slope is negative, it shows that the house is cooling at a rate of -0.003°C/h, which is basically stable and shows that the storage heaters are keeping the place warm, 19.8°C, with a greater warming affect the colder the outside temperature is. The 2PM to 7PM [6 hours] chart As mentioned above, because the storage heaters have not been charged up for many hours [between 8 and 14 hours], it is not a surprise that the house is cooling. What is a surprise is that the relative cooling is so low at 0.015°C/h. Part of this will be because the internal temperature has risen slightly to 20°C [my target temperature]. Allowing for the increase in the Standard Deviation of 1.32°C, up from 1.29°C in the morning, there is, in reality, no temperature change, and certainty not one that is noticeable. Now that is all over, I am going to show four charts that highlight what adding secondary glazing and fixing the leaky back door have done. These are for December. The first two are the temperature slope, second two are the power usage. December 2019, 2020, 2021 Temperature Slope chart. December 2022 Temperature Slope chart. Pre improvements was cooler in the house even though the mean external temperature was 8.3°C as opposed to 5.8°C in December 2022. The range of temperatures where much greater as well in December 2022. December 2019, 2020, 2021 Power Usage chart. December 2022 Power Usage chart. Mean power is now 0.85 kW, down from 1.28kW, a reduction of 0.43 kW or 320 kWh for the month. The slope, on these power charts, shows the change in power needed for every °C change in external temperature. That has gone from 100W/°C to 60W/°C. Airtightness and insulation really work, and I am still getting the benefit of those improvements.1 point
-
@LucyJane
 1 point
 -
Hi, yes they are the wrong way, made to open outwards. Drain holes in bottom of frame will be draining water inside1 point
-
Forgot to mention this before, but one solution is to wrap the stub in a couple of layers of foam roughly at the height of where the concrete slab will finish. That way you can pull out the foam, trim the stub and get a coupler to sit nicely into the slab in the gap created by the foam. I was connecting my stacks up the other day and this worked almost perfectly. I got the foam out, no need to chisel any concrete and the 15 ish mm gap created by the foam was just right for a coupler to push into. My mistake was to be too high with the foam on the pipe, I was only an inch into the concrete when I pulled it out, it was enough but if id placed the foam a little lower I could have had a good two inches space to play with. @SuperJohnG may be an option when setting your pipes in. It saves the headache of getting the socket to the exact height it needs to be.1 point
-
Great advert .. 2400x1200 (8’x2’) 🤯0 points
-
OK, in context, that actually looks pretty good to me. This is all very subjective of course. But I think you know what I was referring to with flat warm roofs. Your design is strongly influenced by set of cubic modules so the higher elevations lend to this goal. All this talk of aesthetics isn't helping your original question about construction method though!0 points
-
Guy Fawkes? That's a GB celebration. Nobody in Northern Ireland has ever heard of him.0 points