Leaderboard


Popular Content
Showing content with the highest reputation on 10/04/21 in all areas
-
It goes in on Thursday. I have been worried will it be cancelled if my provider goes out of business but I’m ok so far.2 points
-
Because DPC should be at least 150mm above ground level & the assumption is made that your entrance will be a ‘level threshold’ (level-ish with your internal finished floor level to allow wheelchair access) and therefore a secondary DPC is required in this zone to prevent rainwater splash up saturating the superstructure wall. This secondary dpc should extend the specified distance past the raised ground level & then step down to lap into the lower dpc.2 points
-
Insane, very draughty2 points
-
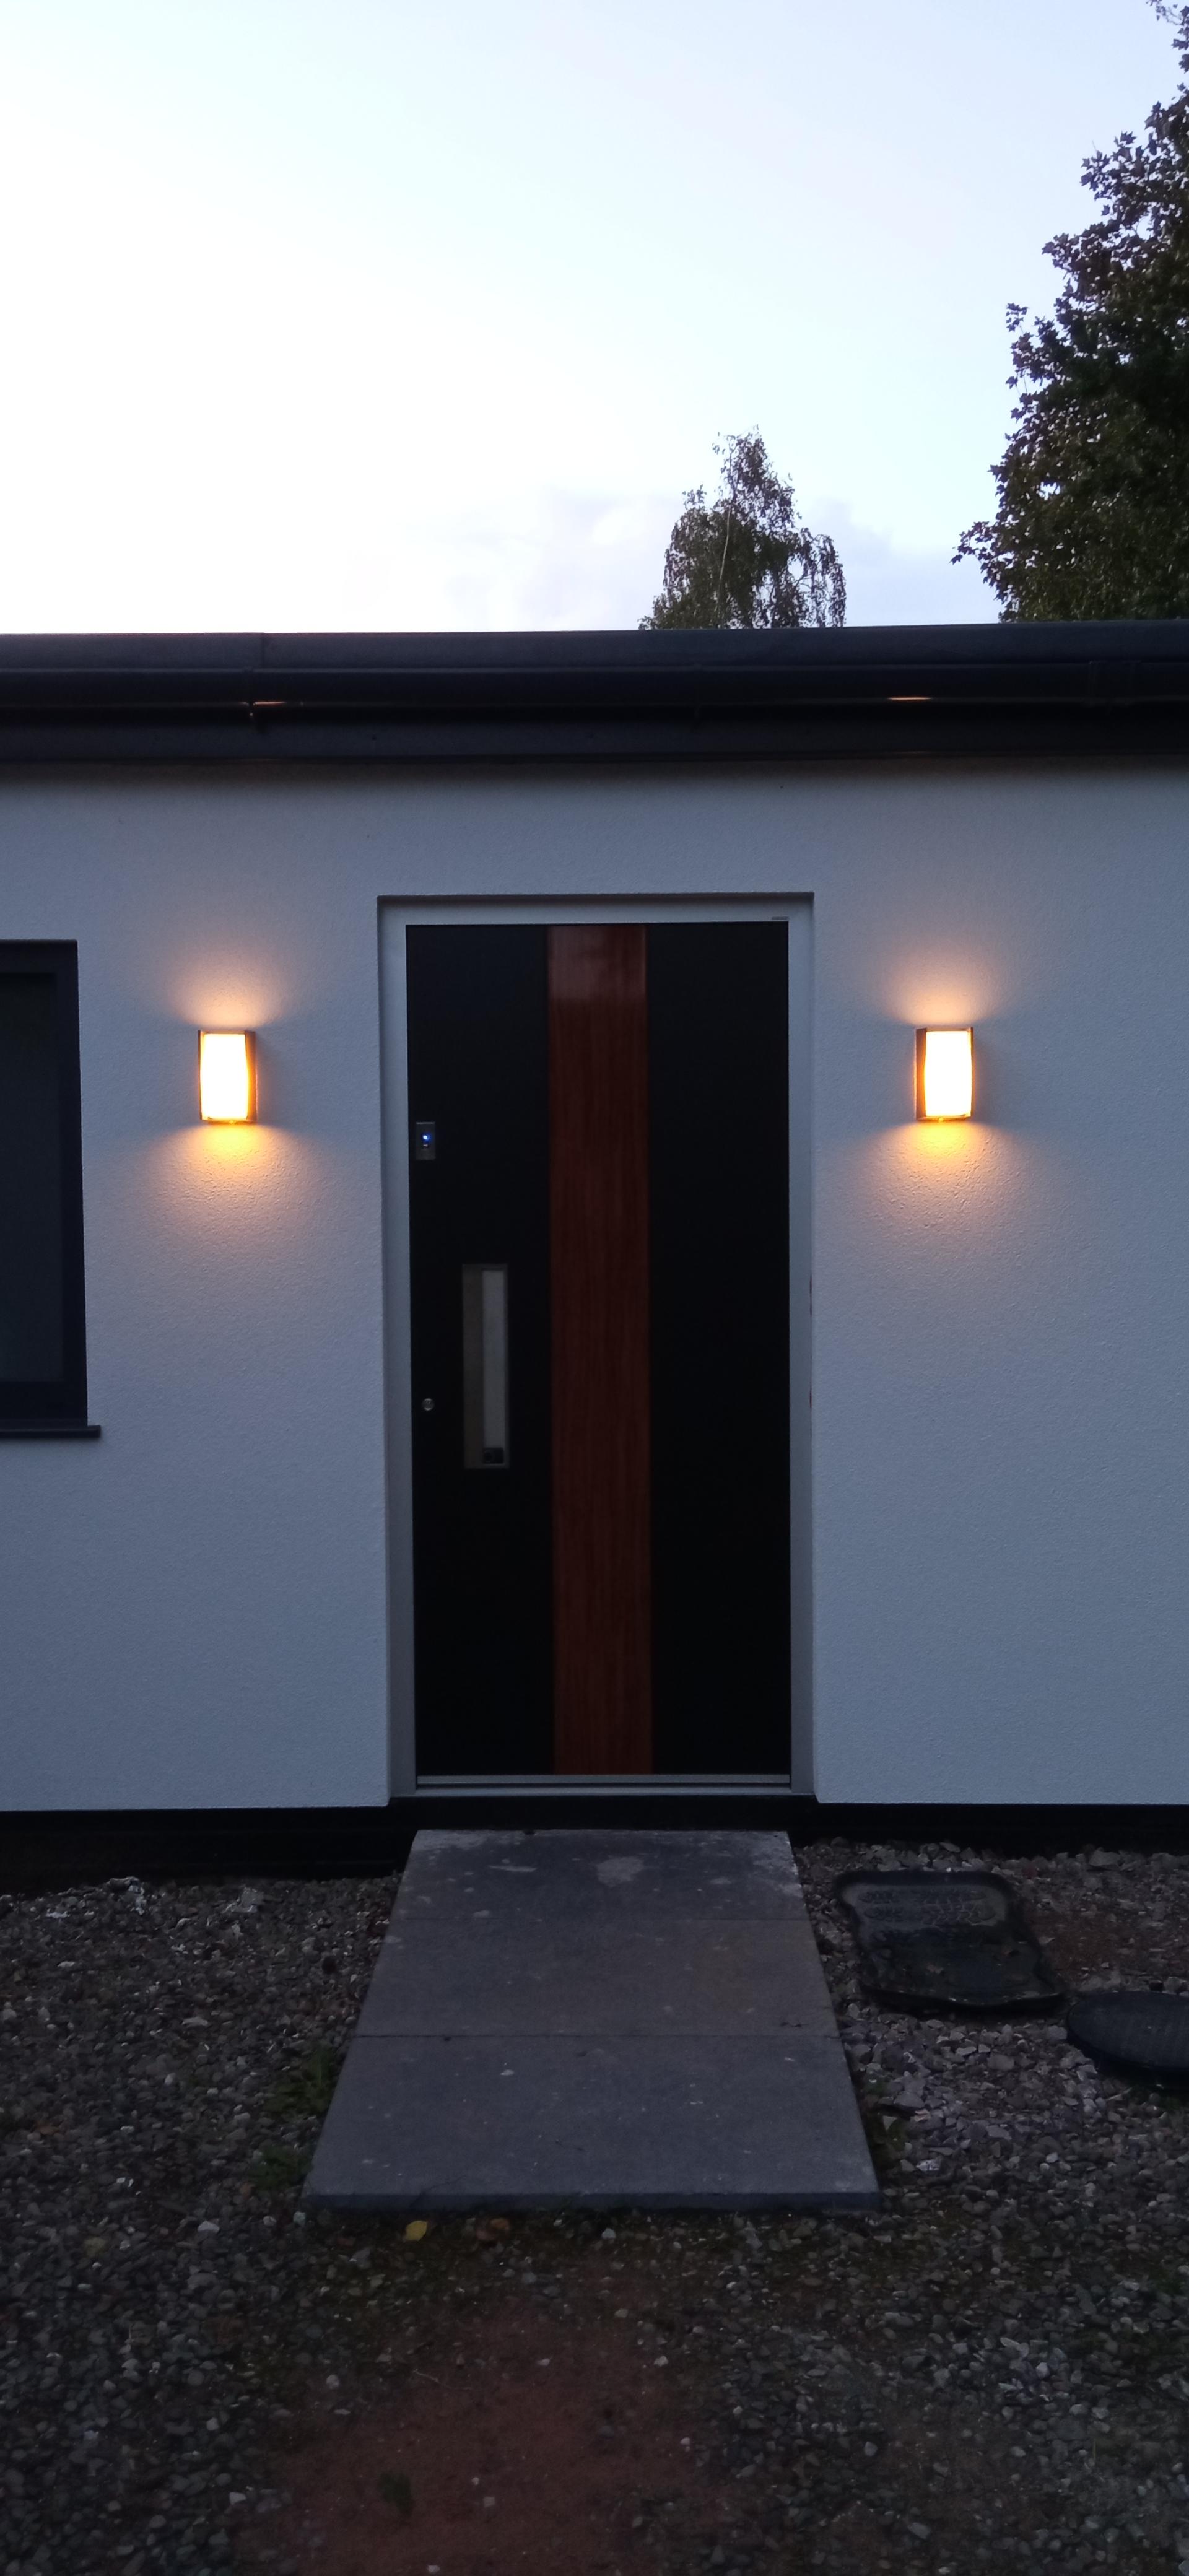
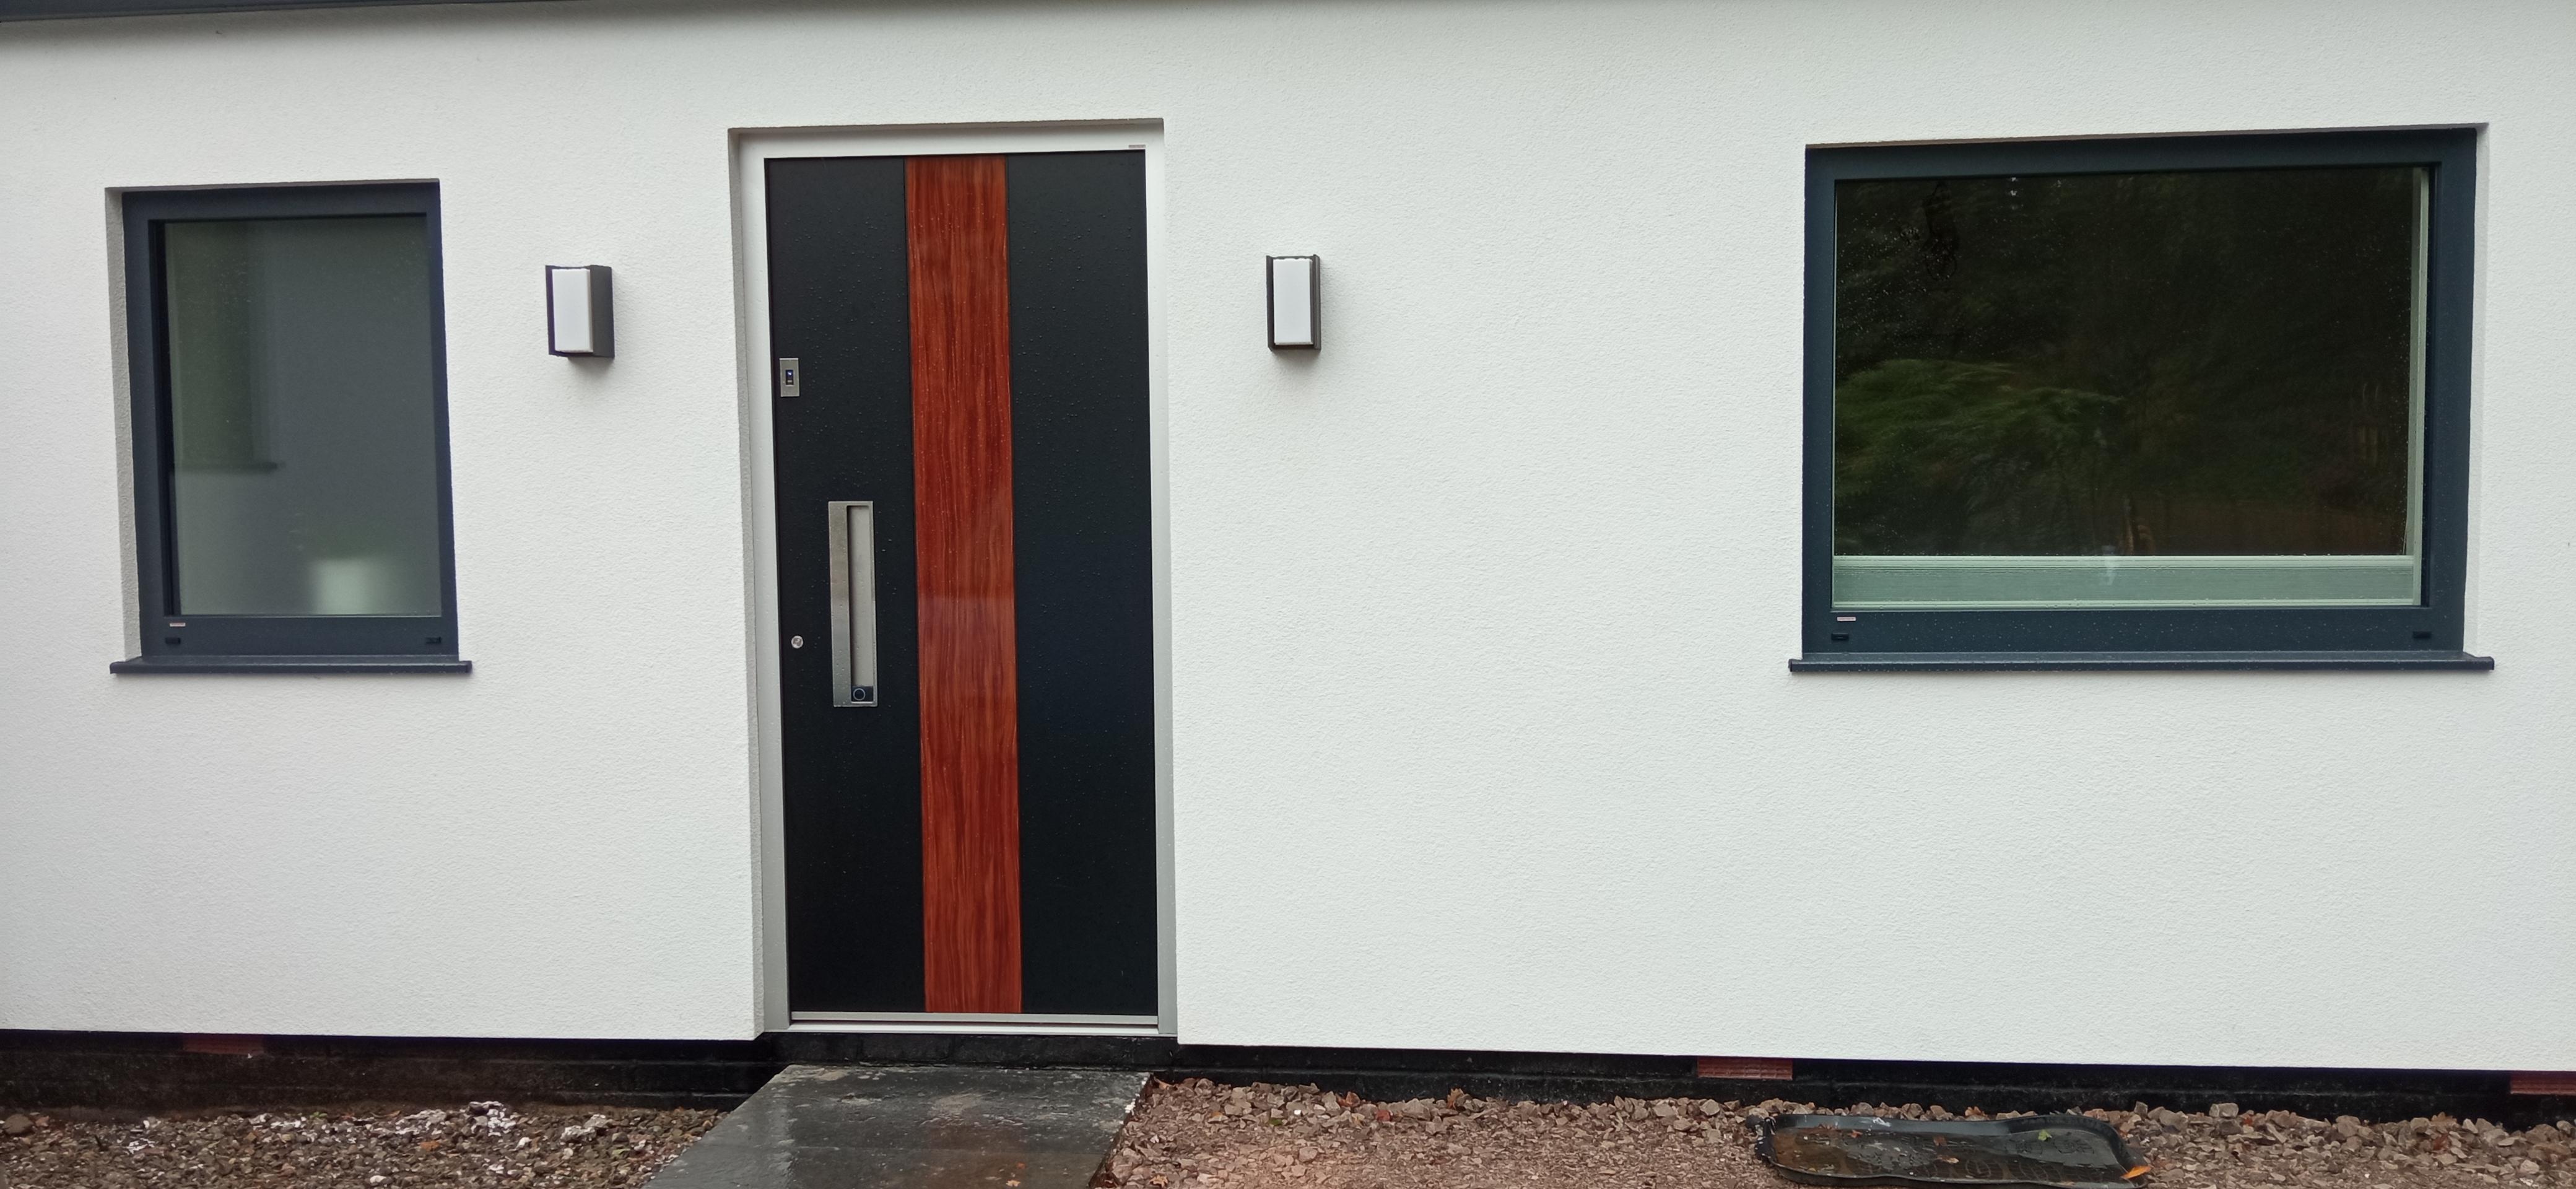
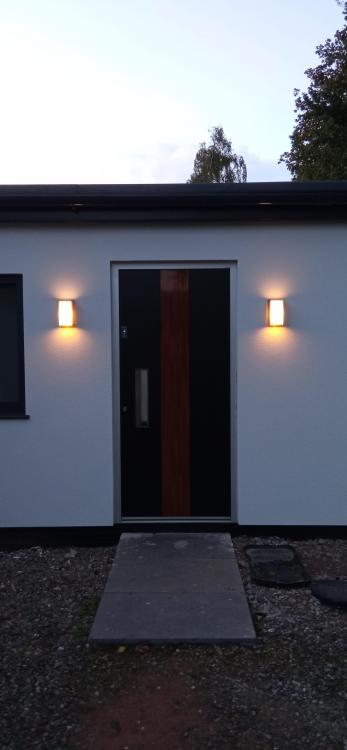
Front door lights now up and look really smart.....

 2 points
 -
Since the basement was finished at the end of June things seem to have been dragging on for ages but we are finally out of the ground and ready for the timber frame. It has taken 13 weeks and we had delays with materials that held things up but when I look back at the photos from the basement being finished to where we are now it is amazing how much has been done and we’re very excited about the timber frame going up next week. When the groundworkers came back post-basement they started by insulating the basement walls externally with 200mm of EPS 100 and then backfilling with clean crushed as per the structural engineers specifications. Then they started digging the foundations for the ‘arms’ of the building as I call them and you’ll see why from some later photos as the main building looks like the body with 2 x arms coming off it. These are a garden room (that links to the kitchen/diner) and the utility room and garage. These are designed as insulated slabs with 300mm EPS underneath which you can see in the photos. Here we see I had to put some Perinsul blocks in, thank you to @ToughButterCup for getting them to me. While that was happening the brickie was also on-site building the internal walls for the basement. We have a 3m ceiling height in the basement so we had to get scaffolding in to build them safely which was another expense I hadn’t planned for (beginners naivety) but something that had to be done. It was around this time that I purchased a DJI Mini-2 drone. It is brilliant and has given us a whole new perspective on the build. Here are a few videos from before the slab pours (please excuse the auto-added cheesy music that DJI added). And some photos of the slab pours. I also put in some VCL between the basement and ground floor as a Tony tray. Once the slabs were poured we move on to the block and beam flooring. This caused the biggest issue with getting materials as the company the groundworkers were using moved their lead times from 15 days to 6 - 8 weeks which would’ve put us stupidly behind schedule. So I sourced some beams from a local builders merchant and paid the beamers to cut them to size on site rather than waiting for the correct sizes to be fabricated and delivered. It was pretty stressful to say the least. But what made it worse is that I decided a while ago to move from precast hollow core slabs to block and beam but no one along the way told me that the beams couldn’t take the load of the walls above like the hollow core could and, by chance, during my conversations with the block and beam company designing it I found out that I had to put supporting steels on top of the basement walls to take those load bearing walls from above ground. Back to the structural engineer to get those designed and then fabricated and installed. And then the beamers tell us that they won’t do the work without a complete fall arrest system across the entire basement 600mm down from the top of the basement walls. Back to the scaffolders to come and put that up at yet another expense (although the safety of the contractors is important to us so I didn’t grumble too much!) and we were finally ready for the block and beam to be installed. So what turned out to be the decision to save a few £k by moving to block and beam has in the end cost me a lot more due to the extra work involved. Oh well, you live and you learn. Anyway, the day came for the beamers to install it and they were a smash and grab outfit but that is, apparently, what all block and beamers are like. They just turn up and smash it out and leave without any due care and attention. To say they were miffed that they couldn’t do that on our build due to the steels on the basement wall is an understatement and comments like ‘if I’d known there were steels I wouldn’t have taken the job’ and ‘I’m losing money of this job’ really filled me with confidence. And if I ever do this again I will probably do the block and beam myself as, although hard work, it’s not complicated and I would’ve done a much better job. Anyway, it was done and they left and we could get on with laying the coursing blocks for the sole plates to sit on. This is where I insisted on precision and I spent a lot of time out there with the brickie assisting with setting out to make sure everything was spot on for the sole plates and checking that the levels throughout were within 5mm - 10mm across the building. It was time consuming but I think the accuracy will pay off in the end. While that was happening and with the timber frame imminent the scaffolders came and put up the required 2 lifts around the entire building and by 5pm the Friday before the frame was due it was all finished and we were ready……or so we thought. The timber frame ended up being delayed by 4 days due to the chippies testing positive for Covid-19 (the first time we have been directly impacted (not including the material shortage etc) by Covid) and during that 4 day delay the contract manager attended site and noticed that the garage (which is 120mm below the main house) had it’s coursing blocks below the main house. After a quick email exchange it was pointed out to me that I’d misread the plans and that those blocks, and the sole plates, need to be at the same level throughout so I needed to raise the coursing blocks by 120mm in the garage by the end of the following day. The groundworkers have moved on and I couldn’t get anyone to do it so I knocked up some pug, borrowed a disc cutter, bought myself a trowel and got laying. I’ve never laid blocks before but I did spend a lot of time watching and helping the brickie so I had a good idea as to what to do. I started after work on Wednesday (sole plates due to be fitted Friday) and finished half of it well after dark and then got up early the next day to finish the rest off. And it worked! Level and straight (ish) and still standing the next day. Phew! And this is where we’re at right now. Timber frame ground floor wall panels are due next Tuesday so we should really start to see things happening rapidly now and within 4 weeks our superstructure will be up. But that will be the subject of my next blog. Here’s a time-lapse video of this part of the build. I had to speed up the footage x10 and each day is about 4s long so things happen at quite a speed but it’s amazing to look back and see what has been done these last 13 weeks. Thanks again for reading and I hope you’re enjoying this journey as much as we are. Until next time…1 point
-
Some lintels only attain the given strength when they have the recommended masonary on them. Single course pre stressed concrete lintels are usually composite and so are some steel versions. not a problem using without the marinara as ling as the loads above are relatively low compared to the maximum given1 point
-
I believe you need house and garage on one Planning Grant for the garage to be zero rated. It might not be possible to ammend the existing Planning Grant.. https://www.designingbuildings.co.uk/wiki/Material_amendment_to_planning_permission1 point
-
Yes. It’s only a cavity tray if it’s described as such,and would continue around the perimeter of the build,and would also normally lap out at at finished floor level (I.e. the standard DPC height.)1 point
-
As an aside from the boiler .vs. ASHP question, why do you want a gas oven and hob? Ovens are almost 100% electric now and this seems to include all the good ones. Having switched over to an induction hob a few years ago there is no way I'd voluntarily go back - just as controllable, vastly easier to clean and when not in use I can use it as an extra area of worktop.1 point
-
its a tray so weepers on the outside lapped up onto the inside skin. same over lintels, meter boxes ect1 point
-
Porcelain is better for outside1 point
-
Check slipperiness and for abrasion. the hardness can vary massively. I guess you need very hard with a roughish surface. porcelain is potentially very slippy when wet too.1 point
-
No problem unless it's a composite lintel as they are designed and manufactured to work in conjunction with the stated number of masonry courses above. Plain tensioned concrete are fine.1 point
-
I’m not sure he should. Maybe best to do your own research.1 point
-
Perfect ?1 point
-
Terminate the three phase in the boundary box and run a spare duct with pull cord from that to the house. If you ever need additional phases you can pull them through at a later date.1 point
-
No. That is not what it is designed for. It is manly used as insulation and they do a stronger version (Perinsul) to be used in a single course to prevent thermal bridging between wall and floor. Marmox also do a similar product (Thermoblock) to Perinsul but a fair bit cheaper.1 point
-
I was not being specific, just joining in the discussion on how much discrepancy might bother a planner.1 point
-
I have used limestone tiling in a new bathroom, on both the floor and the shower walls. Very happy with it except that some tiles in the shower are looking darker because they have absorbed water. This shows more at the bottom, where most splashing occurs. Despite several coats of marble sealer, there must always be some tiny way in at grout, and then it is sealed in and takes several weeks non-use to return to normal.1 point
-
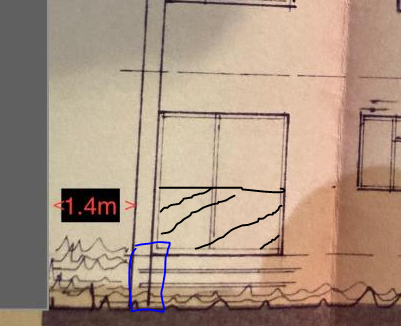
Do you really need the original patio (?) doors? now you have new French doors in the extension? How about, change these to a normal window and fit the ASHP below, then run the pipes around the outside to the existing boiler location. Fix them to the wall and insulate very well. ASHP could be "end on" if that helps, as long as your neighbour does not have a window opening on the flank of their property. If you want to keep the original patio (?) doors, then fit the ASHP under the next window along, as previously suggested by others, and still route the pipes around the outside (under the steps up to the patio doors), just insulate even better due to longer route, or go for a split ASHP with thinner bore pipes that are easier to insulate to a higher degree. ASHP under PD must meet MSC requirements. Minimum distance of any part of the ASHP must be at least 1m from your boundary. With the need for 300mm air gap from a wall to the back of an ASHP, you'll never fit one in a the 1.4m gap. ASHPs are not going to get any thinner, it's a mature technology, just relatively new to the UK.
 1 point
 -
I use both Porcelain is much much more durable Ive used limestone on floors But wouldn’t use it on heavy trafficking areas Great in bathrooms though1 point
-
Or Yea, though I walk through the valley of the shadow of death, I will fear no evil: for thou art with me; thy rod and thy staff they comfort me. Thou preparest a table before me in the presence of mine enemies: thou anointest my head with oil; my cup runneth over. or1 point
-
A few considerations... - still expensive compared to standard construction - lead time and availability - very low density means stability (inc uplift and temporary stability) is likely an issue - possible fire rating problems - making connections - would they work with joists hangers etc? How would you connect frame cramps/wall ties - compression strength is OK, but how about shear and tensile strength - with the low mass these could be critical - while not a big issue for single dwellings, there may not be must robustness in the design - most importantly, what bank would mortgage it??1 point
-
dry verge all day long. zero maintenance.1 point
-
1 - Congratulations on getting an old house to a 78C. That is about half as much heating required as an E or an F, and is a good figure. 2 - How airtight is it? That could make quite a difference to your heat load as the commonplace is that 25% of heat is lost through air leakage. That may be a good route to reduce gas heating usage. Consider an air tightness test, and a hunt for draughts (see Smoke Pencils)? 3 - We have a heat model ss available on the forum. I strongly recommend that you consider doing your own to further build understanding. 4 - Don't neglect to think about controlled ventilation. Do you have trickle vents? If so, consider alternative strategies. 5 - How is your house humidity-wise? 6 - Can you use those single inlet single box heatpumps that just do one area to cover any gaps? 7 - As you say, don't neglect marginal gains - which is the agenda about LED lightbulbs, lo carbon appliances, low current standbys, washing lines and so on. Suspect you are on quite a lot of that. One option which some have found effective has been a Quooker type hot water setup vs a too-often used kettle. Personally I would consider it, but my insulated kettle is still going strong. 8 - Do you have space for more solar? 9 - Are you paying attention to water usage? 10 - Do you have a number for actual Annual Energy use per sqm of floor area? That is quite a useful comparator. Ferdinand1 point
-
Don't overthink it - get the application into the system as soon as you can and then answer whatever queries they have - you'll get points back no matter what, 90% of the applications we do are before the engineer have issued their SER package anyway. Anything that isn't a hydrant needs comment from SFRS so whatever the approach is, the sooner the better!1 point
-
I would speculate that there won't be enough free space around the heat pump. They need some distance from adjacent surfaces, usually 500mm+ from the sides and at least 1m from the cold air outlet. If you reduce these distances the efficiency will be severely compromised.1 point
-
Old Kettle. I agree that in england it is measured from the highest natural ground point. I think you will have to do some working out of the materials you are going to use in order to work out your height. To be honest i think that the 2.5 eaves is very out of date. Especially when you consider modern, warm flat roofs. If you think about a flatroof, internal height 2440mm + roof joists 220mm + Sterling board 22mm + pir 150mm + sterling board 22mm + epdm 2mm. None of my flat roof extensions that i have done on my 3 daughters houses have anything like a 2.5m eaves height. Perhaps flat roofs have different rules ?1 point
-
What about a parge coat at least, on the internal block work?1 point
-
Trouble is future cracking, for me exposed blocks are unacceptable as if/when they crack there will be draughts,1 point
-
Thanks for the links and the in depth info, much appreciated. I've been speaking to the locals over the weekend and there may be a closer pole that we can connect to and the local farmer has said that he would be willing to dig the trench through his field so we are now hopeful that we can lower the 30k estimate to somewhere closer to 20k so current thinking is that we go ahead with the grid connection and we also install a solar array and battery bank so rather than use wind as a back up to the solar we will use the grid as a back up to solar. One of the locals we visited had a wood burning stove which had a back boiler which fed a large holding boiler which gave them hot running water and also hot water for their radiators to heat the whole house so this is something we are going to look into as well at least for hot water but i'm not sure whether this would also service our underfloor heating as well but something for us to look into.1 point
-
Yes, fit the 3P now. You will loose a bigger difference in timber offcuts and dropped screws during the build. And if you like making things in a workshop, 3P machines are cheaper.1 point
-
In that case, count your blessings and speak to them, make it a joke … you may seem a bit fussy but it’s your home and you would like …xyz! we are all human, we all have good and bad days and we all want our days to go smoothly. to quote the Advert … It’s Good to Talk.1 point
-
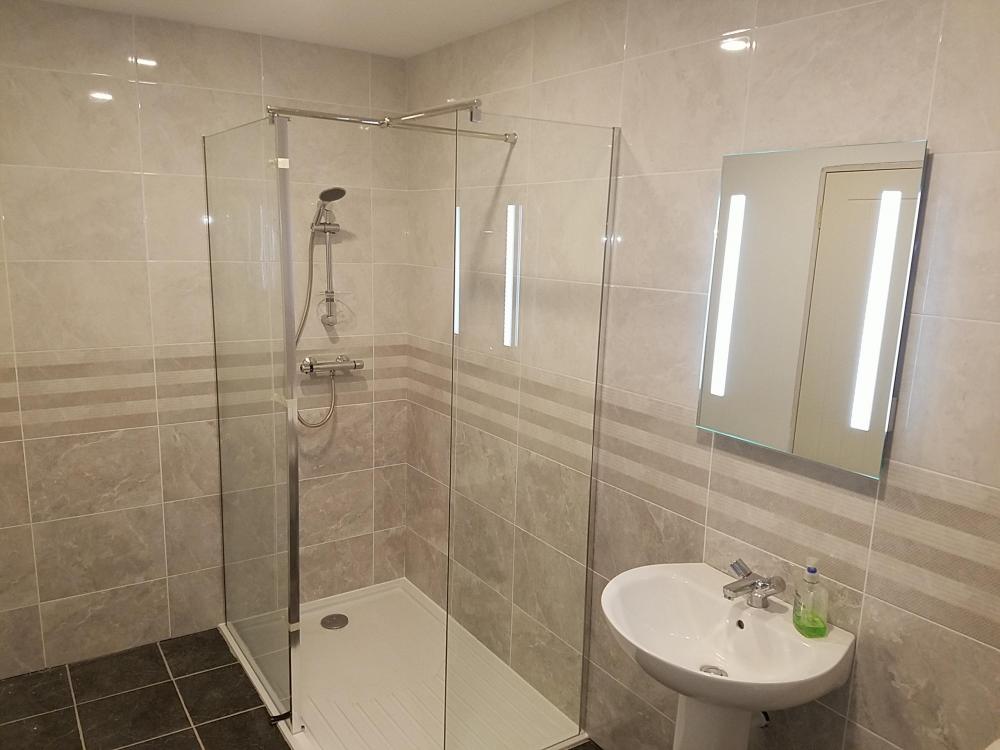
Our trays are 1400x900. I went with a 900 screen with a hinged flipper, and a 600 as an end panel. I'm pleased to say that the chicane/ overlap between the flipper and the end panel stops just about everything.
 1 point
 -
It is true that a 3 phase board cost a lot more than a single phase board, but the way I would tackle it is just fit a single phase board now. you can add a second or change to a 3 phase board later if you need to.1 point
-
£500. Best £500 you will spend. 5/10/15/ 20 years time when the family all have EV and you are looking for multiple charging points! For just one example.1 point
-
how can those tiles be mechanically fixed to a batten that is not actually there ? To quote NHBC guidelines "Verge clips should be in full contact with the tile to resist uplift, nailed twice to battens and sized to ensure that they are in direct contact with the top surface of the verge tile." https://nhbc-standards.co.uk/7-roofs/7-2-pitched-roofs/7-2-19-fixing-tiles-and-slates/1 point
-
We have a course of Foamglass Perinsul around our entire perimeter to eliminate cold bridging between the below DPC blockwork and the TF wall / floor slab.1 point
-
There is no right way to build. Each method you can pick will have its own advantages and disadvantages. Pick the one that suits your site, your budget and your access to skilled labour. The important thing to remember is to make sure whatever method you end up using is you do all the research first. If you want to use timber then use timber. If you want blocks then use blocks. It's your house so pick the one you want to build the house you will live in.1 point
-
Hi We deal with overage on commercial properties. You need to be very clear with the type over overage agreement. You need to make sure that if you agree the overage that it is based upon the land value only with PP/PD and that you dont end up agreeing to pay 25% of the total value once built as it could very well be your profit is gone. You also need to make sure that you get a clause in there which allows for cost deductions so that you don't end up paying a fortune on design and planning, surverys and feasibility. So if you spend 50K on obtaining planning permission that cost is offset against the obverage calculation. I would also suggest agreeing land agent that both parties agree on prior for any future assessments. Longmores have done work for us however not sure if they do residential works.1 point
-
I don't see why not if the compression strength is enough. A quick interweb search throws up 0.5 MPa for Foamglas. Brick seems to be between 0.28 and 2.8 MPa. There is more to it than just compressive strength. Thermal expansion and failure modes spring to mind. I do like the idea of making a house out of it because the thermal properties are so good. 0.038 to 0.055 W/m.K for foam glass, and 0.15 to 1.6 W/m.K for brick.1 point
-
I have got used to the rasping feeling. Like tomatoes, I quite like it now. (I stopped wearing underwear as a new year resolution back in 2010, and have saved literally a few kWh of marginal energy since)1 point
-
We use about 10kWh per day powering "stuff" that is not heating or DHW and that is pretty constant throughout the year. Some day I will do an appliance by appliance measurement to try and see if there is anything we can save on, but at the moment short of watching less telly I can't see an easy saving. Re the tumble dryer. the compromise we have is it is NOT a "dryer" it is a "towel fluffing machine" Certain things like towels, socks and underwear "must" have a spell in the fluffing machine so they end up soft and fluffy. If they dry entirely naturally they fail the "fluffy" test and get described as "cardboard". So just half an hour un the fluffing machine does it, they don't come out dry, but then when hung on the airer in the utility room under an mvhr extract vent, when dried by that they do pass the fluffy test, as long as they have had the short time in the fluffy machine. One day I will pluck up the courage to see a a period in the fluffy machine on "cold" will have the effect of making them fluffy.1 point
-
We went on hols for a week and I monitored the energy use in our absence. Our house is all electric. Passive class, no heat pumps or woodburner. I turned off everything except the following. MVHR ,Fridge/Freezer ,Biocycle septic tank. Total 3.68 kWh/day. (153 watts) Heat Loss from the immersion powered 300l UVC @70deg. 1.64 kWh/day (68 watts equivalent load) Total background load 221 Watts or 5.3kWh/day of which 30% is heat loss from the cylinder. Granted everything except the septic tank is inside the heated envelope so it contributes to the heat load for the 3-4 months of the year it's needed. Our daily electricity use is 20kWh of which normal use is about 11kWh DHW (including tank heat loss) 3.68 kWh background load and 5.32 kWh everything else. I reckon we could half our electricity use with a few straightforward steps. Burn something ( wood/oil/gas/diesel) to heat water and provide space heating. Replace the tumble dryer with an MVHR vented drying cupboard. Hot fill washing machine and dishwashers. Fill the kettle from the hot tap. That would leave a conservative 3kWh/day electricity demand with 153w base load. I considered what if our house was where yours was in Scotland with a 15kW array and a 20kWh battery storage system. ( Best installed price I reckon would be about £30,000) According to PVGIS you would still be short for about 1/4 of the days in december. You would have to make further lifestyle compromises like cooking on solid fuel, restricting appliance use etc during the winter. An electric vehicle would be out of the question Nov- Feb. If you were to consider the same case in Brighton, with a 12kW array and a 7kWh battery you would short less than 7 days a year. I think in your situation the electricity connection is your only option unless you want to live a country lifestyle of 100 years ago. Perhaps consider your petrol cost saved by changing to an electric vehicle as part of the equation when getting a grid connection.
 1 point
 -
And it’ll have a dual pitched/gable roof?1 point
-
I think it has to be more than 1m away from the house to be counted as an outbuilding rather than an extension. The dimension rules are different for outbuildings and extensions.1 point
-
The building has a flat roof, so they were trying to hide the array behind the parapet. For the calculations I did to get to a 30kW system, however, I used PVGIS and an optimally-orientated ground mount array to work out how much PV was needed for 600kWh in December near Aberdeen. That was for year-round optimisation to be fair - if I give it a near-vertical orientation to optimise for winter (tricky for ground-mount on a windy site) you can get it down to ~24kW or so. It's still very weather-dependent though so you probably want generator back-up anyway. https://www.bere.co.uk/assets/NEW-r-and-d-attachments/Lark-Rise-Interim-Monitoring-Report-171201.pdf is also worth a read here - details of how actual performance compares to modelled. FWIW I think the main thing they missed out on was hot fill for the dishwasher and possibly washing machine - clothes washing and dishwasher is about 12% of total demand, and is pretty easy to shift to DHW from a heat pump. Most dishwashers will take hot fill (and clean better for it, at least in my experience), washing machines are a bit less clear but given the lengths they're going to in order to minimise electrical demand it's a very cheap way of making a sizeable saving.
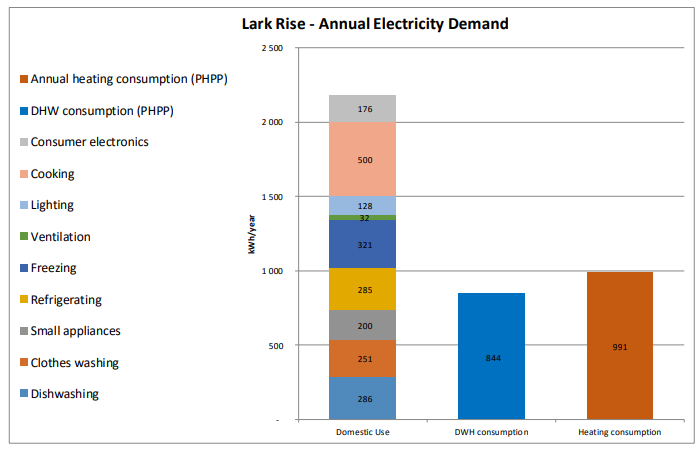
 1 point
 -
https://www.bere.co.uk/assets/NEW-r-and-d-attachments/Lark-Rise-Self-consumption-study-by-Energelio-160429.pdf is worth reading deeply if you're seriously considering going off-grid. It's the calculations for how close to autonomy you can get with a ~200m2 Passivhaus in the southern UK with 13kW of PV and a battery of varying sizes. Even with a very big battery (40 kWh in this case), in December it's still importing ~60% of electricity demand from the grid. Per PVGIS for Aberdeen, you'd need at least a 30kW ground-mount system to meet demand in December, which is the hardest month to handle - in the process producing 27,000 kWh nearly all of which would go to waste. You could probably downsize a bit as you're looking at a smaller house, but given how well insulated the example given is you're going to struggle with getting a 50% reduction without going full Passivhaus. Going off-grid with only PV and batteries in the UK is exceptionally hard. Assuming you need 500 kWh in December to give you some margin (most of the power coming from PV throughout the year), you only need a steady-state power of 700W to keep things going which isn't huge. Small wind turbines are very site-specific and a bit of a lottery though - average capacity factor seems to be in the 15-20% region (inferring you'd need ~5kW installed power), but can be very high or low. One interesting note - heating demand is 1000 kWh of electricity a year in this model and DHW another 800 kWh/year. Take that away and over an **average** year, you'll be able to run everything else 100% on PV. In the model the COP is assumed to be 2.8, so heat demand is 5100 kWh/year => equivalent to about 400 kg of Propane. So an LPG boiler plus standby propane-fuelled generator in case you get a week of miserable weather might be a decent option in your case. As noted the power draw will be very low from it - it's only there as a backup for the few times a year that the batteries run out and need a top-up, so fuel burn and running hours will be relatively low. Resale value is going to be higher on-grid and running costs a bit lower, but not shockingly so. It's really important that the house is very low-energy though - the cost per kWh of off-grid energy is much higher than on-grid. If it was my build, at £30k I'd go for a grid connection (mostly considering resale and the faff-factor), but if it ended up being a lot more (£50k+) then off-grid is feasible.
 1 point
 -
We use 20kWh per day but that’s heating water for 4 , boiling the kettle regularly, electric cooking, constantly running biocycle unit, tumble dryer, constantly running MVHR, and powering a borehole pump. Yet to see what that escalates to with the winter. My parents live in a drafty house next door with literally no insulation. Everyday the rayburn cooker is lit. It heats the water, boils the kettle, cooks dinner, heats the house, dries the clothes and, by stack effect, ventilates the house. Old fashioned septic tank. They do have an electric shower. They use about 10kg per day of dried oak in the summer. (roughly 50kWh) Our electricity use is double theirs although their energy use is triple ours. Probably at least 10 times to achieve the same comfort levels. You can go off grid easily if you are willing to cook, heat and DHW on Wood/gas/oil. It won’t be the freewheeling energy on tap lifestyle that most of us rightly or wrongly enjoy however.1 point
-
A pragmatic view from me..? Having built a few houses out in the sticks and lived in the sticks the last thing you want is for you house to completely burn down due to a lack of water if a fire occurs. Have experienced a neighbours hay lorry going on fire next to their house, used loads of water to stop it setting light to their house. The fire engine ran dry and we drew water from the ponds. If you have the room then ponds can be great fun, not just for kids to learn about nature but for adults too! Once you start to play with them.. it's addictive. If you have a descent roof area you can fill them pretty much with the roof and surface run off water. I can see the logic from my own experience about having a 45m^3 storage as but that is not a big pond. If you live up in say Aberdeenshire it gets pretty cold. If you are doing a pond then you want the aqua culture to thrive and not freeze in the winter. You can find plenty stuff in the SUDS manual about this but in essence you have a shallow sloping bit and a deep bit (1.5 - 2.0m) for winter conditions, lower light levels and so on. A pond of say 6 * 8 *average 1.0m deep will give you your 45m^3. It will vary a bit depending on evapouration so you need to do a few calcs. Yes if you are in sandy ground you'll have much loss so will need a plastic or clay liner. But all this needs to balanced against the fun you'll have playing about..the self build journey.. it's not all about the money you know!1 point