Leaderboard
Popular Content
Showing content with the highest reputation on 08/25/21 in all areas
-
No leaks since new plumber sorted it out, seems to be all sorted and new plumber only charged us £50 which we think is pretty good as he put a new trap and plug on too and discovered the issue. I'm billing old plumber.3 points
-
I inherited approved plans which included 2 chimneys, apparently they're a staple of the local design guide & the PO insisted on them. After buying the plot I gained approval to remove them after submiting a variation of condition application. My argument was chimneys on a new build are "anachronistic, unnecessary & contrary to the principles of sustainable design & construction." Feel free to use my wording - I made the last bit up so unsure if it's actually true but I think it sounds good!3 points
-
Hello Loz. Sorry to hear about you dilemma. Your starting point here is to take another step backwards and understand what the implications are in terms of what happens to the declared strength of the timber when you rip a bit off the top / bottom / sides along the length. Typical structural timber for extensions and the like comes in grades.. you'll often see it stamped C16 or C24. When it is produced each length is put through a stress grading machine which applies a force. Sensors measure how much the timber bends or if it just snaps. If it comes out the end of the machine with the correct reading it gets a stamp to say what grade it is. Now timber has knots / wane / the grain weaves about and so on. You could say have a piece of timber with two knots near the centre but good grain top and bottom which passes the grading. Cut 40mm off the top and now the knots are in the high stress zone for bending so the timber can fail. In summary if you rip a bit lengthways of a stamped piece of timber the grading is no longer valid. You can notch it but there are rules which apply to where and how much you can notch timbers. Point this out to the SE / BC officer and see if they will still pass the joists given that the stress grading is probably invalid.3 points
-
We had asbestos on part of our barn, we removed it ourselves, double wrapped each sheet, double wrapped the skip and put 2 layer of DPM over the top. There is a tip near here that has a licence to bury it themselves. To get it done we were quoted 6k, it cost us about 2k to do it ourselves with the cost of the special skip, DPM to cover everything, special clothing and licence to dispose. When we were looking someone offered to take if from us for £500, wonder which layby it would have ended up in. I've just realised where this is, my best friend lives in Chewton Mendip and runs a B&B. I'd love to move back to that area of the country, but need to finish this build and retire.1 point
-
One ASHP but 2x UFH manifold? While the UF loop itself has a limit in length, you can always put a longer length of (very well insulated) secondary circulation pipe to get from the main plant room to a remote manifold. You'll need to run the ASHP a wee bit hotter to allow for losses along the supply pipe, but shouldn't be crazy. In essence, the same schematic as you'd use for UFH installed across multiple floors1 point
-
And where do they send it? They used to have an area at the council tips for it, then buried it in clay. Now it gets lorried up and taken away at about £3,000 per load. The council will not take a large quantity, only sundry domestic amounts, as this avoids it going in with the rubbish and endangering the refuse staff. Even doing it yourself, which is legal, requires a sealed skip and disposable clothing, then gets taken away and a very large fee for disposal. Even farmers are supposed to do it properly these days.....never trust a pile of earth on a farm......1 point
-
I usually have to talk clients out of too much glass... The approved elevations are miles better than the revised ones, although there might be other poor houses around that should be the bar - but the approved elevations are definitely hurting your application because there's more detail in them.1 point
-
Thanks joe90. He was one of the accountants I spoke to, and the long quote is out of his booklet ?1 point
-
So, your proposed entrance is considered an improvement. Keep that in but revert to the approved windows elsewhere. You could try pitched or curved roof dormers if the catslide is not your thing. Perhaps post up what you propose before you sent it to the planning officer as this could be your last chance to get this through. Personally I think the officer did you a favour and you dodged a bullet there.1 point
-
The car in the pic could scupper any chance of Part Q. Had it been a tractor it could serve as proof of Ag use1 point
-
Long Barrow and Tumulus about 120 metres from the structures. Our plot is adjacent to a 12th century battle site, is a few km from a pair of iron age hills forts and 1km from a roman fort. Not to mention all the barrows, cairns etc in the area. I was expecting to jump through a lot of hoops for archeology and it was never mentioned. No one gave a monkey's about it.1 point
-
Duct under the slab, how would you pull a new cable in if you surround it in insulation and screed over it. Unless you duct it there as well, don’t underestimate how many cable ducts you will have coming in and out. I think I have something like 5 electrical ducts up to my plant cupboard. 1 in and 4 out to feed things in the garden.1 point
-
Aah. proper archaeology. Better investigate further I feel. If it was possible to do the project without any holes in the ground it would help. but drains!1 point
-
Agreed. Mistakes happen and it is sometimes reasonable to find a solution that does not inconvenience the builder. However, this is either a deliberate bodge, hoping to get away with it and never mind the consequences to you, or ignorant of building practices to the extent of worrying about other matters too. For the sake of amicable conclusion to the project, it needs SE and/or BCO to instruct that it is done again. I suggest make a list of the worries expressed above and summarise it to the SE, who works for you. It is not unreasonable to include future squeaking and maintenance, and even worry, in the list. And would the SE warrant for 10 years please against these minor issues as well as failure?1 point
-
You could go with something like Phillips Hue. Leave all the bulbs powered on and then control it from their app. You can create different zones, and different routines e.g. light things automatically at 7pm. It's probably the least technical solution, but it gets pricey, especially if you buy their own bulb enclosures. What's also nice about this is that you can set different bulb colours or brightness. What I have done for my outside lights is divide the house exterior into a number of zones, then wire each zone back to the consumer unit. I then use an app controlled wifi switch to turn these on or off. This means I can use cheaper bulbs, but they are all on or off in a particular zone.1 point
-
Think I would still try and call HMRC. Record the call. Tell them you know the existing building must be demolished but "what about outbuildings like a shed or garage, does that have to be demolished as well?"1 point
-
Get it ripped out and done right. This is your home, not a commercial unit. you will never feel happy knowing it was bodged.1 point
-
Personally I prefer the original design (if not the catslide). Think the new one is going to be dark inside with all those small letterbox windows.1 point
-
+1 on the above, I would say the £200 insurance is money thrown away. 50 year old agreement with a company that has since gone bust …. Nothing enforceable, everything regarding the company ceased when it went under.1 point
-
1 point
-
Sunamp for the UFH is pointless - use the slab as the store and use a Willis heater to provide the heat into the slab itself. You’re only load shifting from off peak anyway and a Sunamp is a resistance heater unit so there is no cost benefit and you’re unlikely to get the payback on installing it against direct heating the slab. You say UFH in the kitchen and bathrooms - what is heating the rest of the house ..? And how much insulation under the screed / slab..?1 point
-
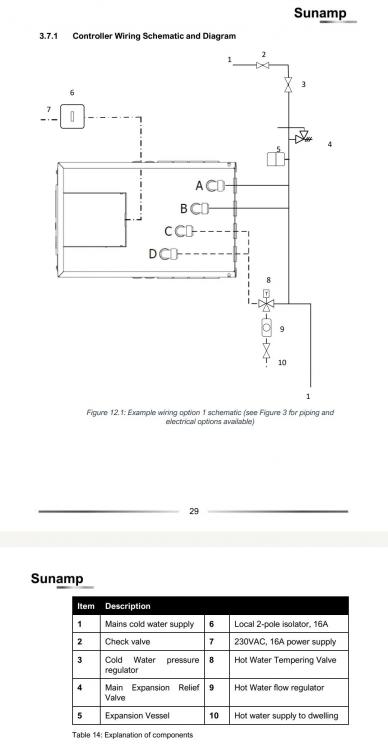
Take a look at this schematic from the Sunamp installation manual (this is from a UniQ eHW12, so may be subtly different). No pump required PRV set to 3 bar Without a PV diverter, your Sunamp will start charging as soon as the timer switches on, regardless of whether the sun is shining or not. By the time the sun comes out you could be fully charged from the grid and your opportunity to self consume your PV generation is lost for that day. Most people say a PV diverter pays for itself relatively quickly. It's a must have really.1 point
-
What a god point. I once took a surplus huge joist to the mill and had it ripped into 2 useful sizes, and it bent and twisted dramatically. The same principle will apply to yours.1 point
-
Definitely bring them up through through slab easiest ans best way. In reality ans cold bridging from this I would think is negligible in the grand scheme of things.1 point
-
I think this worry stems from not compacting the hardcore properly. Pouring a concrete sub slab reduces the risk of the floor sinking over time. Nothing serious happens just cracked tiles by doorways etc. If I could assure that the hardcore was to be laid in thin layers and diligently compacted I would happily skip the subfloor. Your BC and SE don't have the time to check these things so tend to go with the solution that is more tolerant of poor workmanship. As an alternative you could do a hardcore base (properly compacted), insulation, 100mm reinforced screed with mesh tied into perimeter walls. Tie the UFH pipes to the mesh before you pour. powerfloat to finish. By the way you don't really need any concrete in a floor if it's done properly.1 point
-
Your engineer/architect sounds like they’re still designing houses for the days of minimal insulation, no airtightness, uncontrolled ventilation, and oil boilers. If you’re off gas you’re pretty much tied into an air to water heat pump in Ireland. The argument about response times is a bit mute as they work best at low temperatures and longer run times unlike the old oil boiler in a drafty house which needed hard firing whenever the occupants were home and shutting off afterwards to spare energy. Our hollow core (ducon) had a 75mm 35N concrete screed with concrete mesh. This was a structural requirement. In your case get rid of the UFH pipes and insulation and wait until as late as possible in the build ( after interior plastering) and pour a pumped screed as thin as the supplier will stand over. This will leave you an immaculately level floor that won’t be covered in lumps of plaster etc. Spend your time now filling the ends of the hollow core slab if it’s not wrapped already for airtighness. By the way we’re not a million miles from the west coast and have no central heating, just a single electric rad in the hall.1 point
-
This may not be what you want to hear, but you want cheap to build, then ditch the basement. The basement will cost more to build per square metre than the above ground storeys.1 point
-
Can’t wait to find a suitable plot or place to knock down to start a new build instead of refurbs.1 point
-
+1, I have done many refurbishments in the past but found my new build so refreshing (and the VAT refund was useful).1 point
-
Oh I disagree, our planners wanted what they wanted, not the community and when I went to appeal they were told they were not abiding with their own policies (and I have fought planners before and won). Yes, I find your design a little fussy but I like classic lines. You have already found examples locally that fit with your design so yes you might have to compromise a little but don’t give up on your dream.1 point
-
Looking at this I would 100% go for demolish and rebuild. Is this what is proposed? There is no reason to stick with the existing footprint. You will get a house with no compromises and can reclaim all the VAT.1 point
-
I think your architect has picked up on design features from those other houses but has taken the idea just a bit too far. I think if it was simplified a bit it would get through and be cheaper to build as well. On another issue: Our house has some tall triangular windows in wood and maintenance is a pain. A scaffold tower helps but the steps make it hard to move from one window to the next. I would go for metal clad or upvc.1 point
-
Our design is about as far from the local street scene as you can get. Think chocolate box 16th Century cottages right next to ours: a sharp Scandy design. The key thing - for us - was the micropolitics. In this case we knew (through our architect) of the LPA planner's preferences. And he (the planner) has a weak spot for passivhaus design and sustainability. So, without promising that we would work to that standard, we promised to aim for it. All the informal local feedback we had was about the passivhaus design - and the built in sustainability. A SUDS design for example that had a water garden built in to the roof discharge, leading to a small attenuation pond , its overflow goes into a pond set on the existing spring line. I'm not arguing that that's the route you should take; merely to look for the planner's triggers. And then use them. And you can get a hint of those by reading his (hers) Delegated Reports. Worth the effort every time.1 point
-
? Trust me you are lucky . A miserable shite group of vindictive neighbors can find 140 things to object to . Now that we can see the style of the neighbouring properties I would simply mimic them as near as you can to avoid the council objecting to the ‘ character ‘ . A precedence has been set follow it . Then with the money saved from your architects previous effort go underground and double the floor area ?1 point
-
I've no idea what the surroundings are like, so not a clue if it really is or is not in keeping with the area and the throw away comment at the end of the letter that it is 'rather busy' and therefore they will recommend it for refusal is the usual hogwash. Ask them to give you the reference in the Local Plan where 'busy' is set out as a criteria for allowing permission and also where the definition of 'busy' is. Better still use their term 'rather busy'.... Unless they can state chapter and verse what specific policies in the Local Plan this would fail on, it will be passed on appeal. If they can't then they are toast. Although personally I hate those pointy windows..... But everyone to their own. Simon1 point
-
I'd check the wording on the Title. Downloadable from Land Registry for £3, or £6 with the Title Plan included. I expect the wording will be pretty tight if the intention is to leave those areas, bounded by a dotted line, to be open for others to have access over it.1 point
-
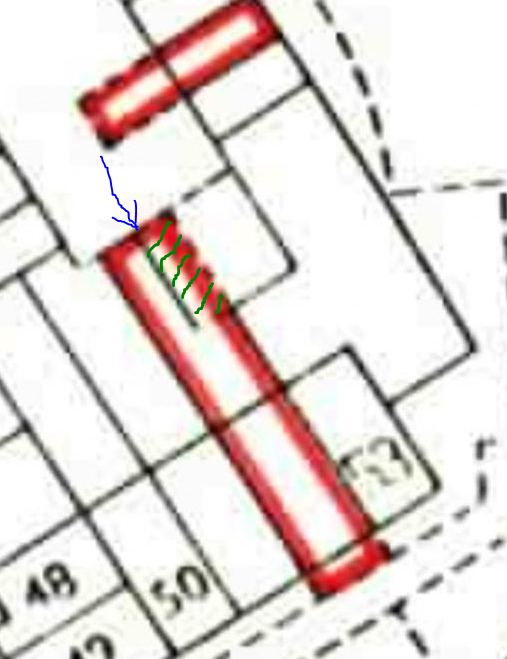
As per the caveats I've included on each of my comments, I'm assuming that the Title Deed refers to (and explains) these different boundary types. And, I'm assuming that the dotted line denotes something different to the solid line. For Instance, a dotted boundary line is used in the space in front of the garage. I would assume that is so the owner has the area protected from anyone else parking there, so that they have access to the garage, but others have a right of access over that area in order to access their own garages and turn their vehicles around. ie. the owner would not be permitted to enclose that area and deny others their right of access over it. There isn't a standard for what these different line formats mean across all Titles held at the Land Registry, but it is quite normal that they are used on a Title Plan and then referred to by the Title to describe what they infer in each case.1 point
-
The red lines define the areas included on the Title document, and therefore what would be "Owned" by your mother if she went forward with the purchase. The red line is correctly drawn in that the outside edge of its thickness aligns to the boundary line. In the area in question the boundary line is shown dotted. It looks to me that the fence is on the solid line marked by the blue arrow: The fence shouldn't cross the solid boundary line, so the outer face needs to sit on, or just in side this boundary. The green hatched area, bounded by the dotted line, while it would be owned by your mother, would need to be kept clear, assuming the dotted line denotes others having access rights over it.1 point
-
It’s a change of use from parking/road to garden ground. As other people have mentioned it is likely that within the deeds other people may have access rights over the areas bound by the dotted lines. Even if they don’t the council might not want to reduce available parking and manoeuvring space so that you can have a larger fenced in garden. They have to consider the impact on everyone.1 point
-
Perhaps you could put the UFH in the liquid screed so avoid the voids and get the UFH in as well, unless building control where you are insists on it the insulation it will do very little thermally, might have an acoustic effect, so might usefully be dropped. If you try and fill back up to the same level with screed however the extra 50mm of concrete might be too great a load so that would be worth checking if going that route.1 point
-
If you go steps in the insulation then use anti cracking mesh ot it will crack above the steps1 point
-
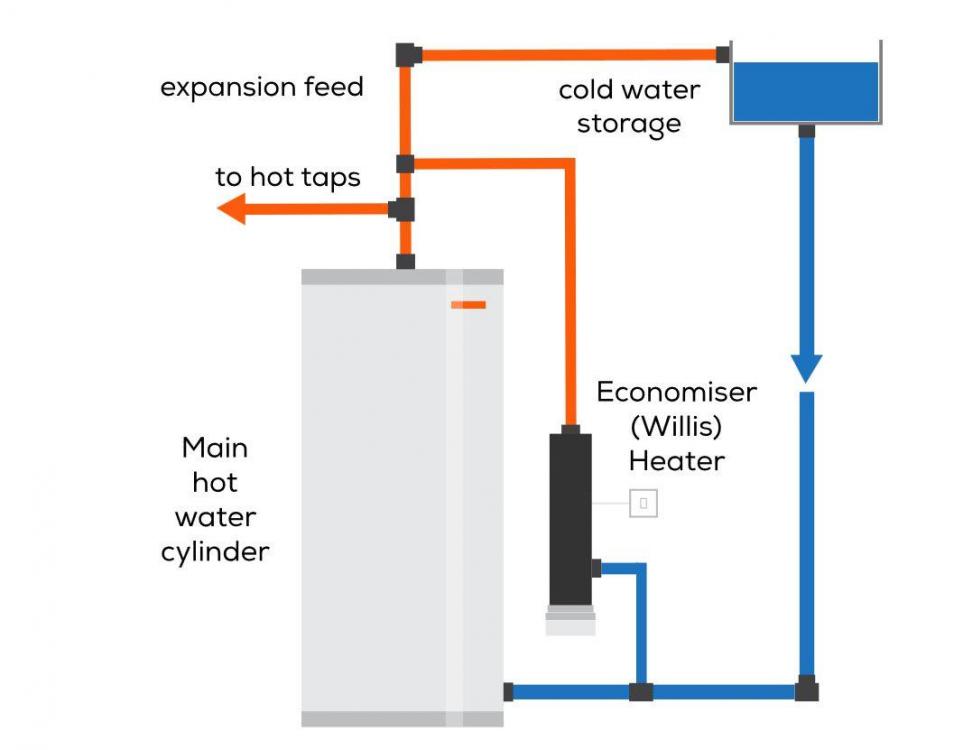
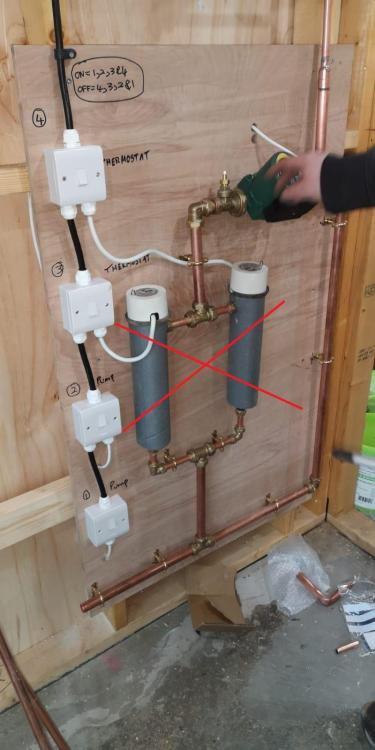
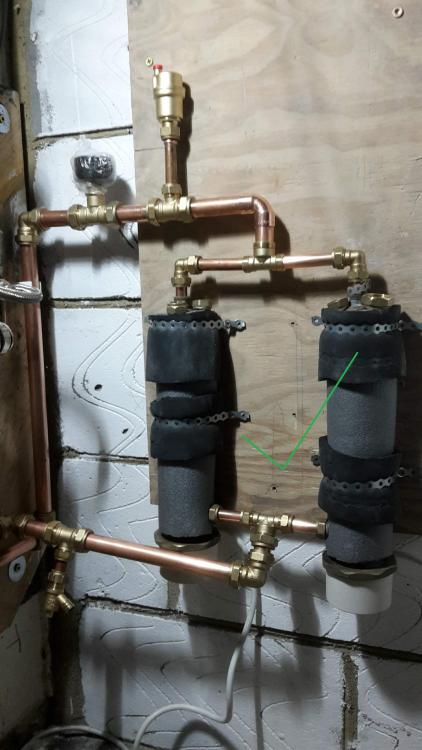
There seems to be a recurring issue with Willis heaters being installed upside down. The original MI's that were supplied with these back when they were pretty much only used in NI, had a plumbing diagram that was pretty near identical to this one, when they are used for their intended purpose, as a way of providing an immersion heater for a vented hot water system that didn't have one, and didn't have an immersion boss on the cylinder: I've seen a couple of photos posted here of upside down Willis heater installations, like these two (I've added the red crosses to show that they are fitted incorrectly): There is a problem with fitting them upside down, in that it creates an air pocket that cannot be easily bled, which then means that a part of the immersion heater element is running in air, so likely to overheat locally and probably have a shorter life than it should. This is best illustrated by looking at a Willis heater with the insulation removed, where the problem is pretty obvious. This is an upside down photo, annotated to show where the air pocket will be: and this is the same photo, but with the Willis heater correctly oriented, so there can be no air pocket: So far, the only photo I've seen on this forum with Willis heaters correctly oriented is this one (nice job @oranjeboom !): In addition to the risk of premature failure of the element by having an air pocket when these things are fitted upside down, I suspect that the electrical connections may well run hotter than intended (no water just under where they are to keep them cooler) and there may also be an increased risk of corrosion from the air trapped in the pocket. If anyone is using Willis heaters in an unusual configuration, given that they are ideal as a way of providing a simple heat source for low power UFH, then it's probably worth checking to make sure they are installed the correct way up. Willis never intended them to be used for anything other than the configuration shown in the diagram at the top of this post, and so probably didn't think that anyone might consider fitting them upside down. IMHO they could be better labelled, too, but I have a feeling that they are now made by several companies, rather than just Willis, so getting them clearly labelled etc may not be that easy.1 point
-
Illbruck look on you tube for product reference I think it is something like 925 but check this as they have loads of products all with a number as the product name.1 point
-
I am just fitting my windows and decided I wanted to avoid any window tape as I thought it looked a right pain, on the advice from NORSKEN windows I have used a system made by TREMCO ILLBRUCK it is a two part process first you use there airtight foam FM330 if I remember correctly, you let this dry and trim it back flush, you then use an air sealing paste that comes in a tube, you squirt this all over the foam just like silicon. However the clever bit is it has a very low viscosity so you get a 20mm wide paint brush and pull it gently down so it spreads all over the foam, you can get your finger in the corners and smooth it out, you can brush it all around the brackets making a complete seal. I am very very very impressed with the product and the reduced cost compared with tape. I am generally a hard arsed very hard to please bloke, but i am seriously impressed with this stuff. I think i have spent £220 on sealing up all my windows, and they are huge, my average window is 2.6 wide by 1.8 high so a fair distance around them.1 point
-
0 points
-
I only figured out this 5 bar/ 6 bar difference today... had assumed these std timber gates were just " 5 bar gates". But no all it seems are 6 bar. Apart from one. Their bloody 4' one. Inept not to tell me, or to know or care their stock was different one to the next, getting annoyed at me being 'fussy' try8ng to explain i needed them to " match". (When i hadnt the knowledge at this point to ask to simply order 6 bar: but as their paperwork says they all are 6 bar it wouldve made no difference). And a rude couldn't care either attitude to me too. But got lucky. The only other place selling them here, had an 8' (6 bar) so ive nabbed that.. & ordering me a 4' (6 bar) for a week+. But still possible it'll be a sodding 5 bar too.. so gotta dive in once arrived, check they match. Last resort: two six footers (& i can see match/ are identical 6 bars). But from this wretched 1st place. Hole still full of water!0 points
-
All we need now is for Cornwall's most famous mathematician to calculate the point of absorption/emission equilibrium for lead on a roof. @SteamyTea0 points
-
0 points
-
Depends vastly on the area you are in, but the general way it goes here now is you don't hear anything at all for until at least 5 weeks after deadline at which point it's summarily rejected for not having the right sort of bat report.0 points


