Leaderboard
Popular Content
Showing content with the highest reputation on 11/09/20 in all areas
-
This will be the last entry for our self build blog. Our plan We originally commenced a self build as there was no affordable housing for us to get on the housing ladder. The approach for the self build, was whether we could build a better-quality house than what we could purchase from a developer for the same cost. This was later refined to achieving a lower mortgage if possible. For the self build we decided to split the project into three chunks. 1. Obtain outline planning, purchase of site – this allowed us to know that a build was possible. 2. Put in services, access, design – this was the first actual work and made an area of croft ground into a valuable plot for lending purposes. Commence the build over two years - using subcontractors and our own materials to eliminate any margins and ensure tight control over the specification. Doing this would allow us to complete the project and prevent us being stuck unable to finish it. What did it cost? The total cost for the project was just over £196,000 (net of VAT). This includes the land, services, professional fees, overheads and the actual build costs. I’ve summarised all of my costs into a pie chart below. How was it funded? · A small electricity grant £1,550 · We obtained a croft house grant for £38,000 · The final mortgage of £74,500 · The remaining balance of £81,950 was funded by savings from employment, which started when we were 23 and finished when we moved into the house in July 20 at 33. · Most of the work we carried out was decorating and general labouring, therefore contributed a small amount of sweat equity to the project. What is the final result? The surveyor provided a valuation back to the building society of £265,000. This was pleasing as sometimes self builds can be more expensive then the total project costs or just about breakeven. Prior to building we were aware of building cost being measured per m2. However, during the build process I realised that this method of reviewing the financial performance of a self build had room for error, as the calculation could be skewed depending on the quality of the finish. For the purposes of our project this would be £1,420 or £1,230 excluding (land, professional fees and overheads). I came to the conclusion that the best method for us is calculating the final cost per month (mortgage, utilities, council tax, insurance) to live in the house. I set a target of £500 per month and I am pleased that we have been able to achieve this. I feel this is a good measure as I wouldn’t want to live in an expensive house that has a huge mortgage. Often at the end of Grand Designs and other tv shows, the presenter asks whether they would do it again? For us I would say, yes, of course. When I look around, every single item in the house was researched, compared, purchased and gradually put together. The thought, time and energy that we have put into this build has created a much deeper connection to the property. Our blood, sweat and tears are in the very fabric of the house. The hardest part of the process was when we were focussing on saving as much of our income as possible to ensuring a low mortgage. We made many sacrifices to ensure we reached this end goal, but we knew these relatively short term sacrifices would have long term gains for our family. For the actual building of the house, we chose a two year build schedule from starting on the foundations. This allowed us planning time between build stages and made the build process more manageable. It also allowed us time to do some jobs ourselves such as fitting insulation, interior decorating etc. We enjoyed taking time to do the jobs we were confident in doing well ourselves. Perhaps we could have taken on the more tasks, but I’ve come to the conclusion that it made more sense to work a bit of overtime and pay a contractor to do the work well, rather than us doing a job slowly and at a reduced quality. In the future, we would consider another self-build, perhaps in thirty years when I will be semi or hopefully fully retired. So until then… See you next time and thanks for reading.3 points
-
Depending on the build approach, you can PM without doing nuts and bolts counting by splitting the works in to packages and getting trades to do each bit - essentially you're taking the role of main contractor. For us, this worked well as the two critical stages - demo of existing and construction of basement, followed by erection of a timber frame package, were substantial and discrete elements. We then worked directly with window supplier, roofer, render, electrician, plumber, joiner, plasterer, tiler, kitchen, decorators, flooring, landscapers etc. contracting with each individually. Most contractors were supply & fit (so zero rated for VAT) but we did source all the plumbing second fix items, some lighting, tiles, flooring etc I found being honest and upfront about what we wanted and what stuff cost and what our budget was is key. You need to develop a relationship with each trade - be nice, offer tea & biscuits but try and avoid over supervision (let them get on with it) but don't be a push over also and be prepared to ask questions.3 points
-
I would say forget these. Get yourself a Dolby 5.1 or 7.1 surround sound system connected to the SPDIF Optical out from the tv. It will transform your watching. Both our main tv's have 5.1 sound systems, both obtained for free from freecycle, both with built in DVD players (nobody wants dvd players now so they throw the sound system out to replace it with a blue ray. So what that my sound system has a redundant dvd player built in?)2 points
-
never pay anyone, including estate agents on a %. allways fixed price with targets to be met2 points
-
I had the same feeling - early on, after we had PP but before we'd landed on a build method, I commissioned a potential PM to do a PHPP analysis and develop a cost plan. The proposed budget (very thoroughly calculated and itemised by a QS) was about 30% over what we had anticipated and his fee was a % on top. However he said that his fee would 'pay for itself' by bringing the build in under this budget. We did PM ourselves, eased by having a comprehensive TF package, and came in 20% under his original figure, even after adding some additional items.2 points
-
2 points
-
I have installed a pump station in the past. Although you can go for very expensive pumps, 2 pump systems, rail mount etc I think it is sometimes more practical to just have a fairly inexpensive single pump with chain plus a spare stored in the house. Don't bother with servicing. If the pump fails, swap it out.2 points
-
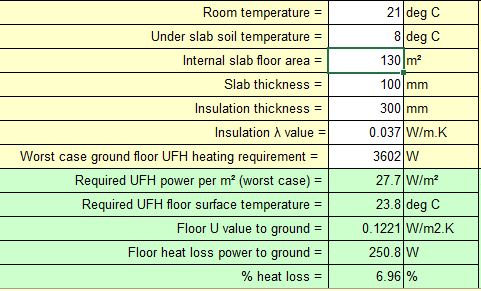
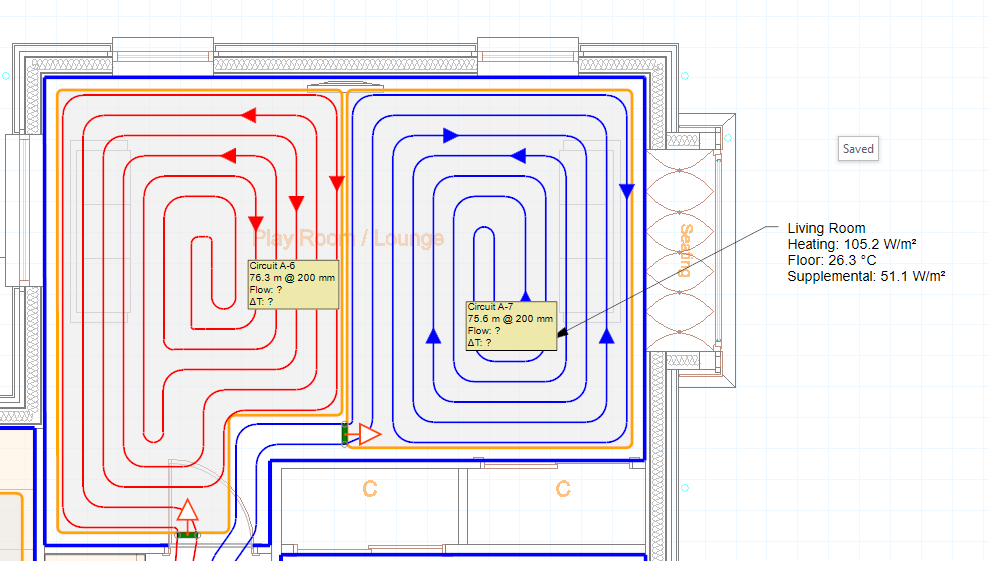
I've read various threads and views and back and forth and done some calculations based on information I have found here and of course from the very helpful spreadsheets provided by our friend @Jeremy Harris. I had pretty much decided ages ago I would get an 8.5kW Ecodan, which might go up to an 11.2kW ecodan unit. However I have not really advanced it beyond basic assumptions, what others done and some quick back of the fag packet calcs. I'm about to start foundations shortly hence, need to firm up on the UFH design for the in slab pipework and would appreciate some sense checking/ a wee nod that it seems ok. Build is SIPS with Kore insulated foundation, aiming for high levels of airtightness but not near PH (basically as best as I can get it without major hassle), Vent Axia Sentinel MVHR. ASHP which does UFH and DHW (UVC 3-400L tank). Secondary heat source of Log burner (I'm aware it's overkill likely - but I have 2 acres of woods, vaulted ceiling and need a backup in the event power ever went out). I would like to map out the steps in layman's terms to ensure they are right and I have followed it correctly from what I have read, then hopefully the thread can then be followed by others. Step 1 - Heat loss calculation: So I completed the heat loss calculator - see attached. I have a few checks to do on areas and might make minor adjustments but near as dammit it's close enough. I have added the OAT values for my local area (West Scotland, south of Glasgow) from the MET office. Now do I basically just use the 'Total daily heat loss power for average OAT (W)' value to find the maximum based on historical data and that defines the minimum amount of heating system required such below: which seems 3.6kW heat loss for January. The simply - I select a heating system which can supply this amount of heat as a minimum (ignore losses for now). So just simply selecting an 8.5kW unit would do the job easy? Step 2 - UFH design So Having found out the maximum heat loss above (3602W) then we can just plug this into the Heat loss and UFH calculator, which I have also attached. And provides the following output. So essentially, going on bare minimum I would need an UFH system which provides 27.7W/m^2 , based on 130m^2 of floor - so essentially if I don't use some slab area then I need to compensate and adjust the calc. Step 3 - UFH loop spacing So I know the total heat loss, I know how much heat input I have to supply per m^2 if I cover the whole area of 130m^2. So I get loopcad, then draw the circuits. Aiming for counter flow circuits as they provide the best option for even heat distribution, keeping circuits less than 100m in length. Now this is where I get a little lost, I have a figure of 27.7W/m^2 for the whole area to get my required heat input, however how do I correlate that with loopcad and also deciding what my spacing should be?! I have seen @PeterW mention quite a few times about the the spacing had to be adjusted but I am struggling to find the route here to confirm easily what it should be. My loopcad drawing (I've attached my current draft) showing for example 105W/m^2 in my living room, but I'm not sure how this should read in relation to my calculated figure. I'm pretty sure I'll need 200mm centres, but I'd like to ensure that was right. I've some adjustments to make to my circuits, but it's not far away. I was finding that the auto generate function for pipework isn't ideal but it works ok. The garage can be ignored - I ma installing pipework in there pre-empting possible future conversion of that area and hence pipe is cheap, so why not add it now. The manifold will go below the stairs - seems to make sense to me, I have a plant room directly adjacent and was going to put it in there but seemed better to get it out of there as I will have lots of ducts and this would clutter that up. Is it ok to run underneath the stairs? I assume I just have to tell the Joiners not to fit the stairs to the floor with big screws?! Step 4 - Zones I am only having downstairs heating, so it is a single manifold. I would prefer as few zones as possible, but a single zone wont work. I was thinking I can have two /possibly three. Zone 1 - Main family room area Zone 2 - Everywhere else excluding shower room and garage Zone 3 - Shower room Zone 4 - Garage (permanently isolated at the moment. I assume you can have multiple zones on a manifold, and can just split them up by using salus actuators?. So a single thermostat for family room can control three loops (each with an acutator) in that room? and so forth?. It's a long post , and actually I wasn't going to talk about zones but thought it was worth adding in. Thanks. Heat loss calculator - SuperJohnG.xls.xlsx Floor heat loss and UFH calculator - SuperJg.xls.xlsx Looopcad - SuperJohnG.PDF1 point
-
Sounds like we have pretty similar systems, though mine is vented. Been experimenting with speed and think I’ve stopped the cycling and achieved long burn with a faster pump speed, as you mention. Need to do a few more measurements to confirm, but TS is def getting satisfied now, so UFH manifolds can just chug away happily.1 point
-
No paint , oil or preservative is fine on oak paint is dangerous, oak significantly acidic and oily and throws off paint1 point
-
1 point
-
So that is over 30 square metres so the whole thing comes under building control approval - so fire, structure, wiring etc.1 point
-
Welcome to THE forum, lots of knowledge here, bring on the questions and we love photo,s.1 point
-
@Dave Jones detached @joe90 I have to get it completed, as I plan on putting my office there. Ive resigned myself to letting the VAT on garage go1 point
-
We have a lot of oak outside on our house with different finishes... Our paddock gate was untreated and took many years to go silver, along the way it went black and grew green "stuff" on the top rail. You might have to wait 6 years or more before its all silver. Our front door is treated with Sadolin. Coat of Sadolin classic light oak and several light coats of Sadolin Extra Satin Clear on top. Seems to last very well but it doesnt have any horizontal surfaces and those weather faster. We also have a lot of oak beams and posts (holding up porches and framing windows) i really want to keep these a nice honey colour. These were originally treated with Danish oil but that's a right pain. It needs recoating every year otherwise it starts going black as if untreated but slower. I ended up sanding it all off back to new wood. Gave it one coat of Dainish to colour it then three of OSMO UV Protection Oil. This is expensive but seems to last much longer than Danish oil.1 point
-
1 point
-
Not a warm roof by design but as I look at a useful storage area I am starting to consider how it can be partitioned into a semi warm space. Just need to ensure I don't create temperate damp space.1 point
-
Both would be ok I used Tyvek We installed the membrane in Feb Pretty rotten weather and myself and my wife spent two weeks slating the roof in The two garages where done the same way Then Brexit arrived and we couldn’t get any slates for most of the winter End of Feb to the beginning of May They both stayed watertight I think the summer months are harder on an exposed membrane1 point
-
Elderly parents? Wet room corner / plastic garden chair / garden hose. Sorted. ?1 point
-
paid to agreed in advance milestones subject to negotiation as thgings progressed. For example, roof tiles arrived two months erarly so we paid after a month (builder gets 30 days) part of the roof works price, he produced the invoice we paid said amount. Sometimes factors outside everyone's co0ntrol comes into play, weather!, so have to be pragmatic. Don't expect dates made in advance to be hit. Our roofers for example were weeks behind as the weather meant they were many jobs behind. They came and battened/Tyvek to get it mostly dry so we could continue second fix which was appreciated. I'm not sure they would have if we were on their case every couple days saying where are you, you were meant to be here 3 weeks ago etc . My observation from our previous self builds is the building game is all about compromises from day1, some you will get right and some you wont.1 point
-
1 point
-
1 point
-
I fitted an electric roller door to my garage. WAY cheaper than the prices this thread is talking about, very simple DIY install, and the usable door opening is the full available opening, the track and motor etc all fit inside, without reducing the available size in any dimension. Why do they particularly want a side hinged door(s) ?1 point
-
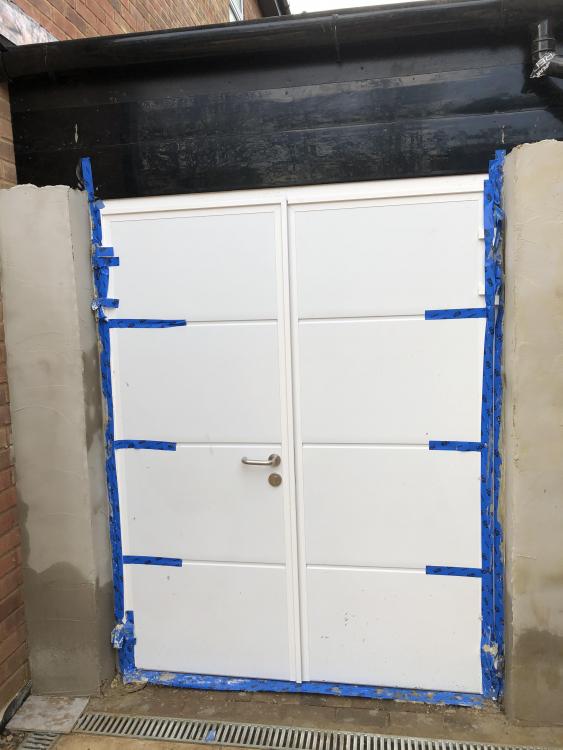
We've just fitted a side-hinged Carteck (Teckentrup) door for the rear (garden) end of our garage. Paid £1300 (installed by our builders so installation not included in this price). I must say I absolutely cannot understand what all the fuss is about. The door is very basic, I can't say it's particularly reinforsed or of some uber-smart design. Just.A.White.Metal.Door. Honestly, I would probably price it at £300 tops, not £1300 (but us being self-builders and buying all things new we probably just got carried away. Oh well). Our front sectional garage door is by Hormann and only £200 more expensive - but it's automatic, all singing and dancing so the price is somewhat understandable. But the rear door is disappointing. Oh, and the sticker on it says it should be cleaned thoroughly every two months!! And tiniest specks of dirt should be wiped off immediately with clean cloth as soft as baby's bottom, lest the guarantee would be voided. I mean, seriously? wiping a garage door every month with triple-ply soft tissue? For that price?..1 point
-
incentivise them, asking price they get X your stretch price they get Y. Make X below 0.75% of asking. Try not to drive the trades mad with constant questions/nit picking. If you see something you dont like ask the architect first as it may be your problem and it saves hassle with the trades. We had a weekly meet on a friday with the gaffer and discussed anything that we wanted to bring up or discuss. This was made clear at the start of the contract/build. No friday meetup no friday pay. He only missed 1 and it kept things on track.1 point
-
We haven't treated our cedar cladding on the house and the north facing wall has gone a nice even silver grey. The other walls are more patchy as it is the rain that washes the colour out rather than UV bleaching it. A friend clad his barn in oak and left it untreated and that went grey. It takes time for it all to even out.1 point
-
1 point
-
That doesn't sound right. You want the pipes tied to the top layer of mesh, so 30-40mm deep. At 150mm depth, the heat will never make it to the surface of the concrete. Make sure you have the fact that the slab will be a finished floor. I.e. you'll need the concrete specced so it doesn't crack with the heating cycles, and is leveled to the right tolerances and power floated. Btw, you'll find that once you cost up all these difficulties and extras, a finished and polished concrete floor slab is no cheaper, if not more expensive, than a tiled or wooden floored screed. Factor in a min of £40m² for a basic polished concrete floor, on top of your normal costs. And also weigh up other difficulties as the build goes on- how do you get electrics and water to your kitchen island? What happens to all the plaster and wet trade crap that falls on the floors? Others here have protected their slabs wil bots of carpet, plyboard etc. Not impossible, bit any savings may not be worth it or realised. But don't get me wrong, and insulated concrete raft is a great design.1 point
-
1 point
-
Assuming ground floor, UFH can loose more energy to the ground, which generally has a lower temperature for longer parts of the year. On a second floor, it should realistically make no difference. If by you mean mechanical ventilation and heat recovery, then no practical difference as that is to do with air changes and not the losses though the walls, floors, roof, windows, doors etc. Depends on the view and if you are an artist. If the thermal losses are manageable, then no problem. Near me is a small cove, if a house has a south view, it would be of industrially scarred land, but the north view is of the Atlantic.1 point
-
Have you read Freakonomics? Because on commission, estate agents are incentivised to pressure you into a sale ASAP as to wait will only give them a tiny drop in income. However, when estate agents sell their OWN houses they take on average 3 times longer to sell, because they are incentivised to wait with a far greater amount of money.1 point
-
Just on the estate agents- How is that beneficial if they don't sell at asking? Obviously if you get more than asking, a fixed price helps, but on a percentage of sale, they take the pain of achieving any less than asking price along with you. On the OP, trust needs to be built up and it's hard choosing who you can build it with, but keep communicating as that's where it always starts to go wrong.1 point
-
1 point
-
Also bear in mind that when these fail the tank full of sewage is not all that bad. Maybe I have poor sense of smell but lots of it will be water from showers, dishwasher, laundry. Obvs a fair mix of floaters but the contents are regularly pumped away.1 point
-
It contains only 2-5 litres of water. The point of an LLH is to allow different flow levels through different parts of the system, not to act as a buffer store to stop short cycling. Oil boilers don’t modulate down enough to not short cycle at low heat demands. Your boiler is running at 65c pump speed 3, UFH needs 40c pump speed 2, therefore you need somewhere to balance that off hence the buffer. For an efficient burn on that boiler, and getting you mains pressure hot water, a TS would be my plan as it allows you over time to change out the components and add in whatever you need for heating. You can even blend at the TS itself and negate the need for a manifold blending unit, and your single pipe would still just go in and out of the TS as normal.1 point
-
Design completed, planning approved, now getting ready to appoint people for build. Independent architect available, with capable architect assistant, did drawings etc, ready to supervise. Gut feeling is trust this architect & their trusted builders/master contractors, hope for the best. Just don't want to be over-naive, so open to any tips on how to get the best out of people without going bankrupt Welcome to that feeling...Engage good people is the best advice. Seems to be a mix of references and gut instinct. My research and discussions have taken £1000s in and out of the equation every week. It's tough. I read that Duncan Banatyne incentivised his builder (main contractor/PM) to look for cost cutting during the build by sharing the saving with him, compared to the 'as designed' costings. That was on commercial buildings, we self builders tend to be fussy types on, perhaps, our forever homes, so I guess a fugly cheap staircase, for example, wouldn't cut it. I don't really see how project managers paid on a % of the build can be anything other than disincentived to save money....I have friends whose self build went over by £100k because their builder was a really good salesman and it all happened before they quite realised. At some point you decide who to trust overall and jump in. The other way is to get the superstructure done by a main contractor then subcontract and PM the trades yourself.1 point
-
1 point
-
https://forum.buildhub.org.uk/topic/17216-magnetic-latches/?tab=comments#comment-2782051 point
-
I'm not sure what you're asking or trying to achieve? An architect has to charge fee's to cover local authority fee's, structural engineers etc let alone their own wage and business costs. Builders require labourers and buying of materials. You could PM yourself and source all materials but then you'd be paying a quantity surveyor to "count all the nuts and bolts" so you know what to order, but then will you get the same trade discount as a builder? If you want reasonable quality your paying for quality in materials and the labour to achieve the best results. If you want quality of design, guess what you're paying for the architects time. As an other note a builder has to quantify their material costs to you, unless your well knowledged and verse you won't know the price of materials and amount required, so theirs an element of trust involved when receiving quotes, but that's the thing you get various quotes. Or you could pay that QS fee who'll also go over quotes to ensure your not being over charged on material quantities, but then you don't want to pay fees so the circle continues... The only way to incentives them is to make them aware that budget is low and they'll design and build appropriately. There's not a magic hand shake and phrase to get the same design for cheaper when it comes to the structure of a building* A good architect upfront will save you money in the long term. * Apart from when it comes to things like kitchens or bathrooms where thousands can be saved from researching alternative looking products similar to the big high-end brands, but then it's often looks over quality.1 point
-
I would guess the time factor. Sounds the sort of thing that takes time, and perhaps they needed to sell for a more important reason.1 point
-
Got to wonder why they didn't get pp in 2019 to change it to an separate dwelling? That ight make it more valuable and it could still be let out. My guess is they were advised they wouldn't get it. Beware. If you do manage to get planning permission while under offer whats to stop them pulling out of the deal and selling it to a third party at a higher price? To prevent that you could talk to your solicitor about an option to purchase contract but that might cost as much as you could loose if they bail.1 point
-
From my understanding, condensing boilers are more like turbocharged cars. They reclaim some of the energy that usually goes to waste. If you run a turbocharged car at too low an engine speed, it is basically 'running rich' as there is not enough air to burn all the fuel. A similar thing can happen at the top end as the fuel injection system tries to put in more fuel, but the turbo has 'run out of puff'. So there is a sweet spot where all the fuel gets burnt, and maximum torque is produced. Now a boiler is obviously not the same as a TDi. Rather than having a 'rev range' is has a thermal range. This is just a range of temperature differences where the boiler can transfer the most energy for the least fuel. This is easier as a formula: Q = U×A×ΔT where, U is the overall heat transfer coefficient A is the overall heat transfer surface area and ΔT is the mean temperature difference between hot and cold side The trouble is that the cold side i.e. the water is not a constant, it varies, and as it varies in temperature i.e. gets hotter, the coefficient U would have to changes to keep the efficiency the same. As a rule, the flame temperature will be constant (within 10°C or so), A, the area of the heat exchanger within the boiler will stay constant, so all that can be changed is the temperature difference ΔT. As heating is not a linear process but follows an exponential curve: T(t) =1- t- exp(-k * t) Where T is temperature, t is time and k is a constant. This produces a chart that shows that when there is a large temperature difference i.e. cold store, the energy transfer is large, but as the store warms up, the energy transfer decreases, even though the fuel burnt per unit time, is the same. Or in simpler language, the hotter you get, the more fuel you burn. The trick there is to find a lower bound temperature that satisfies your hot water needs i.e. 40°C and an upper bound for safety i.e 60°C Using the made up chart below you can find out the amount of time the boiler needs to run at (bare in mind this is showing % change, not absolute temperature). So what you need to find is the range where the boiler is condensing, the water never goes below an acceptable temperature, and never goes above a safe temperature. And runs for the least amount of time, as I think oil boilers do not modulate (I may be wrong here, but the physics is basically the same, just another variable in the mix). I have highlighted this with coloured lines. So for the same temperature change between the blue lines is 7 times units, and between the yellow lines is 22 time units.1 point
-
Tiles need nothing under them - I would do the other walls with Super Leytex at least two coats before tiling though1 point
-
I used this. It's brilliant. Can't remember if I watered the first coat down or not though. https://www.screwfix.com/p/leyland-trade-super-leytex-matt-paint-brilliant-white-15ltr/60248 EDIT: I did water the first coat down. Probably as it says on the tin. Some say I went OTT on my plastered ceiling and walls... 2 coats Leyland Super Leytex 20% water Gyproc EasiFill 20 as required Rubbed down 2 coats Leyland Super Leytex neat 3 coats Dulux Diamond Matt1 point
-
Isn't that the original "branch" approach used by larger installations? You can use a rectangular profile pipes which are much easier to fit into gaps, I think. 63mm pipes are really good for carrying around 30m3/h. Here's a rough calculation. Basically plan for upto 22m3/h for your nominal flows and can go upto 30m3/h at boost with 2.3Pa/m drop. Above that the pressure loss (and noise) increases dramatically. Note that the drop (DeltaP) figures are for 1m only. For a 10m pipe, you need to multiply by 10 and add acouple of Pa per bend on top.1 point
-
@Roz who has specced the reinforcing in the slab...? If its the engineer then it has to go where they say. If its the builder then consider fibre reinforcing ! Pipes can be anywhere but suggest its below half way as it slows the rapid swings of the floor/room temperature and allows the floor to act as a heat buffer. For example I'm in a building where its 100mm slab with 25mm limestone flooring, and the pipes are in the Wunda trays at the bottom of the slab. If you open the back door and leave it open for 20 mins, then close it, the room recovers reasonably quickly as the slab is heated through so probably only drops 0.5c or less even though the room drops by 6-8c. Depending on layout needed, you can install the A146 or whatever reinforcing and zip tie the pipes to the mesh - standard RC25 will not damage this at all, and if its pressurised during the pour there is a school of thought that makes it harder to crush still. If you don't have any spec on the rebar then you could use the Wunda or Polypipe trays, put the pipes in then lay the rebar over the top. Either is fine, one is a little more expensive but easier to DIY.1 point
-
The timber floors ( assuming aluminium spreader plates there ) will prob need a higher flow temp to get the house heating up at the same time, but 35oC rather than 45oC to start off . Small ( +/- 2oC ) increments assessed over 24/48 hrs are sufficient for upping / downing and settling on the best temp. With 6-8 ports the pump speed should be no higher than 2.1 point


