
Leaderboard


Popular Content
Showing content with the highest reputation on 08/31/20 in all areas
-
After demolition was completed in March, nothing happened again until late June. If you want a good worker, you have to wait. And that's my friend of 10 year plus, Noel. So I was happy to wait a few months to get him to do the extensive ground works, an experienced plant operator with a team of solid workers at his disposal. As we're building a basement, we knew excavation would be extensive. Once we'd leveled the site, dug out the founds, the drainage and main basement excavation works could start. As you can see, we've ended up with a rather large pile of bricks... A sense of scale, this is 1/2 depth of 1/2 of the main building footprint... the clay was already building up at this point! We knew then we'd have to shift a few loads away as there wouldn't be room on site. All started well... until, well, I got a knock on the office door and was greeted to Noel looking in with a strange, perplexed, half smile reminiscent of a child that's done something wrong and is straining to hide their obvious pride in their achievement. "Conor, I've found a well" "What do you mean, a well?" "A well". A few moments of silence passed. Then he showed me this: Somebody, back in 1920 or so, in their unfathomable wisdom, decided to build their house directly over a 5m deep, sandstone walled well. DONT PANIC!!! A few phone calls and a bit of head scratching later, we found a solution. 5m3 of lean mix concrete was quickly ordered! The well was pretty much at the back inner corner of the house so had to be dealt with. Luckily, the well was dry (apart from a little sludge at the bottom) and not apparently hydraulically linked to anything of importance... so engineer said fill it up! A shame, but a relatively cheap outcome for what could have been a disaster. We kept going, the clay started to be trucked away at a painful £150 a load. I lost count after a week. Another 'sitting at my office chair' moment happened just as we were seeing the end of the dig. What's the smell? Don't tell me Noel's spilled a load of diesel!!! Nope, we'd hit a large patch of soil contaminated with home heating oil. It was flagged as an issue when buying the house, but the survey indicated that it was localised and not at toxic levels. OK. So, it would appear that the oil had seeped down from the oil tank to about 2m deep in to a slight gravel strata and stuck there. The smell was incredible. Another panicked phone call to the oil contamination expert. Came out a few days later and took samples. We carefully stockpiled the contaminated soil to another part of the site on a sheet of polythene. Good job too, came back as hazardous and we would have been in trouble if we'd taken it to landfill. It's still there. And will be there for a long time in the hope that nature will take it's course and clean it.... In the end, we finished after almost three weeks (up from the one week estimate) and trucked out 51 loads of soil (816 tonnes) and imported 225 tonnes of stone. Bonus tho, we now had somewhere to put our "day" caravan and awning and finally have a spot to have a BBQ and beer after work.... and quality time with family. Ended up 50% over budget.... well, at least we're out of the ground now....9 points
-
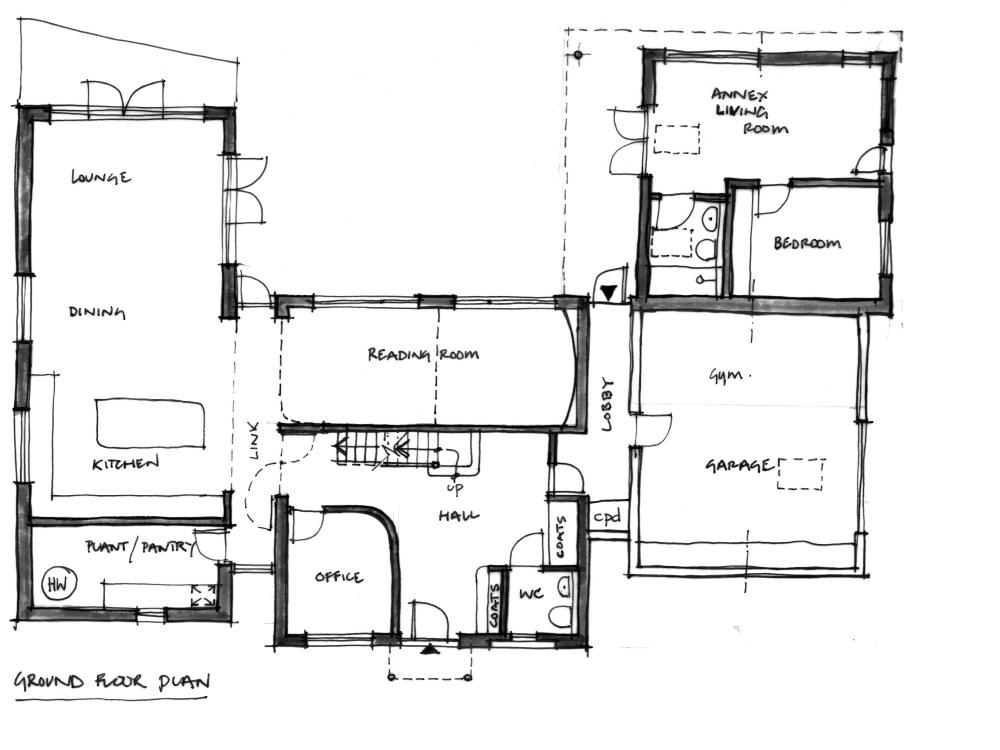
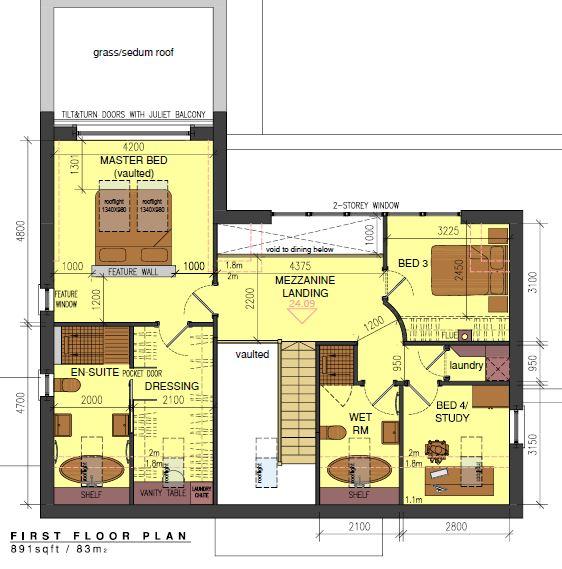
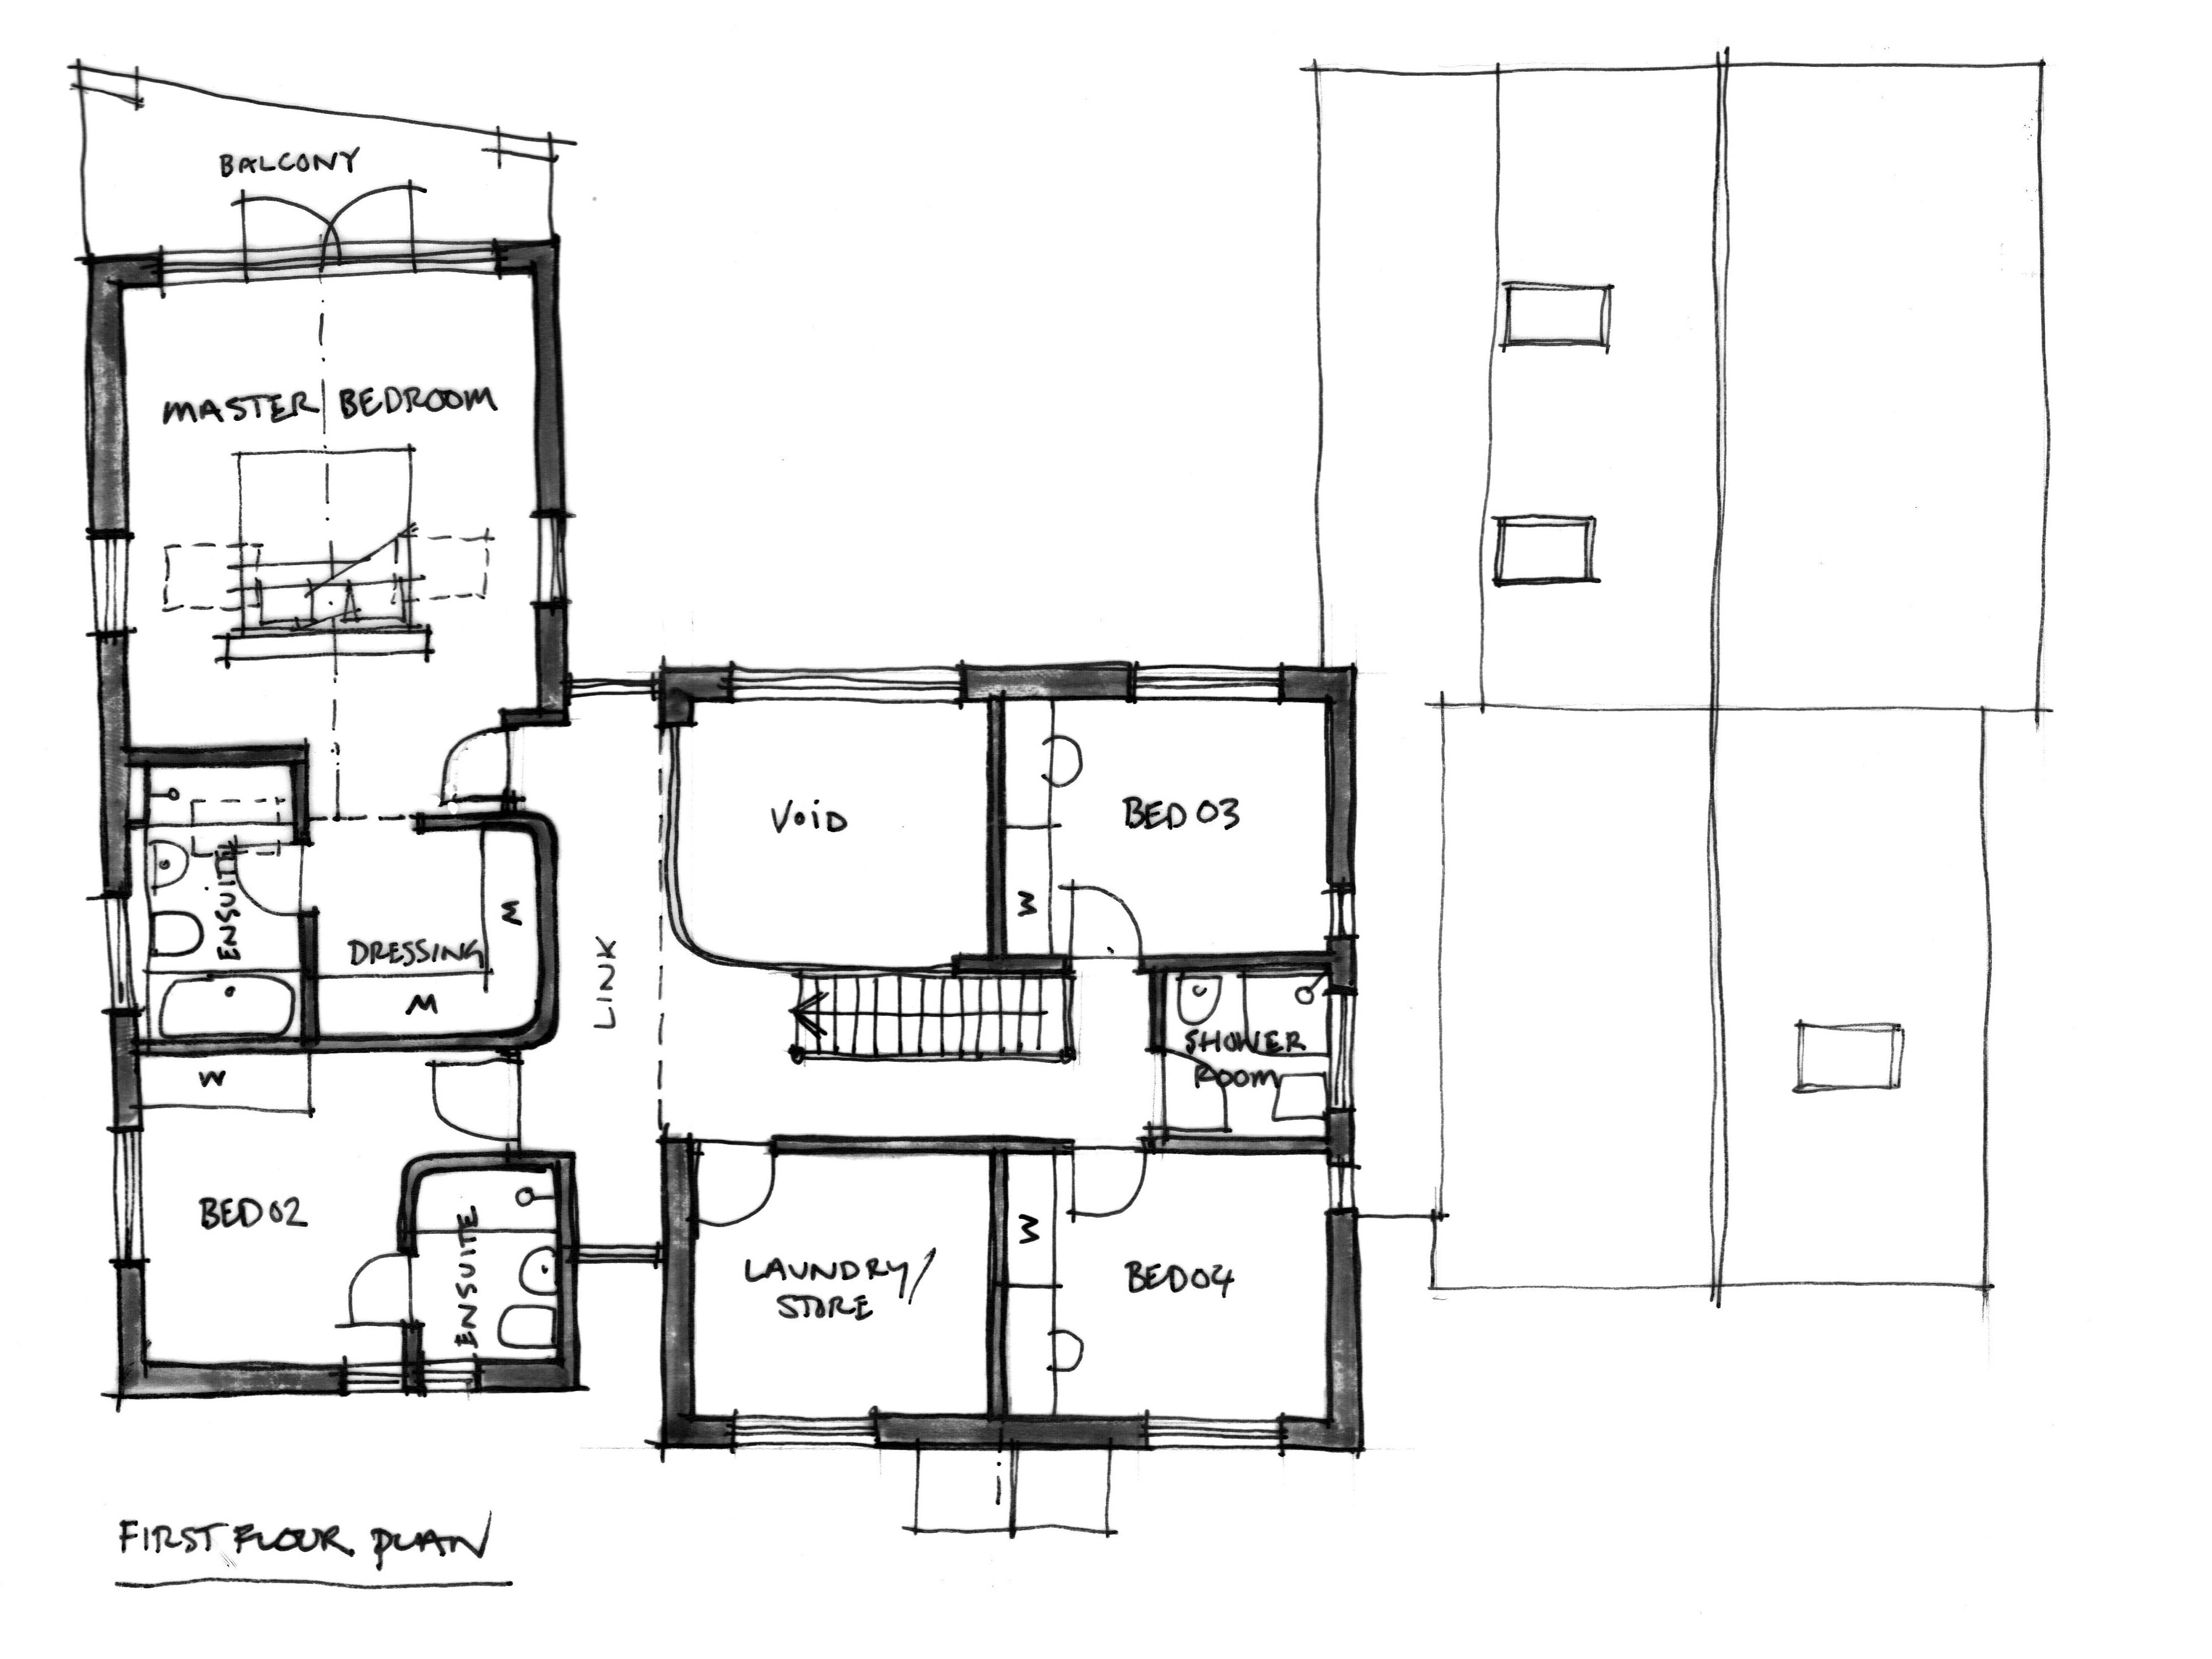
All, These are the draft plans that I have worked up with my architect. I'd appreciate any suggestions you may have. Some background to the house: The house will consist of my wife, three children, one MiL and me I worked from home a lot before it was cool, now it looks like it may never end! My wife loves the idea of an upstairs laundry room The plot is oriented on an E-W road; the front door is due North and the balcony is due South My aim is to build a passive house
 2 points
 -
Grooves draining into the half bowl, whichever side that is on.2 points
-
Well my first lot of home made baskets have been installed ! Iused high tensile sheep netting doubled up and offset to make the holes small, wired them together and then they were filled with Stone salvaged from site. It worked really well and saved me a lot of money but it did take some time all said and done. Got a lot more projects to do so will need to get on and build some more......
 2 points
 -
I have a Slate roof thats been on for a very Very long time ...... maybe nearly 80+ years it’s got no felt and the nails are in A terrible State but i go Up once a year and replace broken, cracked or missing slates And it’s still serviceable after the 7 years I have been here..... If I could afford to replace the roof I would but I can’t so I will keep it repaired until I can. Post a pic of the roof as then people can see the general state of it which will help them give good advice. If your capable and you can get up there safely with ladders then it might be a case of a few simple repairs which could save you many thousands of pounds.2 points
-
I liked it until I saw the elevations... those rounded corners in the plan will get cut out pretty quickly! What are you picturing happening in the reading room? If you've got a big open plan kitchen/dining/living room, it seems strange to have the reading room open to a double height space with open to the circulation, would you not want a "snug" there instead? There's a huge amount of circulation on the ground floor, the hall is huge but hardly any natural light2 points
-
After being asked on several occasions for a breakdown of what we spent We are doing our budget for our next build and using the spreadsheet from the one that we are in The gist of it is 409000 spent - 19000 vat claim Leaving 390000 -185000 plot purchase (Fees& services included in build cost 268m2 = £764 m2 Big spends apart from the usual Slates steel much away Windows 33 sash and bifolds doors French doors 33k Kitchen 18 k Tiles 10k 15 k for paving Wood-burner 3k Electric gates and oak porch 8k All above fitted by myself and my wife So just materials The spreadsheets we did should help us with the next one All be it prices will have gone up a little I could have easily fitted a much cheaper kitchen But went with A German kitchen with one eye on selling We had no choice but to use sash windows due to Heritage being involved1 point
-
It's Natural Stone Surfaces (supplier to DIY Kitchens). They have seemed a good company so far... I contacted them for a quote and attached my kitchen plan for context. They spotted the DIY Kitchens URL and advised I'd be best going via DIYK as they pass on the bulk discount that they give to them. (I'm assuming that was good of them - if there could be an ulterior motive don't tell me now!)1 point
-
Standard for a tap is 35mm. Sounds like a decent company to be asking you for model numbers, so they can make sure they have them in the CNC machine.1 point
-
Also, when the stone supplier came to template for the stone, they took the sink away with them to size up for the hole. Yes they cut the tap hole, and don't forget draining board grooves.1 point
-
1 point
-
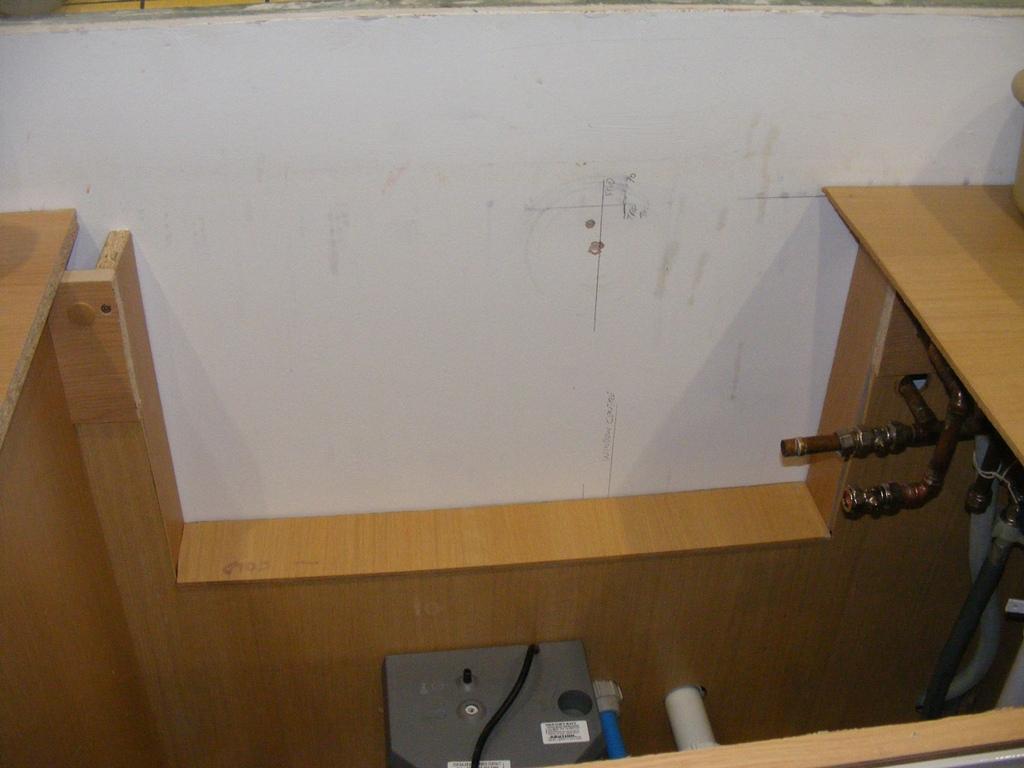
Speak to your worktop supplier before you do anything. Some are happy to have the sink mounted to the unit and then sit the worktop over it. Ours were not. Ours the sink is hung from the worktop without getting any support from the unit, which of course means it is in a sink unit large enough to do that. Your sink unit is not. +1 to cut the back out of the sink unit for access to the taps, this is what i did:
 1 point
 -
P.S. get the back of that sink unit out or you are never gonna get the tap connected.1 point
-
Been there a thousand times. Used to own a kitchen company..... First you need to cut out most of the front bar . If you have got 20mm doors ? you will want a 30mm overhang on the worktop.You need the drop of the bowl to be between 70 and 100 mm from the front of the worktop. Anymore, and you will be reaching, and bending into the sink. Cut away the front bar to 30mm, then use a router to rebate the sides, and what remains of the front bar. Drop the sink in, on silicon, and aim to get it flush with the top of the cab. The sink will be fully supported by the sides of the cab, so no bar underneath required. IMO, get the stone top overhanging the drop of the bowl by 5mm.1 point
-
I’ve router the unit down by a couple of mm so the sink is flush with the top of the unit (don’t have to be too careful as you can secure it will silicon if you want. Then I siliconed the sink to the bottom of the work top. (I mean routered where the sink is only... not the whole unit)1 point
-
A series of staggered shelves would add interest for the cats. Maybe a high sleeping perch too.1 point
-
Almost . The short cut at the end to follow the other tiles on that row ( I.e flat , even if wall isn’t ) goes ‘into’ the wall . @Onoff has got it . I need to ‘thin’ a narrow strip of that corner vertically . As I said , luckily sink and vanity unit go on this wall and in this corner .1 point
-
Architect is doing that but just trying to get ahead of the curve where I can. I got the plot with the foundations already in and then we changed the style of the house somewhat dramatically and it left us with the somewhat massive halls. It is what it is as we couldnt get the loading's to work with the founds any other way. We will make good use of them with build in cupboards etc!1 point
-
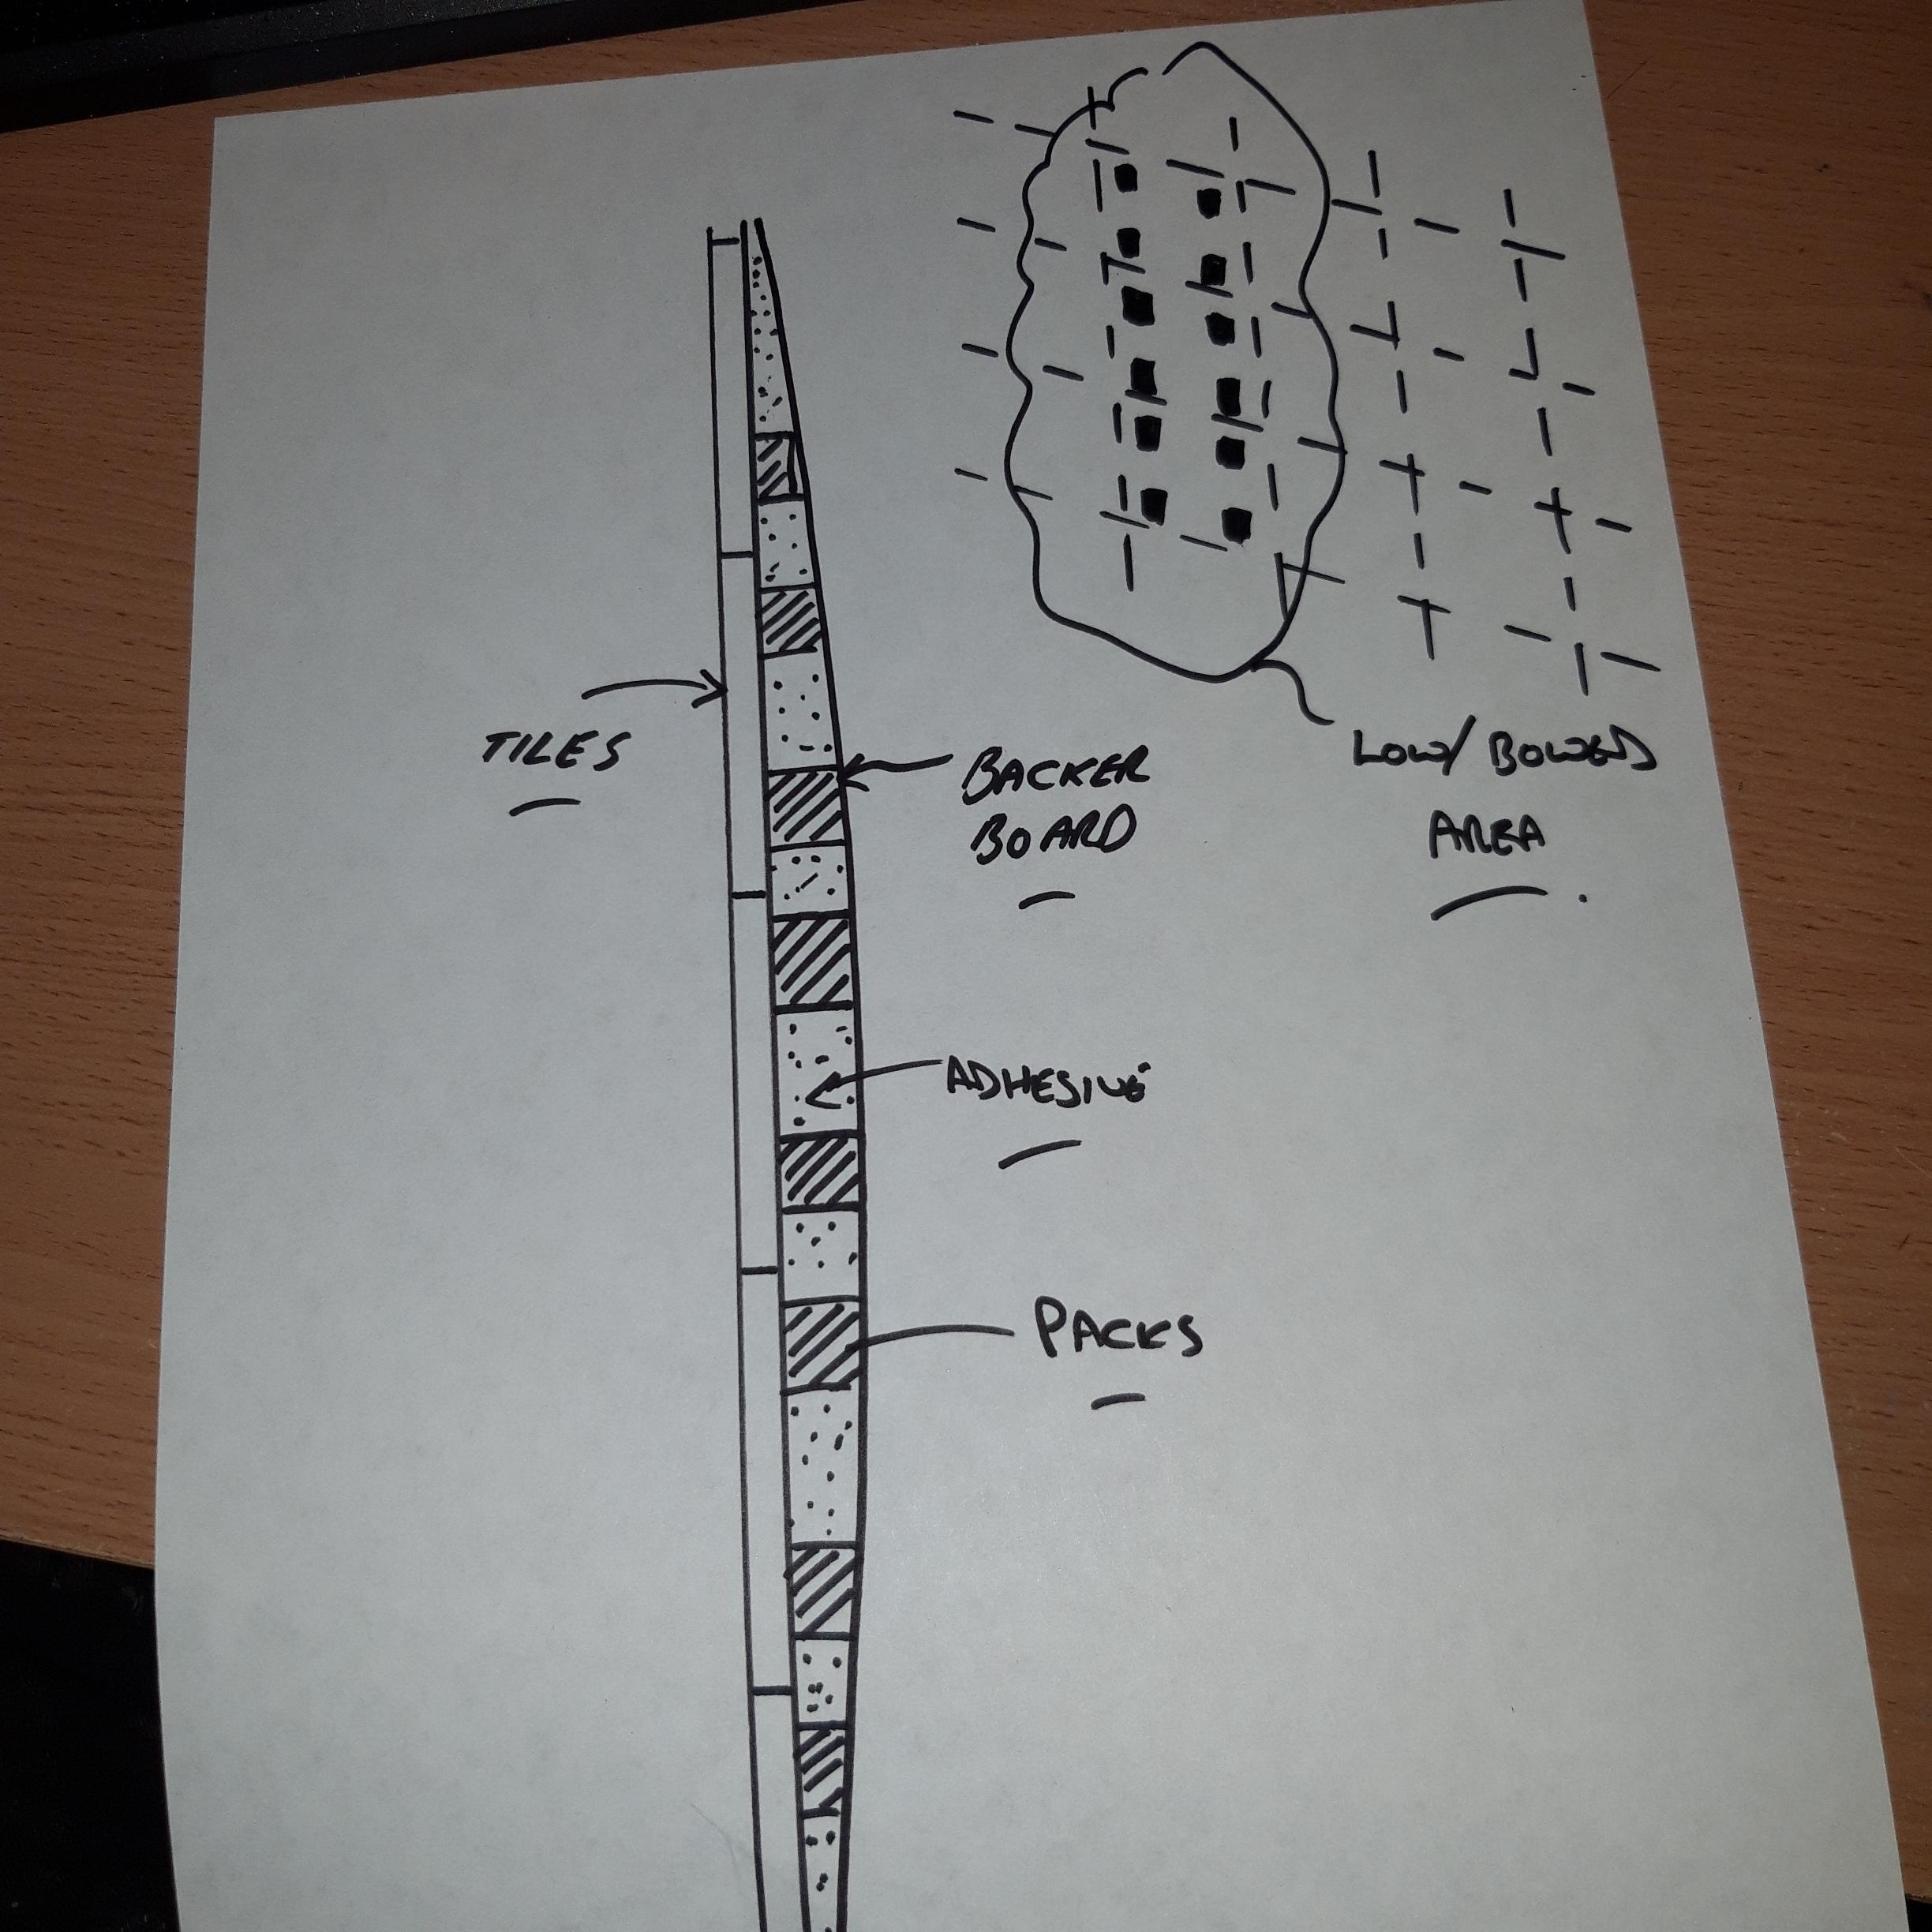
There are 2 different issues I think. 1) the short cut tile that he has at the end of a row in the corner is lower than the rest of the row, so will need more adhesive behind it to bring it level. 2) the wall isn’t 100% vertical so the width allowed for tiles to slide into a gap allowed by tiling the adjacent wall gets narrower as you go up the wall.1 point
-
I'm lost as to what I'm looking at the. Presumably he means as the wall bows out at the top he can't get a tile in? EDIT: Just read, he does mean that. I'd multitool the backer board a bit thinner maybe and tank for good measure.1 point
-
Nah, it's either blue or blue. Matches my mood most of the time. My alcove lights were I think £4.99 for 10 from S'fix with a tenner off the already discounted clearance price. St/st garden deck lights. Bought two sets.1 point
-
Exactly, and the shower is to wash the wellies.1 point
-
With your straight edge against the wall you see the bow, inward right? What you want ideally is a flat wall. A proper tile could lay a whole bunch of tiles and gently press them all in level, even with a bowed wall. The longer your straight edge btw the better. So imo if you marked roughly where your tiles are going, then held a straight edge up, you slip in the nearest thickness pack behind the level. Gives you a pseudo flat wall.
 1 point
 -
Right, you have in effect a hollow there, a depression in the wall. You spread your wall with the same depth of adhesive say 6mm notched. The risk is you push some of the tiles into the depression. Some cleverly placed packs would stop you pushing the tile in too far. They would come up against the pack.1 point
-
Gav-P is right though. When you are in the shower washing your bits, you will wish you had sorted it.1 point
-
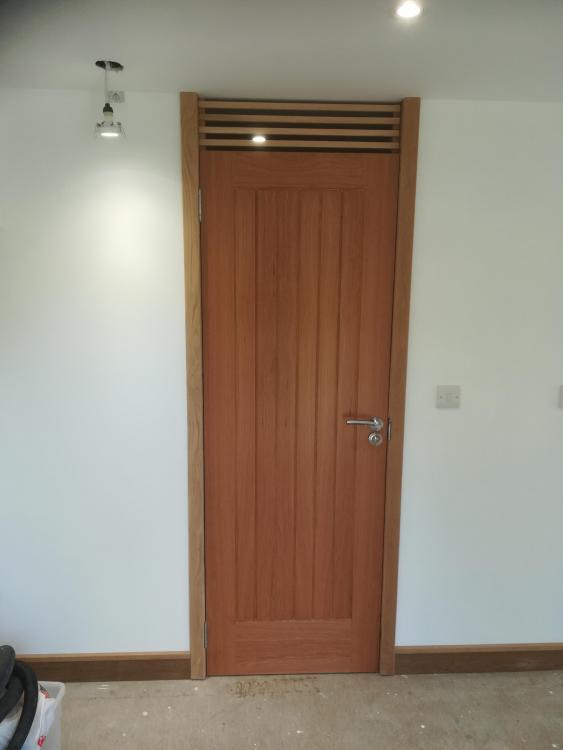
It an internal door within the shed you tart Ferd. Leading to the, every shed should have One, shower room.1 point
-
Bloody posh shed owners. THIS is a bitsa shed / door!1 point
-
I guess the question is whether you will see it when you are using the shower? There is nothing worse than seeing something that you did not quite right... no one else would notice, but will it be one of those things that pisses you off about the shower? If you just push the fitting against a flat surface does it hide the foam backing (I.e. the chrome bit touches the surface), if not then what you have is how it’s supposed to be anyway.... with a little bit of vertical fettling!1 point
-
No, it's the same at that stage (except i didnt get a text). I got the acknowledgement with 6 week prediction after about a month......THEN the letter re 70%, which came a little quicker than the 6 weeks.1 point
-
Had some scraps of oak around, so used it inside. The only thing is it's a lot of different colours. Not sure if to leave it, and just varnish. Stain it then varnish, or just paint it white? It is only a shed. Flooring and blinds next.
 1 point
 -
I used two layers of insulation so I couldstagger the joints.1 point
-
If it was me I'd be swapping around the laundry room and showerroom. Laundry looks same size as those two bedrooms, bathroom and laundry could take up the same space as shower room and bed3, which would allow reconfiguration of those two room sizes.1 point
-
Buy a box of assorted plastic packers and stick those here and there? https://www.screwfix.com/p/broadfix-assorted-levelling-kit-one-size-200-pcs/7565F?1 point
-
Yes definitely an improvement, we had a few problems before with cold spots , downstairs bedroom was one of them that never seemed to get to its required temperature but all sorted now, don’t know about running costs we’ll see how it performs over the winter.1 point
-
On shape, it is best to minimise surface area to floor are ratio, love the idea of PH, go for a lot lower energy use if you can, easy to build in more fabric insulation and airtightness, dead difficult and expensive to retrofit i would do away with roof windows over the bed, very noisy even if 3g high heat loss to the sky too i would advise a building physics model to inform window sizes/overheating dangers - worst are west facing windows, the last job I was a consultant on, west windows reduced in size greatly 75% from memory and a lot of built in shading happened to southern facade1 point
-
Here are my observations: External access to plant room/pantry? Internal access to the annex, thinking about when MIL is older. The reading room so close to the family/living area and with the void, do you need a snug somewhere, sometimes in an open plan house you do need a quiet space to get away from the noise. Bedroom 2 (difficult to know based on dimensions and bed position) would ensuite door be moved around the corner nearer the entrance door give better room layout/space. Ensuites and bathrooms on first floor, consider roof windows if property is overlooked. If this isn't going to be forever house consider putting bath in first floor shower room in addition to the shower by stealing space from the laundry room. I'm not keen on the front elevation, if it was me I would be looking to make the house look like one barn or a series of connected barns. Would a farm house in the area really have had barns built so close to it?1 point
-
Hello everyone, I'm @Sarah A's partner and will be working on this fun little project together. Lot's of very useful information and advice here. We've also had the pleasure of meeting @Redoctober and his partner a couple of weekends ago and visiting their exemplary home in the Borders -- incidentally not too far from where we're looking to build. Looking forward to engaging with the wider buildhub community throughout this process and making our own contributions where we can. -Omi1 point
-
I actually liked the elevations but first reaction was it will be expensive to build. I agree ther is a lot of circulation space and effectively three separate living rooms on ground floor. None of which looks like a main/large living room.1 point
-
As a first cut that looks to me to be *extremely* competent. I make it about 300 sqm including garage, based on a 16ft garage length - is that about right? My main thoughts would be: 1 - Overheating in those south facade rooms especially the "Reading" Room - quite shallow and will overheat if not thought through. Think about a sitting / eating veranda across the bottom of the "U". (Why has the reading room got what looks like a very very very large curved Samsung Television at one end ? One might think it was a disguised cinema room. Does SWMBO know? ????) If you want a projection / cinema room then I would make that end without big windows - it should be fine without lightwise. 2 - Storage space and maybe workshop type area downstairs. 3 - Adequate cooking faciities in the Annexe. 4 - Not entirely sure what the "link" is for. Can that space be used more effectively? 5 - Why not give bed three a tall narrow window to the "void", just for fun. Need to think through how to clean the other side. 6 - I think two things you need to consider are integration garden / house, and heat management. 7 - I wonder about a separate door where the cpd is (what's cpd?), which gives the annexe a separate entrance should you ever need it, and lets the interior being essentially divided. eg to rent out 8 - The aesthetic reminds me of the way my dad used to design some years ago, which some people may not like, but it may be the drawing style of your architect which feels old school. Dad used to work on graphed tracing paper then use big felt tips to block in. When he was at Uni he used to actually use watercolours, and I posted some a couple of years ago here. I like the style; others may not. So far so good imo. Ferdinand1 point
-
Your building shape, size and floor plan are eerily similar to ours... But I think ours is a bit smaller going by the number of rooms you have. We're also building to passive standard. All very nice, here's a contrast with ours for a different perspective. We've just moved our kitchen from the same location as yours to the "outshoot" / lounge. Reason for this is better connectivity with the garden as we have a covered veranda area (pizza oven, BBQ, all that fun stuff) just off the bifolds, along with a kids play area. The space where the kitchen was will now be a dining / play area. Where you have your "reading room" we have essentially a the same... will have a folding partition door between it and dining/kitchen. Few informal sofas and 4.5m wide bifolds to the garden balcony (rear of house is 1.5-2.5m above garden) Also south facing. We are going for an upstairs laundry... Basically sacraficing a bath in the family bathroom for a washing machine and drier. We don't have the garage/ balcony as such yet as shown on the plans, as we've a full basement below the ground floor for utility, storage and guest suite. (Old layout attached- stairs to basement now under main stairs, ground floor guest room now a TV room, and kitchen moved to outshoot, and walk in pantry gone as we've a cold room/cellar in the basement)
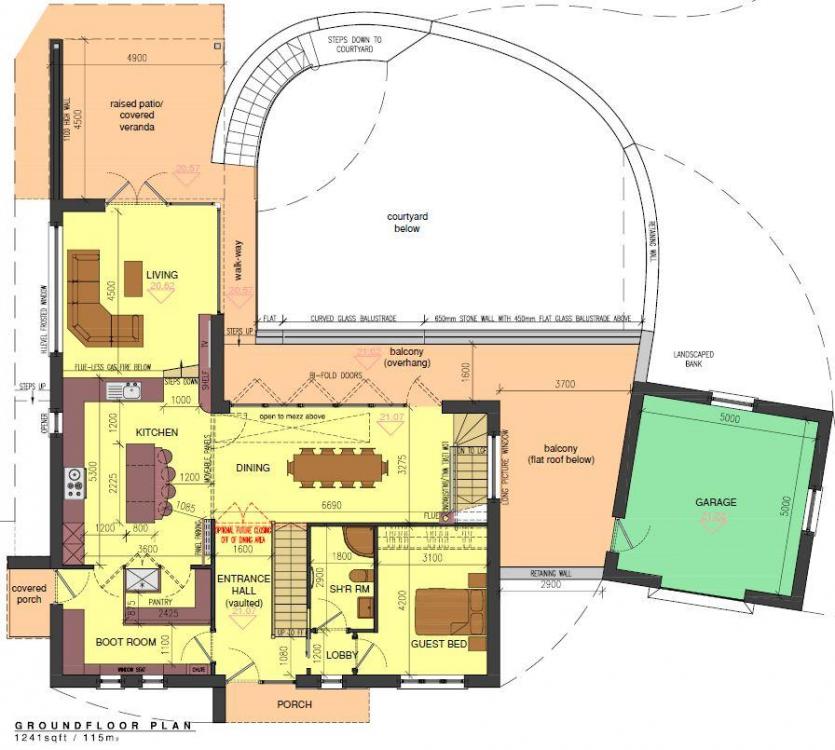 1 point
 -
Really like your design. lovely. The annex behind garage is a nice touch, as is the curved wall for office. Lots of great stuff. These are not criticisms, just a few thoughts / things you may have ruled out already as not needed for you. More in case you sell it in future...even if stuff you don’t need yourself. external access to plant/utility/plant room. Perhaps a full height window door to side? Would consider putting in plumbing for sink & washing machine there to future proof if for example someone wanted to change your upstairs laundry room into a bedroom. swapping laundry/bed 4 around. for waste pipe runs downstairs & add bath into upstairs shower room stealing that space from Bed 4/laundry room. So you can have a full family bathroom. If you don’t need a bath in master en-suite you could then remove that to provide you a bigger en-suite, or a recess for bed 2 Wardrobe making that room squarer. Glazed door to dressing room in master. Hairdryers can be noisy.1 point
-
Could always fit these on the feed to the dishwasher. Work pretty well. https://www.ebay.co.uk/itm/2325185146551 point
-
Undertaking what you have done with a young family is brave, and perhaps a little mad. Congratulations, to you and your wife. Enjoy your home, and family for many years. Well done.1 point
-
Separate room for the compressor (too noisy in your club house garage) TV points. Wifi or phone sockets for creating a garage network. A seating area with a couple of sofas to sit back and admire all the great work you are going to eventually do on the car on the ramp. Plenty of lighting, including on the walls. Integrated sound system. Draft proof doors and the obvious heating. Shadow board for tools as well as more tool chests then you think you’ll need.... you’ll always use them. Oh, and obviously A massive beer fridge!1 point
-
Fakro do a smart sealed and insulated door for this kind of application,. We've a couple of similar spaces in ours ( however they're "inside"in terms of insulation and airtightness) and we put a pair of these doors in. They're pretty good quality and not at all expensive https://www.fakro.co.uk/products/all-products/loft-ladders/dwk/1 point
-
rubbish, new sill required for the case including new lower pulley stlile. may need a new bottom sash if that's shot as well. lost count of the number of sash and case repairs i've done. ask the right tradesmen and it will be repaired, those that won't probably can't.1 point
-
I would do it in stages, try simple easy fixes first and they don't work you need to try something more.1 point
-
We spent £73,000 with IC on sliding doors and windows for 7 houses. We used their approved installers. They subbed Compriband for no-name crap, we had 2 doors fall out, loads of leaks, inward tilt turns that shat themselves and several sliders that graunch to a halt. They were fairly cheap but fairly crap. Lots apparent from day 1.1 point
-
We're installing sapienstone onto birch ply units with a thick ply base running continuously under the porcelain. It'll be interesting how we get on with this! Our floor is porcelain tiles on screen on EPS on concrete, if that matters? Spoke to 3 suppliers / fabricators and none raised any concerns. (None asked about floor build up) This is on the island. On the sink area we're using 6mm stainless steel, which if we weren't open plan I'd have loved to do the whole kitchen in ?1 point
-
Says you can reclaim VAT on telephone sockets and cables but not telephones here... https://www.gov.uk/guidance/goods-and-services-you-can-claim-for-under-the-vat-diy-scheme#T Presumably talking about extensions.1 point


.thumb.jpg.bac90f3bbf6868cf2118d010d936c99d.jpg)


