
Leaderboard


Popular Content
Showing content with the highest reputation on 10/26/23 in all areas
-
@Thorfun is right that pure self building could be very rewarding. It’s something I wanted to do myself but wife wanted turnkey as she was worried about the stress time etc that pure self building involved. The compromise was that I did the demo, contractor did the build l then I built a barn.and the landscaping, fit the kitchen etc. it is true that it’s got less of your DNA in it the more others do for you. Having varying viewpoints, sometimes differing is very helpful to find what’s right for you. Another option would be to identify a builder who could work alongside you, as such you’d get the hands on build experience whilst mitigating potentially serious errors.3 points
-
Don’t do the plastering course, you will not be doing this yourself, same for the rendering. Things you can do as a keen diy’er demolition level site set out dig foundation, or lay insulated slab lay drains build icf walls. Fit roof trusses fit facia soffit fit roofing guttering fitting windows first fix plumbing electrics you can do a bit if you find a nice electrician to help fitting insulation plaster boarding fitting skirting and architrave fitting doors fitting kitchen decorating Tiling second fix plumbing. things you won’t be doing laying floor slab laying screed plastering rendering crack on bud, I wish I was 27 again.3 points
-
I know I had my doubters . ( @Thorfun 😂 ) I really had limited choices . Been a right pita - especially around sky lights - but looks pretty good I think !
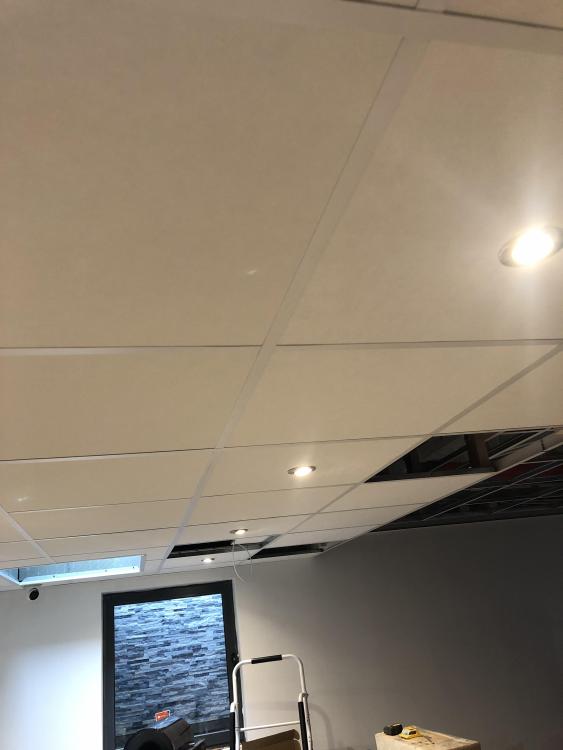
 2 points
 -
Commercially, you are best to earn your building fund doing what you are skilled at, then diy as much as you can. Your funds are hard earned and after tax. Anything you can do yourself is tax-free work. UNLESS your skill is extremely well paid, in which case employ builders at a much lower rate than yours.2 points
-
Yes, give up now, sell, and buy a house that needs no work at all.2 points
-
Defeating the purpose/point of ICF, just cut the services into the ICF, plasterboard directly onto the ICF for the ceiling, I would use resilient channel, only because wood is typically a mess and RC allows the plasterboard to ‘float’ flat2 points
-
Yes and likewise a future partner would not be happy you spending several years of your at home time on a site If it were me I’d deffo do some agency work in the trade you know to build up ££ reserves. Building a home yourself from scratch will take a lot of years for someone unskilled.2 points
-
if it's so easy why haven't you done it yourself?2 points
-
I recently dug out a cellar floor and lined with membrane as damp was sealing in through the walls. Months before I dug a hole in the floor adjacent to a damp outside wall and monitored what happened during and after heavy rain - hole remained dry so I didn’t need a sump and pump etc. (storage space only). your floor/soil looks very wet so a drain and pump system is the way forward2 points
-
+1 to the Shelly relays, that’s what we use for our electric towel rails, works a treat.1 point
-
I plan to use shelly relays for ours. A relatively cheap way to get each individually running of a timer.1 point
-
I buy the firrings from a local timber merchant. You can put them on top of 4 x 2 or 2 x 2 to make longer lengths. You could also have a ridge down the centre and fall either side. More gutter but it will be symmetrical.1 point
-
And if the home built untested/certified mish mash doesnt shutdown when the grid is down,what happens to the linesman trying to fix the fault down the road?1 point
-
Probably cheaper with conventional joists. Run the firrings in the same direction as if you run then perpendicular they need to still be 40mm at their thinnest.1 point
-
Well BS 5628 Code of Practice for the Use of Masonry says: 5.5.7.4 Weepholes Weepholes should be formed through the outer leaf immediately above the cavity tray. These may be formed in the vertical cross joints at intervals not greater than 1 m. There should be not less than two weepholes over each opening. Proprietary devices may be installed to form weepholes. They may be designed to drain the cavity but prevent the ingress of wind-driven rain. Weepholes need not be provided if walls have a rendered external surface finish. I think this situation is frustrating for any customer of the construction industry. You have the designer, the constructor and the certifier and it still goes wrong. Part of the problem is every project is a "prototype". Another is the separation of the functions; in contrast for instance, a car company designs, sources and manufactures within it's own direct control. It then gets lots of goes at fine tuning the product to get it right. Construction tends to have different people who often don't talk to each other but nevertheless assume the "other" is looking after the detail. Once the one off build is done it's the customer who is left to find out what mistakes have been made. How you prevent this kind of thing happening? Well the new Building Safety Act is a nod in that direction but I can't see this sort of simple error will ever be eradicated. It's gone on forever - they never did get that roof on Stonehenge despite getting the money up front!1 point
-
Or …. Do absolutely all of it . Save a fortune and take forever !!!1 point
-
@MrTWales' bar chart is very characteristic and similar to what we have experienced over 12 years with our first 3.7 kW of panels, July and August have often been poor compared with May. Since last year we have a total of 6.9kW installed PV capacity plus 10.65kWh in Pylontech batteries and a 5kW Victron inverter/charger but are very far from self-sufficient in winter (except when we are away, when there is a standing house load of about 200W which is mostly MVHR on setback, and so the batteries will store about two days' worth). Analysing existing energy consumption figures is a must. Also a significant amount is used for cooking so much depends on whether you cook by electricity. We have an oil AGA running 24/7 in the winter which helps a lot, even so we needed to upgrade with a 3rd battery module charged on E7 to cope with winter evenings. Ppl who are wholly off-grid often have 20kW installed solar and 25kWh or more in battery storage, often thermal storage as well bc this is cheaper per kWh. Very expensive in terms of capital and hard to justify on purely economic grounds. Our more modest setup has a predicted payback of 6 yrs. You could achieve almost the same results for less with a cheap Chinese inverter but we wanted the Victron for its 2hrs of whole-house backup. I don't want to be disloyal here but this forum is more specialist and an afternoon's browsing there will give you a lot of interesting case studies of what ppl have done and what you can get away with!1 point
-
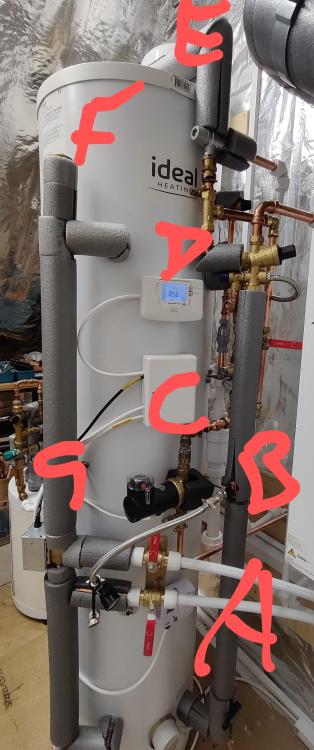
Quick run down on what's on the cylinder. A - flow and return from ASHP B - secondary turns pump, has integrated timer C - wiring centre, timer timer, thermostat, 3 port valve and secondary returns pump. D - timer for DHW heating E - check valve on hot water outlet. Expansion vessel is the white bit above cylinder. Tundish is visible to right of C and D. Between D and E is the water outlet mixing valve. G - is a 3 port valve F - air release valve So basically water from ASHP comes in via the top pipe at A, if the 3 way valve allows it passes water upwards to the top of the coil, water passes through the coil and out the bottom of the cylinder towards the 3 way valve out the lower pipe at A. Any air in the coil can be bled out of the air release valve at F. As this is a retrofit, the cold system is not directly balanced to 3 bar, so a check valve is installed on the cylinder outlet at point E. This prevents any reverse flow through the system. I decided to put all the electrical bits on the cylinder so I have just one power cable and the immersion cable coming off the cylinder. Call for heat from the heat pump is via a radio signal.
 1 point
 -
Here's the thread about wow factor:1 point
-
I think you should watch this before settling too much on ICF. I have picked SIPs for the same reason - I think I can build them myself. ICF seems like a stressy disaster waiting to happen. https://www.channel4.com/programmes/grand-designs-the-streets/on-demand/58244-0011 point
-
Welcome aboard. I understand the suggestion to use pros to get to wind and watertight, but you're missing out a lot of the fun. Granted, my build was tiny (50m²) but I found the basic structure to be very satisfying. Watching your plans come alive under your own hands. I was TF so it was just chop saw and nail gun, and I had the whole thing built singlehanded in a few weeks. At the framing stage, you can be pretty sloppy, the tolerances are much wider than later on. When I came to do the interior, I got nervous about messing it up. Things like kitchen worktops or skirting will show your abilities for all the world to see. I found my rate of work slowed down a lot. And some jobs seemed never ending- insulation, applying a vapour/airtight barrier inside the frame, plasterboarding a vaulted ceiling, and even just the painting, dragged on for weeks and weeks. The only bits I didn't DIY were the major groundworks (couldn't hire a big enough digger), plastering, UVC, and wiring (although I did labour for the sparky). There's a good thread on here somewhere about getting value for money 'wow' features in your build, I'll see if I can find it, it had some useful tips.1 point
-
If I may add my 2 cents. I started by reading Mark Brinkley’s book (it was before I knew this forum existed but would still recommend it as a great overall picture on building a house). you will overrun. And you will be over budget! Ask me how I know. 😉 read the blogs on here. They are a great source of information from folk who have or are doing it! we built a basement (see my blog for details) as have many others on here. It’s a great way to get extra space when planning won’t allow it above ground. But, they’re not cheap. It seems strange to me that the existing bungalow has a basement but you want to fill it in and dig another one! Seems like an expensive idea to me. I wonder if you could put a lid on the current basement and somehow connect it to the new bungalow’s location? Kind of like a secret bunker. If the lid opened you could have a thunderbirds base! I also +1 on the comments to use someone experienced to get you to watertight and then do the rest yourself. The way we’ve approached our build was just like that. Anything structural we left to the professionals. And anything visible we left to the professionals, eg plastering, cladding etc. we’ve done all the insulation, membrane, battening, plumbing, painting etc. saved money but it definitely slows things down and it can easily get you down with how long it takes and the lack of perceived progress. But it is very rewarding! And because of that sense of reward I have to disagree with @Bozza and fully encourage you to have a go and not just pay someone to do it all. You might be able to earn money to pay someone on your downtime but you’ll miss out on so much. good luck with it all.1 point
-
Run a dedicated towel rail circuit to the pair of them and put them on a timer, immersion heater timers work well, or something a little more fancy, and just set a schedule, that is the simplest. Or you might want to split the circuit, i.e. if one is in a infrequently used bathroom you might not want it on at all unless you have guests? In which cause schedule the main bathroom towel rail to suit your typical daily schedule and put the guest bathroom on a simple on/off switch which can be switched on while they visit etc. I've also seen them linked to PIR sensors in the bedroom/hallway - the idea being that if people are about then the chances are they will use the bathroom at some point, that then automatically adjusts for when you are away for the weekend etc.1 point
-
Depending on your airtightness then, you will need a full time (cannot be opened or closed) ventilation source in the same room as the log burner. Building regs give the criteria and size. Pretty sure your mechanical ventilation doesn't count as ventilation for a non room sealed stove. I pretty much say having a supply and extract in the same room is not the best move. If you have your fire on and the room is otherwise quite airtight you could start to comprise the fires seals and the chimney effect and start letting smoke into the room. As the fire and the extract will be depressurising the room. I would go further to say unless you address it now - quite dangerous. If you haven't bought your stove, get a room sealed one where primary and secondary air are taken from outside.1 point
-
We didn't leave a service void on the walls, just chased out using a hot wire cutter as needed.1 point
-
We used the cheaper end hollow PVC panels and on their own I think they'd have felt a bit too flimsy straight onto the stud even narrowly spaced. Higher end solid core panels would probably feel fine. We screwed 10mm insulated tile backer boards to the studs and then used adhesive between that an the hollow panels. Those boards are light, insulated and another layer of waterproofing, esp at corners and around the tray, but would be pricey if we hadn't had tile backer spare.1 point
-
Depends if you need a vapour barrier or not. I needed one, so did a 50mm service void in all ceiling to allow spots to be installed and running wires without compromise of the vapour/airtightness. But would only do this where the ceiling is with the roof.1 point
-
Unfortunately, no, all of the current suppliers no longer make the V2G units as Chaedmo is a dead standard in EU/NA and both Wallbox and Indra now make CCS2 versions (which don't work with the Leaf). The best bet is used unfortunately, I've been tracking it though and there seems to one come up on average every 6 weeks based on the last 1 year of tracking (average prices between £1,400->£1,500)1 point
-
https://www.ukbathrooms.com/products/multipanel-silicone-sealant-in-clear.html?msclkid=ec5032152763108f5cb9572f1df797b6&utm_source=bing&utm_medium=cpc&utm_campaign=CJ - Bing Shopping (All Products)&utm_term=4578572647514174&utm_content=All Products this sort of thing. can’t see the point of plasterboarding myself. But you need to make sure you have enough studwork for it to be solid. Should be instructions with the panels1 point
-
Welcome and good luck, yes this site is full of practical good intentioned advice from those that are, or have done it. I also wish I was 27 again but I am ancient and retired. With my build I had a single contractor pour the founds, build the shell, roof and plaster, I did the rest (retired self employed builder) and was happy to let the trades do the work I was not confident to do (bricklayer, plaster). Planning is a must (but I never use a spreadsheet 🤣). I also changed my mind several times on the construction method pre build and ended up brick and block. The mantra “insulate, insulate, insulate” is a good one, money spent on insulation just keeps giving, fuel, whatever it is will always go up in price, second to this is airtightness, which is achieved by close scrutiny on details (which you can do). Bring on the questions 👍1 point
-
thats really helpful, thanks S2. I'll have a look at this on my break, see if i can cross reference against my bills. This whole thing seems Ludacris really, this didnt happen when i was with the multiple defunct companies in years gone by!1 point
-
Hi and welcome. I'm cough x older than you and still learning. I had the privelege of teaching my son in law 'everything' about construction during lockdown. I learned how difficult it is to explain/ grasp some processes, but then it clicks. He struggled to see why it was all so complex....it is because it isn't a factory where things click together in a precise order. How did the project go? Still going after 2 years. They are learning skills and now doing almost everything themselves except plumbing and electrics. Takes longer but cheaper and often better. They have learned that I was right saying that many specialists are rubbish at what they do every day, and some cheat. Learning is easist when working alongside somebofy. Eg wd worked togrther on drainage, then after 2 days it was declared simple and i wasnt needed. BUT there is the danger of being taught wrong. So keep asking on here. Kent isn't the best place for good value contractors. Get learning. Ours is a refurb, change of use, with some dramatic issues to resolve. Knocking it down and building new is so much easier than refurb. Can you keep any foundations or floor? So often they are replaced needlessly. Tell us more. Is the site flat/ dry / woooded/ rural/ got close neighbours Silly question....its obv on top of a cliff. Or you are Cliff and planning a top quality build.1 point
-
Think about vampire costs. e.g. especially scaffold and plant that will still keep costing you even if you are not using it.1 point
-
Hi. You are going about things exactly the right way. I'm twice your age but going through a lot of the same thinking and practical steps. It's all good. Your work setup makes the whole thing sound very achievable - hopefully it isn't the winter that you are free to work, but those aren't so bad in Kent so it should be ok either way. I guess if you have time and energy then the only other magic ingredient is money, so keep working hard and saving as much as you possibly can. You will need it all! I am finding these books completely invaluable for my research and they really make me feel like I could build a house tomorrow (or at least plan one effectively). https://www.firstinarchitecture.co.uk/books/ I would also recommend watching lots of eps of Grand designs. I don't have time to link to the good eps just now, but Joe and Lena, South London is one that springs to mind that you might find inspiration in as Joe sounds like a similar guy to yourself. You can watch these for free via the Channel4 app. I would really recommend paying the £3.50 for a subscription though as the ads all magically disappear. Grand designs The Streets is also very good - don't overlook that one. Good luck.1 point
-
Hi and welcome. Sounds like a good project. My best suggestion is to look at getting the basic structural shell built for you usually to "wind and watertight" That entails the foundations, frame (by whatever method you choose) roof, windows and doors. Those will be by far the hardest to do yourself with no experience. Then all the inside work is relatively easy. Don't at this stage get too fixed on one construction method. It is possible to build a really good well insulated house by all the different methods, so it may come down to what is normal for your area, i.e. what do the trades local to you know how to build?1 point
-
The bigger the hearth the more generous the 'feel'. Go to the pub. Get your laser measure out and measure the hearth. (Laser? Because many won't notice the laser spot. Everyone will see a yard stick or tape measure)1 point
-
this is as of this morning. Pretty different results depending where you look.

.thumb.png.97ff15ddc0bef32c5902cf869f25ab06.png)
.thumb.png.3195af65f2ee1d0bd051bb12f47381fc.png) 1 point
1 point -
Hello and welcome to BH from me. Ok you're in a conservation area. But first with my SE hat on don't dig out any more as you could compromise the founds! Post more photos and you'll get lots of help here. Main thing is not to do something that makes other things worse. But to wet your appetite attached is a typical tanking system you can install yourself.. you buy it online. Before you do you have a big learning curve ahead of you to get this right but you have made a start by posting on BH. Newton_CDM_Installation_Manual_9.0-2.pdf Newton-508_TDS_9.1.pdf1 point
-
The conversion method is shown on your gas bill; theoretically it varies slightly from time to time. Multiply cubic meters by 11.16 is about right.
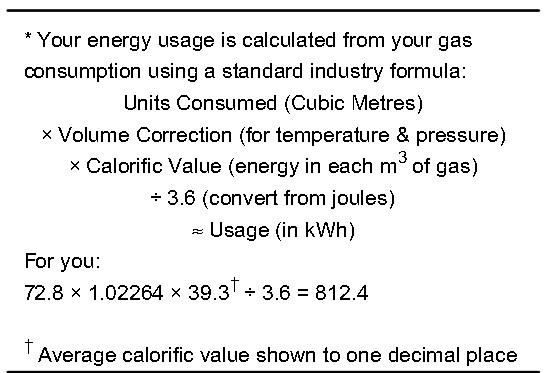 1 point
 -
You really should start asking questions.. There is a massive Elephant in the room here in that you are removing huge amounts of the building that are stopping it blowing sideways, called horizontal stability. Just glancing at your drawings.. you have building stability issues that need put to bed. That little green circle on your drawing could cost you a lot of money.. so ask what it is and the implications.. we are talking thousands here not a few quid. I work with experienced Architect's as an SE (Architectural designer myself so wear two hats) that understand this concept and communicate this to their Clients early on and how you get around it in a cost effective manner. As the Client push your Architect and SE to work together. Most importantly they should be explaining to you what they are doing, thinking and giving you info to let you make informed decisions.1 point
-
@Thorfun word of warning, don't look at the XL joinery book for doors, especially the coffee themed pre finish options. They look amazing but £££1 point
-
Up very North, my options are limited, but there is a Howdens. For the Kitchen I planned ours using DIY kitchens, but they won't deliver here, I could collect from Yorkshire though. I got a price (no worktops ) around 4k. Went to Howdens 7.2k, I sent them details of the diy Kitchens, and in the super sale they price matched. But they have a leaflet on each competitor, and list the differences, reducing the offering to match quality.. one example being that DIY kitchens soft close option is an add on to the draw box, and clip on soft close for hinges. ( I'm told?). Bottom line, you need to haggle big time to get a decent price. We ended up paying 4k for the full kitchen, with an upgrade to the walk in larder. Our concession was the removal of the cutlery draw and bin which I'll get elsewhere. They were a ridiculous price.1 point
-
You can insulate them. Some people box around them and then fill space with foam. You can also mount the steels on thermal bridge breaking blocks to lift them off the concrete. If you have enough space you could fit 25mm PIR on the outside wall side of the steel on the left allowing you to move out of the room. This is more or less what I did.1 point
-
Whichever is easiest. Sounds flippant but don’t make life hard for yourself. How likely is it will get hit by a car where it is? Mine is in a kiosk on our boundary. I don’t intend moving the meter so here it will stay.1 point
-
We’ve little option due to the distance of the supply Ive installed this pre made box buy the boundary and will run a supply into the plant room
 1 point
 -
The 'mobility' is inherent to the structure and not its location. You can have a suitable structure located in a courtyard or under power lines etc where no crane could ever reach it- or down the end of a narrow winding track which is cannot physically fit through. The reasoning behind this is that you could have craned it on to the site and then in the intervening years trees can grow, buildings can be added, which box in the mobile unit. It remains legally a portable building though. So on site fabrication is fine. But you do have to have a plausible way of showing that it could be lifted/moved. That means a monolithic structure, not reliant on continuous support from a concrete raft or masonry underbuilding. No dwarf walls- your joists will need to span the full width. Not a problem on a shepherd's hut. In my own case, I built a rectangular 'chassis' from heavy timber. The walls are fixed on top of it, the joists are hung within it, like the rungs of a ladder. The chassis is supported at eight locations but that's pretty arbitrary. In theory you could put slings under it, or jack it up and back a trailer underneath. Total weight of the ~10x5m building is about 10t. If you look at my early blog entries you'll see how it went together.1 point
-
It does not have to be on wheels. The usual method is make a number of concrete pads either cast concrete or concrete blocks and build a timber frame of joists that literally just sit on your concrete pads. Then you can justifiably say the whole building can be lifted by a crane onto a low loader truck and be moved that way. Several on here have build substantial buildings like that without problem and they have been classed as a "caravan"1 point
-
Lots of the ideas in this thread revolve around sight lines. For good reason. Lining up sight lines doesn't necessarily cost anything but can really change the feel of a place. It's one of the things that makes a bespoke design different to an off the shelf one. My own build was done to a tight budget (about £20k for 50m², plus groundworks/services). Here's some of the decisions I made to keep the budget in check whilst retaining what I think is a pretty nice finish: -My favourite tip is to avoid small windows. Consolidate all your glazing in to a few huge windows. Non opening if possible. You will get a much lower cost/m² with much better thermal properties. It's an absolute win-win. I was really surprised by how cheap a huge non opening 3G window was. -I'm also a big fan of bamboo flooring. I'm not up to date with prices but about five years ago it was half the price of decent oak, and much sturdier. -you don't need solid oak skirtings and door linings. I went with MDF which was a fraction of the cost and also much easier to fit. Need to screw the skirting to the wall, or messed up amitre? Just fill and paint afterwards. - larch and corrugated steel make very cost effective finishing materials, quick and easy to work with. - it's not necessary to spend big money on kitchens and bathrooms. I've seen people spend more on a kitchen tap than my whole bathroom cost. I went secondhand for all my kitchen appliances, but bought good brand names (Bosch and Siemens). They've outlasted the cheap brand new stuff I bought in my other house.1 point
-
After a nightmare few hours on Vaullant's not-fit-for-purpose telephone call queuing system, I eventually got a service engineer out under warranty. The expansion vessel was OK; the problem was with some combination of malfunctioning pressure sensor, and malfunctioning pressure release valve, and auto admittance valve. they replaced all three. Essentially, the boiler was discharging small qualnities (drips) to an externally mounted pressure relief pipe throughout the day - so that caused the pressure to fall to 0.3 bar and the system to require daily recharging, but without giving that much of a clue . The displayed pressures of 3.4 bar and 3.6 bar were probably exaggerated, and caused by the faulty sensor. Thx for your help @ProDave1 point
-
We used 150mm round posts, about a metre under ground and 2m above for the tall ones, about 900mm above and 600mm below ground for the short ones. Below ground is set in concrete. Membrane is used at back off the posts, allow water out and keep soil from washing out.
 1 point


.png.265ecf7270a7dbfba2ddd9a62e7fea7c.png)
.png.8ecb35fca4ed0d01f7396c5f28746f28.png)


This leaderboard is set to London/GMT+01:00