
Leaderboard


Popular Content
Showing content with the highest reputation on 11/10/20 in all areas
-
This will be the last entry for our self build blog. Our plan We originally commenced a self build as there was no affordable housing for us to get on the housing ladder. The approach for the self build, was whether we could build a better-quality house than what we could purchase from a developer for the same cost. This was later refined to achieving a lower mortgage if possible. For the self build we decided to split the project into three chunks. 1. Obtain outline planning, purchase of site – this allowed us to know that a build was possible. 2. Put in services, access, design – this was the first actual work and made an area of croft ground into a valuable plot for lending purposes. Commence the build over two years - using subcontractors and our own materials to eliminate any margins and ensure tight control over the specification. Doing this would allow us to complete the project and prevent us being stuck unable to finish it. What did it cost? The total cost for the project was just over £196,000 (net of VAT). This includes the land, services, professional fees, overheads and the actual build costs. I’ve summarised all of my costs into a pie chart below. How was it funded? · A small electricity grant £1,550 · We obtained a croft house grant for £38,000 · The final mortgage of £74,500 · The remaining balance of £81,950 was funded by savings from employment, which started when we were 23 and finished when we moved into the house in July 20 at 33. · Most of the work we carried out was decorating and general labouring, therefore contributed a small amount of sweat equity to the project. What is the final result? The surveyor provided a valuation back to the building society of £265,000. This was pleasing as sometimes self builds can be more expensive then the total project costs or just about breakeven. Prior to building we were aware of building cost being measured per m2. However, during the build process I realised that this method of reviewing the financial performance of a self build had room for error, as the calculation could be skewed depending on the quality of the finish. For the purposes of our project this would be £1,420 or £1,230 excluding (land, professional fees and overheads). I came to the conclusion that the best method for us is calculating the final cost per month (mortgage, utilities, council tax, insurance) to live in the house. I set a target of £500 per month and I am pleased that we have been able to achieve this. I feel this is a good measure as I wouldn’t want to live in an expensive house that has a huge mortgage. Often at the end of Grand Designs and other tv shows, the presenter asks whether they would do it again? For us I would say, yes, of course. When I look around, every single item in the house was researched, compared, purchased and gradually put together. The thought, time and energy that we have put into this build has created a much deeper connection to the property. Our blood, sweat and tears are in the very fabric of the house. The hardest part of the process was when we were focussing on saving as much of our income as possible to ensuring a low mortgage. We made many sacrifices to ensure we reached this end goal, but we knew these relatively short term sacrifices would have long term gains for our family. For the actual building of the house, we chose a two year build schedule from starting on the foundations. This allowed us planning time between build stages and made the build process more manageable. It also allowed us time to do some jobs ourselves such as fitting insulation, interior decorating etc. We enjoyed taking time to do the jobs we were confident in doing well ourselves. Perhaps we could have taken on the more tasks, but I’ve come to the conclusion that it made more sense to work a bit of overtime and pay a contractor to do the work well, rather than us doing a job slowly and at a reduced quality. In the future, we would consider another self-build, perhaps in thirty years when I will be semi or hopefully fully retired. So until then… See you next time and thanks for reading.5 points
-
aha, block confusion. You'd think blocks were blocks until you start looking. I think you want to avoid aerated or low density blocks, these crack and in the case of aerated are very absorbant and I expect a bugger to render without copious priming. Aggregate blocks rated at 7n and in the order of 1500kg/m2 density are what I used. Confusingly, these are sometimes called lightweight blocks in the trade! I think this means they are lightweight relative to the super heavy cast concrete jobs used on foundation courses, etc. Personally I think a dense concrete block would be overkill for a wall, and your brickie wont thank you for choosing them becuase they are very heavy. Medium density aggregate blocks offer good key for render and are crack resistant, would be the typical choice for a blockwork outer skin in my opinion. Low density aerated blocks are still available in compressive strengths suitable for high loads but seem to have less flexural strength and be rather brittle, hence the reputation for cracking under stress. Note the block choice may affect wall u-value, esp if switching from aerated to aggregate. Not by much, but worth bearing in mind. I used these but all builder's merchants stock an equivalent https://www.tarmac.com/media/959459/hemelitestandard_shortcover_2017__itab.pdf nothing like an evening spent reading block data sheets, have fun ?2 points
-
Hang on ... I’ve just re-read this ( @Dave Jones think you have the wrong end of this too...) and you’re saying @harry_angel you have PP to remove two outbuildings and replace with a larger outbuilding to create a home office ..?? And this is not part of a larger PP scheme for a new build..? That is ancilliary to an existing dwelling so doesn’t count for any VAT reclaim - you will be paying the VAT regardless. The only way to zero rate this would be to put in full PP now for a new dwelling and then move into it - is that your plan ..?? Also, £125k + VAT build costs for a home office ..??! What are you building ..??! You can build a pretty good sized house for that.2 points
-
Cleverer people will be along in a minute but a few thoughts: Such total waterproofing is called "tanking". This is the system I used: 2000x1500 might be a bit small for a wet room without screens. My ground, solid floor bathroom is nom 3000x3000. Wet room corner is nom 1.4x1.4 with floor laid to falls and a wall drain. I've no screens and unless you're careful water from the shower, (I've a handset and rainfall head) can go outside this area. The kids seem to get water 3m in any direction! One route is a 22mm thick wet room former that replaces a section of the existing floorboards. You in effect then tank over the whole lot before tiling. Picked at random: https://www.tradewetrooms.com/tough-x-1700x800x22mm-wetroom-shower-tray/#wetrooom-drain You should manage a wet room type floor with careful screening. Got a quick plan sketch of the room? @Nickfromwales, isn't there a make you rate?2 points
-
Have you read Freakonomics? Because on commission, estate agents are incentivised to pressure you into a sale ASAP as to wait will only give them a tiny drop in income. However, when estate agents sell their OWN houses they take on average 3 times longer to sell, because they are incentivised to wait with a far greater amount of money.2 points
-
As promised, here are my completed (I hope) drawings for building control, which I've just submitted to the local council. I'll post back on here with what they come back with, any changes required, and also any restrictions imposed. I know some were asking what was required for BC plans, so hopefully this will give a good guide for a masonry cavity wall build. Side Extension Drawing BC.pdf1 point
-
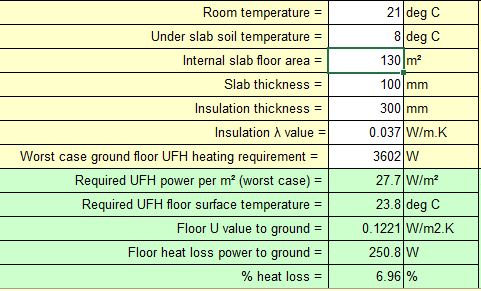
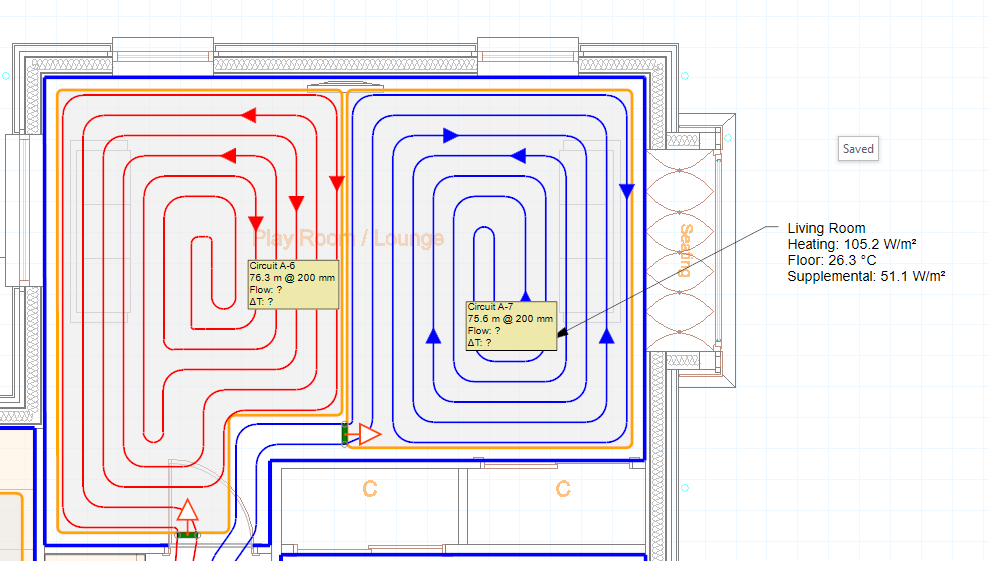
I've read various threads and views and back and forth and done some calculations based on information I have found here and of course from the very helpful spreadsheets provided by our friend @Jeremy Harris. I had pretty much decided ages ago I would get an 8.5kW Ecodan, which might go up to an 11.2kW ecodan unit. However I have not really advanced it beyond basic assumptions, what others done and some quick back of the fag packet calcs. I'm about to start foundations shortly hence, need to firm up on the UFH design for the in slab pipework and would appreciate some sense checking/ a wee nod that it seems ok. Build is SIPS with Kore insulated foundation, aiming for high levels of airtightness but not near PH (basically as best as I can get it without major hassle), Vent Axia Sentinel MVHR. ASHP which does UFH and DHW (UVC 3-400L tank). Secondary heat source of Log burner (I'm aware it's overkill likely - but I have 2 acres of woods, vaulted ceiling and need a backup in the event power ever went out). I would like to map out the steps in layman's terms to ensure they are right and I have followed it correctly from what I have read, then hopefully the thread can then be followed by others. Step 1 - Heat loss calculation: So I completed the heat loss calculator - see attached. I have a few checks to do on areas and might make minor adjustments but near as dammit it's close enough. I have added the OAT values for my local area (West Scotland, south of Glasgow) from the MET office. Now do I basically just use the 'Total daily heat loss power for average OAT (W)' value to find the maximum based on historical data and that defines the minimum amount of heating system required such below: which seems 3.6kW heat loss for January. The simply - I select a heating system which can supply this amount of heat as a minimum (ignore losses for now). So just simply selecting an 8.5kW unit would do the job easy? Step 2 - UFH design So Having found out the maximum heat loss above (3602W) then we can just plug this into the Heat loss and UFH calculator, which I have also attached. And provides the following output. So essentially, going on bare minimum I would need an UFH system which provides 27.7W/m^2 , based on 130m^2 of floor - so essentially if I don't use some slab area then I need to compensate and adjust the calc. Step 3 - UFH loop spacing So I know the total heat loss, I know how much heat input I have to supply per m^2 if I cover the whole area of 130m^2. So I get loopcad, then draw the circuits. Aiming for counter flow circuits as they provide the best option for even heat distribution, keeping circuits less than 100m in length. Now this is where I get a little lost, I have a figure of 27.7W/m^2 for the whole area to get my required heat input, however how do I correlate that with loopcad and also deciding what my spacing should be?! I have seen @PeterW mention quite a few times about the the spacing had to be adjusted but I am struggling to find the route here to confirm easily what it should be. My loopcad drawing (I've attached my current draft) showing for example 105W/m^2 in my living room, but I'm not sure how this should read in relation to my calculated figure. I'm pretty sure I'll need 200mm centres, but I'd like to ensure that was right. I've some adjustments to make to my circuits, but it's not far away. I was finding that the auto generate function for pipework isn't ideal but it works ok. The garage can be ignored - I ma installing pipework in there pre-empting possible future conversion of that area and hence pipe is cheap, so why not add it now. The manifold will go below the stairs - seems to make sense to me, I have a plant room directly adjacent and was going to put it in there but seemed better to get it out of there as I will have lots of ducts and this would clutter that up. Is it ok to run underneath the stairs? I assume I just have to tell the Joiners not to fit the stairs to the floor with big screws?! Step 4 - Zones I am only having downstairs heating, so it is a single manifold. I would prefer as few zones as possible, but a single zone wont work. I was thinking I can have two /possibly three. Zone 1 - Main family room area Zone 2 - Everywhere else excluding shower room and garage Zone 3 - Shower room Zone 4 - Garage (permanently isolated at the moment. I assume you can have multiple zones on a manifold, and can just split them up by using salus actuators?. So a single thermostat for family room can control three loops (each with an acutator) in that room? and so forth?. It's a long post , and actually I wasn't going to talk about zones but thought it was worth adding in. Thanks. Heat loss calculator - SuperJohnG.xls.xlsx Floor heat loss and UFH calculator - SuperJg.xls.xlsx Looopcad - SuperJohnG.PDF

 1 point
 -
the point is, you want the chamber on your land to be as deep as possible while still giving fall, this way you have maximum flexibility for your plot. For example if you need a long run from the back of the house to the chamber, if its shallow you may run out of fall. Work on 13mm of fall per M as a minimum.1 point
-
You are not building a block of flats, the fire issue was caused by a number of failings, not just one.1 point
-
snap his hand of now! Get a manhole connected to it on your land ASAP. A local builder could do it no problem.1 point
-
Could try Recticel or Extratherm, they don’t appear to be caught up in this mess.1 point
-
sorry Peter you are quite correct, i misread the posts.1 point
-
That looks like his plan but the delay means loosing his builder so he's trying to find a way around it.1 point
-
I pretty much agree with your estimate (645W) The formula I use is Volume(m3) x a.c.h. x dT x 0.33 x MHVR inefficiency 0.15 which gives 780 x 0.8 x 21.5 x 0.33 x 0.15 = 664W1 point
-
i realise my density units are wrong! 1500kg/m3 is the typical range for medium density/aggregate1 point
-
I used 7n mediums for the blockwork on my house. 1450kg/m2.1 point
-
+1 another vote for medium weight aggregate blocks 7N1 point
-
A hollow sounding tile isn’t the end of the world and will still outlast most floor covering It only really commercial premises that this could become a problem1 point
-
I didn’t back butter the kitchen floor and it sounds hollow, didn’t back butter the conservatory floor or hallway and they are fine (I do suspect the adhesive was off for the kitchen tho ?).1 point
-
I’ve tilers that work for me and while wall tiling I would leave it to reference Floors must be back buttered There was no need to back butter years back when I first started tiling But we would mix the grout very wet and pour it on the floor Which would fill all the voids1 point
-
I think dried sand is by far the best (cheapest/simplist) solution. Block the bottom holes and using a funnel carefully fill the tank to the top and leave the top pipes open (to relieve any pressure) this will then replicate a stove without a back boiler and installing fire bricks without the hassle ?1 point
-
Pre grouting you can use maybe use this if it bothers you: Tbh you can even do it after grouting which is what I think it's really meant for. (You drill a hole in the grout).1 point
-
Similarly, we've gone for MVHR extract above the sink & dishwasher (against a wall also containing the ovens), and Bora recirculating hob in the island about 2m away from the sink. The Bora will vent out under the plinth all around the island, which has about 9m perimeter, so no specific direction or focus for the draft coming out of it.1 point
-
Yes it works. Stay clear of the BSH products. Stick with the specialist brands. And ensure you have an extract duct above the hob.1 point
-
I didn't give them a w/m2 value, just gave them the plans and left them to it. They came back with 150mm spacings at first iirc but I told them to drop it down to 200mm spacings as 150mm is OTT. Their plans say the 200mm spacings gives 70w/m2 O/P but they must be assuming a specific flow temperature for this value which they don't state. Just checked the docs they sent me and I see two temperatures mentioned, 35 degrees and 45 degrees. So 200mm centres will be more than sufficient with a flow temperature in the low 20s. As per most others on here I anticipate the flow temperature being down in the low 20s and I dont anticipate there being any issues at 200mm spacings.1 point
-
Definitely needed, very risky to go ahead without it in place, they can stop you working1 point
-
Hello and welcome.1 point
-
Morning Paul and a very warm welcome1 point
-
Welcome Paul. There are a few members interested in ICF so an sure your experience and knowledge will be most welcome.1 point
-
There's two separate issues: whether your house's supply is adequate, and whether the supply to the whole neighbourhood is adequate. You may well have a 100A (23kW) supply to the house, but the distribution network will have been planned on the basis of only about 2.5kW per customer sustained capability - on the assumption that you will only use your full 100A for short periods. This forecasting makes assumptions about the kind of load - the number will be a bit higher (but not much) for estates originally built with electric storage heating rather than gas, for example. Your heatpump can be drawing 5kW+ for hours on end, which is much more of concern for the network than your electric shower which might be drawing 10kW but only for minutes at a time - hence the shower is a concern against your 100A fuse but the network operator aren't too bothered, while the heatpump fits easily within your 100A fuse but is a concern for the network operator. So when you install new equipment which changes the nature of the load in your premises, you are required to notify the network operator so that they can plan accordingly; this is almost certainly what you are being asked about. Look here under the heading "connecting electric vehicles and heat pumps": https://www.energynetworks.org/operating-the-networks/connecting-to-the-networks Depending on the circumstances (size of equipment, existing supply), this requires either that you get permission first, or that you go ahead with installation and just have to send in a form to tell them what has happened. I'm guessing from what you said that you fall into that second category - so you (or the installler) just need to fill in the form, send it to the DNO, and keep a copy for your MCS paperwork. But obviously you will need to check the numbers first.1 point
-
Sorry, can't help fella. It is such a hard thing to do, matching existing old tiles. I've got a friend who has run a huge tile place for over 30 years, and he says it is all but impossible to match old tiles. So many producers. Good luck.1 point
-
PeterW, have a read on the reclaim guide its not black and white at all. If the vatman considers the garage part of the demolished house (in the curtilage) then could be a problem. Not saying it will or wont even it maybe could be fixed. Just I wouldt be comfortable rolling the dice on losing some/all of £40k+ for the sake of rebuilding a garage, for a couple grand. Have to be careful with PD as well, they withdraw it as a matter of routine when granting planning where I am. So if you commence and instruct building control against a planning permission can be in a sticky wicket.1 point
-
Page 2 of the linked document says "Max running current 25.3A" so it will be fine on your 100A supply. But before you commit to that model and place the order, check with the supplier that it is an inverter driven heat pump. It does not mention an inverter or variable speed operation which might suggest it does not.1 point
-
That isn’t how VAT reclaims work. They will only reject the part relating to the garage if it isn’t part of the planning permission, not reject the whole claim and not allow you to correct it. What is £25k..?? The total cost of building the new building under PD when completed ..?? Not sure I’m following.1 point
-
check your planning permission notice. As for the garage, ring the VATman and ask him. If there is any even slight hesitation pull it down. Losing the VAT reclaim on a 200k build doesn't bear thinking about!!!1 point
-
I just went into the planning office and asked (pre Covid). Look out for the possibility of them changing policy in the (near) future.1 point
-
It will be on your local council website either under Planning or if you search Community Infrastructure Levy1 point
-
Fireplaces look big until you realise stoves have to sit 100-250mm from the walls depending on the model. This can cause a few issues and you also need to factor in things such as distance to wooden beams with flue pipes if you use vitreous stove pipe - 450mm for a 150mm pipe is quite a distance.1 point
-
Get it right now, you will spend a long time looking at it and thinking you wish you had changed it. I moved a bathroom from one side of a room to another, so glad I did, looked fine on the plans.1 point
-
Although BR rejections do happen, they are very rare. Tbh, I don’t think I’ve ever had one. I’ve issued one before but that was only because of the lack of BR information in order to carry out a plan check, i.e rejection under Regulation 14. Assuming the rejection is therefore based on a combustible material being located within 1m of a boundary? If so, then either the combustible wall needs to be made non-combustible or you pull the way away to at least 1m from the boundary. It’s common design/detail practice and concerning if it’s something your architect/designer has missed or unable to satisfy. As mentioned above, the resubmission of a BR application would not normally attract an additional fee. You would however have to pay additional fees should you choose to use private Building Control/Approved Inspector. They too wouldn’t be relaxed on the BR’s so you’d still need to comply in one way or another.1 point
-
So use an Calcium/Cement board behind the wood cladding, and then treat the cladding with ZeroFlame or similar. This is a pretty standard detail that is used on commercial buildings https://www.sts-uk.com/building-board-solutions/cladding-receiver PIR isn’t the issue here - sounds like the BCO is looking at the external build up and not seeing a 60 minute fire resistance prior to the insulation. Not sure about fees but my local area don’t charge for a second application. You will have paid both plan fees and inspection fees, so even if they charge you again it will only be the plan fees.1 point
-
It is probably long past the date that BC could take any enforcement action, even if they wanted to. Don't poke the bear and bring it to their attention. You can usually just get the vendor to put in place an indemnity policy to cover you in the unlikely event of any action, but ONLY if you have not bought it to the attention of BC. More important is ascertain by survey the condition of the property is to your satisfaction.1 point
-
If you can afford it a physics model of the house will help you by informing decisions and optimising things, lots of glass = lots of problems with heat loss and heat gains, west facing can be worst for overheating1 point
-
Yeh but that advice expired after 12 months...... ?1 point
-
Whoops! I couldn't have read that more wrong. Sorry there @Paul F! Deffo do not paint plastered walls before tiling. Proper tile primer.1 point
-
That doesn't sound right. You want the pipes tied to the top layer of mesh, so 30-40mm deep. At 150mm depth, the heat will never make it to the surface of the concrete. Make sure you have the fact that the slab will be a finished floor. I.e. you'll need the concrete specced so it doesn't crack with the heating cycles, and is leveled to the right tolerances and power floated. Btw, you'll find that once you cost up all these difficulties and extras, a finished and polished concrete floor slab is no cheaper, if not more expensive, than a tiled or wooden floored screed. Factor in a min of £40m² for a basic polished concrete floor, on top of your normal costs. And also weigh up other difficulties as the build goes on- how do you get electrics and water to your kitchen island? What happens to all the plaster and wet trade crap that falls on the floors? Others here have protected their slabs wil bots of carpet, plyboard etc. Not impossible, bit any savings may not be worth it or realised. But don't get me wrong, and insulated concrete raft is a great design.1 point
-
Are you in a CIL area?1 point
-
Another day; another quote. Overall almost the same total cost but it is interesting that previously "The Supplied and fitted cost for a 1 x 3 section SL20 Classic Minimal framed sliding door system with all panels sliding with multi point locking and all frames in a standard RAL colour all glazed units will be energy efficient glazing and a U-value of 1.3. The approximate size of the doors would be 5700 x 2450 the cost of this would be £16,261.00 plus vat supplied and fitted." 16K!!! From other company " 5700mm wide x 2450mm high -Three track Sieger Slim® sliding door system comprising of 2nr sliding and 1nr fixed panes (→,→,Fixed) 1 item 7,617.28£ 7,617.28£ Alternative Option - 5700mm wide x 2450mm high -Three track Sieger Slim® sliding door system comprising of 3nr sliding panes (→,↔,←) 1 item 8,119.93£ Alternative Option " 8K!!! Original company (with double glazed units) have now said for the same cost they will do triple. Anyway I've halved the price of 1 expensive unit already ?1 point
-
If you are after the slimline sliding door, try the Spanish company Cortizo. The sliding door system called Cortizo cor vision looked good on architect's house I visited. https://www.cortizo.com/en/sistemas/ver/55/cor-vision-sliding.html I have been quoted recently £450 per sq m (+VAT) from https://doors-direct.co.uk/1 point
-
Me too. I found that glazing prices varied massively, even for systems with pretty much the same spec and performance. I had quotes ranging from £8.5k to over £24k for virtually the same spec (aluminium clad timber, triple glazed, guaranteed airtightness). Our total door and window area is 25.33m² and the average Uw value for the glazing we ended up fitting is 0.7 W/m².K for the windows and 1.2 W/m².K for the doors. 6.63m² of the glazing is in our front gable, which is around 5m high. In total, our doors and windows came in at about £335/m²1 point


This leaderboard is set to London/GMT+01:00