Leaderboard


Popular Content
Showing content with the highest reputation on 01/01/23 in all areas
-
I know this isn’t the right sub-forum for this thread, but I never introduced myself when I joined in Oct 2020, just 2.5 months before our RE-build started (which I’ve decided is a tad harder than a new build). In those first six months I spent so much of my time on this forum that by March 2021 when it was my birthday, the forum’s name featured in a gift that SWMBO made me (basically a framed miniature model of all my favourite things, and on the miniature tablet within the miniature model was the buildhub logo - hope she hasn’t committed a copyright breach!) So just wanted to say thanks to everyone for all the support, particularly for making me feel less alone in this journey. Self building can be a very stressful, difficult thing that not many people do; I’m a terrible perfectionist and often my own enemy which makes it all the harder. But I can’t imagine how I would have done it without all the people here. Happy New Year. 2023 has simply got to be better than 2022. Or at least let’s just believe that.7 points
-
Yes happy new year everyone. This should be the year I retire and get more time for leisure. It will be interesting just how easy it is to retire from self employment, I suspect I will still do some work for a while, but nowhere near as much. Nobody is going to present me with a carriage clock and thank me for my dedicated service to the business. So here is to more time on the water, sailing, and rowing.4 points
-
Yes, I hope this year is a bit more settled. As my Mother is still about, even though she broke her leg again, last year really was a bonus year, for me, though I know not for others. This year has started well, it is not raining yet, so time to go out and play. Play is important.4 points
-
Yes a happy new year to one and all, like above this forum has helped me immensely throughout my build and frankly I consider you all to be friends (though never meeting most of you).3 points
-
The PIR manufacturers have tremendous marketing. Every merchant and builder in the land cannot seem to see beyond it. Saved €1300 from memory in our floor insulation by using EPS.2 points
-
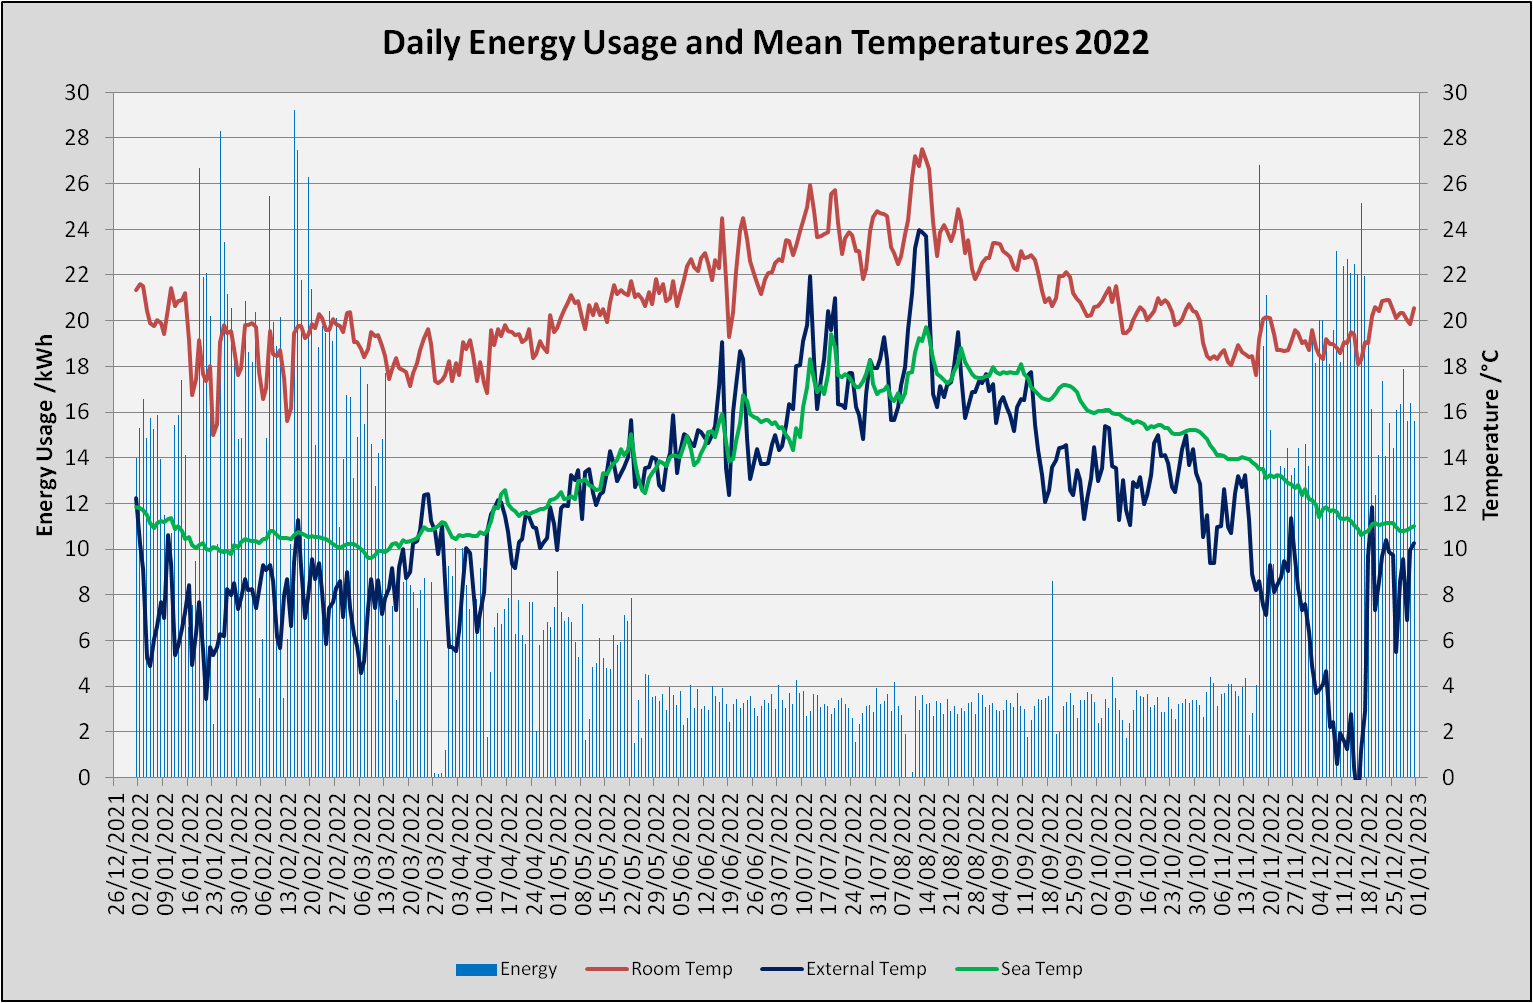
When it became obvious, 15 months ago, that we were all in for a significant hike in energy prices, I decided to set a target of using less energy. I generally used about 4 MWh/year. This is down from 11 MWh/year when I first moved into the house over 17 years ago. The initial target was 3.5 MWh/year for this year. Putin invading Ukraine caused a lot of uncertainty, and much bigger price hikes, at one stage EDF were sending out silly 'estimates', but they have since stabilised, and in my case, actually reduced from last quarters peak. So I set myself a new target back in May of 3 MWh/year. So how did I get on. I missed the new target, but was under the old one. This was mainly down to the cold weather that started in the third week of November and carried though to the third week of December, it was at least 5° below average, and sometimes 10°C lower. The weather is never very cold here, just feels it goes below 9°C. Daily mean of 9°C is around the temperature I turn my heating on. So this last year, I have used a total of 3237 kWh, with 474 kWh during the day and 2765 kWh during the night. That was as read by my old CurrentCost Opti-Envi meter. The actual meter showed that I had used a total of 3224 kWh, with 503 kWh during the day and 2721 kWh at night. Pretty good agreement considering that the EDF window initially had an odd hour between 23:00 and 00:00 hours and then 01:00 to 07:00 sometimes, and then 00:00 to 00:800 at other times, which I cannot be bothered to adjust for. I made three changes to the house this year. First change, I fixed the leaky back door. I was expecting to have to buy a new one, but found that the warping was being caused by a dislodged threshold. Took 2 minutes with a screwdriver to put it right. Lesson here is to investigate rather than assume. I still fancy a new door, a barn type would be nice, but just cannot justify the price, so may try and make one. Second change, at the end of May, was putting a timer of the top immersion heater on the E7 cylinder and pulling the fuse on the bottom element. This saved around 1 kWh/day, (can see the step change in the chart). It has made the quantity of DHW marginal, and I have been caught out a couple of times, but I can live with that, though others may not. 15 minutes of override sorts the problem for a shower, so not exactly dreadful. I intend to play about with the timings, maybe 1 day of lower heating element and then two days of higher heating element to reduce the chance of running out of DHW, but it will be a marginal saving for little benefit. Timer was under £20. My water usage has stayed about the same at 140 lt/day, though I really need to lower this, but I like a bath and dislike a shower. Third change was to make some secondary glazing for all but 1 window (should really be 2 windows, but decided to live dangerously). I did this with cheap planed timber, very cheap polystyrene sheet (cast acrylic would be better, but I like to experiment first) and some W profile draught excluding foam tape. Cosy about a tenner a window. So about £120 for that This has made a difference to both the U-Value and the draughtiness. Though not the prettiest of retrofits, but as I expect the polystyrene sheet to start to 'frost', I can make it much better next time. As a side benefit, the house is a lot quieter as well. In all, I have probably spend £200 on 'energy saving improvements' and have saved approximately 0.8 MWh/year, with my profile of 85% at the cheaper 15p, that is £100 saving (and the savings only started from end of May), so come next May, I should be quids in. The house seems warmer as well, but that maybe because the back door is not leaking, and I sit at my desk opposite that door. Mean house temperature has been 20.6° with a mean temperature difference of 8.8°C. As some of you know, I am keen to reduce parasitic loads, and have very few. Fridge (kind of essential, but still think 0.3 kWh/day is excessive), laptop (that is now mains only), 3 RPiZeroWs (could get away with 1), a cheap Weather Station (that I hardly look at as the outside sensor has stopped working) and a tiny 'pocket' router (which I can get rid of as it is only the energy monitor on it) and the CC energy monitor (could get rid of that as I made a similar one, but I like the display). I have, this last week, made a secure TOR webserver (one of the RPIZeros) that at the moment is just logging and publishing outside temperature. If I get bored, and trust the reliability, I shall shift all the data logging to this and just let it 'do its thing' but giving me remote data viewing. On the downside of my energy usage, I have driven an extra 27,000 miles this year, on top of my usual 22,000 miles/year, but even there I have modified my driving style for economy and increased them MPG by 20% (other benefits are the car is still going at 220k miles, driving is generally less stressful, had a £270 speeding fine once and got banned many years ago, but only a £30 fine that time, now I stop everyone speeding), but it has cost an extra £4000 in fuel, and used an 2,300 litres, so about 23 MWh of energy. Now the important chart.
 2 points
 -
Here Here, With SE's thumbs up just install more insulation to mitigate the wall floor thermal bridge.2 points
-
Use this opportunity to install more insulation into the floor, and more screed, for an all-round better performing heating system ( assuming UFH )? For inverts for drainage you should be referencing TOC ( top of concrete ) not FFL . TOC for you would be top of screed.2 points
-
They're lousy for heating. Anything less than 37C feels cool to humans. The air leaving these will be at more than say 21C setpoint but less than 37C (for efficiency reasons). It'll make you feel cold. It will annoy you. They're great for cooling. Anything less than 37C feels cool to humans. The air leaving these will be at less than 21C setpoint. It'll make you feel cold. It will please you. it will still not please you as much as still air at 21C would please you. There is a MATERIAL variation in performance between units. It is DIFFICULT to work out what it is. Explore here: https://www.eurovent-certification.com/en/advancedsearch/result?program=AC&product_type=AC1%2FA%2FS%2FR&keyword=&champ_23=3-4#access-results Or look at the attached spreadsheet where I compare five units. Row9 = standard bracket Midea, €650 for the 3.5 kW / 12000 BTU kit. Row11 = basic bracket Panasonic, €650 for the 3.5 kW / 12000 BTU kit. Row12 = standard bracket Panasonic, €1300 for the 3.5 kW / 12000 BTU kit. Row13 = premium bracket Panasonic, €2600 for the 3.5 kW / 12000 BTU kit. Row15 = premium bracket Panasonic, €2200 for the 2.5 kW / 9000 BTU kit. The ratings are built around cooling mode. The 3.5 kW class units provide ~2.5 kW of cooing at 30C ambient. COP4.75 for a basic one, 6-6.25 for a standard one, 7.5 for a premium one. Not much difference you might think. In the more common condition we see 1.6 kW of cooling at 25C ambient. COP7.25 for a basic one, but 10.5-11 for the standard one, and 12.25 for the premium one. That's a material efficiency bump. The differences get even more spectacular in heating mode. When it's 2 degC out the premium unit manages 2.25 kW at COP 5.75, but the standard unit only do 1.5 kW at COP 4.5-5.25 (that COP falling off a cliff if you push them harder), and the basic unit just 1.25 kW at COP. The premium units also come with more defrost / snow / ice type equipment protection than the standard units. That premium unit will still be giving you 4.2 kW at -10 degC with a COP of 2.75+ which is damn impressive for heating. You definitely want these units if it's your only source of heat. Standard class units will probably do if you're only cooling or only operating in the shoulder seasons. 2.5 kW class units work even better. 2 kW at COP 6 when it's +2C out, 1.25 kW at COP 8 when it's +7C out, 3.6 kW @ COP 3 when it's -10C out. You're better off with two of those than a single larger unit. One upstairs one downstairs. Downstairs takes more of the heating load than upstairs but both are available in limit conditions. Vice versa for cooling. Multisplits don't work as efficiently unless you ONLY use the one head at a time and you undersize the outdoor unit. (i.e. you have the 2.5 kW outdoor units with two 2.5 kW heads) That's due to the operating range limitations of the outdoor units. It only has one sweetspot if you're going for the ultimate performance. I threw in a standard range 3.5 kW Panasonic unit in the UK in a fit of heat induced insomnia rage a couple of years ago. Works adequately for shoulder season use. Not worth paying double for the premium unit. I wouldn't use it in preference to the gas boiler in winter for comfort reasons though. The XtremeSave Midea performs decently for the money. (standard panasonic performance for the basic Panasonic price) Don't buy the Midea Blanc etc for €50-100 less. That extra €50-100 makes an enormous difference to the performance. For ~€999 fitted we're going to pop one in the apartment to take the edge off in summer and the edge off in spring/autumn when it's the odd cool day but the district heating hasn't started up yet. You won't justify the step up to premium if it isn't the main source of heating / cooling. The basic range is never worth it for cost of ownership reasons. I am still seriously tempted to use an air to air unit in the cabin build instead of a ground source heat pump. COP 3 ish at -10C is approaching what the ground source unit does anyway. Heat distribution and comfort from a lack of drafts swings me back to wet heating systems though. MoreDetailPerformance.xlsx2 points
-
Build a really well insulated house. My annual ASHP heating usage is 1220kWh for the last 12 months. It is still hovering around 0 here, slightly above in the day, often a lot below at night, was still snowing today. Normal winter weather up here.1 point
-
The 4000tl spec Ive just looked at has max DC input as 4.2kw so quite limited. It also seems to have 2 MPPT inputs so if only one is currently wired you could hang your new panels on the free input. PVGIS will give you hourly data which you can crunch in Excel. Put in all the panels facing the same direction AND inclination as a single array and down load the data for the best FIT generation year youve had. Repeat for the remaining panels grouping them in separate arrays by common direction and inclination. Once you've downloaded all the data put the date, time and kw from each dataset into a new sheet. Add all the kw values to give you total kw for every time period. Then sort the entire sheet by kw total column to see what your likely peak kw DC input is. If its 4.2kw or less then youre good to go, otherwise a bit more thinking. Bear in mind that if your max PVGIS input is close to the inverter limit, then over time you might have problems with changing weather. Despite the fact that panel output is supposed to drop off over time, we've just had our best annual generation since 2015 on our FIT system.... climate change or a one off???1 point
-
I have a letter from the councils empty homes officer saying this property has been empty since December 2009. That and now the council trying to charge me this would hopefully be sufficient evidence1 point
-
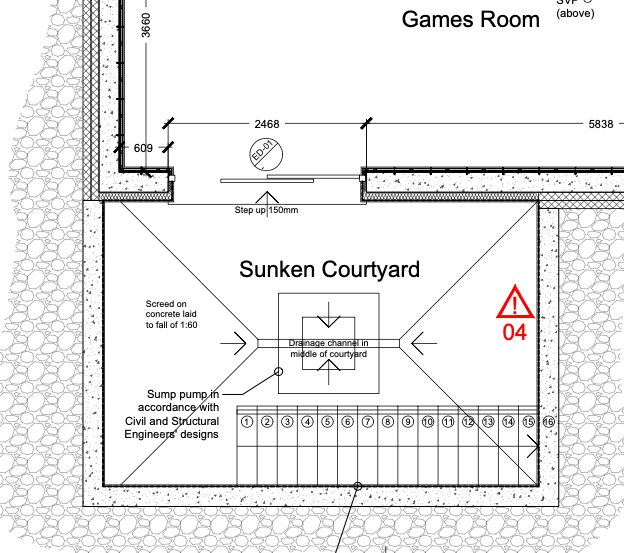
so actually I can answer my own questions here. I've checked the architect's drawings and they state 150mm step down to the courtyard. so I'm taking that as conforming to Building regs and so will crack on with laying a 50mm directly on the slab and then can lay the patio around it. I also need to fit a drainage channel/ACO to take patio surface water to the sump so should end up ok with levels etc.
 1 point
 -
Yep - hex nipple / socket same difference just nothing to grab on that with a spanner but will work fine. If you can’t get a 3/4 male drain cock then get a 1/2 one and just get a 3/3 to 1/2 reducer1 point
-
one of these on to the end of the manifold? https://www.screwfix.com/p/flomasta-female-socket-3-4-x/52588 and then screw one of these in to the end of that socket? https://www.jtmplumbing.co.uk/pipe-fittings-c433/compression-valves-15mm-28mm-c41/jtm-compression-valves-drain-off-type-a-p898 ps. I have to say I was a bit worried about doing a Google search for a 'female hex nipple'. thought I was heading into @pocster territory there for a second.1 point
-
so now I have @pocster's permission to carry on with the 50mm pipe solution 😉 anyone able to answer my questions regarding the step down from the basement to the courtyard ending up at 150mm? or minimum rebar cover for reinforced concrete if I need more than a 150mm step down? I've answered the pipe question myself by finding this stuff https://www.sumpsandpumpsdirect.co.uk/acatalog/2-inch-Rigid-Pipe.html#SID=361 point
-
They do them also I believe1 point
-
OK. drawings very useful. I should emphasise that I have not reviewed the previous 6 pages, so please excuse if this is already covered, and tell me. You have a basement which should be watertight....a complex and precise construction. You don't then make a hole in the bottom of it to allow water into the house, then pump it out again. The perimeter drainage needs to go away from the house. then there shouldn't be any need for sump or pump. If the building has been designed for you then the designer should be resolving this....or the contractor.1 point
-
@Thorfun ; I can see now ! You are draining a big area 🙄 That can be a shit load of water on a rainy day ! . Pump away my friend . Belt ‘n’ braces all the way . I’m 4 pumps ( only 3 active at the moment ) and 2 sewer connections. You should certainly be doing no less .1 point
-
From my experience of pumps, the pipe at full flow with a strong pump is in danger of destroying the manhole it sits in...a powerful jet. 'at a fair whack' doesn't sound like manhole destroying force. Also, I suggest wait and see....the groundwater may have been building up, and your pump may be reducing it to natural levels, and will then slow down. Yes, you may be dewatering the whole area, which is another issue for another day perhaps.1 point
-
Exactly the converse. If you are aiming for a minimum cost house you may be able to spare extra insulation and 3G windows if you achieve excellent airtightness. Airtightness is the single cheapest and best thing you can do to reduce bills and improve comfort. Passivhaus is 0.6ACH and probably the best standard although many on here have beaten that by quite a margin. Good design and about €900 of tape and membrane got us to 0.31ACH. The execution took thought however.1 point
-
Pretty much all done already with the exception of triple glazing (but I have progressively upgraded the glass only in my double glazing as panels have failed, wow does it make a difference!) Working also on a heat pump to replace aging boiler, if my LPA will allow it (see separate thread about the crazy noise constraint they have applied) Over the year I currently use the same as I produce, however of course the generation and the use times of day don't coincide so, yes, I am reliant still on grid import. With a HP the balance will of course change in favour of import. The two initiatives are sort of linked, together they reduce my scope 1 and 2 emissions from my house (using the government reporting methodology) by 78%. All my calculations to date conclude that batteries don't work financially, unless electricity prices go up again significantly and stay up (which I don't rule out). If the alternative is grid export then they make absolutely no environmental sense at all because they consume scarce resources for no environmental gain.1 point
-
>>> I'm considering getting a NeoHub so I can use the API it exposes me too and it just surfaced on my stack again (could be only for 10 minutes). Let me note some finds on this subject then: https://stackoverflow.com/questions/57873516/trying-to-communicate-with-heatmiser-neohub-using-provided-api-json-over-tcp-an https://github.com/RJ/heatmiser-neohub.py https://faq.heatmiser.com/hc/en-us/articles/360001844820-How-do-I-request-the-API-Documents- https://pub.dev/documentation/neohub/latest/ https://gitlab.com/afshar-oss/neohub-dart/-/blob/master/doc/Neohub_Api_For_Systems_Developers.pdf I'll post here if I find any time to write some code...1 point
-
I have recently ued https://www.insulationuk.co.uk/ for 240mm Eps in new build of floor 84m area. 2 layers of 100mm and 140mm staggered. I think you would find 260mm eps 70 at 250mm around 30 to 35% cheaper than the 160mm of Pir!1 point
-
Yup, noted earlier that there is no insulation ( and expansion ) upstand around the perimeter of the heated slab ( screed ). Needs a bit more detailing before we allow this to proceed1 point
-
ok no prob central scotland 270k manage myself and employ tradesman no architect flat ground decent conditions hopefully mains available 30m away1 point
-
Reading the original post first I would like to clarify: If the aim is a prediction for the next 3 hours I can't help. If your looking for general predictions of daily sunlight over a month I can do this. Predicting sunlight is easy on fully cloudy days and completely clear sky days otherwise good luck! The value of any information can only be decided when the purpose is confirmed. If I was anal about needing the house to respond to sunlight I would use sensors. If it was solar gain deflection I would use sensors. If it was to calculate solar gain or PV output this can be done. If you want to know exactly how long sunlight hits a particular spot on your building you can install a 12PV panel obscured to only produce enough power when lit by sunlight (or add a relay that need a minimum voltage to start the meter)and a ayron JR-HM001 Snap in Mechanical Hour Meter Rectangular Hour Meter for DC 6V to 80V and an appliance to use up the power produced. Hope this helps someone. We live on a windy island, where expected hit and miss weather days are frequently wrong. M1 point
-
Thank you to you, my 'friends' too, it's an amazing community. You're a great bunch, even the weird ones 🤣1 point
-
Well I think this is a very good discussion as a bunch of us are likely to face similar hurdles. While I generally like to be squeaky clean, I think in this case the LPA/MCS/BSI systems are a bit stacked against you, so a bit of street smarts are required. How about these tactics: (1) Install + Inform the neighbours of your plans and tell them you'll taking great pains to observe the noise rules. + Install as planned. Have a backup plan for extra attenuation / screening if needed/desired. + Make some measurements yourself before/after installation along the MCS/BSI lines. I like the time graphs for their sciency look and feel, and that suggests a logging noise meter/app. + Tell the LPA the work is done as specified. If they ask you for the calcs/data, submit them. + Check with the neighbours after installation to make sure they're happy. (They're the only ones really who have the ability to spark up the LPA). That should be it. However, if, despite your careful handling of the neighbours they raise a complaint to the LPA: (2) Argue and remediate if necessary. + Submit and/or point the LPA to your calcs/data. + The neighbours/LPA will either have to put a consultant to work through your calcs/data or employ one of their own to make their own measurements. Bearing in mind the most LPA's are stretched right now and their general remit is to encourage energy efficiency (e.g. heat pumps) either of these IMO is very unlikely. + If the neighbours / LPA get the bit between their teeth. Then: (a) ask them to identify the errors in your calcs / methodology. (b) propose your back plan for attentuation. (c) if and only if that is accepted, implement your backup plan. That should be it, but if there are still objections: (3) Circle the waggons. + make updated measurements yourself and submit your updated data/calcs. + If either of the neighbours / LPA still have the bit between their teeth, then I suggest they'll need to prove non-compliance (and you've already demonstrated that you've done everything in your power to comply). + if they can prove non-compliance and you can't think of any other attenuation mechanisms, go to appeal. + plead (a) you have taken every possible step to comply, and (b) heat pumps are government recommended technology. + if you lose, take it to the papers and embarrass the LPA. It's BS that you even have to think this through, of course. I would be willing to bet that you'll easily stop at (1) above. In my view, LPAs are in an Alice in Wonderland state atm. How does that sound?1 point
-
The DNO has said the extra panels will be ok so no need to limit export1 point
-
You can get shallow downlights. Our ceiling void is made up of 38mm battens and 15mm plasterboard which allows shallow 45mm downlights.1 point
-
Yes my plan is just to do small jobs for customers I know. I already turned down even looking at the wiring for a new build on the West Coast scheduled to happen later this year. I could do with just one more year of NIC contributions after the end of the 2022/3 tax year. What I have not been able to find is what is the minimum I can earn as self employed to qualify for that? and then set that as my target, and when I reach that target, stop completely.1 point
-
When I retired from being self employed I got more picky about the work I took on, only doing jobs I wanted, not working 7 days etc. I think everyone should retire by degrees not just suddenly stopping. Life it too short and retirement should be enjoyed.1 point
-
No, because the air bricks for all of you will run front to back. They can’t run sideways because it’s a semi. BC might not be happy if you have to excavate downwards to get enough depth for the floor buildup, they can get twitchy about exposing the footings. But that’s only an issue if you need to dig down a long way and your footings are shallow.1 point
-
For the few quid that a buffer costs, fitting the correctly sized on saves hassle. You may end up fitting on anyway. Cold lofts are not the best place to fit hot stuff, the parasitic thermal losses can be quite high. Better to have those losses within the heated envelope, during the heating season they become useful.1 point
-
Tbh they don't get the chance, well the developers I work for dont. I have never had the end client wanting to force technical details like these, as this is my expertise they are paying me for. I choose when and where to survey, as everything I stick in a report has to defendable. The condition your LPA has set is interesting as it doesn't look it has to be discharged, is it stated as a pre commencement condition? The 10 dB below figure is used by mainly London authorities, and is based on the guidance of bs4142:1997. There were big changes that came about with the 2014 version of 4142. One of these is now there is emphasis on context of impact, and your point about night time impacts with people indoors is valid but can usually be addressed on the context of the impact (bs8233:2014) Unfortunately the way the condition is worded the 10 dB below figure is stated as an absolute value. A recent assessment I did was for two ASHPs and condenser units in a residential development had to go in an enclosure, as it was a London LPA that wanted 10 dB below the minimum background. Other authorities are more flexible, and will allow up to +5 dB depending on context. For my own ASHP, I chatted with the EHO and it was agreed to do the noise assessment on my planning app to the mcs method even though it wasn't going in as permitted development. Also note assessing to BS4142 you may have to apply corrections for tonality or itermitancy. BS 4142 is more stringent than the mcs method.1 point
-
TinkerCAD is easy to use and exports directly for 3D printing1 point
-
Parametric CAD might suit you then. Often I start with a bunch of dimensions and think of the part I want in a simple modular fashion. This is when I reach for OpenSCAD.1 point
-
If you keep the suspended timber floor, it needs to be ventilated. BC should have picked this up on my neighbours extension, but didn’t. I would put the dpm on top of the insulation.1 point
-
I’ve been chatting to our local rep and he’s agreed to reduce K prices Partly the terrible wether over the last few months and suspect mostly The expected downturn Both base and top coat will drop to pre pandemic rates With a little bit of commitment on my part I suspect Webber are reducing also I was watching the news ass the pandemic started They we’re doing a tour of a loo roll factory just a few miles from me The chap stated that while people where hoarding They produced a million per day and had storage capacity for six days I suspect the same will apply to many others1 point
-
The material cost of steel v tile v slate you can work out yourself as many of the roofing suppliers online show how much of each material covers per sqm meter. You also work out the roof size of what you consider to be an average size house. Installing steel would be a lot quicker than tiles especially if you have a simple roof design without dormers. I’ve successfully installed a steel roof on my barn / shed but the installation isn’t perfect, there is no way I’d personally do the install on my house and risk it looking gash. Steel roofs look fab in rural settings if installed well. There’s a bit of skill involved where the roof meets for example roof windows. Not one for an amateur. If you are anxious about budget / costs a simple form agricultural style building will be perfect in a rural setting and will cost a lot less than say a house with a complicated form / roof etc.1 point
-
@ToughButterCup we’ve got valves that are relatively flush, not sure if they’re less than 10mm though. When I get home on Tuesday I’ll measure it and see, if you haven’t come up with a solution by then. *** @ToughButterCup nope, sorry. Well over 10mm depth to our ceiling valves. ***1 point
-
Flush mounted ..? https://www.blauberg.co.uk/en/ceiling-mounted-vent-grille-adjustable-ventilation-diffuser-extract-air-white1 point
-
All the best. Yes it was a long reply.. then main thing is that if you read my post I was not just writing for you really.. it was for everyone on BH.. we all pinch ideas and discuss design be it planning or all the other issues. If you want more help then post more on your thoughts. If you give a bit on BH you'll find that you get much more in return.1 point
-
I don’t think so, I think it was a smaller one. Probably the same pcb inside though.1 point
-
Here's an article. https://www.jlconline.com/how-to/foundations/insulating-over-a-structural-slab_o I'll attach a PDF from Huber in the USA. 2-Layer-Floating-Subfloor-with-AdvanTech-subflooring-Technical-Tip-Subflooring-AdvanTech.pdf2-Layer-Floating-Subfloor-with-AdvanTech-subflooring-Technical-Tip-Subflooring-AdvanTech.pdf1 point
-
I would say 2 layers of 11mm would be fine. Screwed and glued. Kingspan recommend 18mm T&G but I feel properly overlapped sheets would be stronger. Don't forget to leave enough space for expansion and contraction. https://www.kingspan.com/gb/en/knowledge-articles/a-guide-to-constructing-a-floating-floor/ Here's a project from the states. https://youtu.be/NbC-EfQ_u3E1 point
-
But why need to blip it? I had calculated the heat loss of our house using Jeremy's spreadsheet. When the house was just a bare shell, I just put a small known power electric convector heater on in the middle of the downstairs for a week, and plotted inside temp vs outside temp over a few days (once it had reached equilibrium) and confirmed delta t between inside and outside was what was predicted for that amount of heat input. I can't see that working with a shot test as a modern well insulated house, the time constants are measured in hours if not days.1 point
-
You can’t judge it on the coldest week of the year just like you wouldn’t say it costs next to nothing to run in the warmest week of the year.1 point
-
Hi all, I've fitted an F7 filter to my mvhr system, which uses a nuaire xbox95wh1 (very basic unit, but bought very cheaply, £350 as new, as an incorrectly specified installation) The whole thing has cost less than £100. Here are the key points of construction, results and next actions. I hope this is helpful. I'd also appreciate any further info you may have to assist with the next steps, as below. SYSTEM DESCRIPTION https://info.nuaire.co.uk/IandM/671686.pdf The system has 5 extract and 5 intake ducts, semi-rigid ducting, external vents being on the gable end of the house. THE PROBLEM To try to eliminate wood and coal smoke pulled in from my neighbour's woodburners and open chimneys. I firstly researched the commercially available units such as this: https://www.blauberg.co.uk/en/blauberg-cleanbox-nox-carbon-polution-pollen-indoor-air-quality-filter-box-for-heat-recovery-ventilation-systems and this https://www.airclean.co.uk/indoor-air-quality-filtration/indoor-air-quality-filter-system/ but they appeared to be vastly overpriced for what they actually are, so I decided to make my own, initially using a g3 and f7 filter, as here: ASSEMBLY G3 prefilter and F7 particulate bag filters used: https://www.addfiltration.co.uk/12x12x2-290x290x45mm-g3-grade-2-deep-dry-glass-panel-filter?search=g3 https://www.addfiltration.co.uk/12x12x12-287x287x300mm-4-pocket-12-deep-f7-grade-synthetic-bag-filter?search=f7 bag Total cost inc postage, around £20 I used an F7 bag filter rather than a panel filter to increase the interval between servicing. The enclosure itself was fabricated using tilebacker board, as it's robust, light. cheap, easily cut, and impervious to moisture. Much better than mild steel, plywood, MDF etc. https://www.jtatkinson.co.uk/catalog/product/view/id/11068/s/multi-pro-moistsure-tilebacker-s-e-1220x800x12mm/ cost, about £15 I used angle brackets to assemble the enclosure, which was then sealed with silicone sealant. Total cost about £10. Removable filter access panel was fixed using these, as I had some lying around https://www.powertoolsdirect.com/forgefix-cavity-wall-zinc-speed-plug-4-5-x-35mm-bag-10 150mm duct flanges from here, about £10 delivered https://easyhvac.co.uk/index.php?id_product=155&controller=product Total cost around £60. Significantly cheaper than the above, although it does not have an activated carbon stage yet I designed the enclosure to fit in the loft under the roof, so it's an interesting rhomboid shape. Ive also provided for inclusion of an activated carbon filter stage within the enclosure, should it be needed. I used f7 rather than F8 to keep the pressure loss within reasonable limits, my thinking being that I can replace the F7 bag with an F8 at minimal cost after seeing how the NuAire unit handles the pressure drop. I have removed the existing filter media from the MVHR intake filter, ensuring that the edges of the filter frame still have the original G3 media present to prevent internal leakage within the MVHR unit. RESULTS 1) The filter still allows some smell of smoke to penetrate, although to a significantly reduced degree than previously 2 ) OK Intake flow rate been achieved despite the increased F7 filter resistance, although as expected the intake fan speed had be increased to maintain airflow as before. The MVHR clogged filter warning has not been activated, therefor the system must be working within its design parameters, ie the fan is not seeing excessive load. 3) Increased intake fan speed has resulted in increased noise level. This noise level is still very low, but any further increase, say to accomodate f8 and/or carbon filter may become unnacceptable for sleeping NEXT ACTIONS 1) SMOKE/SMOKE ODOUR I may add an activated carbon filter, using media such as this: https://www.calgoncarbon.com/products/ap-4-60/ I'll make a tray with seive material in a an open frame. i've already included supports for such a frame in the MVHR enclosure I may also experiment with an F8 filter to see which solution gives the better result at the lowest pressure drop. AND/OR I may substitute the F7 for an F8 bag filter. Does anybody have any experience of the effectiveness or otherwise of F7/F8 for smoke particles? 2) NOISE The filter is fitted before the MVHR, so I may seperate the G3 and F7, and move the F7 filter stage to post MVHR, this will probably eliminate this noise issue, and allow for further fanspeed increase if necessary. I also wonder whether the MVHR fans are better at 'pushing' or 'pulling' the air. I'd appreciate any further info on this point if there are any experts out there 3) Further down the road, if the carbon and/or F8 filters prove to have to much resistance for the stndard Nuaire fan, I'm thinking that maybe an additional intake fan, seperately housed, immediately before the MVHR, would overcome this problem. I've not researched this as yet, so I have no idea how to specify such a thing to produce the appropriate pressure and flow at minimal energy consumptiion. I hope this is of use. Any info or comments you may have, especially on the fan'pushing vs pulling' aspect, or the implementation of an additional fan would be greatly appreciated1 point