Leaderboard


Popular Content
Showing content with the highest reputation on 06/28/22 in all areas
-
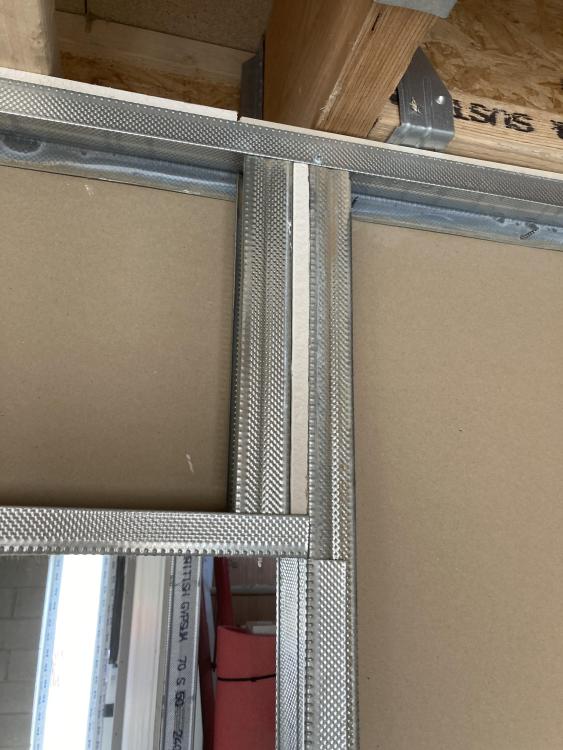
I’ve just been to a job (Care Home) One that we did the taping on but didn’t have anything to do with the framing or boarding We we’re apparently to expensive Cracks have appeared above each door frame A simple blame exercise The client is refusing to cough up the final payment until these cracks are remedied Ive stripped several of the boards off to find there isn’t any vertical stiffener A simple rip of plasterboard that reenforces the joint and stops it cracking Make sure your framers put these in
 3 points
 -
I visited Installer '22 at the NEC on Wednesday (told everyone who asked that I was a renewables retrofit specifier in the domestic sector, I'm not...)... My take-aways from the day: 1. Cool Energy had a demonstration trailer setup with their newer R32 based unit driving a very nicely made, Italian sourced, fan coil unit in cooling mode. They have a nice product and they're very technical and open. Units will ship with the newer Carel pGDX display in the future (https://www.carel.com/pgdx) and this is a nice display/interface. My visit and chat has cemented them as my chosen supplier for my domestic renovation project. 2. Unitherm heating (Exeter) had a good display of heat pumps from various suppliers on their booth, but nothing plugged in and working. They were one of the few companies there with LG units to see. 3. Grant, who supply Chofu units (Japanese origin) had a nice booth, but the real take-away from them was their nicely produced brochures and handover guide which do a good job of explaining to the homeowner how setback and weather compensation work. Nice to see them trying to educate the user in how to get the best from their system. 4. Midsummer wholesale have launched heatpunk (heatpunk.co.uk) a web based tool for graphical heat loss calcs. It's similar to the freedom toolkit except it is web based and runs in the browser. You draw your house, specify the building contruction and it does heat loss and rad sizing in a graphical manner. Free to use (for now). I asked about importing DXF plans and that's something they are considering. 5. Sunamp are listening and are working on a making their PCM43 more reliable in long cycles (that's why it isn't available yet), and are also thinking that PCM50 would be a good fit for heat pump applications. 6 (Leaving the best till last). Homely, by Evergreen energy - wow, this is a game changer. A modbus enabled, IoT based, smart thermostat and heat pump controller that takes control of a wide range of modbus controllable heat pumps and will optimise the flow temp and operating times depending on occupancy, weather, solar gain, predicted weather for the coming 24hrs, TOU tarrif data from the tarriff provider, storage battery %SOC, etc etc. It can automatically commision Midea and Samsung units over modbus and provides a full app for the end user to setup their schedules and temperatures. It has an indoor light/temp/humidity sensor that allows the unit to automatically setup the weather comp curves for a property, no installer callbacks, no fiddling by the user. I was very impressed with this and can see it being of real benefit to end users. They are going to enter a line of communication with Cool Energy to add support for their units. All in all, very glad I visited. I'll go again next year for sure.1 point
-
So after 2 years since the planning permission was granted, and a 2month delay from the builders I'm finally underway on what will be the last major building work on this bungalow. Having real trouble finding a joiner who's available to do the roof, so I may end up having to do that myself. The one bit i'm unsure on having never done a lean-to roof before, the wood plate which goes on the wall, is it fixed using thunderbolts?1 point
-
I must say I'm surprised as well. I've converted a steel portal frame commercial to residential and each engineer that looked at it proposed additional steel to stiffen the frame even though that extra steel would be performing almost zero to the load bearing elements e.g. roof, since the new walls would be carrying the new roof rafters. In the end we went with ICF for various reasons so all the columns are embedded with concrete but the issue is deflection of the frame. Even with half the columns in concrete the rafters are moving around fairish. You might be surprised how much that frame moves around - try and borrow a magnetic laser level and clamp it to the steel. Even in a very mild breeze I wouldn't be surprised if that laser line jumps about like a frog on hot coals as the steel sways. Once we finish the next pour and put the glulams between the rafters then this will stiffen the whole frame up but we still had to put a couple of steels in as well to prevent all this deflection in different directions. Also at design stage when we looked at timber frame as well as block construction it was generally accepted if we went down that route that we would need to tie into the steel with special slip ties so that the steel could move under expansion/contraction without causing the blocks/finishes to crack. Appreciate you've had an engineer look at it but just passing on my experience.1 point
-
That is how the old quarterly billing system used to work on estimates but it used a rolling 5 quarter average to calculate estimates. The companies are rather clever as Bulb for example doesn't do much with readings and has a random usage generator that I think means you are kept within 10% of a previous month. I did an exercise last month with them and gave them 3 daily reads one after another at 3 days before the bill was due. What I found was a regular 4/2 peak offpeak usage per day, but when the bill came they had estimated 3 days at 6 and 5 units per day respectively…! So 150% on peak and 250% on offpeak actual usage. The issue for them is they say that your payments are for the upcoming month, yet with a forecast of around £75, they are still taking £133 and will only drop that to £111 “to stop debt build up” despite being over £180 in credit ..!1 point
-
Is this banter getting a bit rich for this thread?1 point
-
Kudos, I've always admired your fores....1 point
-
I check my usage through the app on a daily basis for no other reason than I’ve become a bit obsessed with it. We have been using between 8 and 10 units a day. Yesterday was the start of me working a longer shift at work so I was out of the house 2 hours longer than normal. My usual routine sees me getting up and putting on the telly and drinking numerous cups of coffee before I leave however of course this was two hours less than normal. Looked at my usage for yesterday and it was down at 6.8 ! Does the tv and kettle really use that much? It’s the only thing that happened differently so I’m assuming it does in which case I think I need to stay at work!1 point
-
yeah. I know. but the beauty of the Squirrel Pod system is the expandability. so it's trivial to plug in another couple of batteries to double the capacity when funds allow1 point
-
@pocster you are fabulous. 23kW storage! brilliant. sadly our finances are dwindling fast due to the stupid material prices at the moment and so I've had to cut back our battery storage to a measly 6.4kW for now. but the system I've purchased is expandable so I can add extra batteries at a later date to give more storage. but 6.4kW will do for now I think. I look forward to the day when I can attain the level of your awesomeness.1 point
-
you can adjust the springs, we have similar set up to you, and needed to adjust the pre load on the springs to enable the window to stay open at all. There are videos and pics online of how to do it. Best done at install time as some of the covers on the outside need to be off to access the springs and adjusters1 point
-
why wouldn't you? it's better to have it and not need it than to need it and not have it. 😉 <goes off to update the electrical drawings to ensure there's a cat 6 cable to the kitchen island as I think I forgot it!>1 point
-
I wish everyone read their meters. Would make life so simple for everyone. On a more general note about estimated bills. Now a lot of people have smart meters, why don't the energy companies off the chance to pay a twelfth of the previous years usage, OR, pay what you actually owe. I know some cheapskates will get into trouble come the winter, but they will probably be in trouble anyway (and I am paying an extra 25p a day to bail them out).1 point
-
1 point
-
I don't know where their calculation gets it's figures. I thought OFGEM were cracking down and fining suppliers who charge too much per month? I tried to change mine using the self service function on their website but it was advising me to increase, not reduce the monthly payment, even though just keeping it the same would over pay based on the last 12 months actual usage. So I sent an email outlining my calculations and they agreed.1 point
-
Thank you.1 point
-
I just put mine DOWN by £40 per month and will keep it at the lower level in anticipation of the £400 grand from the government. for at least 10 months.1 point
-
I would expect them to be sort of M5/M6 machine screws or something. If it is just a modest oven it could also just be in with self-tappers into plastic or metal.1 point
-
We had the rendering done after the windows were fitted. Our door fitters had the exact opposite view that the render would provide the weather tight seal and be done after the door fitting. They also felt that aluminium cills did not need the same dpc detail as the TH manual. Having the render done first may have a lot of advantages. My inexperience might be showing here, but I actually thought the windows had to be in before you could render, I never even considered that it could be done first. We did the same as Russell with the windows and put down the liquid dpc. We fitted all our windows. We used window straps, Illbruck tape. Drilling holes in TH ICF is tricky due to the depth and because you are drilling blind into 75mm of EPS first and then there is the issue with the embedded rebar. I managed to snap one masonry drill bit as it fused on the rebar. Do you have the check reveal detail on the window openings? The door fitters cut this off for the door install. But I kept them for the windows. The window, cill and check reveal detail is very tricky as indicated by the original posts in this thread.1 point
-
Pv was 4kw with just PW pv now 8kw with optimisers, pw and se battery ( new inverter aswell ) Optimistic ? . Actually did it yesterday . 23kw 100% full and ended exporting 😁 Currently draining pw into my EV with the hope solar production will refill it today . In winter you are indeed correct . My ambition is at off peak rate to fill 23kw . Should in theory (!!!) never ever use peak rate again . Boom !1 point
-
@bertybuttface I sent them a ping and got this reply: "'' The SE8000H and SE10000H are still not officially compatible with the SolarEdge Home Battery. You can subscribe to our newsletter here: https://marketing.solaredge.com/newsletter-row Here is a link to the firmware page, where you can find the release notes for the latest version (updated with new versions): https://www.solaredge.com/setapp-inverters-firmware/ """1 point
-
Is your PV oversized for the inverter? As it how many kW of panels do you have? Charging 23kWh of battery from a 3.8kW array sounds optimistic even for high summer, but I guess you're sizing all this for overnight cheap rate recharge. (Perhaps a brave decision as who knows if those cheap off-peak rates will last)1 point
-
Yeah sorry . This inverter replaced previous one ; so all pv through it1 point
-
I was responding to your thought to buy a unifi managed switch to have everything controlled under one app/console. IMO the router is far more useful and important to have control of, and useful to be integrated into the same control surface, than the switch. If you're happy to keep the virgin media hub as the firewall router then I suggest just using unifi for WiFi and nothing else, in which case just get the cheapest unmanaged PoE switch that it's compatible with the APs and be done.1 point
-
Se and pw playing nicely at the moment. Currently charging my EV at max rate (7.2kw ) . Pw supplying 5 . Solar currently less than 1 . Se picking up the slack .1 point
-
Yep, that’s the one.1 point
-
Semi ridgid all the way. The fully flexible is OK if you support it fully. But that can be a pain if it needs to be elevated. Keep an eye on the market place here or post a request as the amount you need is likely laying around unused at somebody's site.1 point
-
We bought a 1930s semi not far from you, but survey identified lots of damp and other problems before we bought so we knew we would have to gut the whole place before we bought it. By the time we were ready to apply for planning permission we knew we'd be: gutting the whole house of all its wiring and plumbing removing all indoor walls with the exception of one quarter of the house (consisting of one bedroom and one living room under it) that was staying the same knocking most of the rear wall of the house down to make way for a ground and first floor extension doing a loft conversion removing the external pebbledash covering of the whole house At the time, we thought it was a major job, but that the house had "good bones" and so we were just removing what was necessary and keeping certain crucial bits like the roof and the joists. Planning more or less forced us to lower the height of the ground floor floor by about 40cm. This was not planned, as we assumed the corbels were the same level throughout the house, but ultimately that proved a bad assumption and we ended up needing underpinning. Quite a lot of underpinning. Then during contracting, the builder persuaded me to retile the roof at the same time as doing the loft conversion. And when i started reading about the benefits of MVHR on this forum I realised we would need to replace most of our joists with posi joists. So the joists went as well. Oh, and did I mention we were replacing every window in the house and the front and side doors? One day I got "home" from work (we weren't actually living there through this rather severe bit of house surgery) to discover that the two rooms I thought weren't losing their walls, ended up losing one wall. This was actually necessary, so i retrospectively okayed it and then the builder asked me whether there was any point in keeping the other wall and so I gave the okay for him to get rid of that too. In the end, in no way overstating the extent of the gutting, we ended up just keeping the side wall, the front wall, a quarter of the rear wall and about 10% of the roof rafters and two fireplaces (one of which had to be lowered by 40cm when the floor was lowered by 40cm). The whole ordeal took 18 months and cost me an absolute fortune. I had always thought you couldn't knock down a semi detached house, but shortly after we started our building works I saw that this is exactly what they did around the corner. I'm still not sure whether there would have been much saving in £ given the additional structural engineering and insurance required for the adjoining house, although I'm sure it would have been quicker and we would have ended up with a better insulated house. Having said that, our neighbours were impossible to deal with and if we had knocked down our property I think they would have killed us judging how angry they got with us when we were doing a bit of gutting. I imagine that with a terrace house, in theory you could knock it down but in practice the structural bracing and insurance costs would be double the cost of that required with a semi detached demolition and so would be prohibitively expensive. Our house is also very well insulated, having put about 50mm of EWI on the original walls, made the house very airtight and not cut corners on the insulation for the new bits. Good luck.1 point
-
There's 2 types of flexible ducting. Floppy: Best Avoided. And Semi Rigid: Which lots of us have used to good effect.1 point
-
Might be worth insulating all ducting too if its a cold roof space, this might prevent some condensate.1 point
-
I am using TH and the fabric has been built. Rendering using EWIPro silicone in a few weeks. So this is what has and has not worked well: - Do a lot of research about getting a building warranty if applying render direct to walls. A couple of large insurance companies (eg LABC warranty) now all but refuse to insure this except under some impossible conditions. See example here. - I have opted for an architectural warranty which covers direct render to ICF. - I did have the option for leaving a vent gap between the wall and the render using battens and render boards but somehow that defeats the purpose. Plus with 150mm EPS there will be a lot of long and thick screws into concrete, both expensive and slightly impacting insulation values. - my EPS walls are all scratched (seriously), pushed in, damaged, etc. not in a big way of course. Any serious damage can be fixed with low expansion foam. But when different renderers came for quotes, they were not worried at all whatsoever. They said the first base layer will smooth everything out. - I understand you can hose wash the silicone render within reason. So it is water resistant enough. However it MUST be applied well. EPS is NOT waterproof, I have seen it in action. It is not porous like plaster at all, but water will get through it eventually. Remember the old white foam coffee cups? - very critical to make sure openings are sealed well. Goes without saying. Remember there is no air gap like a two leaf wall, so sealing has to be much better. - I plan to glue plasterboard direct to EPS with some screws into galv steel for good measure. But remember, if you were to fix heavy stuff, the plasterboard and the glue may take the weight, but the EPS could get ripped. Very unlikely to happen with normal loads though. With thermohouse there is only 50mm EPS inside the house so is easier to reach the concrete core where you have to. I have also used sterling board for heavier stuff as suggested already, fixed to concrete using thick hammer fixing for my plant room walls. - for external render I have the option of using double scrim for additional strength. But just can’t see too many cars driving into the walls, so am taking a small risk… - thin coat silicone appears best for EPS. - if you have neighbours across the fence when you design the house, make sure the architect looks at fire spreading regs. - for windows, thermohouse is not really the most impressive out there in terms of product support. Most other providers offer their window jamb system and kit. - for doors and windows, make sure you choose a system which integrates well with ICF. Assuming you will go for low u value windows, they are often different from standard windows. So do not make assumptions. Eg with my Rationel windows, they want to place the entire weight of triple glazed windows on the base, possibly over a few spacers. ICF EPS is not designed to take that type of load and will give over time. My solution is to replace the EPS above the concrete on openings with thinner EPS 300 or 400, with a 10mm layer of cement or timber on top of it. To take the point load of the spacers. - think what you want to hang outside and allow for it at concrete pour time. Also for any holes in the wall, etc. - good luck. - on a separate note, if you are aiming for low u value house, then be prepared to argue with heating engineers who will (likely) use standardised parameters to work out your heat demand. I ended up registering as a reseller with a main brand so could enter my own house parameters. Yes, those with 30 years of heating design may still want to use heat demands from 30 years ago (no disrespect to those good advisers, but personally I gave up with JG and NuHeat for underfloor heating, though I am sure it was my bad luck. same with boiler/heat pump. I had to insist over several calls and after emailing informative documents, before my heat pump guys incorporated MVHR efficiencies into their air volume change calculations….1 point
-
You can also link more than one using tank connectors, so that one dp feeds them all. In the winter you can even leave the tap slightly on, to dribble away and attenuate the flow. Did that on a big workshop once, as an official solution, accepted by the Environment Agency.1 point
-
yes you can, just make sure the used ones you're buying didn't have chemicals in it. Some high pressure clean IBC tanks before selling some other sell IBC tanks that had e.g. vinegar in them so you can clean yourself. So there is no problem with IBC tanks just make sure the supplier is reliable / trustworthy.1 point
-
You’ve not got a meaningful cavity when it comes to insulation. I would treat it as a solid wall. If you’re planning on insulating your solid walls (everyone should be at some point), then I’d just stick whatever system you plan on using over the cavity areas too, whether that’s internal or external. If you’re going fully vapour open (breathable), just be careful, enlist help of your insulation merchant/architect with regards to moisture. james1 point
-
Just 31.23mm inside. You can get a pretty good estimate for the speed of light using a microwave and a bar of chocolate.1 point
-
Oh yeah, completely forgot about that!1 point
-
Microwave is definitely more energy efficient at least for small items. Imagine a pie you could heat it in around 5 minutes at 900W in the microwave maybe 0.1kWh , but it would take around 30 minutes in the oven, which would use around 0.6kWh (I assume it uses more energy at first to warn up the oven). Of course if you heat a pie in the microwave you are a monster and know nothing about food.1 point
-
I'm hoping this message reaches you in time, and would be interested to hear how your DRP meeting goes. We'll be undergoing the same ordeal in mid-June, although we will be armed with a planning consultant, architect, landscape architect, ecologist, etc, etc. I'm mightily impressed if you're tackling this yourself! We are meeting on site and then travelling to a meeting room arranged by the DRP (as part of their fee). They are allowing 3.5 hours for the whole process. If it helps, this is an extract from one of their emails: Presentation Guidelines In terms of the format of the presentation for Design Review. The list below provides a guideline on the information that could be provided which will depend on the stage of the scheme, the site analysis however is essential: · Location plans – 1:1250 · Existing site plan – setting out existing buildings, land ownership, listed buildings, conservation areas, pedestrian and vehicle movement etc. and urban design analysis if undertaken · Proposed site plan – setting out landscaping, car parking, pedestrian and vehicle movement etc. · Aerial photographs, if available · Proposed plans, sections and elevations · 3D images of proposed scheme – photomontages and views · Proposed site sections and elevations to show relation to context · Views in and out of the site, showing the project in context · Indicative details to illustrate the proposed architecture. A few other points I've picked up in the process might be of interest: If you give the manager of the DRP a heads up on what the project is beforehand, they can select panel members with relevant expertise. And some DRPs specialise in certain types of architecture - no doubt you've selected one that will know about sustainable buildings. It is important to get an understanding of what your DRP will expect to see - our architects have done a number of these presentations and all panels seem to vary in their expectations - some will want just a basic concept so they can suggest design ideas, while others will want to see more detailed plans that they can tweak. Our architect has already had an email checking that 'you haven't done too much have you?' Is your planning officer attending? Apparently having him hear directly from the panel can streamline things later on as he can understand how you've taken the DRP's suggestions on board. Our planning officer suggested a DRP that he had dealt with before, but para 80 applications don't come across their desks very often so they have to get help. However, they are usually interested and keen to be involved - handling such a scheme looks good on their CV after all. Have you budgeted for a second DRP? If they feel your design doesn't meet the para 80 requirements, you will probably need to go back with a revised presentation to get their support. One final point for your presentation, you need to show that your para 80 project specifically relates to your site - the phrase quoted to me is that the house must 'fit here and nowhere else'. And one final worry - whilst DRP support does usually result in planning consent, apparently less than half of all para 80 houses ever get built, mostly because of the final cost, but often because the DRP's input results in a design that the applicant doesn't really want! But hey, we do it for the challenge. Good Luck.1 point
-
You were always my favourite!0 points
-
23 kWh you (expletive deleted)ign retard.0 points
-
If the cost of express bi folds is eye watering, you’re in for a reality check.0 points


.jpg.c21f3ac78c9b7efd90cbdcb312744dc5.thumb.jpg.7adcad4c0e384f5ecd7d56b0618df6e5.jpg)