Leaderboard
Popular Content
Showing content with the highest reputation on 06/19/21 in all areas
-
Hi Oxo Yes it is worth it.... We had our planning application application refused. There was objection from our neighbour, a local residents association and the parish complaining that our design was bulky and overbearing, loss of privacy, loss of light and out of character with the street scene (high % with gables), impact on conservation area as well as loss of bungalow. Admittedly our design was "out there" (our nice neighbour / friend referred to it as "the Miami style house" (he didn't object)). I contemplated changing our design and resubmitting our application with a more traditional to try to make it fit. But our planning appeal consultant advised against this and quite rightly suggested that our plans will still most likely still be refused. Mrs. Bucket would have complained no matter what, so there's no guarantee that your resubmission will be passed. We submitted our appeal and included that we had pre-application advice (from an officer who left (managed to argue this point cross referencing the point in the white paper)) and how the officer did not visit the site (yours could have still viewed from outside regardless of Covid), similar to your situation where you have evidence. We cited that the officer preferred this mass out of the two we presented for review. The report included all the reasons why the property wasn't suitable in its current state - how we want to make it our forever home. We also stated how our architect had accounted for the 45 degree rule in the design and good architectural design encourages new design, in fact in his decision the inspector stated "Paragraph 127 of the Framework sets out that planning decisions should ensure that developments are sympathetic to local character while not preventing or discouraging appropriate innovation or change”. He also stated that the design would have no impact on the conservation area? We referenced statements referring to inclusions in the latest government law of permitted development passed Ist September 2020 (?) and referenced the NPPF re Pre-application engagement and front-loading as well as referencing other relevant paragraphs such as how the design will meet current and future standards re Lifetime homes, if you have children you can explain the tight space and demonstrate by submitting photographic evidence of the rooms, including two beds, crowded etc. And in your case you can reference similar house designs as you plan for in the area. We said we would use obscure windows to the sides. There are many arguments you could use, I could go on and on - I spent hours looking at our LA's paper and cross referencing arguments in the NPPF, government white paper and Permitted Development law to help make sure the appeal was all watertight. You might find this useful to make sure your design adheres: https://assets.publishing.service.gov.uk/government/uploads/system/uploads/attachment_data/file/830643/190910_Tech_Guide_for_publishing.pdf And to cross reference points in response to the council and objection letters https://assets.publishing.service.gov.uk/government/uploads/system/uploads/attachment_data/file/958420/MHCLG-Planning-Consultation.pdf https://www.gov.uk/government/publications/national-design-guide https://commonslibrary.parliament.uk/research-briefings/sn00485/ We asked our neighbours opposite and a few doors away to write letters of support (doesn't have to be those originally consulted (one was)), which they did and helped to highlight that opinions are divided. Mrs. Bucket our immediate neighbour used the same arguments as she did before which obviously were her personal opinion and actually read quite pathetic saying we were building "down the garden" and this time went and wound up our nice immediate neighbour's wife to do the same when he was out. The council's response was very wishy washy referring to the LA plan, which is still at the modifications(?) stage and easy for us to respond to, you also get a chance to respond to representations in any objection / support letters - but at this stage of writing you are not allowed to produce new evidence and only respond to the council's comments but did cross reference the responses to the government's white paper and law. If you do lose the inspector will highlight areas and make recommendations and as I understand it you can still win with say a condition that you should add more greenery etc. In our case it was that we must have obscured windows to the side walls and not use the flat biodiverse roofs as balconies. The council wanted our PD rights taken away should our appeal be granted but the inspectorate couldn't see any reason for it. So glad we appealed because WE WON!!! A local estate agent who came to value said its a shame some people don't and how he has seen some homeowners scale right back or build chalet bungalows instead. Something which we did try to contemplate. After winning were able to modify our design and resubmit for free and get rid of the red bricks which the pre-app officer advised us to incorporate to try and marry the traditional and were able to go back to our original plan of pure white front and slightly angular design. As our architect put it, "free roll of the dice". Go for it, while it can go either way and there's no guarantee that you will win, but there's also nothing to guarantee if you submit a revised design / planning application you will get approval. The more I dug into the policies and laws the more I found them to be in our favour if presented well. Please don't be disheartened. If you don't try you will never know and you could find yourself in the same predicament if you don't. Good luck.4 points
-
Mixing oak and pine (even if the pine is stained / dyed) is never going to end well imo. You will never, ever, make pine look like oak. They will also colour differently over time and with exposure to their surroundings. If you cant do it all in oak, I'd only paint the softwood if you have any oak doors or other natural timber surfaces exposed. Trying to mix totally different timbers and attempting to fake a look to match almost invariably looks awful.2 points
-
What do you mean by first fix carpentry as that is not normally your visible elements with the base exception of a staircase. If you are talking about doors, skirts and archs etc then you could stain and oil pine to look similar to oak but you would need to be very careful as it may all end up looking different as some woods absorb stains differently. Also by the time you’ve done the finishing with coloured oils and so on, you may find the price for oak isn’t as bad as you first thought ..!!2 points
-
I submitted a pre-planning application with plans I amended which were done in 2014 by an architectural technician who we would have happily used again but he is now retired and much prefers to bird watch. I have found the experience of trying to find someone else a little daunting. Firstly I contacted a local arch technologist who took a month to respond with a quote. He quoted for his plans incl BC and then attached quotes from several companies re reports that might be required eg Tree Report £500 (no trees), D&A statement (would amount to £2000 in the end), Heritage Statement (also £2000 with everything added), fill application form £250 and so it went on. His own plans were reasonably priced but the total would have reached around £10000 plus VAT. 3 others approached were too busy. Looking at the Planning portal I could see that some architects do their own reports where they can, so thought maybe the costs might balance out. The Architect I chose from the planning portal is RIBA qualified but is retired but still does some work. She was interested so off went the plans I had done. She said she does her own reports and as I have already done both D&A and Heritage reports myself (plagiarised from others) she said she could adapt these where required. There is no VAT and on the face of it she fits in with all our requirements ie flexible, knowledgeable, experienced and not expensive. The price she has quoted is £3000 and includes drawings for Plng and BC, drawings for obtaining tenders and overseeing the build (if I have read this correctly). Am I going to wake up from this dream or am I going to be totally disillusioned by the responses I receive from here. I have checked her out on the Architects Registration Board and have seen a couple of examples of her work on the Planning Portal. I have another Arch technician interested and am very impressed with his website and his knowledge and his costs are also reasonable but there is just some niggle of a doubt. I have therefore decided to engage the Architect but no doubt will get more of a feel for things during discussions with her before I sign any contract. Does it sound as though I have been lucky.1 point
-
I think the stud is fine for the weight, however the fixing of the radiator to the plasterboard is not best, in my humble opinion. Lots of things to be considered: What thickness is the plasterboard? Is the plasterboard plastered or drylined? Is the wall in a damp room? Can some of the screws fix through the plasterboard into the stud? Is 35kg the dryweight? Is the radiator going to be on a wall that has passing traffic? Years ago, I worked for a national timber framed house builder. One job I had was going around about 32 houses cutting open walls and putting noggins in where the radiators had been fixed to the plasterboard. The plasterboard had slowly bowed out with the weight. Best of luck Marvin.1 point
-
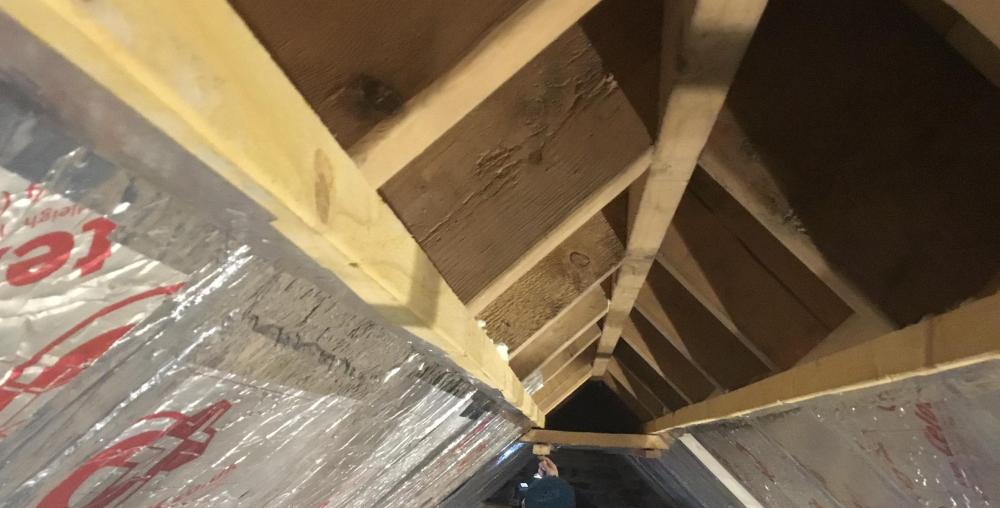
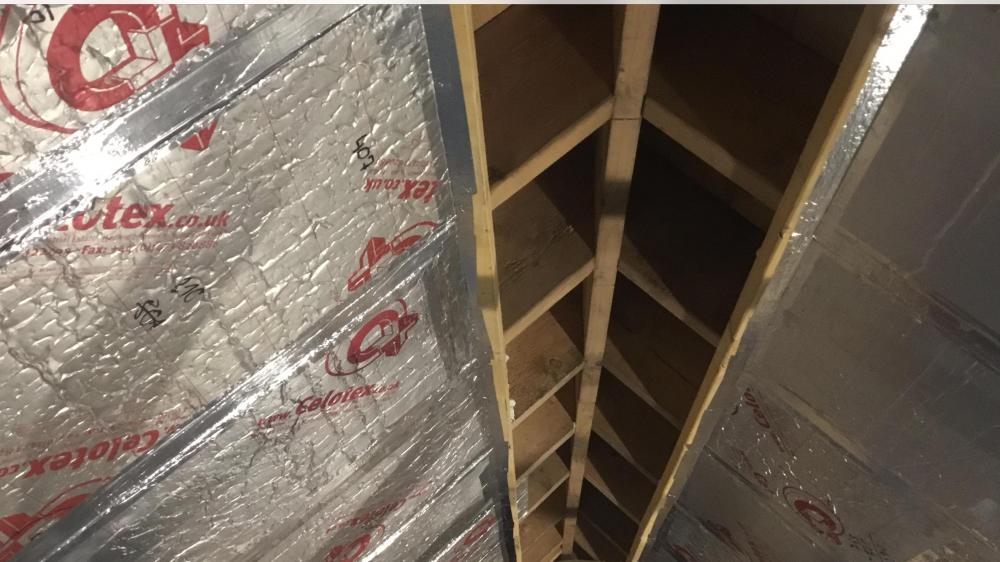
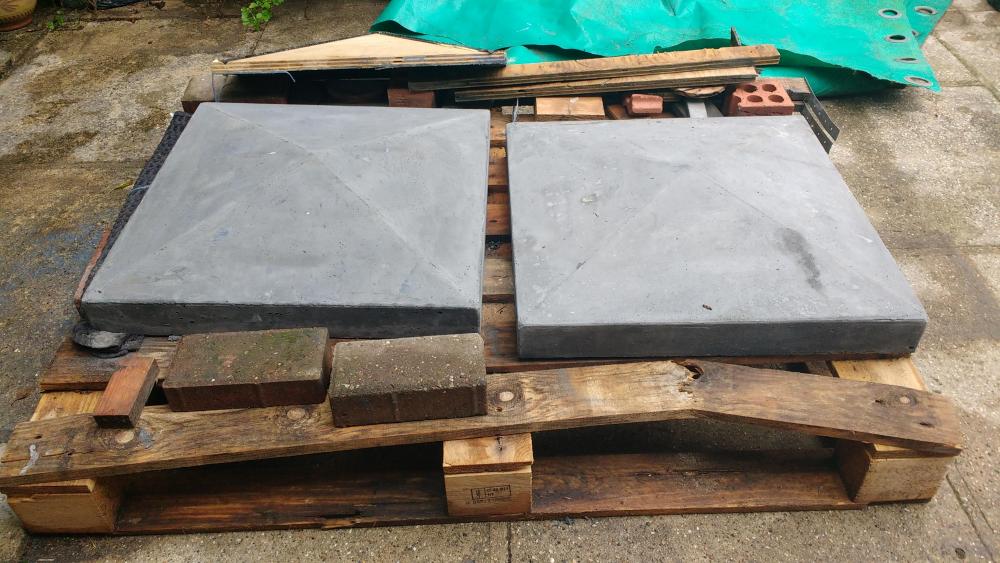
When I did my roof I vented the soffits at each rafter bay and then a 50mm gap all The way up below sarking and then vented the ridge with tile vents along the top x 4 The result is a VERY well vented rood, you can feel the wind blowing up each bay really well. In the picture you can see the area that is fully vented at the top. The bits of wood running length ways are so there is something solid to butt the insulation up to and adds another fixing point. I put 50mm of insulation up first (foamed and taped) as in the picture - We used foam glue to stick up the first 50mm and held the board in place with battens until the glue had gone off and then removed the battens - that’s what’s going on in the second pic and then added another 170mm over the 50mm and attached this with foam glue and screws. It’s probably not how the “book” says to do it but it’s been up 8 years without a hitch. The last picture just shows the vents on the roof.1 point
-
I expect you meant under the insulation. The vapour barrier should be on the warm side of insulation. As I recall the 50mm gap is to allow roofing membrane to drape 25mm between rafters and still leave a 25mm ventilated gap (eg when there are no sarking boards to support the membrane). So my guess is 25mm would be ok if the BCO allows it. The main problem with ventilation is usually at the eaves and ridge. Builders tend to forget and just mortar on ridge tiles. Later when there is a problem you are faced with fitting tile vents one per rafter bay as the rafters stop lateral air flow. Typical suggested ventilation schemes for different roofs are something like this. Yours would be the one top right. Note that the dimensions are per meter. eg at the eaves (marked B) you need the equivalent of a 25mm wide slot the whole length of the eaves. If using round vents you need enough to provide 25,000 square mm of free area per meter. If you were to fit this type of common round soffit vent .. https://mytradeproducts.com/products/manthorpe-circular-soffit-5-colours-g700?variant=37765056233625¤cy=GBP&utm_medium=product_sync&utm_source=google&utm_content=sag_organic&utm_campaign=sag_organic&gclid=CjwKCAjwq7aGBhADEiwA6uGZp6QEf45bAAjO8jSqSrNeEZ7XuVKpoEqsHIx7wO44fffOpy19cZL1BRoCwkgQAvD_BwE ..it has only 2150mm² free area per vent. Meaning you need ELEVEN per meter !! You probably cant fit that many in a single line as the rafters get in the way. You need two staggered rows. That's a lot of vent holes to drill. Not so bad at the ridge where you need 5mm gap or 5000 mm² per meter each side.1 point
-
It depends on the screw type. I like to use toggle / butterfly fixings in plasterboard as they spread the load away from the hole, and a setting tool is worth the investment, to get a clean and tight fixing. (otherwise the bolt spins and the board gets damaged). Then you can perhaps centre it to ensure some normal screw fixings go into the timber. Once you have chosen a fixing type, the information should allow you to calculate how many you need, but best allow some safety margin, as people sit and lean on radiators. You can find allowable loadings on the websites of suppliers and manufacturers. For example this says that each fixing supports 20kg. 4 of these might therefore be sensible, but you must check to suit your circumstances, including the condition of the plasterboard. https://www.diy.com/departments/fischer-steel-hollow-wall-anchor-l-37mm-pack-of-4/1161797_BQ.prd1 point
-
A single stud should have no problem carrying the weight. The only issue I see is that if someone knocks the rad sideways the bracket might dig into the plasterboard unless its a decent area. I believe wires are meant to be at least 50mm deep in the wall so I'd use screws that penetrate the wall around 40mm. So 40mm plus the thickness of the bracket. See what others say.1 point
-
1 point
-
1 point
-
Exactly . We always got “ detrimental to the local amenity “ . Fight them hard enough and make then define exactly what they mean . Obviously they’ll struggle but will come back with usually a list of weak points . Then you can adjust to suit thereby mitigating ‘ out of character’1 point
-
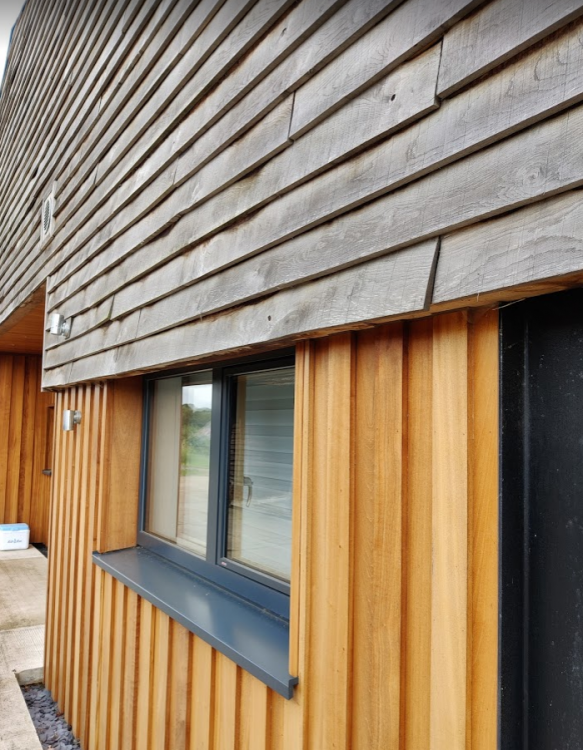
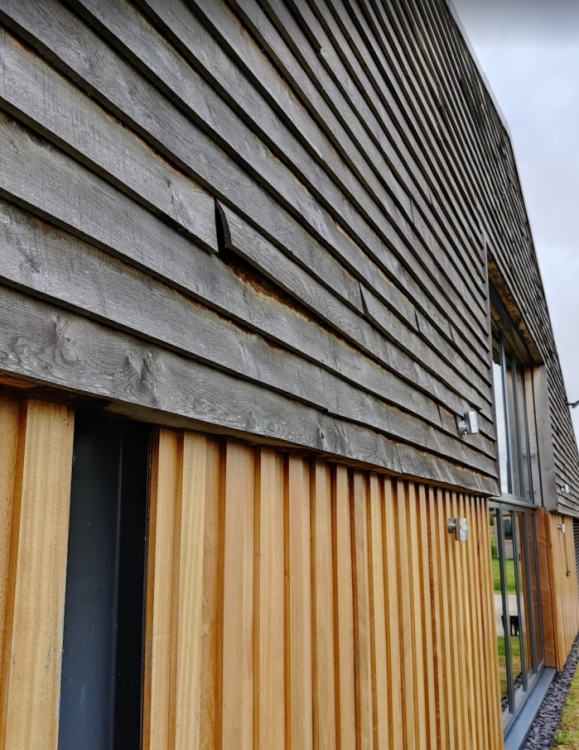
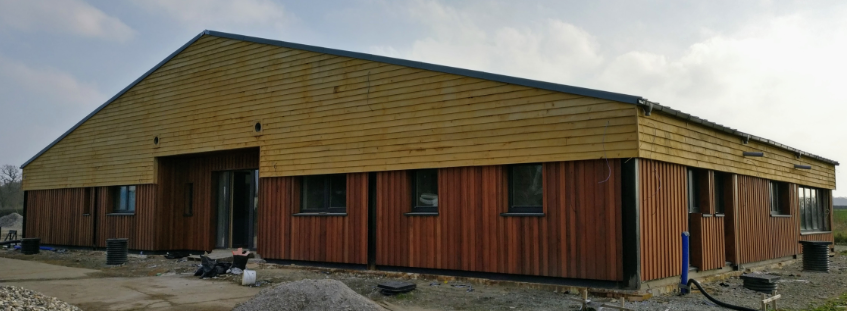
I have fresh sawn European Oak, feather edge, horizontal cladding through the top half of my build. Mines an agricultural conversion and needed to link to an old oak framed adjacent barn. The board size I went with was 17mm to 5mm x 175mm ranging in lengths 2.5 to 3.5mtr My thoughts are that I love the finished look, but if I did it again I'd change what I did a little. 5mm is too thin, there are some splits, and it is in the thin area of the board that the splits occur (around the fixings). I went with around a 30mm - 35mm overlap, which I would increase to 35mm - 40mm. I was persuaded by the very capable chippies to not go with the pre-drill and screw fixing that I had planned, and to go with 1st fix nailing. I'm on the fence whether that was the correct choice. The 1st fix nailing is not strong enough to hold the boards that want to twist, but perhaps screwing would have caused more boards to split as they shrank. All sides of the house eventually silvered evenly, but it did take 3 years or so. The NE & NW facade distorted less and split less, SE & SW have more boards needing some attention. I have probably 4 - 6 boards in 180m² that need replacing, and another 10 that need re-fixing. NE facade SW facade It does take some time for the "fresh" honey colour to start to grey, so you may have to live with a colour clash for a couple of years1 point
-
Is there a buffer tank installed? Turn off the legionella cycle, it is pointless.1 point
-
The other thing you need to factor in is the appearance of the two woods mentioned. Pine in my opinion, can be very knotty and surely regardless of the staining process, these will show up. I have oak throughout and yes, albeit, a costly item, the appearance is far superior in my mind than pine. You often find folk opt for pine or even MDF, if they are going to paint it, thus avoiding its appearance. Examples shown below Planed Natural Pine Skirting If price is an issue then the following may be a compromise? Light Oak Laminate Skirting Board1 point
-
It doesn't. But Insulation *over* the slab with UFH in a screed or board above will be more responsive.1 point
-
Hi @Omi. This was probably one of the things in our project that I ended up researching the most amount of time into after we had already started breaking ground, having really been naive about the complexities of combining MVHR with a stove that is not anywhere close to an external wall. We haven't installed our stove yet, but we have pretty much confirmed our installation plan, although I haven't actually got an installer to confirm formally it's all okay, just various oral opinions that sounded very encouraging from installers who had plenty of experience. In essence, what I've learnt is this: If you have to have a long air supply pipe, it's all the more important that your exhaust flue is set up as efficiently as possible. One of the changes we made to improve our set-up was to bring the location of the stove closer to the centre of the house so that it was almost directly under the chimney that we want to use to vent out through two storeys above. This means our exhaust flue is about 10.5m long and almost perfectly straight, with just two minor dog legs. The installer who has looked at that positioning thinks that will "pull like a train". Unless you go with a specialist product like Schiedel (mentioned by @dpmiller above) or Poujoulait (mentioned by @Trw144) no manufacturer is going to confirm in writing that it's okay to have vertical air supply pipe drawing air from above the location of the stove. They are basically freaking out that the air supply pipe might end up becoming an exhaust rather than an intake, even though simple laws of thermodynamics suggest that a 2m supply pipe will be overpowered by the much more efficiently positions 10.5m flue I was proposing. But hey-ho, I'm not going to bang my head against a wall repeatedly for the sake of it, so I had to look for another solution. Many stoves will actually have the recommended maximum length and number of bends for an air supply pipe somewhere in the installation manual, but... there will also be some contradictory info like "HETAS approval only valid when installed without direct air feed". Ultimately, you don't need HETAS approval. The one we almost certainly going to go with, the DG Bora corner stove, says it can be up to 11m long and have 4 bends in it. I'm not going to push it that far. We are currently thinking of going straight out the bottom of the stove, then bending once towards a wooden step we are building between our lower ground floor and upper ground floor, going into that step and bending again so as to take the pipe to the side of the house. We have to bend a third time to get out above ground level, but whereas the first two bends are 90 degrees each, the last bend will be somewhere between 30 and 45 degrees. In total, this works out at about 6.75m I think, possibly as much as 7.5m. Can't remember. I was very tempted by the additional peace of mind given by a DIBT certified stove, but... I'm probably not going to go with one. I have found some nice looking ones which are similar in price to the DG Bora, but none that have the corner glass that the Bora has. Ultimately, I put the question to our MVHR company, CVC Direct, and they confirmed that it doesn't have to be a DiBT certified stove, that they install MVHR with wood burning stoves a lot and that it's not a problem. They also said that worst case scenario they can set it up so there is a very slight positive pressure in the room where the stove is. Whether you have a DIBT stove or not, there is always going to a break in the seal when you open the stove door to light or refuel. I don't need to buy my stove for another couple of weeks, so if anybody can recommend a DIBT corner stove that works as well aesthetically for a corner as the DG Bora corner stove, please let me know as I would prefer DIBT, I just realise that it is not a "must". Try and speak to several installers until you find one who will work with you in trying to recommend something that they can happily sign off on and will work for you. This is harder than it sounds. I've spoken to four different companies, and only two of them sound like they know enough about this. Of those two, one is extortionately expensive and the other one doesn't return my calls because he is so busy and booked up! Returning to your specific situation, depending on the kW rating of your stove, I think you will probably want to use a 110mm soil pipe, lots here favour that size and it's also safer to upsize if you are concerned about sufficient air. That means you have two options I think, either: you have a cold part of your floor where instead of UFH you have your air vent. This would mean having slightly less insulation under that as well, so you will need to check with your SE that structurally that will still be okay and wouldn't cause any issues - might be tricky; you go further down and through your concrete slab - again your SE will need to sign off on this, but should be okay i imagine if you add some extra steel rods under and over the pipe, perpendicular to it. I don't think going down any further is feasible as the more you go down, the more you end up with a deeper U shape which the installer probably won't like as not as efficient at the other end when you have to come up; and then there is also the issue of having to go through the DPM, which is definitely do-able, but if not done properly risks damp issues. Of the two options above, I'd be leaning towards going through the slab, just get the SE to spec how it should be done. I'm sure others will have views, as I'm really a complete novice having only just planned my install and not yet executed it. Suffice to say that if you do go down, you save yourself a bend if you install a stove that can already be vented from underneath. Oh, and I'm sure that the link you posted isn't talking about a direct air feed situation. It is just talking about a regular installation, not a direct air supply installation. Keep us posted with what you end up doing, as will be helpful to compare notes.1 point
-
Belt and braces..to add Squirt some expanding foam into the joints between the gaps, tape it up (plenty info on BH about cheep effective tapes) as the foam is not that vapour tight but really helps keep the insulation in place. Sleep tight.. and.. in the winter; don't put on 5 gallon pots of stock on the stove steaming away all night, avoid drying vast amounts of washing without opening the windows. It's you own home so you know to let the "steam out"..just be sensible. Keep the heating on at low so you get some residual heat permeating though to the outside walls and into the roof space, you move the dew point outwards and you'll be fine. In terms of heating cost, it's a few quid extra a year?, no point in analysing this to death as you have a refurb /conversion. Just do your reasonable best and march on! Start thinking about the kitchen units and the enjoyable stuff! In other words don't go away for example, let the place freeze, come back and make lots of water vapour. It's like an old car with leather seats, they crack if you keep them in an old damp garage, take it out and crank up the heater.1 point
-
Don’t most manufacturers do their own version? e.g DuPont/Tyvek, Proctor, SIGA, ProClima, Protect, Gerband etc. with so many options it’s hard to know where to start but (as well as the recommendations above) you could check the Passiv House Institute? https://database.passivehouse.com/en/components/list/airtightness_system1 point
-
1 point
-
Treat CU upgrade and meter upgrade as two completely separate things. CU upgrade looks probably straightforward. If it looks neat it was probably done by a decent spark. You will almost certainly need earth bonding upgrading to current standards. You will need to TEST everything and from that you will determine what are ring and radial circuits and choose your MCB rating accordingly. The meter upgrades are done by the DNO. you have a VERY old "white meter" setup. Just get that swapped to a single rate meter and much of that clutter will go. the old off peak fuse board will then be redundant and can be removed.1 point
-
Hello Laurence. I would start by asking the builder to confirm what lintel they put in. Next step, if different from spec just drop the SE a note to say.. for example.. due to supply constraints the builder swapped the lintel for a xyz type... as said builder was trying to help out.. is this OK? and include a few photos. Many SE's are sympathetic and will go the extra mile to review. As a word of encouragement. It looks like from the photos that the lintel is carrying mostly the dead weight of the blocks rather than the weight of the blocks plus a variable load (live / imposed load.. say a snow load on the roof) so most of the deflection could already have taken place. Thus when you measure for the doors you'll take the smallest dimension off a datum.. usually in the middle if the lintel has been installed level. I'm being cautious here as there could be a load on the inside leaf we can't see from the photos.. if this differs a lot from the outer leaf load then you'll find in the detailed manufacturer's notes a reference to what is call the "load ratio". This is the difference between the inner and outer leaf loads. If the two say go beyond a 3:1 ratio it can make the declared load capacity invalid. Hence my suggestion to contact the SE just in case. Folk on BH have different views on support beams over bifolds / large span sliding doors. Cold formed steel lintels such as Catnic / Keystone and others are absolutely fine in the right circumstances so long as you know how to design them and also very importantly make sure they are installed correctly as per the instructions. With a 2.5m bifold you should be well within the region where a Catnic or similar will be fine. Yes, cold formed steel lintels are attractive as they can be cheeper and help with thermal bridging, but they a more complex beast.. Laurence the standard of workmanship on the blockwork could be better.. but I would like to see the whole wall inside and out before making further comment. Let your SE see this as they will want to look at things in the round. The main thing is don't panic and think it has to come down! If it is an issue there are many work around solutions. For the very curious.. sizing Catnic / Keystone lintels and similar products for bifolds. Yes there is no doubt that folk have issues with these cold formed steel lintels. A Universal beam is a steel beam that is rolled into shape when the steel is still hot. It starts off as a big lump of hot metal and is rolled in it's "hot" state. Roughly, a cold formed steel section starts as a big lump of hot metal that is rolled into a big toilet roll, a standard roll weighs about 6-7 tonnes from memory. This roll goes to say Catnic, they unroll it and shape it using a series of rollers into their lintel section when the steel is cold. But these two different processes result in the steel behaving in a different way. Cold formed lintels can be more complex to install depending on their shape and if they are supporting just the outer leaf of masonry or both. if you are say a designer and want to use a Catnic type lintel over bifolds you can do a back calculation. Lets say you have a span as in Laurence's case of 2500mm. Now deep in the technical spec may be something that says "deflection limit is based on span / 360" This means that one of the criteria is that the total deflection should not exceed 2500/360 = 6.9mm.. Often ok for bifolds particularly if you have more "dead" load that bends the lintel before you get the doors measured up. But say you have a span of 3600 mm. Now here you take 3600 / 360 = 10mm.. This is a recognised deflection limit in the codes.. but for bifolds in particular you may be starting to push your luck. Remember that in general DIY / self builders have less control over the standard of workmanship. What an SE/ Designer can do is to say.. we are not happy with manufacture's deflection limits. We know that this lintel is certified for X amount of load at a deflection limit of span/360 = 10mm .. lets make sure that we size the lintel based on 80% of the declared load and all other things being equal (lintel bearing etc) we are now on the ball park to getting a deflection of roughly 80% of 10mm = 8mm and this we can live with in terms of door design. If you read this far.. thanks!1 point
-
Keep mentioning EICR as it’s the logical thing to do, and as a former spark giving you some free advise with nothing to gain from it1 point
-
Very old uneven wall under the plasterboard so i inserted a plywood `plug` to give the screw shanks something to bear on otherwise the screws would have bent and torn down through the PB1 point
-
Not a valid objection Don’t bother, our neighbour who objected to everything had no valid objections whatsoever (according to the appeal officer). It’s nice if neighbours are nice but its obvious yours is not anyway.1 point
-
The same neighbour wrote on 2 pages how he objects to our house becoming larger because there would be shortage of smaller less expensive houses in the area for the families to buy. his own property is twice the size/height and value! So whatever we do to increase ours to create more space for ourselves - he will be against by the look of his lengthy objection essay. Hard to imagine how to get such character on board - more and more inclined to be working with a more reasonable appeal officer who unlike our LA planner will actually visit the site to see how our proposal can make things better and not worse. the comments here are clarifying so many things for me, it's great, want to hug everyone ?1 point
-
+1 for trying to get difficult neighbours on board. I've lost count how many times we applied and how many times the same neighbour unreasonably refused. On the last application, we wrote a polite letter to the neighbour pointing out that despite their last objection the last application was actually granted, and what we were now applying to do was to vary it in such a way that our extension would be some 50cm further away from their property. Only when they realised that, did they stop objecting and we got our plans (which we actually wanted, as opposed to the weird concession the council had forced us into) approved. It was very frustrating though as I was aware of the importance of getting neighbours on board from the outset, and therefore printed all of our drawings in A3 for them and took them over to explain what we were applying for before we actually applied. I invited the neighbours to raise any queries or concerns with me directly before we filed. One neighbour was very reasonable and told me that they would be neutral on our application, whereas the other one refused to engage with me at all and instead wrote vehement objections after our application was filed.1 point
-
thank you for all the comments, they are giving us strength ? we did speak to the officer at the first attempt at application. he even said they had no issue with the ground floor extension, which was documented by our planning consultant on email to us. we then withdrew to make changes to the first floor based on the objection - we moved one of the windows to the side and obscured the new bathroom window not to overlook the neighbour. but the decision and the new objection were still saying that we would be directly overlooking the objector - big inaccuracy there. we were also surprised that the decision was against the ground floor after all, despite the office not having an issue with it before as per the email mentioned above. and we definitely won't be skimming it on the appeal advisor but to find an expert is proving difficult, we'd like them to be local expert in SW6 London, but not found it yet - if there is such person here - would LOVE to hear from them ? will try and post the decision text later, just reading it makes me want to cry, just feels so unfair ?1 point
-
Only if you apply again for planning permission but not necessarily if you appeal. With my appeal the original “issues” were deemed not valid even though they were voted on by committee, not just one planner.1 point
-
Stuff the objections. Seriously, stuff em. The only thing that matters is the Decision Notice. Address the issues listed there, and you stand a chance. Post the Decision Notice would you please (copy / paste). Thanks1 point
-
I went to appeal after 3 failed planning attempts, did it myself. Found it easier and more user friendly than app.lying for planning permission. The appeal officer threw out all four objections even telling our planners they were not following their own guide lines. I even got what I originally wanted without the compromises I made for planning application no 2 and 3. Just do it ?1 point
-
Did you go for a pre application meeting at the outset? That would have given you a feel for the lie of the land. I had to pay for the planning officer and the conservation officer to be present. They love you to take mock up images to react to. Another tack would be to submit a revised application after a pre app and taking into consideration the objections. Have you got any Permitted Development rights? There might be another way round it to increase your floor space without planning permission. A garden building for working from home perhaps? Can you change the internal layout or extend into the loft space? There are some members who have gone through appeal, who should be along later. Good luck!1 point
-
An appeal inspector is much more likely to look at it objectively. Don’t skimp on the appeal though. It’s worth getting a Planning consultant with expertise in appeals on board.1 point
-
100% appeal. If you post up the refusal letter and anonymise it you may get some useful suggestions for the appeal. The planning officer report can also prove useful.1 point
-
I would definitely appeal Whist it’s frustrating for you These objections usually only delay the inevitable1 point
-
Object. I'd request a meeting with the planner and ask how much the letter of objection is impacting their decision, maybe they would refuse anyway. You said the neighbour is a developer? So how would he like if all his developments were objected to and blocked. You are a private individual trying to improve your house for your benefit and you care about your area - as a developer he cares about money. I think I would try and track him down for a coffee and a chat. I suspect that he has some ulterior motive, hoping you will move away because this house no longer suits and wanted to buy it for himself to develop? Is he planning on selling up soon and doesn't want to sell a house next to a building site.1 point
-
I installed a Reina Greco 1800mm high x 470mm double radiator in our kitchen 3 years ago. No complaints, it installed fairly easily and it's still working OK!1 point
-
I've just installed some Reina Diva towel radiators. I choose them as they had some of the highest heat outputs for their size. Based on first impressions they seem fine.1 point


