Leaderboard
Popular Content
Showing content with the highest reputation on 03/18/21 in all areas
-
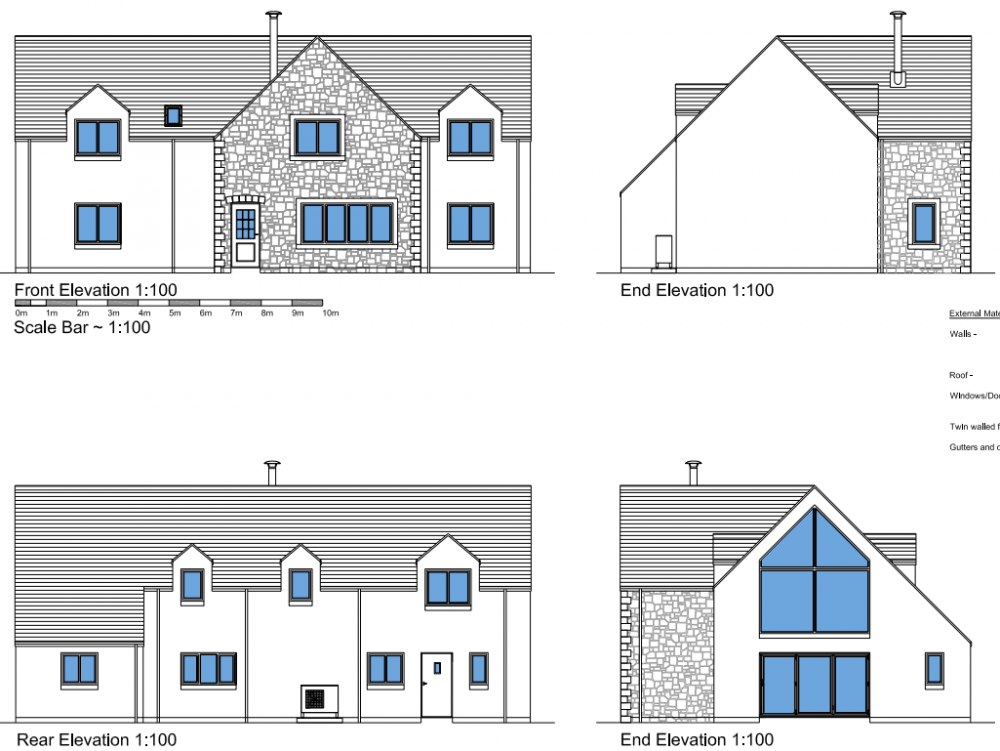
Quick update - we have planning permission! The approved elevations are: Unfortunately we lost one of our favourite features - the arched covered entrance - in reducing the width of the gable but must admit that the elevation does look better proportioned this way. We still need to get actual stonework and render colour approved before building can commence so anticipate that our next battle will be over that -- particularly the definition of the colour "cream" which was demanded by the planner. We're not big fans of "cream" with a heavy proportion of yellow/orange so here's hoping we can convince him that the RAL colour chart "Cream" is acceptable: https://www.ralcolorchart.com/ral-classic/ral-9001-cream3 points
-
ok it might be fixed!! i read somewhere to leave it on for 60mins "calibrating" and not the 20mins the manual says. So far this seems to have worked and the valves are now open and everything is balanced at 2l/m3 points
-
2 points
-
@pdf27 The 19% reduction is saying that the SAP CO2 emissions must be at least 19% better than a building of the same shape and size built to the notional building specification in Appendix R of SAP2012 (page108). Can also be found in Part L1A. IMHO The 28% is so undefined as to be impossible to quantify2 points
-
PWA will have to be paid for them, keep a diary and photos of everything. If they do dig then could undermine your foundations, you need to research PWA, as with this you can stop them. With it any problems are covered1 point
-
50mm small bore runs will negate any further mitigation. It'll allow an air break, and as the horizontal runs are across the 3 items, there wouldn't ever be an opportunity for a vacuum to occur ( IMO lol ). I've done so many of these I've lost count.1 point
-
Not worried so much about the second post as I will start from the house end and finishing it off at the other end of the back garden doing one post/panel at a time.....I will probably have smaller panel at the end.1 point
-
Normally a 100mm would be enough. If it's 150mm it won't really make any difference. The only important bit it's the measurement to the 2nd post and you take it from the wall to suit how you intend to do your fence.1 point
-
Dig 100mm out and put the post in. Then put the 2nd post to suit your panel/d rail from the wall.1 point
-
That’s from a picture on a Harvey softener that states it needs to. The minimax is made by Harvey anyway - worth checking with them ..?1 point
-
I got quoted about a grand for the same thing from the UK. My render artist was from Iran i think. so some of the things were a bit lost in translation. I did get to alter things twice, and for the price i was happy with the result.1 point
-
I think that your second storey rear extension would need to meet the 45 degree rule from your next door neighbours window. So it might be possible to get a full width ground floor, and perhaps a half width first floor. Go down the garden, and get us a couple of pics.1 point
-
I doubt you will get a double storey rear extension. Show us a couple of pics, we will soon have 367 different opinions, but you did ask.1 point
-
1 point
-
1 point
-
I have done this with stone slabs on a bed of sharp sand / cement a bit wider than the slabs, haunched around. If the porcelain is thick and non-slip I don't see a problem.1 point
-
This could well be a case of "be careful what you ask for" You complaint seems to be all the parked cars make the road dangerous, so you want a ban on further development in that road to stop adding traffic so it does not get any worse. I could see that backfiring and the "solution" being to ban parking on perhaps one side of the road as it is clearly a dangerous situation. Where would that leave you and the rest of the residents if half the on street parking disappeared?1 point
-
Can I just check my understanding of this is correct? The 19% reduction is saying that the SAP CO2 emissions must be at least 19% better than a building of the same shape and size built to building regulations minimum. The 28% reduction is in practice saying that you must have a big enough PV system to offset 28% of the CO2 emissions of your final building.1 point
-
1 point
-
So the plumber did it wrong and it's against the by-laws, Surely the first response is to get onto the plumber for him to put it right gratis.1 point
-
Ridiculous situation of local authority introducing these conditions and not having a clue what they are doing. Sometimes there is a get out clause stating if the planning condition makes the scheme not economically viable the condition can be dropped. A scheme of 17 houses near me had a similar condition dropped when the developer made a simple statement to this effect but no figures or costings to back up this statement! Has the local authority a 'sustainability officer' or similar you could ask.1 point
-
I seem to remember reading the cold bridges only run for about 1.5m along the walls and not worth doing more. Also, you have to consider having a step in the wall, re-doing the skirtings and loss of internal space. My feeling would be to do just external walls. Does warm batten mean battens on top of insulation so you have service cavity?1 point
-
I come across these types of planning conditions on a regular basis and it is obvious that they are written by people who don't know what they are talking about. You actually have 2 slightly different conditions here, I normally deal with these as follows; The 19% reduction in DER over the TER is simple and will probably mean using renewables/low energy (need to check with the planners what is included or allowable here!) The 28% reduction is arrived at by removing all of the above renewables and comparing the DER/TER (this dwelling may fail the Regs but this is not an issue for the planning condition). Ask the question of the planners - doubt you'll get a sensible reply! As above get an OCDEA on board asap to advise.1 point
-
I take it there is a flat roof above each window? Not sure this is clever: run the gutter across the windows (say the group of three on the RHS) along to the left-most (pair of?) windows and put your downpipe there. This would mean that rainwater disposal drives the window design - not clever. Might a rainwater chain be an idea? Might be clever. If you can't beat it, join it..... make the downpipes fun - interesting The idea is from Germany (sorry you have to get used to that from me ?) Clever but expensive.1 point
-
1 point
-
I think adding a new pole and changing the route to use it would be around £2,000. They normally want a £300 fee to do a survey and may not be very responsive until you pay for that, or even if you do pay! I've heard of figures between £1500 and £4,000 for similar work a few years back but the devil is in the detail If you dont mind.. It might me cheaper if you allow a pole in the bottom corner of your plot but don't offer that unless putting another one in the road is expensive or not possible for som reason. Beware the pole location messing with visibility splays if any are a condition of your PP.1 point
-
I've realised that I already have a quote for a new connection which includes a local site plan from SP Energy: it shows that there is nothing major under the plot. They gave me a number to call with questions in any case so I can double check with them. Thanks for this - all things I probably would have just taken for granted.1 point
-
relative to what? particularly if insulation/mvhr can be considered an energy efficiency measure Usually by an OCDEA (On Construction Domestic Assessor) who would also do the carbon emissions as part of the design SAP assessment1 point
-
BCO won’t know - start with the power distribution company. Location will help to identify which one to talk to. It is perfectly possibly to get planning for houses that cannot be built, either for structural reasons or because of environmental reasons so don’t take it that just because a house has planning that you can actually complete it ..!!1 point
-
All good comments, thank you all for your candour and for your prompt replies. I think the reality of £1,500 per m2 as Moonshine said is more realistic and though the plot and prices in the area aren’t an issue it’s, do I want to end up £750K in. Really, I didn’t. I think I may end up having a frank discussion with my wife that we should consider taking the house off the market (expecting an offer on Saturday). There is nothing that I want to move to, and the costs look a little prohibitive. P.S I’ve used the estimator online before (prior to our current redevelopment) and it was the best £150 I’ve ever spent! But I needed more of a feel from you guys.1 point
-
@nod I think it could mislead others when you quote your build costs, as you are a very experienced contractor and you and your partner did all the work yourselves. The OP is looking at getting trades in and should budget at least £1,500.1 point
-
First time self builders in Bedfordshire, hoping to start in 2022 after 15 years of dreaming. Here's the technical bit, so far. We got planning permission in 2019 on a rural plot, 191m2 footprint (2-storey-ish?! due to planning!!), have decided on timber frame (appointing designer/manufacturer this week), but all the rest is TBC. As with many on this forum, hoping to beat building regs, airtight/well insulated design but not passivhaus, decent glazing etc, but all is currently TBC, so looking forward to getting advice and being part of this community.1 point
-
1 point
-
Plan for the worst and hope it works out better - I'd say you have zero chance of getting 243m2 for £275k no matter where you are in the country. There are guys on here who have done some amazing things in terms of what they've got for their cash but I'd say they are the exceptions rather than the rules It's more important to be realistic, understand how much you can access in the worst case scenario, make sure it all still stacks up - and then look at how you can deliver it for less, starting out with an unrealistic goal and sticking to it get's very difficult very quickly. Get a qs to give you a cost of that housetype in your area and see what the starting point is1 point
-
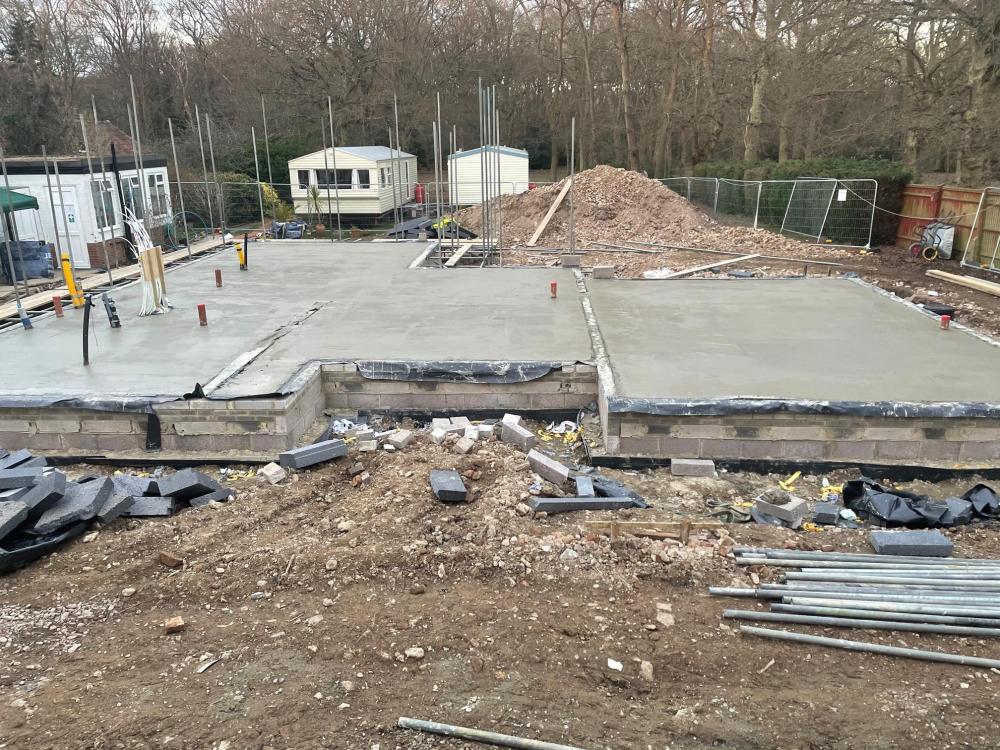
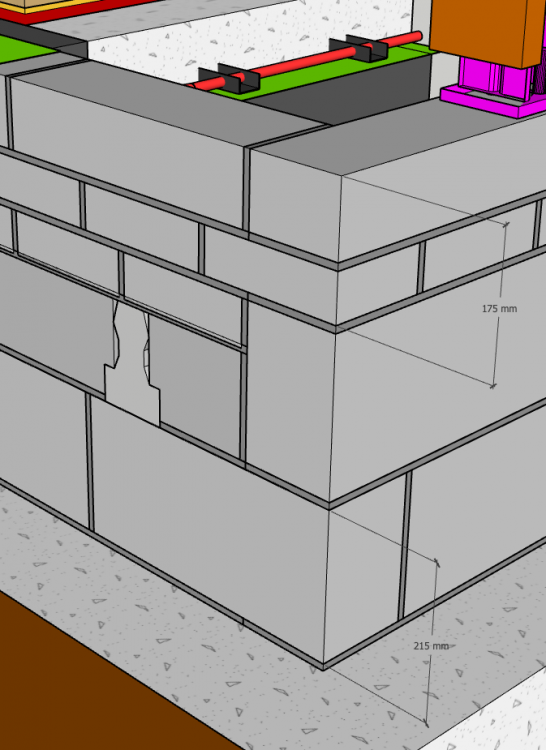
I though I'd post an update - sharing some lessons now we have the substructure complete, especially for anyone considering an insulated beam and block floor. To recap, this features an insulated beam and block floor from Milbank - make up from bottom (as specified in the BBA cert of the insulated floor system, which I believe is used by a number of concrete beam suppliers that offer an insulated beam infill option? Conventional pre-stressed concrete T beams with EPS insulation infill the full depth of the beam, A 150mm EPS top sheet across the top of the beams. Damp proof membrane Structural concrete topping to finished floor level (there is no conventional screed on top of the slab). Underneath all this are piles plus reinforced concrete ground beams. The foundation blockwork supports a timber frame structure with 140mm studs - and blockwork is 140mm wide to match the timber frame. Lessons: 1 making the blockwork the right height upto DPC. From my detailing, the final course of blocks to DPC would need to be 175mm high (not standard 215mm high for blocks). So the plan was to cut down the blocks lengthways so they were 175mm high. I hired a masonry bench saw with a view to accurately cutting down a large number of blocks - one course is >70 Linear metres so > 140 blocks. After cutting a few blocks with the masonry saw I abandoned this due to the time to cut each block and the fact the sliding table on the saw had no fence and I could see no way to attach one, so could not get accurate repeatable cuts. In the end I located two sizes of coursing bricks/blocks to make up the required height: W140mmxH65mmxL215mm and W140xH100xL440. These blocks cost me best part of £1K mainly due to the latter only being available in Cornwall and had high shipping costs (via Jewson). 2. Telescope vents (needed for any suspended floor) - make sure the brickies build as specced. I specced the vents to be in the side elevations of the house which ran parallel to the concrete floor beams. The brickies did not put them in because they said they normally go in the infill blocks at the ends of the floor beams - which is fine for a conventional B&B floor as they will vent below the inserted concrete blocks. However, this won't work so well with an insulated B&B floor where the insulation infills extend the whole depth of the T beams. Another problem with placing the vents here as the front/rear walls has dropped thresholds so there would be nowhere for the vents above finished ground level. I now need to cut in the vents in the side walls where I specced them to be. 3. Fixing UFH pipes in a concrete slab. It's not uncommon to bury UFH pipes in slabs, however most seem to attach them to the topside of steel reinforcing mesh. The BBA cert for our insulated floor system specified that the steel mesh should be at mid height in the slab and there must be min 75mm concrete above any "services". So our UFH pipes would need to go under the steel mesh. We opted for self adhesive clip tracks. They struck fine to the DPM. However when the pipes were clipped in they pulled the clip track upwards and the DPM with it - with such force that in places the pipes also lifted the steel mesh to the point it would have been protruding from the top of the slab. There was no option but to place some staples at the pipe loops to keep them down. I'm not sure what the alternative method of fixing the pipes would be, perhaps plastic pipe tray, but not sure how the chairs for the steel mesh would sit on these. 4. Ordering Readymix concrete. So my CAD model told me the slab had a volume of exactly 14m3 - which I'm sure is correct. So I ordered 14.2m3 - 0.2m3 for contingency as we don't want to be short when pouring a slab right? I also had not subtracted the volume of UFH pipes (almost 1km of 16mm pipe) and steel also in the slab which should mean we had even more ready mix left over. When it came to the pour we were indeed short of readymix and it was too late to order some more from the plant. By chance we had a bulk bag of aggregate, a mixer and many bags of cement, so we mixed some more conrete - all of the bulk bag and we were still short. We got the last couple of barrowfulls from our spoil pile where the pump had been emptied. Lesson is that you need to allow for vibrating which we did that allegedly gives a better finish and stronger concrete but reduces the volume of the concrete and also allow for the waste in the pump (substantial) and readymix truck. 5. Generally very pleased with the insulated floor system - very easy to install and all quantities calculated correctly by manufacturer. Beware the insulation comes by default on an artic due to the sheer volume - we had to pay for the shipment back to warehouse then back to us on two smaller vehicles when the artic driver refused to enter our road.1 point
-
An internal filter box is a good idea as it’s a larger area and easier to clean out.1 point
-
I quite enjoyed this... Nothing to do with the insulating properties of the towel then ?1 point
-
I have 2 amp sockets switched from the door position in my rooms. table lamps and floor standing lamps plugged in corresponding 2amp sockets. works for me.1 point
-
1 point
-
1 point
-
May not be a problem then but it says substation. On a separate note, have you checked there are no large cables running under the plot as the substation is nearby..??1 point
-
Cement board is a pain to cut and tile adhesive sticks to it so well you may need to smash the boards the remove the adhesive. At least with plasterboard it just turns to sog. I quite like the idea of the Wedi board type stuff which is lightweight and waterproof. Not used it though.1 point
-
For me it was just 'belt and braces' really for the small extra cost, just in case any tiling grout or sealant joint failed/leaked in the future the cement board backing would remain intact. I had tiling grout fail in a tiled over plasterboard shower enclosure in the past and by the time the leak was noticed the wet plasterboard behind had to be replaced which turned a small job into a major job. Maybe not essential in the upper wall areas of the shower which don't get very wet. Only drawback I can see is water resistant cement board is not as easy to cut and work with as plasterboard but the extra time and cost involved is not such an issue if you are installing DIY.1 point
-
1930's timber is often slow grown and in suprisingly good condition even if the paintwork is a bit flaky, are they in poor condition as plastic can look out of place on older properties? I would not use a large national double glazing type company under any circumstances, use a local installer who has recommendations and examples of many satisfied customers.1 point
-
That’s very cheap The thing is with bricklayers we keep hearing about how much they earn But there’s a lot of down time also Which has to be factored into any price or rate Get him booked1 point
-
Fair, maybe, maybe not I would start by breaking it down. How much will it cost you to do the bits you can; fence down, muck away and all that, don't forget to count your £/ hours as that's part of their price. Then add the cost of the footings; (the concrete, the blocks, pipes and bits n bobs, the digger, the calcs if your having them done.) Then your left with the cost of the stone and the cost of the labour... Does the remaining price seem fair?1 point
-
Welcome. There are a number of us here in Scotland. I’m in the Borders and we have some other members who are a bit closer to you who may be able to advise a bit more on local trades vs national companies.1 point
-
Yeah. Problem is when plumber puts 32mm in, ignores the length and then proceed to add lots of bends... ?0 points
-
0 points
-
I have no knowledge of automated systems, so am following these threads with interest... One bit does confuse me... This image appears to turn up the extractor if someone has a “movement” whilst on the pan... but if they have a “colossal movement” I.e. a big sh*t??.. then all the light in the house flash to warn the occupants!0 points
This leaderboard is set to London/GMT+01:00


.jpg.c21f3ac78c9b7efd90cbdcb312744dc5.thumb.jpg.7adcad4c0e384f5ecd7d56b0618df6e5.jpg)

