
Leaderboard


Popular Content
Showing content with the highest reputation on 03/04/24 in all areas
-
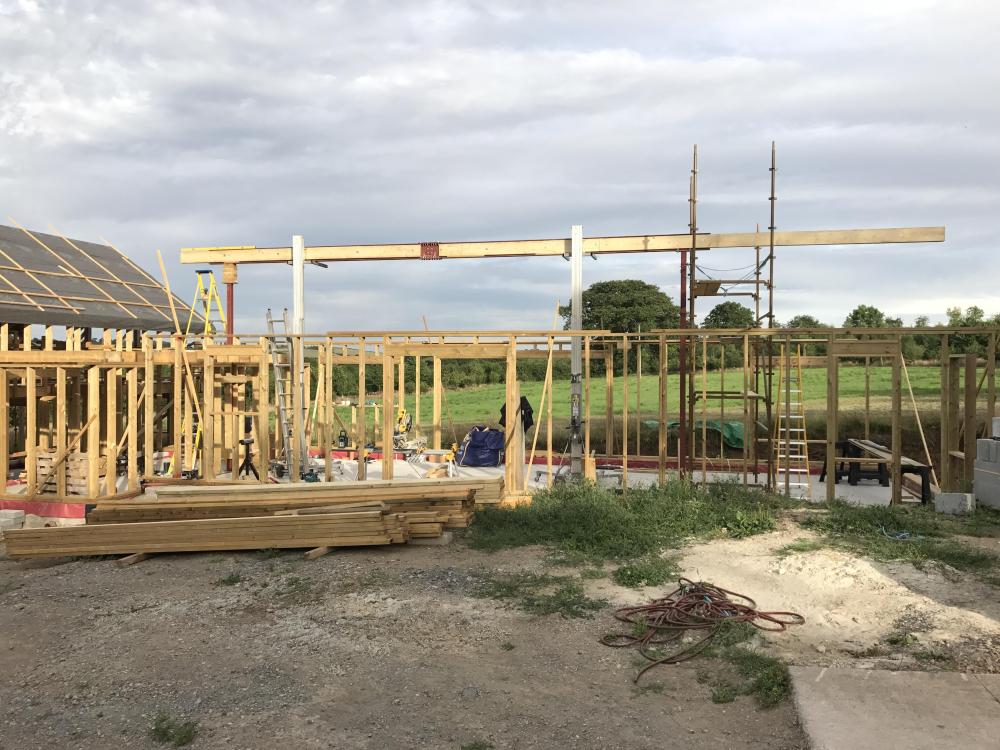
Around 11 months ago, we started from a stripped site, the treatment plant was in and running the cabins / static so drainage just required connecting up. we had to wait for the warrant to be amended (change to the certificate of deign) this held us back ma month or so until the BCO just said "get on with it, we can sort that later"- top guy!! If we had waited for the amended certificate of design we would still be building, it took him 5 months to get it to us. I've documented most of the build in blogs on here, partly to have a refence to remember the process, partly as pay back to Buildhub for the inspiration and pointers in the planning / design stage. I'm so glad I spent hours looking at and reading others blogs that we made the switch to ICF. I'm convinced there is no way I would have achieved the efficiency I have for the money spent. Budget was always tight, so some decisions have been made due to Hobson's choice, leading to triple glazed UPVC windows and composite doors. The front door, south facing GRP Composite with low threshold and a slim glass panel leaks with 40mph winds, this leaks through the gazing cassette, and the low threshold. as I know we wont use this door much, we went for a slam lock, another mistake, it blows a gale through. To be fair the company are re making, I'm just not sure if there re-making the panel or the full door, I did ask, if they were remaking the full door to change to standard handle and lock, so it can be adjusted to minimise the drafts. we will see what happens, a full door replacement will mean taking off the reveals in side so a complete PITA, but worth it for no drafts. We had the airtightness test carried out, and they used the front door for the blower door to mitigate any issues with that door. I had put caps in the MVHR. so he just cracked on, the back door is not perfect again due to the low threshold. He didn't seal the blower door to the frame, not sure what the procedure is but seemed a little frustrating. We achieved 0.88 Air permeability, which I'm very happy with, budget wise we didn't spend hundreds on airtightness tape, just designed good solutions, and the doors leak a bit . Our As built EPC came back at A103 , with a possibility of A128.. the report say A105 if we install Thermal Solar EST saving of £40 pa , and A128 with a wind turbine EST saving of £1100 pa, so pretty much the best we could hit. To finish we need to sort out some paths outside, ramp, and the rain water pond, but other than the second bedroom need decorating the house is done. Next week we will hopefully get building control around to see what he 'needs' to get a completion cert. I'm hoping for some flexibility on the ramp and pond, . We need the VAT refund to pay for this stuff. We are working our way through the invoices, but we built for less the 90K and we still need the VAT refund. I've enjoyed it all, and we both agree we have a home. Good luck to all of you with your current builds.4 points
-
I am curious. You've had plans drawn up, commissioned a builder and started work. Why did you conclude that it wouldn't need PP? I am assuming that you have read the "Permitted development rights for householders, Technical Guidance" before starting the development (I see that @joe90 has already given you the link.) As far as I can see, the PD limit for an infill extension is 8m not 10m. You've also got the side elevation within 300mm of the curtilage and added two fenestration openings directly overlooking the neighbour. IMO, stop and start talking to the planners.3 points
-
I'm not an electrician or anything so I can't comment other than to say that with option two you need two additional junction boxes so more places for things to go wrong. Easier if the cabling comes off the sockets so you can access it more easily to check for problems in future.3 points
-
News to me Thanks. You could send this in and risk £96 and hope. It shows willing at least. There is no harm in sending a note to explain the circumstances, (got the wrong advice/ misunderstood the permitted development guidelines) especially that the neighbour is absolutely happy with it. Give a phone number in case they want to help. The planners aren't usually vindictive. They may even contact you to discuss the best way forward.2 points
-
Just finished renovating a 140 yr old farmhouse with similar stone walls. We went for breathability throughout, cosy wool, membrane and lime plaster (internally) for all external walls. UFH via a ground source heat pump and very pleased with outcome. Decent heating bills and internal humidity is 40% average. Thought about tanking the house but very glad we let it breathe again after many years.2 points
-
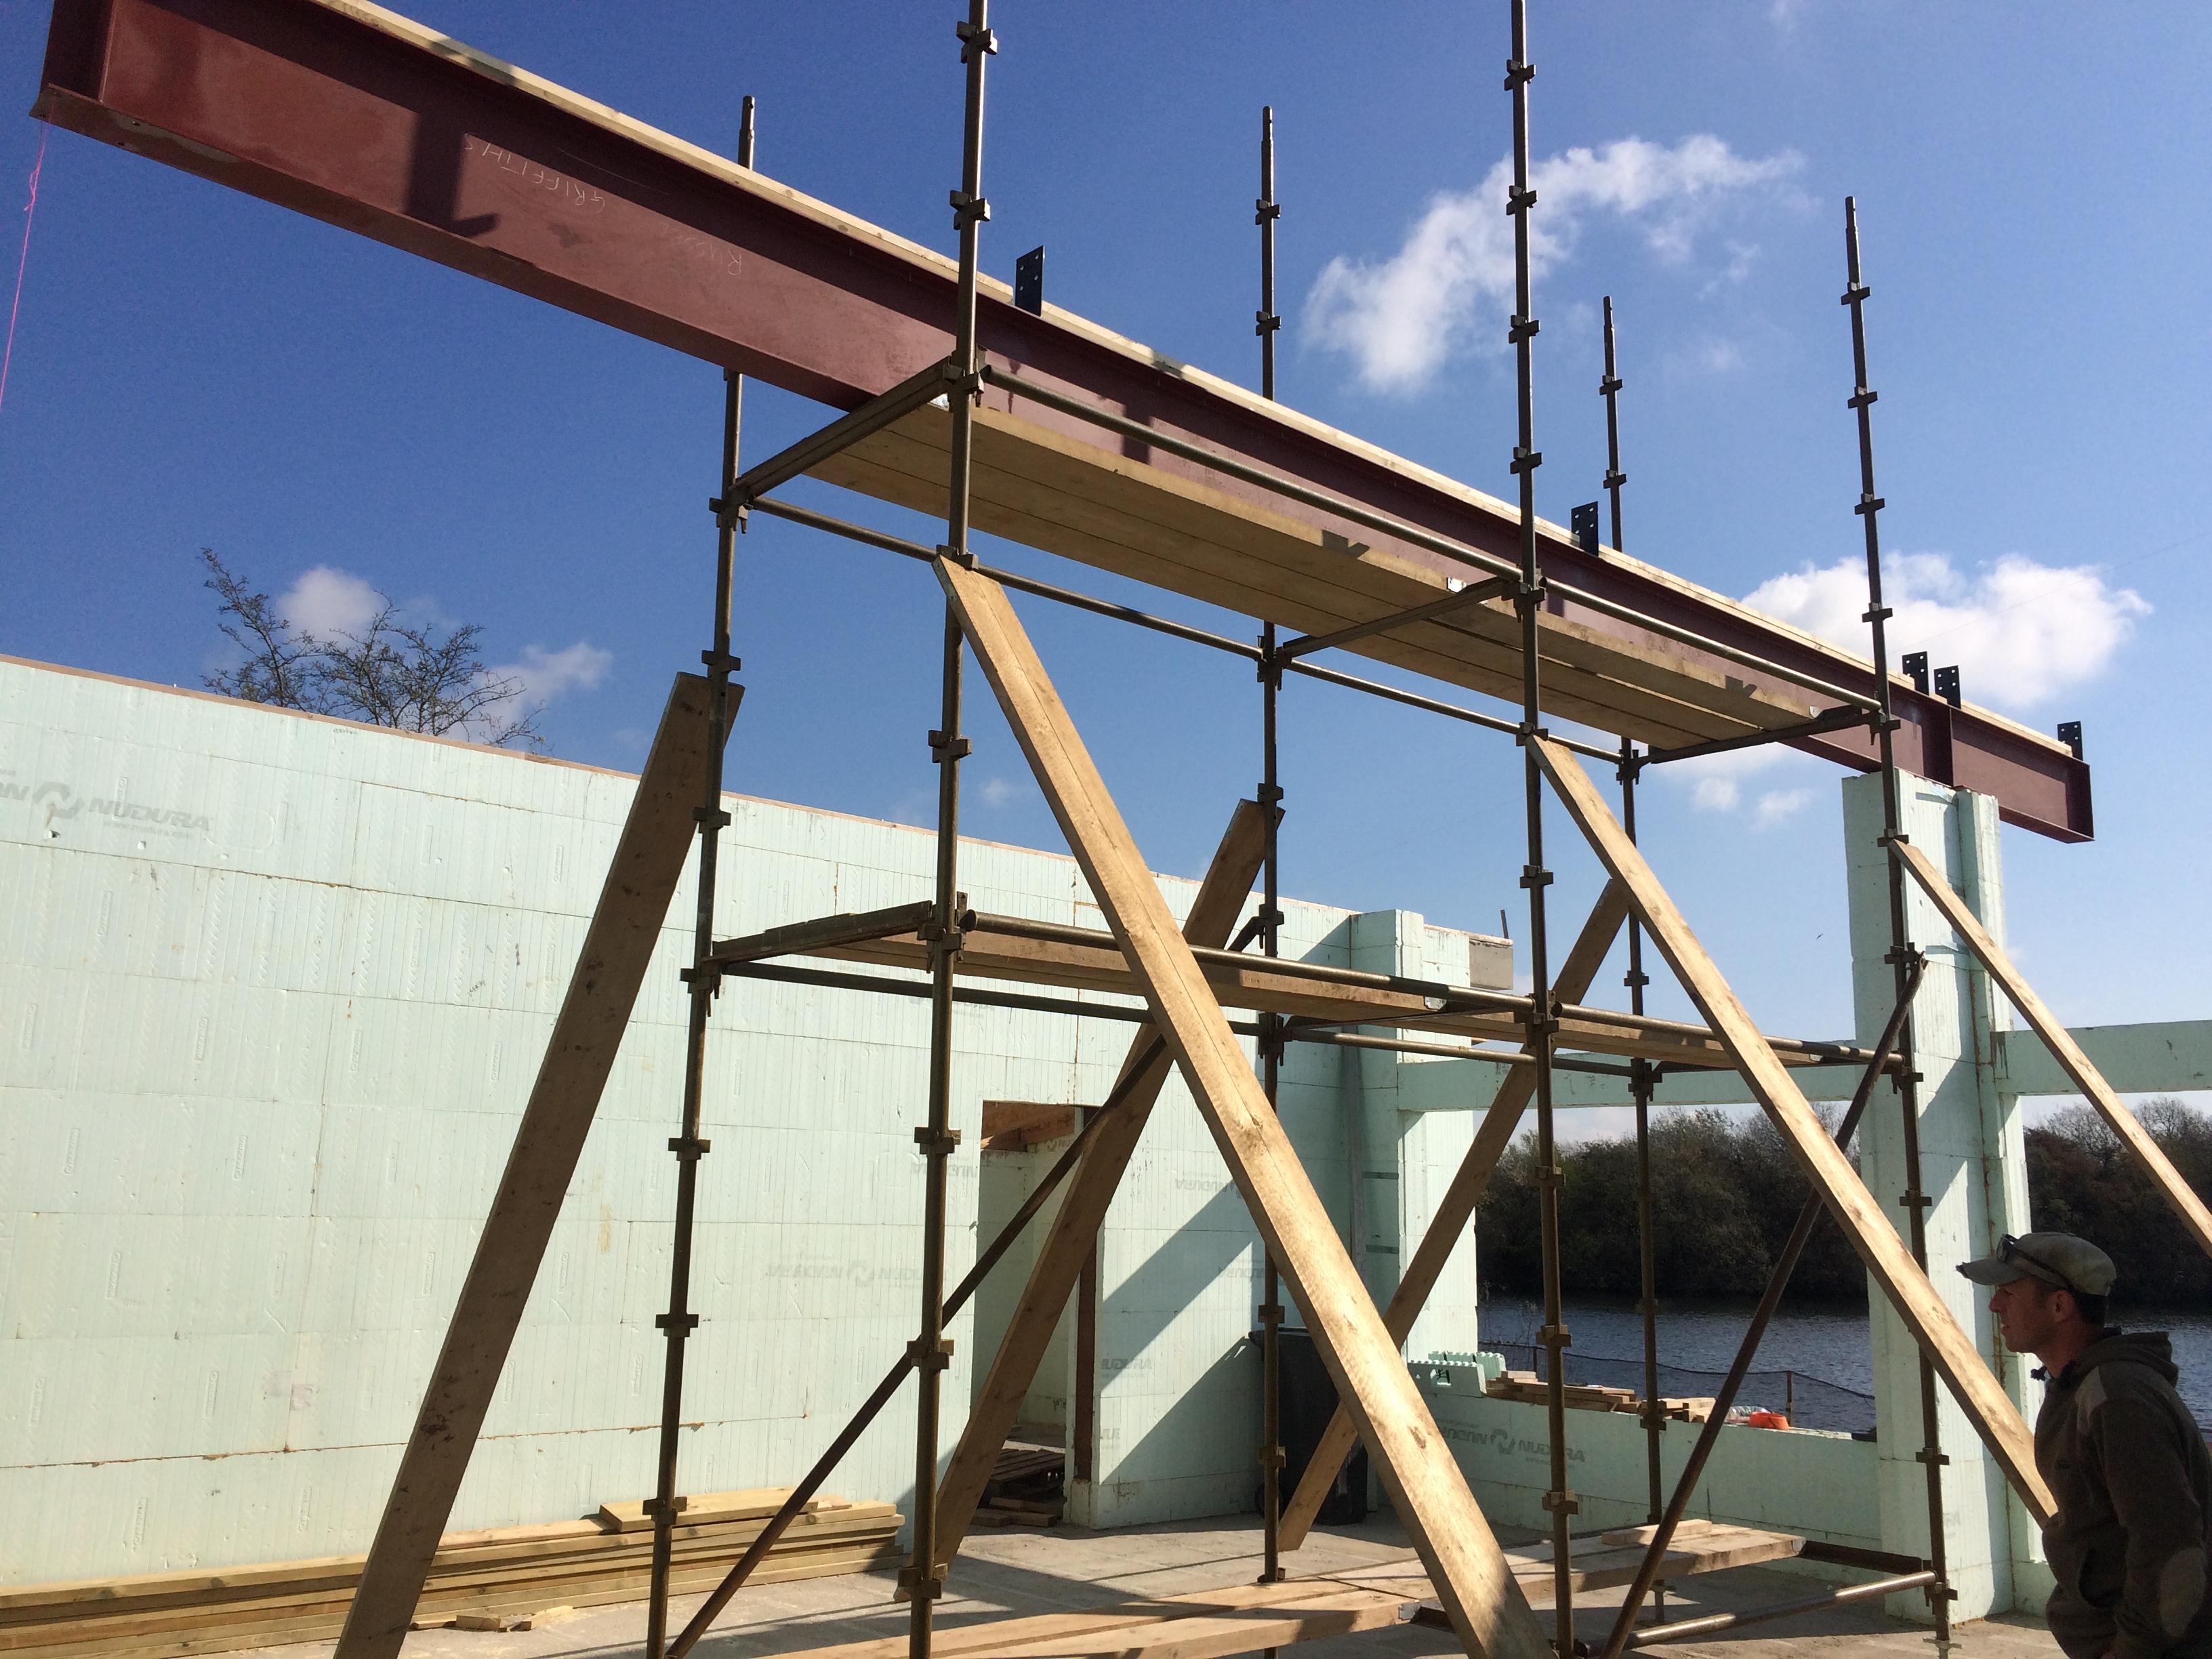
There's a better, safer way of doing this. Walls are cast, beam set in place, chemical resin anchors used to fix the beam in vertically to the concrete. Horizontal lengths of rebar welded on the flanges and to the starter bars in the concrete. Next concrete pour covers the lot. That's how all of ours were done.2 points
-
2 scaff towers if you have access to some. Depends how much time you want to spend on it. You could make perfectly adequate and safe supports out of constructional timber which you may already have on site for later use. A few joists and offcuts and 12mm bolts and the job's a good'un, but slower than a scaff tower!2 points
-
Oh yes, just 1 thing to be aware of if you are going down this route that no one tells you is that once you buy the land, if you need to provide the title deeds to the lender (which you will), you will have to ask your solicitor to expedite the title registration with the Land Registry as the normal queue is currently 18 months and the lender is unlikely to proceed without a clear title deed.1 point
-
I am just exploring ideas to overcome what appears to me to be a stupid rule. Leave a gap (nothing to say how big the gap is) and it is a side extension only. Dare to join it to the back of the garage and suddenly the 8M limit kicks in. Stupid idea no 2: Build a very small PD rear extension on the back of the old garage just enough to provide the new access passage. Then adjacent, but not touching that build your side extension for the rest of the build. Because it does not touch it is only a side extension and the silly 8M limit does not kick in.1 point
-
Here's some more info to put your mind at ease: Each end of the beam will be sitting on a rebar reinforced concrete column. The concrete strength of the wall itself (RC35) should be similar to that used in padstones, and the whole ground floor is monolithic - a single piece of concrete. Otherwise, it's a good point to raise, and I appreciate you looking out for those of us who may not know much!1 point
-
Sounds like a design. So there may even be a drawing of this detail. The purpose of a padstone is to spread the load over more than one block, (perhaps not an issue here), and to provide precise level control, and to provide a flat surface for the direct seating of the beam. But the beam wouldn't normally need to be bolted down. I'd be surprised if an SE didn't mention this in any way, even to say 'no pad stone required because / but do this.....1 point
-
It won't get you the full 10m but it might be worth looking at the Larger Home Extension scheme. https://www.planninggeek.co.uk/gpdo/house/extensions/larger-home-extension/ As your neighbours are in agreement and you are in a detached house you maybe be able to get up to 8m without full planning permission. I'm no expert though so you would need to check this very carefully.1 point
-
Genie for the lift and kwikstage for the pour.
 1 point
 -
I’d crane that in . Have before . Otherwise it’s a heavy mofo situation1 point
-
The 3 years is a Planning condition and is from the date of the approval. So you have to start “within” 3 years and not on the 3rd year date. You don’t need to send anything to the Council in order to confirm commencement. Just document it with photos, etc…1 point
-
While it’s true that that the pipes are likely safe it’s irrelevant as far as the op is concerned. Scottish Water have agreed to replace it and have delivered a terrible service is doing it. Write to their CEO, Alex Plant. https://www.scottishwater.co.uk/about-us/who-we-are/executive-leadership-team# Use their own words in your correspondence https://www.scottishwater.co.uk/About-Us/What-We-Do/Water-Sector-Vision1 point
-
I agree with this, though how 'lead-free' the water is depends to some extent on mineral deposition within the pipe and how much disturbance there has been. If, for example, a lead pipe with limestone deposits in springs a leak it may well be scraped out to form a 'bell' for a sweated joint, leaving the water in contact with lead as it has not been (given the 'stone lining') for years up to then. It should not be your problem but I am sure you could get one of the companies which tests bore-hole water quality to test a sample from your taps. It won't be free but in the absence of action from SW it may be pragmatic.1 point
-
Strangely?,1 point
-
1st question would be - how will you lift this into place? A 5m (almost) 250kg beam isn’t like boosting a big lintel into place. The method of lifting will then determine the best (safest/most economical etc) support method.1 point
-
I wonder if the pump is stalled and somehow current limits so fuse doesn't blow? Repeat the voltage measurements. Measure voltage at the pump. At the output of the switch. Input to the switch. Check the neutral to the pump. With power off measure resistance/ continuity from neutral at the pump to neutral as far away from the pump as your meter leads will reach.1 point
-
Sorry I don't have a clue. I've purchased that Greenwood extractor and will replace the utility one with it. I've also changed the Vent Axia bathroom extractor previously mentioned to be on continuously. So it will be both of those on the whole time as the primary mechanical ventilation in the house (in addition to all trickle vents open)1 point
-
Make two timber 3 legged stands (think axle stands) cross braced and you get to use the timber afterwards for something else.1 point
-
how long will it be up there unsupported before the concrete goes off? a couple of genie lifts? Scaffold tower? it must be a meaty beam if its 54kg per linear metre Cheaper options are probably available with variable levels of safety1 point
-
Why would it? I installed my own, does not need gas type training/certification .1 point
-
Presumably you have checked on the LA web site what written objections the neighbours have made? This will give you pointers to the likely tone of the site meeting and give you a chance to prepare your rebuttals.1 point
-
+1 Still need to diagnose the 20V drop. If confirmed that represents a lot of power being dissipated in a reed switch.1 point
-
Exactly that happened to us. Result - PP was awarded. Planners are used to neighbourhood grouches. I defer to @jack above - in addition to what he says, Planners are duty bound to make a fair representation of the spread of comments: for and against.1 point
-
My recollection is that the consultation date is the latest date by which you can submit comments and guarantee that they will be heard, but there's nothing to stop comments being considered after that date. I think you or a trusted friend being there to take notes would be highly desirable.1 point
-
take an hour or two off.1 point
-
How much? Something like 200mm won't be noticed. We switched from cut timber roof to insulated panels, resulting in a 300mm increase. We dropped the ridge by 150mm and wall plate by 50mm.1 point
-
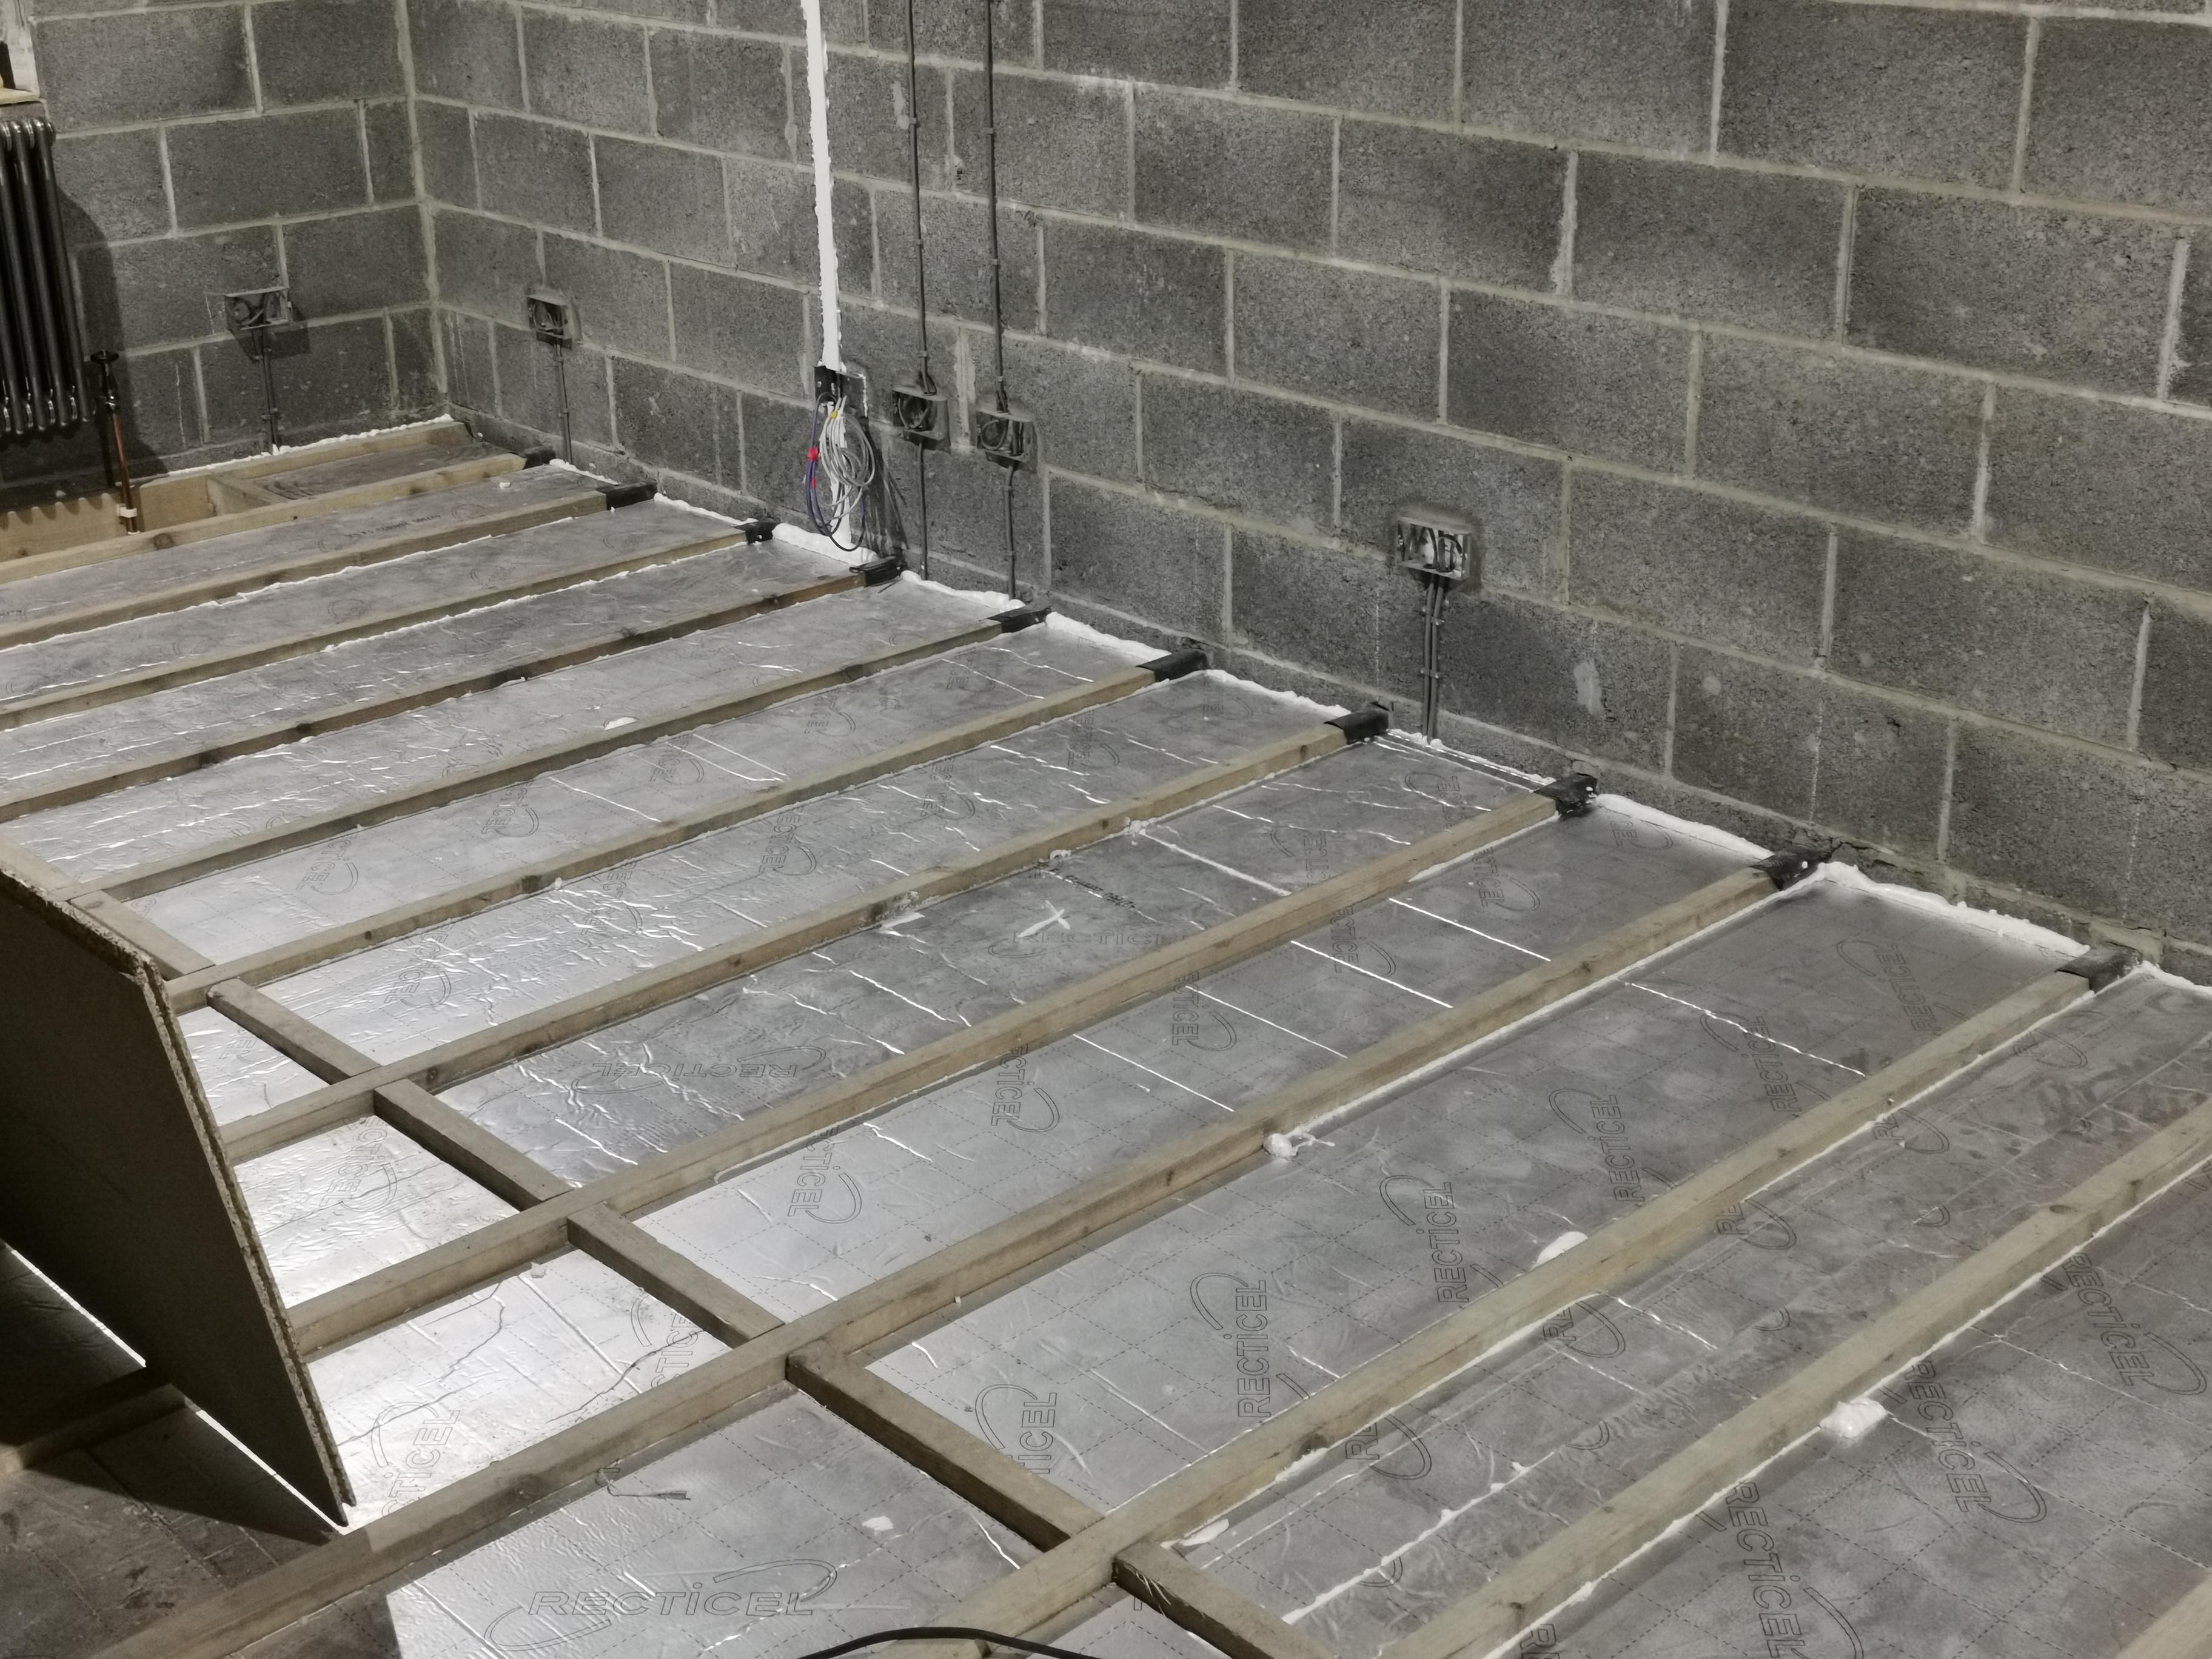
I'd go with the 150mm PIR, best bang for your buck and if it's supported on battens then it's rock solid ready for your pug mix. Here's my 170mm version, just need to tape over the joins.
 1 point
 -
Yes to support the pug mix and to fix the UFH pipes to.1 point
-
Yep, it’s a PITA you cut out the ridge and cut the rafters back to the correct length, then fit a timber into the web of the steel and lift it up to the full height. it can be easier to remove all the old rafters and ridge and replace with new steel ridge and wooden rafters.1 point
-
Planning permission and building regs are two totally separate things. Think of it as owing a taxed, MOTed and insured car, but you have no license to drive it. You can park it on a public road, but you cannot move it.1 point
-
Firstly, check if you need to formally discharge any pre-commencement conditions. Secondly, check if CIL applies and if applicable, submit the relevant forms prior to commencement. Once you have sorted the above, you would need to make a material start/operation on site and that is defined as… https://www.legislation.gov.uk/ukpga/1990/8/section/56 To confirm works have commenced, you could submit a Lawful Development Certificate to the LPA. Or you could have this confirmed by Building Control. As a result of the changes to the Building Regulations in October, the definition of commencement has changed… https://www.nhbc.co.uk/builders/products-and-services/building-control/new-changes-to-building-control1 point
-
How much over 2 years has it been from approval? Double-check and then you know for certain how much time you have to play with. A site down the road from me 'locked in' their Planning permission by dint of slapping a bit of concrete in the foundation trench. I very much doubt that the concrete is deep enough, and I would not be keen on a foundation made of 2 entirely separate layers, but Planning seem to have accepted it. It is now an undeveloped overgrown eyesore (and also, due to site constraints, I am not at all sure how they will build it, but that's all 'irrelevant'!). Do you have full construction drawings? Have you applied for Building Control approval, or are you proposing to use a Building Notice (alternative B Regs application type - fine if you are 100% sure of what you are doing; less so if not)? Have you had a structural engineer to design the foundations? If not, get that now, or a.s.a.p., apply for Building Regs, get the foundations dug and poured and then, from a Planning point of view, I think you can breathe...1 point
-
The indication of starting is usually digging the foundations but during a planning fight I had for my build established that any demolition also counted so do you need to demolish anything?, can you dig some foundations. Take pictures of any work with digital dates if possible in case you need proof.1 point
-
as @Conor says, self build mortgage is the way to go, we used Melton Mowbray via a specialist self build mortgage broker (https://www.mayflowermortgage.co.uk/).1 point
-
We had the land, and had started the build and had a large mortgage on our previous house, and used Loughborough Building Society for their self build mortgage. Having the land is a distinct advantage, you won't need a deposit. You will need an estimate to complete [we just did a spread sheet, based on estimators online with firmer estimates. We suggested our stage payments, and they did not mind that the first stage payment was the completion [passed off] foundations which we had already done. We dealt with Loughborough direct without going through an agent, Their rates at the moment look about 0.7% higher than ecology.1 point
-
Sorry I missed your post. Maybe use the quote function or the @ to tag me. We're in Ireland too. Passive standard build. Moved in in 2021. We used a raised Heal trussed roof, We have a cold loft with 450mm blown cellulose. It's a sealed roof as per the Tyvek manual with ventilation over the membrane via battens and counter battens. We stapled and taped an airtighess membrane under the trusses and returned it to the inner leaf of plaster on the external walls. The membrane oversailed all inner walls to minimise risk of leakage. We used two layers of 44*47mm battens under the membrane to run our MVHR pipes and wires. Then a layer of standard plasterboard and skim. We had only 5 wires into the attic. I used a small square of ply instead of the membrane and I drilled one hole for each wire and sealed with airtight sealant. I bought an airtight attic hatch too but nothing gets stored up there. Time over again I would change 2 things First use just a single layer of 20x70mm battens for the wires only. Then run the MVHR in the attic, it'd be much easier and as I was doing the airtightness I could be confident I'd have sealed them properly. Second use a double layer of plasterboard. The house is so quiet that we can hear the wind through the 450mm cellulose. Either that or a layer of 11mm OSB as sarking, it'd stop the membrane flapping too. Or maybe both.
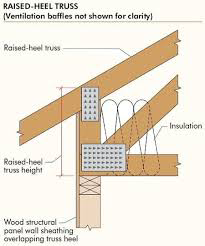 1 point
 -
Our windows were on a 12 week lead time alone. There have been points where I would have rather not done it all. Instead would have bought a wee cottage, bit of land, workshop and banked the rest. As it is we are two years in from first stepping into the land to now. We are 6 months into our build with maybe 4 months to go with a fair wind. It’s all been funded by the sale of our previous house. Neither of us work so getting a mortgage is out and we won’t use any of our savings to finish it. Building costs more than you think. People tend to overestimate how far your money goes and underestimate how much things cost. There are many new posts on here from well meaning self-builders starting out on the journey thinking that they can build for a fraction of what the reality is. Ultimately it will come down to how much you can do yourself and doing it yourself will likely take longer than getting trades in.1 point
-
In the present climate sell the house and live on site, it may not be what you want to do, but you don't want to be stuck like we were with a part build house (basic shell) all money spent, and the old house would not sell in a dead housing market, not unless I gave away a 5 bedroom house for less money than the construction cost of the new 3 bedroom house (i.e pay to downsize)1 point
-
Sure, you can try Amanda Tate Partner Surrey Property Lawyers The Old Estate Office Wilderness Road Guildford Surrey Gu2 7QR Tel: 01483 485 800 Fax: 01483 485 801 Email: info@surreypropertylawyers.co.uk1 point
-
You have broken Goggle Translate.1 point
-
The point of a warm roof is you DON'T need to ventilate it. Mine, from outside to in is: Tiles Battens counter battens Breather membrane 100mm wood fibre board over rafters 200mm Frametherm 35 between rafters 11mm OSB Air tight membrane 25mm battens for service void Plasterboard. On some sloping ceilings where there were no cables I omitted the service void to give slightly more headroom (bathrooms) U value about 0.141 point
-
Off topic but I tend to agree. I am yet to detect a correlation between cost and quality on anything I have done so far in my build. In fact, I might be detecting a hint of the converse.1 point
-
Ok, this is onto flint blocks and not lime, however he's told me the technique would be same just a different mix for lime. My choice of nailpointing to make the stone 'pop' is optional. Someone good would think in terms of doing 6sqm a day. Put as much muck in as gets you to the middle of the day, then go to the earliest stuff and wire brush, nail point, then soft brush. (The video is of my upper floor which is using standard yellow sand but white cement, the final photo shows lower floor which is 5 white sand, 1 lime,1 white cement.) pointing.mp41 point
-
Very helpful and insightful.1 point


.jpg.c21f3ac78c9b7efd90cbdcb312744dc5.thumb.jpg.7adcad4c0e384f5ecd7d56b0618df6e5.jpg)


This leaderboard is set to London/GMT+01:00