
Leaderboard


Popular Content
Showing content with the highest reputation on 05/15/22 in all areas
-
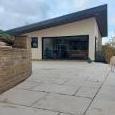
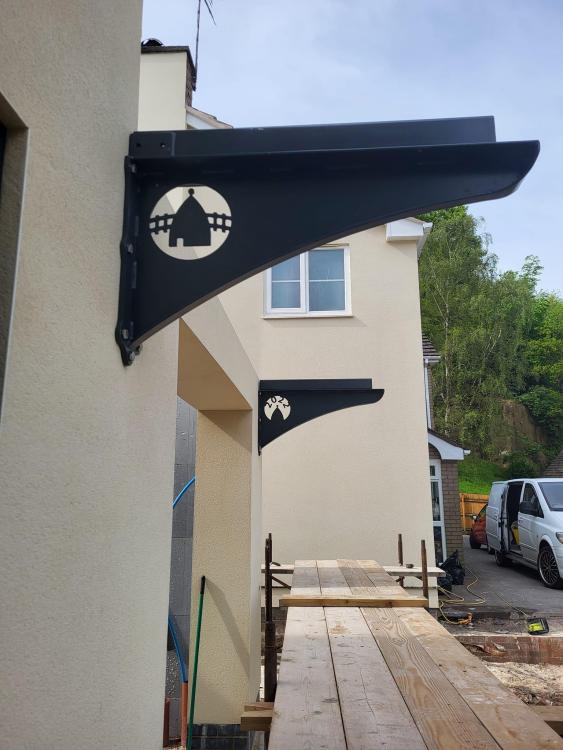
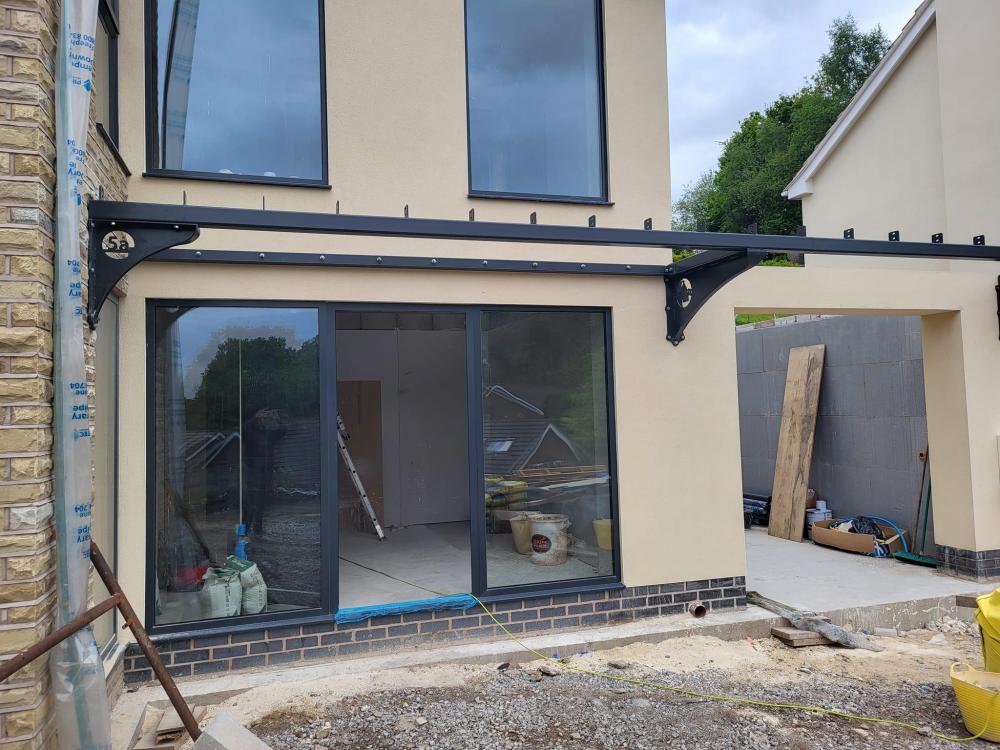
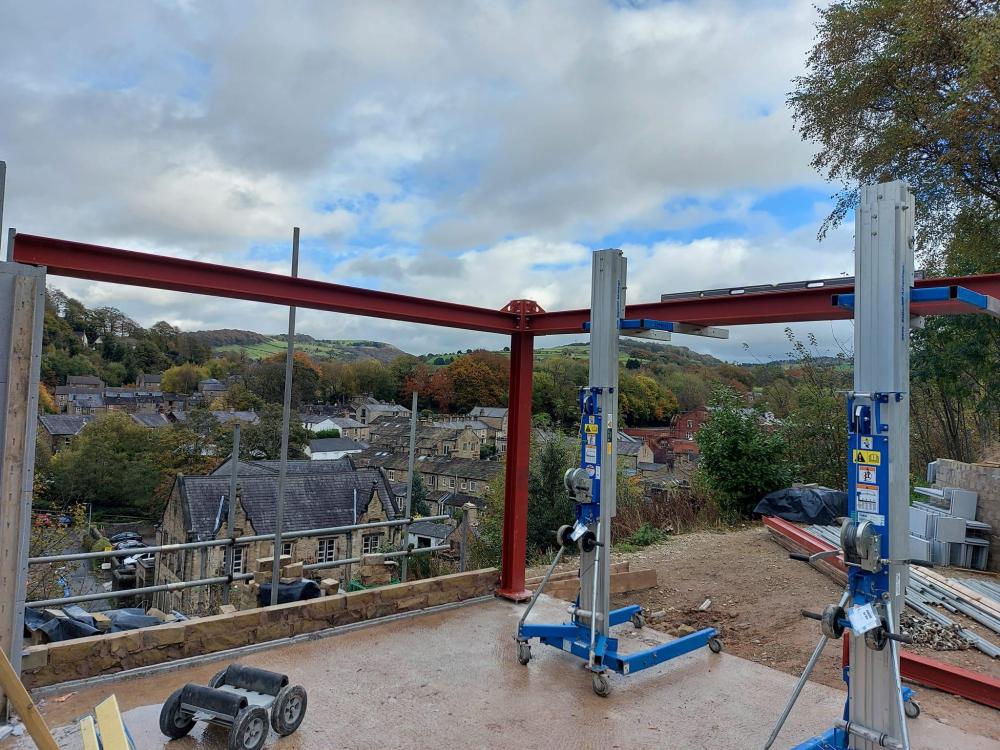
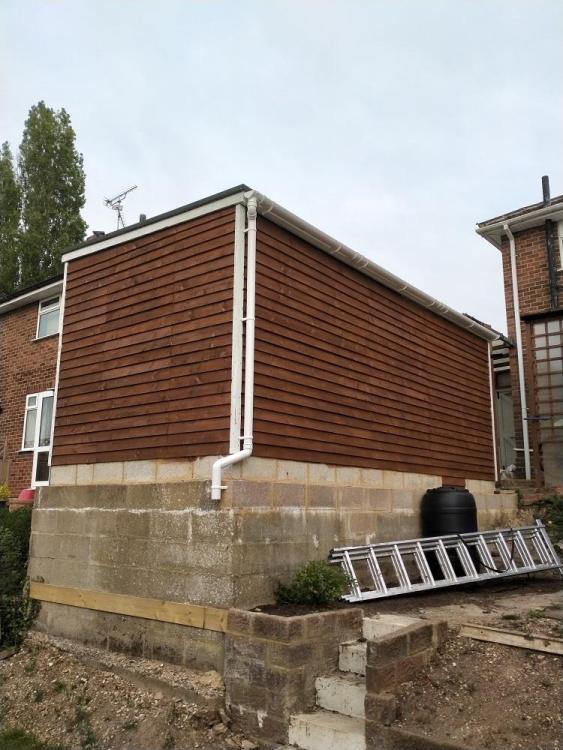
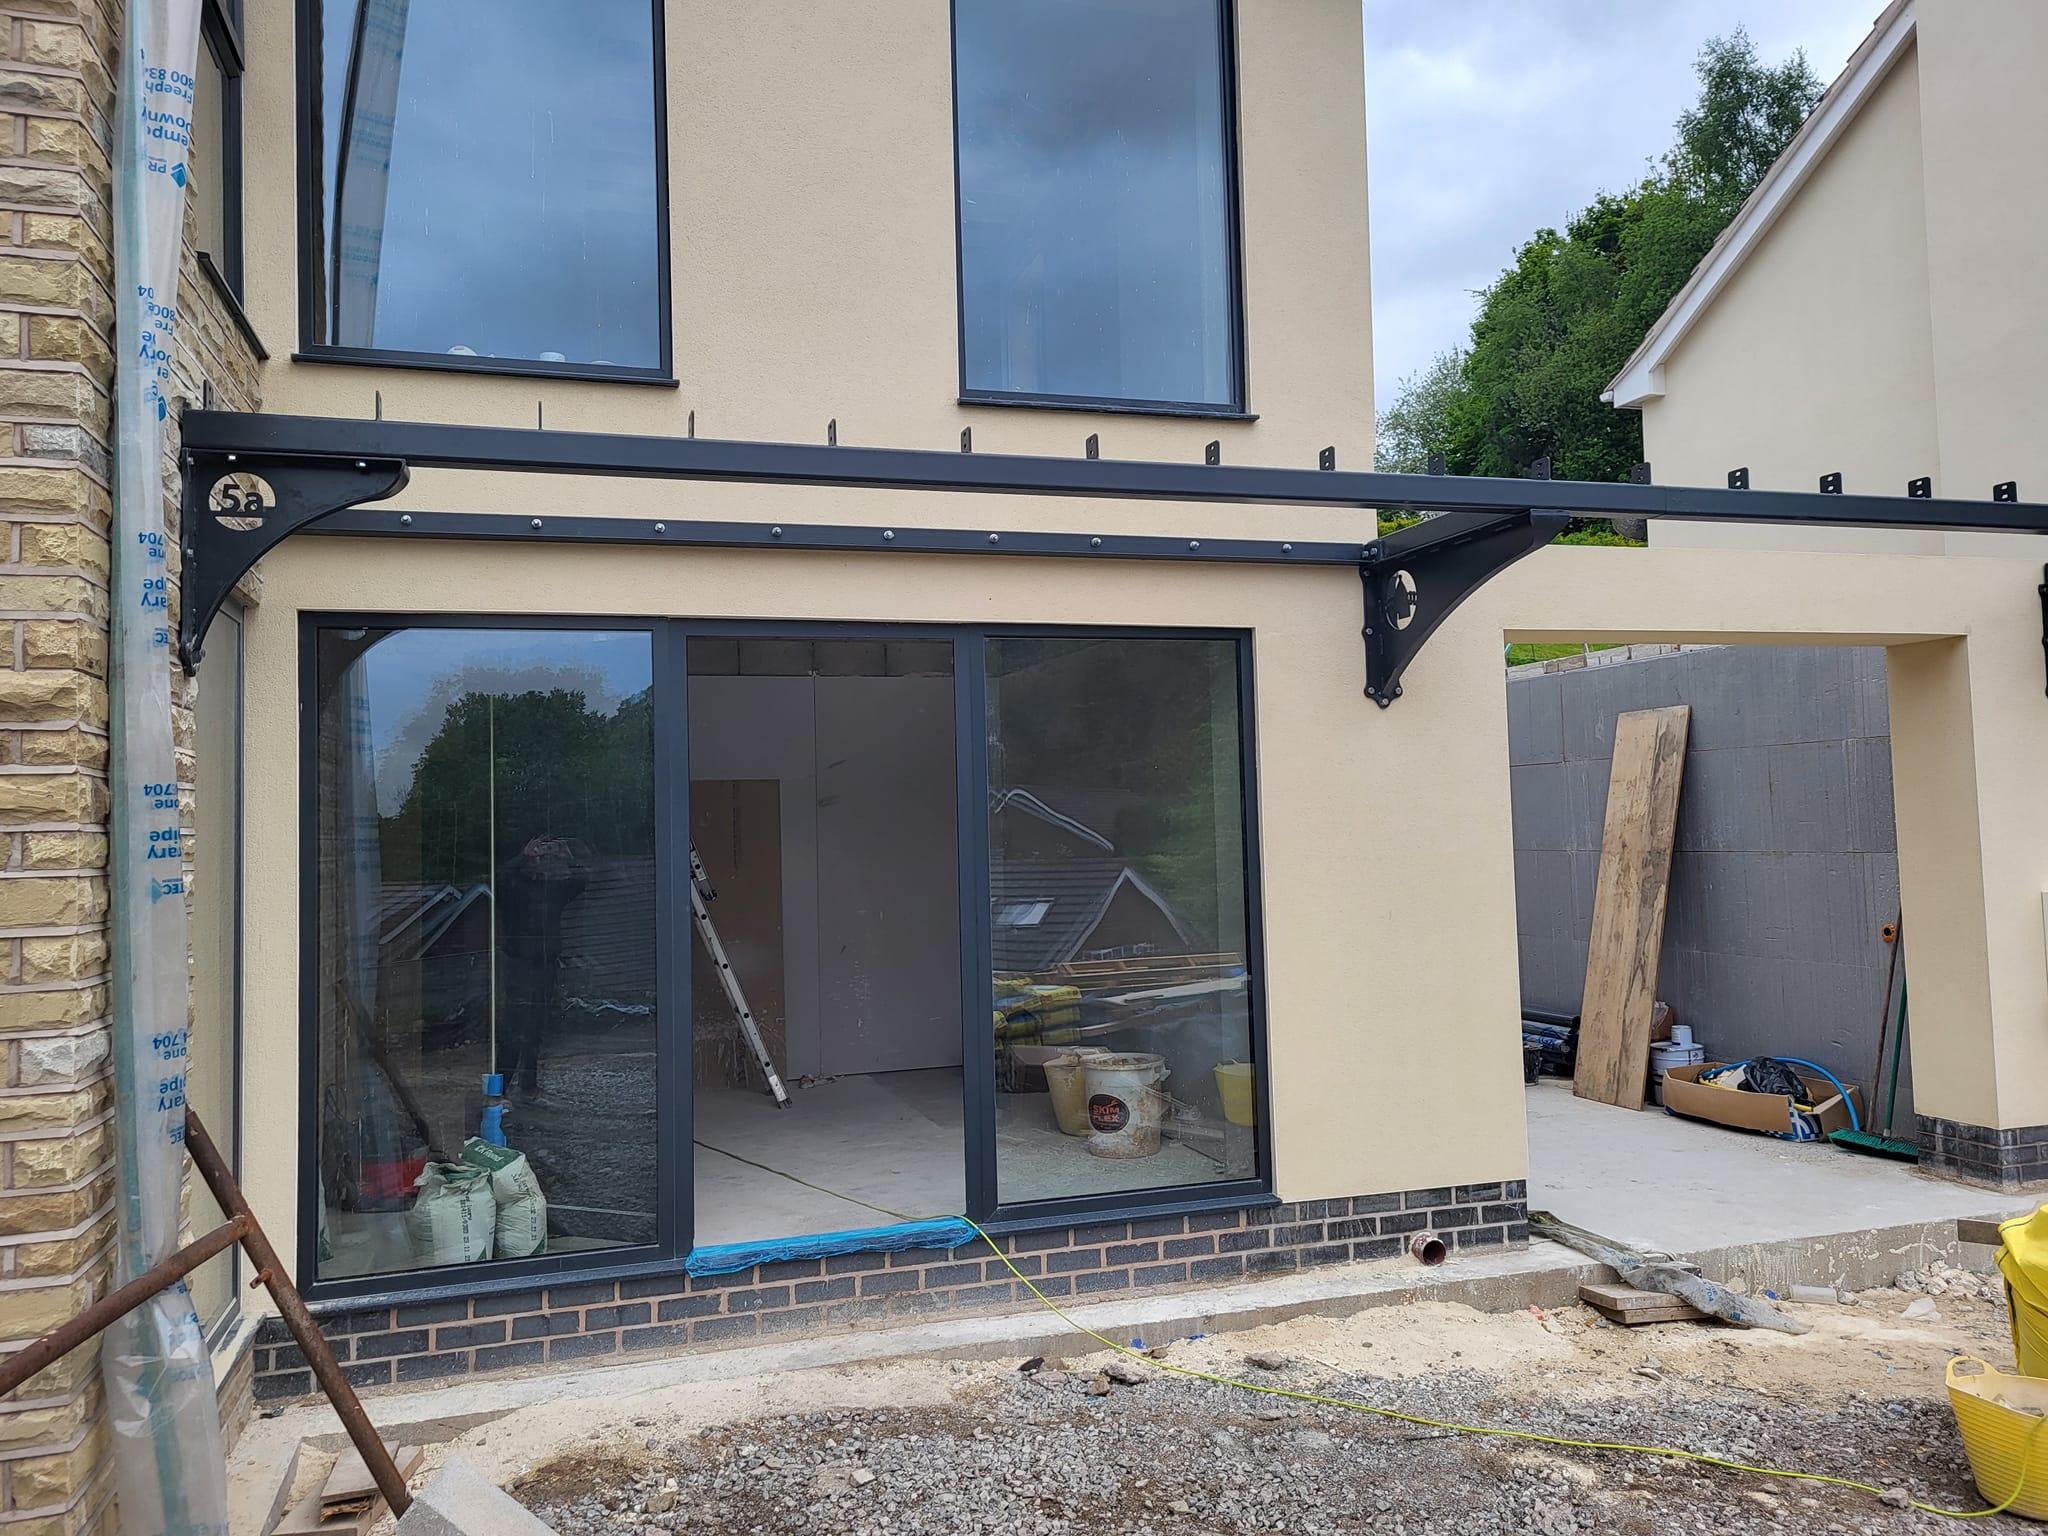
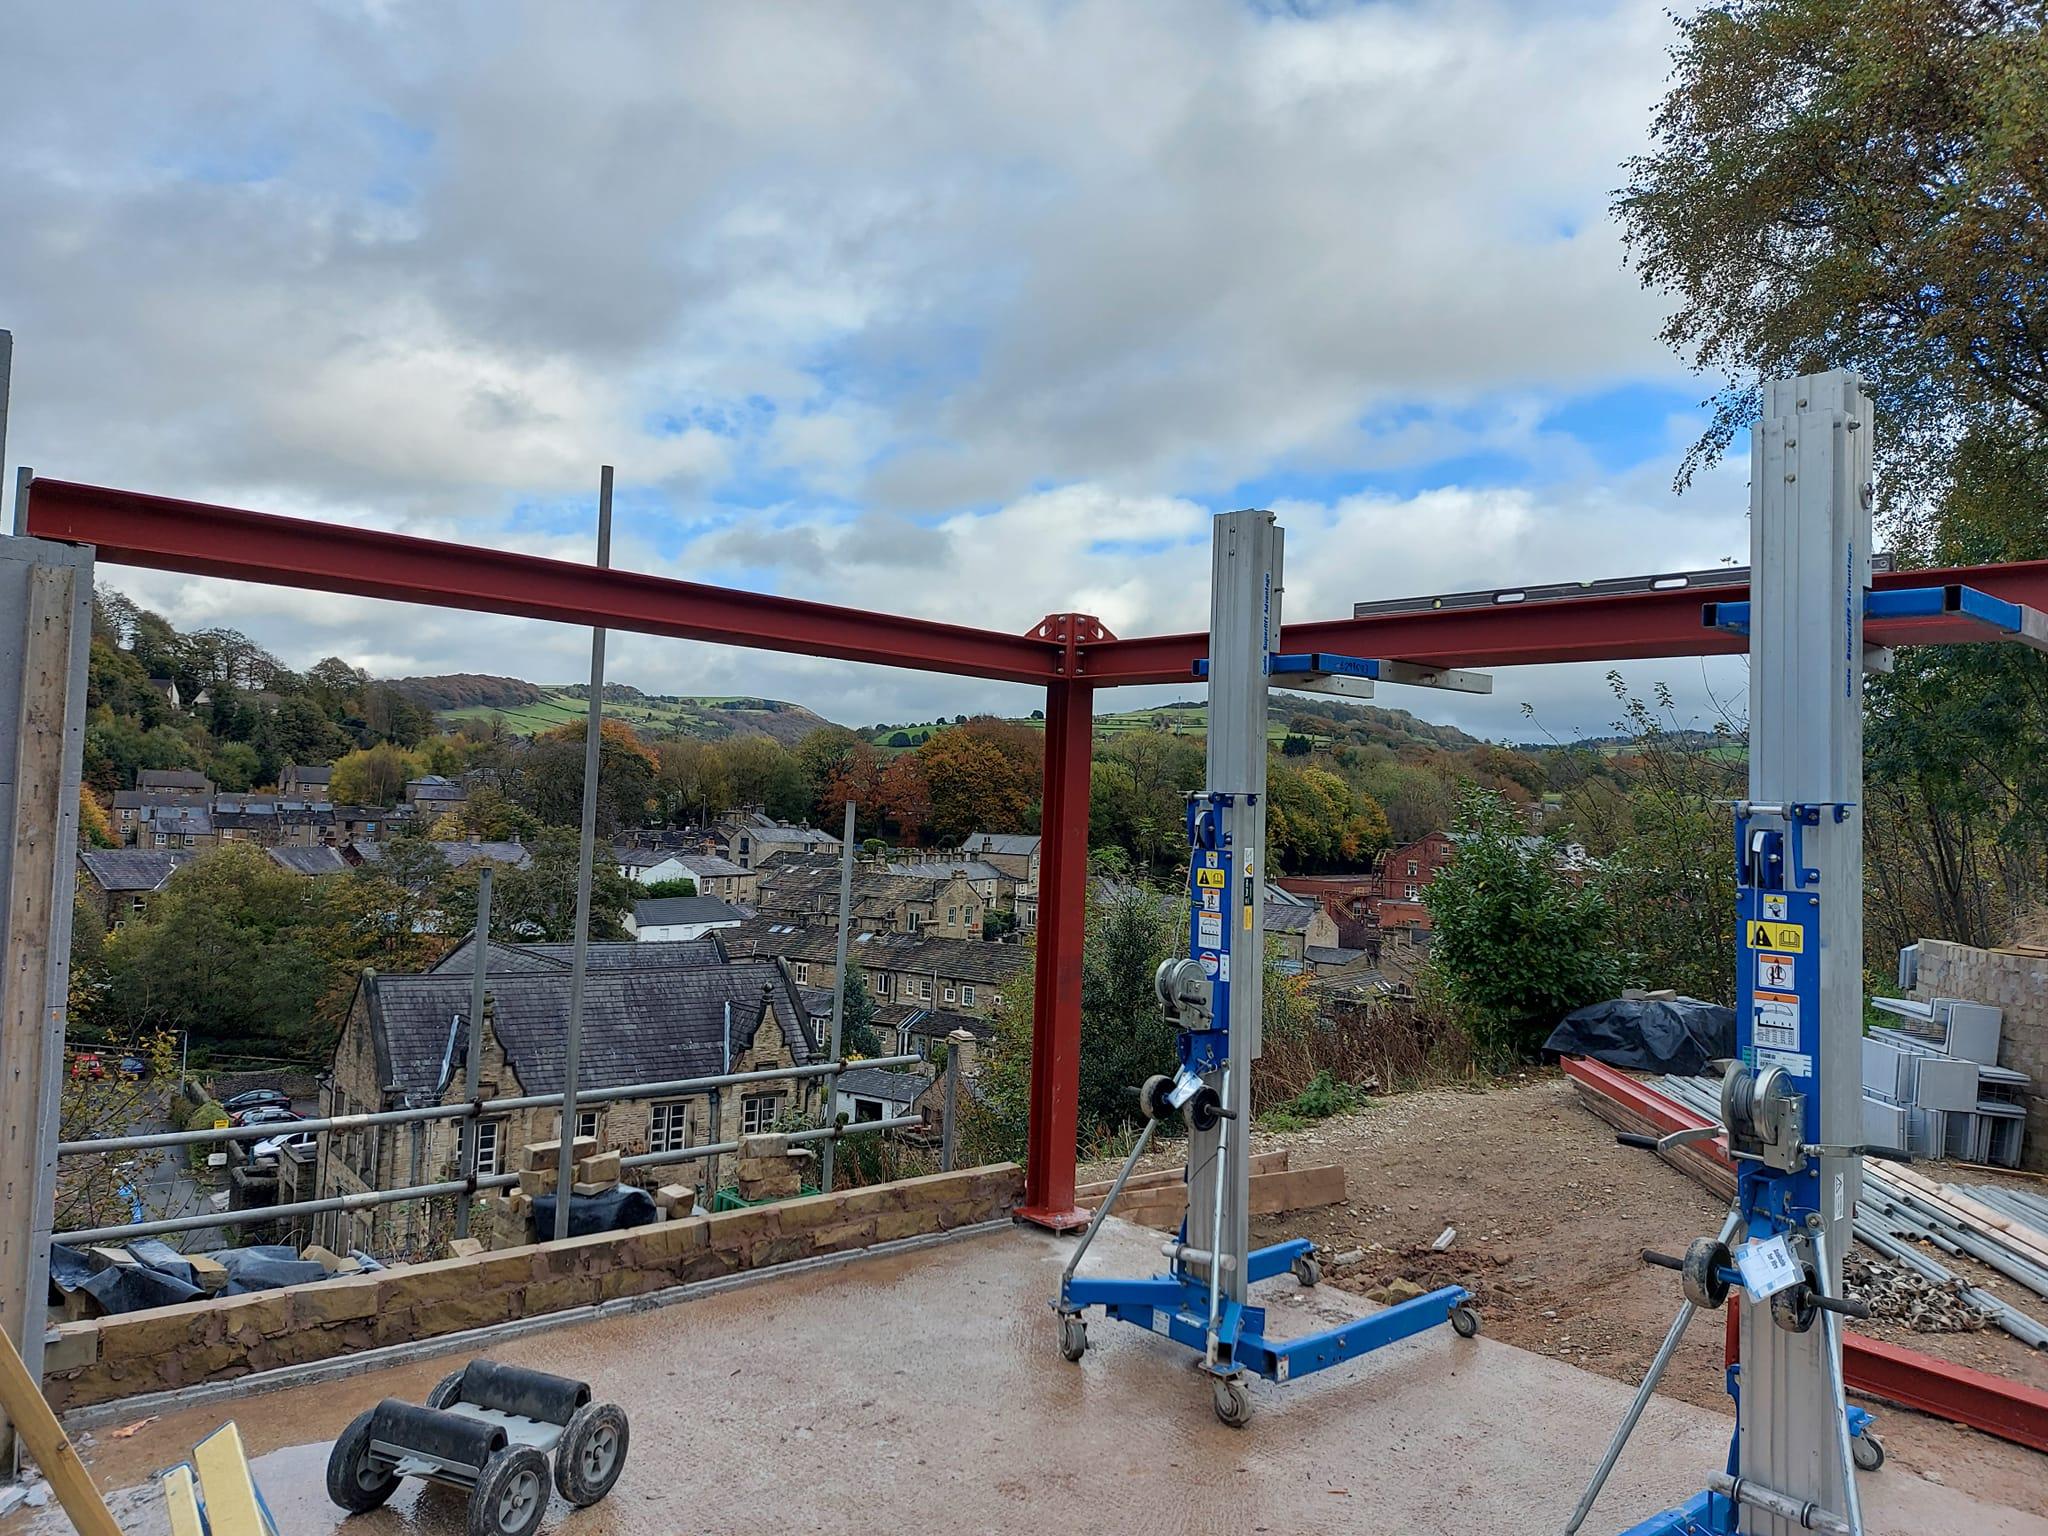
Canopy going up this week with bespoke brackets
 4 points
 -
2 points
-
I had a few spare minutes on this lovely sunny Sunday evening and decided to spend it writing up a blog post for our basement UFH install and screed. We have a 250mm reinforced concrete slab sitting on top of 200mm EPS300 in the basement. The slab wasn’t very flat and so we decided to use a cement based liquid screed to give us a nice level base for our finished flooring. So we put down 25mm of PIR to level things out and also to allow the UFH pipes to be stapled to. I did some quick maths and I figured out that it was cheaper to use the 25mm PIR and UFH pipe staples than to use pipe clips fastened to the slab and a thicker layer of liquid screed and so an order was placed with our BM and it was delivered and fitted by my lovely wife and me. We found this is a pretty easy task to be honest and only found we had to put a small bit of sand blinding to level a couple of dips in one room. In the rest of the basement the PIR just took the bumps of the slab out. We taped the joints and foamed around the edges for a belt and braces approach even though there was a DPM going on top. Next came the DPM layer. We found this a bit of a pain to do! Not hard but trying to smooth it out and keep it square so that a constant amount was taken up the walls was just fiddly. In the end we got the laser level out and set it about 150mm above screed finished level and then used that to ensure we had enough DPM up the walls. Then we had to tape it to the walls but soon found that standard gaffa didn’t stick to the concrete walls nor the dense concrete blocks! We painted the concrete with a PVA mixture and that helped a lot for that but just didn’t work on the concrete blocks at all. Off to Google and this awesome forum and I eventually found Gorilla Tape which sticks well to concrete blocks and we were off and running! Following this we laid the UFH pipes. This was a job we actually really enjoyed. It was very satisfying creating those wonderful spiral shapes. We made some spacers and I was laying the pipe according to the layout designed by Wunda and my wife was walking behind with the stapler ‘kerchunking’ down the staples as we went. At the end it looked so good we were sad to think all our hard work would be covered up and never to be seen again. This was my first time running UFH pipes and also my first manifold fitting and I was very happy with how the manifold turned out. I filled the pipes with water and the pressure gauge showed that there were no leaks. That and the fact there water wasn’t pissing out anywhere! With the liquid screed booked in we needed to get a move on and get everything finished off and ready. The last stretch was to fit the temperature probes, perimeter expansion strip and create the expansion joints for crack mitigation at the doorways. Thanks to advice from this forum’s users I ran the temperature probes in UFH pipe with the end crimped down so as to not allow screed in just in case they need replacing in the future. I got the expansion strip from uHeat on eBay. It came with a plastic skirt and adhesive already attached so it was a real breeze to fit. Not much more to say about that The final thing was crack mitigation strips for between the doorways. After speaking to the screeder I decided to use 5.5mm plywood board. It was an inexpensive and simple solution. I was asked to cut them to size but leave them to the side of the doorways and the screeders would add them as they went around. Obviously I had to put them in place first to ensure I got the sizes right! So here are photos of our basement ready for the liquid screeders. On the day of the screed they turned up early before the screed lorry to setup their pump and check on my prep work. They said it was exemplary and that I wouldn’t believe the state of the prep work of some of the jobs they turned up to! They had absolutely nothing to do to the prep work which made them happy and made me happy that all our hard work was worth it. They put down their little tripod level thingies and waited for the screed to turn up. Once it did it was really quick work and very impressive. If it wasn’t for the fact that they ordered 6.4m3 of screed but the company only sent 6m3 they’d have been done in a few hours but, as it was, they ended up having to wait a good 2 or 3 hours for the last little bit of screed to turn up. They were not happy as, in the end, they had to spend the whole day here when they could’ve been on to the next job. But, at the end of the day we had a wonderfully flat looking basement floor. And 48hrs later we were walking on it. 🙂 All in all very happy with the whole process and I will be getting these guys back in to do our ground floor screed. thanks for reading.1 point
-
What does "thermal mass" mean to you? It's not got a definition that everyone agrees on, and there's no units for it, making it open to interpretation. A masonry skin, outside an insulated cavity, and therefore outside the thermal envelope could be considered "thermal mass". Similarly a poured concrete raft, sitting atop an EPS former and therefore within the thermal envelope could also be considered "thermal mass". The effect of both is to dampen the diurnal temperature variation, and assist the insulation in stabilising the internal temperature of the house. Concrete sitting inside an EPS sandwich would be just as effective as if it were either fully inside or outside the insulation layer.1 point
-
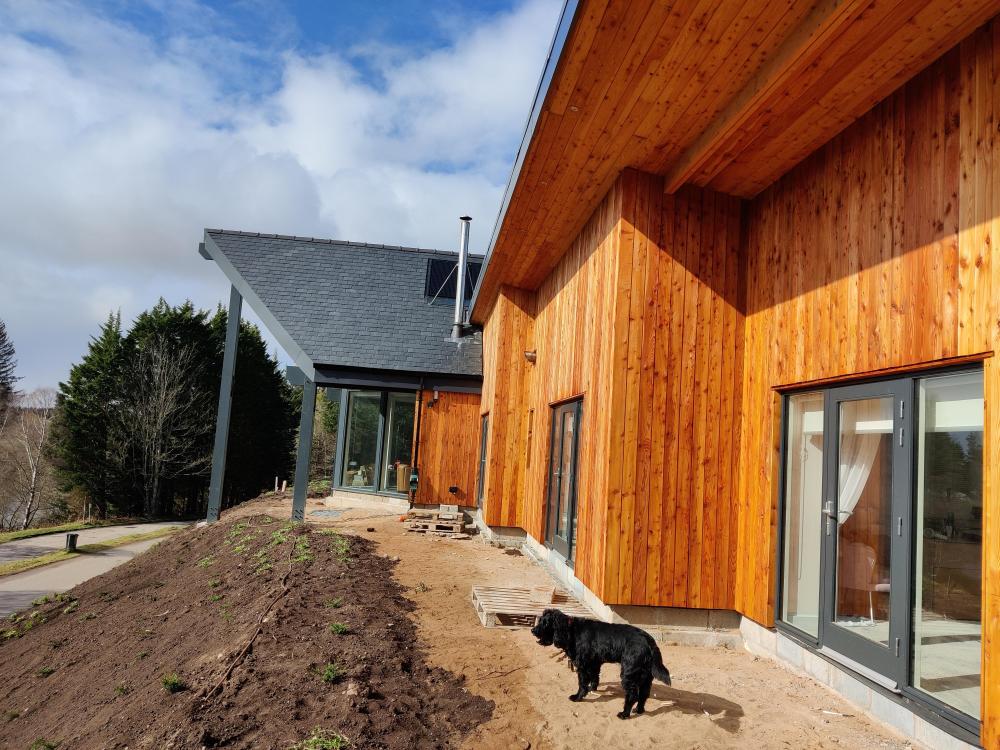
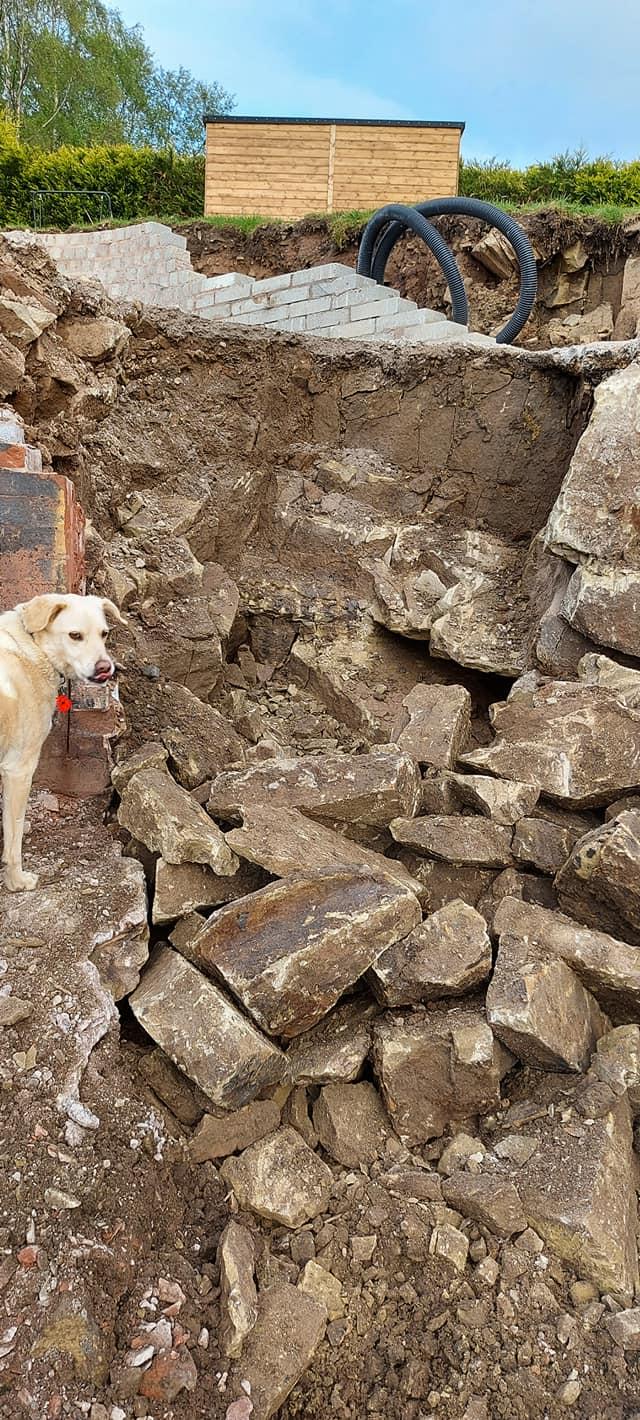
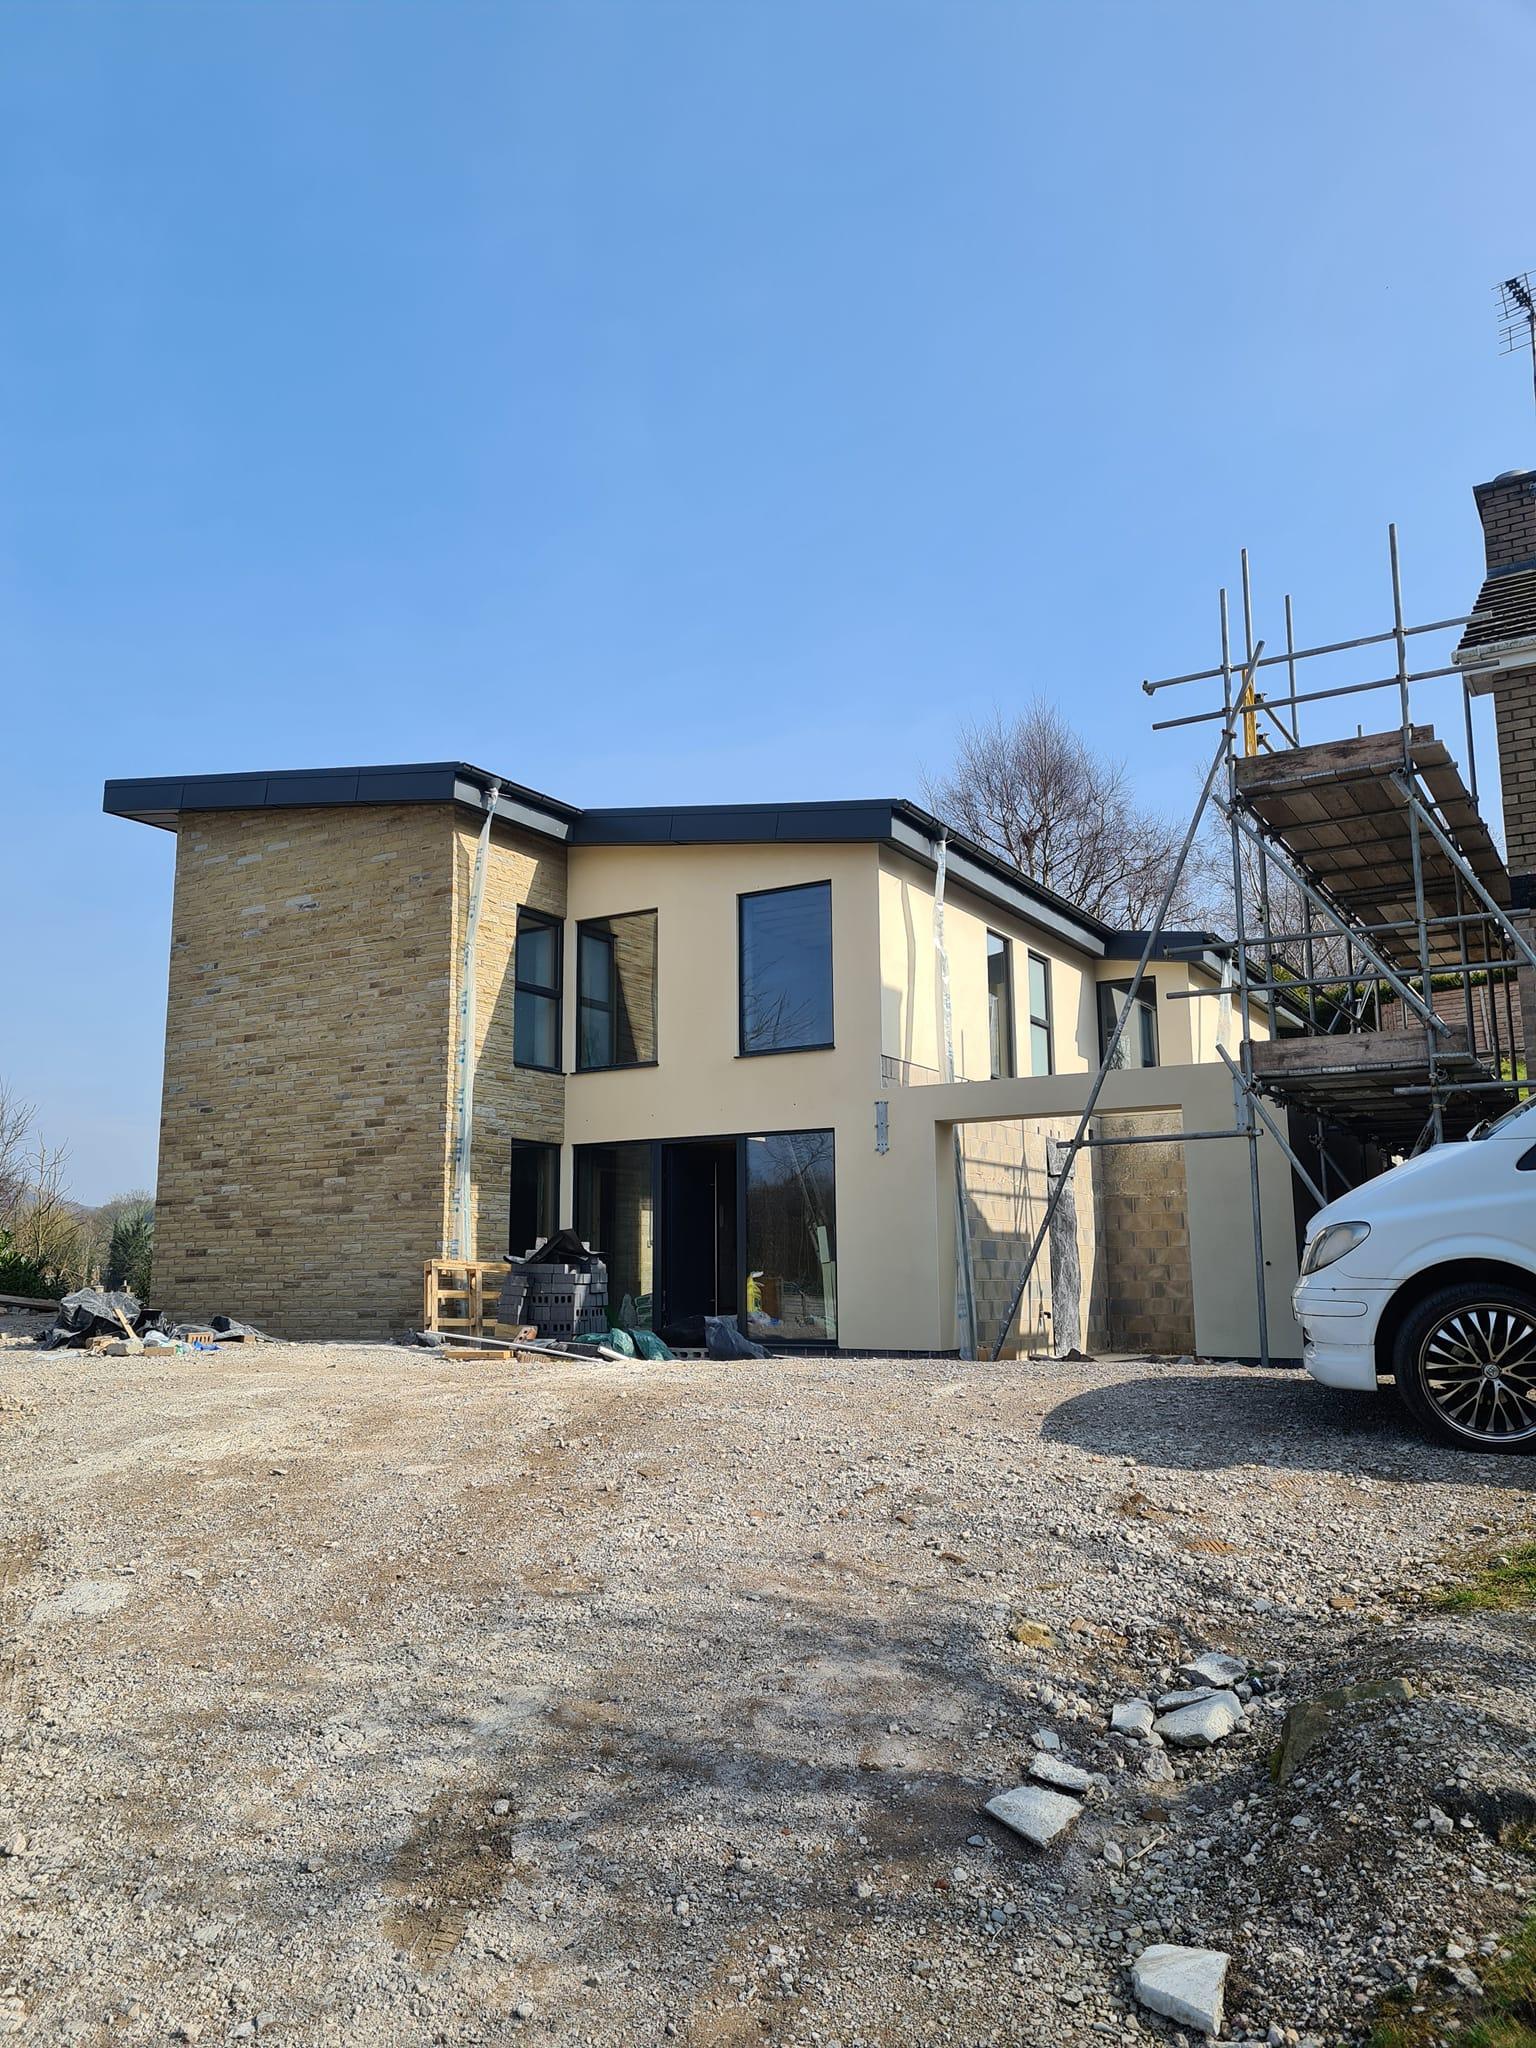
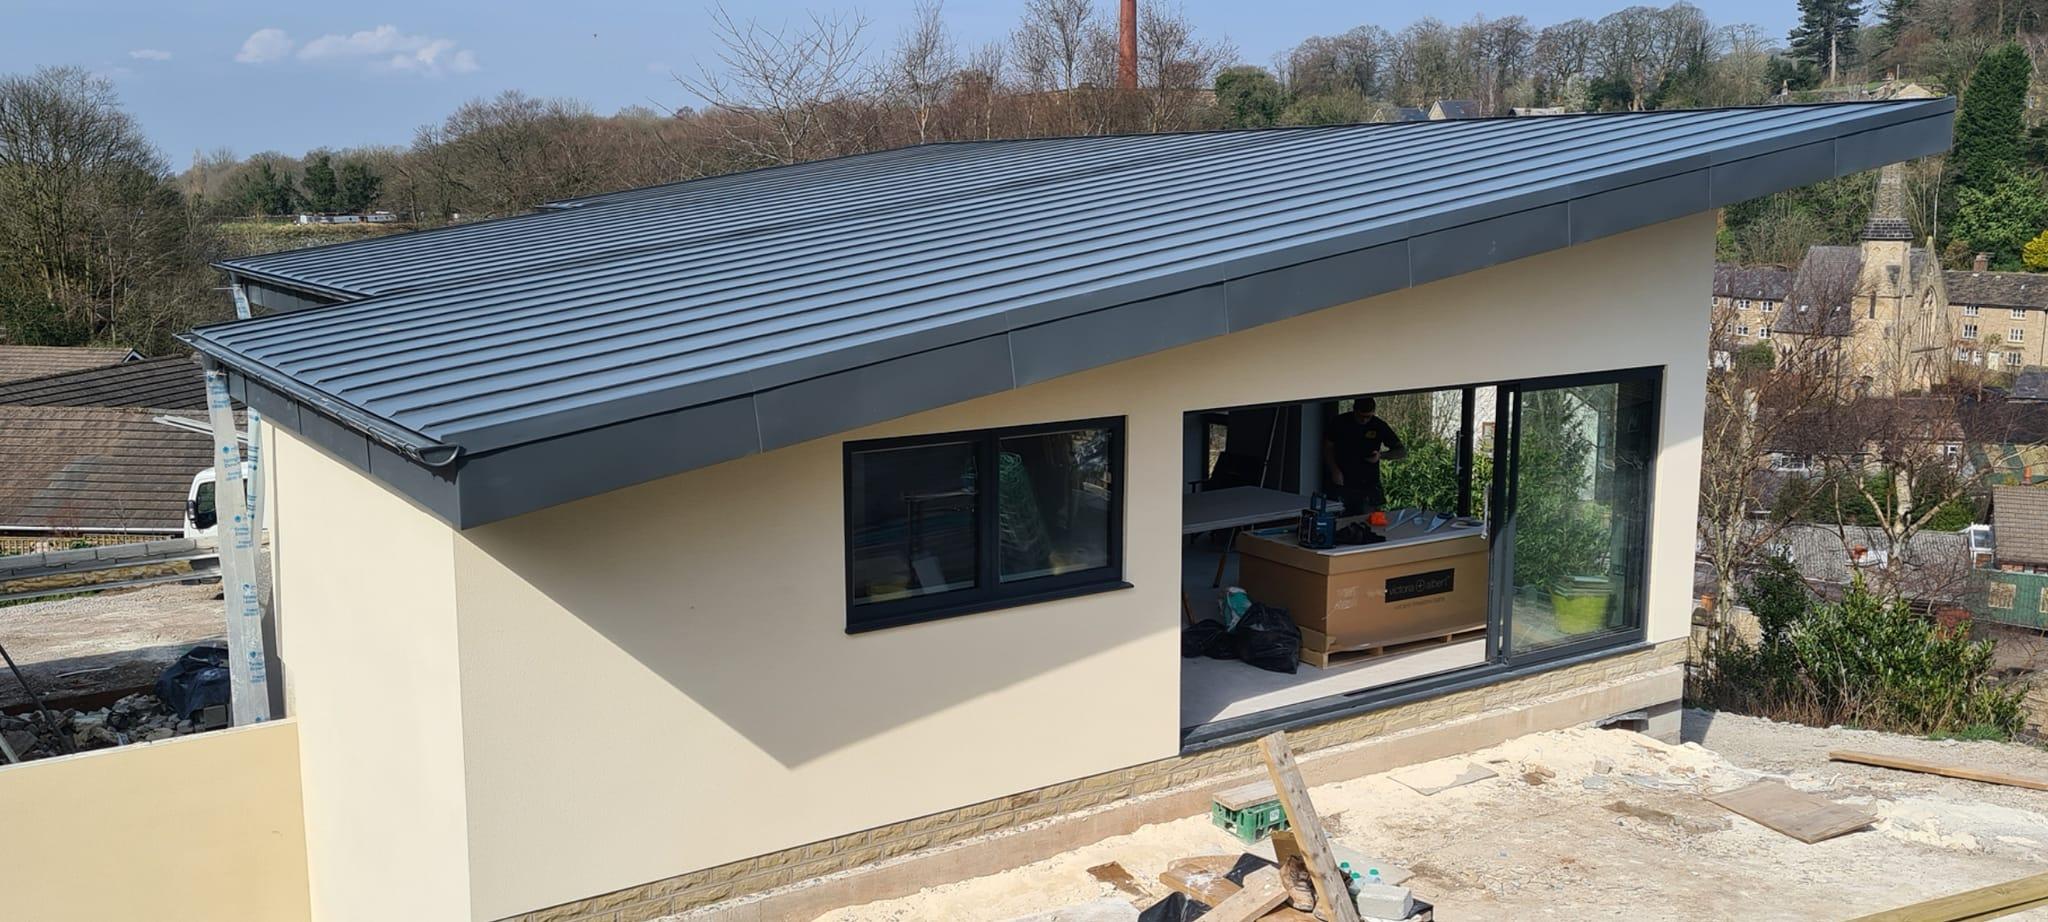
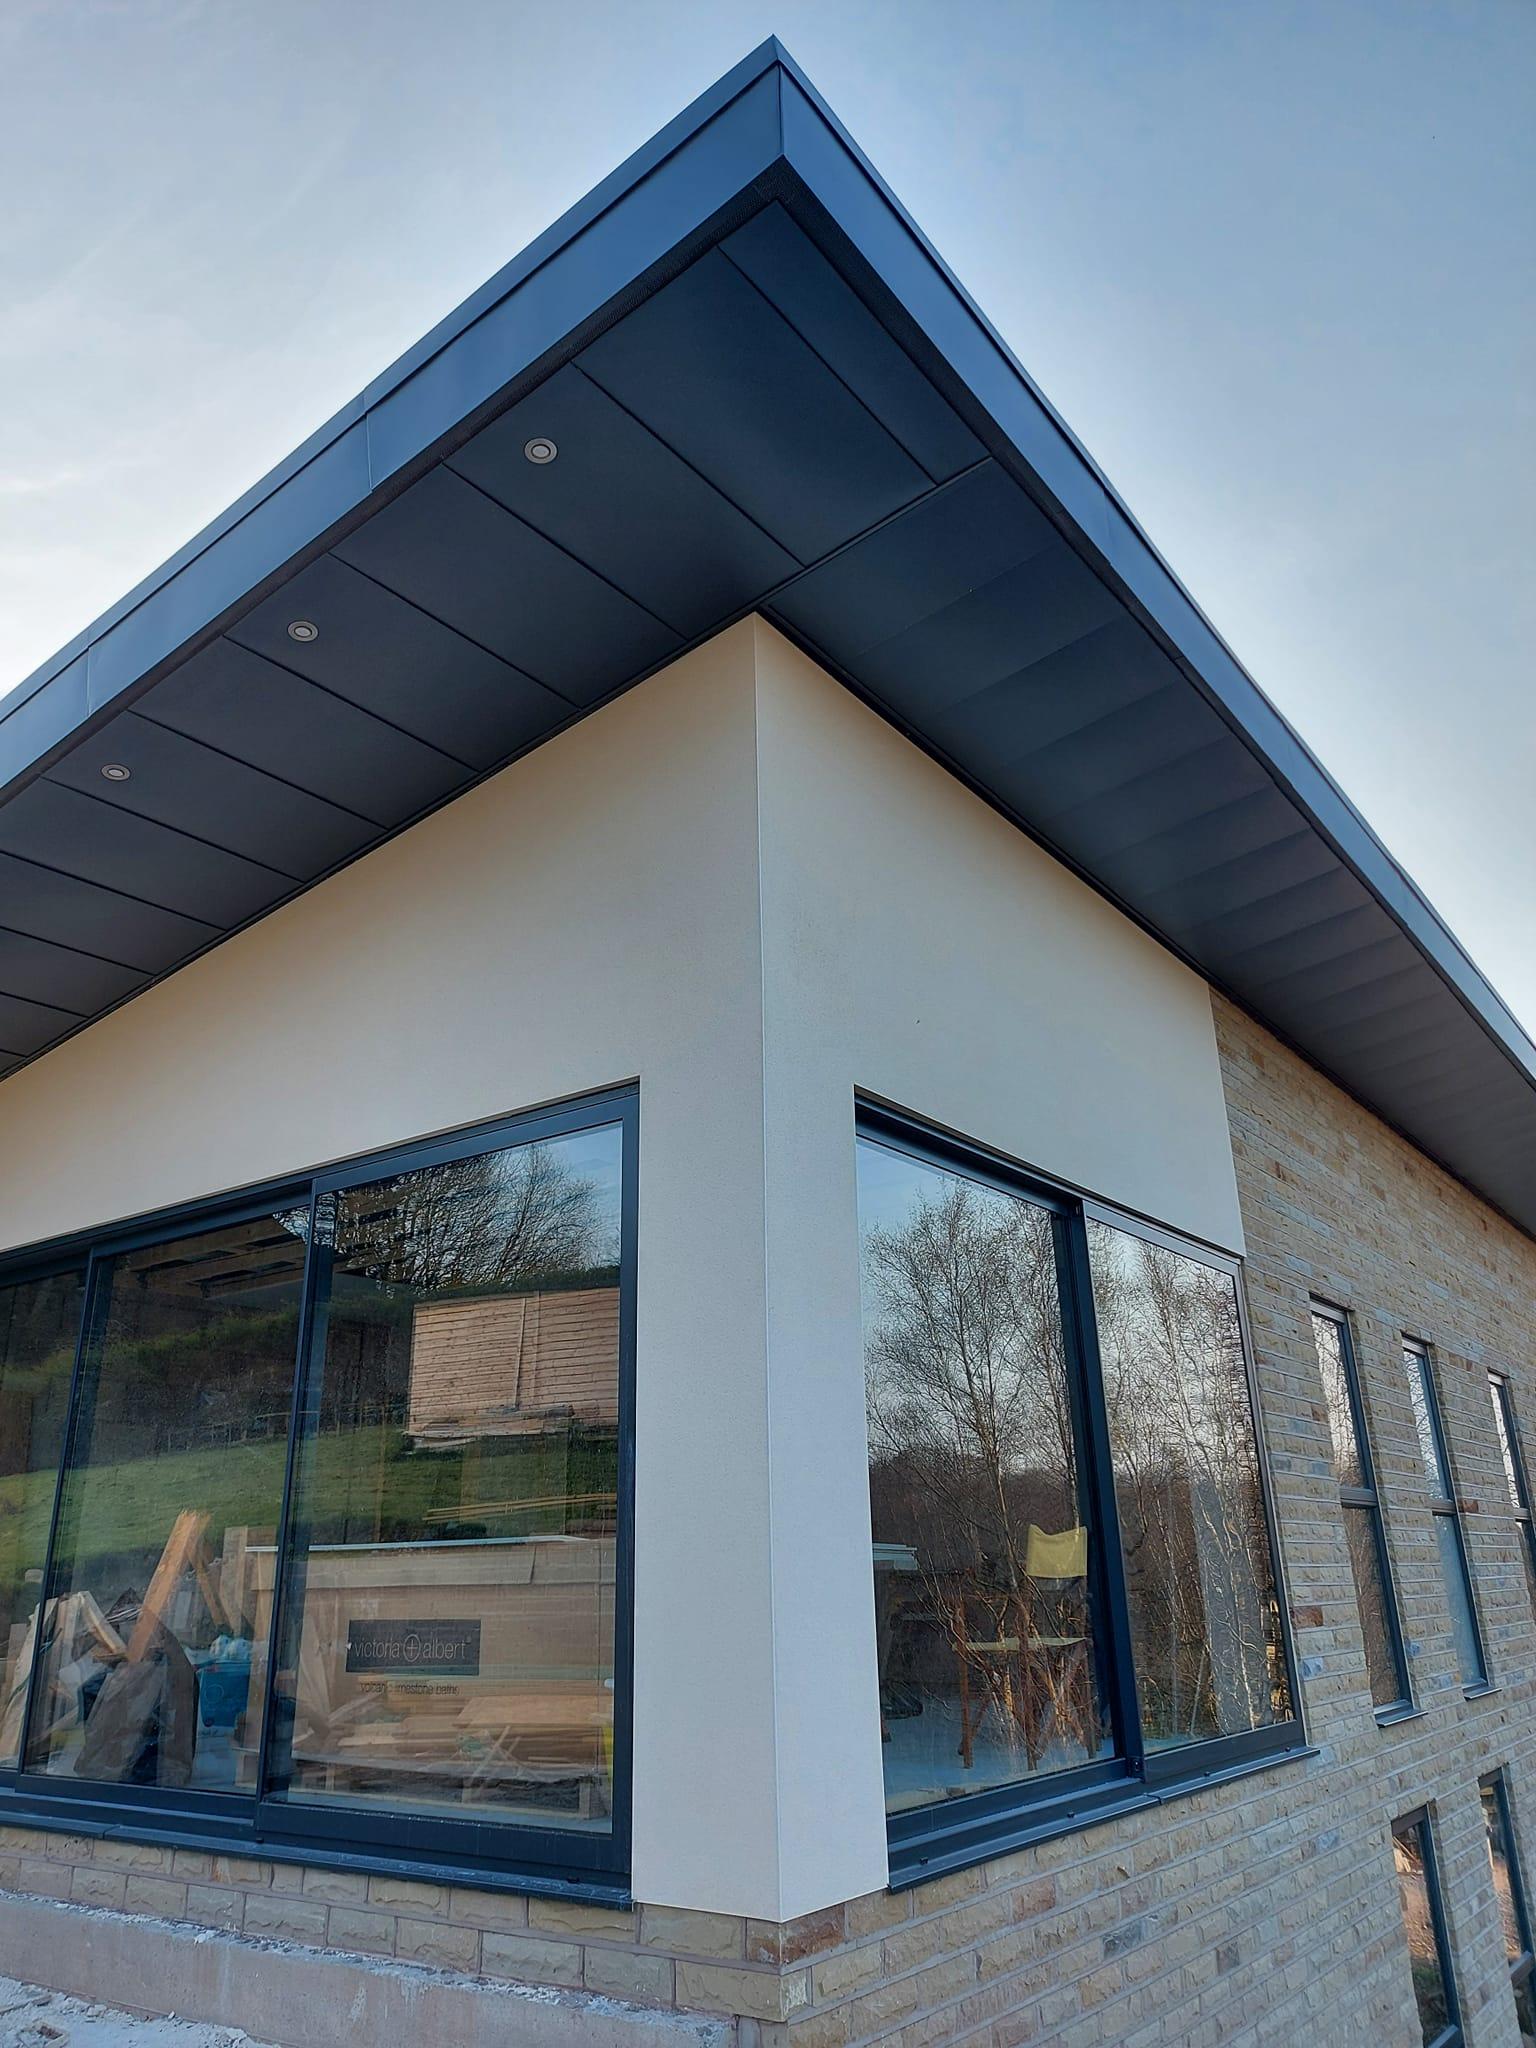
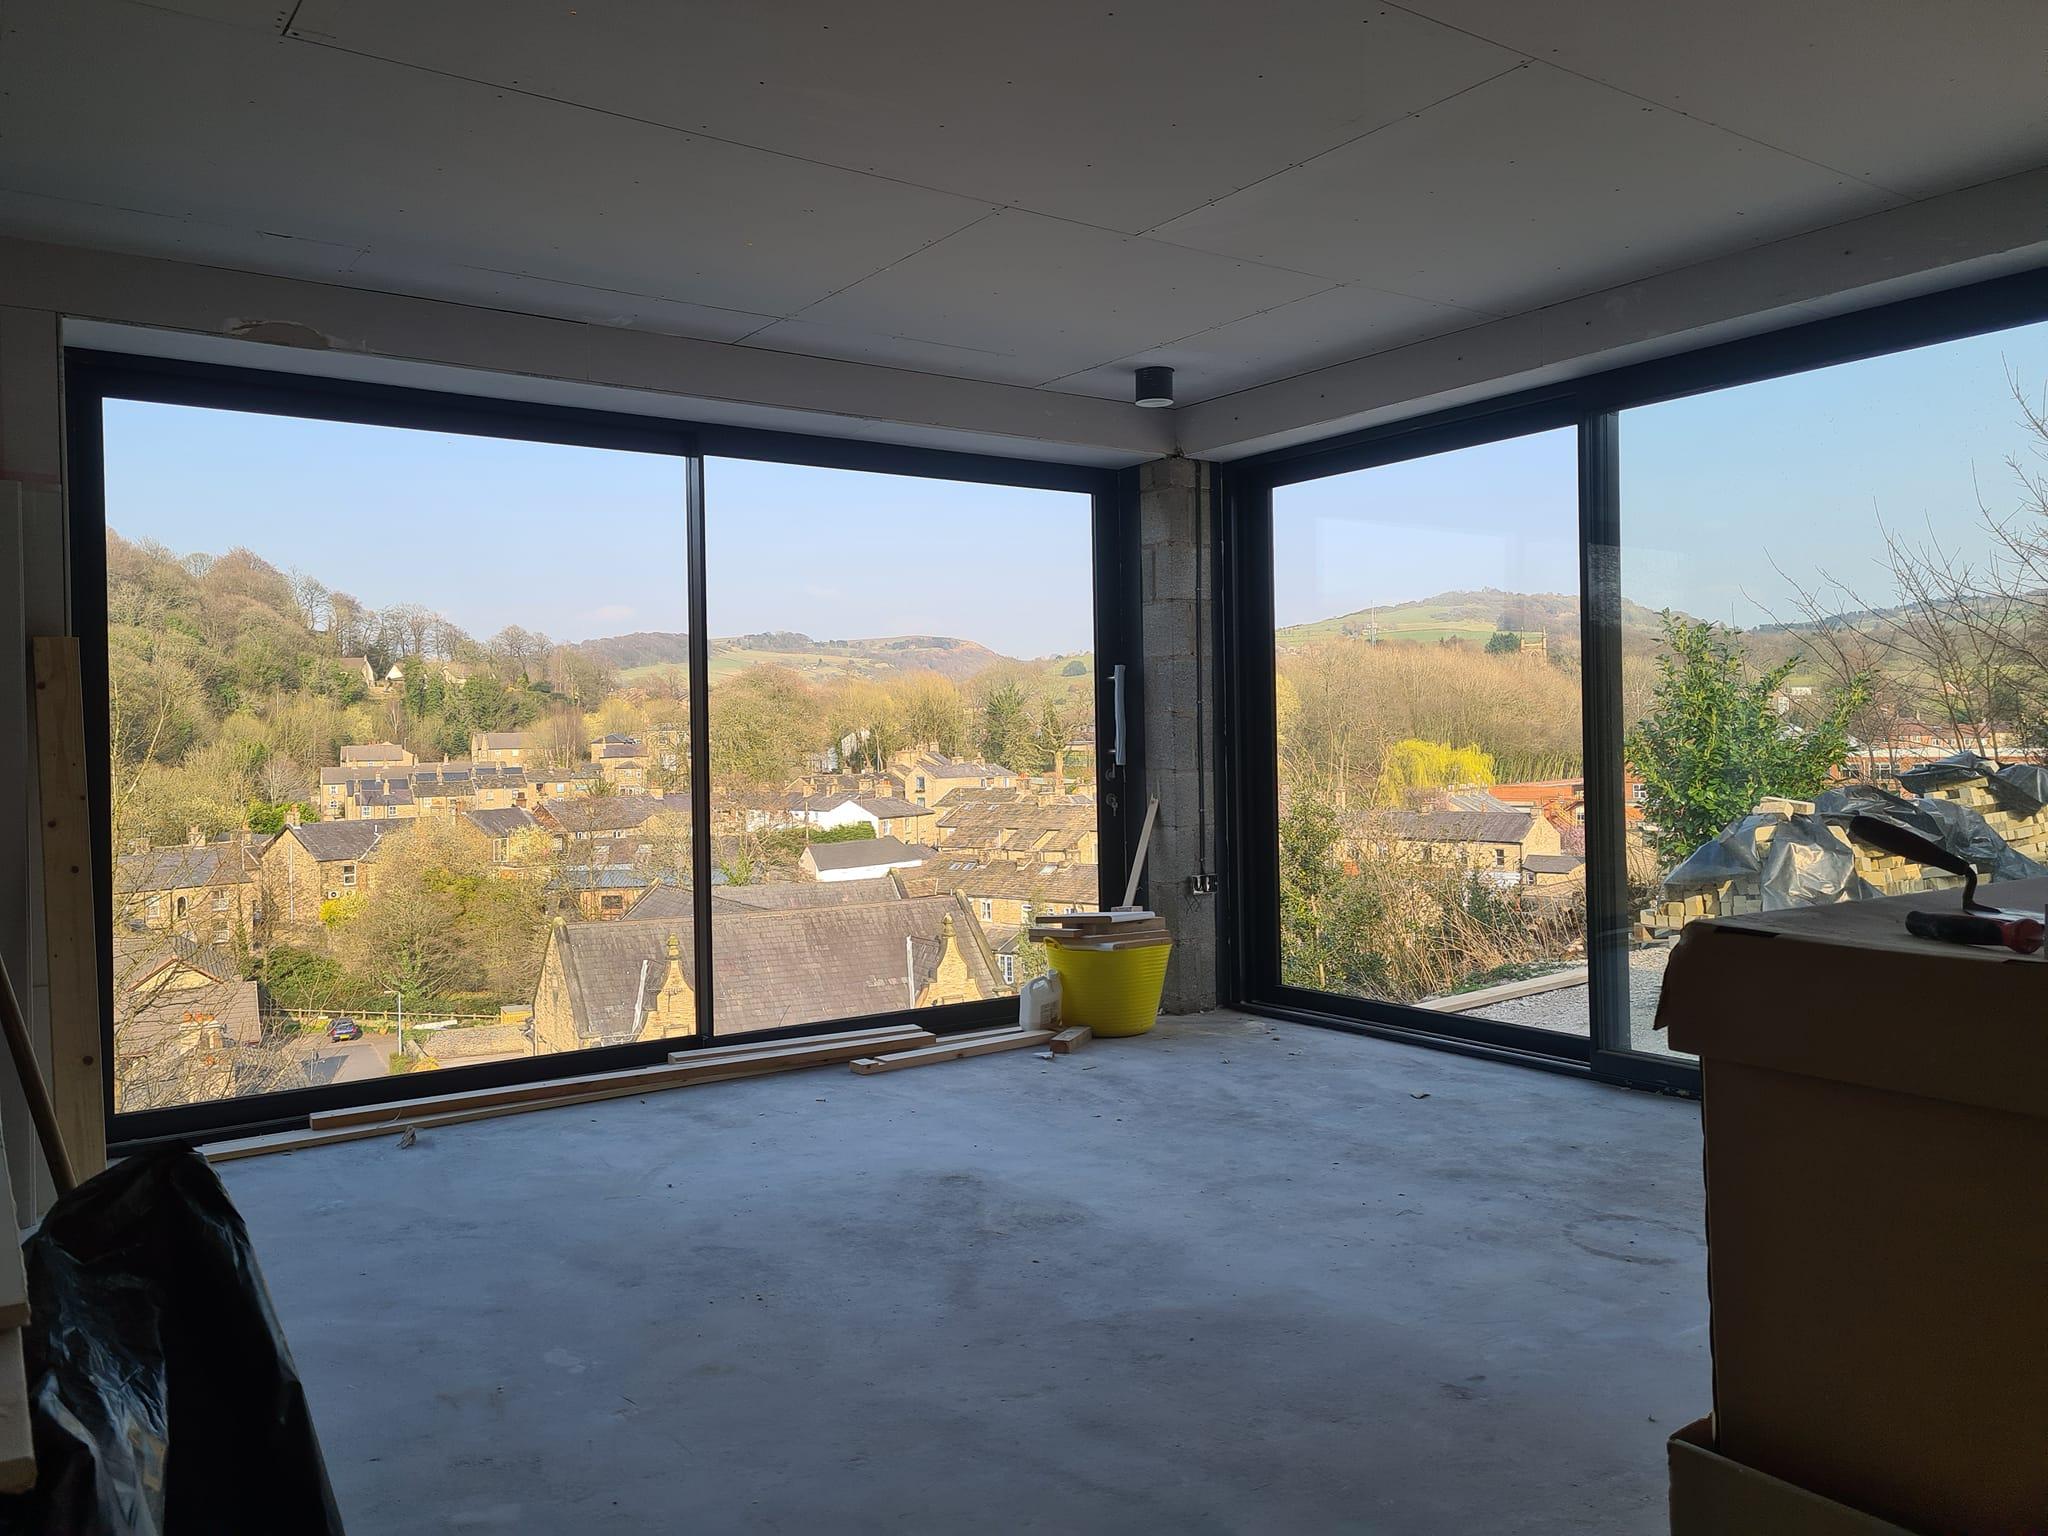
I've been poor at uploading pics over the last 12/13 months and we are now about 2/3 month from finishing (hopefully). So the construction is ICF on a 200mm concrete raft faced with natural stone and block work with K rend - well two rafts as one is at first floor level being built into a hill. Monopitch warm roof is GreenCoat PLX steel. Hopefully the pictures will tell the story. We live in an old quarry and are lucky enough to have great views. Flat roof annex on our current home was demolished to make way for the new build. Existing house will be sold shortly.


 1 point
 -
Looks fab, thanks for showing it.1 point
-
Reference above to a conclusion drawn……was irrelevant as that chap was NOT off grid. Anyhoo.1 point
-
I would do wet or even electric UFH in bathroom/ en-suites and electric towel rads (for towel drying, not heating 300 to 400W). And provision for an electric panel heater in bedrooms. UFH in bedrooms has no real place, we have it and its a complete waste. Very slow to heat up and even slower to cool down. You need (possibly) a warm hour in the morning and evening. But cool when you go to bed. I would keep the cash in your pocket.1 point
-
4/6/4/6/4 glazing unit. I’m going out on a limb here and saying he hasn’t ordered with Krypton filling. I’m also assuming Planitherm One as coating but unlikely and needs specs to be sure. Which he will need to provide. 1.2W/m2K argon filled 90% Yes but here there is no window frame, it is glass in the building framework and would pass. Optimal for Argon and Krypton is 18mm, larger gaps create convection. Current building regs is 1.6W/m2K for windows, changing in June to 1.4W/m/K1 point
-
That table and link are 2021 version of Part L which does not come into force until 15 June 2022. From memory current standard for windows is U=1.61 point
-
I believe so. Part L1A, Page 25, New fabric elements in an existing dwelling https://assets.publishing.service.gov.uk/government/uploads/system/uploads/attachment_data/file/1057372/ADL1.pdf
 1 point
 -
If you are not sure of the spec, then you will need to go to the manufacturer. However, Is it not the whole window value that needs to be under U 1.6, not just the glass?1 point
-
I would and paint the battens black.1 point
-
Unfortunately I already ordered and paid for timber joists1 point
-
call me cynical (and I am) once the PIR is factory fitted and covered by a VCL membrane, also factory fitted, how do you know that they've done a good job in the factory? you're just assuming that the factory workers give a **** and do a bang up job. but I wonder what the reality is? this is what we did. it wasn't hard work but it is time consuming and not completely pleasant! the roof was a real pain though. but I know that the mineral wool is well fitted and that every join of PIR is foamed. if I had the choice again I would seriously consider a twin stud/I-joist wall filled with blown cellulose for performance and speed of fit.1 point
-
Building regs have changed twice in that time. So what you have is an almost finished, outdated house. Good man.1 point
-
I would ignore all the advice given above. No membrane, no added top soil, no poisons, just mow (not too short). You end up with a mix of plant species, many of which will flower and feed bees and insects, instead of a lifeless, toxic, boring monoculture that looks like plastic and will drain your pocket and your time keeping it that way. Peace, not war (with nature).1 point
-
These guys list a lot of IGU with different u-values. https://www.regencyglass.co.uk/sealed-unit-types/thermal-performance/u-values-library/ They don’t do a 24mm TGU. The 28mm unit has a u-value of 1.0. We used illbruck Trio compriband tape for our windows install. They do a tape specific for timber frame that can accommodate differential movement. https://www.illbruck.com/en_GB/product/tp450-compriband-timber-max/1 point
-
When I was reading various window spec documents there seemed to be an optimal spacing for using argon and a different optimal spacing for uses krypton. I seem to remember that a DGU with 16mm gap would outperform a TGU if the gaps weren’t large enough, sorry can’t remember the actual measurement. It would not surprise me if a 24mm DGU outperform a 24mm TGU, the gaps are less than 4mm. *Edit sorry bad maths of course it is 6mm. Here is an FAQ that illustrates this point. https://www.regencyglass.co.uk/faq-2/triple-glazing-v-double-glazing/ Also you get improved sound insulation if the panes are different thicknesses.1 point
-
I was more thinking that my suggestion of a mixture of stripwood on the face of the studs and fewer sister studs would mess with centres, but it looks like there are some doubles etc anyway.1 point
-
We are about to start work on our self-build. We need a structural warranty, partly to keep the mortgage company happy and partly because who knows what will happen in the next 10 years. I got two quotes from companies that are on the mortgage lender's list, both marketing themselves as being 'self-build specialists'. Both quotes came in at, give or take, 1% of the build cost. I assumed that was therefore the going rate. It was only after I had paid for one of these and got sent the Personal Guarantee form to complete, that I realised that the niggling doubt I had about them insisting that I was the 'Developer' was in fact a major flaw. It meant that I was being asked to underwrite the cost of any defects in the first two years myself. So in effect the 10 year warranty is only for 8 years. And were we to sell, the purchaser would claim against us for any defects, not the insurance company. I asked if they had sent me the wrong paperwork - after all, the company markets itself as being "specialists in self build insurance". I pointed out that the definitions in the policy made clear that I was not a 'Developer' as I was not building the property to sell to another person, and the policy is clear that it expects the 'Insured' and the 'Developer' to be two separate people. I also pointed out that the precise reason I needed the insurance for 10 years was because I would not have the money to rebuild should the construction company go bust in the first two years, and a defect materialised in my house. But alll to no avail. In the end, I decided to exercise my rights under the 14 day cooling off period. I then got a quote from Protek - and it was one third of the cost of the previous two quotes. What worried me most of all was that the company insisted that many self-builders are entirely happy with their arrangement. Maybe I have missed something, but I can't imagine many others in our shoes would want to knowingly put themselves in this position. So I am posting this here in the hope it helps others still finding their way through this minefield.1 point
-
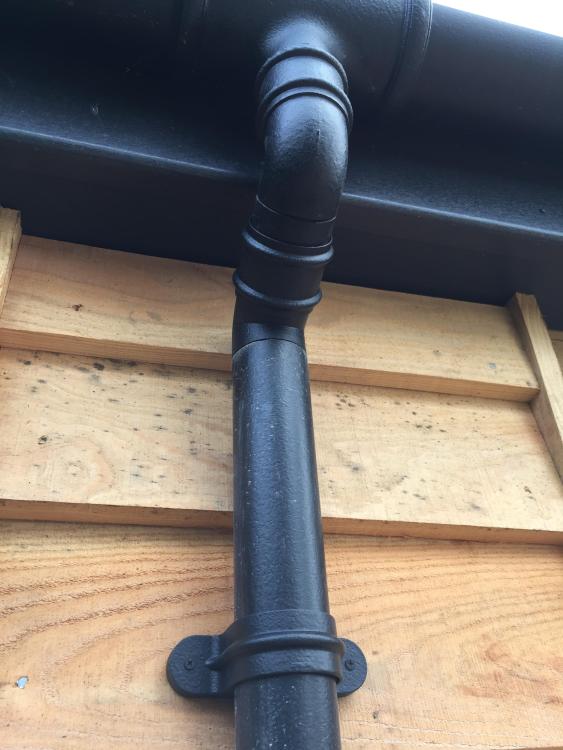
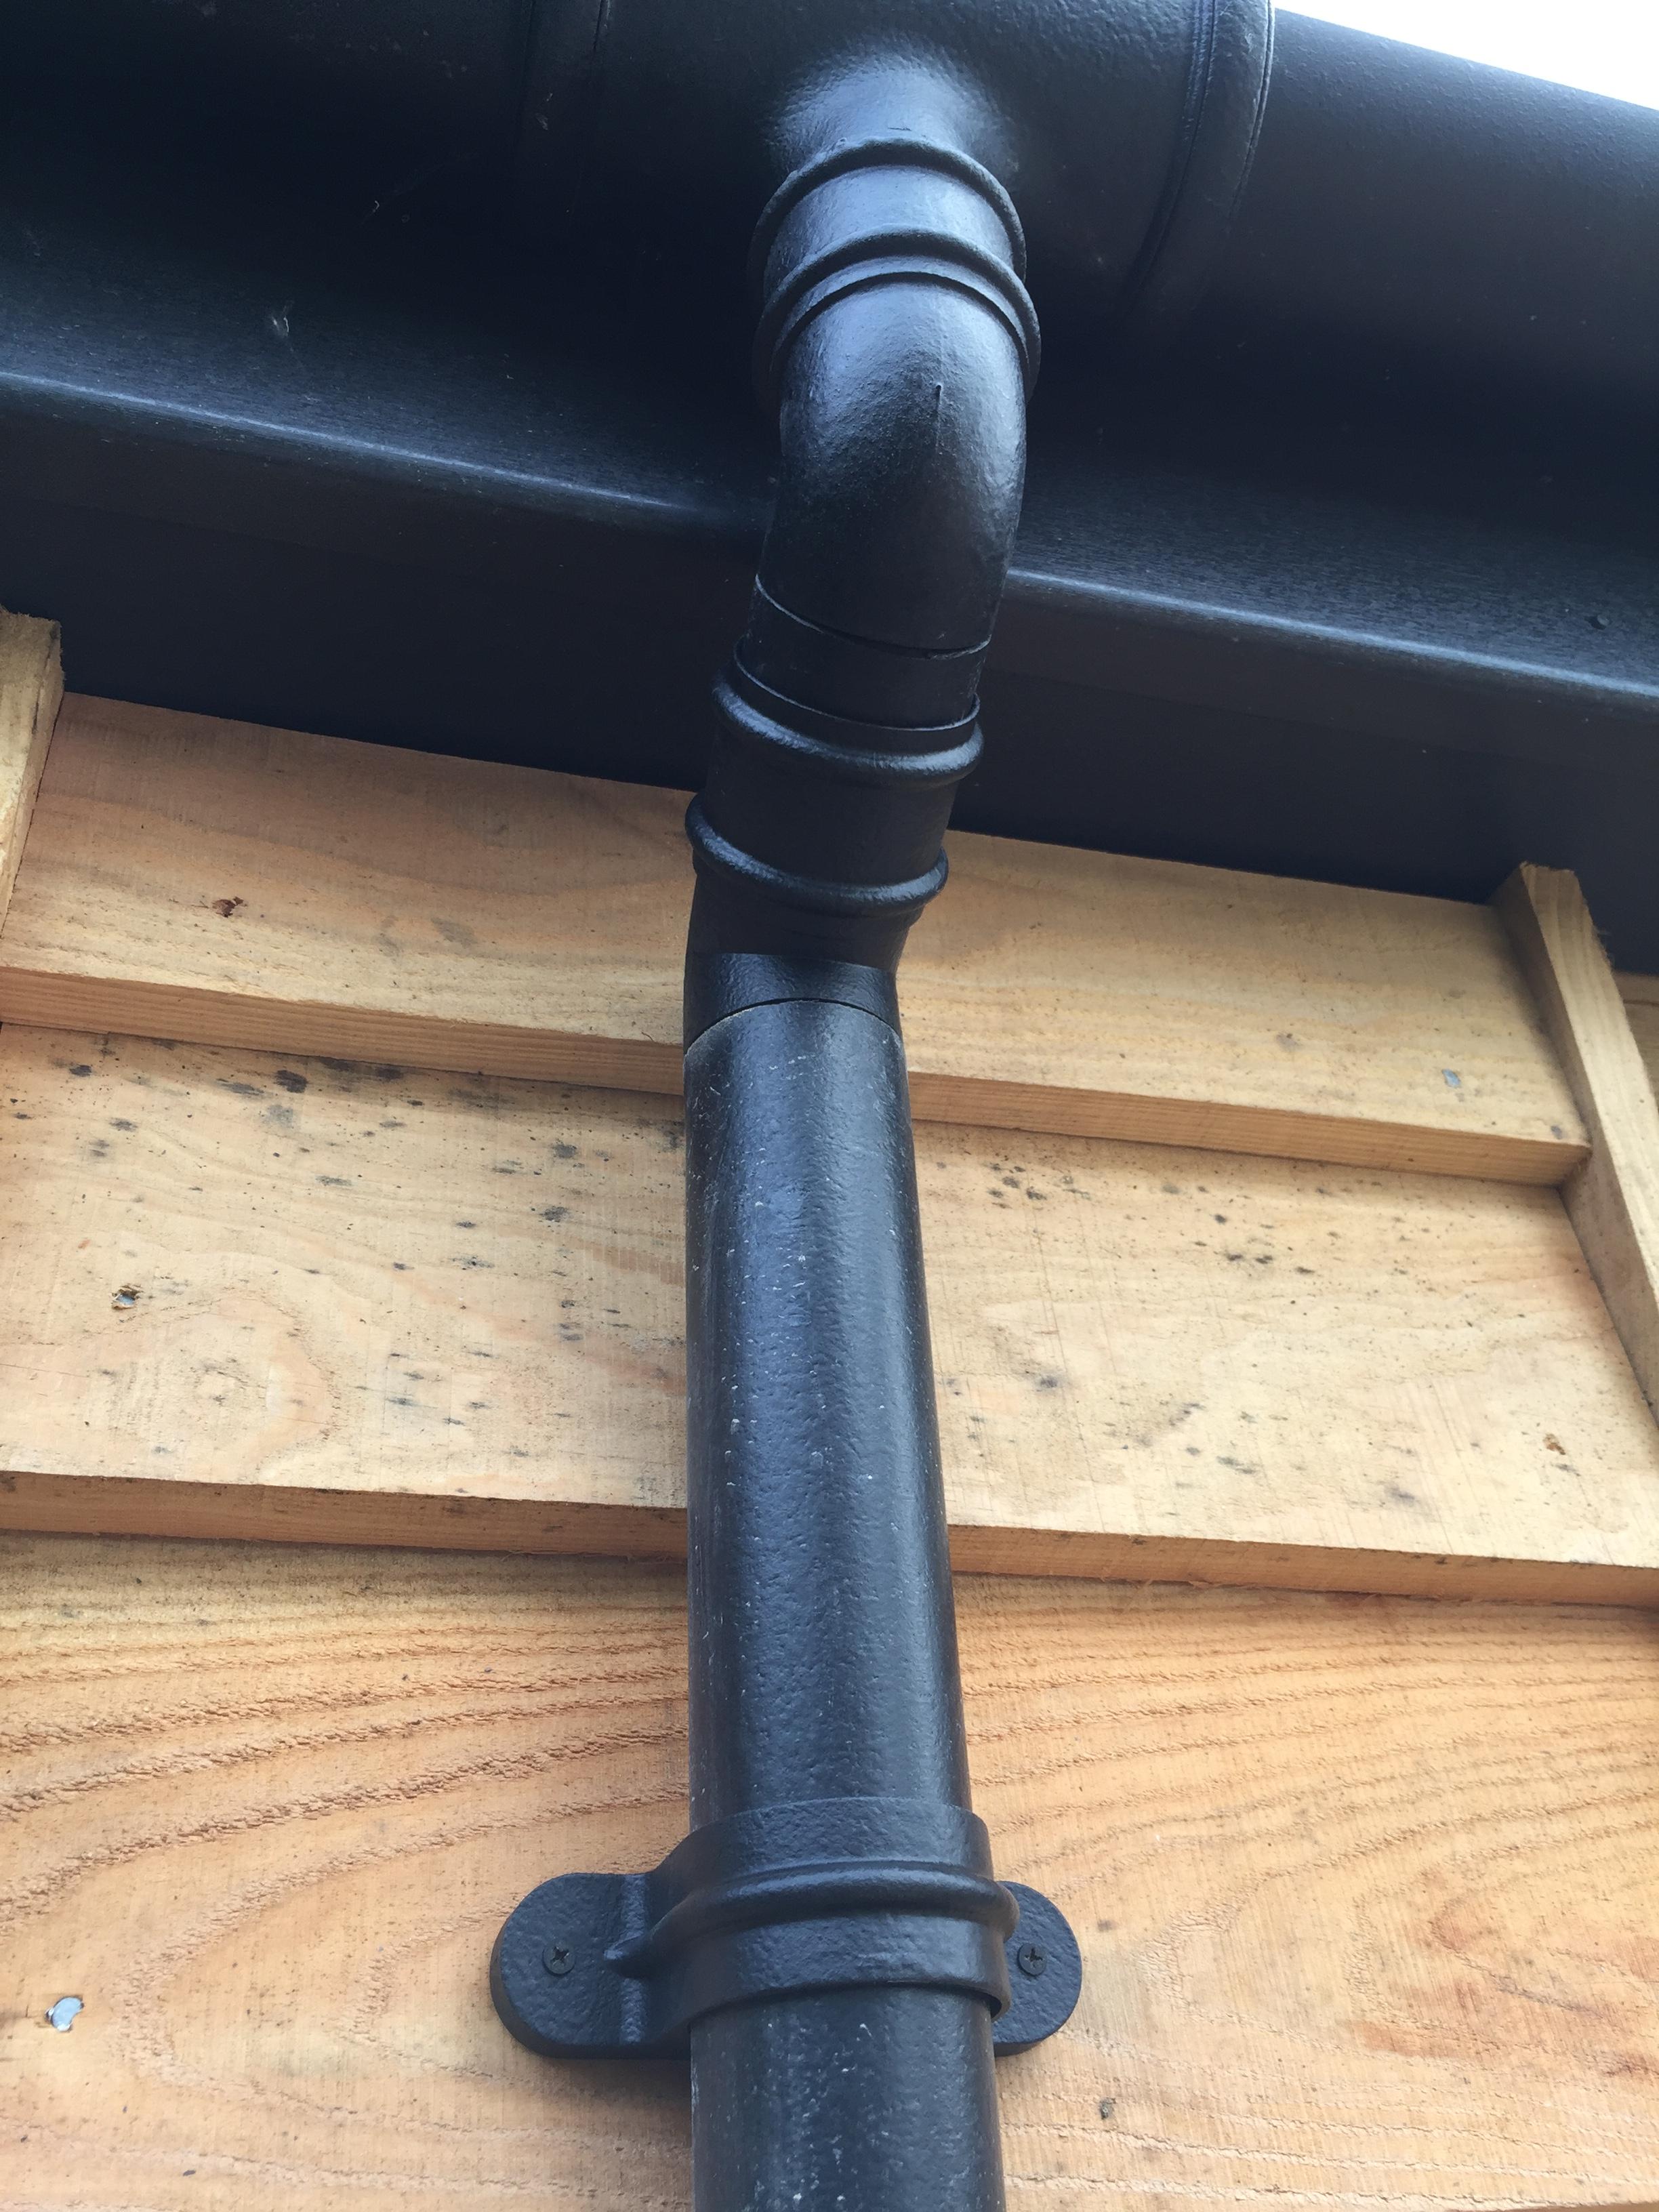
Now masking and prepping for paint. Cast iron look guttering/ downpipes going in

 1 point
 -
I think you are OK... Approved Document A.. https://www.gov.uk/government/publications/structure-approved-document-a I think you want Section 2C from page 13. Paragraph 2C10 on page 14 says minimum thickness for an internal load bearing wall is.. Table 3 line 1 appears to give a figure of 190mm for a wall 3.5m high and upto 12m long. (190/2)-5 = 90mm So 100mm block should be OK. If the wall is less than 9m long it appears it can be up to 9m tall before you need to make it thicker (Table 3 line 2).1 point
-
https://passivehousesystems.co.uk/product/gerband-fortax-6400-airtight-sealant/1 point
-
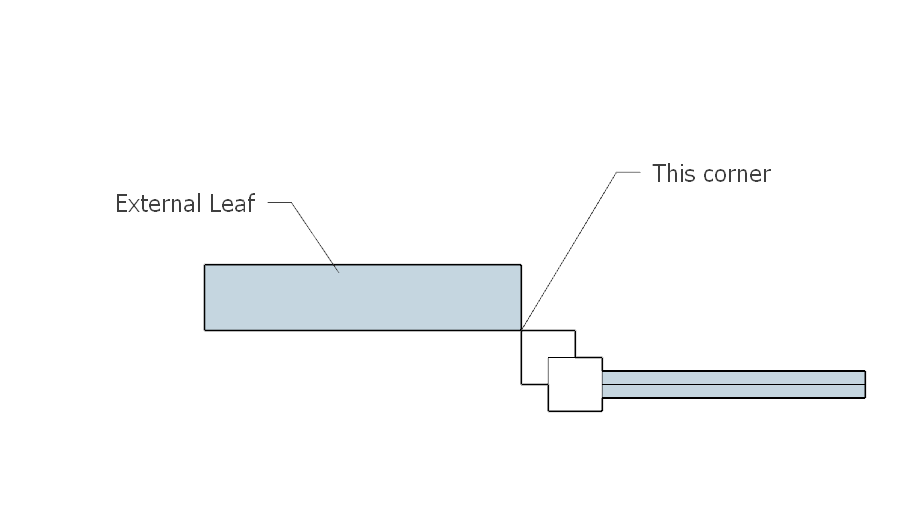
Robustness, membranes get torn by careless follow on trades. You can use a membrane j beads and just plasterboard as per https://www.edmondodonoghue.com/build-it-better-window-door-detailing/ This can happen if you build the inner leaf before the outer and install the window boxes first. The ply greenbuilding store used on denby dale delaminated before the windows were installed and the outer leaf was finished. It's not an issue with fitting the OSB post windows. No window straps were used. The windows were bolted to the outer leaf with 90deg angle brackets. Screwed, but either should be fine. I'm not sure what you're referring to here. do you mean the osb window bucks and the bricks? In any case you would need to use proper airtight sealant, not off the shelf mastic as that can dry out over time and crack. Airtight sealant is like trying to work with bubble gum. It's very sticky and messy. Tape is clean and easy. Having seen the bond by sealants, airtight paint and airtight tape I would rate the tape best for adhesion. Expanding foam is another pet hate for me. Messy, it shrinks unless you get very good stuff, it's expensive. I think you're referring to Compriband which is an expanding foam strip. Very clean and robust and will last as long as the windows. Also overlapping the frame with the brick and using this will create very sound proof windows. https://www.sealantsonline.co.uk/ProductGrp/002a005a0001 I don't follow you here. What wouldn't work? Maybe a diagram would help me see it. Glued onto the OSB base of the window box. Thermally it's preferable to bury as much of the frame in the insulation as possible. With the revised method I've shown the gap should be equal 3 sides and maybe slightly less at the bottom as sills are normally thinker than plasterboard. This thinking is based on old narrow cavities. To enforce the tray to fully cross the cavity suggests that the insulation will be wet right to the inner leaf. If this is the case you've got much more serious problems, Practically I cannot see any issue with an angled profile extending 50mm-100mm in from the outer leaf and a gap to the inner leaf. I can't see the benefit of weep holes. How much water are they expecting to make inside the wall? The outer leaf should be well pointed such nothing more than the smallest drips form on the inside of the outer leaf. These will be directed to either side of the window by my PVC profile and drain harmlessly to the bottom of the cavity. If you are in a very exposed location and wind driven rain is really such a large factor, right above the window is the last place you want to introduce more holes. Are you working from the revised detail? I wouldn't build it again the same as we have done. Yup. Rent one as people say. You could do the whole thing in a few hours if you had your OSB pre fixed to the frames. https://www.olympustoolhire.co.uk/product/cartridge-fixing-tool-nail-gun-steel-masonary-concrete/1 point
-
Gas use for the whole of April was just over 1m^3, so ~0.38kWh/day. Thus a 90% reduction in direct gas burn. Result. https://www.earth.org.uk/note-on-solar-DHW-for-16WW-UniQ-and-PV-diversion.html#2022-04-30 Rgds Damon1 point
-
It's simply the price you pay for independence from a commercial ecosystem - which would probably still require continuous tweaking anyway. My 'poor mans' approach has been to retain conventional wiring/switches/light fittings and simply populate with smart bulbs. The only 'unconventional' addition is occupancy sensors in all rooms which supply node-red with the necessary info to automate the lights. We're all used to ignoring the wall switches now we're got virtually 100% automation and voice control over everything. Given that the smart bulbs can default to full-on at power-up, replacing the wall switches with N/C momentary open switches would restore a degree of functionality to them but I've not really felt the need.1 point
-
What ever you do smart, will be old hat in 10 years time and not supported. Keep it simple, and replaceable, but install cat 5/6 data cables to TV points.1 point
-
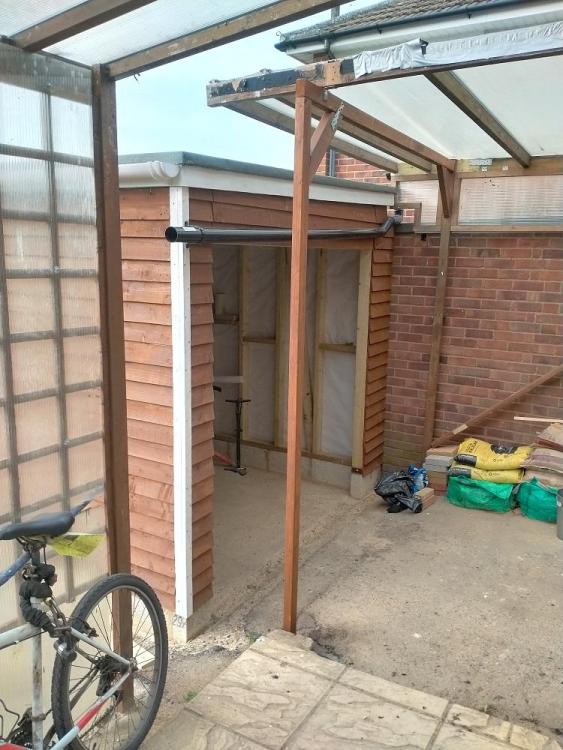
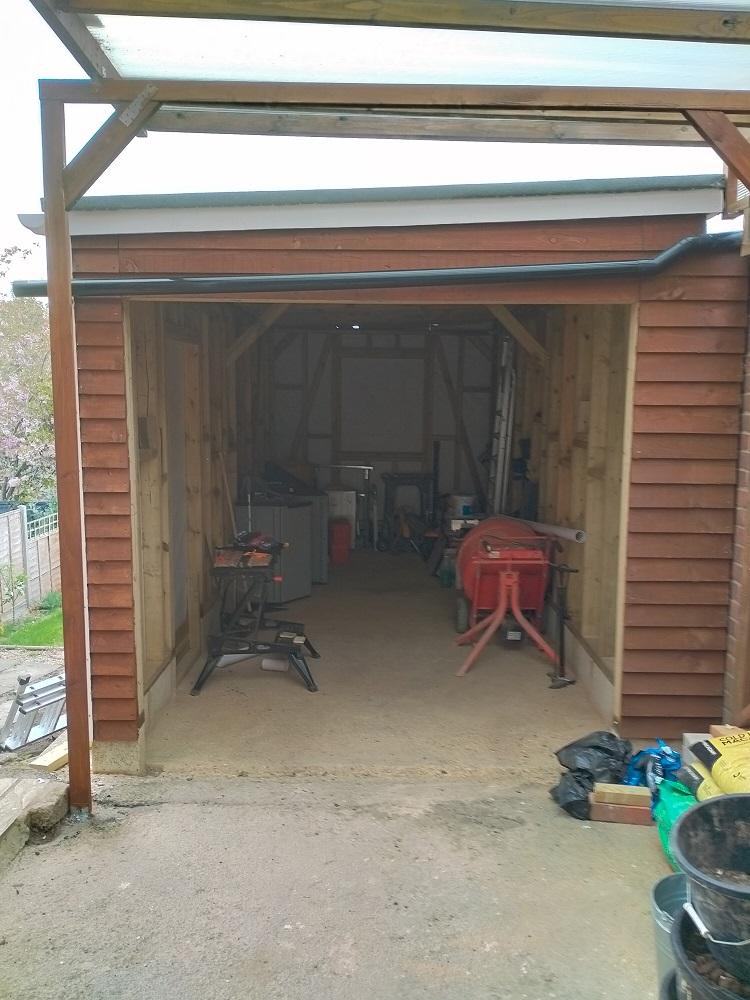
Hi everyone. Here's an update on the garage build. As you can see from the pictures it's almost complete. I'm having the garage door fitted in by professionals for reasons. As a response to comments by other members, the walls of the garage will be replaced with corrugated steel on the neighbours side and UPVC cladding on some if not all the other sides. This will make the garage more resistant to fire. I have also bought some Thermoguard Timbercoat fire protection paint which I intend to paint the framework with. When this has been done, it should be safe enough to fit any electrics inside.

 1 point
 -
Our Scottish Larch has been on for around 11 months now and has stays remarkable straight. So no complaints, photo was taken a couple of weeks ago after oiling. About 30 roads miles from woods, to saw mill and my house.
 1 point
 -
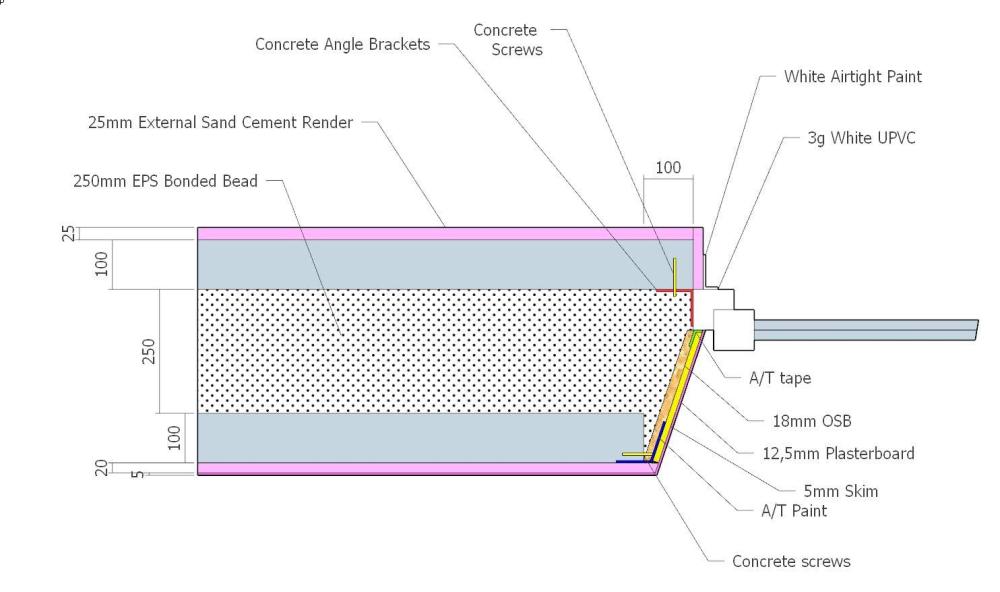
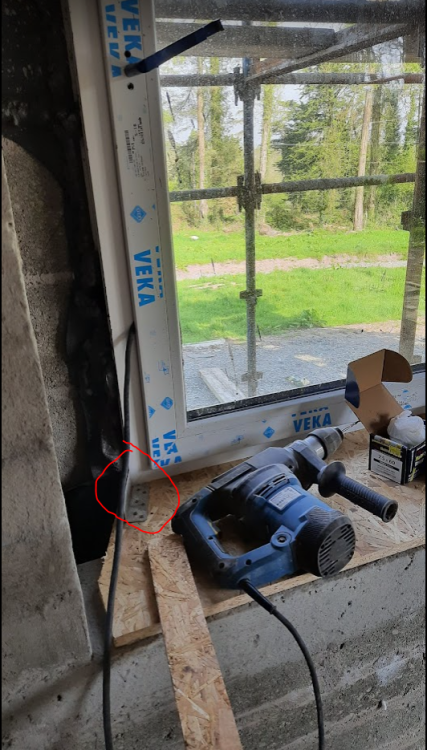
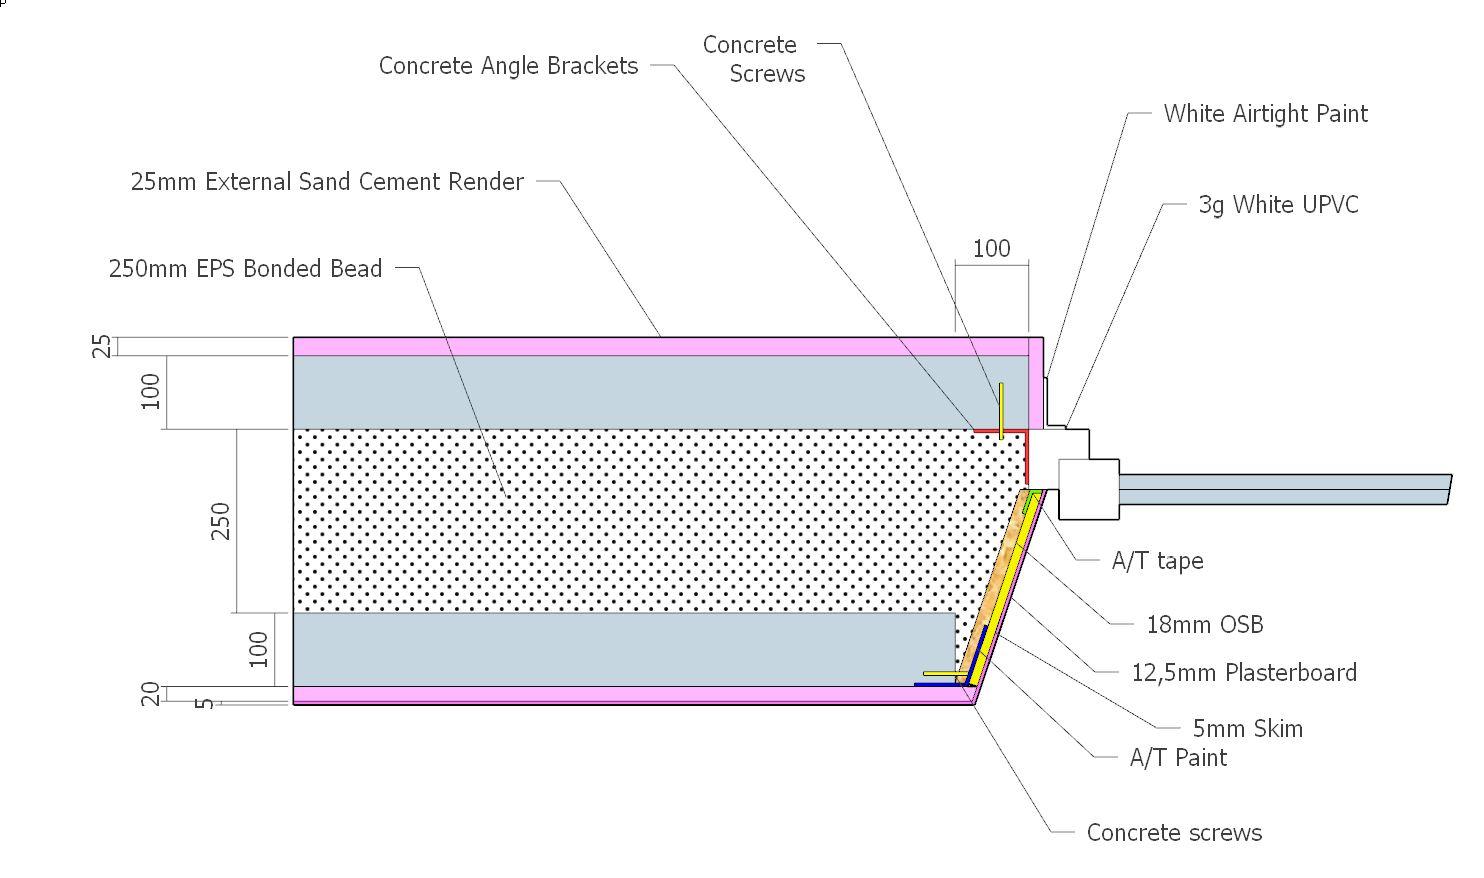
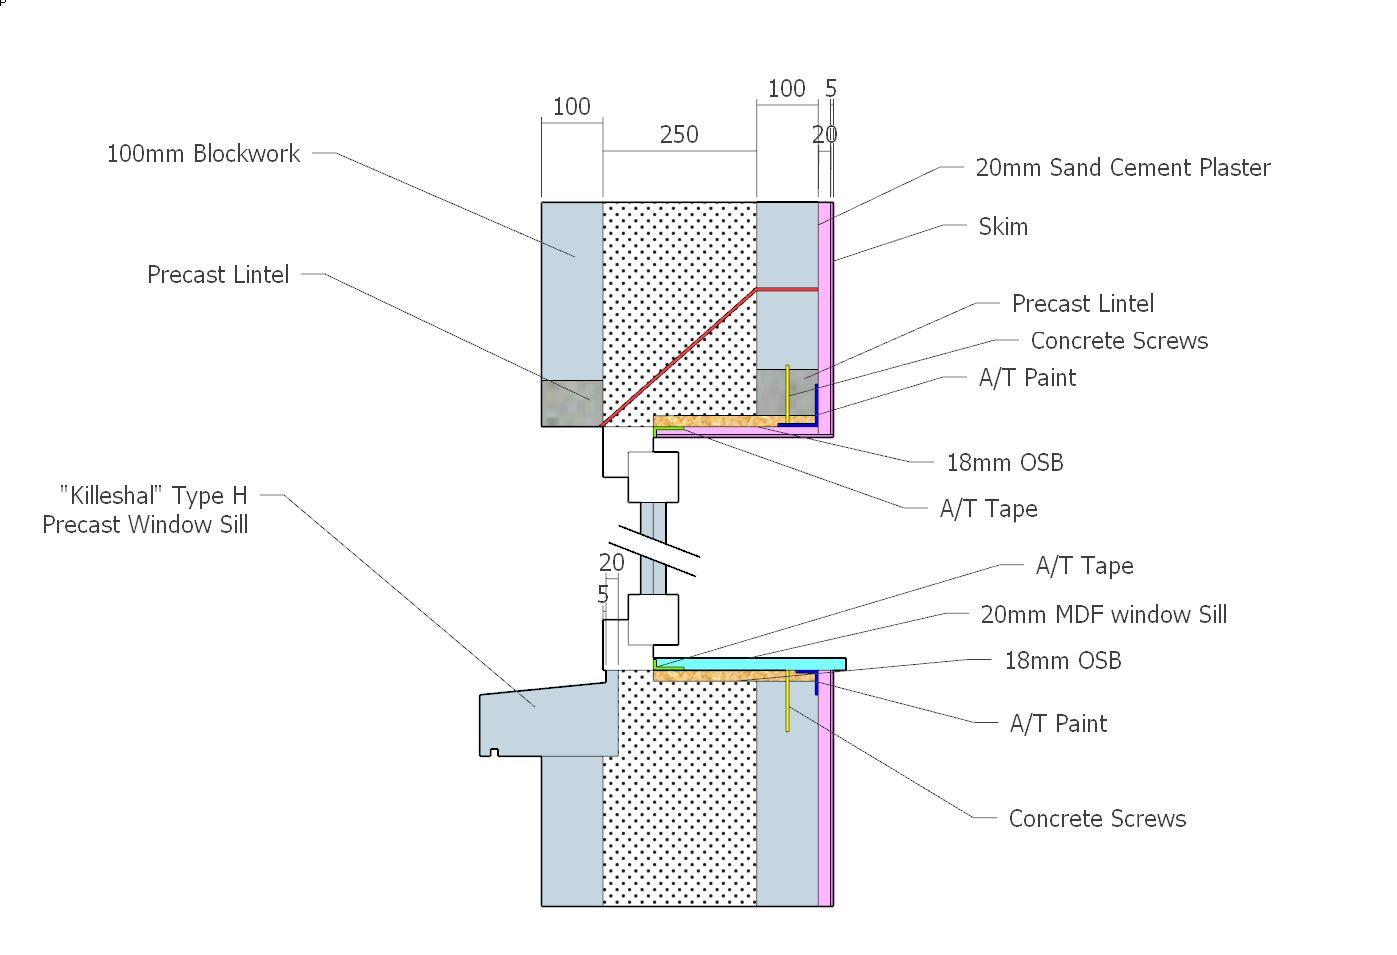
Here is the plan view of what we actually built Here is the section. I've omitted the external render and external airtight paint here to show the overlap of the window bottom on the sill. The windows were installed bolted to the outer leaf first. No connection to the internal leaf. I later cut out and threw away the vertical DPM as I have no idea what purpose it serves in a wide full fill cavity To make the OSB window boxes we first made the base and the top. and bolted them with concrete screws to the lintel and blockwork. Note the angled brackets used to fix the side panels afterwards. The sides were fixed using galvanised angle brackets afterwards. In doing do the whole OSB box became quite rigid despite only being connected to the inner leaf. It was simply floating against the window. As we have quite deep windows I wanted to make sure that a child (or adult!!) jumping on the interior window sill would not collapse it. This was a fear if it was only cantilevered from the inner leaf. Sha Delete From there the Airtightness process was straightforward. A/T tape from the window to the OSB. A/T paint from the OSB to the blocks. Wet plaster over the A/T paint. Plasterboard to the OSB and skim. I used A/T paint to seal the external to the external render for wind tightness. White paint on white windows is a bit of a mess but nobody notices unless they're fussy. Overall we had an excellent blowerdoor (0.31ACH) and the splayed windows are nice. The Sills are solid and perform thermally very well. I had a THERM model somewhere but I can't find it. A 25mm hole drilled in the OSB head and sill allowed EPS blown beads to completely pack out below and above the window. I drilled test holes to check in what I considered the hardest to get to locations and I was impressed. PROBLEMS encountered. 1. The window fitters measured the windows when I wasn't there. I wanted them to get the outer blocks to overlap the frame by 10-20 mm. It would have made the frames appeared slimmer and we'd have had more glass. Moreover we'd have been able to use compriband or similar to seal the outer blocks to the frames. As it was the blocks and the frames met with two opposing 90deg corners ( angle to angle) whick meant that gap was very annoying to fill. In the end a mixture of expanding foam(yuck), plaster and silicone got it done but it was very tedious. I had to seal the frames to the outer leaf for our wind tight layer with airtight paint which was a bodge. It would be awful on coloured frames. 2. Plastic DPC/DPM used as cavity trays and vertical DPM's. What a terrible way of building in the 21st century. They catch all the mortar droppings (sometimes bridging the cavity), often get torn. Prevent a good seal from the window frames to the outer blocks. Generally blow about and slap you in the face in the wind. Total RUBBISH. If I had my way again I'd put an angled PVC profile just over the window head and leave it at that. I cannot see how vertical DPM's prevent water making its way inside in a wide cavity with the inner totally isolated from the outer. 3. The OSB window boxes were very time consuming to make. Maybe premaking them and building them into the blocks would be better. A solution to prevent them degrading in the weather would need to be found. 4. A few hours spent pretaping the windows before install would have saved many hours later on. 5. When screwing the angled OSB reveals to the blocks I was a little over zealous and put a bend into a couple of them. 6. As the OSB was only "floating" against the window some of the gaps around different windows are inconsistent. I don't think anyone else has noticed but me however. I'll add another post about what I'd do differently the next time as this one is getting a little long.

 1 point
 -
If you have any questions while trying out the config software, post them here. It takes a bit of getting used to, but once you get the hang of it, it's incredibly powerful. For example, I've just installed magnetic (reed) window sensors on my garage door rail, and mounted the corresponding magnet to the door itself so that one of the reed switches is closed when it's full open, and the other is closed when the garage is fully closed. I also wired in an output relay across the open/close volt-free contact that controls the garage door. Programming Loxone to read the open/closed status based on the reed switches and to add a virtual button to the app to let me open and close the door took about three minutes. Later, I plan to add some logic so I can see when there's an issue. For example, start a timer when the door starts closing, and flag when it hasn't closed within a certain time (suggesting there's a blockage or some other problem).1 point
-
You can plan and dwisgn the whole thing yourself. Loxone is still quite open in this regard compared to other systems. https://www.loxone.com/enen/support/downloads/ There is a planning tool inside this app, seperate to designer.1 point
-
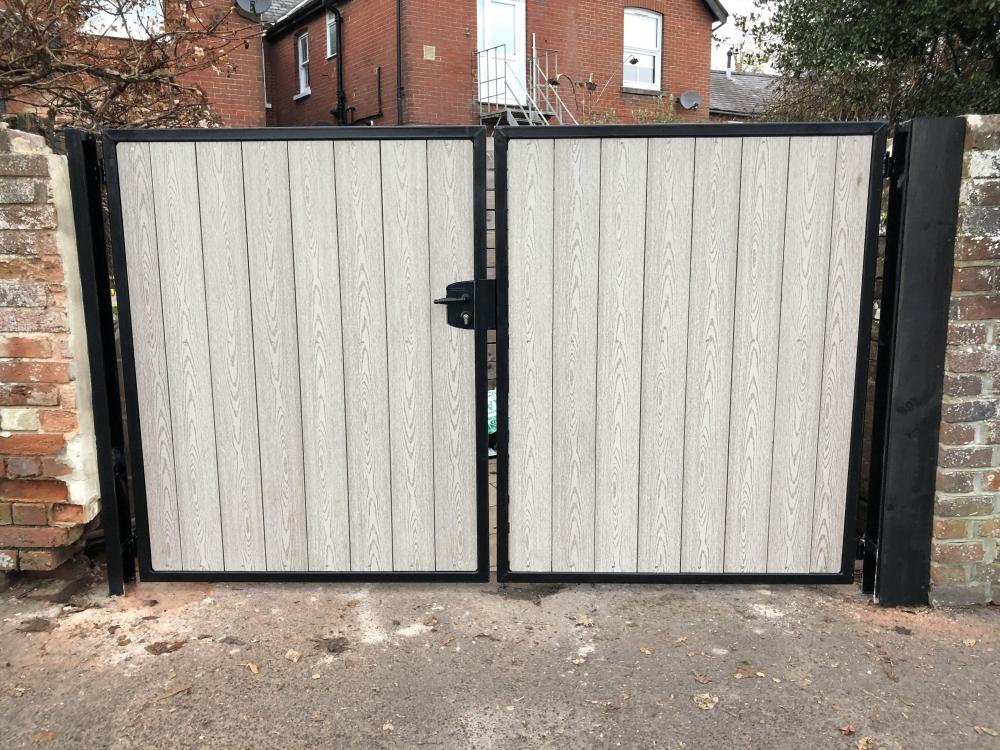
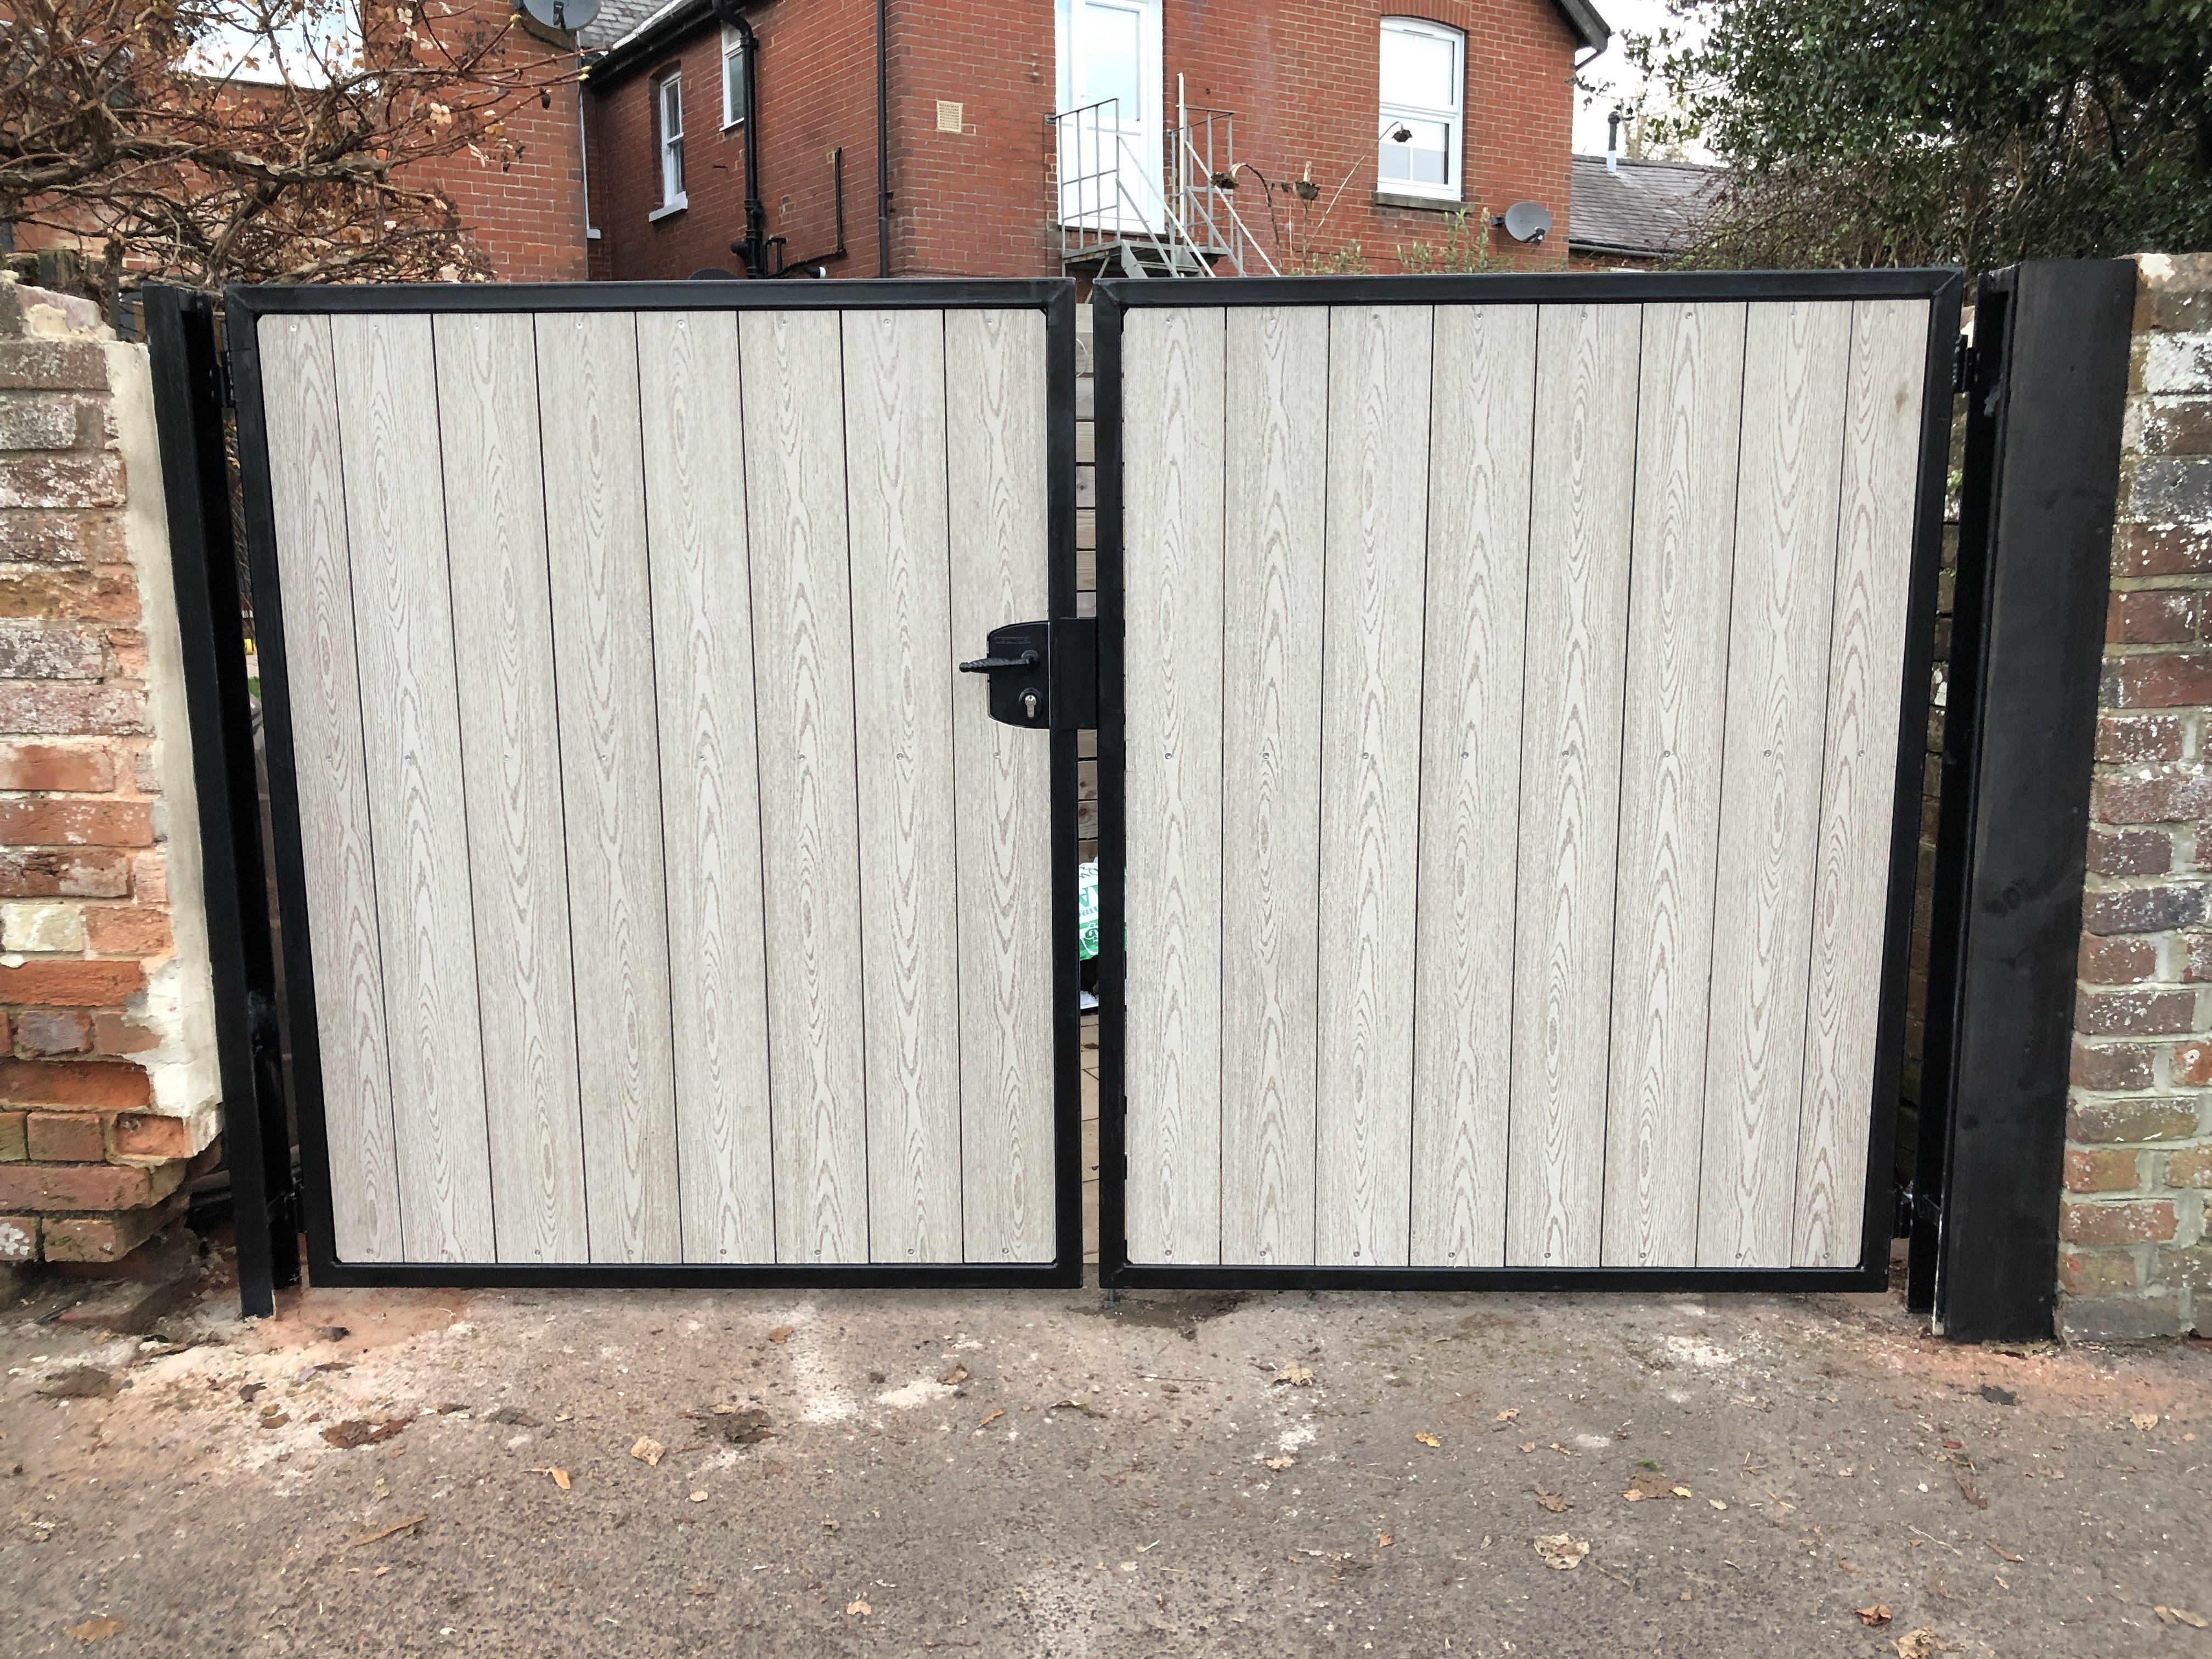
Heres my finished set of gates with decking infill... really happy with the result
 1 point
 -
Jesus Christ man, pull your finger out.0 points
-
you take the furniture/rugs and paraphernalia in the existing house and transfer it into the new house, rearrange to suit. hate waste0 points
-
I had the training booked and paid for but could not attend as the first lockdown hit last year. When I asked when the training would be rescheduled I was told I could no longer attend if I did not have a qualifying business already (e.g. electrician) and the fee was refunded.0 points


.jpg.c21f3ac78c9b7efd90cbdcb312744dc5.thumb.jpg.7adcad4c0e384f5ecd7d56b0618df6e5.jpg)


.thumb.jpg.bac90f3bbf6868cf2118d010d936c99d.jpg)

This leaderboard is set to London/GMT+01:00