
Leaderboard


Popular Content
Showing content with the highest reputation on 01/16/24 in all areas
-
@Gone West Original question. Comfort I think is simply the temperature we feel on our skin. Nothing really to do with U-Values really. Hence we like the sun on our face, hate cold tiles on our feet, like sitting on a radiator (briefly!) and hate a breeze when getting out of the shower as the evaporative heat losses of the water really cool our skin. For a comfort we need to manage 3 things, the old faithful trio Convection Conduction and Radiation. Convection or Drafts. Solved by airtightness and eliminating different internal temperatures that cause convection currents. Insulate cold surfaces similarly. Slow and steady heating is better then intermittent blasts, heating all the rooms equally is better than just one or two. This may not always be possible or economical. Conduction. Getting rid of cold things you touch or replace them with materials of lower thermal conductivity. Tiles for example are worse than Lino. Fit UFH. Wear slippers. Keep humidity under control, a damper carpet feels colder. Radiation. Keep you skin covered, even a light shirt will reduce the amount of energy you "shine" away. Cover windows and cold walls with curtains to reduce the amount of energy they soak up through radiation. Fit 3G windows and add insulation to cold surfaces. Add an IR heater to bathrooms to heat your skin directly after a shower. In short I think you should insulate the wall but only after tacking the airtightness and ventilation of the house first. Then you can then decide on your preferred build up based on (but not limited to): Cost Risks of low permeability materials and poor workmanship Contribution to airtightness Mitigation of thermal bridges Floor space loss Ease of construction3 points
-
To quote myself, this needs more digging as it's the root of most debate here I think. Every material has a different permeability. Something like aluminium foil over PIR has a very low vapour permeability, practically impervious for the purpose of building (as long as there's no holes!) A fabric wall hung drape is very permeable, almost all the vapour gets through. Gypsum plaster, Cement plaster, Lime plaster, Woodfiber, EPS, OSB, plywood, are all somewhere in the middle. Now lets move to the real world. Every house is different with different occupants, different heating habits, different standards of construction. Each house goes through daily, weekly and annual cycles of accumulating and loosing moisture in the structure via vapour. What we are aiming for is to make sure that the walls can dry out on average faster than they are being wetted. This is a case by case basis for every house. A house with poor airtightness and IWI will see lots of damp air make it's way into the walls and condensate there. However if it can dry outwards in the long term no great damage will be done. However if it's drying is restricted by say cement external render, the moisture will build up and there's trouble. Similarly a house with terrible airtightness but a cosy layer of continuous EWI could survive with terrible ventilation and airtightness as the wall would always be too warm to condensate the vapour. ( It wouldn't be healthy or comfortable through) Some forum examples here to discuss. @jayc89 has done I suspect a pucker job of their house, they PIR is taped and foamed diligently and all thermal bridges are taken care of from the inside out. Then there's proper internal ventilation and heating. Outside is properly pointed (and maybe brick creamed?) Not lightly to see any issues. Perhaps so good that if there had been external render then that might have even been ok as there was so little moisture getting into the wall initially. Good airtightness to prevent vapour reaching the joist ends would be my only concern. Suppose a typical builder had under taken the same issue, badly applied insulated plasterboard, air gaps and thermal bridges galore, noisy bathroom fans that would never be used. The same wall would probably ended up sodden for most of the year. @Roger440 maybe had some issues, maybe from a high water table pushing water up through the walls. The low permeability cement render was enough to cause moisture to build up faster than it could dry, hence problems. Reapplying lime render with its greater vapour permeability instead was enough to tip the balance in favour of more drying than wetting and - hey presto, problem solved. Maybe a dehumidifier in the room, or a fire or a French drain would have had the same benefit. Hard to say or maybe they were not practically possible. @Gone West Peter your first house had no internal "vapour control layer". Just plasterboard over open cell spray foam. As this is a relatively permeable material, one could have worried that the backside of the colder OSB sheathing ( which was less permeable) may have accumulated moisture. However your airtightness was so good (<0.6ACH) that no air leaks got to take internal humid air to the sheathing. This approach is very acceptable in the US but not so much here. @IanR I know specced a foil backed plasterboard for his house with it's external airtightness layer as vapour control measure. However I don't think this was needed as the superb airtightness (0.11ACH I think, hurray for cellulose!!) would never allow enough vapour to escape into the walls to be a problem. Similarly the MDF sheathing with it's high vapour permeability could probably have been replaced with OSB or something cheaper. ( It does help thermal bridging in his case thought.) A mate of mine built a house recently from Hempcrete blocks, TF with hemp batts insulation, more hemp blocks and lime render both sides. There's a single MVHR unit inside but I'm unsure as to the level of airtightness. The house will ok with diligent occupants. However if there's under ventilation and under heating at any stage I would worry about the moisture content in the walls caused by air leaks despite them being of a very high vapour permeability. @Gone West back to (some of) your original problem. You simply need to establish can your walls dry faster than they can accumulate moisture. Very important in this case as the colder wall will be condense vapour more readily. If you can absolutely bullet proof an internal PIR install, with no chance of air leaking via gaps, or sockets, or by the walls or ceiling and you can completely eliminate thermal bridges then I would be happy to do it. The wall will still dry (slowly) via the cement render externally but so long as it's not getting vapour from the inside it'll be ok. As an added complication, insulation giving higher internal temperatures makes the air more vapour laden, so unless you're really on top of ventilation as well it'll increase the risk further. Maybe if you're less sure of the ability to seal the PIR completely use an internal soft backed woodfiber layer with lime render. It can still readily dry inwards and airtightness isn't so vital. From a practical point of view I'm far more in favour of flexible IWI like wool batts or sprayfoam. Then at least if you get a puncture the risk is very localised to one spot. Puncture a PIR sheet or insulated plasterboard poorly foamed in, and you could expose a whole wall to internal vapour via air leaks. If you really want to be sure, EWI is almost completely fool proof from a moisture risk position as the whole structure is above the dew point. TLDR: Anything can work so long as it can dry faster than it gets wet.3 points
-
If you have a small bendy straw, bit of electrical earth sleeving, or other thin tube they clean out the hole better than just a brush. I've even used a balloon pump to clear a hole of debris before. Resin fixes better than anything I know.. But it's a one time fix. Make sure your brackets are level, or the radiator won't be!2 points
-
Perfect excuse for @Pocster's shirkers thread2 points
-
As I think @SteamyTea is alluding to, I don't think you have a problem with moisture, or moisture in the wall per se. It's just that the wall is sucking too much heat out of the space, and will continue to conduct heat even after a long period of acclimatisation. Due to the nature of the wall itself, you'll always experience it as being cooler than the surrounding air - a very pleasant property during a heat wave,not so much in the depths of a cold winter. I have heard some people suggesting that the interior finish has a great impact on the experience of thermal comfort in the home, some of which has come from those selling woodfibre IWI, for example. I've heard it said that this is because of how the material bounces infrared from its surface and apparently woodfibre returns these to the body to make it feel warmer - I suspect this is a brilliant example @Iceverge's definitions above and could be added to those. Why do I suspect this? Because downstairs in my house I have masonry walls with just a gypsum parge coat internally (my 140mm woodfibre insulation is EWI so not relevant to the IR claims) and upstairs I still have mostly OSB. Neither feels more or less comfortable than the other with the temperature and humidity remaining the same. The only time there's a difference is during very hot weather and downstairs remains beautifully cool for days during heatwaves. Now in your instance, you will also have your wall contributing to your RH, even if it isn't wet or damp. If you use ventilation to try to reduce humidity, the wall will simply give it back to the room. If you had a wall lined with PIR, this wouldn't happen and you would see a reduction from extract ventilation (see paper I linked to above which measures this process). I'm sure I'm not new in suggesting the solution is to insulate, but then the question remains as to how. Generally the concensus is now verging to using a buildup of materials that largely behave in the same way as the wall material and this doesn't require a ventilation gap between the wall and the insulation layer. So your options could be to use just a thin layer of insulating plaster which can be lime based, or even lime and cork like SecilTek ecoCork, for example, which is then finished using a lime render. Alternatively, you could look at IWI in cork, woodfibre, or even sheeps wool (sheeps wool recommending a breather membrane against the wall between the insulation and wall). Each of these will have different buildups with the cork and woodfibre generally being stuck to the wall and then plastered. The sheepswool is installed between battens followed by vapour control/airtightness layer, then plasterboard and skim if you want to. If you wanted to try ecoCork, and your wall areas isn't too big, I have about 33 bags of it surplus to requirements that I'd be happy to let you have - I just don't know the expiry date on these and hope they's still be okay as they've been stored for a couple of years now. This is just covered with a Seciltek render to finish. Then there's the hempcrete spoken about earlier. There are then those that are quite happy to put PIR on the wall, but generally this is now only recommended with a ventilation gap between the wall and insulation. TBH, I don't envy you, I once loved the period property thing and having bumped along a rocky road with these types of buildings, I've found the road is paved with a lot of snake oil and its salesmen. Even some reputable suppliers and designers make things up as they go so buyer beware.2 points
-
Greetings on a miserably rainy Sunday October morning. Perfect weather for catching up on some blog writing! As the title suggests this blog will be about our external coverings of the house and, by the end of it, the outside of the building will be pretty much finished allowing us to crack on internally. We started many months ago by battening the outside of the buildings. As we are having external blinds and they have a requirement for fitting the blind cassette we needed a large gap between the house walls and the outside of the cladding. This meant 50mm x 50mm timber battens and counter battens. We did this ourselves and saved many thousands and, even though it was slow going (as, it seems, everything is when you do it yourself!), it was very satisfying with the carpenter saying that it was good work and he’d seen chippies do a lot worse jobs than we did. Nice warm fuzzy feeling ensued. We are having a mixture of burnt Siberian larch (https://en.wikipedia.org/wiki/Yakisugi) and, to contrast the black, standard Siberian larch on the ‘arms’ of our property and entrance porch (all will be revealed in photos below) and I ordered all the cladding to be delivered on-site prior to the carpenter starting. The carpenter started on the garage using the standard Siberian larch which we bought from Jewson at a very reasonable price, and quite a bit cheaper than we could get from the usual timber cladding suppliers and we are very happy with the quality of the wood. He then went on to the black charred larch (which gets everywhere and he and his tools looked like they’d been in a coal mine by the end of each day!). We purchased the charred larch from Permachar (https://permachar.co.uk) who gave us a brilliant price. The wood itself was burnt and delivered from Lithuania (https://degmeda.eu) but they will only sell to the UK via Permachar. It is stunning wood, but incredibly fragile and any sort of dragging or scraping will cause the black char to flake off. While he was busy doing that and while the scaffolding was up I thought it a good time to get the guttering started. Our architect specified Zinc guttering and after a lot of thought and looking at stainless steel and zinc we also decided that zinc was the choice for us. We ordered it from Rainclear (https://www.rainclear.co.uk/guttering/copper-zinc-guttering/guttering-fittings.html?color=235) who offer next day delivery if in stock and were incredibly helpful and very well priced. It’s also a clip on system which even I managed to install without any major issues! Around the same time and while the carpenter was busy putting the cladding up our external blinds got fitted. We bought those from a local company called Powell blinds (https://powellblinds.com) who stepped in brilliantly at the last minute after we were seriously let down by Cornerstar Aluminium (long story which I won’t get in to here). The blinds are fitted up behind the cladding above the windows but externally so they will be hidden from view when lifted up. We absolutely love them and during the heatwave this summer we lowered them and this drastically reduced the temperature inside the house. There was still one large south facing window that didn’t have blinds that needed shading. We wanted and the architect designed a Brise Soleil in this area but all we had to go on was a 2D drawing. I contacted a few companies about getting one made and installed and the quotes came back at between £6k - £7k! A figure we simply could not afford. So I did research and spoke to a local forge called Horsham Forge (https://www.horshamforge.co.uk) with an idea I had. He said ‘that could be done but how about this instead?’. He suggested brackets with a pole running through them and vertical timbers slid on. Genius! On to Sketchup where I draw up the brackets and gave them to the forge to be created and spoke to my timber manager at Jewson who procured me some thermowood at the size I needed and got my carpenter to fit it and it cost me £1700 in total. So we saved around £5k by doing it ourselves and we also enjoyed the journey and got a solution that we designed (with the help of the forge of course). We think it looks fab and it does a good job of shading from the sun apart from a couple of hours when the sun is directly facing that side of the house. So we will still get some solar gain but it is definitely reduced and it’s a brilliant architectural feature. 😉 Right, while all this was going on the chippie was finishing up the cladding and now that it is all finished and I have put the downpipes on we have an almost finished external facade to our dream home. We love it and think it’s stunning. So very happy with the carpenter’s work (http://www.kmlcarpentryandroofing.co.uk). Kieran’s attention to detail at the junctions between the 2 types of wood is fabulous as it is in other areas too. He would also discuss any issues and potential solutions with us to make sure we were happy with them rather than just doing something he thought was right. Hopefully the pictures below do it all justice! (Note: please ignore the 110mm brown downpipe in the below photo! It will eventually be a rain chain but this works for now. 😉 ) Thanks for reading and we hope you like what we’ve achieved so far.1 point
-
Just stumbled across this - http://measuredheatloss.com/ tools for measuring as-built heat loss from a building, much like we do for air tightness.1 point
-
Have you looked at Wiim? https://www.wiimhome.com/wiimmini/overview I don't know Alexa streaming and Alexa Cast, but thought it was similar functionality to Chromecast, which I am familiar with. With a Wiim Mini or Wiim Pro you can turn an "old" amp and speakers into a connected amp and speakers, group them with other similarly connected devices etc. You'd need one Mini or Pro for each amp. Not sure about Alexa Cast, but Chromecast will handle Streaming Service, Internet Radio, Podcasts etc. I think you'd need a separate App to play off your NAS. I use Plex and its integral Chromecast for that, but without Voice Control for Plex.1 point
-
Tried the fan coil on auto mode again today, and just cooled the room down. Reverted to manual fan operation and room temp settled to where I wanted it (after a few hours). The reason could be the Salus auto balancing actuator, auto mode switches the fan to different speeds and to off, so maybe dT is just changing too quickly for the actuator to keep up as it will have been tuned for UFH, not a coil containing a litre of water. So manual mode with WC is probably the way to go. It keeps it simple.
 1 point
 -
Most of your costs do not seem to of whack with what was quoted in this previous thread - The problem sounds like you want the network upgraded in a place that will be of no use to anyone else, so you bear all of the costs. Looking at the quote, the one thing I would be asking about is the Land Right costs as the pole is already there and already on your land so I wouldn't think an easement is required. It may be that SP want a new easement drawn up and put into your deeds for future owners. If someone else has power within a few hundred metres of you, it could be cheaper to dig your own trenches and connect to their transformer, but I would guess you have already looked into that. The reality of the costs is that there would be a lot of work and disruption involved for very little benefit to the wider public. It seems like they would have to disconnect other people's power for some period to get you connected. Thus the hand delivered letters, project management etc. It also sounds like it is in the middle of nowhere so they want to charge the costs of getting there. Considering the intermittent use that will likely be made of the site a generator would seem like the best option. It would probably cost in the region of £1k. It depends a bit on what kind of equipment you are using. A hot tub could hold around 500litres of water. It would need 15kWh to heat that from 15 to 40C. That would take a few hours on an electric heater and would require a very large battery on a solar system. I would look into a propane hot tub heater or wood system. https://supaheater.co.uk/product/supa/?campaign=Pmax-Sales-K2L&content=&keyword=&gclid=CjwKCAiA75itBhA6EiwAkho9ewGQa66DZzg8xVZ2V0-1vKDdjlvJmh_Ehz3WM7AEKa6l6wmAsFpB2hoCOW4QAvD_BwE If you take the hot tub out of the equation you can look then at a small generator or solar/batteries depending on what you are looking to do in the workshop.1 point
-
If if was a big hole, a damp rag on a stick brings out the last of the dust. For yours perhaps a cotton bud! BUT. Trade tip, once you've squirted or forced the mixed resin into the hole you must push the rod in slowly while rotating it slowly.otherwise the resin scooshes out. Also this turns any dust into harmless filler. Then support the bolts horizontally....maybe need some bits of of stick for that. Look at the resin instructions for times for handling. Very slow in cold, very fast in the warm.1 point
-
With the resin, get the top fixing in and done up for each bracket, then through drill for the bottom fixings so you know they will be in the right place. Stud size = hole size minus 2mm.1 point
-
https://www.ofgem.gov.uk/sites/default/files/docs/2014/04/guide_electricity_distribution_connections_policy_0.pdf this may help in your research. If it transpires you do have to pay that much - £18k - I’d be tempted to install a generator and/or renewables and go off grid.1 point
-
skip (general builders waste) for the bagged such, how much pure soil do you think that you are going to excavate, as depending on that is if you will need muckaway.1 point
-
I agree, but without cooling the house down in the evenings, it would have just got hotter day by day. We like a warm house and I don't feel comfortable sitting down, unless the temperature is at least 23C.1 point
-
Fill it with sand and cement and your tilers will tile over I’m guessing a large heavy tile1 point
-
@Alan Ambrose that was my exact thought, I’m pretty sure because the DNOs have a monopoly the regulator agrees/approves standard pricing eg per meter etc. I have specific recollection of finding a price list for Openreach for telecoms fur my own project. that said @Lordster even if there is standard pricing you need to scrutinise as different people could assess your project differently thus resulting in different quotes. Suggest you post the quote here.1 point
-
Are you tiling directly onto the concrete block? without backerboard or anything? Wish my newly built walls were straight enough for that!! If the tile edge doesn't meet over the chase, you can probably just bridge it (depending on the tile!), I'd personally probably fill it in (even if just squirty foam and then trim it flush), but I'd be putting backerboard over my walls anyway so that would hide any chases.1 point
-
I don't think the hollow sound would be an issue but it may not work well if the tiles meet in the void. Neat chasing!1 point
-
Back to the point. One of those Scottish heritage studies measured the in situ U-Values of old stone and lime walls. (I think I linked it in one of @saveasteadings earliest threads). The U-Value correlated with the moisture content in the wall. Damp Wall = Bad U-Value. More importantly moisture in a structure that wasn't designed to be damp causes decay, through mould, fungus, frost action and physical water erosion. My understanding of the issue is as follows. This moisture gets into walls because of: A. Bulk water ingress. Solved by (but not limited to) Unblocking drains and gutters Repointing externally Adding roof overhangs/flashings External brick creams, French drains to lower the local water table. Fixing leaking pipes and showers enclosures. Water proof external render or paint B. Condensation from humid internal air. Solved by (but not limited to) Managing internal humidity with adequate heating and ventilation. Entirely blocking air paths through the wall to prevent air "carrying" moisture to a part of the wall below the dew point. Keeping the entire structure above the dew point. Normally with insulation, thermal Bridges must be managed!!!! Now that's all fine in theory, but unless you build your house in a laboratory that's impossible to achieve. In any case, there'll be some construction moisture in the walls anyway. You need to allow your wall to dry. To deal with this you need to the moisture to leave the wall via evaporation. This can be achieved by (but not limited to) Keeping the wall warm through heating, limiting IWI or fitting EWI. Keeping internal humidity low. Not trapping moisture between materials of too low vapour permeability. (This is nuanced, more later....) Alternatively for some construction types moisture is acceptable (e.g. foundations) but you'll need to build it out of permanently moisture tolerant materials like concrete, stainless steel and plastic.1 point
-
Done and they have zero rated no issue1 point
-
That can apply if the work is of benefit beyond your own project. For example i had an industrial client and it needed a new trandormer (one of those big ones, fenced off. They quoted many tens of thousands, but a specialist got that halved as there was spare capacity for future development. Clearly the electric company was trying it on. Might that appply to you? Also look further afield. Is there other power nearby?1 point
-
+1 to resin but make sure all dust is removed from the hole.1 point
-
i hang my buffer tank on the wall with resin and threaded rod, it aint going anywhere. Could probably inject the resin into the hole and then drill and plug it again if thats the route you fancy.1 point
-
I helped a friend go off grid on an AirBnb let shed. 1.2kW for £1,700 and it's been running for 4 years. With better panels and batteries you could easily get up and running for a lot less money and time than the connected supply. Have a look at the Bimble Solar web site for some package quotes. 1.2kW is a bit light but it is possible to plug in a hedge trimmer so a 5kW rig would be easily enough.1 point
-
Unless you can get the price down I would be going off grid. Solar PV and batteries for small loads and lighting, Diesel generator for large loads, should only be needed occasionally, welder etc. Wood fired hot tub. It would be interesting to see the quote.1 point
-
The contractor that did ours wanted to see the planning permission and then took my word for it that we had not yet got completion. then they zero rated the work.1 point
-
Another option (used many times on old walls or dot and dab etc.). Make a big hole, fill with plaster with a bit of cement added - goes off quickly and rock hard. Drill and fix into this.1 point
-
Yeah is there a reason you're going with acoustic insulation in the external walls? The thermal performance of that is going to be shocking. And the acoustic performance won't be great either because afaik you're meant to leave an air gap for the acoustic insulation for it to work best. Save yourself some time, money and space. Use 70mm PIR in-between the studs, which leaves you with a service void for cables etc. Then just regular PB over the top. If you want more insulation, you can get 90mm PIR and then batten out the studs to create your service void.1 point
-
Nothing attached. I had a similar mental initial quote for 3 phase (£26.5k) the final cost for single phase was £475. This was with SSEN. I got a few quotes with them over the time and what I learnt was the planners aren’t consistent. For example, I let the first quote lapse and got a second quote for 3 phase and it was reduced to £15k for no apparent reason. However my connection wasn’t coming from a HV line. The fact that the contestable quote is dearer would suggest something is amiss with the quote. Therefore challenge that. Ask to speak to someone else or just phone in and speak to someone else. I thought the pricing had changed such that you no longer pay the full cost on your own as the cost is spread across the whole customer base.1 point
-
Impatient? Drill new holes in the bracket. Buy 80 mm screws and brown wall plugs. Drill deep holes in the wall. Push two brown wall plugs deep into each hole using a screw. Use say three screws per bracket. (two at the top and one at the bottom) That should get you into the brick not the plaster. If you're an animal you hols the bracket in position then drill the bracket and wall at the same time with a 6.5 mm SDS then bash the wall plug through the bracket and into the wall without removing the bracket. (the 6.5 mm SDS bit in crumbly brick should give you a tight fitting "just about possible to bash it in using a screw as a drift" wall plug. Some experimentation might be needed depending on brand. Up the screws to 100 mm if you've got solid walls and thick plaster rather than cavity walls. You can't fix into plaster. That's what's probably happened. Maybe yoy hit a mortar line. Either way just whack a hole through the bracket where the wall wants it to be rather than where the bracket wants it to be and you're good. Fill the old hole with some non structural whatever. Or resin in some threaded rod with a nut on the end. Leave the nut loose; hang the radiator relying on the screws; then nip behind with a spanner to finish tighten later because it's cold just now.1 point
-
It might be worrh looking into Rawl mesh sleeves. They are made for weak, danaged and irregilar holes. Please look them up first as it might not work for your situation.1 point
-
You would need to find out the fraction of moisture it can absorb According to a study of 3 hempcretes*, 'liquid transfer appears negligible for relative humidity lower than 80%', it has a moisture buffer value of 'excellent' or 'nearly excellent' on the Nordtest classification (from 1.94 to 2.15 g/(m2 %RH) depending on the composition), and high water vapour permeability. Which is pretty good. *Florence Collet, Julien Chamoin, Sylvie Prétot, Christophe Lanos. Comparison of the hygric behaviour of three hemp concretes. Energy and Buildings, 2013, 62, pp.294-303. 10.1016/j.enbuild.2013.03.010 hal-00810372.1 point
-
You said its not damp now, but didnt say, what, if any covering is on it now. If what you want to fit is no less permeable than whats on it now, then id suggest the risks are low. On the other hand if its a bare wall, or just lime plaster, then risks are much higher. As i already suggested, no one will give you a definitve answer. It will come down to judgement and your appetite for risk. With absolute respect to those on this forum, there are other places with much more practical experience of older buildings than is available here, this being pretty focussed on new build. Warning though, some can be hardcore limeists! Believing its the answer to everything, or just open the windows to ventilate!!! PS. As im sure you have read what i did to dry my last house out, however my neighbours took their traditional modern builders approach and put a DPC a meter up the wall and boarded over it. Looks nice, and is is damp free. However, im pretty confident, indeed, can see, that the walls are damp. And im sure, just like mine used to be, if i drilled into them, slurry paste would come out, not dust. Sadly, this is the industry standard for damp walls.1 point
-
our basement courtyard is open to the elements which has caused a few issues as we have an point of ingress for water in to the basement through the courtyard sliding doors (i have a flooded basement thread from Nov 2022 about it). if we didn't need the escape doors then the basement could've been a sealed box with no external penetrations and would greatly reduce the risk of flooding. thankfully we're on top of the ground water removal now so future flooding should not occur! barring catastrophic flood events that is i guess.1 point
-
Could we substitute "need" for "desire". England is pretty straightforward. If you have habitable rooms in a basement then either bring it's access stair up into a protected hallway with a final exit or provide an alternative escape from the basement.1 point
-
I've been living in this minefield for the last couple of years having bought an 1850's house. A couple of points; - There's certainly something in "thermal mass" we have 2 rooms of similar size, both have 2x external walls, one room has 2x 220mm external walls, the other has 2x 330mm external walls (it's almost like a solid brick wall using cheap reds and then a single leaf facade of nicer cream bricks in front of it, and I haven't found anywhere it's tied in yet...) the room with the thicker walls was always the warmer of the two before any insulation. - Because of the external looks of the property, EWI was a no go for us, we couldn't hide the original brickwork. We opted for IWI, having spent months researching "breathable" solutions we couldn't justify either the cost of additional build up. For the most part we opted for PIR adhered direct to the existing lime plaster, mechanically fixed battens through it and PB finish, which BCO was happy about. We came to the conclusion that moisture does get into "traditional" brickwork and the best remedy is two-fold - fix the source of moisture; so ensure gutters, ground levels, etc are sound and if moisture gets in, it has to be able to get out again, so at least one side of the wall needs to be permeable; so lime mortar/render on the exterior, no cement. 2 years in and it's worked well for us, we did have a damp patch showing on an external wall last year which was caused by a cracked drain near it, we fixed that and the damp patch is slowly going away again, so the logic we built to, seems, to hold... There are so many horror stories out there, but they come without full context. We were pretty OCD about foaming and taping all gaps, to avoid condensation, we also have MVHR so internal humidity should be managed well, both of which likely contribute to our (early) success.1 point
-
MH-z19 for co2 and BMx2801 point
-
Lets be realistic, how are you going to retrofit a DPC to a house? (please dont say a chemical DPC, thats utter bollocks and nothing but a scam)Especially one of stone and rubble infill construction? Please, come back to the real world. Having the wall allowing water to evaporate faster than it gets in is how old houses with no DPC work. Sadly, of course, it didnt always work. There were no calculations to do that way back when. It was hit and miss. The really bad stuff has invariably long since gone. Short of demolition, you have to accept and work WITH it if you want a damp free house. When i did my last house, i admit i was sceptical too. But removing the inappropiate material completely fixed things. When i started the walls were so wet, the socket back boxes had corroded away (in 10 years) and if you drilled a hole in the wall it came out as a slurry. Stripped the plaster off, repointed the outside in lime to replace the cement, removed the concrete slab on mud. In a matter of weeks, it was completely dry, to the point drilling a hole in the wall at ground level produced dry brick dust. Frankly, it was quite amazing to watch over the weeks. At the new place, which is stone with much thicker walls, we uncovered the fireplace early on. It had been pointed in cement. The bottom 2 feet some of the stones were dark and wet to touch. Chipping out the motar revealed the lime behind that in places was so wet, you could push your finger into it. Its taken 6 months this time (and the outside is still painted and pointed in cement) its dried out. The motar is hard, well as hard as lime ever is, stones have all dried out. Ive only repointed a small section so far. Again, practical real world experience. Which for me wins over hypothesis.1 point
-
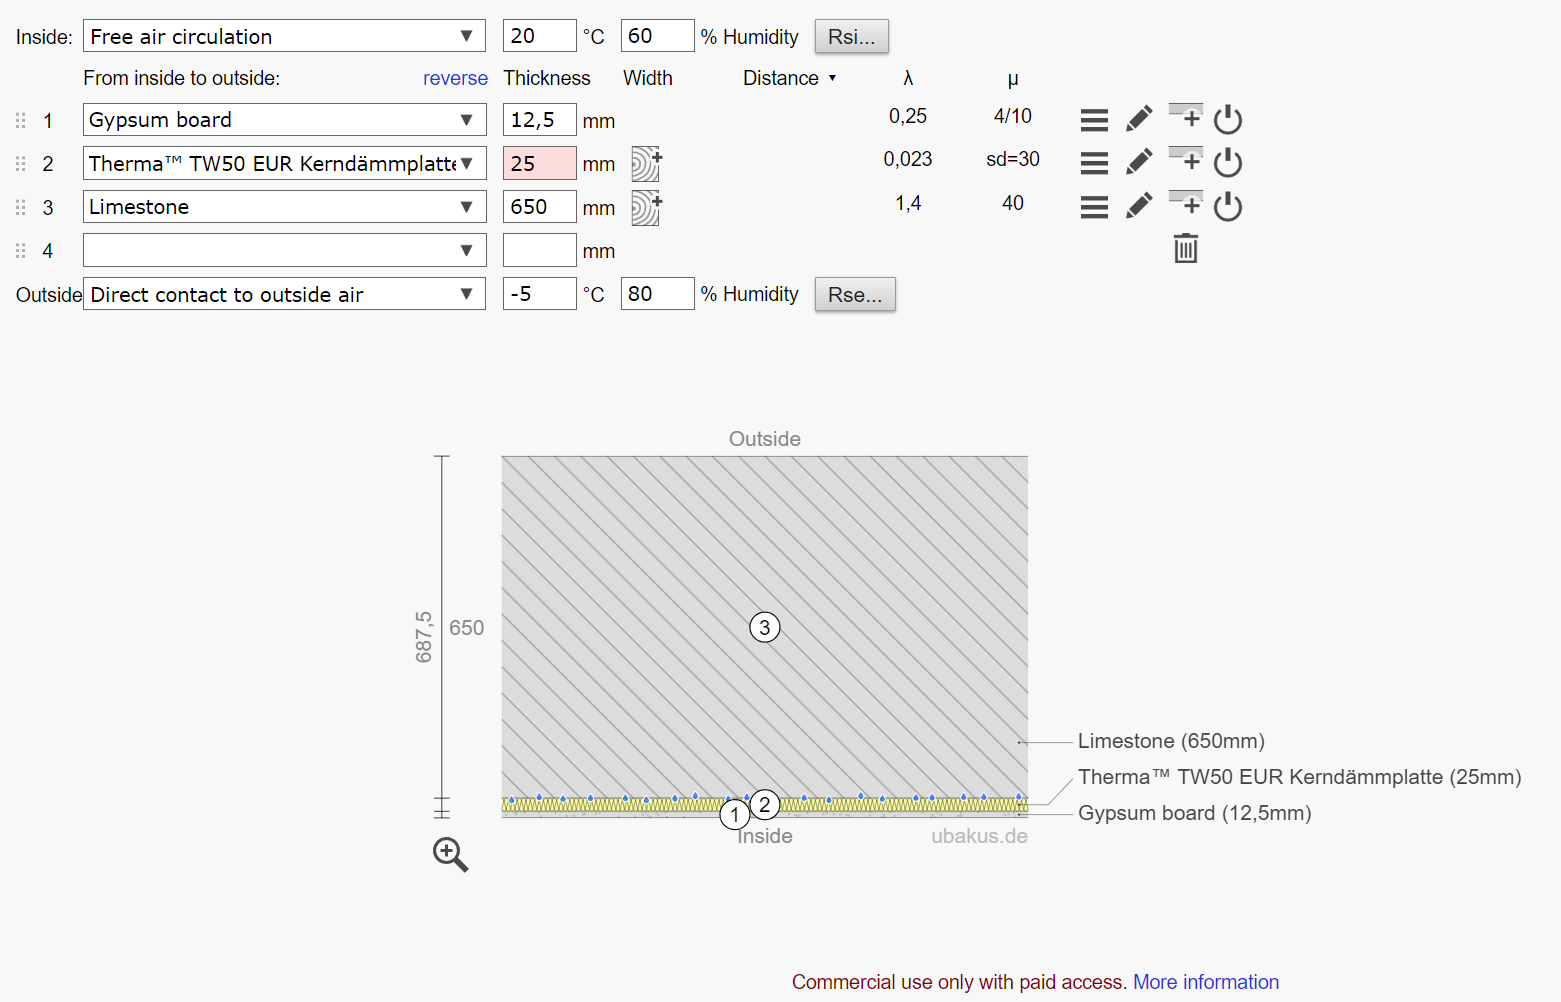
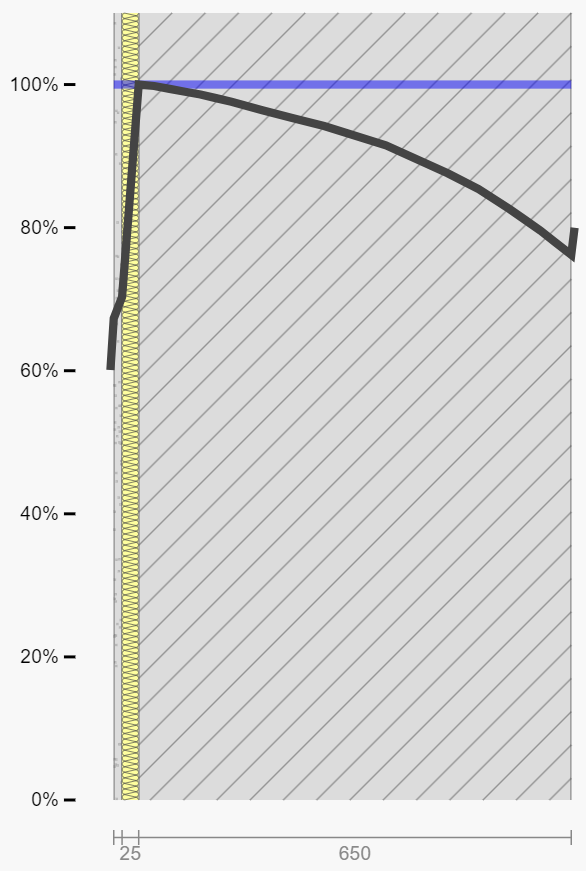
Even without "rising damp", it's a condensation risk. It's a good improvement in U Value 1.5 -> 0.565, but moisture collects between the PIR and Stone wall. Temp on the left and humidity on the right. But, the condensation may not be an absolute risk. It shows from 1° and below it's a risk, but it doesn't consider how long the temp needs to be below 1° for it to stabilise. The 650mm wall has a 23hr decrement delay, so it's got to be down at that temp for over a day before the inner face could drop below dew point.

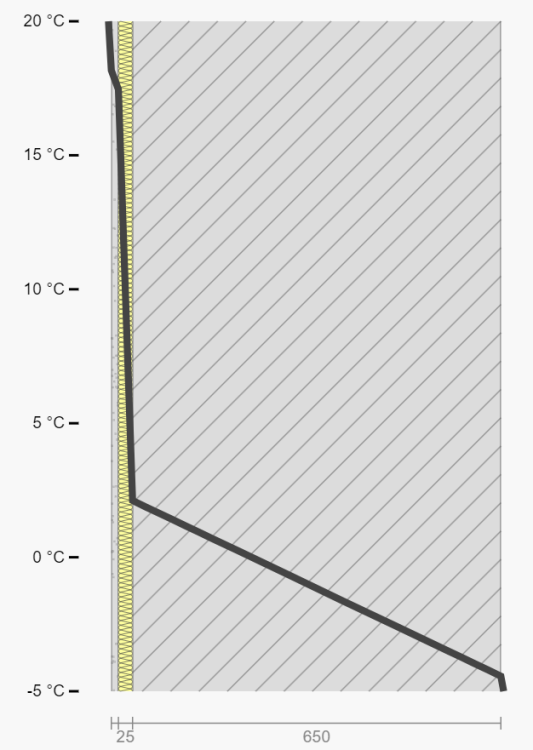

 1 point
 -
Does it make any difference if you have net metering?1 point
-
The Higroster vents finally arrived from Brookvent last week (delays at the Brevis end apparently), so I spent a few hours over the last couple of days fitting them. As I mentioned, the windows didn't have trickle vents before, so I ended up making a couple of templates from MDF, one for inside and one for outside, then removing each opener in turn and routing a slot into it. All went well and they're now fitted to all bedrooms and the lounge and playroom downstairs. I also removed the PIV yesterday and stuck it on eBay. I'll be keeping an eye on things over the next few weeks but initial signs are good - much less moisture inside the bedroom windows last night and the reveals stayed dry, which is better than the night before. Thanks again for the advice!1 point
-
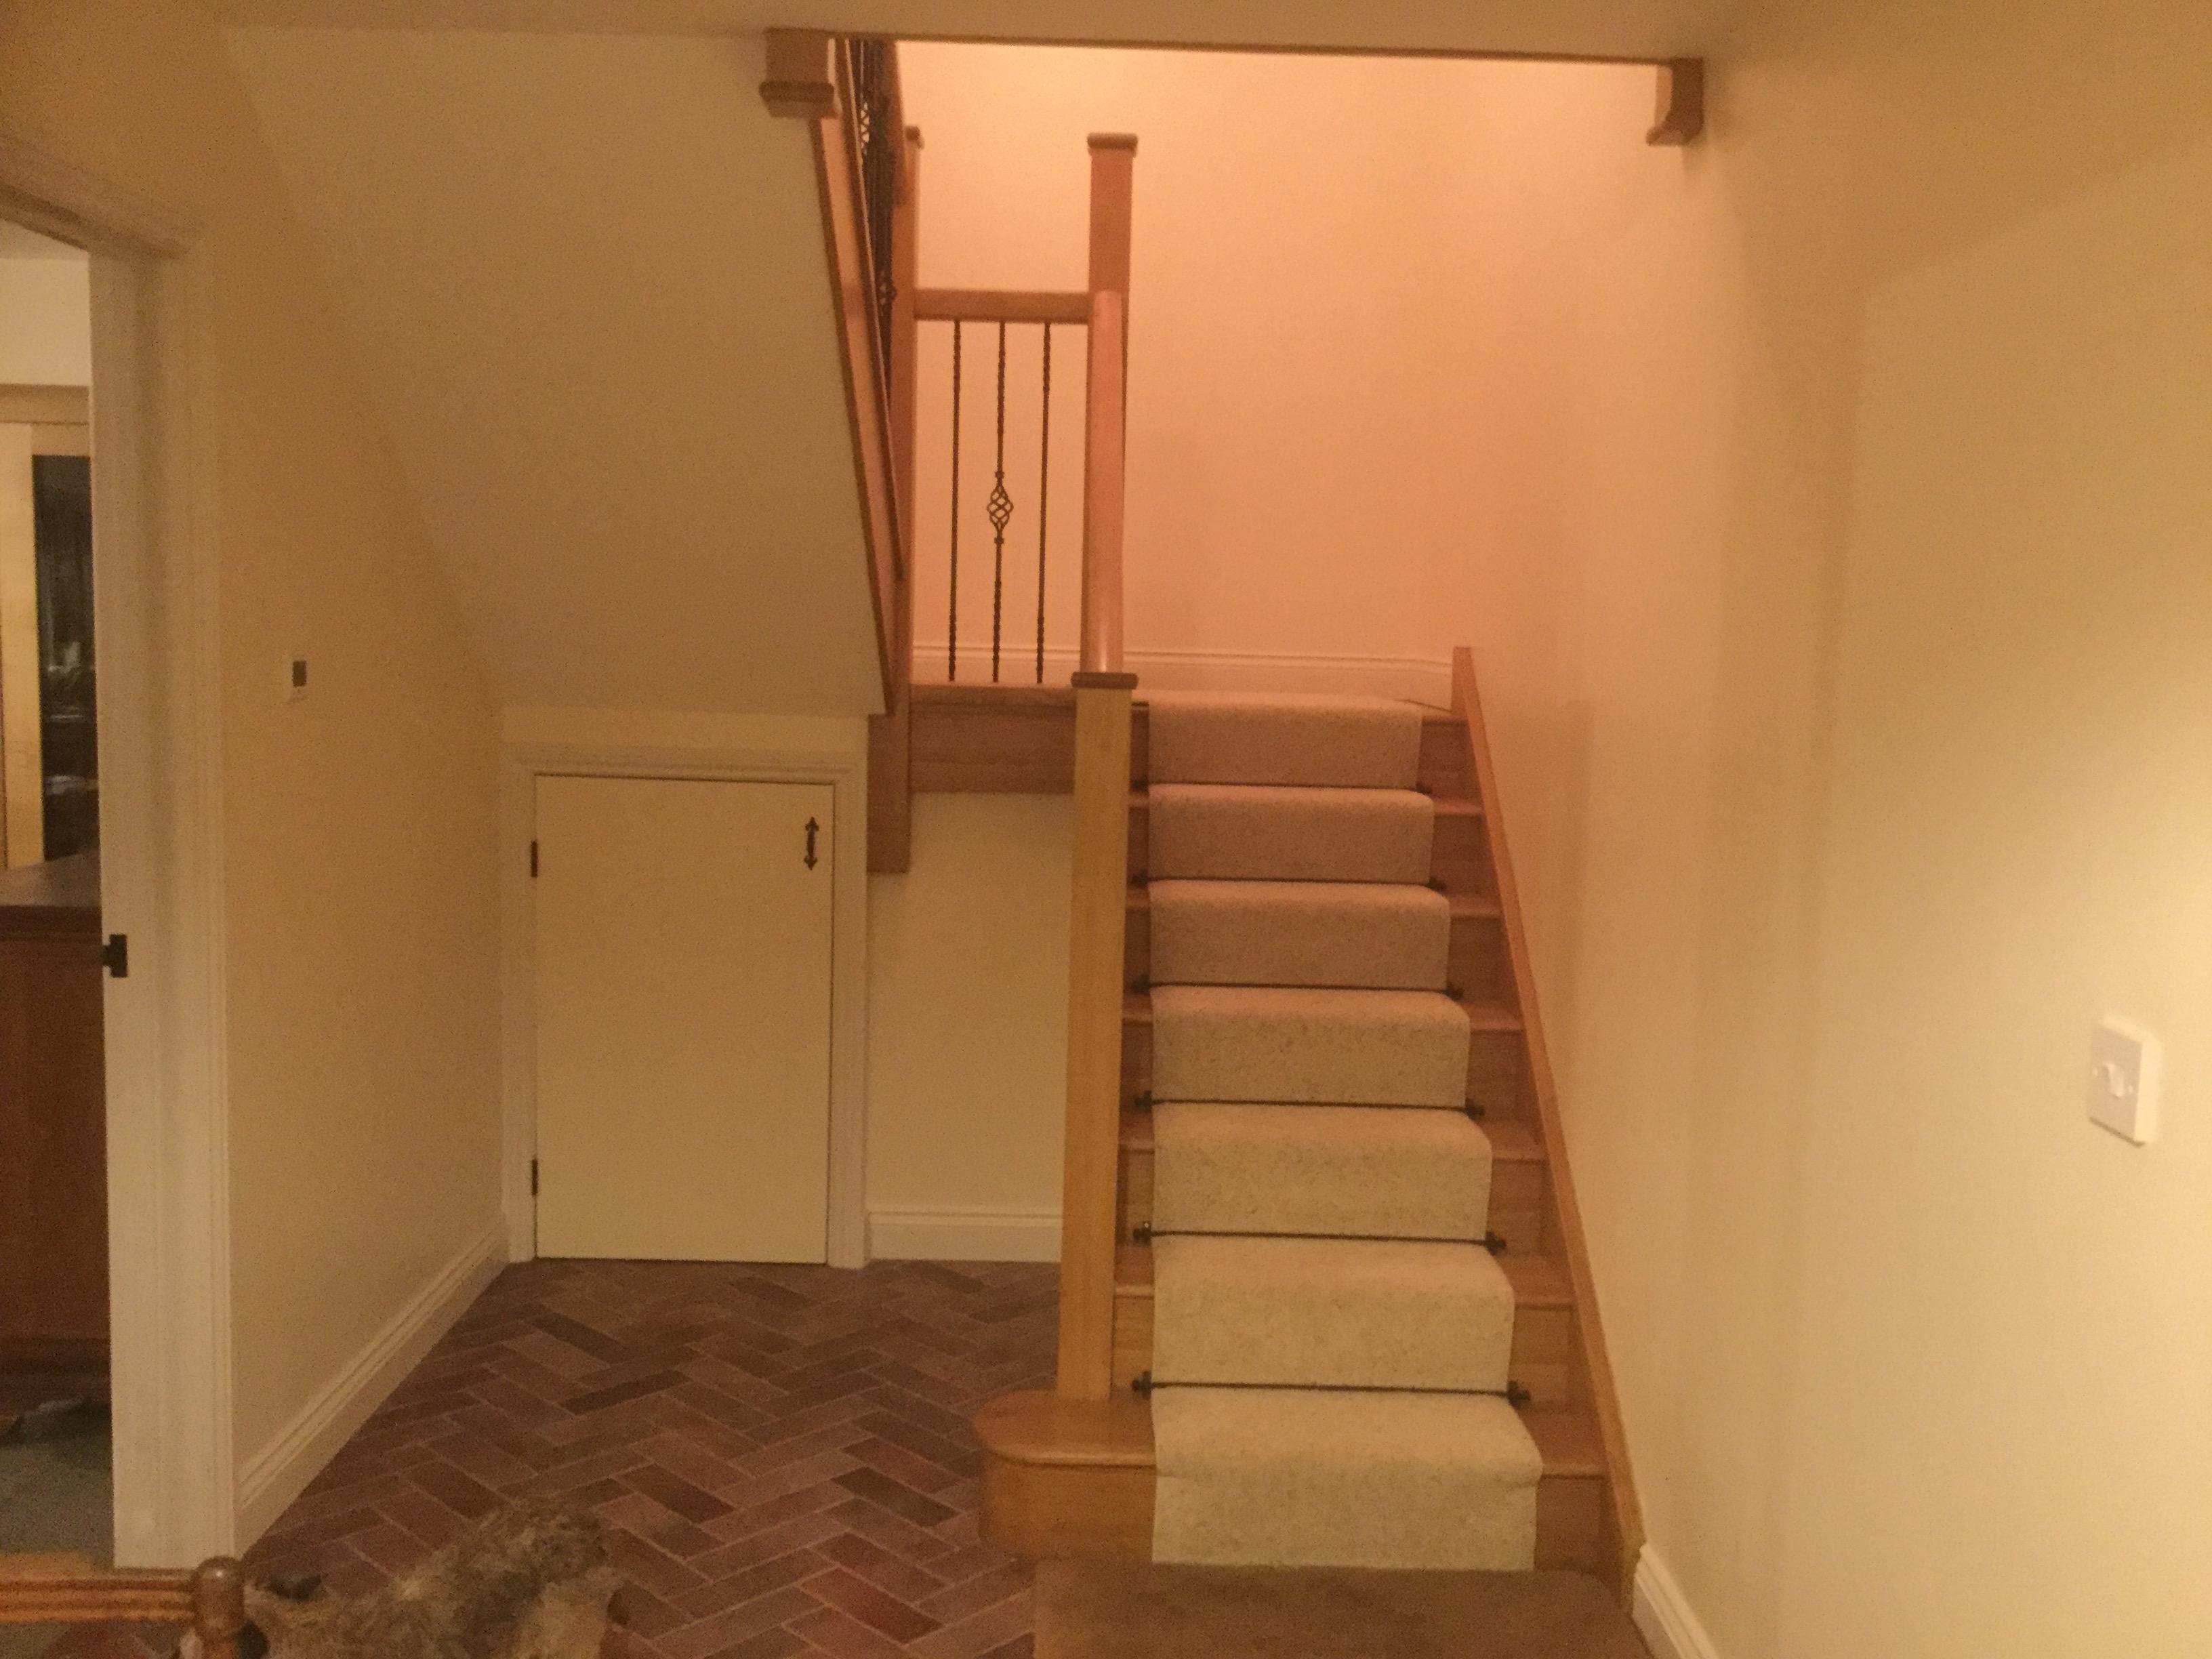
Well I initially felt the same as I love woodwork and had some machinery, but, with all the other work on the build I was involved with i got the satisfaction of assembling the “kit” and ended up with a lovely looking oak staircase without the hassle and longer time frame.
 1 point
 -
did this at our old place, got a price for ceder and nearly fainted. bought a load of 4.8m treated 2x1 roofing batten. put it through our DeWalt portable planer and it came out lovely and smooth. stained with osmo and you cant really tell the difference. used a battery brad nailer for invisible fixings. whole lot cost less than £100, the osmo being the dearest part.
 1 point


This leaderboard is set to London/GMT+01:00