seanblee
-
Posts
33 -
Joined
-
Last visited
seanblee's Achievements
Member (3/5)
10
Reputation
-
Shower and basin drain connections
seanblee replied to seanblee's topic in Bathrooms, Ensuites & Wetrooms
There's going to be boxing along the left side of the room for a wall hung toilet frame so I'll be running the basin waste through that, it's really just whether it's worth up sizing to 40mm or if I should just reuse the existing 32mm - my gut says 40mm is a better job... I'd love to have the shower tray flush but the joist layout makes it impossible - I really don't want boxing below and I'm not comfortable putting a 40mm hole through the double trimmer, feels like that's removing too much material. -
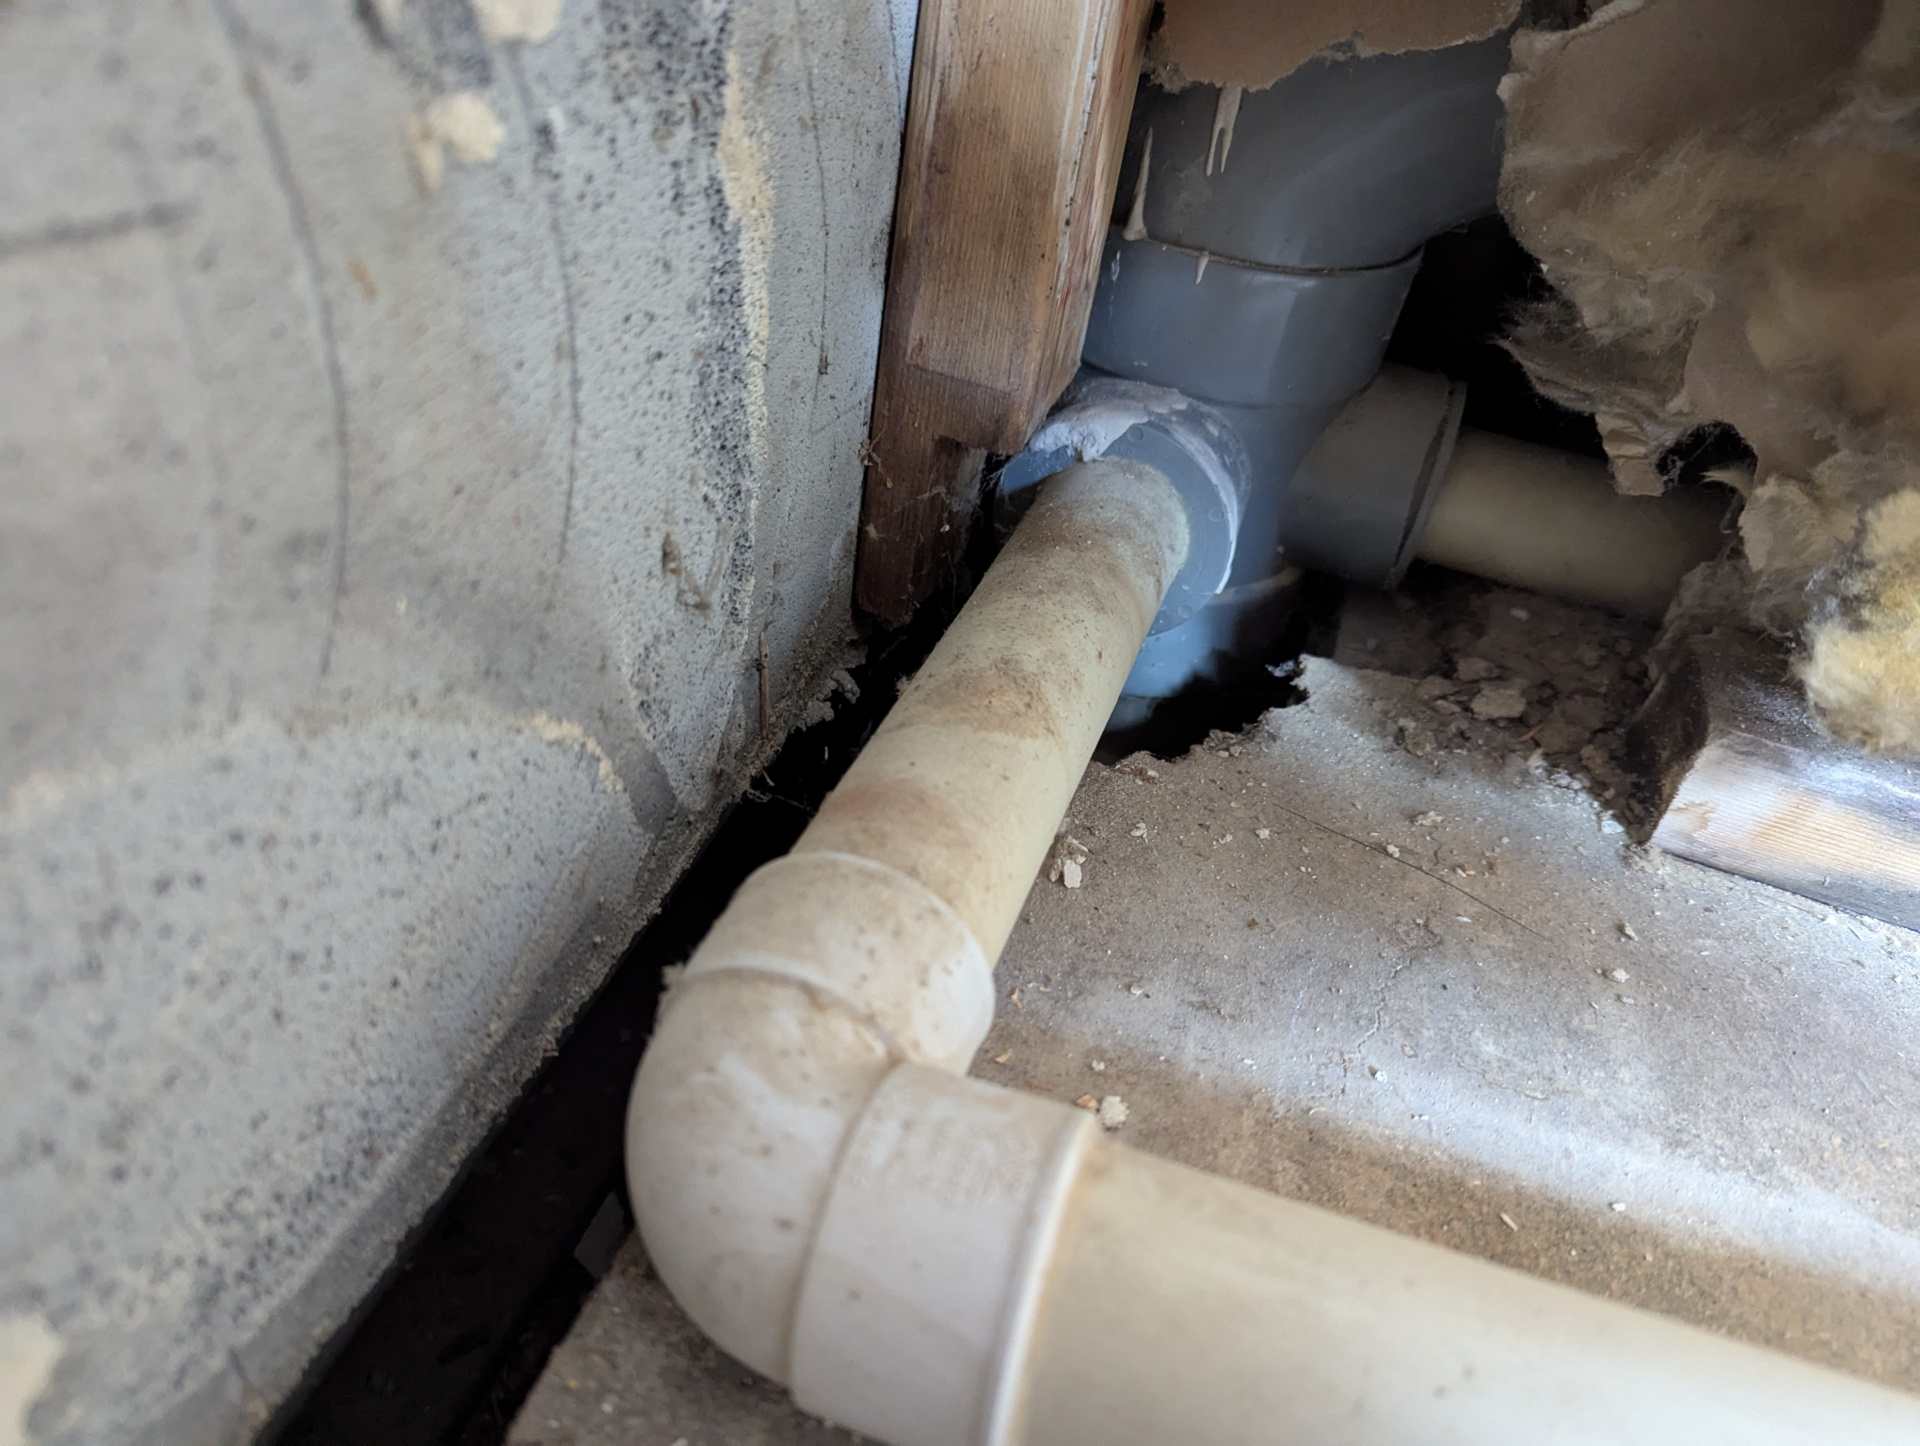
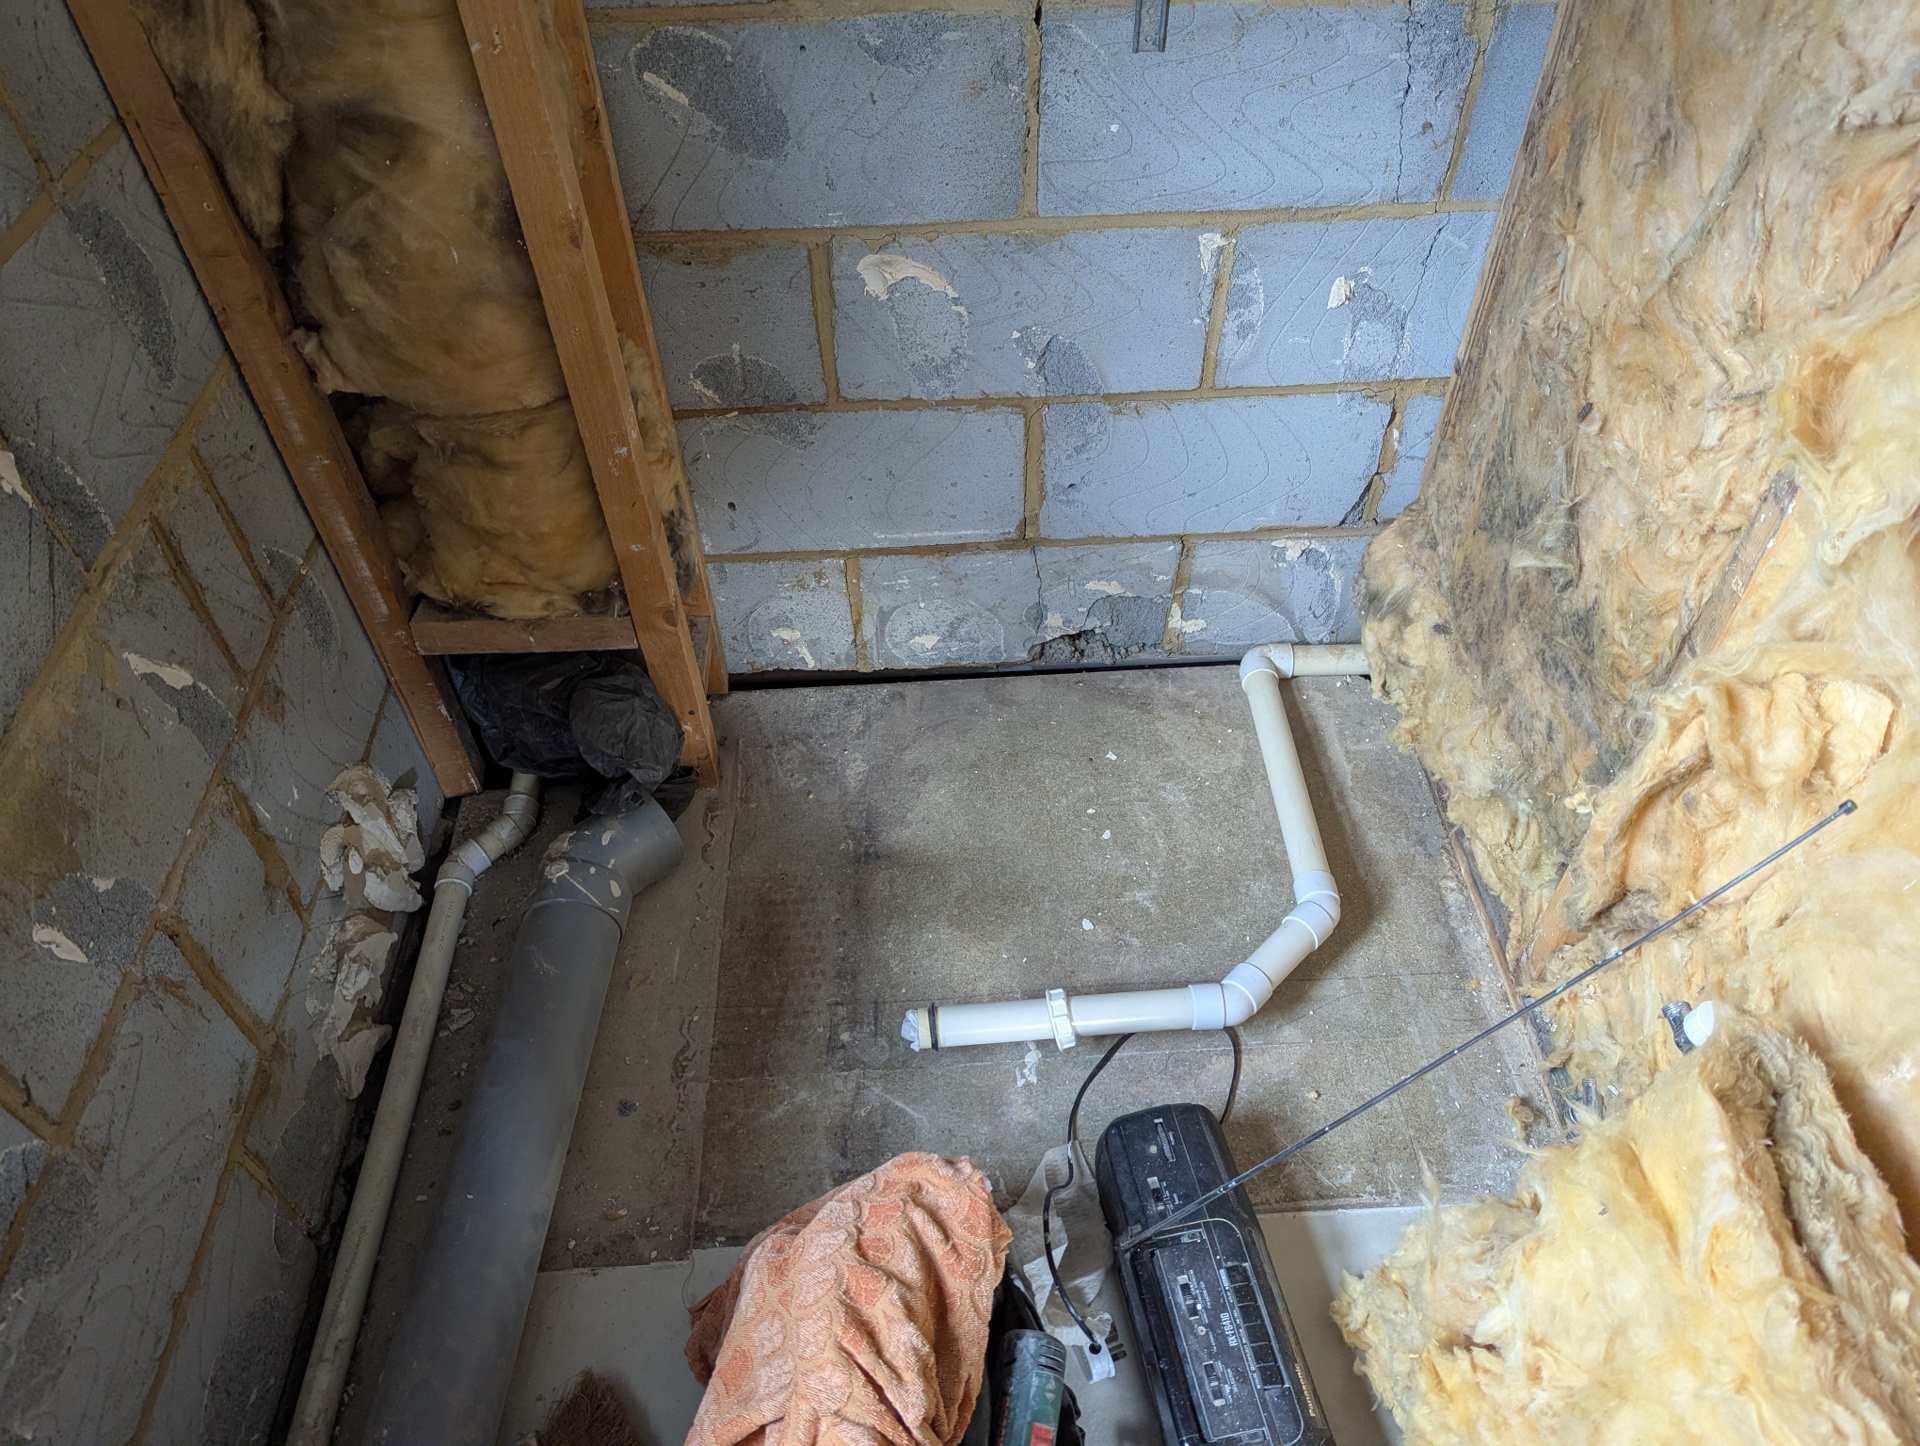
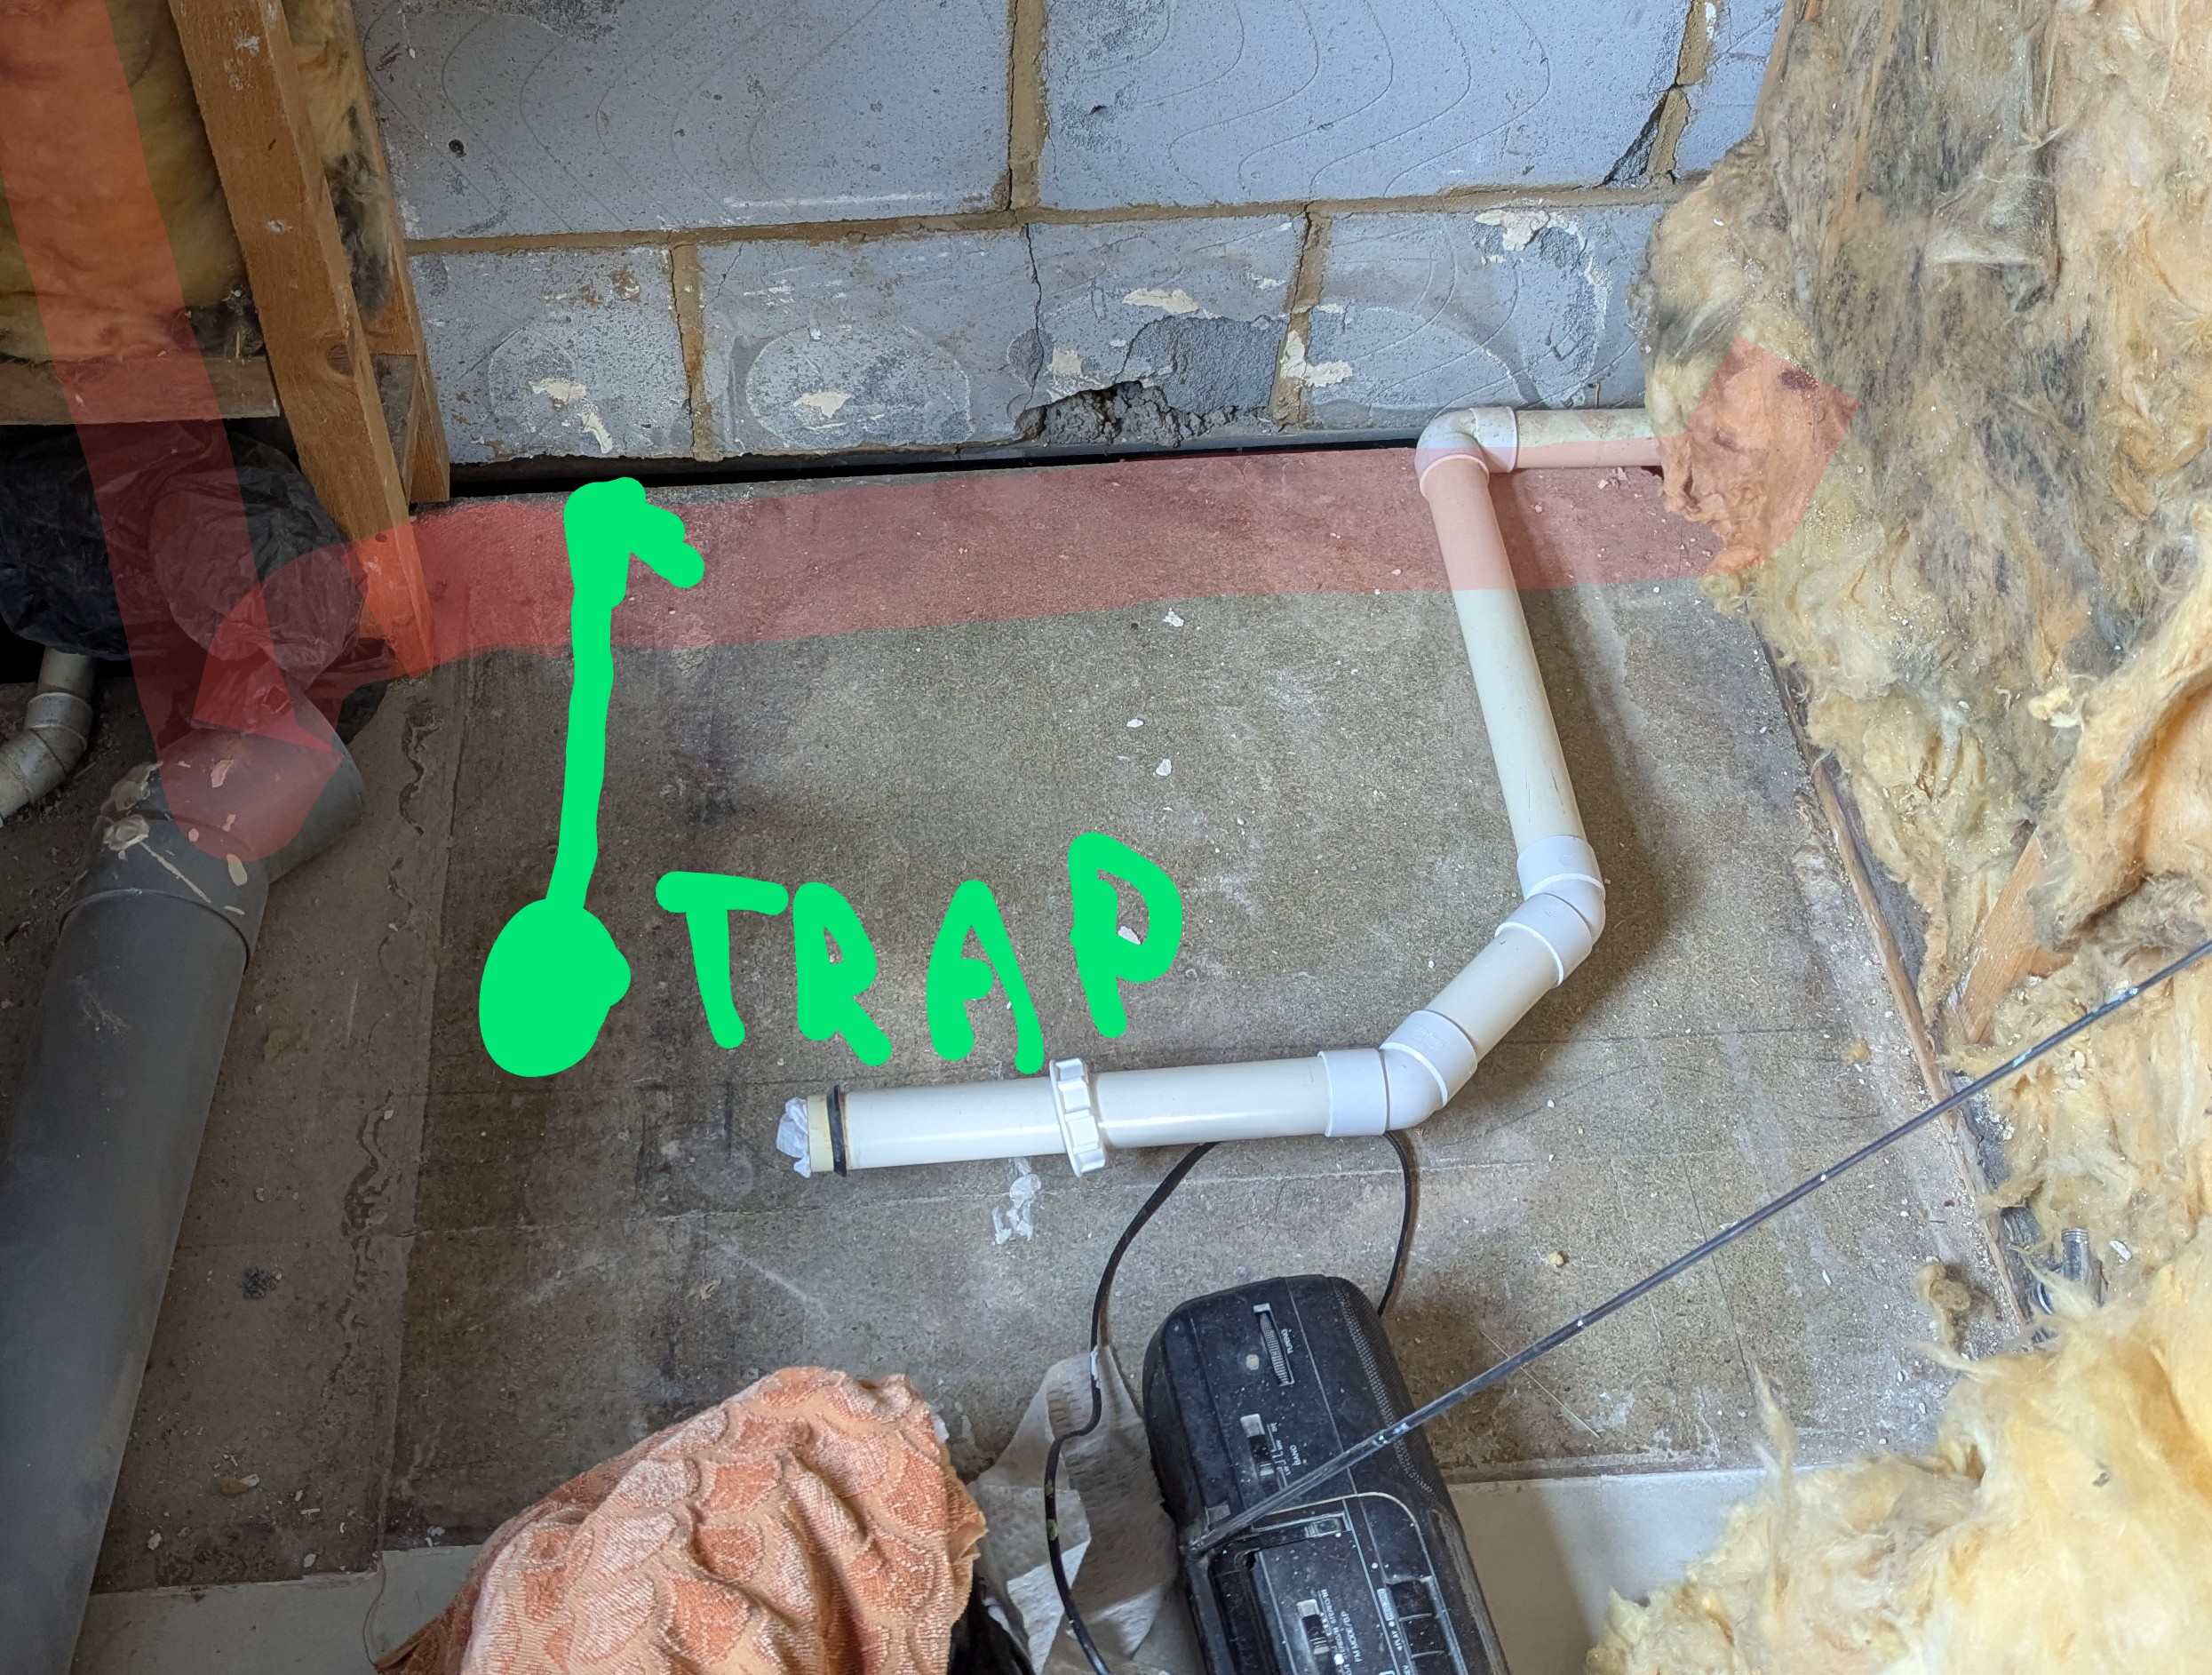
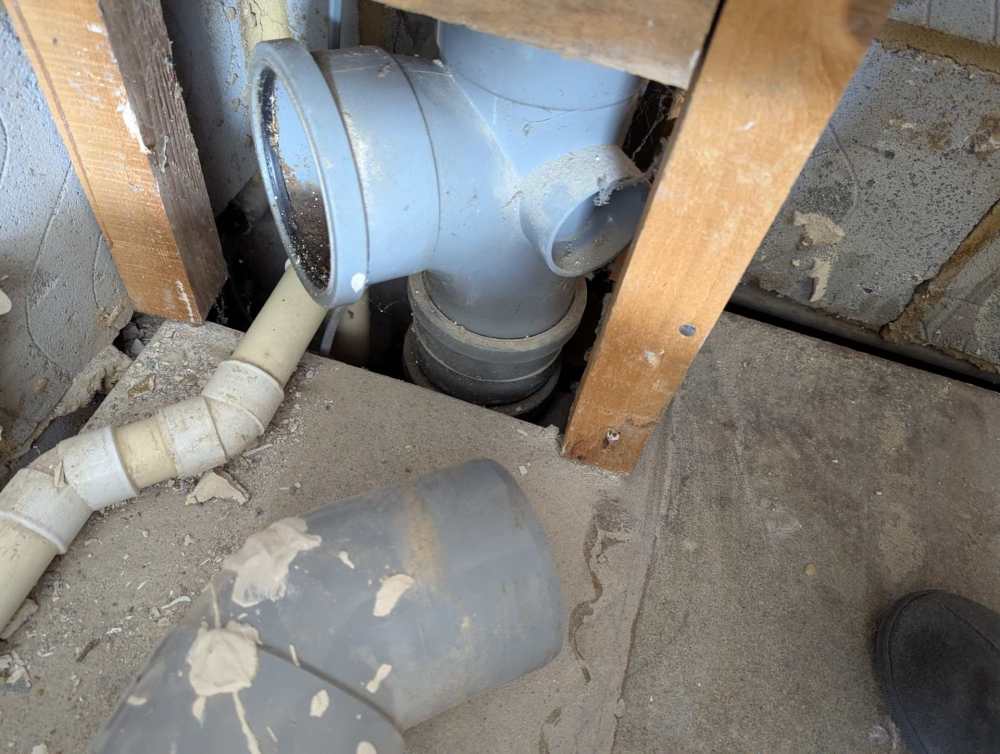
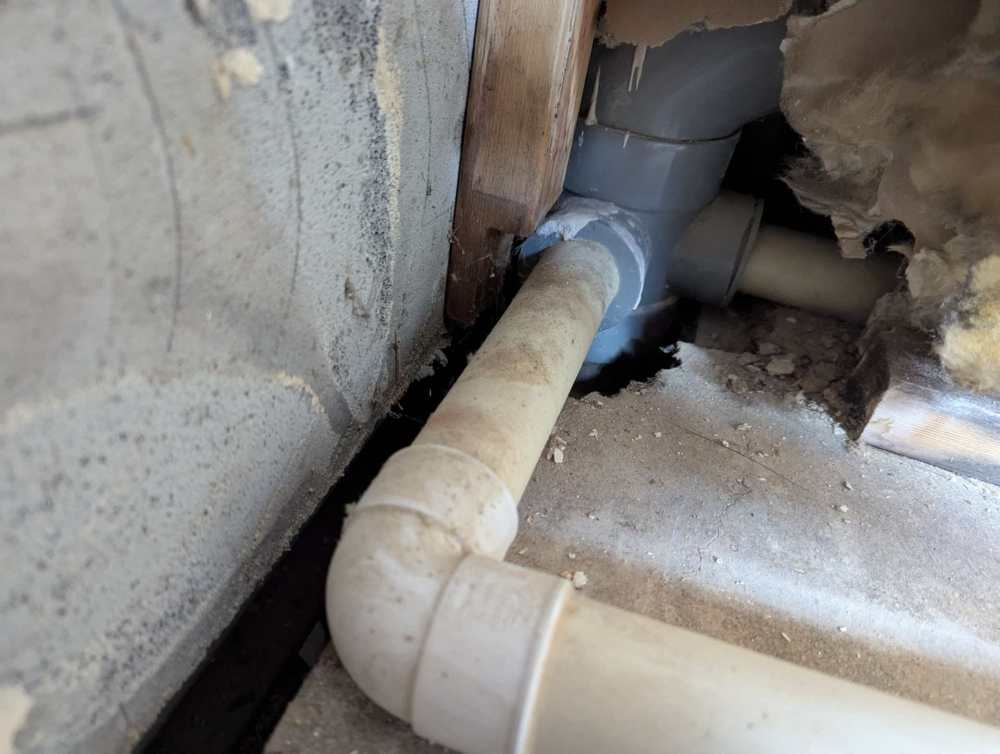
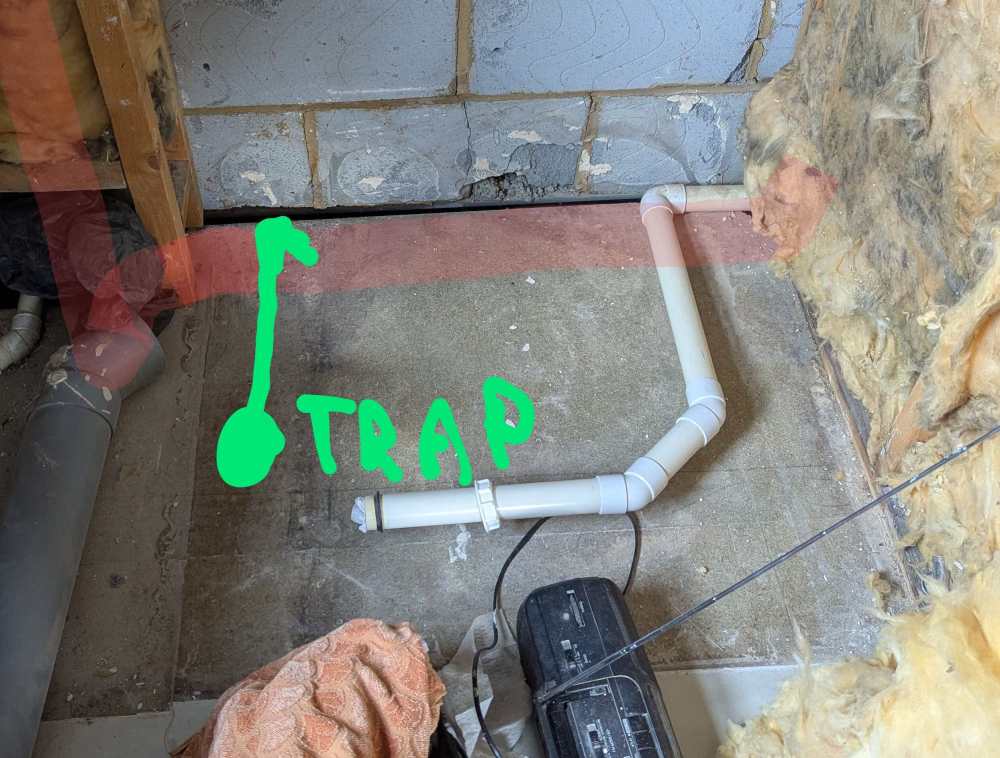
I've (mostly) gutted our ensuite and am now trying to decide the best way to provide a drain connection to the new shower tray and basin. The existing connections are as below. The main bathroom is through the wall on the right and there's a mini stack that the shower drain is connected to (along with the bath, toilet and basin in the main bathroom), with a 110mm running horizontally under the floor at the back to join the main stack on the left. Main joists run top to bottom, except there's a double trimmer running left to right next to the 110mm at the back that's carrying the joists for this section. The existing basin connection is 32mm all the way with minimal fall into a vertical drop, and the drain used to glug whenever any water was run down it. I was hoping to find some 40mm somewhere but no joy, so I'm thinking about capping the 32mm and opening up the boss next to the toilet waste connection and running 40mm, reducing to 32mm where it comes out of the wall to the basin trap. Does that sound like the best option? For the shower, the current connection from the mini stack is above floor level: The old shower tray was on some bits of 4x2 on edge and had a big upstand, so a huge step up and over. I'd like the new tray closer to the floor, so I'm thinking about capping the existing and cutting a channel in the chipboard floor, putting a strap boss on the top of the horizontal run at the back and dropping the shower connection straight into the top of it, something like this: I'd then raise the tray on a couple of layers of 18mm ply, so there's still a slight step but not as much as before. Is that the best option, or is there another way? Many thanks in advance!

-
Boiler short cycling with low flow temperatures
seanblee replied to seanblee's topic in Central Heating (Radiators)
I'm going to give that a try for a few days and see what the gas consumption looks like - at the moment, it works quite hard from 4-5:30 every morning to lift the temperature, and whilst it's been around 5 degrees outside, we've been using 85kWh a day, which feels like a lot to me. -
Boiler short cycling with low flow temperatures
seanblee replied to seanblee's topic in Central Heating (Radiators)
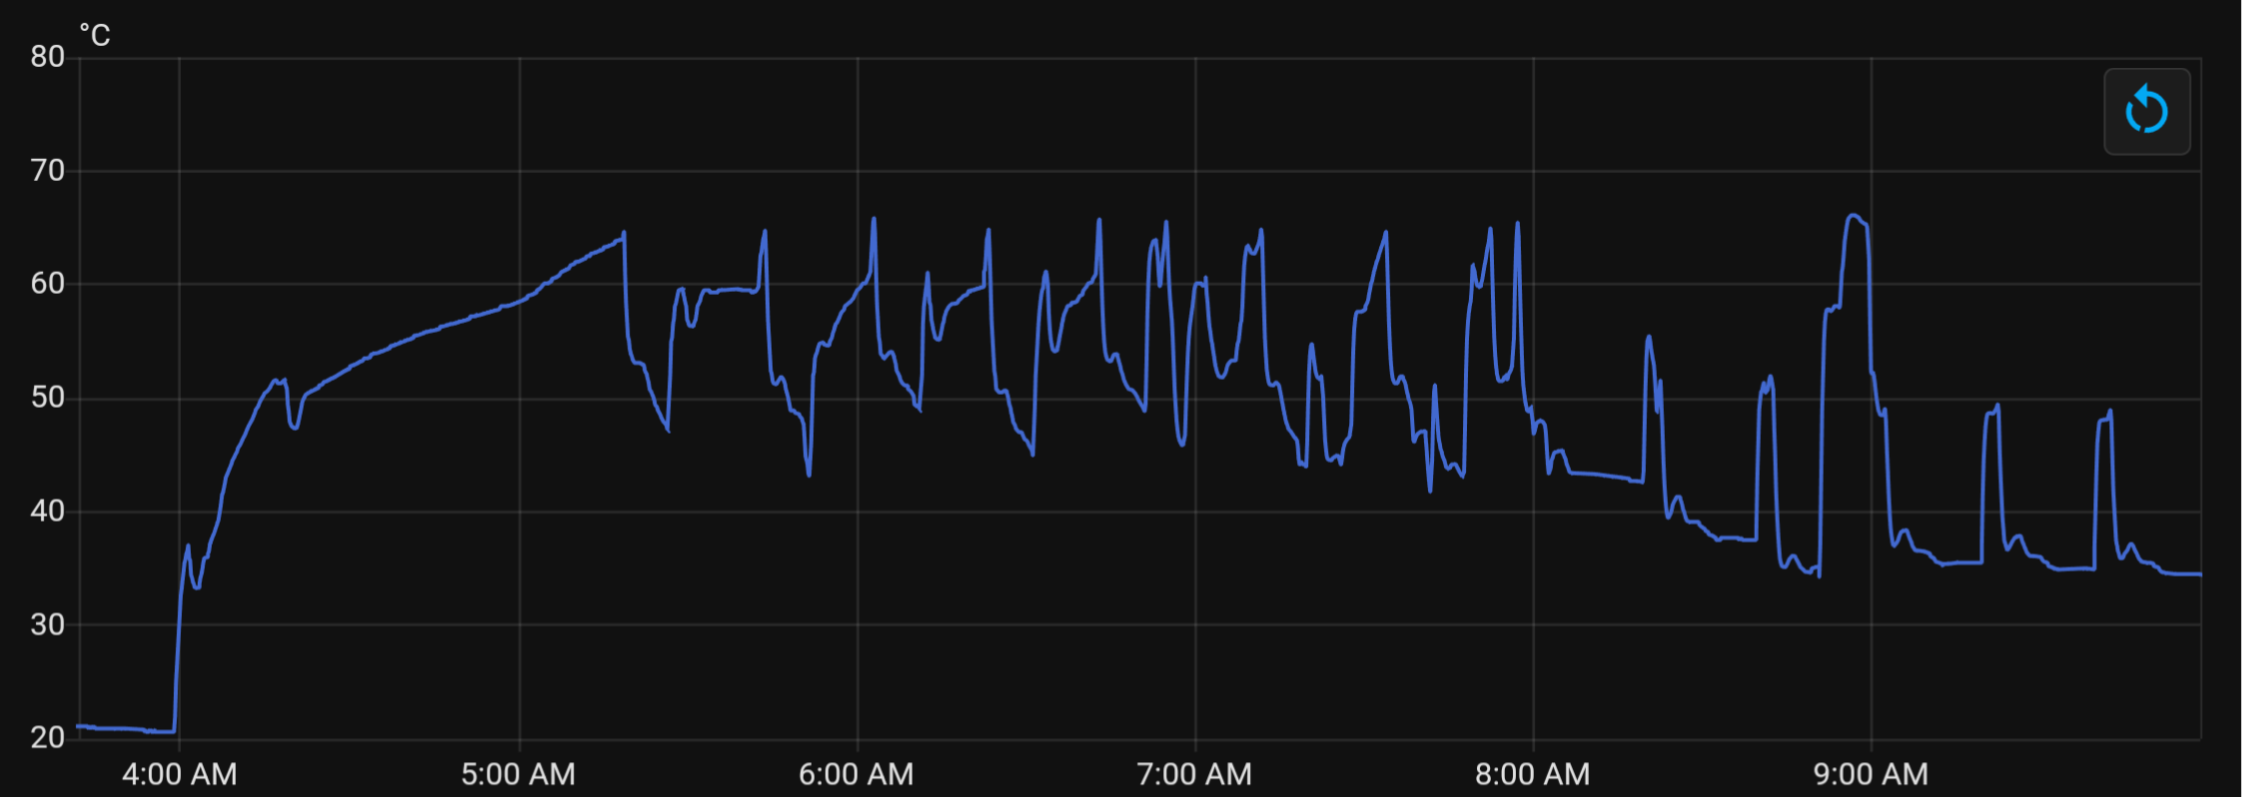
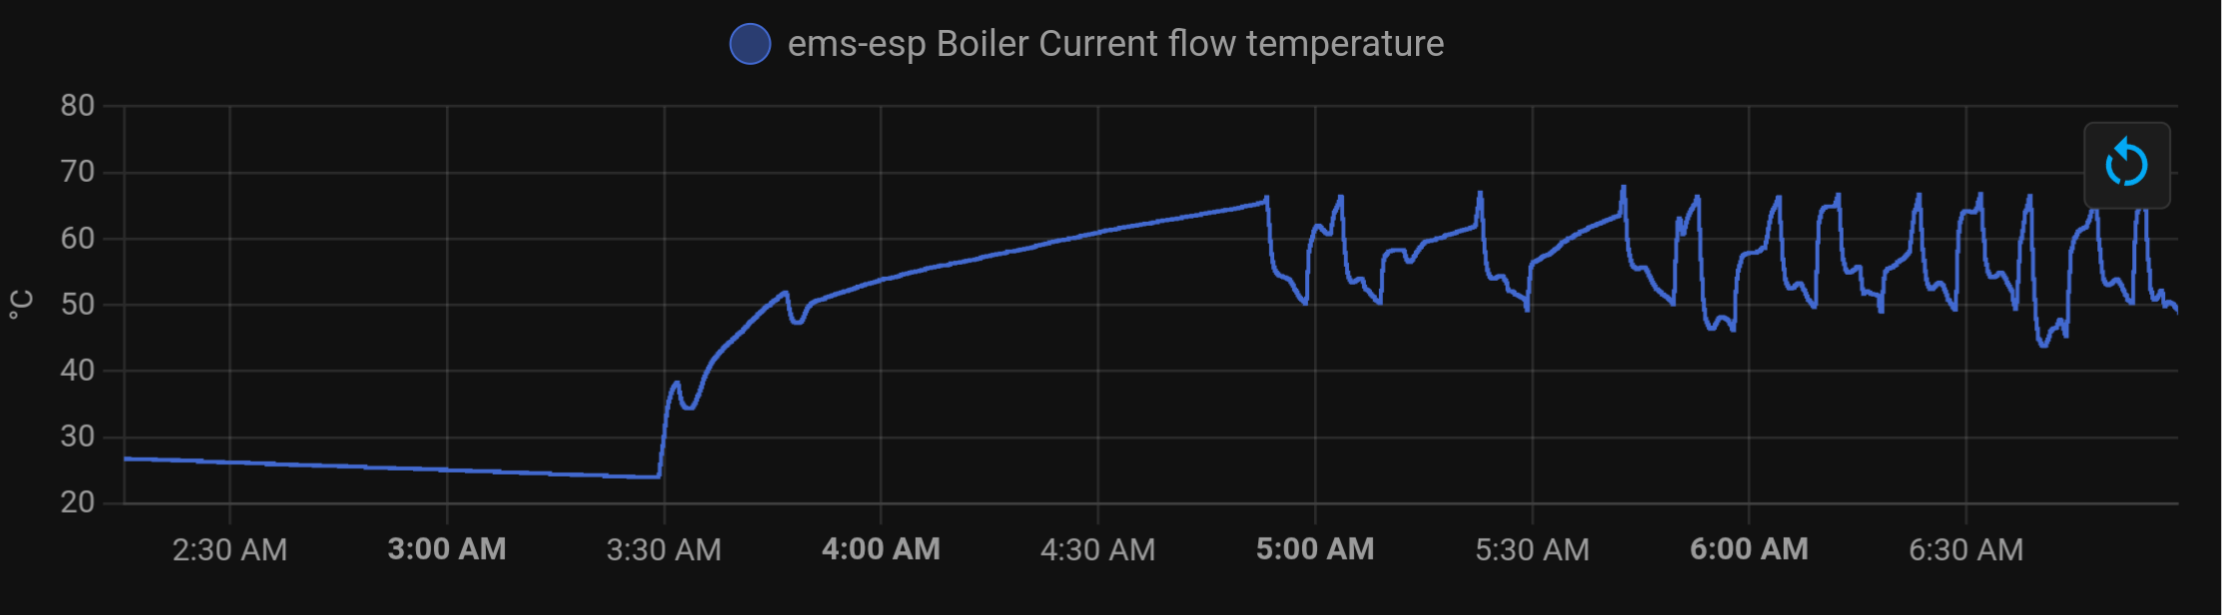
Well, I'm still running at over 60 degrees flow temperature - I think I'm ultimately going to need to replace the two vertical radiators with bigger ones to get more heat into the room at lower flow temperatures. Other than that, I think things are looking pretty good - this is the flow temperature today, and the burner stats show it running at 28% from 4am for nearly 90 minutes, so it's no longer short cycling.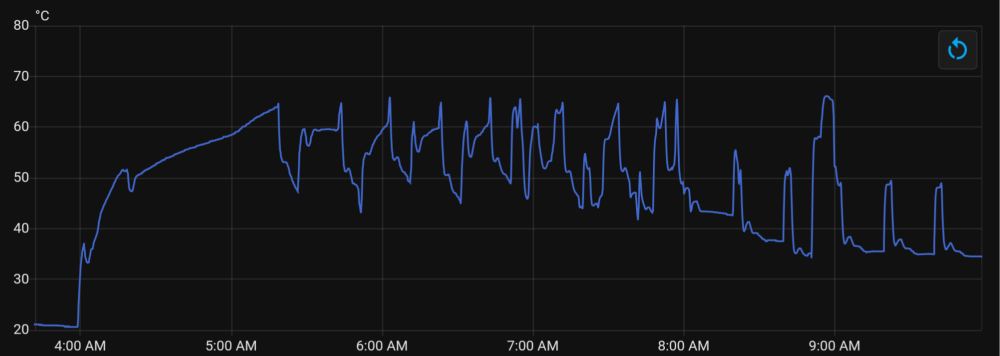
-
Boiler short cycling with low flow temperatures
seanblee replied to seanblee's topic in Central Heating (Radiators)
They're all back where they were, so approx 10 degrees drop across each radiator at 65 degrees flow. At this point, I think the changes that have made a difference are eliminating (most of) Evohome's TRVs, range rating, tweaking anti cycle and increasing the flow temperature. I'll give it a few days then I might try lowering the flow a few degrees in tandem with opening the lock shields a little and see what that does, but I'm happy it's at a good starting point now. Thanks again! -
Boiler short cycling with low flow temperatures
seanblee replied to seanblee's topic in Central Heating (Radiators)
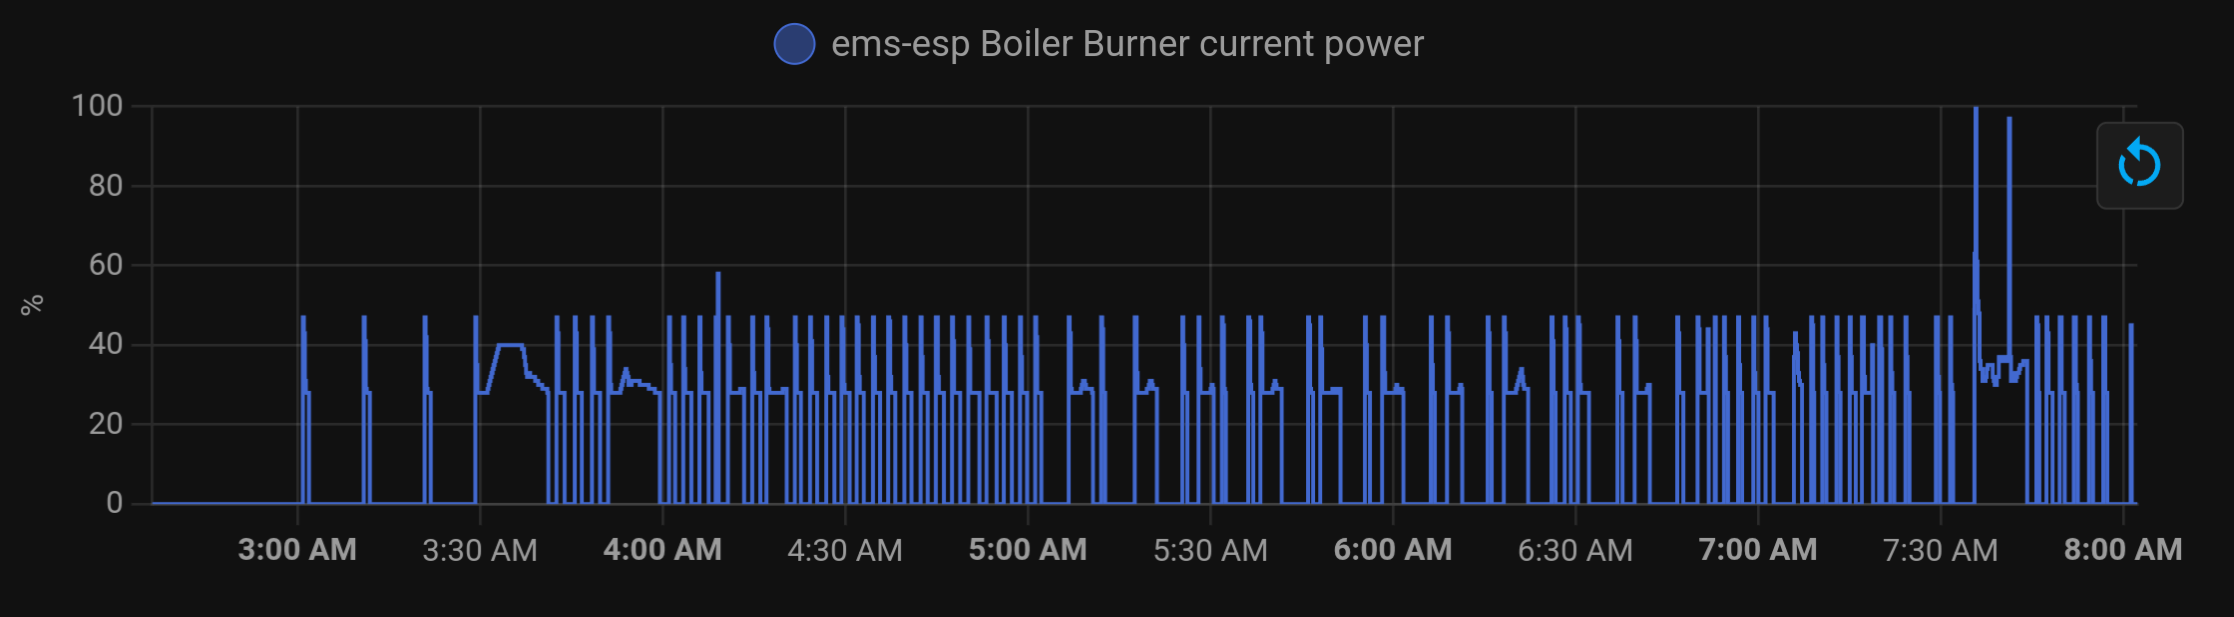
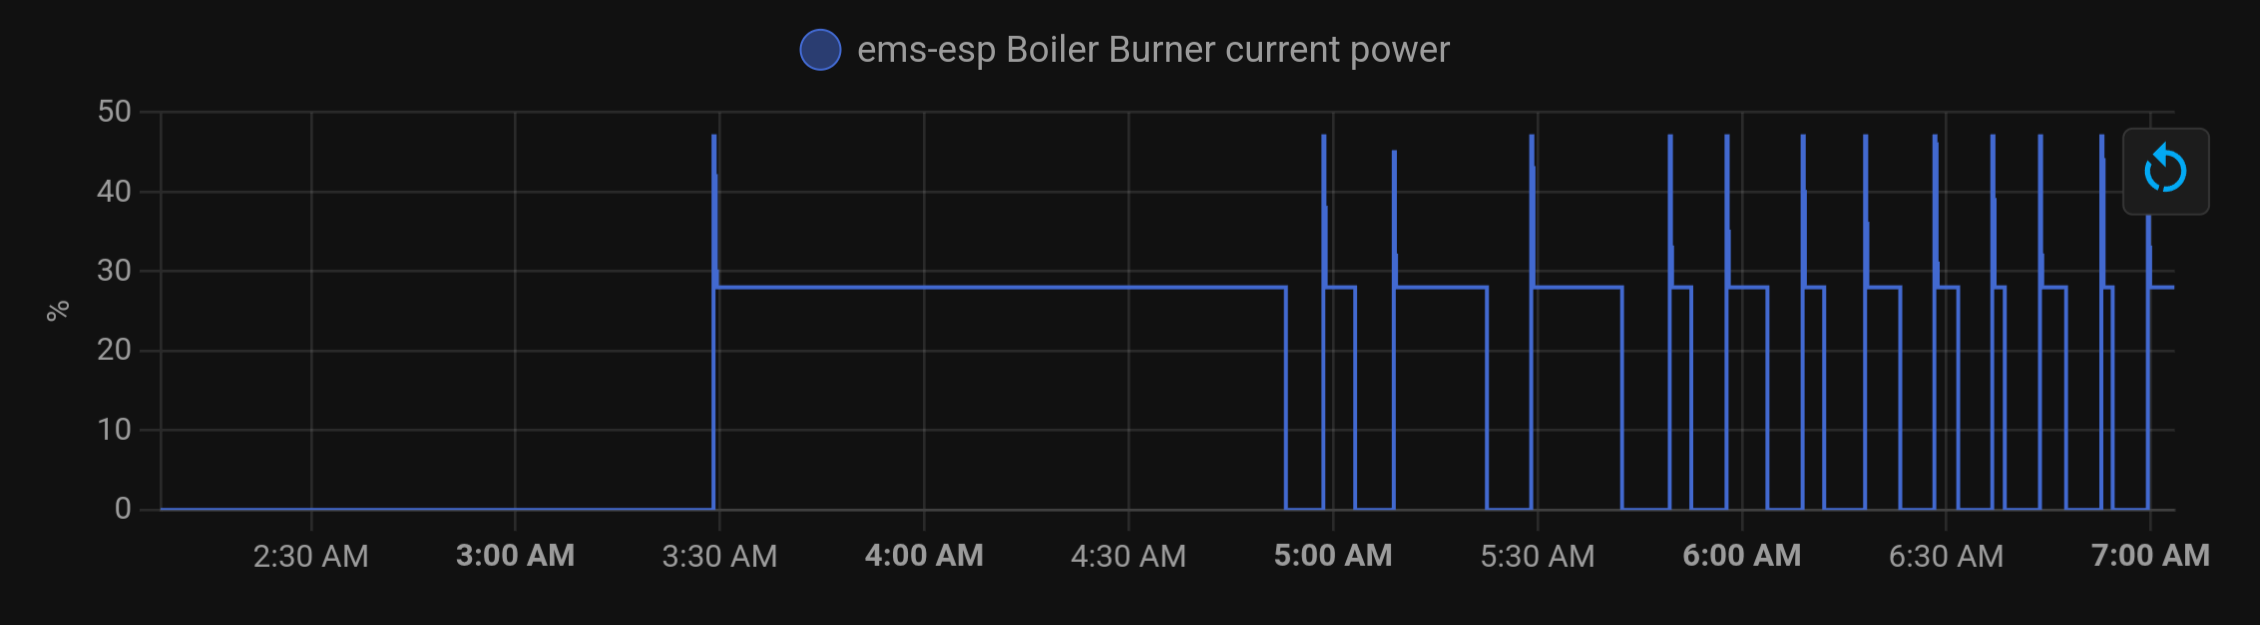
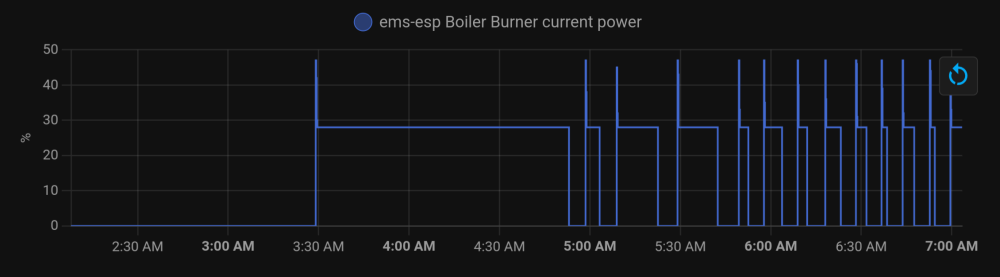
This morning is looking rather better: Perhaps more interesting is the burner power - this was yesterday morning: And this is today: Pretty dramatic difference! I might still raise the ACT a little to reduce the cycles when the room temperature is closer to the set point, but this is the first morning I can remember where I came downstairs to find the lounge at the target temperature, not 1-2 degrees below. 28% is as low as it'll go for range rating, the register won't accept a smaller number. It looks like it very briefly fires at a higher power level but almost immediately drops back to the configured setting.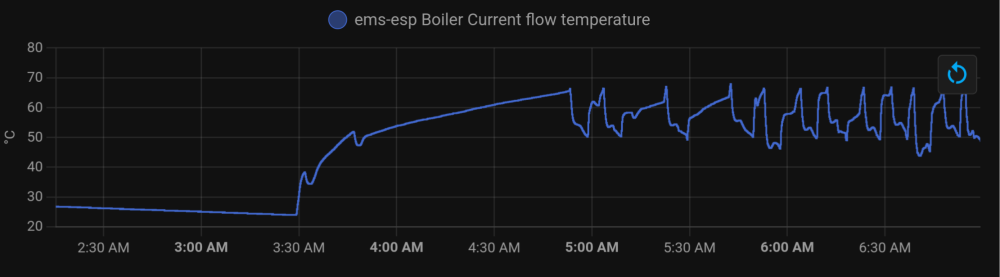

-
Boiler short cycling with low flow temperatures
seanblee replied to seanblee's topic in Central Heating (Radiators)
Good call, I'm not sure why I thought 40% was minimum, I've dropped it now to 28%. I reduced the anti cycle time when I was struggling to hit the target room temperature in the lounge - I've bumped it up to 5 mins and increased the hysteresis to -15K. Behaviour on this boiler is that if the flow overshoots, both the anti cycle time and the hysteresis have to be satisfied before it re-fires. I've also increased the pump overrun from 5 to 10 minutes. Thanks again for your continued input, much appreciated! -
Boiler short cycling with low flow temperatures
seanblee replied to seanblee's topic in Central Heating (Radiators)
Thanks, yes I've played with most of that. I range rated it down to the minimum (40%) for heating (installers left it on 100%). I tried decreasing the anti cycle time to 1 minute but I've bumped it back up to 3 now. On the pump, the installers left it in the default of proportional high, which was very noisy, so I dropped it back to proportional low a few weeks after it was fitted, and now it's on fixed speed pump step 2. I only got monitoring working through HA in the past few months so I've no idea if it's always behaved like this and I've just not known, or if this is something new. I can try pulling the pump and seeing what state it's in, it's internal to the boiler though so I'm not sure how easy that's going to be. I was wondering if it maybe needed a flush. -
Boiler short cycling with low flow temperatures
seanblee replied to seanblee's topic in Central Heating (Radiators)
Unfortunately yes. I've increased the set point to 65 and it seems better, but I'll know more tomorrow morning - right now, the rooms have overshot their set temperature, so I think Evohome needs to re-adapt. -
Boiler short cycling with low flow temperatures
seanblee replied to seanblee's topic in Central Heating (Radiators)
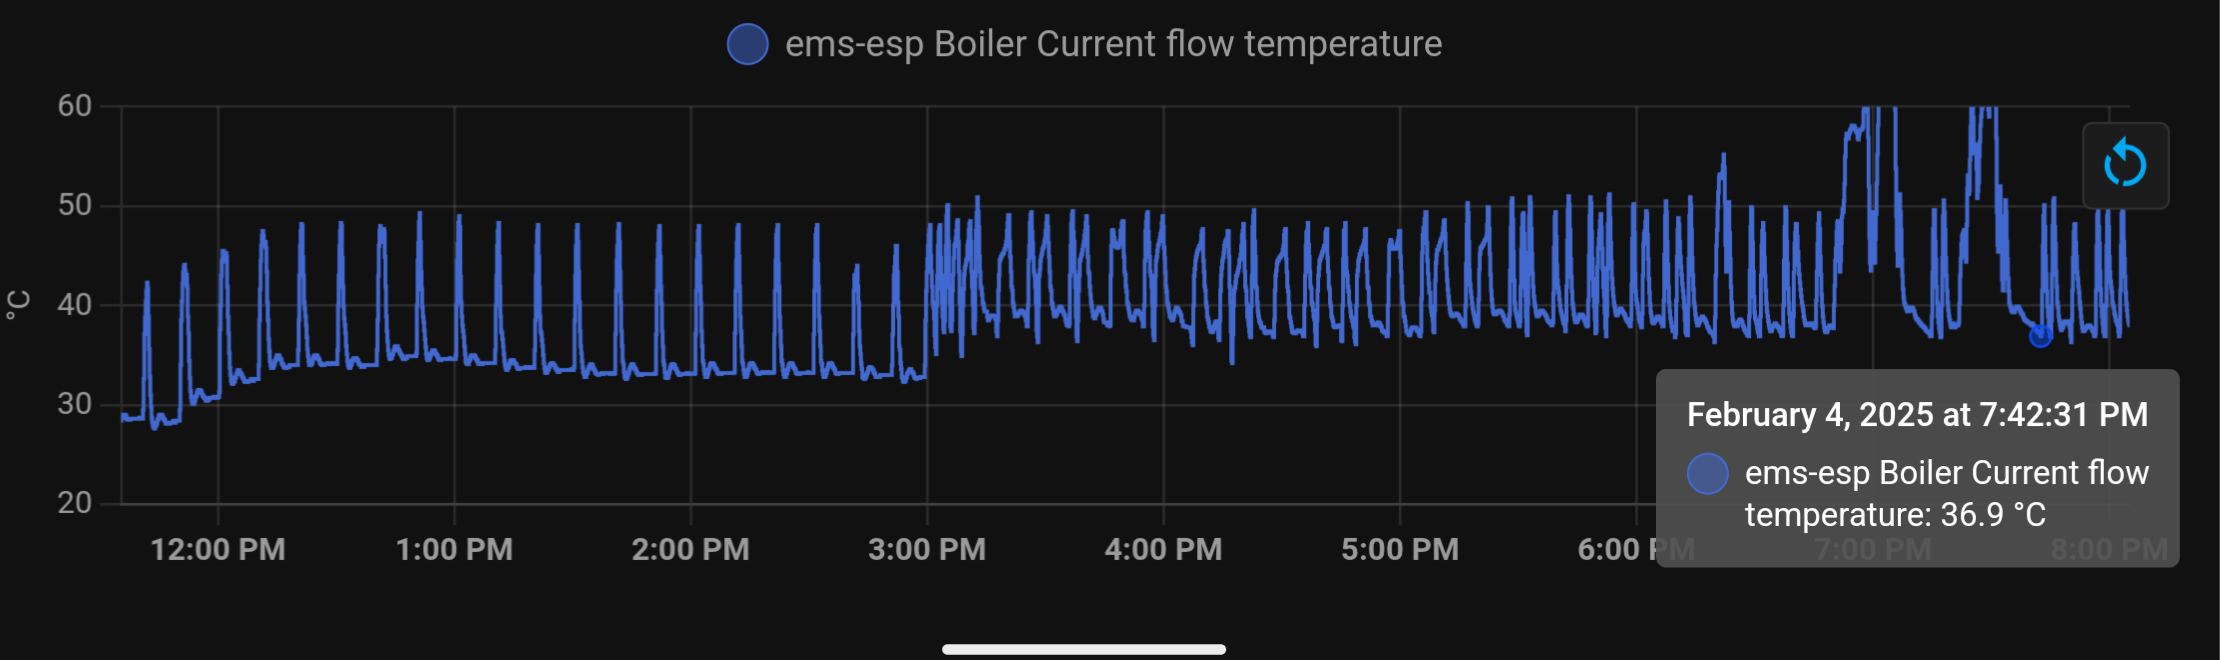
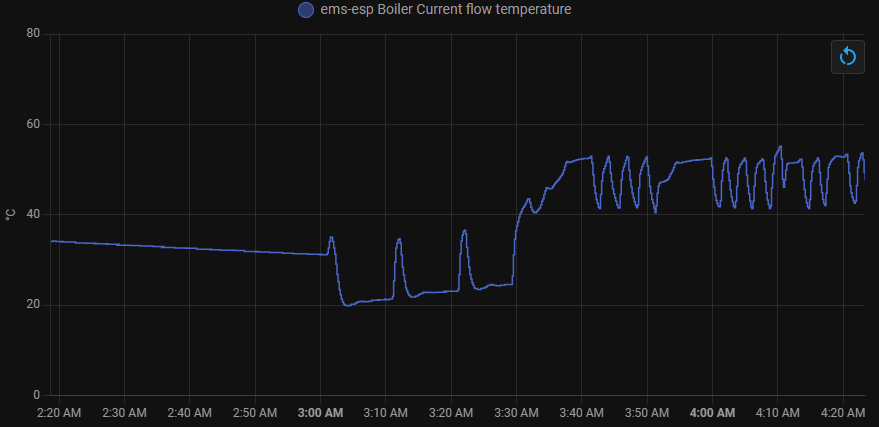
I increased by half a turn this morning and another quarter this afternoon (leaving some lockshields now wide open) and it hasn't made any real difference to warm-up this afternoon. The setpoint was 18 for the lounge during the day, increasing to 20 at 5pm - Evohome decides when to start warm-up so it hits this temperature at this time, and it looks like it kicked off just after 3pm today: Overnight setback for the lounge is 17 (dropping from 20 at 10pm), so there are a few spikes from 3am onwards where I guess Evohome is firing the boiler for short durations to maintain temperature. Warm-up proper started at 3:30am in order to hit 20 by 5:30am (my kids wake up annoyingly early!): I think I'm going to try that - increasing pump speed is out because it makes the whole system noisy (even with lockshields wide open), so the only logical thing to try is raising the flow temperature. I think I'll put the lockshields back where they were this morning, turn off the HA automation then bump the flow dial up to 60 and see how that runs. If it's stable, I'll start incrementally decreasing it until I get back into cycling. It does make me worry about a potential future ASHP - I know they don't need such a big delta between flow and return, but I don't see a way around a buffer without a full repipe, which would be a nightmare...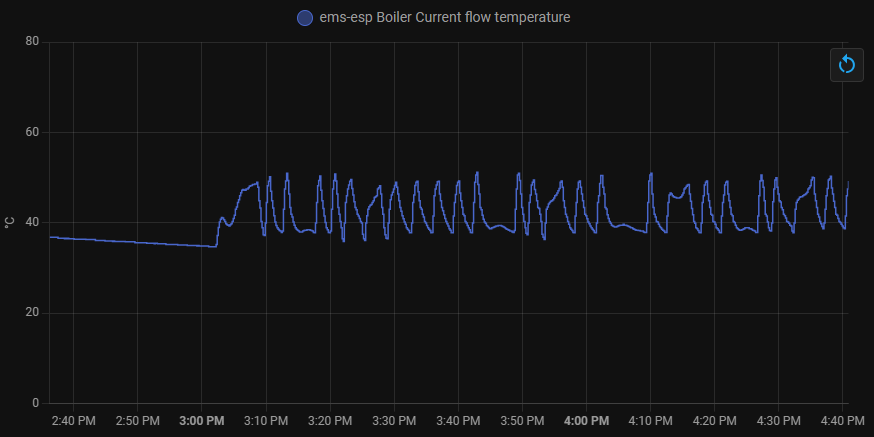
-
Boiler short cycling with low flow temperatures
seanblee replied to seanblee's topic in Central Heating (Radiators)
No improvement this morning. I'll try opening the lockshields half a turn as you suggest and see what that does...
-
Boiler short cycling with low flow temperatures
seanblee replied to seanblee's topic in Central Heating (Radiators)
I understand that Evohome turns the boiler on and off a few times an hour, but that's not the issue I'm having here - even when Evohome is continuously calling for heat, the burner is firing, the flow temperature is rapidly rising until it crosses the setpoint, then the burner is turned off until the flow falls to the hysteresis threshold of 10 degrees below the setpoint, then the cycle repeats... -
Boiler short cycling with low flow temperatures
seanblee replied to seanblee's topic in Central Heating (Radiators)
No obvious improvement yet, but I'll see what it's like tomorrow morning on warm-up...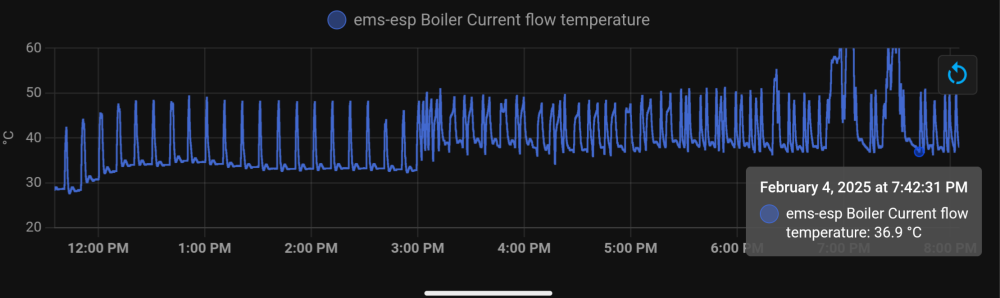
-
Boiler short cycling with low flow temperatures
seanblee replied to seanblee's topic in Central Heating (Radiators)
When I get a moment, I'll drain and remove the vertical rads and check the diverters - mine are a bit more awkward because I've got central flow and return via a H block valve, but there are bungs at each end of the bottom tube so I'll remove those and check. -
Boiler short cycling with low flow temperatures
seanblee replied to seanblee's topic in Central Heating (Radiators)
I've removed the Evohome valves from all but the lounge radiators and put everything else back on TRV4s - that leaves Evohome controlling the two vertical rads, the boiler and the UFH (via another BDR91 to power up the zone valve, pump and actuators). I'll let you know if that helps! Should I be considering an ABV, or some sort of flow rate monitoring?