Leaderboard


Popular Content
Showing content with the highest reputation on 10/11/23 in all areas
-
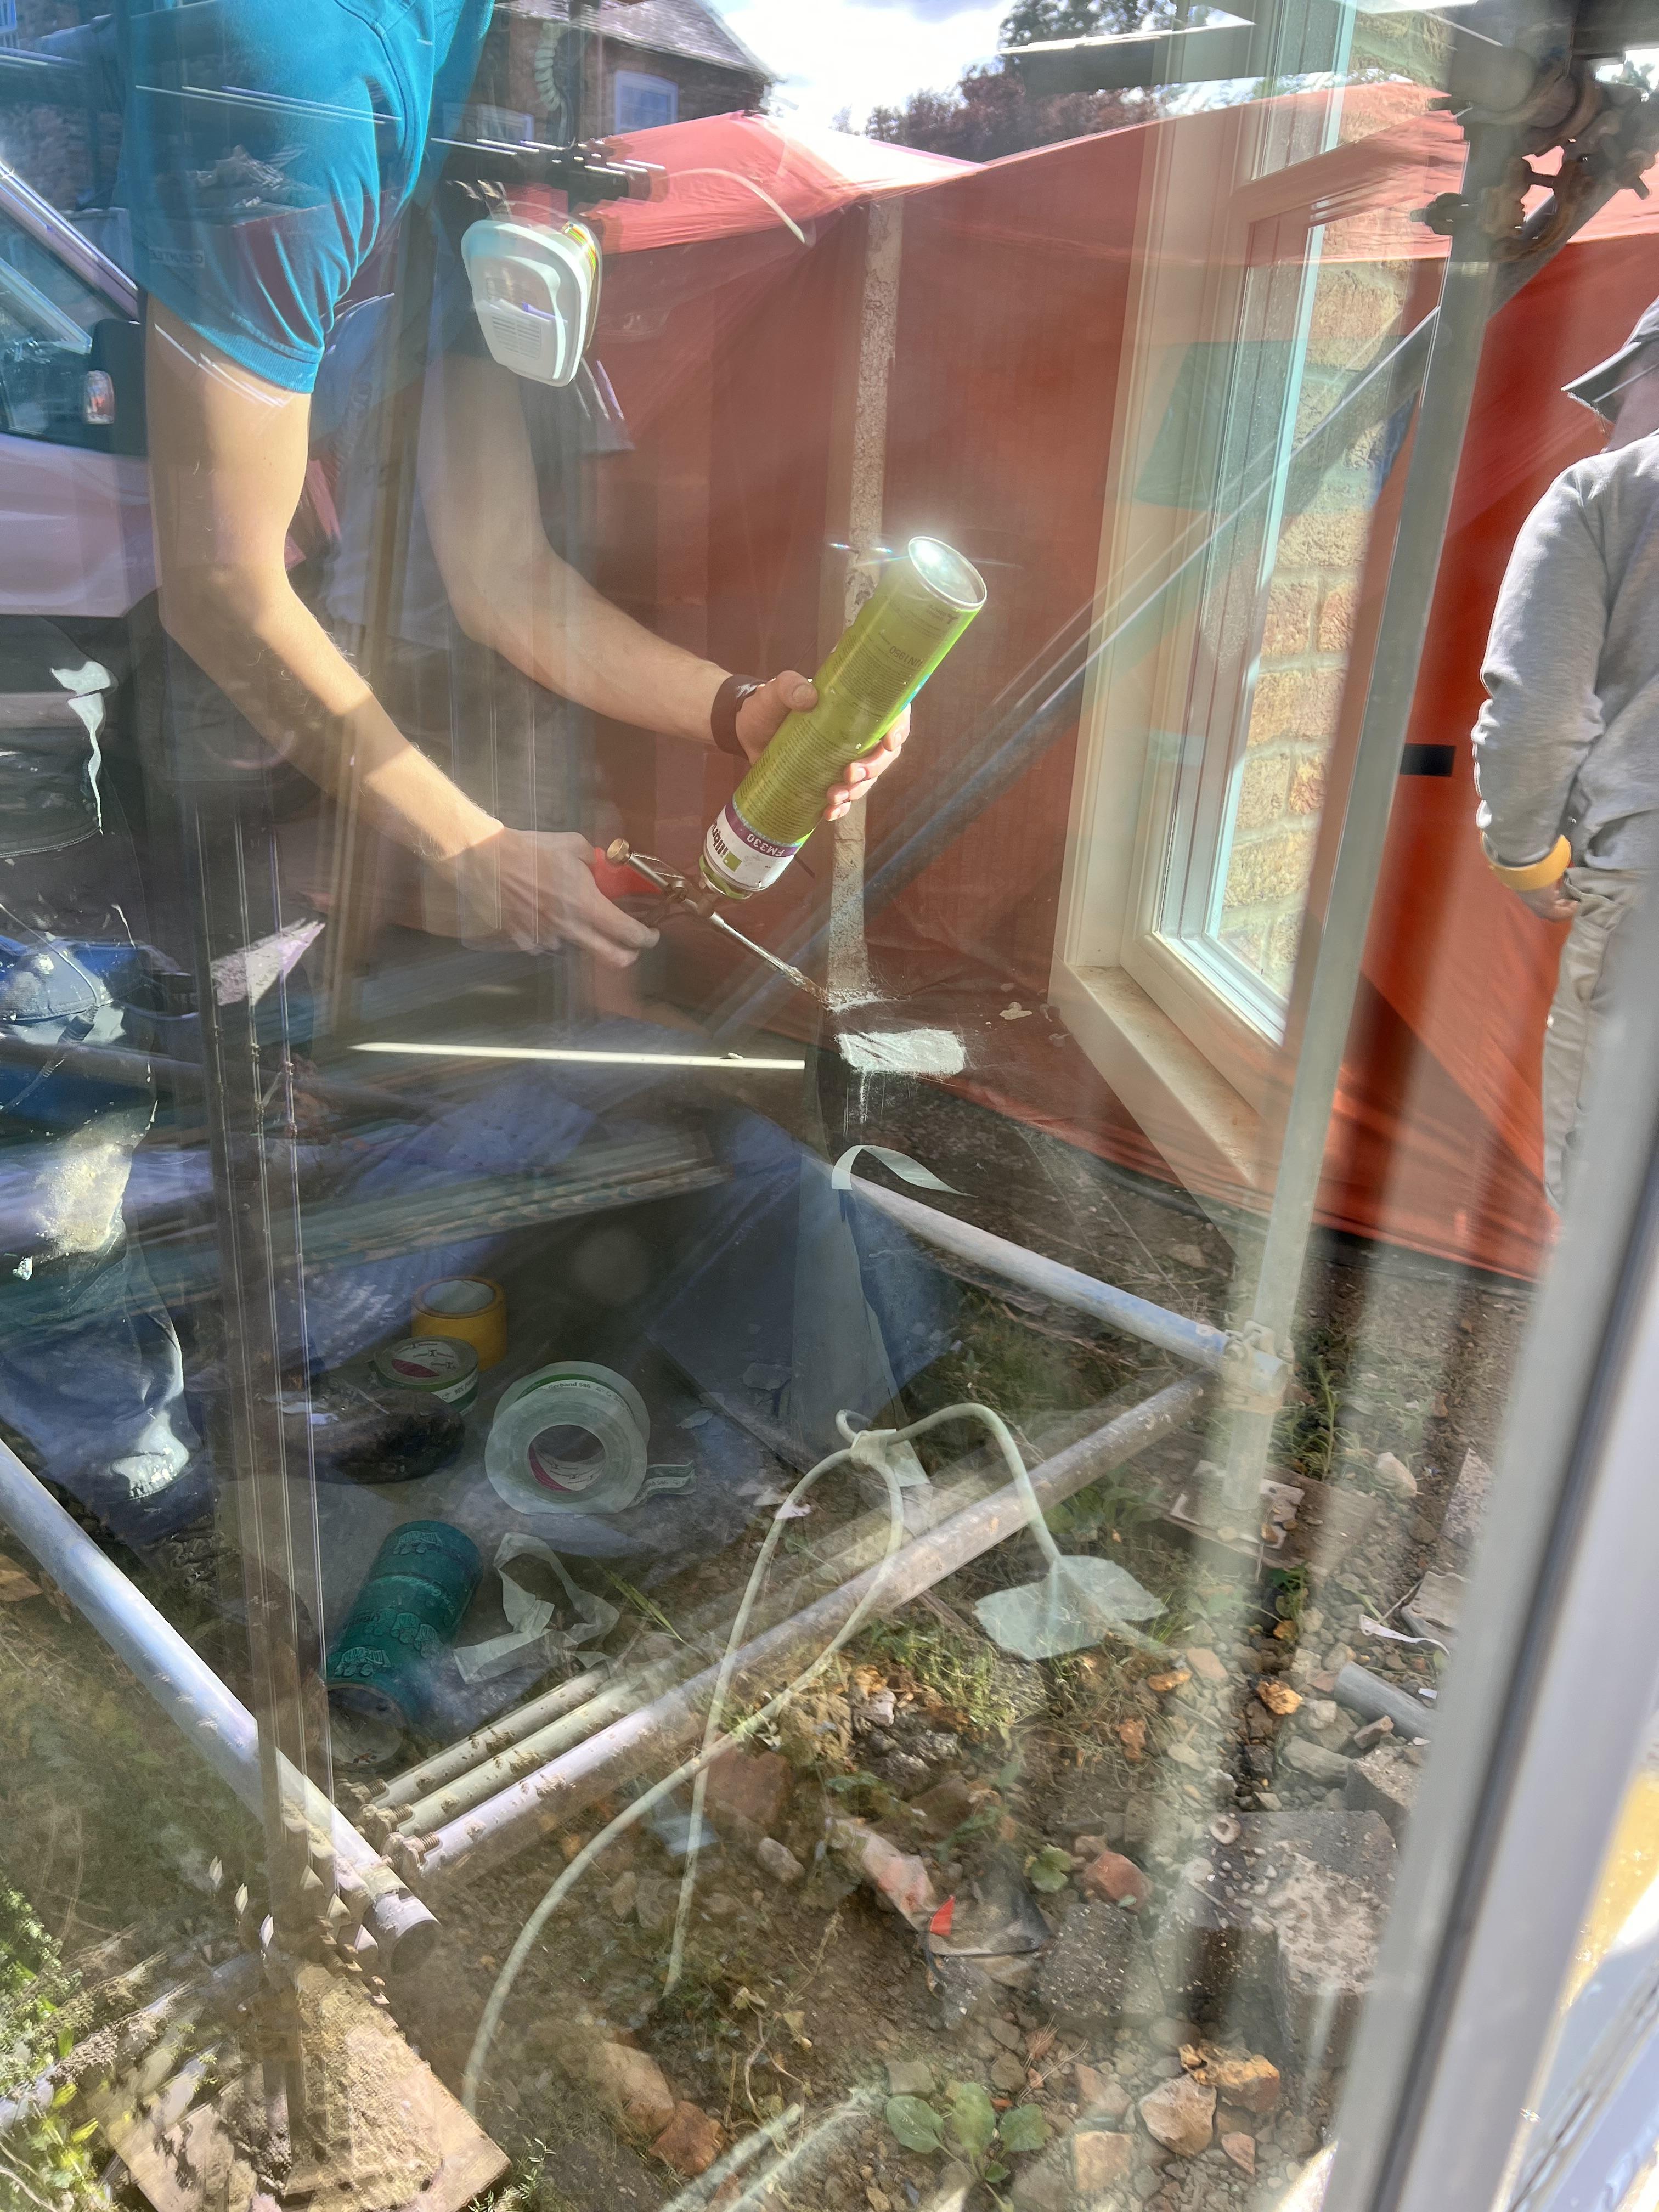
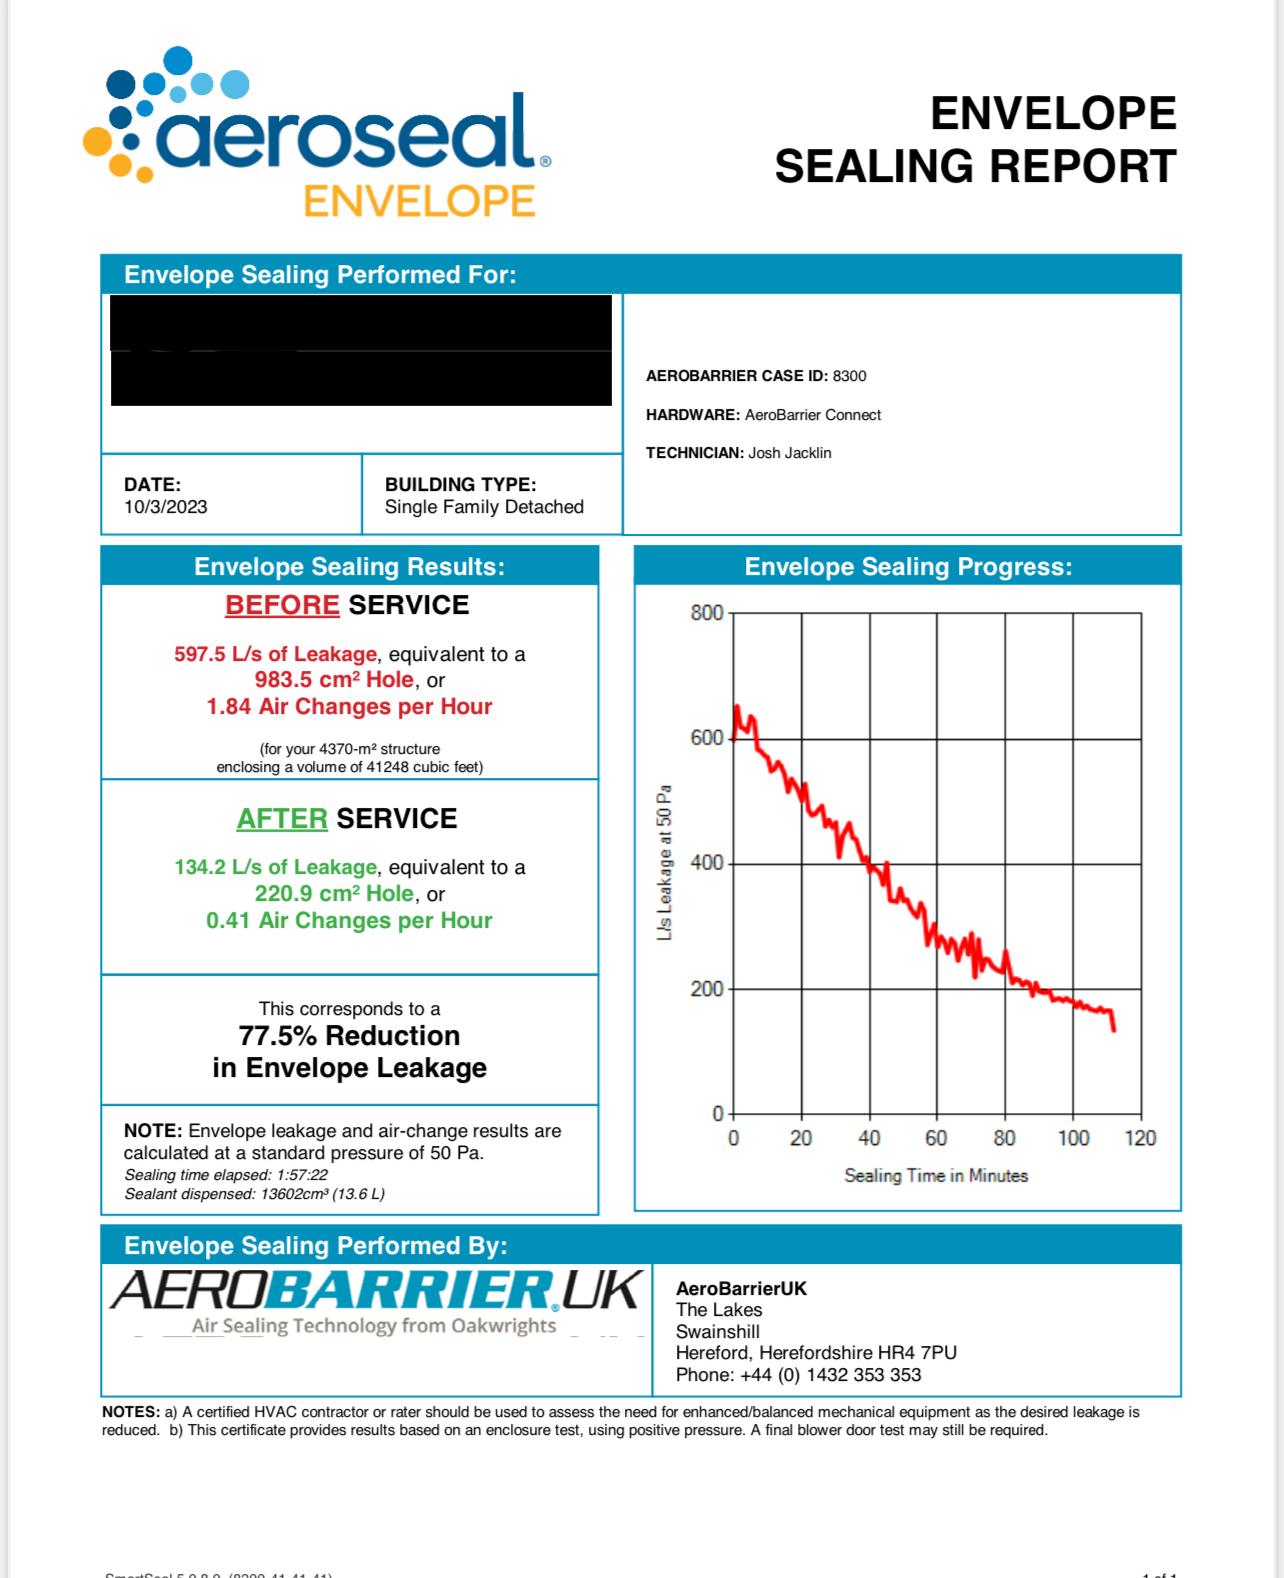
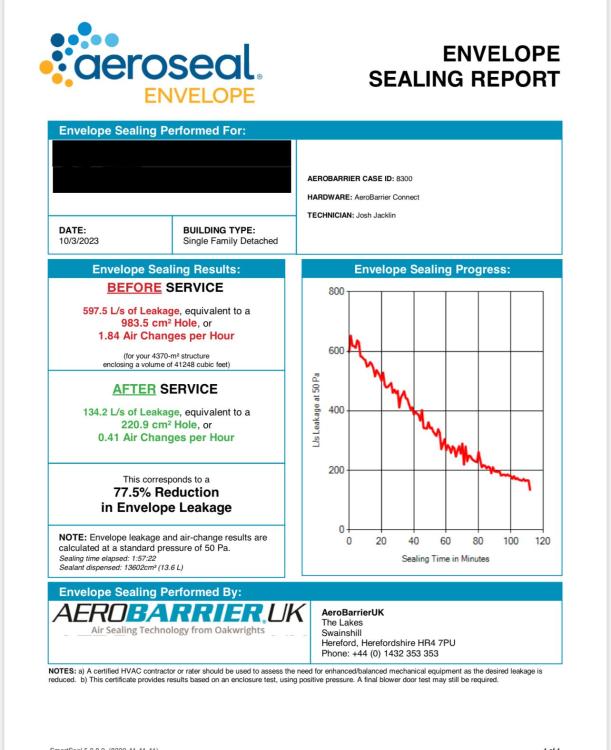
Hi all - I know this is very late after these original posts but it seemed the right thread - I'd been debating Aerobarrier https://www.aerobarrieruk.co.uk for some time, I really wanted to build a house that's as efficient as possible but was stuck with a traditional build (brick and block)... My builder knew this and supported me with air tight roof membranes, parge coat, and air tight tapes to all windows and doors but I didn't think this would get me as far as I wanted - the passive 0.6ach I spent quite a bit of time on the phone with the folk at Aerobarrier who were really patient with me as I asked them lots of questions to deal with my internal debates, but eventually took the plunge - the cost wasn't crazy so I had convinced myself to give it a go... The Aerobarrier team spoke with my builder a few weeks before to run through all the work he had completed and they had agreed that the best stage to do this work was pre-plaster so my builder was a little concerned at what the initial test result would come out at! The team spent most of the day on site, initially checking the completed work, and then using an air heater to warm the house (which helps with the sealant), the kit consists of several 'stations' set up around the house which is a computer controlled mist that comes through nozzles on tripods which contains the sealant. The initial test on the house came out at 1.84ach which we were fairly happy with, the team then kick the process off and I watched the house fill with the sealant, which runs for about 2 hours, as it's going you can start to see the numbers drop as very small holes are plugged, after a while a member of the team entered the house to spot larger holes (you can see where a lot of sealant is attracted to the holes as it forms a white mass) and manually sealed these leaving the process to continue to run... And... The result for me was an amazing 0.41ach at the end of the day and this is pre plaster and floor tiles which I hope will at least keep me at this level - A very happy end result for me. I thought I'd share my experience with you all as I know this is newish to the UK - I'll be waiting for my final post build air test now and making sure no new holes are made in the envelope! I've included a couple of pictures which may help give a view of what I've explained about, happy to take any questions....

 3 points
 -
Once it is plonked down, any prising up to get levels perfect would lift it away from sand and cement, but tile adhesive will cling and there won't be voids.3 points
-
Definitely need a right of way to use the private access road, and that needs to include not only you and your visitors when the house is complete, but also all the traffic in relation to the build, delivery vehicles etc. That needs to be a condition of your offer that an access right is included. And it needs the be hereditable (might be the wrong word) i.e the right of access will pass to the new owner of you sell the house.2 points
-
I personally would not use any silicone on the trap . It should work “ as is “ . Also if it needs to be removed later it will be far easier . Pipe off trap is just hand tighten yes - no glue .2 points
-
I’d make sure you have a rubber mallet and spirit level handy . Then you can gently tap it level … 👍2 points
-
I agree, sand and cement is very solid and especially on any timber, which will move a little. It’s a bit why I don’t like mortared ridge tiles .2 points
-
I’d say tile adhesive as it gives you more ‘play’ . A sand /cement mix will depend on your mix . I think it’s one of those things where either method would work tbh . Understand you want to be confident before you commit !2 points
-
I have installed a vent axia sentinel kinetic high flow MVHR, I have installed a fused spur next to the unit and also ran the cable in for the controller (copies for units controller on the front) I have just been look at the installation instructions and I naively thought there wouldn't as many control options as there is! Do i need a switch live or do i just link it out from the live so it runs constantly? Will the built in humidity control the speed when required? Is there any other form of control that people recommend? Any advice on this would be great! Thanks again all1 point
-
Quite a few years ago now, I lived somewhere that was getting a large housing estate built directly behind my back garden. The lib dems came a-knocking with a petition to get it stopped and just could not comprehend the idea that I was actually in favour of it being built. Poor souls.1 point
-
There are limits as to how small you can print stuff! The one here can do layers 0.1mm thick. As an on track aside, last night I got my lad to copy the reed plate of a harmonica. It's a bit of a challenge we're trying for a lad up the pub. The original brass reeds measure 0.4mm thick so that's no issue to print. We placed the printed reed bed in the real harmonica and could actually get proper notes on the low end but struggled on the high end ones. This was on the blow. Tried a printed reed bed on the draw side and got nothing. What was interesting is that the reeds are slightly raised. We had to print flat then wedge a sliver of paper under the bent reeds to keep them up. We then reheated the reed bed to just above the glass transition temperature of PLA and let it cool. The reeds stayed in the raised position. Of course plastic lacks the tonality of brass but it was good to try.1 point
-
It's on Amazon at https://www.amazon.co.uk/Ultimate-Energizer-Guide-Effective-Electricity/dp/1652228403. The most illuminating review I read said: Edit: plenty of videos on YT reviewing/exposing it.1 point
-
If you aren't proficient in CAD / can't draw & model in 3D then you'll initially be limited to printing other people's designs. Many are free, check out Yeggi & Printables for a start: https://www.yeggi.com/ https://www.printables.com/ Cults3D for example has designs you need to pay a small charge for sometimes but then as @SteamyTeasays, you're used to paying for it..... This then seemed apt to start you off: https://cults3d.com/en/3d-model/home/ass-penholder1 point
-
That seems evasive. If someone has dug a hole it isn't much trouble to measure the depth. Ask politely? Ahh but I now see they haven't dug a hold, just looked at a general statement in a book on the area. Till is glacial deposits. It can be very good to build on. Also it can be tend of m deep. Really I would want to dig a hole on your site because it might be topsoil on fill or disturbed till. Farmers bury stuff in corners of fields too.1 point
-
Aim for 0.15 U value or ideally better, to manage downward heat loss. Ultimately centres and flow temp depend on how many W/m2 you need to get out of the floor? Have you completed heat loss calculations?1 point
-
Be prepared for high flow temps and quite high downwards heat loss, you need double your proposed insulation. That level of insulation is fine for radiators, but not fine for UFH.1 point
-
I have manual switches outside wet rooms to boost, but after the first couple of months they are very rarely used, except in the kitchen if we are cooking smelly stuff. The humidity sensor looks after most boosting, but must say that only kicks in rarely. We have our system tuned well below building regs. We do monitor CO2 levels in lounge and bedroom, if we have 6 or more in the lounge for a long period we also boost then manually. So I wouldn't go overboard with manual control.1 point
-
But if the bottom is flat, then why not lay it as one big tile?1 point
-
Check the instructions. Some/most trays need support over the whole base area so for those tile adhesive and a notched trowel is what I used. Allows some levelling like you would a tile. Other trays are strong enough that several large dabs of mortar can be used and that's slightly easier to level the tray.1 point
-
45° will always run more smoothly if you can. A pair of 45s will also allow more tweaking. It's probably more to do with your geometry. 90s are easier though.1 point
-
Thank chaps. I'll give with tile adhesive.1 point
-
I would start by lowering the ground level adjacent to the house, if you can't lower the whole garden, dig a trench cluse to the house at a lower level and make a feature of it with decorative gravel for instance. If nothing else it will give you an indication of high water table (if it fills up and does not drain away) Ideally you would cut back the paving leading to the front door and fit a drainage channel there to again try and keep water away from the front wall of the house. And do the same on the paved area leading to the garage, stop the paving a bit away from the side wall of the house and a drainage channel to keep water away from the side wall.1 point
-
So Installer came and straight away stated issue with wiring. Further, temp sensor for tank was not even connected. Now I have hot water. I can see pump working, however immersion seem to be kicking in on the end of the cycle. Not sure if this is ok, water set to be heated to 55 degrees. Heating seems to be working ok at the moment.1 point
-
From experience the water board are sticklers for the rules, might get lucky but personally I wouldn't chance it. If they cotton on its the wrong chamber they could potentially start to question or ask for further areas to be re-exposed which is hassle you don't need.1 point
-
This might be worth a look for sizing battery: I'll do an update against actuals at some point, went MCS in the end and filled the roof on the scaffolded elevation as that seemed the most cost effective approach. Battery sizing has a much harsher drop off though so be wary of chasing that last 10% of usage as things start getting silly. With export payments where they are and heat pumps getting more affordable, I'm glad I didn't bother with a hot water divert as I would have turned it off by now and used cheap rate electric. This can change at the whim of the market though.1 point
-
By the time the slates are lapped it will be nearer 0 degrees, so no. The GRP slate effect is great, really looks the part. Mind you, if it is virtually flat it won’t be seen and even a flat slate effect would look wrong to me. Just go standard GRP.1 point
-
looks like the external sill is now built into the walls, which makes it interesting as the sill is usually screwed into the bottom of the frame (from the bottom). open a window and look to see if they have screwed through the sides of the frames into the walls when fitting them, if not then they have probably been fitted with straps that will be buried under the plaster. looks like they have fitted trim up the sides of the frame on the outside, so hopefully it is a bit undersize which will give you some wiggle room getting it out and the render is stuck to the trim and not the frame, although the trim will be superglued to the frame. externally glazed too just to add to the fun. probably just been foamed in LOL. a multi tool will cut through the frames. i think my plan of attack would be to cut the plasterboard off the top and one of the sides about 2" away from the corner bead then about 2" away from the frame on the other side. measure the size of window needed aiming for a looser fit than normal 😆. id be tempted to just cut the old sill out with a multitool and make the 'horns' of the new sill slightly bigger to cover over what's been buried in the EWI. then just screw and foam the new one in.1 point
-
You really need to investigate coanda nozzles for MVHR, makes the whole process way less complex. Basically put the outlet or extract points anywhere that is convenient and let the air flow and it's tendancy to stick to a surface such as a ceiling do the hard work. Also research cascade ventilation strategies with MVHR, which can tie in to the above.1 point
-
I always preferred resin stone as it tends not to flex. I always put silicone around the waste connection top of the trap, both sides of washer underside of tray and top of tray.1 point
-
Looks great in the pictures.1 point
-
But if you are going the fan coil route, why not ditch the middle man and go a2a multisplit? The head units for those are far more developed and mass manufactured than water based fan coils.1 point
-
5degress is basically a flat roof. Typically min. 15⁰ for a standard tile, I've seen some low pitch ones down to 10⁰. You'll need some sort of flat roof or zinc panel system.1 point
-
Yes https://shapesgrp.co.uk/products/fibreglass-roofing-sheets/slate-tiled-roofing-sheets/1 point
-
As a pre-warning... this will be long. So there's another TL:DR at the bottom to save time! Let's get started So I'm back and I'm now slightly more informed than a few weeks ago when I initially created this thread. I'm writing this because these posts can often be super helpful for someone like myself. Feel free to read and share any helpful advice but please refrain from opinions which will quite clearly just trigger people. One thing I have learnt on this journey for definite is that everyone's requirements are extremely different. So please discuss the differences between options etc but let's keep it civil, informative and to be honest, fun! To clarify my objectives here, I'm looking to reduce (or better, eliminate) my monthly bills by investing now while we have the capital. I'm not looking for an amazing ROI in the shortest time possible. We're building a large extension onto the house with the intention of staying here to raise a family for the next 15+ years, minimum. So here's where I am at now: I crunched an absolute ton of data (basically uploaded 2 years worth of half hourly meter readings into ChatGPT). I manged to work out loads of interesting habits such as common peak times, highest/lowest usage days and highlight other weird anomalies. I'm pretty certain approx. 10 to 12kwh of solar storage will do me justice I'm looking at around 8 to 12, 405w, solar panels In-roof systems look pretty straight forward I've had some quotes back and for the system I was looking at from an MCS qualified supplier/installer we're looking at £12k A DIY approach, which also includes a bonus 300L solar hot water cylinder, would be approx. £6k Granted, this doesn't include fitting But, some of which I'll do myself with my electrician. The roofers, who are installing sky lights too, have agreed to install the GSE in-roof frames for the solar panels while they are up there tiling Finger in the air slightly, let's say unforeseen costs plus installation help from my on site trades is around £3k, then the final DIY route is now only a few grand less than the MCS approved route but still less than my initial £10k 'max budget' Since my original post, Octopus announced they were scraping the requirement for an MCS and I originally thought I'd struck gold on the timing! However, news articles everywhere would lead you to believe this is a done and dusted decision by them. However, after talking to them directly myself, it's actually just a trail on a very select number of customers. damn. I'm hopeful they will still roll this out fully and I've signed up to be a guinea pig regardless. fingers crossed. G98, 99, 100 etc forms are kind of confusing.. it's still not clear which or what I need if I never ever intend to sell back to the grid but I'm assuming the worst in all my planning for now and I'll work backwards from there There's a requirement that I'm still yet to even bring into this and that's a UFH system. We've not decided on wet or electric yet and to be honest what I decide here might then have a knock on effect to this What's next? I'm not actually sure at this point! I do need to make a decision pretty quickly as we're getting close to needing the new roof, which, was the entire point of all of this. DIY route CON: Prevents me from selling back to the grid and offsetting bills CON: Potentially much shorter warranties on some of the cc when not installed by someone deemed 'approved' CON: Dealing with more moving parts and more trades here, I've got to do more self learning and anything could go wrong at my expense PRO: I can throw in a hot water cylinder to offset the gas usage (topped up by my gas boiler when there's not enough free energy) This actually has another unexpected and positive side effect, which is better water pressure! To which we have extremely poor pressure in the area and it's always annoyed us PRO: I mean, cheaper, but only slightly I guess PRO: From what I can gather, all the components/materials are either equal in quality or superior in some way. e.g 2 modular batteries total over 10kwh whereas I was quoted for a single battery at about 9kwh 'Approved' MCS route CON: Easy one to start with. Cost. It's about £4 to 5k more like-for-like It's approx. £2k more when comparing to the DIY route that's got a hot water cylinder CON: Although I'll have the MCS, if Octopus roll out 'no-MCS' fully then surely 'selling back' rates will only ever start to be less and less beneficial anyway? Might be a long winded assumption of course but it would piss me off regardless CON: The solution isn't quite as flexible and specific to my needs Granted, this could be due to the installer preferring one brand over another or perhaps a lack of understanding of my requirements and could be changed. PRO: Easy peasy I wouldn't actually really have to do much as they'll take care of everything PRO: I can sell back to the grid, bringing me closer to that low/zero bills desire PRO: Longer warranties on some of the components used when installed by an approved installer Worth pointing out I don't know what the standard warranties are on some of the parts, as it might only actually be a year longer etc so not that much of a positive! And breath. Sorry about all that but thanks for reading! Too Long, Didn't Read: I still want to reduce bills with solar panels and batteries long term. Even looking at hot water cylinders now. DIY route is cheaper but of course has cons like no grid selling. MCS-approved route costs more but offers convenience. Still deciding as Octopus's no-MCS plan is uncertain.1 point
-
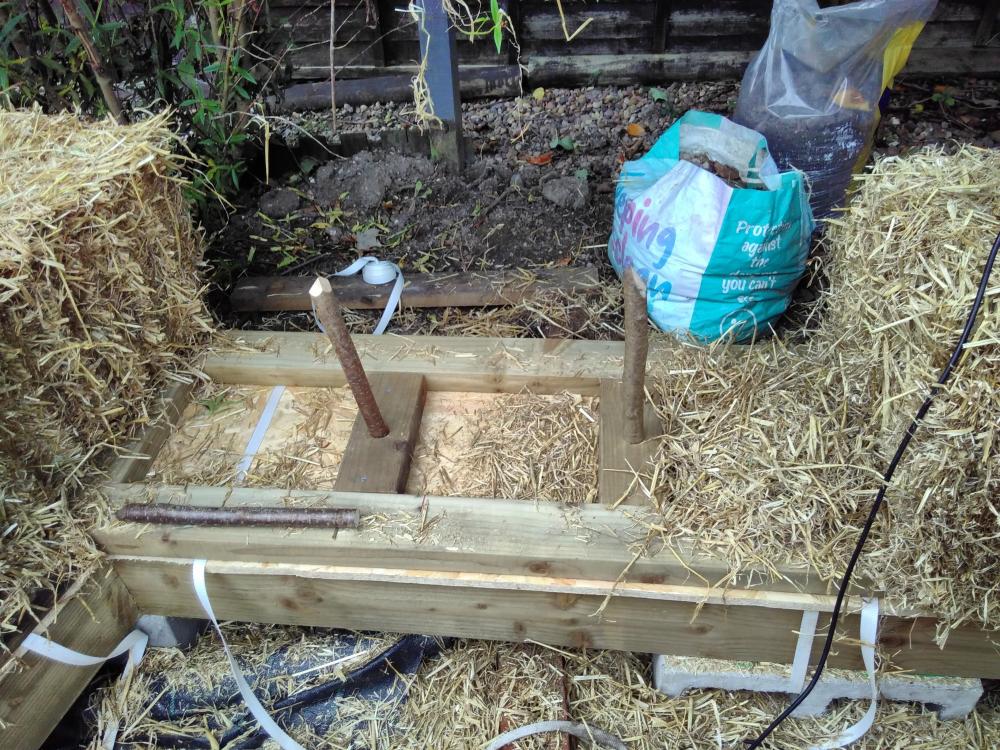
Bit more progress \o/ Straw goes onto baseplate, hazel stubs in noggins to pin the first course. Loose straw gets packed into the gaps in the baseplate, and stuffs any gaps between bales. Dressing the bales (with a hedge trimmer) generates plenty of that. Got the doors in as well but that's a botch job so won't show it yet 😉. Once the paddle mixer is here i can whiz up some render for the bales along the brick wall and get those in permanently; have a strong urge to get the posts surrounded by straw before strong winds come along, though. Packing straps pre-installed under thebaseplates,ready for conpression time. Unsure juat now whether I can use them to do the compression, or if I'll be running truckers straps under the box beam and around the wall for the extra beefiness.
 1 point
 -
Slightly off-topic (but only slightly) I've been giving some thought to a related topic recently. Although A2A is not a good match to my house, air to water + fancoils (which have many similarities - they heat air quickly, shift it around causing dust issues, and make a noise) have specific advantages for heating, which nothing else matches. In particular they can adjust the amount of energy they deliver without adjusting the flow temperature, so for example can respond quickly and deliver more energy than 'normal' without raising the flow temperature , by turning up the fan speed. If you want a perception of fast recovery after a night time set back, this is a distinct plus. I have a hunch that, for the common pattern described by @Crofter above (in during the evening, happy to cool down during the night, want a quick blast around breakfast, out during the day) they might be the ideal emitter if, as many do, you want to economise a bit when not in, whilst keeping overall efficiency high and maintaining comfort. Fancoils in bedrooms are particularly unpopular, but consider a fancoil which has sufficient emission without the fan to meet night time requirements, then blasts on (but with a slow start up) just before the alarm goes to warm up the air in the bedroom and bathroom for the couple of hours (if that) before everyone goes out to work/school. Our UK aversion to air-borne heating is understandable, but perhaps not entirely justifiable. I sense that there is more in this hot air heating thing than first meets the eye.1 point
-
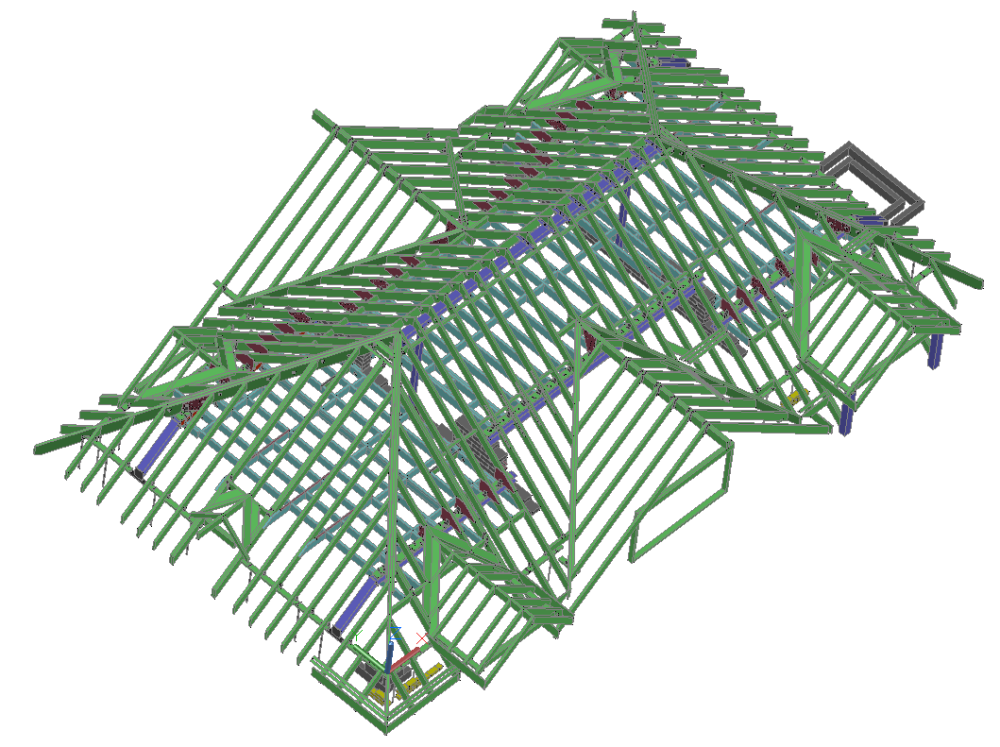
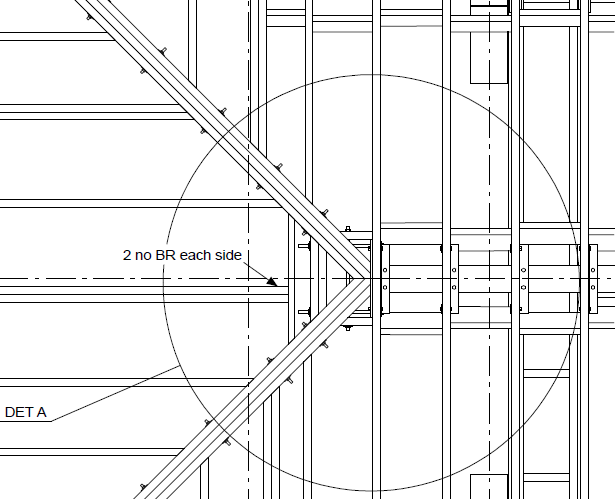
Can see the general thrust of the design, some steels etc. I have not studied in detail but pick out one element.. the roof. You have flitch beams at the roof hips. That is going to be more expensive once you detail that up and realise how difficult that is for a normal builder to put together and build properly. The following is pretty detailed but I hope it gives you food for though in the sense that you need to ask a lot of questions and try and look at the design holistically In other words if we buy a motor bike in parts the sum of the parts will cost more than just buying.. ready to ride away! Below is screen shot of my structural model of a roof I got involved in and improved / value engineered. It's possibly more complex than yours but there is a lot in it that may help you get your head round what is coming down the pipe. The first screen shot is of the overall roof structure. I can see that on your roof plan at the bottom you have some heavier, treble rafters.. I'm guessing this is for a big roof opening / dormer? At he bottom left of the model there is a dormer, a bit smaller than yours but the concept is the same. The main thing about this model is that all the parts are off the shelf, nothing hard to source and a decent builder will be familar with working with the different components and know how they are supposed to be installed. The aim is to go for the simple stupid. Lastly all roofs are different ( the layout and support positions below also drives the roof model) when we get into the fun part of self building so don't take my way as the best way for your project. Below is how I swapped out the originally hip flitch beams for solid timbers and the hips.. they are offset in the vertical direction but I gave the builder the info they need to offset, rather than just guessing. It's actually quite easy to do once you get your head round the roof angles and if you can do a compound cut (a competant joiner/ chippy should be able to do this easily). I know as I used to be on the tools before I was an SE) In the above there are short horizontal timbers with long threaded rods (from Jewson ect). These tie the hips together and back into the main roof. You can see there is no connection at the ends of the hips to the ridge area aNd may wonder how the vertical downwards loads are resisted.. The reason for this is that in practice with the steel between the timbers the connection is so complex it almost stops working. Ask you SE how the are going to detail the flitch beam to ridge connection. Would be interested to see how they do it. For me I'm sharing what I know and how I try and simplify so in the round we stand the best chance of getting it built the we want without costing a fortune. The above is a screen shot looking up from below. Here I cantilevered the ridge beam so we have a simple connection between the supporting post and the ridge beam. Let's break down big problems and make them into simple things that can be tackled one at a time on self builds. The ridge beam has an big steel angle shop welded onto the end.. now we have big ledge to support the hips.. the chippies / joiners can't miss that landing area, even if they cock it up a bit there is some slack in the design. In summary the two images above show how I tie the roof together and support the vertical loads by decoupling the hard things to do on site.. Below are some screenshots to show how the model gets translated into a "paper drawing" for the builder. Incedentally if I'm doing something like this I always give the builder the 3D view and say.. I want it to look just like that! It's also great for self builders (and me) as its helps you visualise what needs done.. and it is great fun! Below there are a few things / ways where you can save money and some food for thought. When we are working with steels supporting roofs the steels themselves are usually not that heavily loaded to the extent that the steel material wil start to fail. Normally as steel is "bendy" it's the deflection that govens the design. This often means that the connections can be made more cheaply in a domestic application. You may see some SE's asking for a "full strength connection. This can involve an expensive welding process and beam end preparation. If the connection forces are relatively low then we can often use what is called a division plate with a bog standard 6.0mm fillet weld. The plate is cut from a bog standard flat bar.. off the shelf. Below shows a cranked beam form the model with a division plate shown as the black bit between the beams. Here we just use standard 6.0mm fillet welds to join it all together. Cheep and chearfull. I did check the division plates would not stick out the roof by the way!. In the above you can see a timber wall plate bolted to the top of the steels. It can also often be shot fired.. ask your build what preferance they have. In this case all the steels came predrilled to make it idiot proof.. I said if there is a hole it needs a bolt. The red bits are plywood gusset plates nailed and glued to the sides of the rafters, there is a timber packer behind these gusset plates you can't see. The reason for this is partly geometric and partly govenernd buy the Architectural design. But in essence this worked on this job to transfer the roof loads down onto the steels while also tying everything together. The L shape brackets are just Simpson or similar stuff off the shelf. Hope this post helps inspire..


 1 point
 -
Hiya. The reinforcement options like the Simpson etc have their limitations and these are reduced further when tackling solid joists. One reason for this is that the engineered type joists are less variable in terms of the local strength.. which is where we want to put nails / screws etc. If you only want to hole one joist with a big hole then look at trimming the joists out.. like a stair well and double the joist up either side for example. If you can't do that then we may plate the joist with flat steels each side but these steels need a hole also and thus up to a point the larger the hole the thicker the plates. At some point the hole becomes too big and even the steel plates won't work. Now the plates will be long. A starting point would be a steel flats 1.0 m long each side and be about 10mm to 15mm less than the depth of the joist to account for timber shrinkage. Here the joists shrink in depth, the steel doesn't so it can pop you floor and or a ceiling. An important thing to remember it that timber is graded at the size it comes out the mill based on the complete section depth and width. Now timber has knots, shakes in the grain etc. It's sods law that where you want to cut the hole will be right where there is a big knot or defect in the remaining grain... and now all the theory can be invalid. Each case needs considered on it's merits. Can you tell us a bit more about what you want to do? This concept works for steel beams where we hole the webs reasonably close to the middle of the section and weld in a tube to transfer the stress around the hole. But I don't think it would work for timber as not least when the timber shrinks it would stress the glue... and then we would need a glue that can really bond timber to steel for structural applications.. and also be able to be used under site conditions?1 point
-
For a self build string lines and a good steel tape are an essential requirement. Also consider a water level.. not technical but it's cheep to knock up and means you can check that either you or the builder are getting the basics right at little cost. Best to get the founds right as you sleep well at night.. you need to get the sleep in early as later you'll maybe be grateful for it! It happens in soils like sand when they are loose. Main thing is to clean out the bottom of the found so the concrete doesn't end up getting poured on loose soil.1 point
-
uPVC can and will perform better but it depends on the profile (how man chambers etc.) - not all uPVC profiles will be better than timber aluminium windows. Just to let you know, the test performed was using a 44mm glazing unit, using 4/16/4/16/4 glass/spacer and Krypton filled gas. You will receive a different performance if that glass was Argon filled and I would suspect a Ug value of 0.64 or thereabouts and a Uw value of approx. 0.85 / 0.9Uw possibly higher.1 point
-
So I managed to core my three 152mm holes. I purchased a Makita 8406 core drill, which is capable of dry coring upto 152mm and it did them with ease. I figured I'll add it here as it may benefit someone else at a later date. I paid £240 for the drill, ok so I could've hired a drill for half the price but I still have a few more smaller holes to core and so it will certainly come in hand in the future. Thanks to all for the comments.1 point
-
In 2022 there were 965,665 asylum applications in the EU, 243,800 of them in Germany alone. there were 81,130 applications in the UK in 2021 a mere 8% of EU applications. You are Suella Braverman and I claim my £5.1 point
-
https://www.tuc.org.uk/sites/default/files/Welfare_States_Touchstone_Extra_2015_AW_Rev.pdf https://ukandeu.ac.uk/how-generous-is-british-welfare/ -> https://www.cwep.us/ but I don't have easy access to their data. Still, this is an instructive picture. Why do they actually make their destination the UK rather than another country along the way? Complicated, but a major factor is that it's seen as much easier to find work in the UK. Yes, work. Taking our jerbs etc. Then there's the language barrier (or lack thereof). More, better, cheaper housing would likely make the UK more attractive to people from overseas, but refusing it for that reason would really be cutting off our noses to spite our faces.
 1 point
 -
The title of this thread really does not reflect the content of the linked article. This is about property developers claiming UK has the biggest shortfall in the quantity of housing (relative to demand), not quality. In almost all cases, developers lobby for lower standards, to continue to build low quality housing, claiming it makes the product more affordable and thus is helping solve the quantity issue. In practice, many large developers sit on plenty of land ready for development but limit release of it in order to artificially maintain the high price of housing, while holding down the quality of housing built, all in order to maximise profits. e.g. https://www.mpamag.com/uk/news/general/stripehomes-biggest-housebuilders-increase-land-banking-by-4/3898911 point
-
'ello! I've done something almost the same as you describe, in Groundwater Source Protection Zone 1. So the short answer is: yes. The Environment Agency don't like the use of infiltration tunnels, as they allow treated effluent to infiltrate over a smaller area in plan view, even if the surface area in three dimensions is the same. As you've probably discovered the infiltration isn't part of BS6297, although I believe Graf are working with the BSI to have it added as an acceptable option in future. The EA will allow their use if it can be demonstrated that a standard infiltration field or mound isn't practical, and that there is no possibility of discharging to surface water (ie a ditch, stream, or surface water sewer). In my case we couldn't fit an infiltration field in the space available unless it was to be outside the planning redline, uphill, and involving pipe runs going back under the house after having been through the treatment plant. The space that we had was limited owing to root protection areas, the required margins around habitable buildings, and the fact that a right of access was granted by title, over which a farmer needed to drive 50t machinery. Our infiltration tests came out favourably (vp 19.8). I haven't looked up the One2Clean PTP, but we specified a Solido Smart and tertiary treatment via Tricel Puraflo modules. Once we had an assigned officer for our permit application at the EA, they suggested that they'd grant the permit without the tertiary system being necessary because whatever levels the Solido Smart emitted were clean enough. Of course, they encouraged use to use the tertiary system and were trying to give us flexibility, and we intend to install the tertiary system even if it is overkill. The folks at Graf were very helpful in providing documentation and detailed sizing calculations that the EA appreciated receiving. Graf know that their customers face a bit of hurdle using the product, and have experience in helping people negotiate permit application. Given that we're in Groundwater Source Protection Zone 1, there is no higher level of treatment required unless you're within 50m of drinking water borehole. So if you're anywhere other than that, it is indeed possible to get a permit to discharge to ground. If you can demonstrate that infiltration tunnels are the only viable option, it is realistic to be granted a permit to use some. FWIW I phoned about five different drainage consultancies, and every single one of them said "Groundwater source protection zone 1? No chance, mate!" They were all wrong.1 point
-
I could not operate our 3.6kW PV effectively without a battery as we gather energy during the day and then use it overnight. With a 9.5kWh battery I'm still exporting energy despite having A2A cooling and an EV (which has been running on sunshine for the last couple of months).1 point
-
A few things to consider If you wish to sell the electric generated the whole install needs to be done by a MCS installer. You pay more, but you can sell the electric for 5 to 10p kWh. Not MCS, means you source everything yourself and just about anyone can install. But ideally the electric hook up would be done by an electrician. Plenty of companies are out there that provide full kits. Batteries, if you are installing 3.6kW array, you can self consume everything you produce, so battery benefit in my view is questionable. Roof integrated requires no tiles below the the solar panels, so saving are made there. Pretty straightforward once you get your head around it. Basically the PV panels connect together, go to a DC isolator into an inverter, to an AC isolation switch and then to your consumer unit. It's never plug and play, so don't let anyone convince you otherwise. But it shouldn't be complex. I am in the process of installing a ground mount array of 3.6kW for a total cost under £2000. I have a combination of new and used parts. This is not a MCS install, if it was it would cost 3 to 4 times more.1 point
-
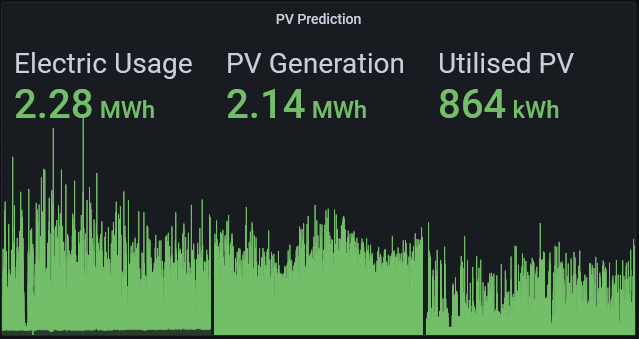
I've been interested in PV for a while but put off by the variance of estimated savings making it difficult to determine how useful it would be to my specific house. PVGIS is a fantastic tool, but how much of that generation could I actually use? "Around 50%" wasn't specific enough for me but fortunately, my smart meter was recently updated to connect to DCC, so it was time to go down that rabbit hole, results shared here to prompt debate and so others can point out errors and maybe explore a similar study on their own property. Firstly, hourly data for the proposed install location was downloaded from PVGIS and averaged over the 2005-2020 period available: https://re.jrc.ec.europa.eu/pvg_tools/en/. This average was then dumped into an InfluxDB database Next, half-hourly consumption data from my smart meter is available via a DCC connected company, with 13 months of data available. There are a number available, I chose Bright as they have API support: https://play.google.com/store/apps/details?id=uk.co.hildebrand.brightionic. This data was pulled down with a python library into the InfluxDB database: https://github.com/cybermaggedon/pyglowmarkt. Note I had to pull 10000 minutes at a time as there seems to be a limit on request size. Now I have all the data, there's a few options on what to do with it. Firstly, Grafana was used to support detailed interrogation of the data as well as an in-built method for summing timeseries data. Below pictures are for a 3kW system mounted vertically on a ~SSE facing house wall: Annual utilised PV is just the min of usage/generation for each hour in the time series. The result is... disappointing, suggesting if I'd had this system installed over the last year I'd only have used 40% of the generated power. As with most houses, the culprit is significant evening usage - computers, TVs, dishwasher etc. I can shift some of the usage to mid day, but not enough to make a significant enough impact. Inspecting a random day (6th September) confirms an increase in PV size would not solve the problem either: Area on this graph is kWh so it's easy to see a lot of wasted generation mid day (between the blue and orange lines) followed by significant grid usage in the evening (between the green and blue lines). Note that electicity consumption is quite low as my heating and hot water is from mains gas. Ideally this excess could be dumped into a hot water tank but we have a combi boiler and I'm struggling to make the sums add up once you factor in even more initial investment for a tank etc. Therefore I'm ignoring offsetting gas consumption and purely looking at the significantly more expensive unit rate electricity consumption. That aim then brings us to battery storage. I couldn't find a way to simulate state in Grafana so used the InfluxDB Python bindings to set up a basic charge/discharge simulation across the year. It does not factor in battery efficiency due to me being lazy which will slightly skew figures. This simulation takes three parameters: PV system power in kW, battery capacity in kWh and the unit electricity rate to calculate savings. Hard to predict for a long term investment so I just used the current 27.09p/kWh rate. It's then possible to experiment with proposed systems: $ ./battery_sim 0 0 0.2709 0.00kWh utilised and 0.00kWh stored out of 0.00kWh generated. Total 0.00kWh (0%). From grid: 2280.95kWh. Annual Saving £0.00 $ ./battery_sim 2 0 0.2709 750.32kWh utilised and 0.00kWh stored out of 1424.67kWh generated. Total 750.32kWh (53%). From grid: 1530.63kWh. Annual Saving £203.26 $ ./battery_sim 3 0 0.2709 863.03kWh utilised and 0.00kWh stored out of 2137.00kWh generated. Total 863.03kWh (40%). From grid: 1417.92kWh. Annual Saving £233.79 $ ./battery_sim 3 5 0.2709 863.03kWh utilised and 998.04kWh stored out of 2137.00kWh generated. Total 1861.07kWh (87%). From grid: 419.89kWh. Annual Saving £504.16 $ ./battery_sim 4 5 0.2709 930.05kWh utilised and 1102.64kWh stored out of 2849.34kWh generated. Total 2032.69kWh (71%). From grid: 248.26kWh. Annual Saving £550.66 $ ./battery_sim 4 9.5 0.2709 930.05kWh utilised and 1151.73kWh stored out of 2849.34kWh generated. Total 2081.78kWh (73%). From grid: 199.17kWh. Annual Saving £563.96 $ ./battery_sim 5 9.5 0.2709 970.84kWh utilised and 1211.10kWh stored out of 3561.67kWh generated. Total 2181.94kWh (61%). From grid: 99.01kWh. Annual Saving £591.09 $ ./battery_sim 5 13.5 0.2709 970.84kWh utilised and 1221.01kWh stored out of 3561.67kWh generated. Total 2191.85kWh (62%). From grid: 89.10kWh. Annual Saving £593.77 $ ./battery_sim 7 13.5 0.2709 1018.43kWh utilised and 1268.62kWh stored out of 4986.34kWh generated. Total 2287.04kWh (46%). From grid: 0.00kWh. Annual Saving £619.56 Quite easy to spot the return on investment of the PV and battery capacity is tightly coupled, no point having loads of generation you can't store or massive storage with no excess generation. This is where I've stopped for now, it'd be trivial to go one step further and optimise the system for most cost-effective setup but that would need a cost function for £/kW solar and £/kWh storage (installed) that I haven't bothered to put together yet. Note that the upgrade to a Tesla Powerwall (13.5kWh) is very cost-ineffective, but could technically provide 100% of my usage with a 7kW solar array. The 5kWh battery with 3kW PV seems a sweet spot for me and uses 87% of the generated power but I'm unsure on the costs of such a system yet. To go ahead I'd prefer a maximum 10 year ROI which sets pretty tight budgets, ~£2k for a 2kW system with no battery or ~£5k for a 3kW PV 5kWh battery system. This obviously rules out MCS, but has anyone got close to this with self installation and connection by an electrician? Comments and questions welcome, does this line up with actual performance people have seen from their installs?
 1 point
 -
Who knew - you can get Tupperware slates. Bloody good idea. They'll go in the dishwasher. Tops!0 points
-
They are closer to @Nic than you. We used to make a lot of architectural GRP back in the 1980s. Never really understood why it was not used more. Fake chimneys and naff porches may be part of the reason. And Reliant Robbins after a crash.0 points
-
But yet migrants are still making a B line for the UK Worst housing Best benefits system I find headlines like this ironic Visit France and see all the migrants camped by the roadside0 points