
Leaderboard


Popular Content
Showing content with the highest reputation on 09/13/23 in all areas
-
Hah! It's amazing to see the forum is still in full flow with the architect bashing. It's amazing the misunderstanding of what we actually do, fees are not just based on the time taken to do a task, I can do a house layout very quickly, but only because I've accumulated years of knowledge, worked with various planning departments, worked with different build methods on different types of sites, have appropriate insurance, have a network of consultants to deal with any scenario etc etc The fact is that buildhub continually perpetuates the myths that architects only draw pretty pictures and don't have construction knowledge - and that percentage fees mean that architects don't have incentive to keep budget in mind etc. It's just a nonsense and the old heads who dominate the forum giving out poor advice to people at the start of the process which can never be rowed back from. Really the main reason that I stopped frequenting the forum, I'm amazed that there are still some who bother wasting time helping people and trying to defend a profession against ignorant misinformation. The number of times I've heard on here that construction drawings are just a copy and paste exercise is crazy - especially post grenfell and in the throws of brexit. In the case of the op - there are a number of options, whoever you decide to use - make sure that it's someone you can get on with, you're likely to deal with them for a reasonable amount of time. You get good and bad in all walks of life, look at previous work, maybe speak to previous clients. Go and visit the neighbours one which you want to mirror and make sure it's what you actually want too - building is expensive so make the most of it!5 points
-
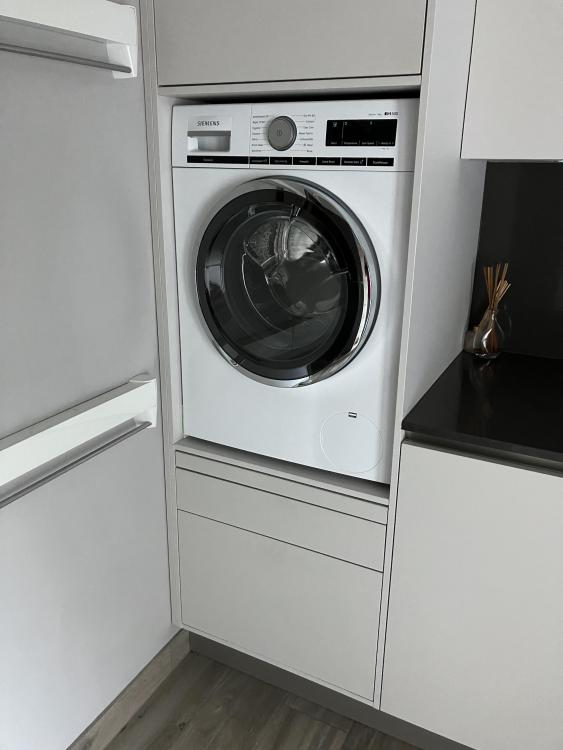
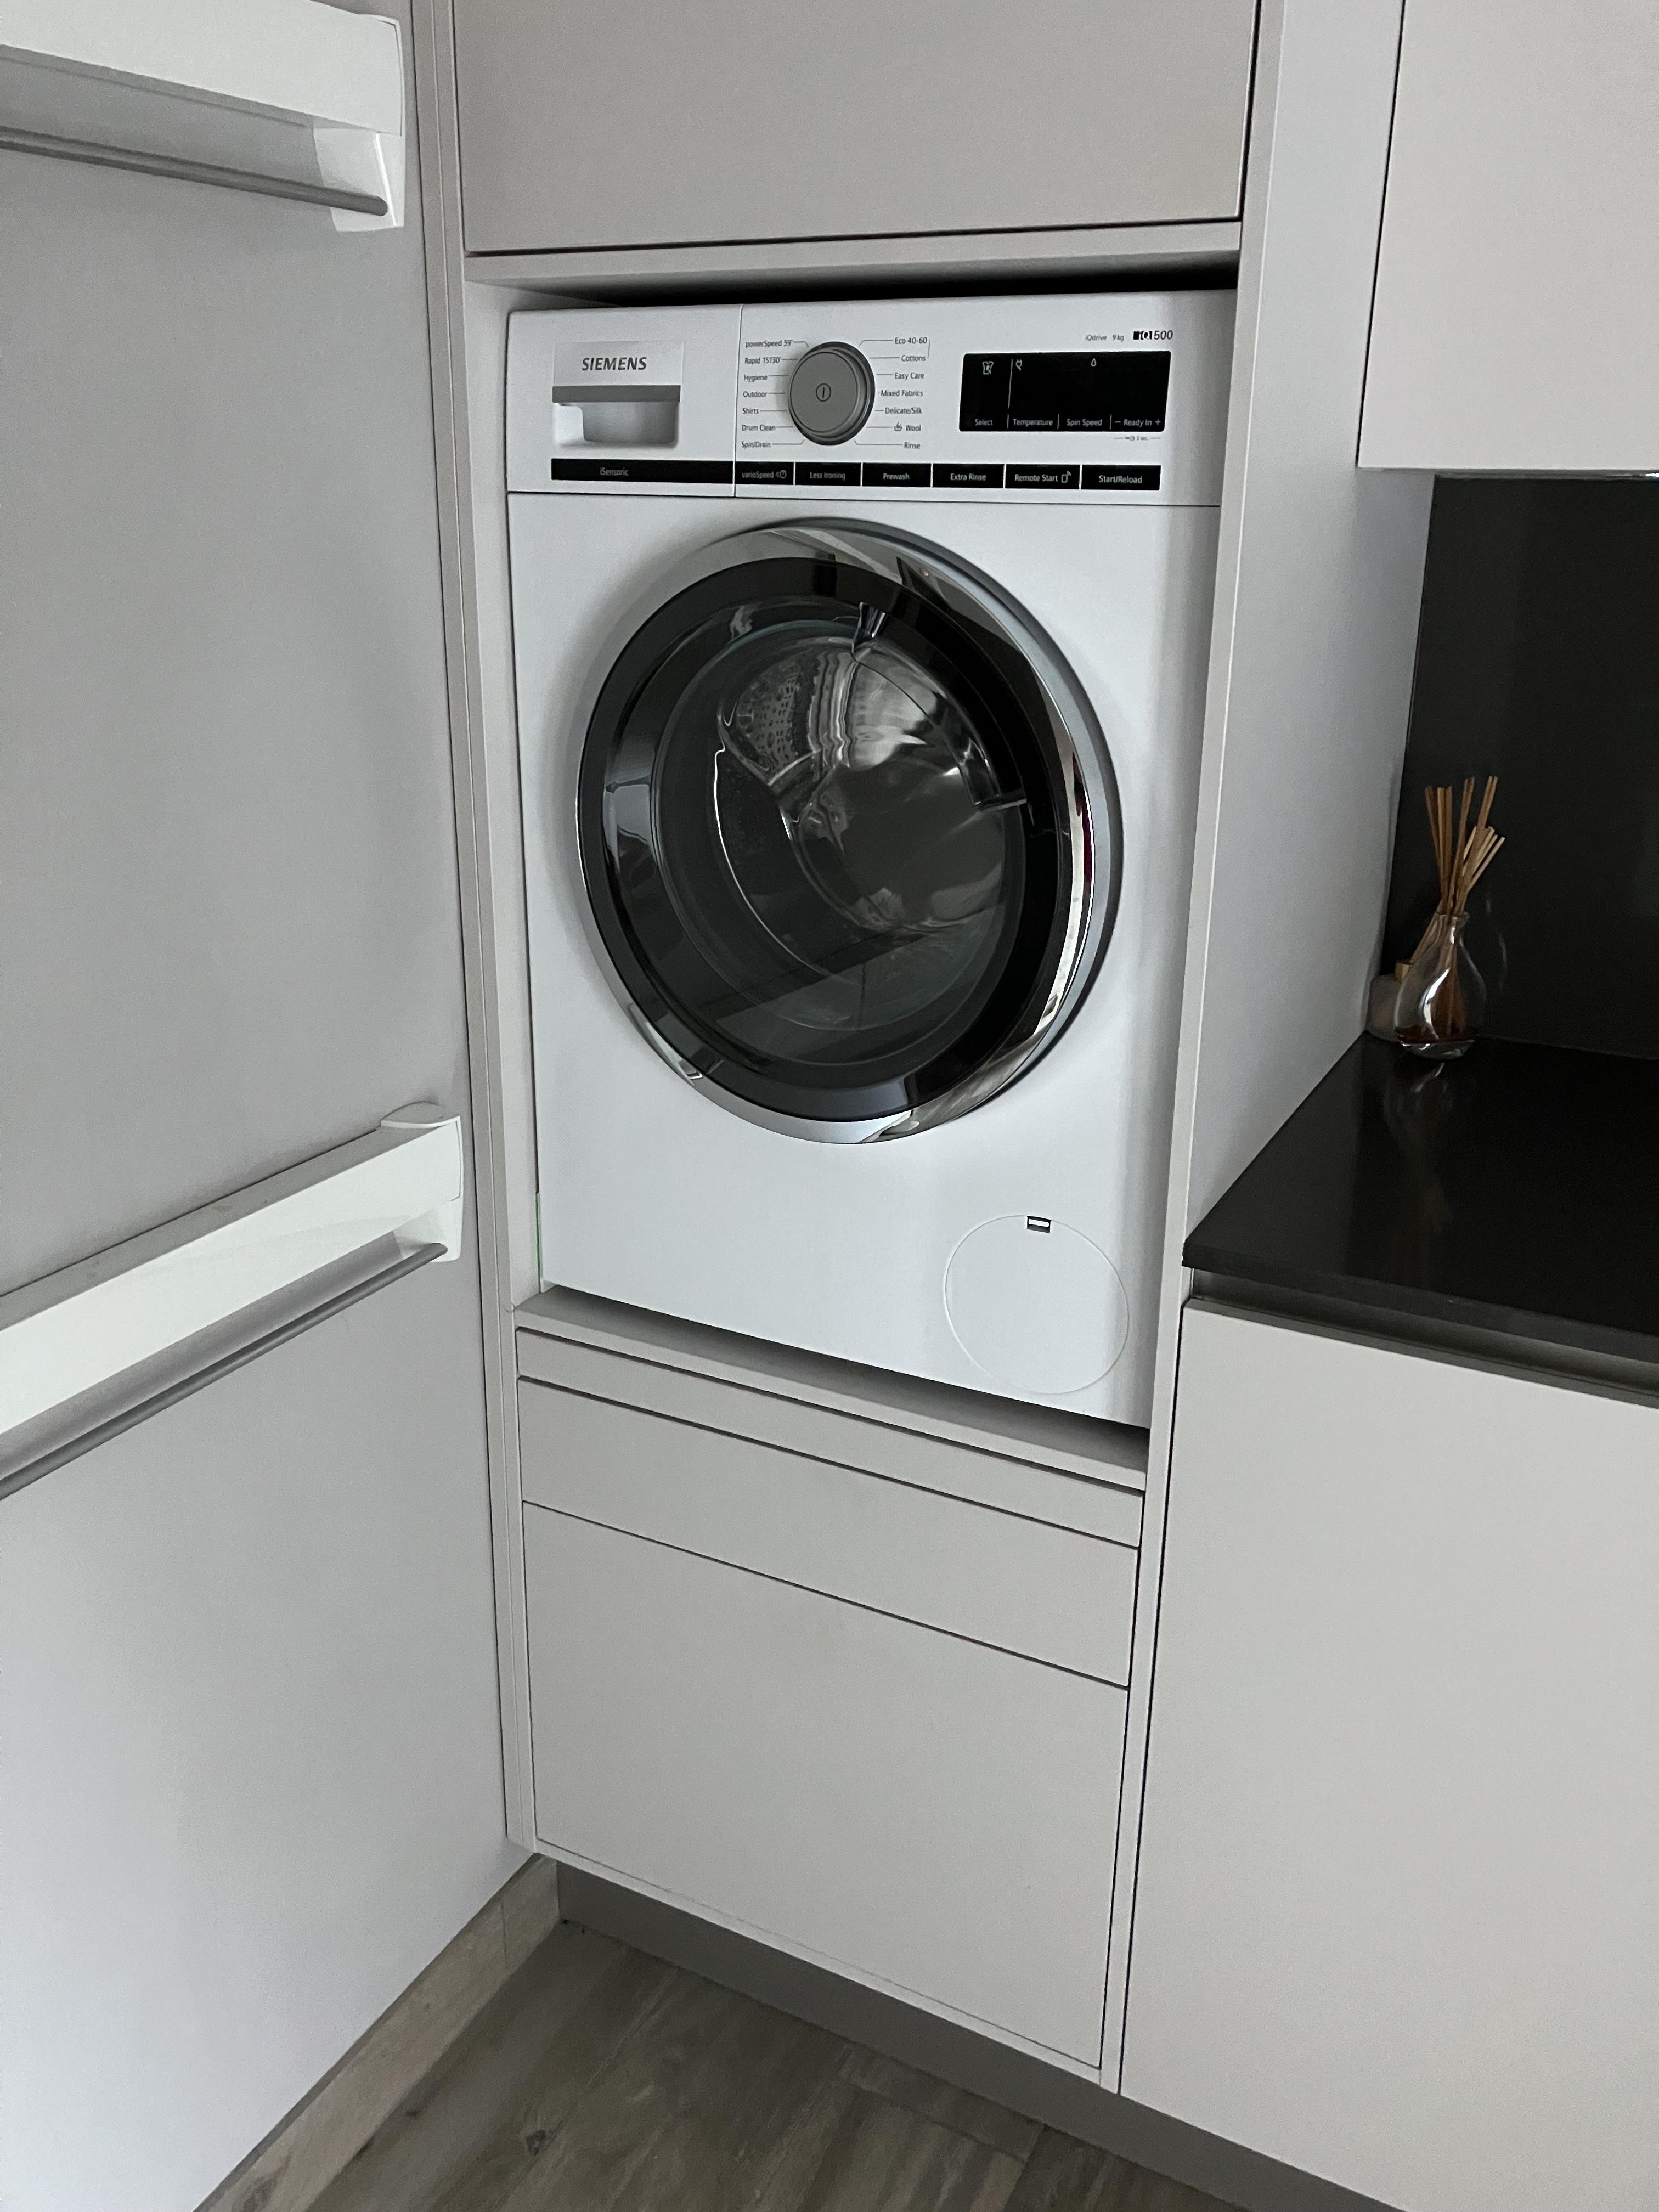
Our washing machine is integral and not floor mounted on the bosses insistence to make loading/unloading easier. I was terrified at the prospect of having a washing machine in a kitchen unit AND off the ground, I could foresee no end of calamity’s befalling us. Two years on and I’ve stopped checking it when it’s on a spin cycle. It hasn’t fallen out of its cubby hole. It hasn’t moved at all. Before the spin starts the washing machine turns the clothes and agitates the drum to try and balance the load. If it can’t balance the drum to a reasonable level it won’t spin. Just to clarify. The unit is specifically designed to take a washing machine and is suitably reinforced. It also has to be fitted either between other units or, as in our case, a wall and units. The wall hung cupboards have to be there as well.
 3 points
 -
Problem solved. When I switched the pipes in the loft it turns out I switches the pipes for the Sink not the Shower Mixer. What I did was from the wall switch the shower mixer upside down so the pipes then 100% changed and the mixer started working. Now we just need to locate where the shower pipes come from maybe under the loft boards but not a major job to change. Plumber coming in next few days to sort it out. Apologies for wasting everyones time!3 points
-
Ours are stand alone but mounted off the floor , both very quiet and no noticeable noise when on spin. Mind you they are not the cheapest on the market.
 2 points
 -
True to you word! Excuse the spelling, quick response. Visually your soakers don't have enough upstand.. but I think you'll get away with it as the roof pitch is steep. I would recut the top line of the chase. Put a timber batten up the line of the roof, put safety boots on and hold the batten with your knee or get help to hold it at each end.. the easy way and much better, and recut a few mm higher with a 9" grinder with diamond disc, marked for depth of cut. Aim for 25 - 30mm depth of cut into the wall. Get your top side of the chase straight. That is the bit you will see. Get a brush and clean the chase, then get a Henry hoover / Dyson and really get rid of all dust from the chase. I'm not joking! Go to B & Q and get some SBR bond. Apply the SBR bond to the bottom of the chase only. Follow SBR instructions, let it go tacky.. if it dries out it is no good and makes the bond worse! Don't get the SBR bond on the slates and clean your tools pronto after. Cut the batten down to 25 mm less than the depth to the top chase. Hold it against the wall. Make up a mix of 1 part cement with 3 parts sand with some mortar plasticiser. Use the cut down batten as a guide to re level the bottom bed of the chase when the SBR is tacky. Clean up, keep it moist and go for a beer and let the mortar harden for a few days. Now you have a neat top cut and have sorted the bottom part of the chase that you need to be able to jamb the lead into the rebate. If you leave low spots in the bottom chase the water will get back into the wall and the flashing wiil get distorted when you are trying to fix it in place. If doing it DIY fold up your flashings but keep them to 1200mm long in length, then install as per Cookson Lead work guide. Be gentle when jambing the lead into the chase.. then point up and seal the chase. Make sure you use Patination oil and apply it to both sides of the lead (the bit you see and the bit you don't) and edges of the cut lead. This sounds like I'm laying it on thick but you have some good looking stone and slates there.. don't spoil it with crappy flashing work. In this case I would say the flashing should stop 10 - 15mm from the top of the slates.. stops capilliary action. As the soakers don't have enough upstand then just along the top of the soakers run a V shape line of lead mastic at the top edge. You can do this V by cutting a slot in a standard matsic tube nozzle. Ths will create an extra ledge which will mitigate the lack of upstand depth of the soaker.2 points
-
If you want something slightly tidier Cut a square of timber the width of two planks and larger than the hole is all dimentions out first . Trace around it and cut out an identical hole in the roof. Then place a backing piece of timber above the hole and screw your "patch" into place. A small bit of filler and wood stain and you're finished. TBH, if you're pulling if down I'd just go with @TonyT suggestion,1 point
-
A piece of wood larger than the hole, screwed over the hole?1 point
-
If you know what you want , brand and type , then Google is your friend here , just find out what you can buy them for delivered and compare to the BM's if there is not much difference in price then you know there is still a bit of meat on the bone for the merchant and can start negotiating with them . I needed 17500 facing bricks the best I could do was 90p a brick delivered but ended up paying 12k with MKM but I had to take them in one go .1 point
-
Ouch! Our price was £450 for a thousand, and delivery had to be for a full lorry load. I think block prices vary a lot by region. Here in Northern Ireland blocks are a lot cheaper than the South West. And my builder seems to get good prices on stuff from his various trade accounts of course.1 point
-
Do you have a local manufacturer? We have a quarry half a mile away that makes and sells concrete products. Our builder got ours from the quarry for 45p per 100mm medium density block delivered. Which is pretty good I think.1 point
-
We liked the idea of a raised washing mashine until we saw our friends intsallation with a peice of pipe insulation wedged between their washer and dryer to stop them acting like giant castanets. I think if done right and raised like @Buzz then it can be very nice. But it can be done badly which is not so great. If I remember correctly I think some of the German Kitchen manufacturers install a steel frame to support the appliances of the ground. Which is probably the way to go.1 point
-
A thing to think about with any retaining structure is build in a bit of flexibility. If a solid block wall moves a mm you will get cracking, if a Gabion wall settles a bit, you will never know. Go the gabions. I priced to do some major retaking works alongside the river Thames. One engineer had it in timber and one in concrete and brick, I priced the timber, they went with the concrete and brick, two years later it got ripped out as the water rose and it all settled a bit.1 point
-
I had an integrated one & it never moved, I fixed ply to the floor for it to sit on. It came with a bracket that you could fit to stop movement but being the professional that i am I didn’t fit it1 point
-
Secondhand tank with new bladder is fine1 point
-
1 point
-
By the looks of it you started in mm, rather than converting to m. So the answer will be in mm. And it is Phi.1 point
-
I don’t have anything to do with groundwork’s or geotechnical but Just looking at this and my first thought is that the calculation would be for the minimum depth below the lowest point to prevent a slide or shear down the slope. that aside, min foundation depth is generally to get below a level that will be affected by movement from shrink, heave or frost etc.1 point
-
The cut, considering the wall type, is probably as good as can be expected by hand.1 point
-
Ha ha - yes, apologies. I've been busy getting stuck in and fitting work, life and rain around the job. So far so good thanks and all limbs and peripherals intact. The cut didn't come out great, but not sure how much that was to do with me or the wall itself; which is prone to falling apart a bit at the best of times, and so suffered a bit with the angle grinder. On that subject, I posted another thread for guidance on where to go from here. And in that post you can see my (un?)handy work to date.... Thanks for remembering me and for your interest.1 point
-
We used wood strangers, basically 240mm dia by 4m long wooden posts. Dig trench circa 1.5m deep, concrete in posts.
 1 point
 -
There are only a few doing that, and they criticise everybody other than themselves. As I mentioned before, I wonder what they do as jobs, if everything they do is perfect, and how much they expect to earn.1 point
-
Welcome. Photos, thats what we like. Specially if there's a knotty little problem like: Looking forward to that - because I messed up (well ... bodged it), so I'm keen to see how you mess u.... errrrr, do it.😑 Ian1 point
-
No, I think they are reasonable for their heights. Our 2.4m high wall has a 1700mm toe and 1200mm heel, all 200mm thick with two layers of reinforcement. If they were part of the building structure, where the ground slab and other corrected walls, your concrete would be reduced by about half. But building abasement comes with other Complications and costs.1 point
-
The thickness of first floor structure, plasterboard, blocks, 25mm insulation, 50mm screed and floor covering (tiles likely). A lot of people here are suggesting no UFH on first floor and no zoning to save cost. I will take this on board and discuss this with my other half. Inexperience. We wanted to build the house quickly and install UFH on the first floor. Nobody, from architect to the builder, advised us against B&B on first floor. So much for the quick build, almost 2 years from starting site clearing to just starting roofing. The architect took a few years to design the house and still messed up the levels then eventually decided to go with another architect. The rise of material prices over the past couple of years and scaffolding (has been up for over a year now) cost has eaten a large chunk of my budget. Not had the best of experience with anybody yet. The best advice/help I've had is from buildhub community. Thank you Buildhub community.1 point
-
Presume you are using an MCS installer, in which case they should know the grant requirements. Mine was installed last December and grant approved using design EPC/SAP, still not finished so no air test or as built assessment.1 point
-
Well we use ours regularly and our previous one was still going strong after 8 years when we sold the house. I'll add that the internals appear to be the same for Neff and Bosch, so any fault will be the same.1 point
-
I think it changes the ratio by 30% if you put the pipework half way up in the concrete. This assumes equal thickness of insulation and screed. 30% sounds a lot, but it is not great, but then it does depend on the temperature differences between the pipe temperature, slab/insulation temperature and ground/air temperature, If I was not so busy I would try and calculate, been a while since I have looked at differential equations.1 point
-
as accurate as your plans. Provide the structural engineer drawings and they will price steelwork as well. They use rates for your area but you can override day rates to suit. They will not cost as they cant, your costs to get out of the ground so groundworks costs.1 point
-
1 point
-
Could also be crud in the valves. Here was our shower following some repairs to the apartment building... The muck holding those check valves open caused backflow of cold water into the hot water system...much to the annoyance of our neighbours. 🙂
.thumb.jpg.3093e7151aa33358eeda6bf4fdef8dad.jpg) 1 point
1 point -
No they would need to be on each mixer. Im not sure this is the problem but I've heard that when the valves are missing water can sometimes flow down a hot (or cold) pipe, through a mixer that is OFF and back up the other pipe the wrong way. From there it goes to another a mixer that is ON. So the one that is ON effectively has two hot feeds or two cold feeds. Perhaps try allowing all mixers to cool down fully then turn one on full hot. While that's running hot go to the other mixers and feel them to see if they are heating up. Don't turn them on just feel the mixer to see if its getting obviously hotter when it's been off for ages.1 point
-
Yes it could just be seasonal movement. Often folk see cracks and think "oh no the house is settling and going to fall down" in the next week. Observe the door over the landing and see how it sits in the frame when shut. Often if things start to drop then the doors start binding. If you want you can cut thin shims out of say a coke bottle and monitor the gap to a reasonable degree. If you can slip in 5 shims and a week or two later you can't then you can get a feel for how things are moving. You may find that once you put the heating for a few days the shims come slack. If the weather has been dry and warm then turns wet you should be able to detect that in the shims. This will give you an idea of how your house behaves on an almost week to week basis. You'll be surprised just how much things move, but it can also set your mind at rest.. it's just the old house doing what it does. To provide a bit of context. The major house buiders are tackling more and more difficult sites with less than favourable ground these days. They improve the ground, often by soil mixing using lime / cement etc. The new houses are designed not to settle more than 25mm over 50 years so even on a new house you can expect quite a lot of potential movement in the first few years as settlement is often not linear. Bonner makes good points. If you try the thing with the coke bottle shims let us know how you get on. Make sure you use don't mix the shims up.. keep them all together in groups for each gap, use tape to keep them together if need be (they are a cheep version of feeler gauges but not calibrated) or this could start to live in your head. The nice thing is that they are pretty flexible so can get round the odd bendy bit of wood. On doors push them in until you hit the door stop so you maintain the depth of penetration each time.1 point
-
Anyone who claims a heat pump is cheaper to run than a gas boiler is a brave man. My view is an ASHP running with a COP of 3 and electricity at 3 times the cost per kWh of gas, the ASHP could equal the cost of heating with gas. So for a property that does not have gas, it is a way to equal the heating costs if you had gas available. An ASHP will be better for the environment eventually as more electricity is generated by renewable means. Re the heat loss from the building. How technical are you? How much do you know about the building design and proposed insulation (if's all buried in the SAP report if you have the full report not just the summary) Then have a look at this.1 point
-
https://www.climamarket.bg/wp-content/uploads/TDB-EHS-TDM-Plus-for-Europe-R410A-50Hz-HP-Ver1.0_170313.pdf1 point
-
Seriously? Why bother? Save your time and money!! It’s already insulated and airtight to passive house standards. Any additional insulation will give very little gain I would’ve thought. Plus you’ll likely have to uprate your electrical cables as they’ll be running through insulation.1 point
-
I think that is the important bit. What often does piss people off is the IP side, that lack of transparency and general poor quality offerings. But it is the same with a lot of goods and services, price is not a marker of quality.1 point
-
Thats what happened to us and this - without any discussion this is the result .... The BCO could not have cared less about the SUDS stuff. I had to - or rather I made him listen to - the way all the roof water runoff is ducted to the pond via ( the yet to be built) rainwater gardens. I also took notes about the conversation and sent him a summary of what we discussed via email. Bottom line: if what you propose is anything like in line with National guidance then you needn't worry. Fill yer boots here. Good luck Ian (PS , yes, I have fallen in.)
 1 point
 -
Just as an aside it is interesting how many posts we have seen on this topic, it must have hit the zeitgeist right on the head!1 point
-
Build Update: For anyone curious how costs have been stacking up so far, we are getting close to a shell. All the hard stuff has now been completed (~100 muck away loads, leveling out the sloping site, foundations, basement, steel beams etc.). The semi-submerged basement has been completed and we're building the brickwork for the upper floors now. I changed from TF as their engineer wanted to use a huge amount of steel to support the frame so it ended up being more cost effective to continue with masonry. 3G windows have been ordered and should be here early November. I've changed the cladding from render to a long format Scandinavian brick that I really love (google 'the burnt timber pavilion' to see an example of it). My original estimate was £544k to bring it to a shell, I'm currently on track for £590k, with the main increase coming from additional steel beams and the fancy brick. This leaves me with £200k for the internals. I've been pretty active the past few months in sourcing bargains for this stage and I've done pretty well - I've been managing to source materials/items at massive discounts which leaves the majority of the budget for labour. I've already bought a kitchen for the house for £4.5k which was a used designer one with gaggenau appliances, but the owner just needed it gone from their Chelsea townhouse ASAP so sold it for peanuts. Bit early to buy it but it was the perfect size and couldn't pass up at that price.1 point
-
The wow of our house is the view across the valley to the hills beyond. What we did is widen the hallway as you walk in the front door, the inner hallway door is glazed into the kitchen which has a glazed door to the garden. Therefore when you walk in the first thing you see is an uninterrupted view straight through the full width of the house to the hills beyond. The other thing we’ve done is open up what would have the second bedroom upstairs. We’ve turned it into a sitting room. You come up the stairs and it’s open plan with a vaulted ceiling exposing the glulam ridge beam as a feature. Neither of these two things have cost us any money to do. Where we are spending a little bit of money, but not a huge amount is in some of the lighting for the open plan living area. We found a great lighting place called glow lighting in Ripon. https://www.glowlighting.co.uk Hand made blown lights and spun metal lights. They are really beautifully made. We visited them last month and were completely sold on the look.1 point
-
put a bee brick in our garage, have to look after nature.1 point
-
Leave them be, they are unlikely to do any structural damage. I had them in a previous property for 13 years without any issues. Masonry Bees are solitary and do not gather in large numbers although a few will choose the same patch of wall which suits them best.1 point
-
In Scotland they just dropped off the ducting, using the FTTP duct and connected to the copper network on the other side of the track. The copper network is rubbish, so cancelled the contact and use 4G, but have installed the ducting, so box ticked and no cost.1 point
-
Can’t comment on the validity of this formula however the result should be 0.06958 and the unit is metre, therefore 69.58mm so you were right!0 points
-
@Oxbow16 Can you still type? We all want to know how you got on.0 points
-
We actually had a RAT get in an old sofa when we first moved in. Gained access to the lounge from under the floor via oversize pipe holes in the walls. Give the cat it's due it did sit and point saying "Oh look a RAT!" Missus moved out to her Mum's for a few days with the baby. Anyone know where I can get another rat?0 points


.jpg.07ccdcc4a4bed233fcbed769033c437b.jpg)


