Leaderboard
Popular Content
Showing content with the highest reputation on 06/01/23 in all areas
-
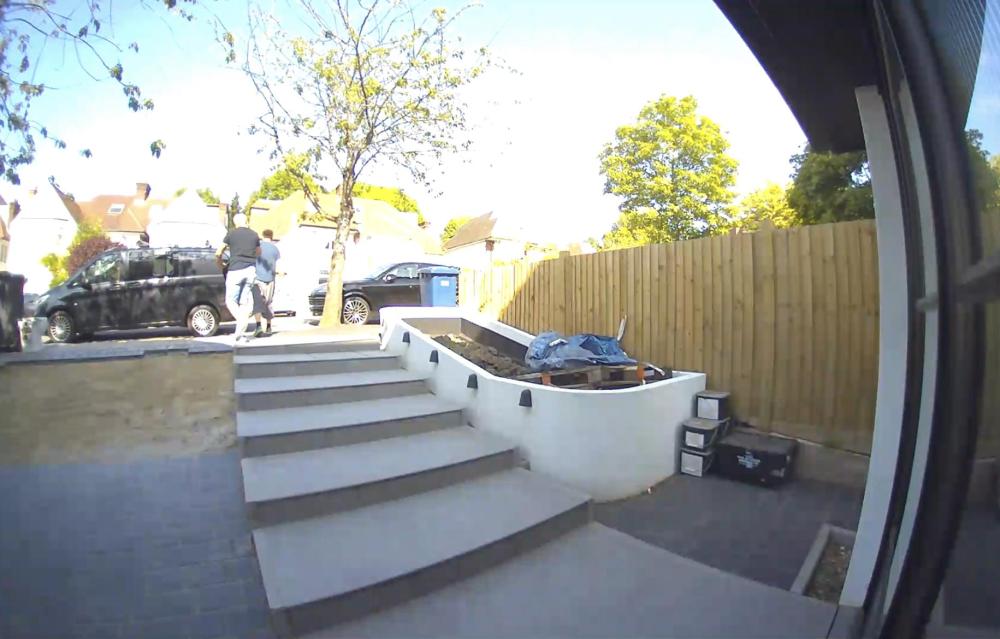
Ok, so almost a year after driveway V1 was finished, my trusty builders are back to redo it. Costing me an absolute fortune, but probably cheaper than couples therapy. Here is progress (of two guys) after day 1 (which started at 11ish and finished at 445): they have managed to take up almost half the setts. The rest will come up tomorrow.4 points
-
PVGIS: https://re.jrc.ec.europa.eu/pvg_tools/en/#MR Nothing wrong with that pitch, PVGIS will show you the generation which you can compare to South, probably less of an impact than you were expecting. West has the unexpected benefit of pushing more generation into the peak flux export window, if you're installing batteries too.2 points
-
Well I'd argue that the principle for meeting at least one of the three bullet points plus most of the three lines below must have been established by the approval of the outline application otherwise it would have been refused. The only part of the policy that refers to matters more properly dealt with under reserved matters is "comensurate with the scale and character of the area". It is more likely that an oversized house will fall foul of that requirement than it would simply if it would be too big for local housing needs. As mentioned above you need to reference the local area in terms of size, shape, relevance to plot and materials. If you can do that you are chipping away at all those reasons why it should be refused reserved matters approval. By all means lean on the self build bit as well but that alone will not get a three storey glass cube approved amongst stone built thatched 1 1/2 storey cottages. PS - that last bullet point about affordable housing is often put in policies to allow Council's to ignore their "can't build in the countryside" policy if a scheme by a social housing provider or the like proposes to build homes for rent on some odd bit of rural land, often for local renters. Usually the same land a market driven developer would be refused permission.2 points
-
In my limited experience planners allow houses that are in keeping with their surroundings in scale and appearance. If you propose something that doesn't fit in or would set a president they don't want (eg outside village boundary) then they will find every possible policy excuse to reject it. ⁰2 points
-
I wrote a post that might be of interest: http://forum.buildhub.org.uk/topic/32067-mvhr-monitoring-and-control/2 points
-
I did wonder if this should be in the MVHR section but actually it's more about the technology side of things so figured Boffin's Corner might be best place... The reason for posting is that I'm always really interested in reading about what other people have done with all things home automation, electronics, DIY etc and figured that the very people behind all that might well be interested in what I've been up to too. I've also got a bunch of graphs which for some reason have always appealed to me and I'm sure I can't be alone in that! So here goes! The follow graphic illustrates what it's all about, and that is essentially the 'command and control' of our Titon MVHR unit. Titon do sell an LCD touchscreen controller for it (although I'm not entirely sure if it is compatible with our particular unit) but it is pretty expensive and I figured I could do more for less, and have more fun in the process! It is based around the following components: Raspberry Pi Zero W - This is the 'heart' of the control system and monitors temperatures (using DS18B20 1-wire temperature sensors) in all the ducts (supply, extract, intake and exhaust) as well as humidity in the extract (using an AM2302 humidity sensor) and (soon) air quality in the supply (using a Plantower PMS5003 particulate sensor). As I will elaborate further below, with all this information it can automatically boost on humidity rises, cut back or turn off the ventilation entirely if outside air quality suffers, report heat exchanger efficiency etc and likely more things in the future too (I've been thinking about putting summer bypass under its control and perhaps complete fan control too). It also creates the graphs and serves them up for viewing in a web browser. Shelly Uni Smart Relay - Used as the interface between physical boost switches in the house and the MVHR unit so as to increases their utility in terms of allowing different actions for short vs long presses, but more importantly it also provides an easy way for boost and setback to be triggered from other triggers whether that be from the Pi, widget buttons on our smartphones and voice control via Alexa. Shelly 1PM Smart Relay - Used to monitor the power consumption of the MVHR as it was something I was interested in understanding even before fitting the system, and it used to also serve as a means by which to disable the ventilation in response to a fire but I have since decided I don't actually like that and would rather the ventilation kept working. It is still connected to the smoke alarm circuit though and will alert me via app/SMS if the alarms do trigger. Raspbery Pi Pico W - Acting as a 'mobile' means to interface with a PMS5003 air quality sensor whilst I am still playing around with it, but when the sensor goes in the ducting I'll read it directly from the Pi Zero from then on. So breaking down some of the functions further... Heat Exchanger Efficiency With knowledge of the supply, extract, intake and exhaust temperatures you can calculate heat exchanger efficiency in real time. The Paul Heat Recovery page on the subject describes two methods in more detail and the following graph illustrates what are fairly typical efficiencies figures (high-80/low-90%) I see from the unit: Automatic Humidity-Related Boost The Titon does have its own humidity sensor with an adjustable (but unmarked) threshold and whilst I've never actually tried it I've always assumed it would be susceptible to false positives (triggering when it shouldn't) or negatives (not triggering when it should) and perhaps more to the point was always going to be a bit of a pain to fine tune (and adjust seasonally) given that the unit is in the loft. So, given I am monitoring humidity (in the extract manifold) anyway if we look at a typical graph it is easy to see when boost needs to be triggered: Those peaks correspond to showering and cooking (e.g. mostly the hob) and as I said are really easy to spot with a rate-of-rise calculation. The Pi takes measurements every 5 minutes and as a starter-for-ten I set it to trigger the boost (via an API call to the Shelly Uni) if the humidity rose by more than 5% within the 5-minute window. This turns out to have been a perfect threshold as it has never knowingly missed a shower (or pan of boiling water) or triggered when it shouldn't have in the several years it's been running now so I've not cause to make any changes. Automatic Ventilation Setback This is the most recent addition to the control system, and is still work in progress but as it's been so interesting to me I thought I'd share the not-quite-finished product... Our neighbour (who thankfully we get in really well with, but even friends can be annoying!) bought a wood burner for their recently-built extension. We've been mindful of what we might be breathing in from it as it seems barely a day goes by when there isn't some article or other written on the subject. Indeed, on occasion over the winter we've seen smoke coming from it but more to the point we've been able to smell it through the MVHR too. Granted, this is mostly when I've seen the smoke and have jumped up on a chair to sniff the incoming air from one of the vents and it seems the planets have to be in alignment for this to occur e.g. a cold still day with no wind, the neighbours using damper-than-ideal logs etc but it's happened a two or three times now and whilst I've been convincing my wife how sensitive the human nose is and that we shouldn't assume we're being poisoned I did begin to really want to quantify how 'bad' the situation really was. Aside from anything else it was a good excuse to buy another sensor, produce more graphs and give another aspect of control. Like others whilst we normally run the MVHR 24/7 and enjoy the fresh air it provides but this of course is only effective if the outside air is indeed fresh so my goal is to detect when it isn't fresh and either turn the ventilation down (whether that be both supply and extract, or perhaps just supply I don't know yet) or perhaps even turn it off temporarily when such a situation arises. The PMS5003 particulate sensor is a delightful little thing - the size of a small box of matches and costs around £15. You wouldn't expect much for so little but I've read several accounts now of people having compared them with air quality sensors costing thousands and them being a reasonable enough match, certainly good enough for taking measurements that are meaningful, consistent and reliable enough to feed into a home ventilation control system. The sensor is based around a laser whose light is reflected by the presence of particulates in its path from which the sensor can determine particle quantities in the 0.3-10μm diameter range which is exactly the region of interest when determining common particulate matter based analysis and determination of air quality. The following graphics illustrate the what the sensor can detect: The sensor does everything for you in terms of detecting the particulates and then presenting summaries of particle count and mass of different particle sizes over a serial line that I am reading with a bit of Python code running on a Raspberry Pi Pico W (currently powered by a USB powerbank for mobility): The Pico is configured to continuously read from the sensor and gets an update roughly once per second and, via HTTP through its wifi interface, I can request and parse these readings from a script running on the Pi Zero: I capture the readings once per minute which are then stored and can be graphed to show particle count of any specific detectable size but I am finding the 'all detectable sizes' (>0.3μm) summary useful enough: The particle mass figures are even more useful as they can be compared against Air Quality Index charts such as the UK's Daily Air Quality Index (DAQI) 10-level bandings shown below: Now technically the DAQI levels, like most AQIs, apply to 24hr mean readings thus non-continuous spikes as seen above don't really up the level - it's the 24hr average (as shown in the table) that really counts if wanting to compare against the index. The neighbours haven't been using their woodburner over the past week or so as far as I can tell and so it would've been rather boring to put the sensor in the supply manifold as ultimately intended so instead it's been sitting in our open-plan lounge/kitchen/diner and it's been quite an eye opener! As the following graph illustrates, cooking really does produce a lot of particulate matter: I think the first spike was preparing some halloumi burgers on the hob, the second the bread machine in action and the third some sausage rolls in the oven. What was really quite alarming was when my wife burnt some sesame oil in a frying pan... I was out at the time so have only got her word but she insists it wasn't that smokey (and to be fair when I got in later I could smell cooking but didn't assume anything more than that) and yet the particle count graph looked more like a nuclear bomb had gone off: The spike doesn't look all that significant until you look at the y-axis scale - a peak of over 3000 particles/0.1L which is over ten times the peak we'd normally see when cooking! It was interesting to see the PM1, PM2.5 and PM10 counts against the DAQI for that episode too: Whilst as mentioned it doesn't mean all that much shown like that given the DAQI is meant to be used with a 24hr mean (thus 13μg/m3 of PM2.5 in this case, which is still only Level 2 'LOW' on the scale and not the 195μg/m3, or Level 10 'VERY HIGH' as it might otherwise appear presented like this!) but it does make for an interesting perspective nevertheless. Some might say it also serves as a quantifiable measure of my wife's cooking skills but obviously I wouldn't... So that's where I've got to really! Next steps are to buy another air quality sensor as it seems a shame to lock this one away in the MVHR ducting as there are too many experiments begging to be done - lighting matches, candles, perhaps the barbecue and maybe driving around with it too (the sensor, not the barbecue) to see what the air is like on a commute or in a city etc. Also with two sensors I can have one inside the house to automatically boost when required, and one in the supply duct to do the opposite and turn the ventilation down/off temporarily if the outside air quality is lower than desired. I've written more than I planned to so well done - and thanks - if you've got this far. Hope it was of some interest, and if there are any questions or any way I can help you do something similar I'd be happy to oblige.1 point
-
And for the obvious need to be able to isolate the tap in the winter! The hacker in me would want to make use of the normally closed solenoid valves from a washing machine and have Alexa turn on the water on a schedule.1 point
-
@PeterW is, like me, a genius. Firltted our outside tap this evening for filling a paddling pool, and fitted an isolating valve off the manifold so it will be out of reach children and magpies.1 point
-
As your build goes up your Brickies or more likely you should rattle your cavity ties I normally use a 3 meter length of metal conduit Simply put it down en the cavity and give each tie a tap I normally do this at chamber height then just before the roof goes on1 point
-
Isolator on the inside - which you should have anyway along with a non-return valve. Just turn it off when you go away.1 point
-
You’re very helpful and don’t let anyone tell you otherwise. 🙃1 point
-
1 point
-
Might be a good shout, like a lockable key cabinet you see in offices. I'll look into that now. Obviously it's not a huge concern, 99% unlikely anyone would ever turn it on as a jape, but if the possibility is there then I'd like to reduce that to 100% unlikely. Maybe even something like an eye bracket and a "close to the handle" padlock would do it.1 point
-
i really think you're doing the right thing and not just for your marriage's sake! well done and keep up updated.1 point
-
30 degrees is fine, you will get slightly better summer performance than winter. Nothing wrong with east or west either, both is better than one or the other - you get good production from first thing, until sunset, with a slight dip at midday.1 point
-
Another thing to consider is that you don't necessarily have to use resilient bars on both sides of the wall, you can get a lot of benefit from using them just on one side. We used double PB on both sides +resiliant bar on just one side in critical locations. Look at the British Gysum white book if you want to see decimal reduction numbers for the different options. https://www.gyproc.ie/sites/default/files/Non-loadbearing timber stud.pdf1 point
-
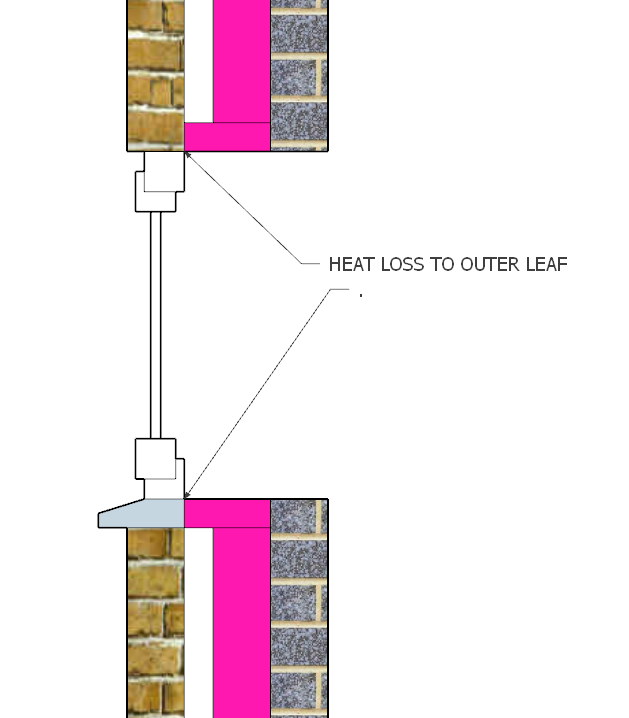
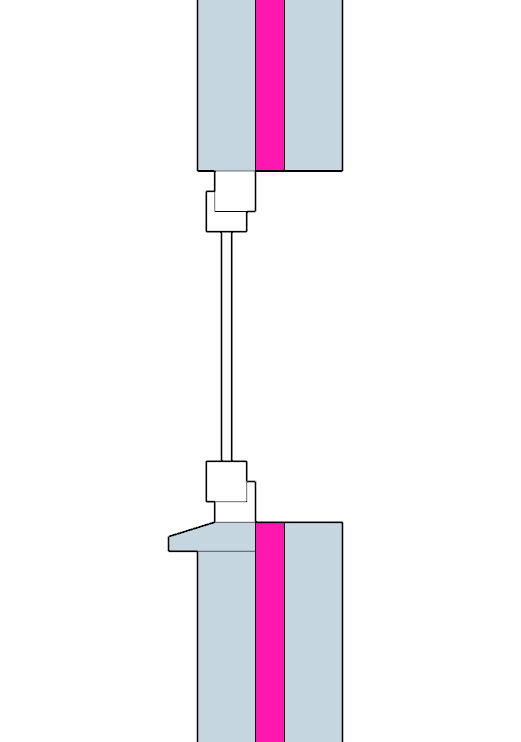
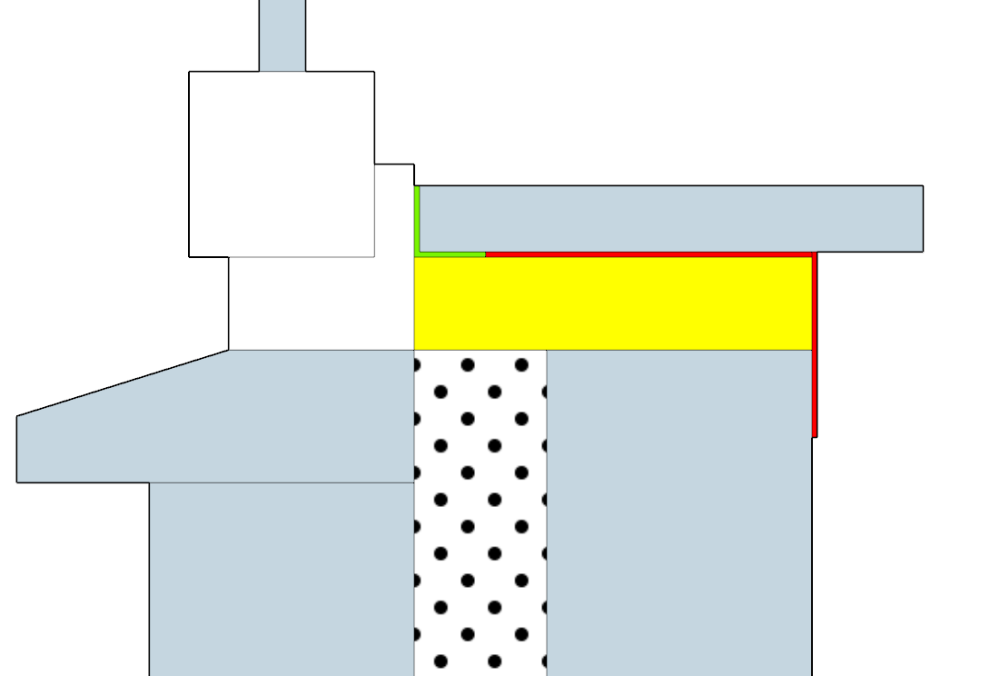
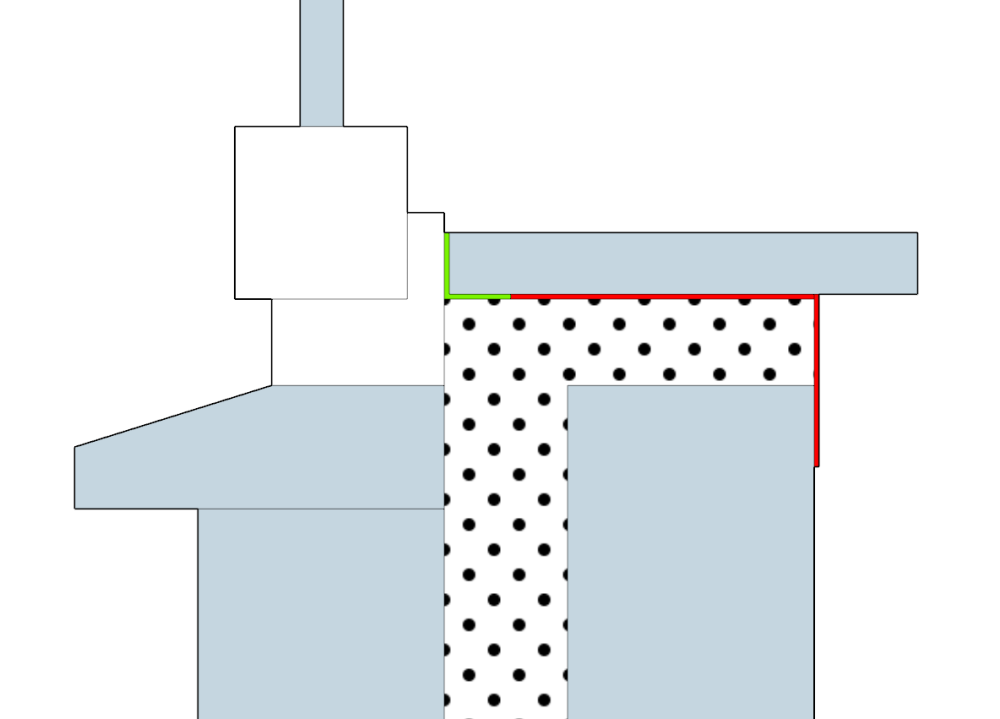
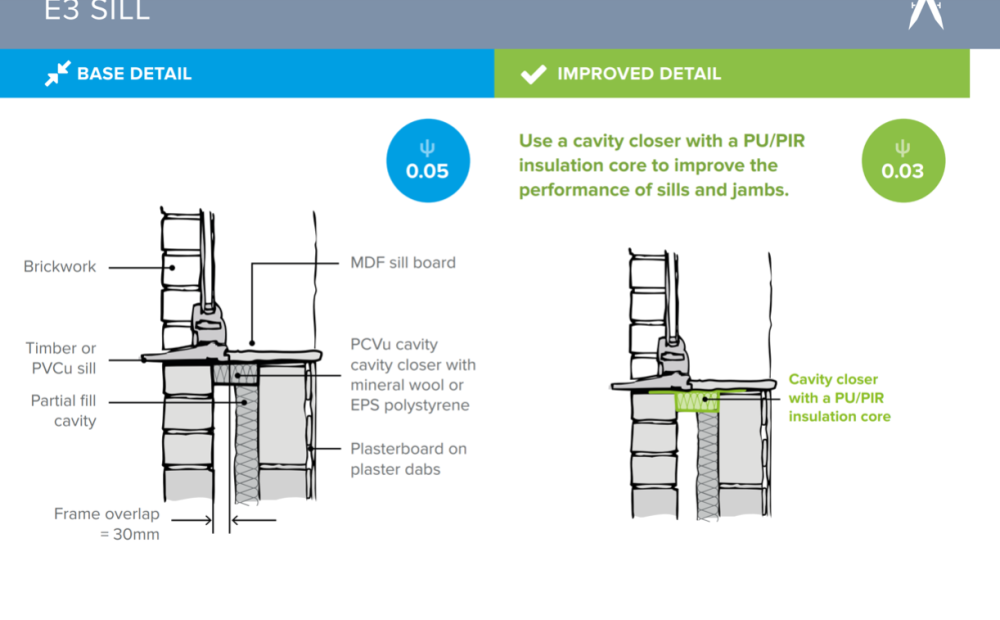
I don't know on the new build if the window overlaps the cavity closer. Worse case it is like this and the installers haven't done it. The cold outer leaf could be practically "touching" the inside which is a bad thermal bridge. I suspect in reality they've moved the windows more inboard and this isn't an issue. However it's still better to cover as much of the frame as practical with some insulation. However you'll need to drill a 25mm Diameter through the membrane and batten as shown in each of the four sides of the window to allow your EPS beads installer to give a quick squirt of beads to thermally isolate the windows. If you want you can drill a few extra holes in the batten only and not the membrane to visually check that it has filled to the corners (it will BTW). The Hole in the membrane can be very simply patched afterwards with a piece of A/T tape. Hey presto. A fully thermally insulated window frame. ZERO waste of insulation unlike boards products. A fully gapless install No thermal looping/bypass. Perfect A/T details. Exactly consistent frame gaps unlike other methods. A consistent pallet of very cheap materials. No need to fight with the window installers. Don't worry, almost all of us are in the same boat.1 point
-
They don't look great, but timber grading does permit timber with surprising large splits (shakes) to be used. But it's too long ago since I had to argue over that with a supplier to remember the details.1 point
-
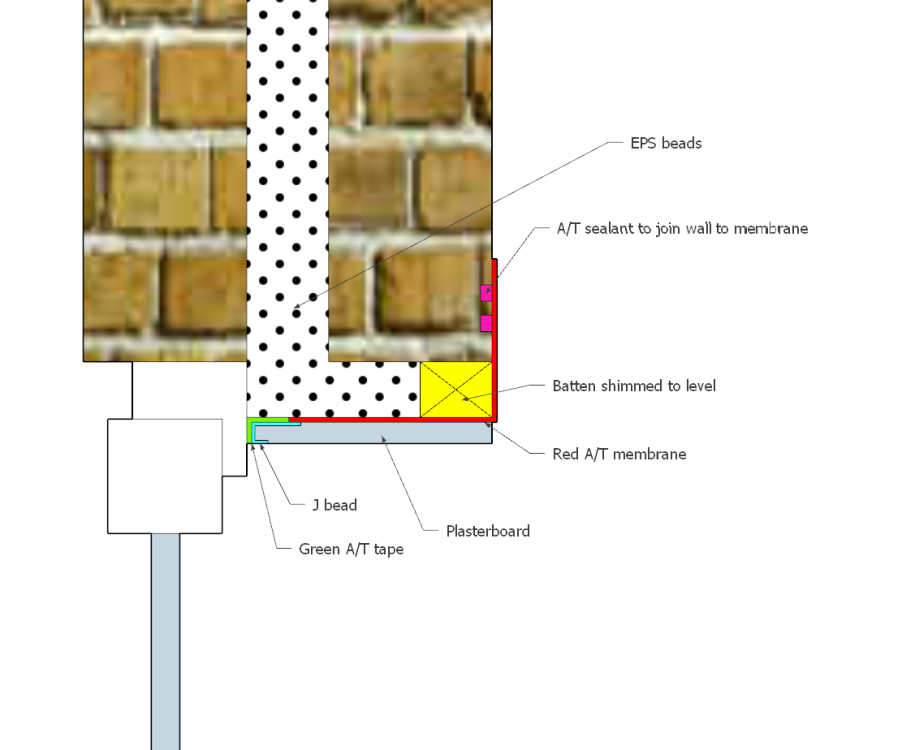
There's plenty of space to over insulated the frames internally there. I wouldn't sweat about it. In the existing house here is what you have. @Dave Jones is right it's a nasty thermal bridge. However it's easily solved. This will do for the heads and reveals. 1. A/T tape and membrane. 2. J bead. 3. Batten shimmed level with j bead. 4. Membrane returned to inner wall and sealed. 5. Plasterboard. 6. EPS beads injected into wall as insulation. For the Window board you'll need to run some support in the form of a few battens per window as below shown inn yellow. These should be fixed to the inner blockwork. 3- 4 should be fine. Then let the EPS beads Fill the rest. You could mess around with PIR boards etc but it's a mess. Just let the beads do the work.1 point
-
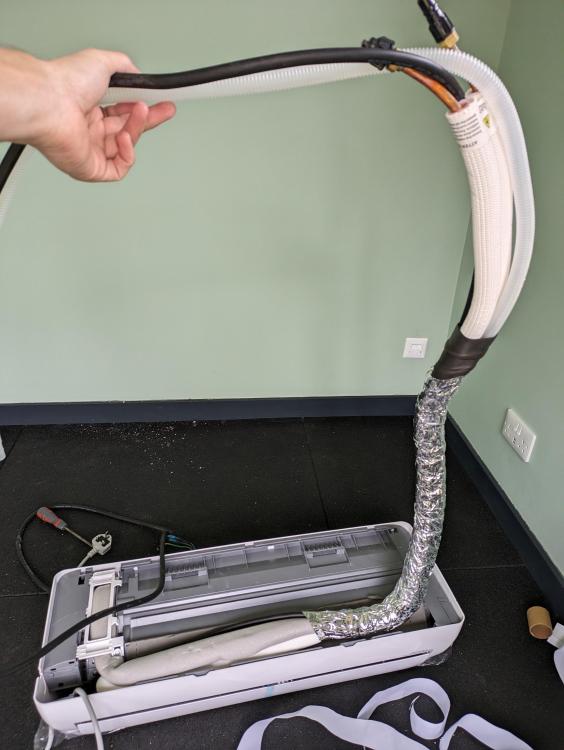
Anyone else installing one, note the illustrations and the installation text don't entirely match. E.g. the text says to install the protective sleeve in the hole cut through the wall, and to wrap the pipe bundle in additional insulation, prior to passing through the (sleeve in the) wall. The diagrams don't show either those steps, nor does the kit include said sleeve or insulation. So, anyway having noticed this I managed to get mine back off the wall and wrap the pipes. I used self-adhesive foam and then a layer of self-adhesive aluminium foil. The result looks OK enough, and importantly the bundle passed much more smoothly through the wall than it did as separate pipes/wires. Next up is mounting the external unit ona wall bracket.1 point
-
I'm just about to have the final layers put on my patio. I've gone for resin, build up I've done as 100mm crushed concrete that went down on top of approx 500mm rough hardcore with clay below, then levelled with 70mm type 1. Company will come in and lay 50mm permeable tarmac followed by 20mm resin bound gravel. As the tarmac is the permeable kind it's fully SUDS compliant. One company tried to tell me they used permeable concrete, but I was bit wary about that as hadn't heard of it before.1 point
-
2 bricks or 150 clear below DPC except for access doors. Try lay the crush down in 100mm lifts and wacker them to stop it cratering over time.1 point
-
1 point
-
It looks like sand and cement. Problem is caused by the usual culprit, water. I would just mix up a bucket at 4:1 and patch it in. Sponge it after to match the finish. When it's well dried in a good dark coloured exterior paint should be enough to protect it from water running down the wall from above. If this isn't enough carefully cut the paving back 100mm with a diamond disc and dig it out 100mm deep. Then back fill with chippings to match the paving creating a mini french drain that will prevent any rain splashes and mini pools of water by the base of the wall. I think sand and cement patchs and a good coat of weathershield will be fine however.1 point
-
For info, the above method works well without cavity closers for EPS blown beads, getting a really consistent and easy and cheap to install well insulated window. You can even pre install the membrane, tape and J beads before the window is in situ.1 point
-
I would. 1. Parge the walls. 2. Cut a strip of membrane the length of the perimeter of the window and about 50mm deeper than the reveal depth. 3. Starting at the 6 O'Clock position lay the membrane on the sill, up the reveal, across the top, down the reveal and back to the 6 o clock position. Use some dabs of silicone to hold it in place. Be sure to push it well into the corners. 4. Careful mark 10mm (or more depending on your window design) with a pencil around the perimeter of the window and apply your split airtight tape to seal the window to the membrane. 5. Fold the 50mm remaining piece of the A/T membrane onto the wall and apply a double bead of airtight mastic to seal it to the parge coat. It may need some cutting and trimming at the corners. 6. Screw a J bead to carefully cover the edge of the A/T tape on the window perimeter. 7. Slot in plasterboard with a few dabs on the reverse and mechanically fix through the membrane to the brick reveals. Squirt some Illbruck FM330 behind there if you're anxious about any hollowness. You may need to use some small packers to get perfectly consistent reveals. I would avoid paint on airtighess near windows. You are lightly to spend longer masking it neatly than using actual airtight tape and it doesn't adhere as well either.1 point
-
1 point
-
This is exactly it! Some good quality tape and polythene should keep it well covered. Then also taking as much care as possible to minimise the risk of the barrier being breached. I get that its a little risky, but should work fine.1 point
-
Yeah,let’s get the kids primed for a lifetime of servitude before they’ve had a chance to start questioning things. Far better for Society as a whole to have an educated population who aren’t as susceptible to the triggers fed their way by the Mail et al. And how many innovations in our history have come about by people having a broad knowledge of things outside their particular discipline? Grammar schools in Sevenoaks are basing their intake exam on questions not yet covered by the pupils’ curriculum,so that tutors are required to stand a chance of gaining entry. So much for social mobility there. The ‘alphabet gender bollox’ is basically telling kids it’s not okay to be a dick to someone cos they’re different to you-how terrible for them. When my kids see the trans person on the till in a shop,it doesn’t confuse them,they just accept it. It’s me & my generation who do a double take because we weren’t brought up with this as a thing. Regarding the PV,doesn’t surprise me in slightest. I occasionally work on New Build sites (I did almost exclusively as an improved,& consequently had to unlearn many things) & the phrases ‘if it looks right,it is right’,’looks ok from my house’ & ‘Stevie Wonder would like to see it’ are commonplace. Hard to find a group of people less inclined to innovation & more resistant to change than the entire mass house building sector.1 point
-
The full act is here. Their obligations are listed in chapter 2. 10. https://www.legislation.gov.uk/ukpga/2016/22/contents/enacted Eg.. I would ask something like.. With reference to the Housing and Planning Act 2016 Chapter 2 "Self-build and custom housebuilding".. 1. In each base year since 2016 to date, how many people have been added to part 1 of the "Self-build and custom housebuilding register" ? 2. In each base year since 2016 to date, how many people have been added to part 2 of the "Self-build and custom housebuilding register" ? 3. In each base year since 2016 to date, how many "serviced plots of land", that meet the obligations under the Act, have been granted planning perpermission. 4. The information the Council uses to determine that a planning application is for a selfbuild or custom build home as defined by the Act. Unfortunately I think councils are only required to meet local demand (Part 1 of the register). But it might still carry weight if they are way behind.1 point
-
Having self-built in a rural area myself (replacement old house, when planning policy preference was to retain and upgrade existing buildings) what I learned was this: the local authority will have a series of planning policy requirements. Obviously if your proposal ticks all the boxes your application will go through easily, if you don’t it won’t. Some of these policies are aimed more at major developments as opposed to single homes (exactly as @Jilly says). That said perhaps the council won’t be keen for anyone to build something that would be too big & expensive for many to afford (eg if you sell it). I would just advise the more boxes you tick the increased chances of success. In my experience the fact that I was going against the council policy preference to rebuild existing buildings, by replacing it with something 2x as big, was the fact that I was replacing it with a sustainable property, high quality natural materials, fitted in referenced the former building angles footprint etc etc, had community support etc etc. so I was trying to tick most of the other planning boxes. The planners asked me to use natural slate on the roof for example - they were right to so and I was happy to comply. If your proposed build is clearly much larger than what it surrounds suggest a design that references local vernacular or maybes two smaller linked buildings to get your sqm you need. I know much of what I’ve said doesn’t really answer your specific query, but just offering this in case you’d hadn’t considered this. your issue may be if 250sqm is significantly bigger than what it surrounds. Floorspace can be hidden in design eg 1.5 storey houses clearly look smaller than 2 storey.1 point
-
Except that it is permanent so the floor bends a bit, but just once and stays there. If anything it reduces bounce from movement.1 point
-
I'm not sure it matters for a one off 'custom builds' as they call self builders. As you have outline planning, you should be fine, it will be a matter of agreeing the design and conditions. I believe the 'affordable housing' refers to large scale housing developments where the developers have to put in a few smaller 'affordable' properties in addition to the obligatory executive homes.1 point
-
The external ground level at that point is too high - it looks like it’s the same height as the DPC and sub-floor ventilation. Surface water is by-passing the DPC. Pull the gravel back so that it’s about 250mm below the DPC and see if that does any good. Clear out the vents and let everything dry out. Going forward you’re going to have to reduce the ground level.1 point
-
10-15x if a retrofit into an existing poor / leaky dwelling, not so if a new job? Simple. Then you fit a 400L UVC. Incremental price increase is WAY less than buying and installing ( and finding a home for ) a second UVC, still uses the same footprint, and will be ample. I only put a 500L in for a family with 4 generations living in a massive, multi-bed / multi-bathroom house. Once blended down to shower temps that's a LOT of hot water. A "guest" switch gets fitted on any of my jobs where the house is 4 beds or above. One tap of a button and you get a 15/30/60/90/120 mins boost to either 1x or 2x 3kW immersions for duress DHW eg there's a wedding / other and the house is fully occupied with more occupants than rooms. Constant DHW with that lot going + ASHP in DHW mode.1 point
-
@Selfbuildsarah you don’t need that much space and you can “stack” things such as the expansion vessels on top of the cylinders. First off, need to know how many showers etc you have - 10l/min is a pretty decent shower and is the maximum under the G2 water efficiency regs if you’re required to achieve that anyway. With an 70/30 of hot to cold from a 300 litre tank at 52°C, you’re at around 40 mins of shower flow before you get a cold shower. Take that tank to 72°C and you’re adding around 18 mins additional flow which is actually a fair amount. 82°C and you’re over an hour at 65 mins of capacity, and this is from a 300 litre UVC with 90% usable capacity. 300 litre UVCs are pretty easy to get into surprisingly small spaces - the Telford one is 660mm diameter and that’s not far off the same footprint as an ordinary fridge freezer. Telford custom make their cylinders at no extra charge with all ports and connections where you want them too so they are easily installed. I’ve designed variable flow installations with domino tanks using multiple UVCs but that’s for buildings such as B&Bs who want flex but limited heat loss when rooms aren’t in use and the 2 variables are always capacity and temperature - all depends on the need, and proper design from the outset.1 point
-
Saw this on "Just have a think" youtube channel (was a promotion): https://atmotube.com/atmotube-pro Portable option! 10 days battery on 15 min charge so may not be suitable for long term house usage.1 point
-
Temperature is the mean free path speed of a molecule or atom. Mean temperature is the mean of the sum of all molecules. When water is above 4⁰C, the density reduces with temperature rise. So at the top of the cylinder, the free path speed is going to be higher than lower down the cylinder. Some of those top molecules will be above 100⁰C. This is what caused evaporation. Nature is quite wonderful, and often not intuitive.1 point
-
Apologies, I have been running around emptying kitchen cupboards ready for builder to come and tank the walls and fit the kitchen. I swear clearing out all the cupboards is akin to moving house 🤦♀️ Thanks to everyone for the welcome and I will get some pics posted of the house/barns and add a profile pic 😂 I am just outside of Launceston 😊1 point
-
Both of you need to breath. A friend of mine has the saying 'What's this really about?' Apologise. Understand each other's POV. Get an automatic, bags of salt, some time, and book yourselves in with Relate. The housebuilding has driven you both bonkers and you are frustrated that you have spent so much time and money and it's still not perfect... Sometimes we try to control one thing because something else is out of control. You will probably still have to redo the drive, but try to live with it for a while to both figure out what would be best collaboratively, or she may still not like the result...1 point
-
We have taken a warranty with selfbuildzone. Cost £1500. House 147 sq mts I can't believe how thorough our inspector has been. Wants drawings & calculations for everything. Came out again yesterday to inspect how the stonework was being done. Checked the cavity for snots & cavity ties. Discussed how we should close the cavities. Advised on best way to do guttering. Looked at the new proposal for the low level SVP (thanks again, Jeremy) & passed it. He said he is there to help & to call him anytime I needed advice. Agreed window installation pants. I am really quite chuffed. He is a second pair of eyes. After all it is in our interest for things to be right. I am glad now we decided to take a warranty. Never had any intention to sell but when Henry was diagnosed with cancer in April made us realise that nothing can ever be certain. Through experience I know that NHBC warranty worthless. When a developer builds a new estate it is only the first couple of houses that are inspected. It is assumed the others will be all be OK.1 point
-
0 points
-
If you do it nothing will happen . If you don’t then Sod’s Law will work . Prevention is best 👍. For a small fee I can stand there naked to deter people . It’s not the first time .0 points
-
Tried your last suggestion, if anything that made the neighbours want to use the hot tap to wash their eyes out.0 points
-
Cctv , gun , taser , naked man . These are slightly unhelpful suggestions I know .0 points
-
Need a min of 150mm cav for EPS beads. Messy. Much prefer sheet insulation, smaller cav better U value.0 points
-
0 points
-
0 points
-
I didn't say I had learnt either 😄.0 points


