Leaderboard


Popular Content
Showing content with the highest reputation on 12/19/22 in all areas
-
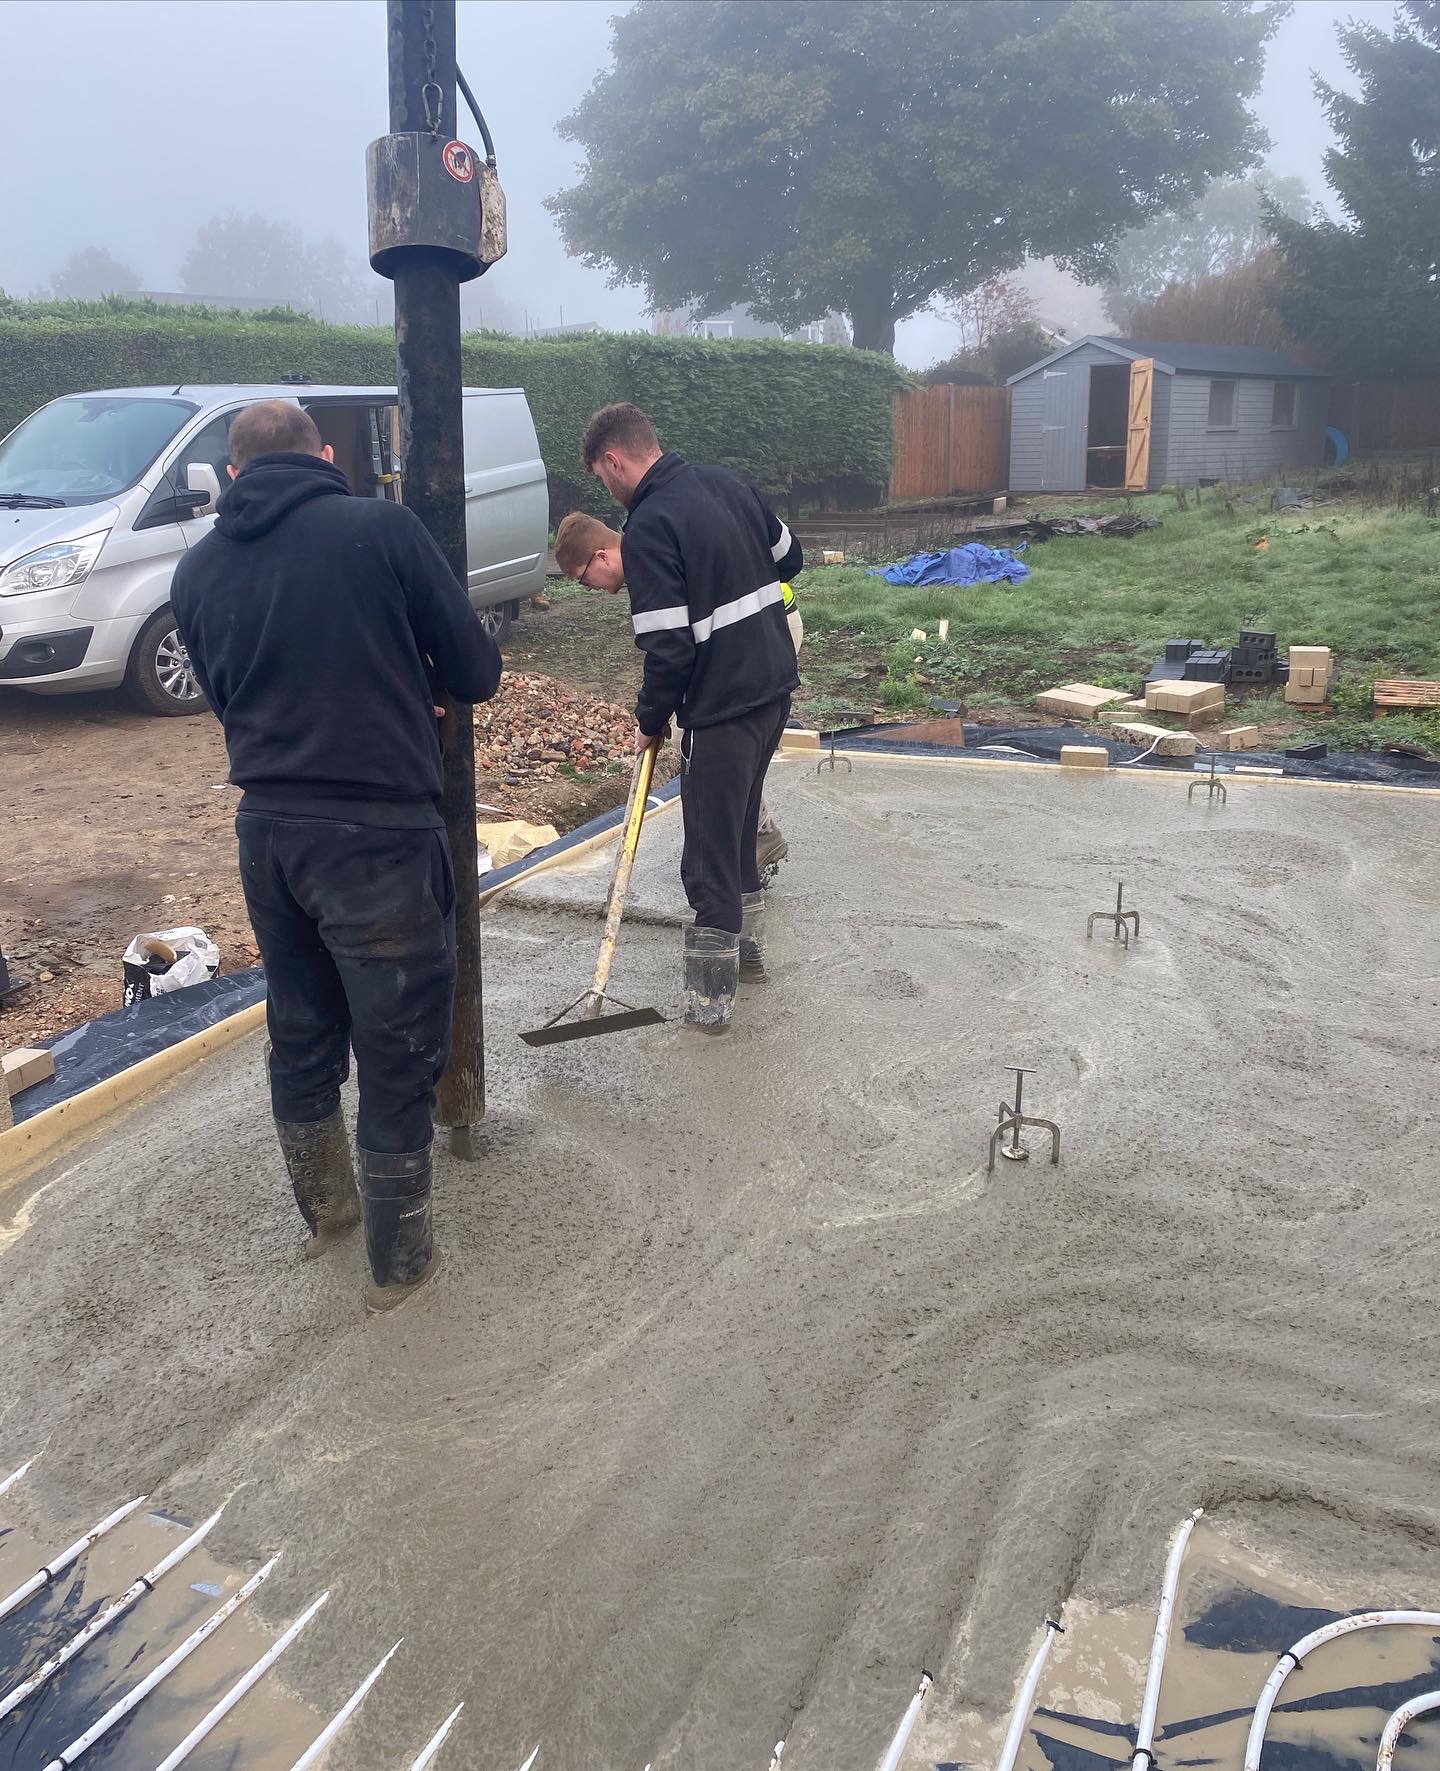
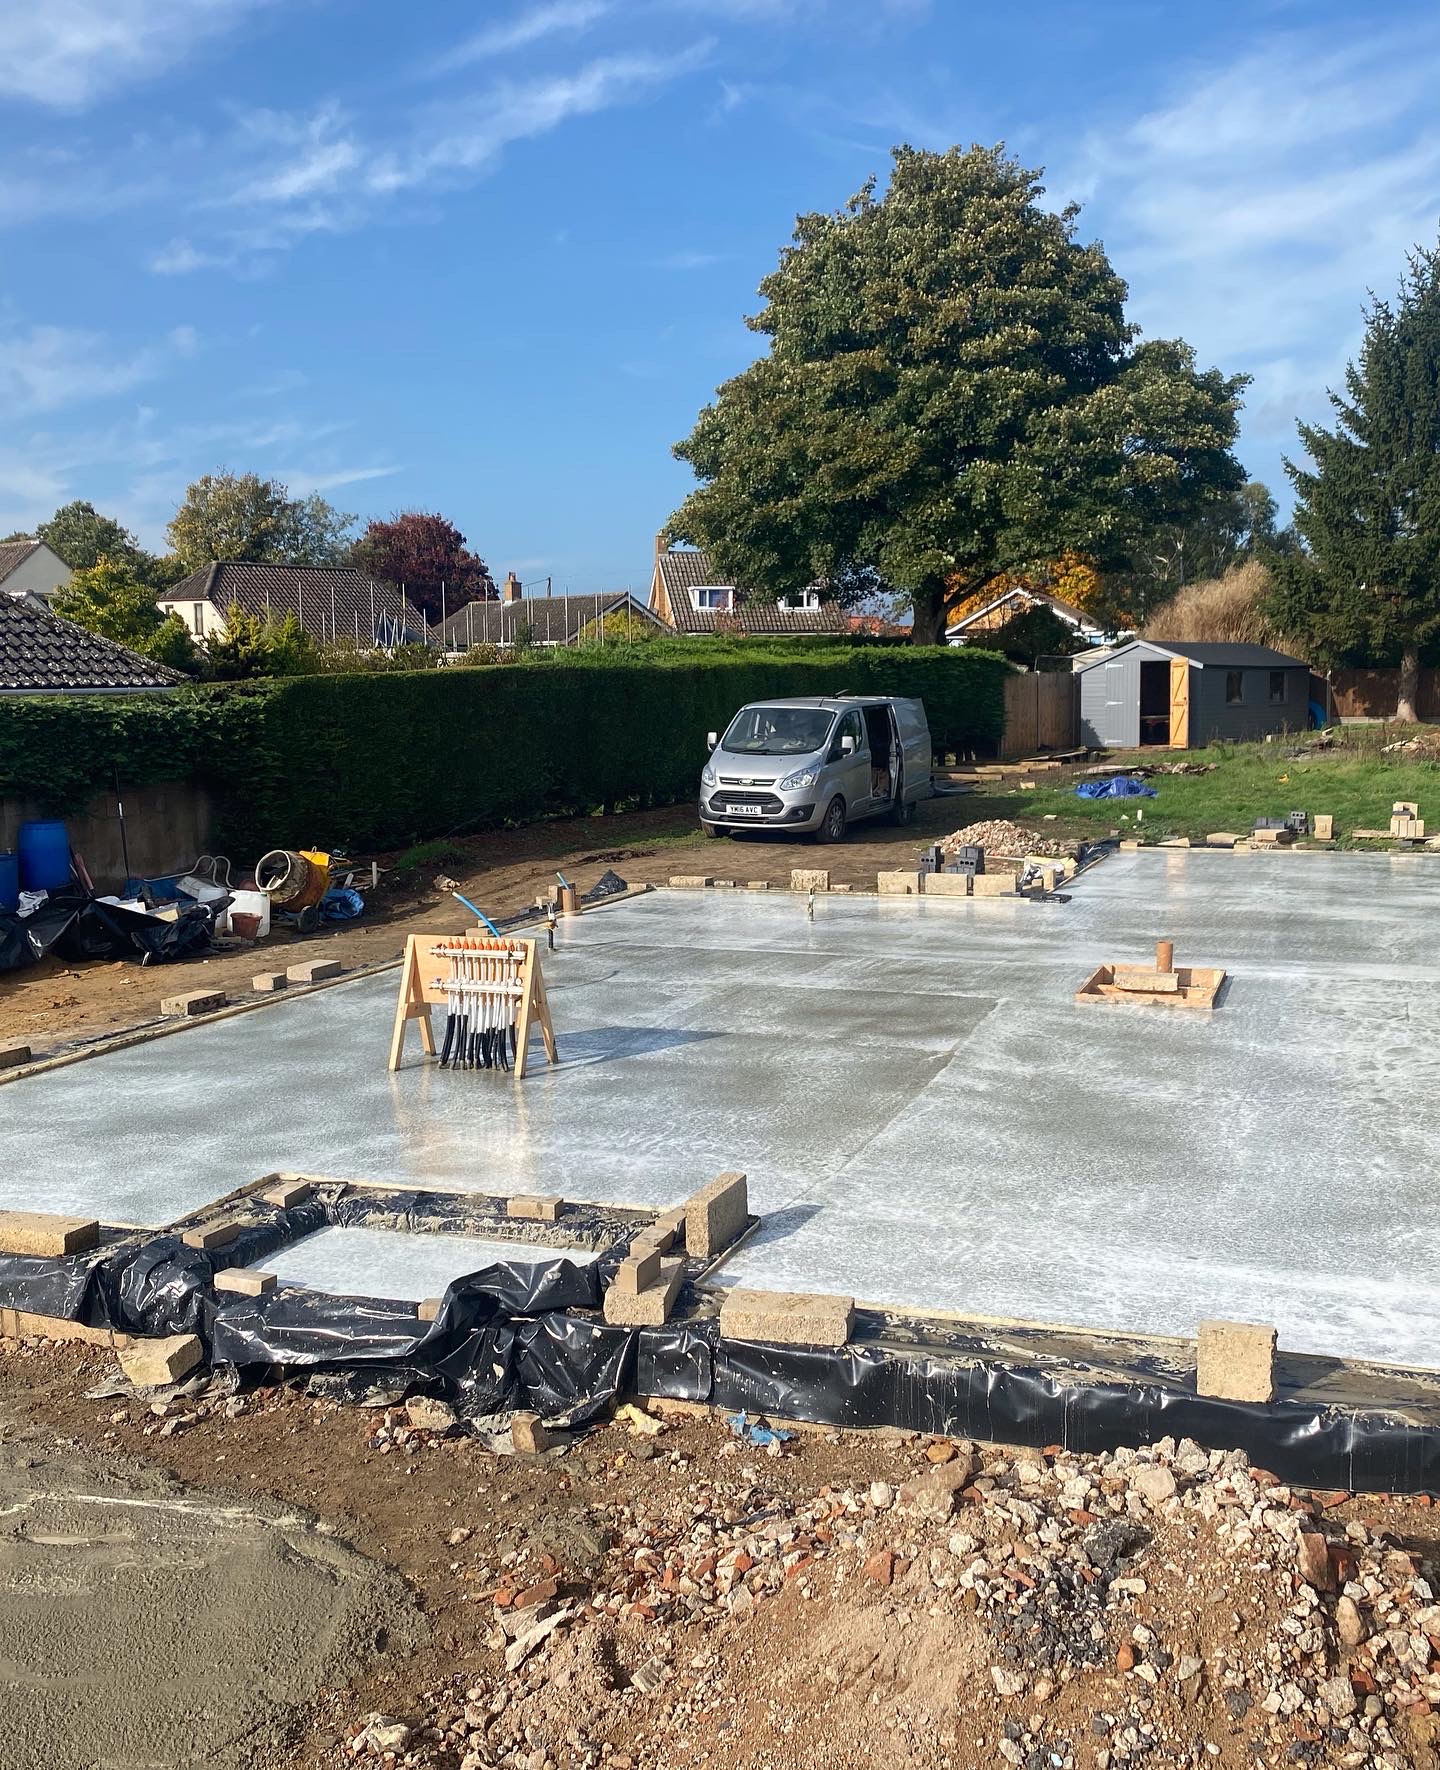
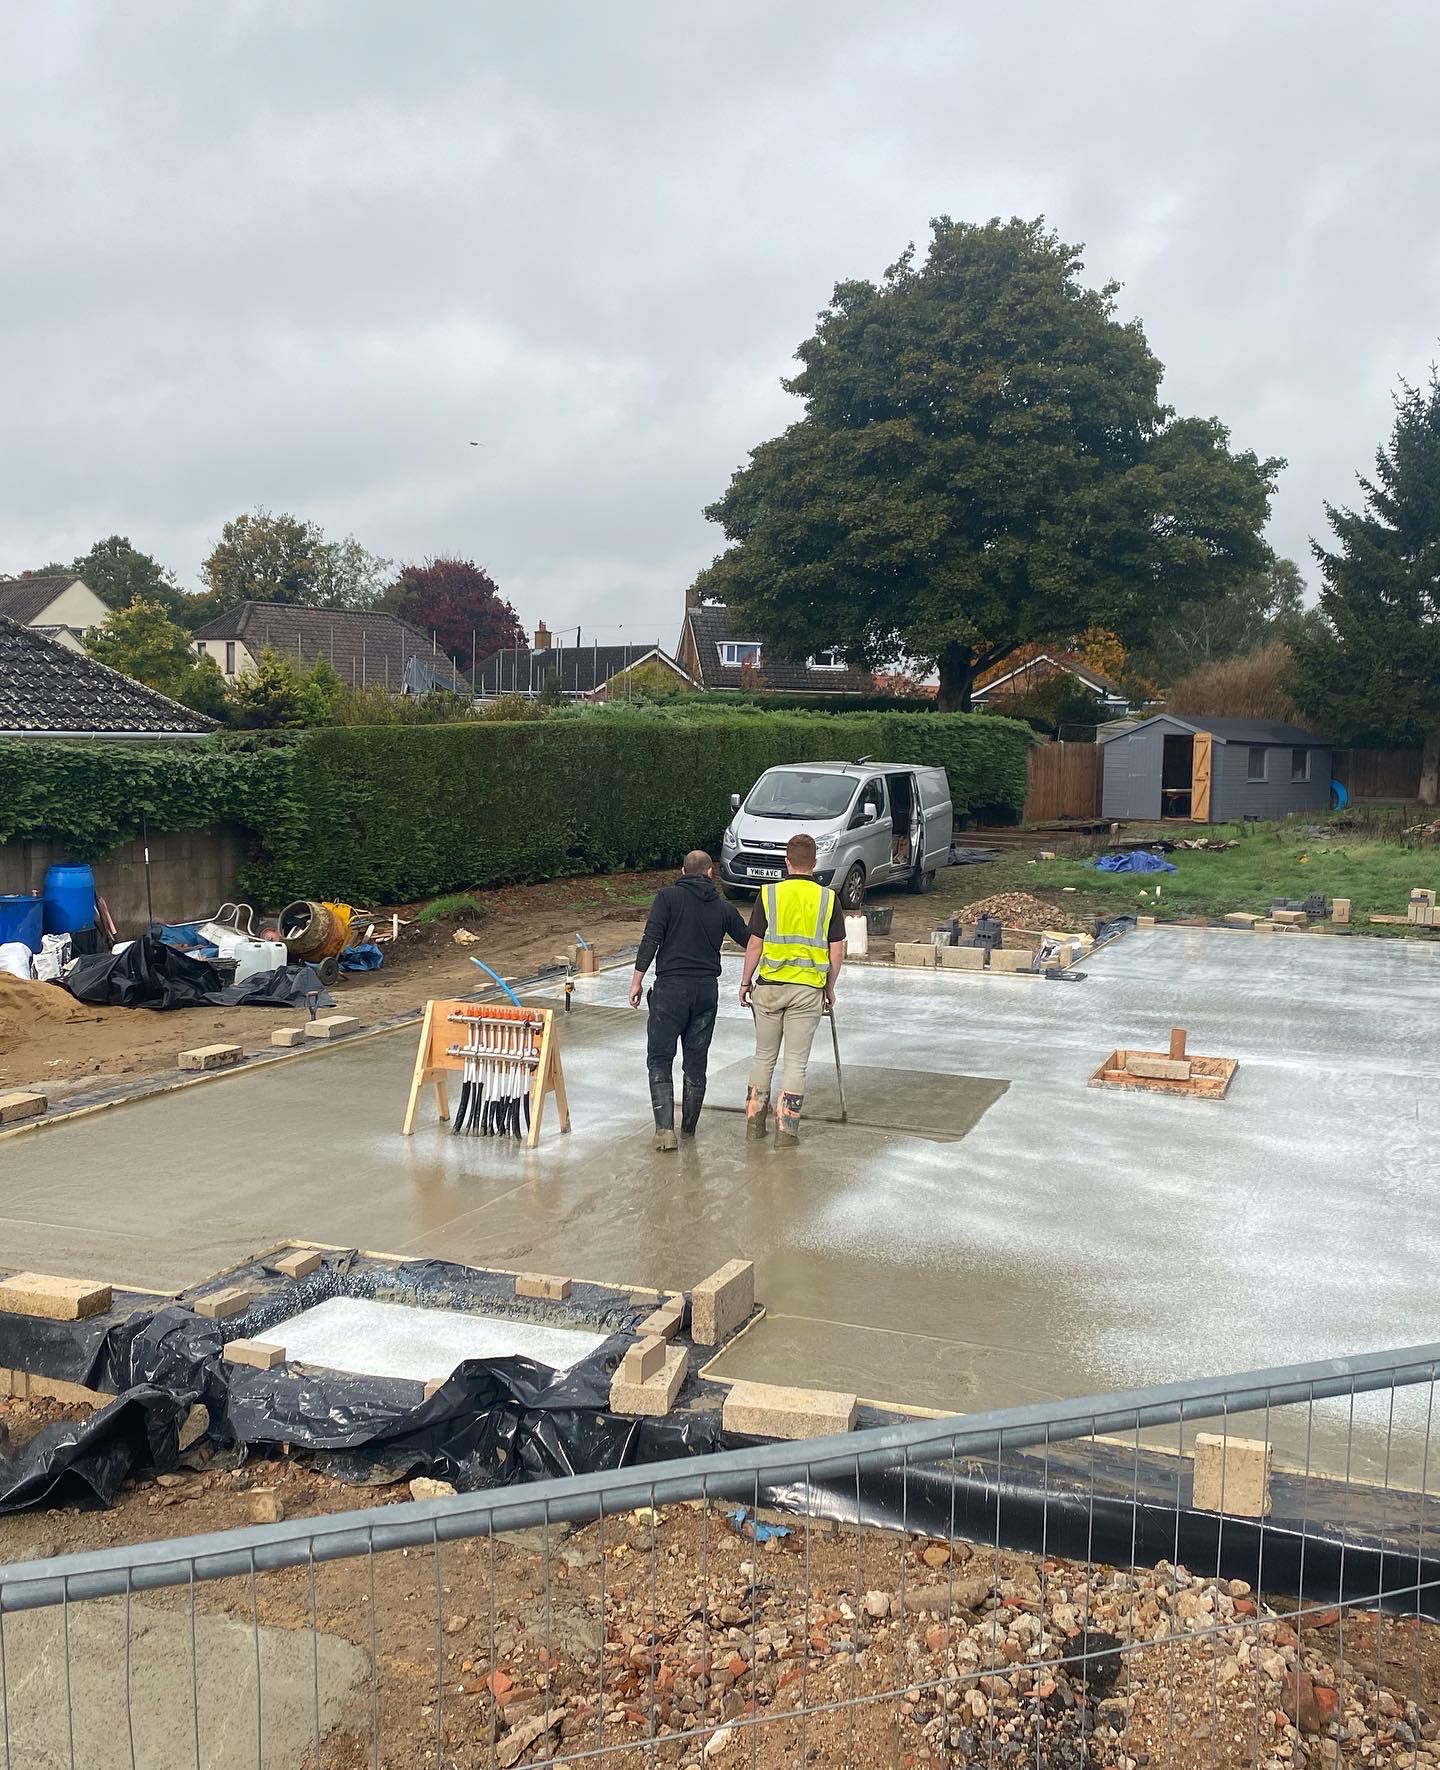
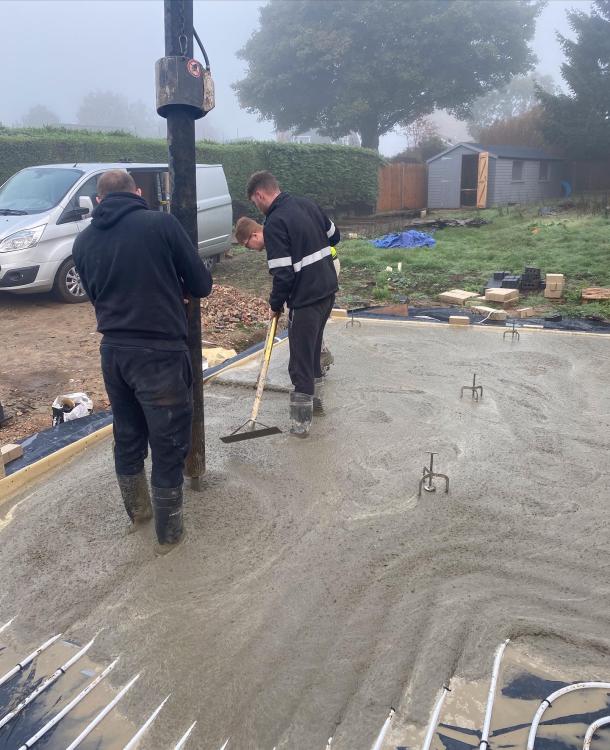
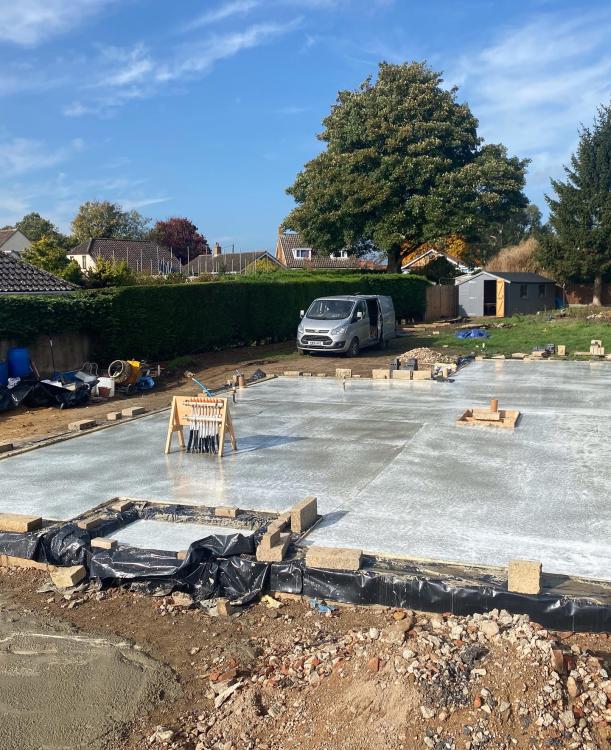
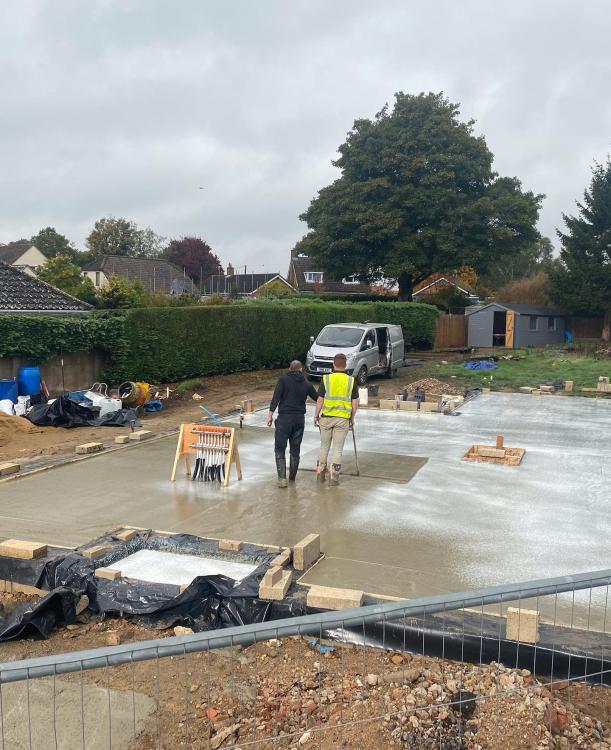
It’s not too difficult to get the hardcore base flat and level to within a few mm, any undulations are fixed with the blinding sand which is not too difficult to get within 3-5 mm if using a lazer level. So with the blinding sand nice and level lay the DPM then the PIR with UFH pipes then the concrete. The fibre reinforced c28/35 concrete I used was more like a screed as the max aggregate size was 10mm but mostly 6-8 so it poured flat and is self compacting. saved me th3 additional £3000 for a separate screed just for the ufh pipes that wasn’t needed.
 2 points
 -
I really would speak to the person responsible for installing, there are various things to consider I believe, roof angle, wind and snow loading etc all make a difference.2 points
-
Time short, clever solutions difficult to attempt at short notice. So, cheated. Blobs of expanding foam cut into strips, reached under the units and pushed them into gap between plasterboard and screed. Not 5 star work, but if there were gaps before then they are at least less "open" now. Let's see how the test goes. Thanks for all the ideas.1 point
-
@Nickfromwales @Mr Punter That standing water was actually caused by a blocked sewer, after I read these messages I lifted the man hole and the level was only a few inches below the cover. Ive had it unblocked now and the water is gone, it was just an elbow. Ive now started the process of installing the french drain and digging out the old pipes.
 1 point
 -
There's a fly-lead connecting to a small junction box at one end, that allows the arrays to be daisy-chained together. If "designed in" the fly-leads will be covered by a profile capping.1 point
-
I have only radiators. They respond more quickly to changes in the water flow temperature than UFH so are better-suited to night-time setback.1 point
-
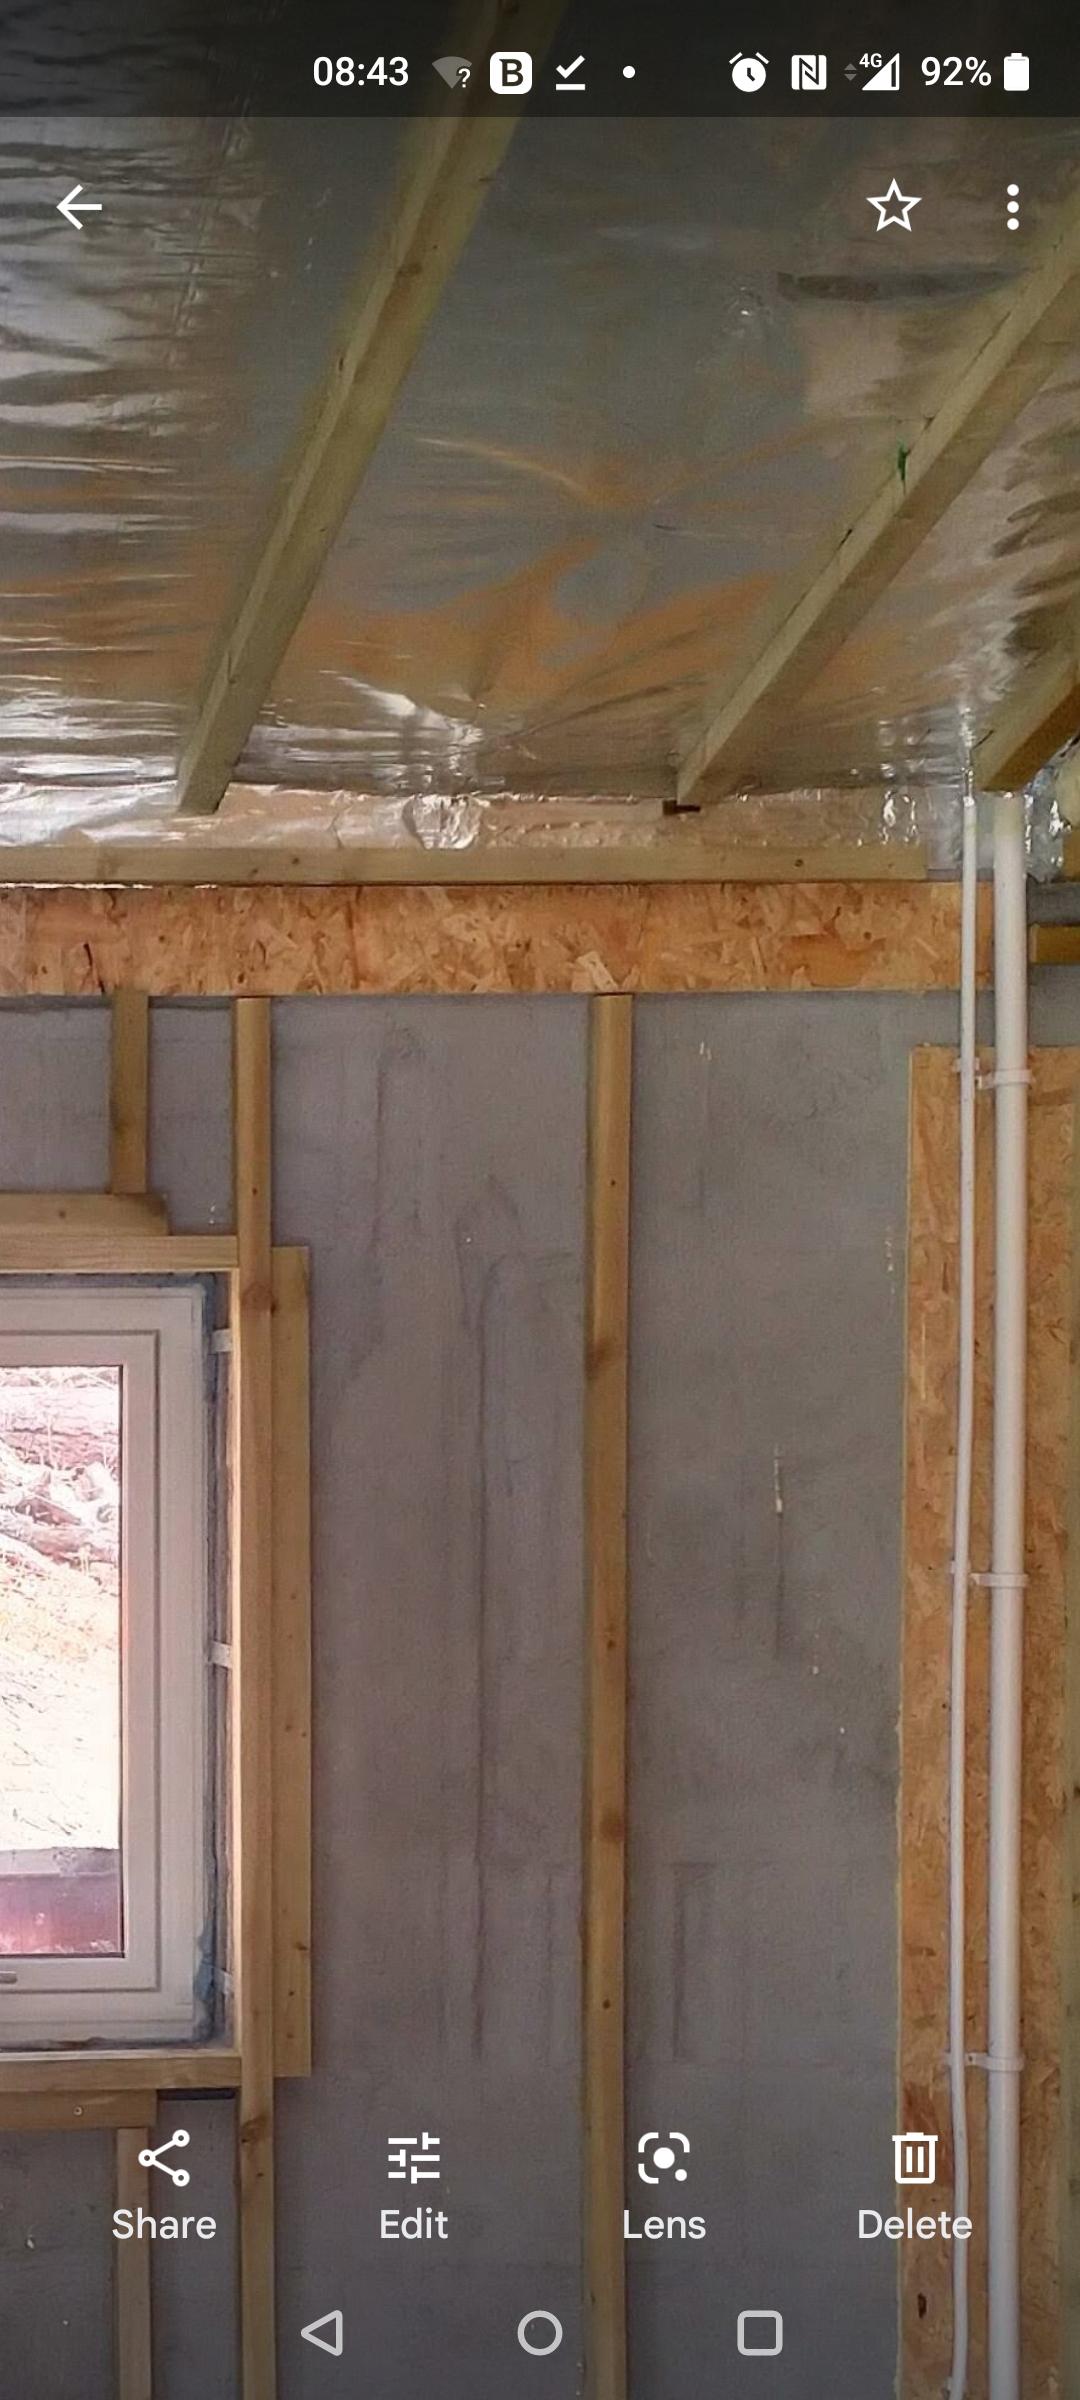
You could counter batten at this point. First foil tape all the joists and PIR joints. Make sure the wires coming through are sealed. Counter batten deep enough to suit low profile downlights then plasterboard. It's what I should have done.1 point
-
You need an ultra sound machine of some sort. The interface and structure of different materials is visualised by piezo electric echolocation. The technology was first applied to check the structural integrity of ships’ hulls, so there must be something out there. There are cheap medical ones on eBay but might not work for this application.1 point
-
More or less the best price. Cheap compared to compriband which is silly money. These things are mostly used on expensive windows so the price kinda pales in comparison to the glass.1 point
-
Lithium can discharge at -10C but usually cannot be charged below 0C. A pipe freezing protection kit which comes on below 2C could possibly be used to fashion some kind of heater, but probably not worth the hassle1 point
-
Exactly my concern and question when I spoke with them.1 point
-
Prices seem to be at a premium currently, unless you know differently. I've looked into similar to retro-fit on my aluminium roof. As well as the value, I didn't get an answer I was happy with regards how to replace them. The roof should have a 60 year life, but the PV 20 - 25, so at some point they will need replacing. When I asked, the manufactures had not run any trials with regards removing the modules and if damage could be avoided.1 point
-
I meant clear ct1 just to make a water tight seal . Plastic beading over the top of that edge to hide it all .1 point
-
What was your spec for the house? What was the EPC rating? and air tightnes of you had a test done? What communication happened between you, the builder and the electrician? Who specified the lights? Most of us on here, if asked first would have told you not to fit recessed spotlights in that roof structure, it is virtually impossible to make them airtight, especially if you want swivel ones. We would either have advised changing the roof structure, or fitting some other form of lighting?1 point
-
You could fill with foam backer rod - cut to fit. Tbh you can use cut down pipe insulation. Then I'd over seal with white BT1 not CT1. White CT1 will go yellow over time. Cut down insulation used as backer rod. Alternatively do you have any uPVC window board etc left over? Cut and stick on again with BT1. https://www.toolstation.com/bt1-ultimate-bathroom-adhesive-sealant/p74523?
 1 point
 -
Installer gets the money and they take it off your bill1 point
-
You are not included in the money loop. Your invoice just includes a credit against the total I believe, or the amount quoted to you is £xxxx, less £5k1 point
-
some of the savings will be related to insulation, but one major energy saving factor of MVHR is how dry the property becomes, which makes heating it a lot less difficult. at this time I had 62m2 of heated floor space.1 point
-
1 point
-
That's how I did my battens, there is also one horizontally along the bottom, the OSB at the top, is running cables and fixing to.
 1 point
 -
Currently I just have a double socket attached to the EPS... in the loft 😬 . Next time I'm making changes, the plan is to replace it with a consumer unit and at least get the lights shifted over. Probably a dedicated socket on each floor too, so we don't have to let all the warm air out through the loft hatch. Taking a bit of a breather at the moment though 😅1 point
-
What about under concrete block & beam? That could be a game changer for me.1 point
-
Big, not huge imo, especially if it were in a 'low temp' dwelling. A 100L buffer gets sucked bone dry ( of heat ) incredibly quickly, as I'm finding on my current project where we've been firing up the het pump in this cold snap. I'm designing one system atm which will utilise either a 200L or 250L buffer + 9kW HP, but this is to cope with 1) a passive setting with very low heat output, which is also married to a detached annex likely to be heated in the future by FCU's that 2) will consume most of what the system has to offer when all is at 'full chat'. It'll be getting 2 lots of foam spray ( 100-110mm ) to keep standing losses at an absolute minimum. A bigger buffer should give a faster response / recovery time here vs being reliant on the HP alone. If the OP has a buffer which is known to be sitting at >40oC, and that is not arriving at / being delivered to the manifolds, then the issue may simply be that it is not being ( getting ) circulated between the two. If the heated water is there, then there it should be getting delivered into the floors. Controls / sensor issues seem to be at play here.1 point
-
Not at all.. I did not read it this way. I can see where you are coming from.. good economic and practical design insulation wise. Please don't take this as being critical.. we are all here to help each other on BH. I laid it on thick in my earlier post to try and highlight the SE side of things. To touch on the technical. The regs in Scotland are different from those in other parts of the UK, tend to be more onerous. You mention various detailing of the construction.. I read this as standard stuff until I came to the bit where you were running the battens horizontally.. now that is clever. Normally as a starting point I would take a TF wall as having 15% repeating bridges, in practice a heavily load bearing kit will have a bit more than that but BC don't often complain. That said from a buildability point of view you still need the dwangs / noggings so they would need to run vertically and your average builder would probaby stuggle to fix these without splitting the timber. For me it all sound great until you look at buildability, Yes it you were doing a 7 storey student accomodation block you could educate the Contractor but on a one off small build... it can limit your options. For all on BH.. if you get too "fixated" on some detail that will save you a few mm of insulation it will work against you.. better to make it easy for the builder.. get more quotes and say.. I'll spend the saving on extra insulation in the walls ratherthan asking for complex details around windows / doors or tight level tolerances. Also for folk building you own house. This is about people management.. yes you don't want to get ripped off but if you do get on ok with your builder you want to keep them to the end.. then they too can see the end of the job and will make an effort to finish it off...their pride will often kick in if you don't get too tight with the money. I used to be a building contractor before I became an SE so speak from experience. Like your ideas about sound performance and just practical stuff like fitting pictures.. that holds weight.. cost the same to screw the plaster board.1 point
-
Sounds like the "level 3 manual whole-house backup" in https://www.deegesolar.co.uk/eps_for_solar/ (I found this link very useful when trying to understand my own options). Another possibility when you have two inverters is to make the PV inverter's output a dedicated input to the battery inverter. Then, you only have the battery inverter's capacity to worry about for G98/G99 purposes. They need to be compatible with each other, though - there's a standard involving frequency shifting that the battery inverter can use to tell the PV inverter to reduce its output,and that's quite important. I didn't keep notes but I do remember concluding that a https://www.victronenergy.com/inverters-chargers/multiplus-ii combined with a Solax X1 Boost G3 would work. Expensive, though. A single inverter with both batteries and panels DC-side is so much better for me.1 point
-
For all.. Recommendation.. pick @saveasteading brains.. you could save a fortune.. but you will get true professional CE advice for free so what about chucking £50 quid to BH as a donation?1 point
-
it’s very hard to pin an exact value as I made other improvements in the same year. at the point of installing the unit and setting it running, my yearly annual quantity of gas for the prior year was 8752kWh, of which around 800-1000 is for water heating, no other gas appliances. Almost exactly a year later my yearly total stood at 6938kWh, however some of that drop will be attributed to insulating 2 rooms floors. Hopefully it’ll give a rough idea. Since then I’ve done more work (as you’ll see in my blog entries) on insulation and air tightness and my yearly gas amount now stands at 4314kWh1 point
-
The gully trap is either blocked or is not connected to the drainage system. This looks like the pipe is connected to gully trap serving a rainwater downpipe. You really should be separating the foul and storm systems. Connect the foul drainage pipe to a new gully trap and connec5 the gully trap to t(e foul drainage system.1 point
-
That was my comment. Given that UFH pipes have a flow temperature greatly in excess of what we tend to think about with insulation in other places, building regs don't discriminate (AFAIK) between losses at ambient and the directly heated screed. Therefore going beyond regulation minimum would seem to be sensible.1 point
-
Yes - high hazard, low risk. Just not, uh, zero risk.1 point
-
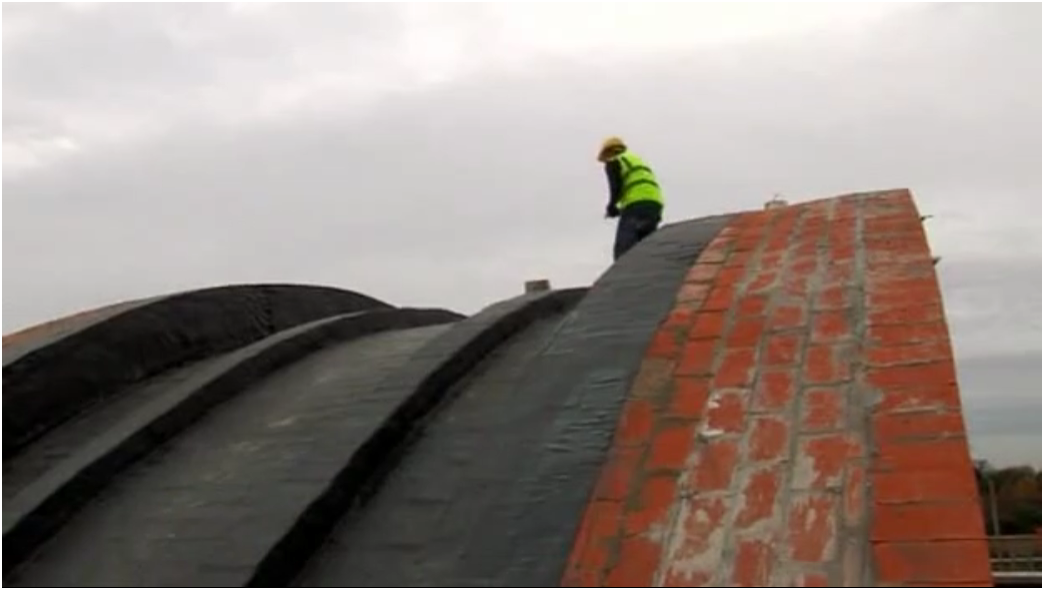
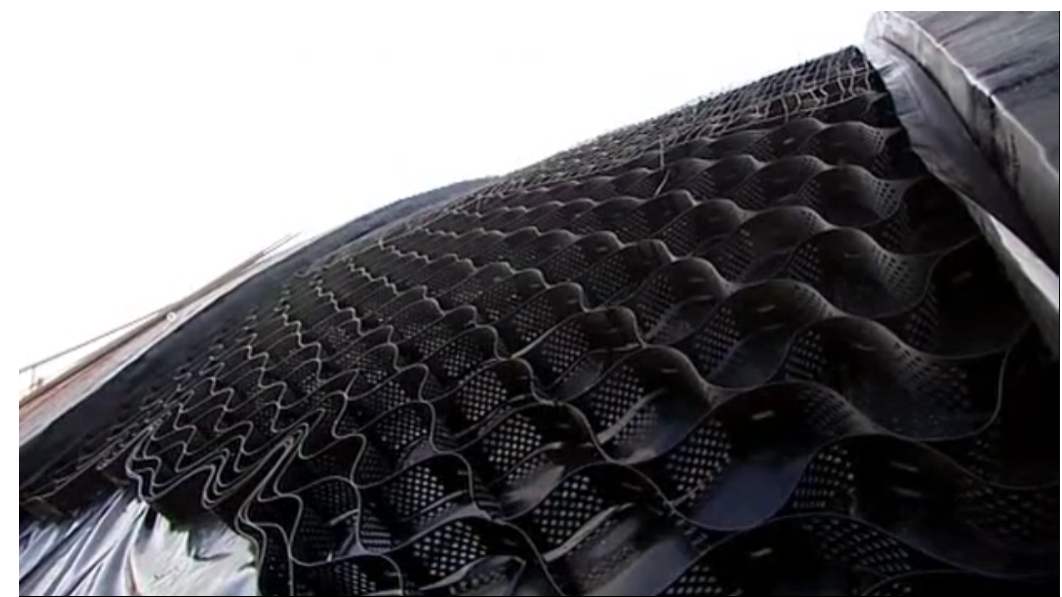
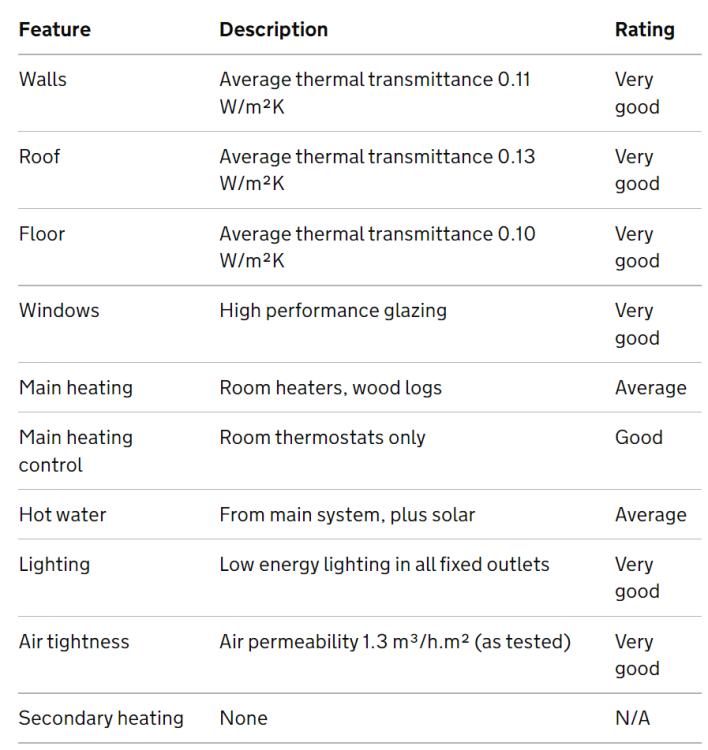
Had a little dig into this, and rewatched the episode. As it happens they also redid their EPC this summer. The episode discusses that the design is passive. And the epsiode includes an air test @ 33 minutes below. His "High Five" accent reveals a Borat fan, I'd say ! Basically, the roof u-value is 0.13 (EPC = 92), and the arch is insulated on the outside under the green roof. It overhangs at the sides and that is where the uninsulated bits are - must be an interesting joining detail there. Timber frame box walls are 300mm of newspaper clippings. One point I did not remember is that the outside 2 layers of tiles (from 3) are laid in cement, whilst the inside layer is in plaster of Paris. Drainage via a layer of terram or similar, filled with 20 tons of gravel: Main source of heating is a biomass boiler. Has solar PV (with a very nice payment per unit) and also solar thermal. I'd say they knew exactly what they were doing. Well done all round. And, yes, there was the obligatory baby. Links: EPC: https://find-energy-certificate.service.gov.uk/energy-certificate/9676-0036-6304-9432-7200 Programme:
 1 point
 -
Yeah I've had only limited success using extension pipes with expanding foam. Have usually just about got things to work, although like @j_ssays it does seem to come out slightly different - perhaps less aerated and so doesn't expand quite so well. Worth a try though.1 point
-
I believe merchants are going to have a think long and hard about any price increases in 2023. Demand from both domestic and commercial builders will be a fraction of the levels of recent years. Any material buyer in '23 will certainly find good value if they look for it.1 point
-
The more ignorant, the more arrogant and certain?1 point
-
I think you may be overreacting. If your heat pump keeps your house warm then it is doing its job and performing. It will use a lot of power in unusually cold weather and make up for this in spring and autumn by using much less power. Whether the economy of operation is good or bad depends on the heat loss from your property. The company that supplied your heat pump presumably made an assessment of this. It would give a context with which to assess your electricity use.1 point
-
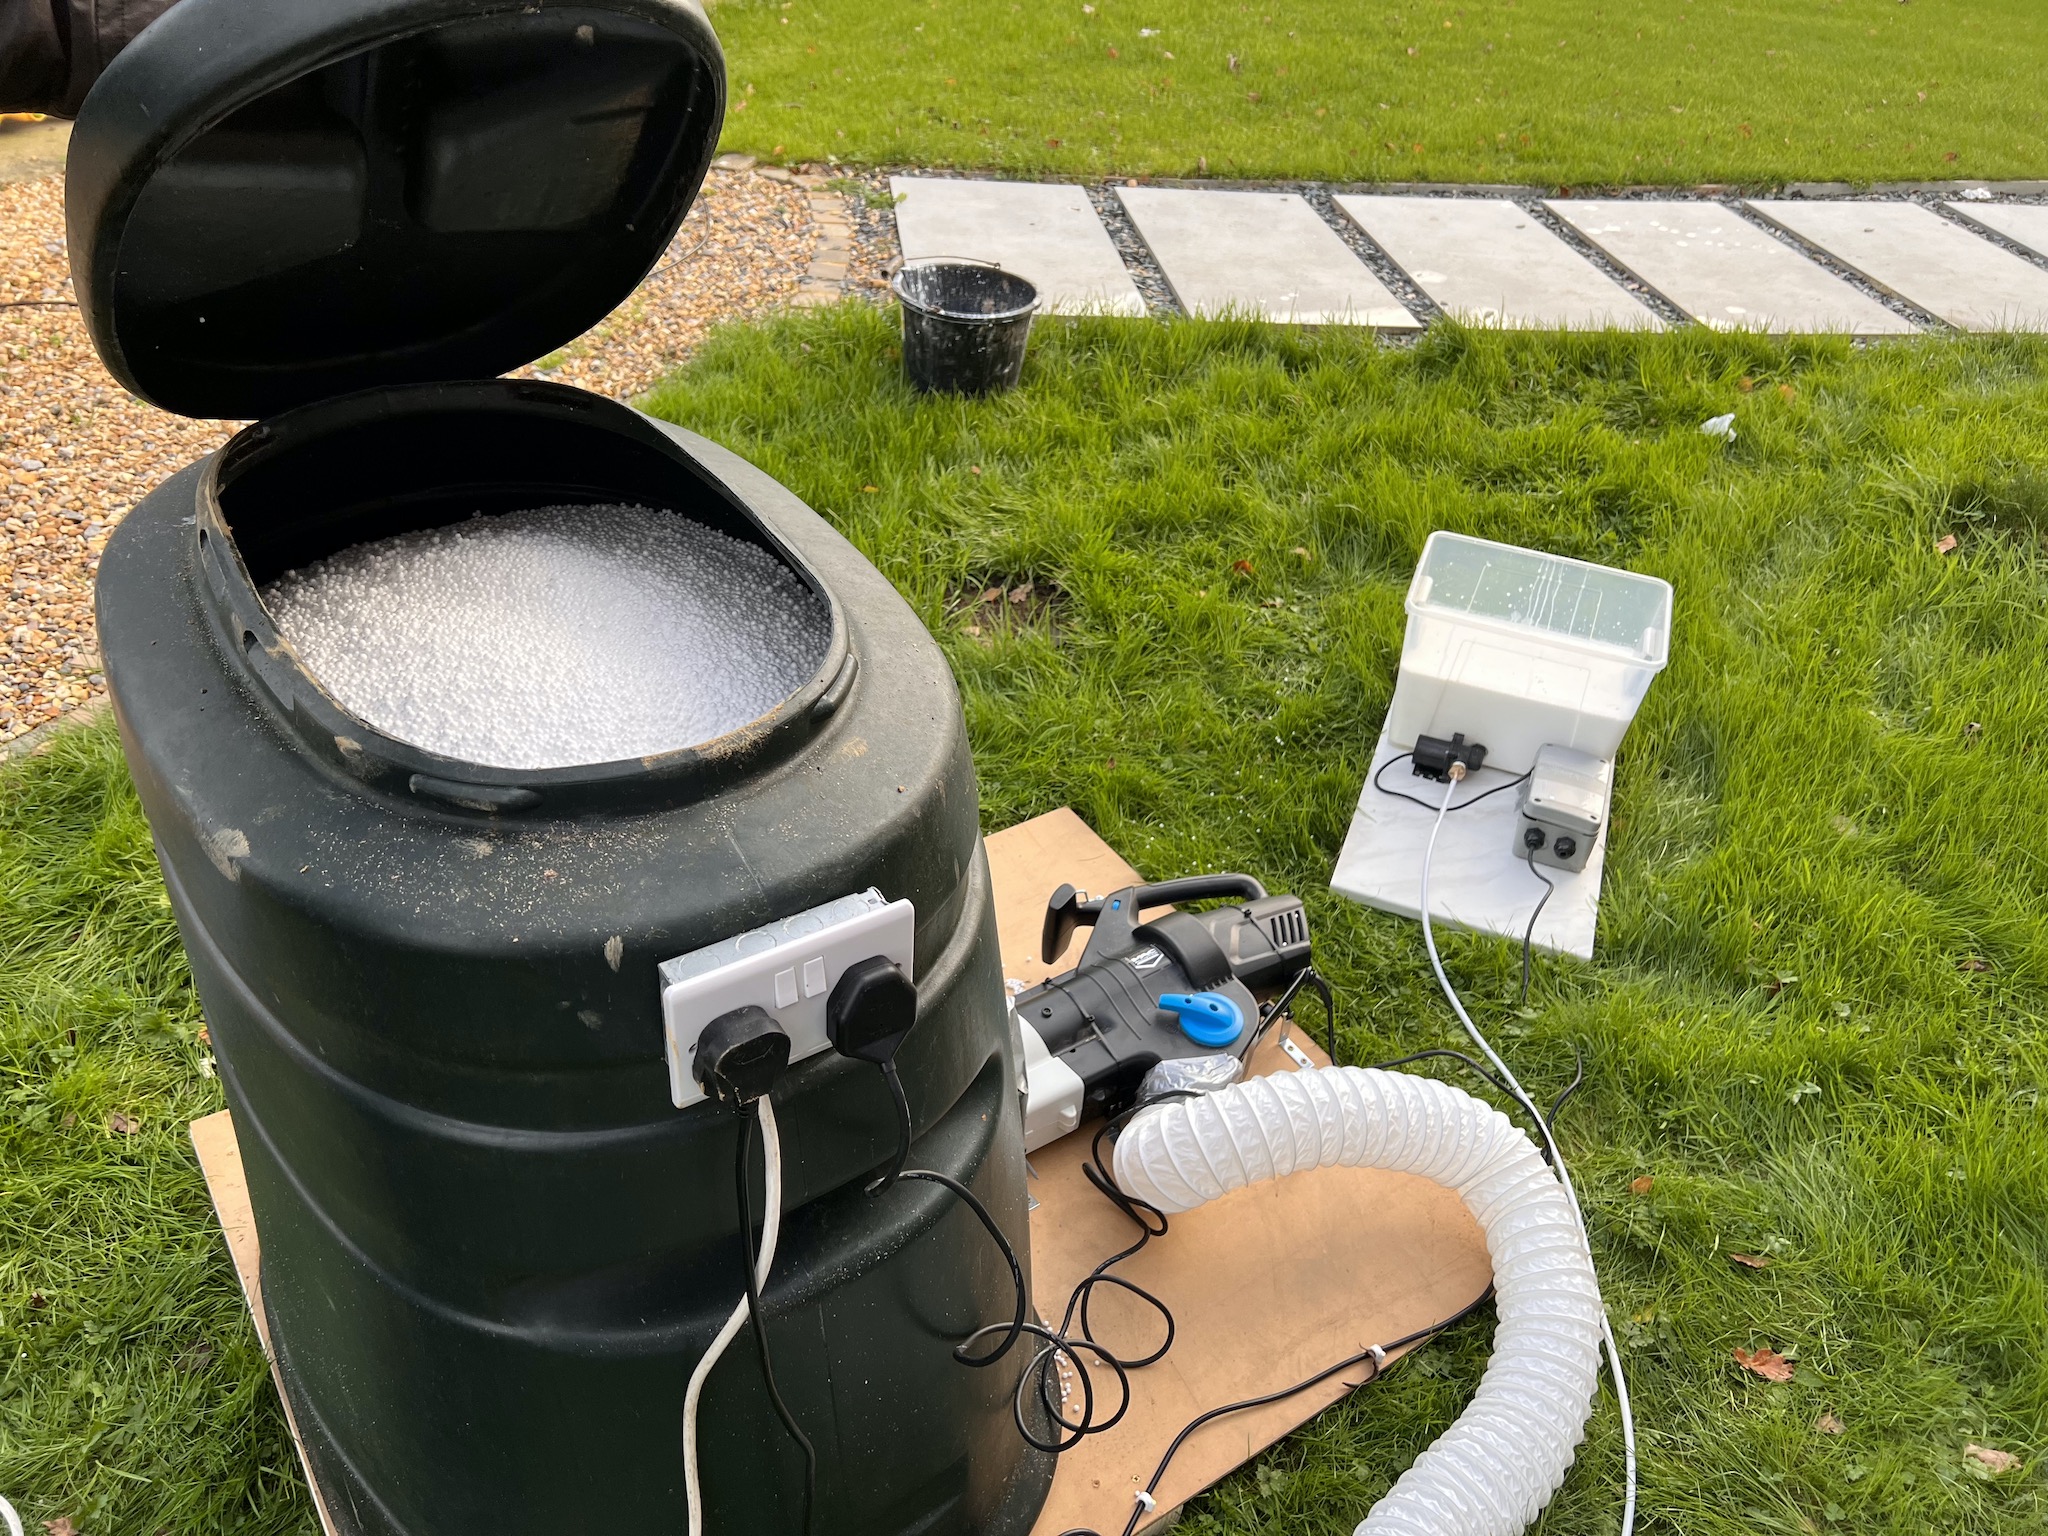
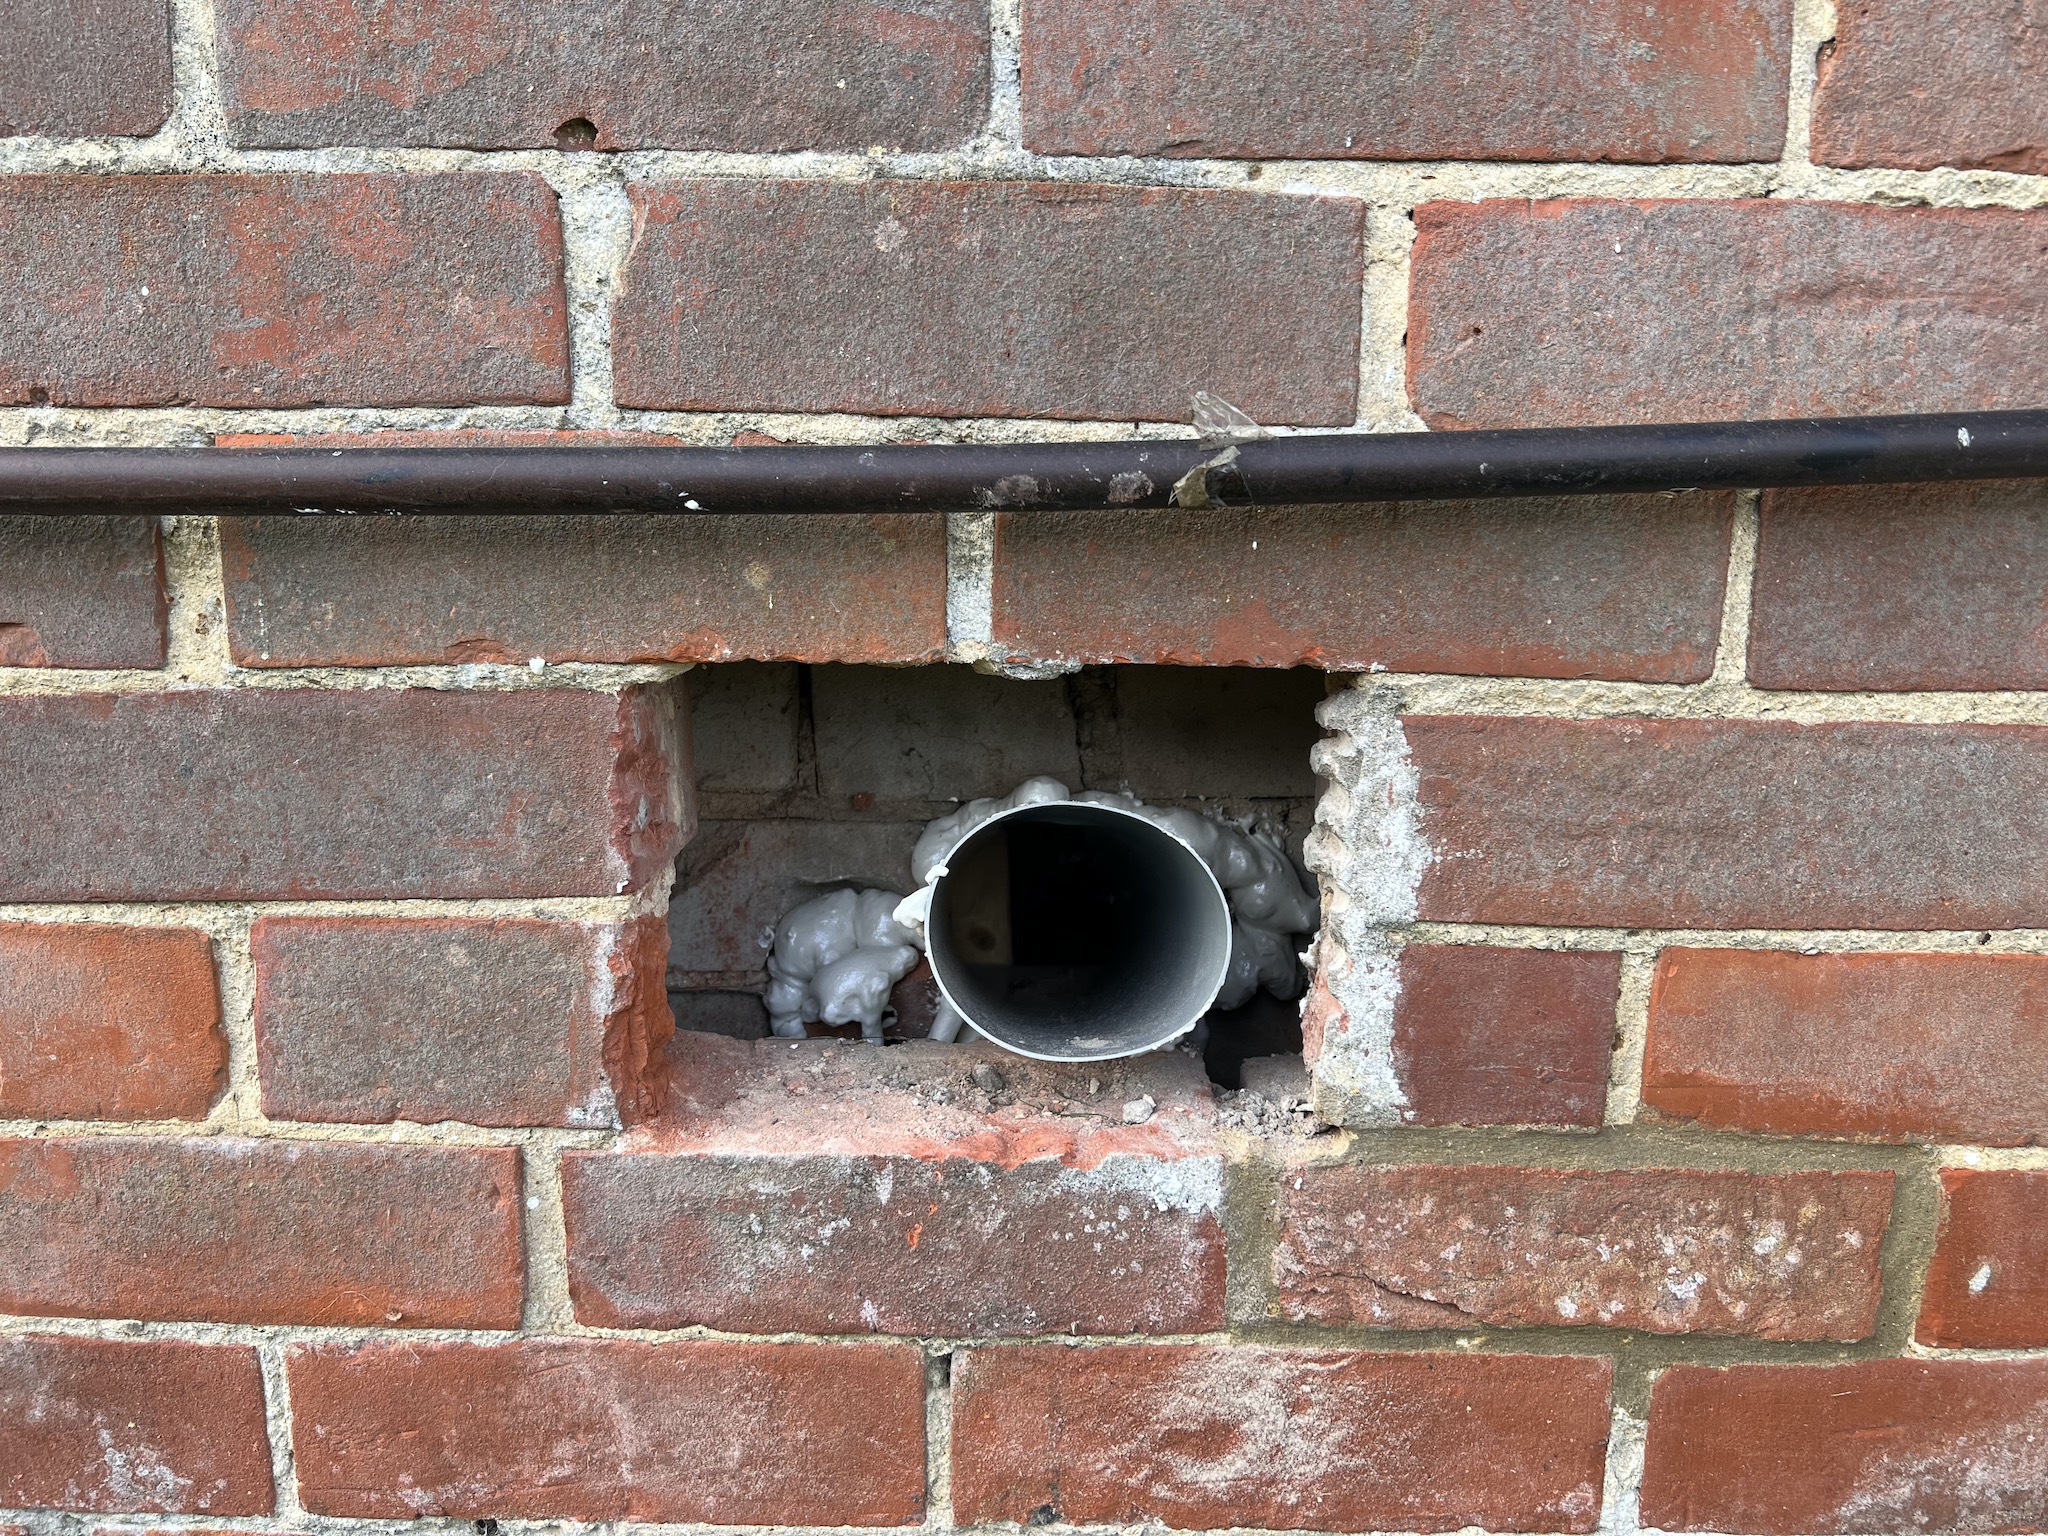
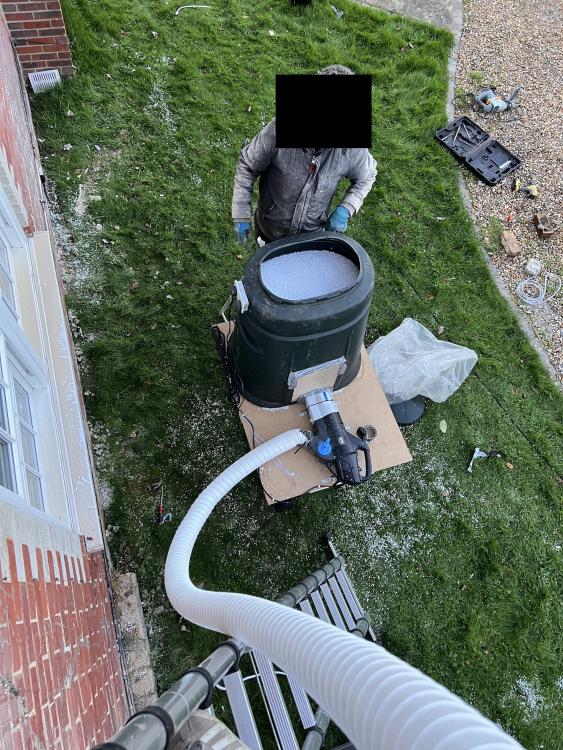
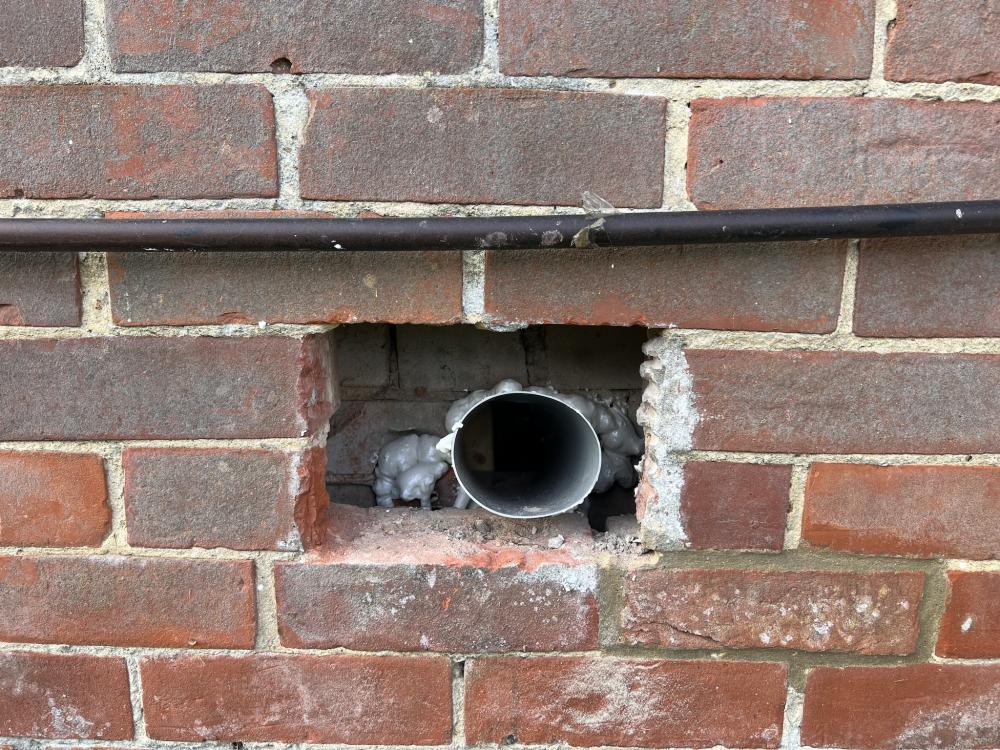
Just wanted to post a little update incase anyone else finds this and is thinking of it. It worked rather well. We've injected just under 10m3 into the cavities of the house, and it's already a lot more comfortable. I think probably what was worse than the lack of wall insulation was that the air bricks were not funnelled into the sub floor - it looks like some time in the past the floor has been replaced (i'm guessing it was circa the 80's) and all they simply knocked a hole through the inner skin into the subfloor, but the air bricks were letting freezing cold air all through the cavity. We installed 100mm pipes and foamed around the the inner skin to seal it up (to stop the EPS beads going under the floor), then mortar and (eventually) some vents over the exterior skinny to tidy it up. I've gone for closable vents on the outside so we can block off cold air to the sub floor during the freezing months. You can actually walk on the floor now and be comfortable - obviously yes there is a concern with rot of the timber, so i'll open them occasionally to air the sub floor out. The machine itself I made up in a couple of hours out of a piece of mdf base, an old compost bin i had laying around, and the £50 3kw leaf blower from Screwfix. I also made a PVA glue hopper out of an old pump and bits i had spare also. We watered down the PVA 3 to 1 and injected this near the nozzle so it coated the balls on the way through. Initially we were removing bricks as our nozzle was 50mm, any smaller and the machine would clog up. However i realised that if we blocked off the leaf blower inlet to 20mm, we could have a 20mm outlet and it worked perfectly, just a bit slower. So we did that, and used a short bit of 22mm copper pipe as our nozzle to inject through. However it meant we could drill 25mm holes with an SDS bit - much nicer than removing bricks. The main hose was a standard 100mm duct. The eps beads flew in with some serious pressure - worked great. We did have a little issue in the cavity wall not being closed in a small loft space above the utility room - bit of PIR and foam took care of that. I did take half a day having to get the beads back in the bags however to go again, however I did have to laugh when i popped my head through the loft hatch to see a giant pile of beads not where they were supposed to be. The jury is still out on the PVA - difficult to know if the mix was right, and if it was being pumped in quick enough to make any real difference. All in all, total cost of £500 for some beads and £100 on materials. £50 of which is the leaf blower which is fully useable again to actually blow leaves... I do plan to suck it back out the walls and re-use it whenever we come to demolish the house in the near future, save the landfill and a few quid!
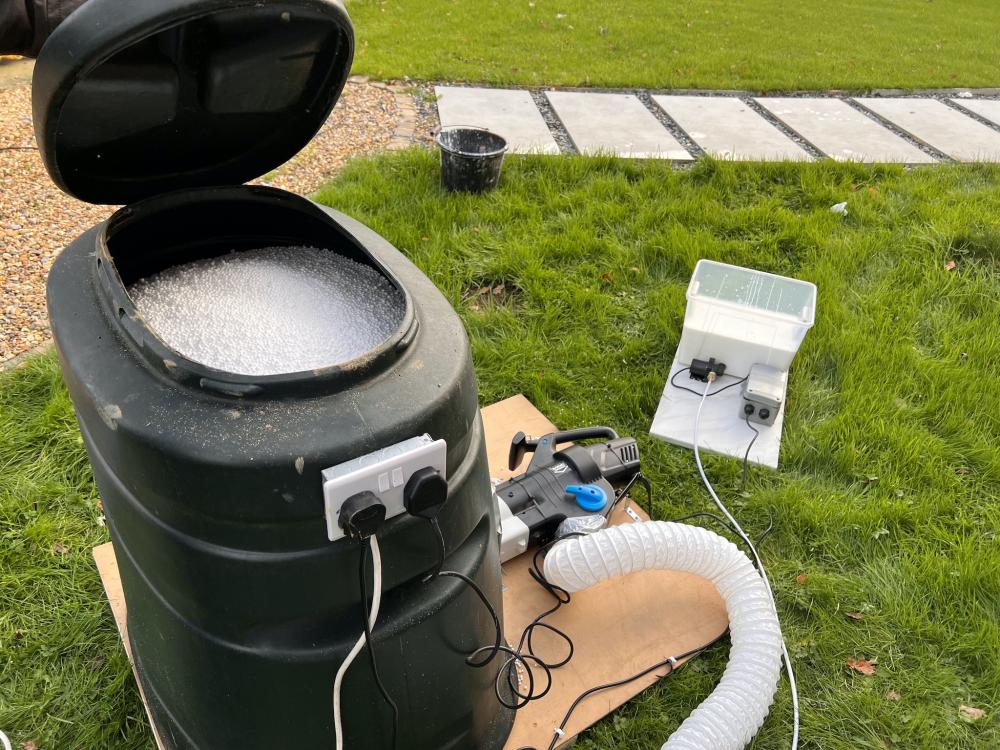
 1 point
 -
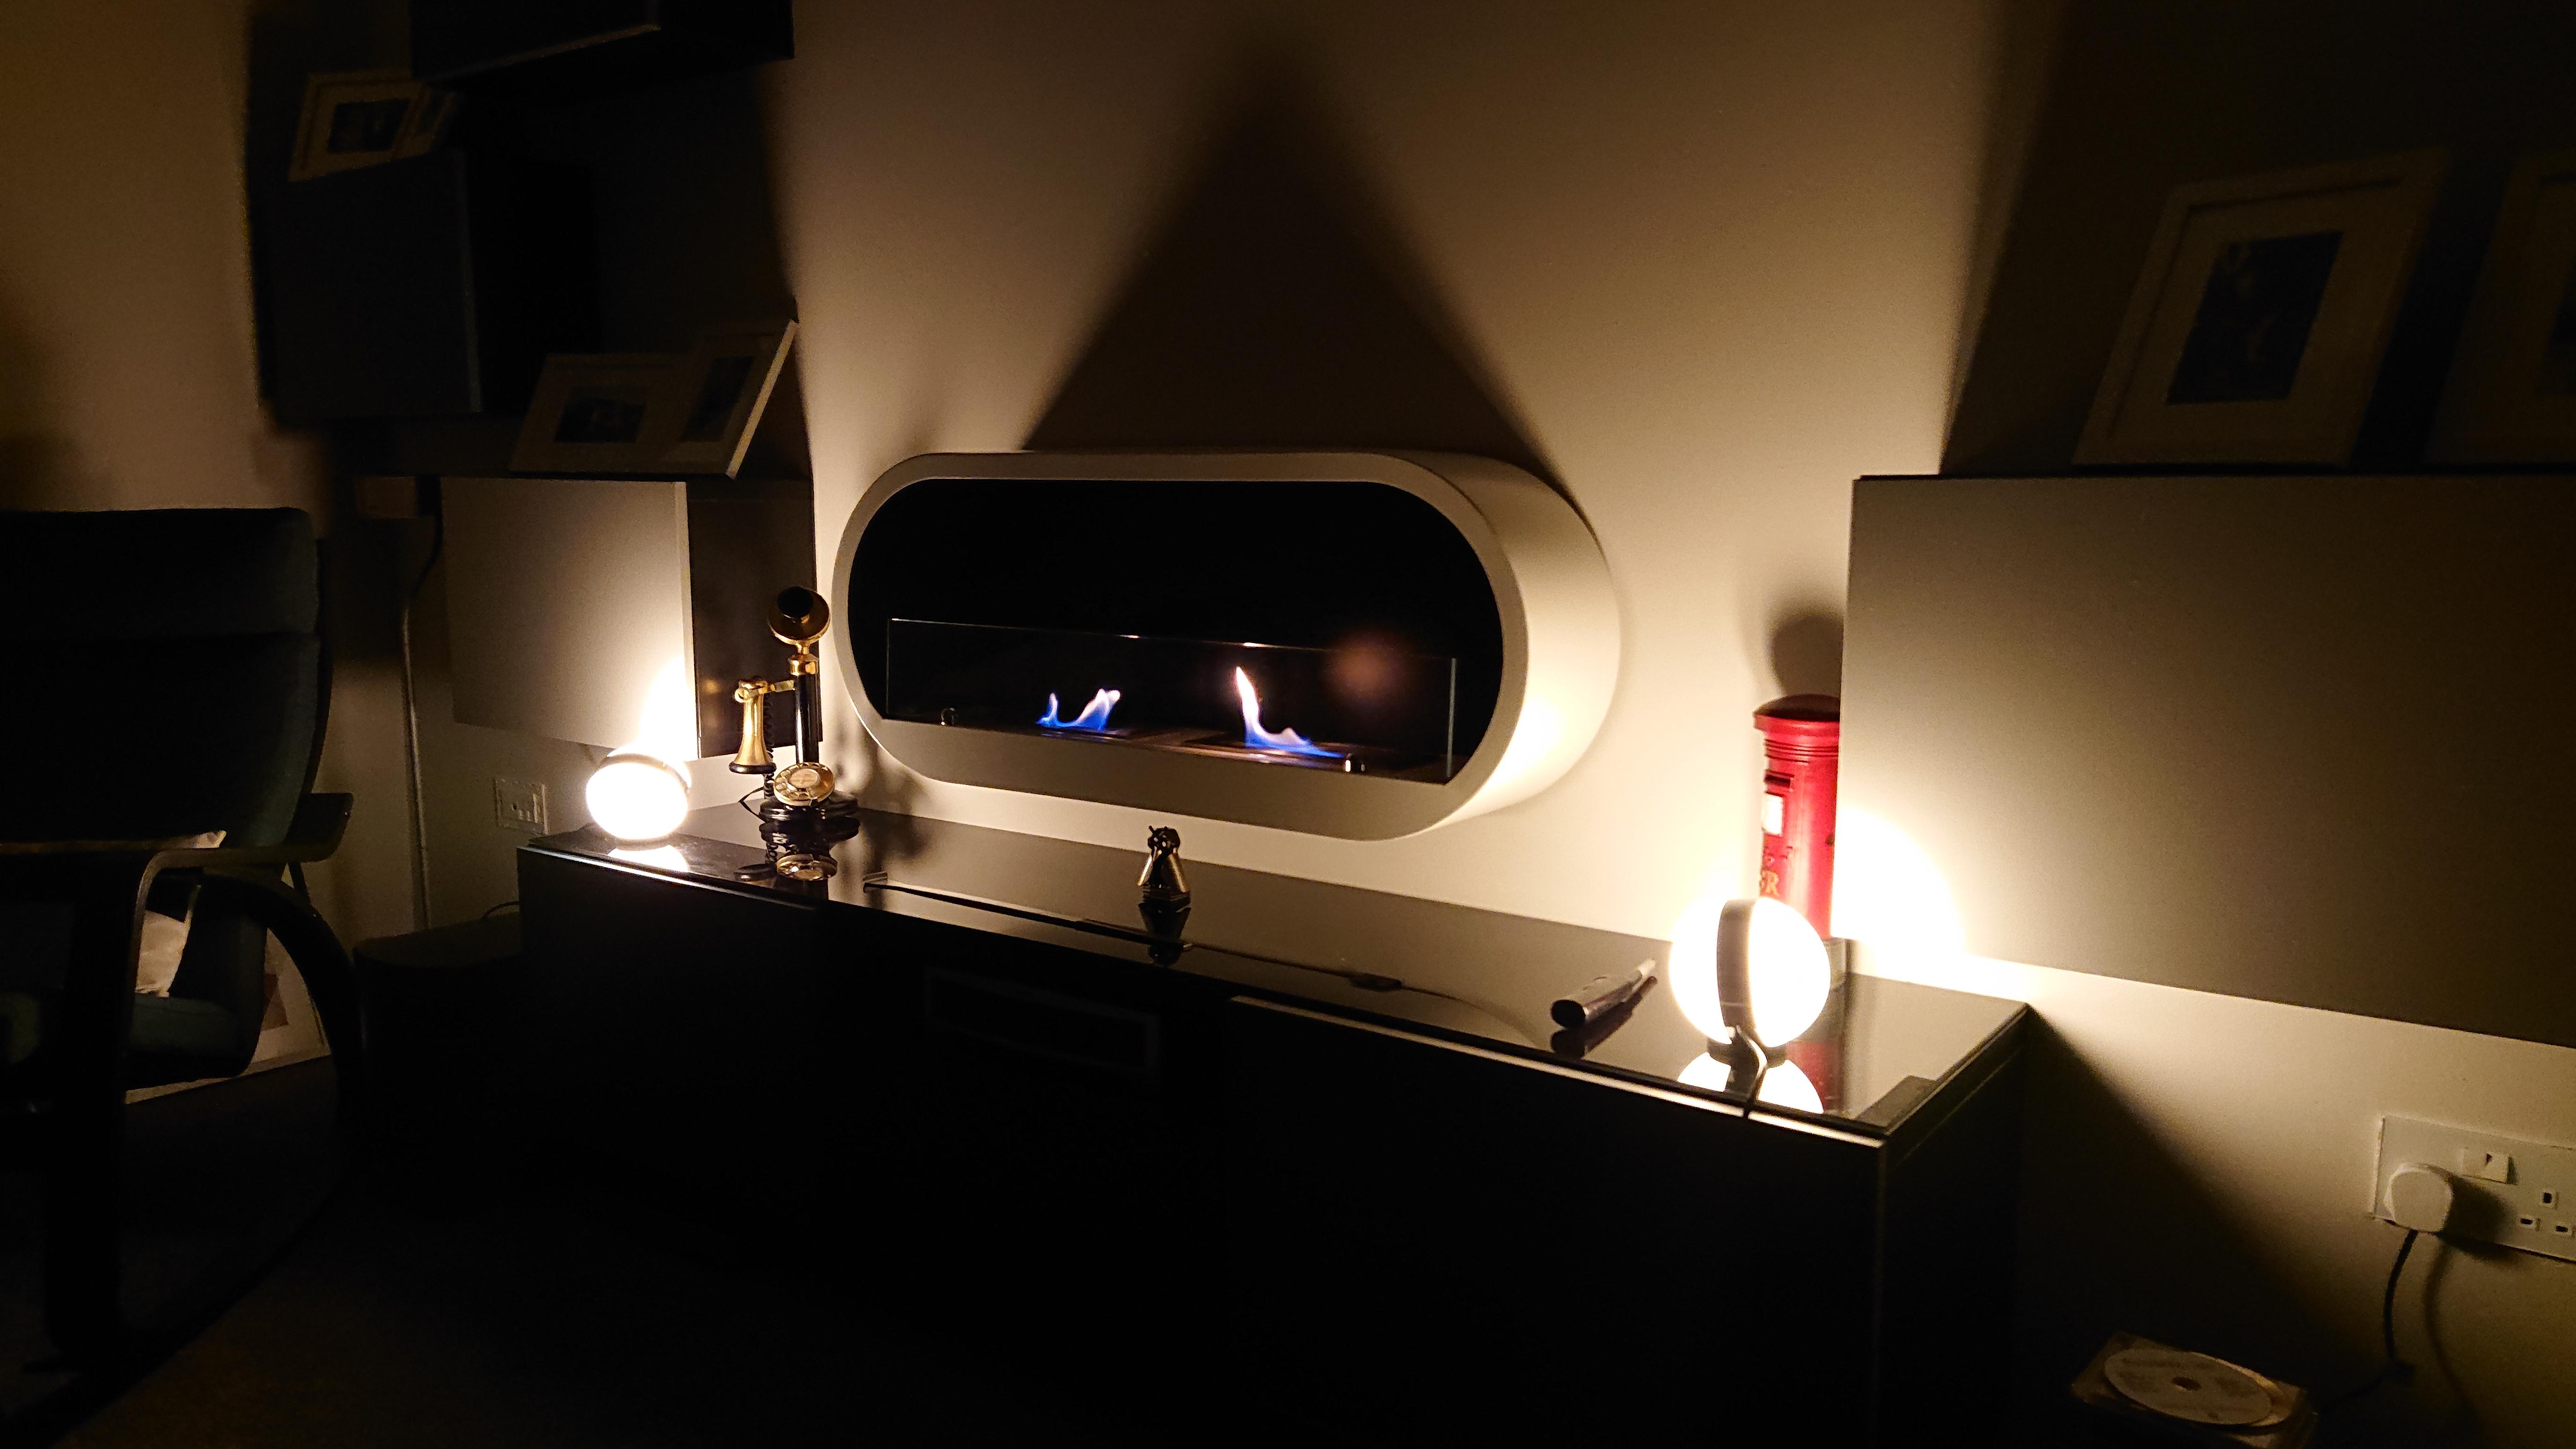
We had wbs in our plans but didn't bother for various reasons. Got this before Christmas and love it. Kicks out a decent heat and each side will last 6 hours. Ours has a double burner, we normally put in half a litre in each side after dinner and it lasts until 10. Lovely to look at and decent heat for the whe front of the house. We don't really need the heat but it is nice having super cosy on a cold night.
 1 point
 -
I never asked them if it was ok, but my blueberry bushes had to make do with tap water in the summer.0 points
-
They work on girls but not plasterboard0 points
-
Yes but the water would help put the fire out when they burst into flames0 points
-
install them in your basement. I've heard it's the done thing. just keep them off the floor in case of flooding events!0 points
-
Various trades I had on site, all confused by airtightness and insulation in general. But the best comment I had was when they saw how much insulation was going under the floor, told me straight I was stupid, and wasting my money, as heat only goes upwards, not down.0 points
-
How can I copyright passivehoose and make a shilling?0 points